Shipping
This chapter covers the following topics:
- Overview of Shipping
- Shipping Transactions Window
- Quick Ship Window
- Shipping Execution Simplified User Interface
- Integration with Oracle Transportation Management
Overview of Shipping
You can manage shipping information such as trips, trip stops, deliveries, delivery lines, containers, and freight costs in the Shipping Transactions window, Quick Ship window, and the Shipping Execution Simplified User Interface. In addition, you can complete these shipping tasks:
Trip and Delivery Planning:
-
Create a trip or delivery.
-
Assign delivery lines to a delivery or a container.
-
Schedule pick-ups and drop-offs.
Pick Release:
-
Release eligible delivery lines based on defined picking criteria.
-
Select the Release Sequence Rule to control the order in which picking lines are allocated to inventory.
-
Enter or validate shipped quantities, backordered quantities, staged quantities, and inventory control information for delivery lines (after pick release).
Ship Confirm:
-
Assign delivery lines to trips and deliveries.
-
Auto-create a trip and close stops.
-
Ship confirm or back order a delivery.
-
Select a backorder reason to automatically move the backordered material.
Shipping Transactions Window
The Shipping Transactions window is a consolidated workbench. It enables you to plan and manage trips, stops, deliveries, delivery lines, and LPNs (containers).
Note: The entity fields in the Shipping Transaction window are keyboard navigable even if they are display-only. You can use the folder functionality to rearrange the fields to optimize the data entry and update.
Shipping Transactions Window
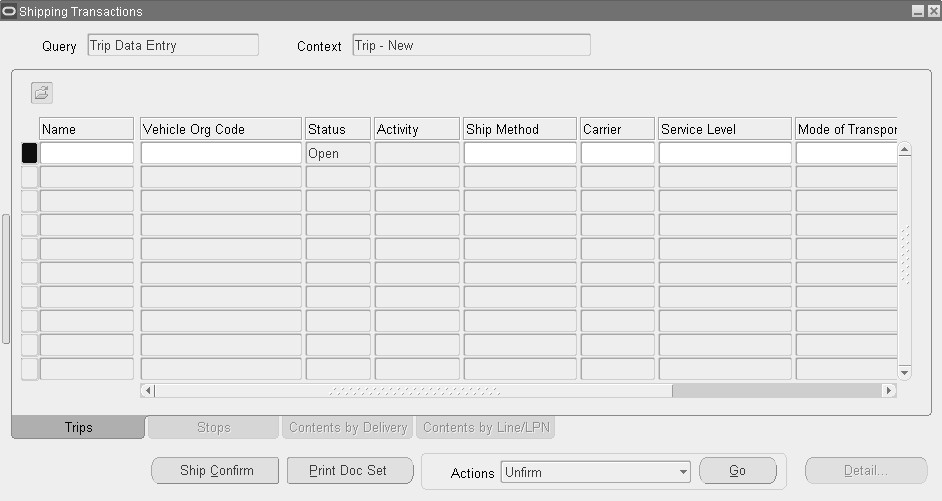
When you navigate to the Shipping Transactions window, the Query Manager window opens on top of the Shipping Transactions window automatically, enabling you to search for trips, deliveries, delivery lines, LPNs, and stops. You can either move the Query Manager window to view the Shipping Transactions window that is behind it or close the Query Manager window to view the Shipping Transactions window.
With the Shipping Transactions window, you manage information about shipping entities, and complete these tasks:
-
Plan trips, stops, deliveries, and delivery lines/containers.
-
Ship confirm a delivery or trip.
-
Track shipments.
-
Track shipping containers.
-
Handle over and under shipments.
-
Initiate intrastate (European) transactions.
-
Pick release trip, stop, delivery, delivery lines, and container.
-
Run reports.
-
Enter details about a shipment such as weights, waybill numbers, tracking numbers, serial numbers, and freight costs.
-
Enter source shipped quantities and view source picked quantities. To do this you must set the profile WSH: Ship Confirm with Source Requested Quantity UOM to Yes. The fields Source Shipped Quantity and Source Picked Quantity are also available in the Quick Ship window and the Details page of the Shipping HTML UI. For the windows, these fields are folder-enabled therefore, select Folder and then Show Fields to display them. For the HTML page, set the personalization property Rendered to True.
-
View delivery and trip workflows.
-
Enter a backorder reason for the staged delivery lines.
-
Enter values for some shipping attributes after ship confirm. You can enter values for the shipping attributes based on some conditions.
-
Print document sets and view them.
The Shipping Transactions window is right-click enabled. You can perform actions by right-clicking on the window and selecting the desired action.
Although buttons are active when no data exists in the Shipping Transactions window, if you attempt to use the buttons then no action is performed and a warning message is displayed. This is also the case when buttons are active when the action of that button is not possible. For example, when a delivery line is assigned to a delivery, the Autocreate Deliveries button is active, and if you click that button a warning message is displayed stating that the delivery line is already assigned to a delivery.
Note: The Shipping Transactions window does not refresh the main tabbed region after an action is performed within a detailed tabbed region.
Updating Some Shipping Attributes After Ship Confirm
If values for these shipping attributes were not entered before ship confirm, you can enter values for them after the ship confirmation process:
-
Tracking Number on the Lines/LPNs tab
-
Waybill and Number of LPNs on the Delivery tab
-
Seal Code, Vehicle Item Name, Vehicle Org, Vehicle Number, and Vehicle Number Prefix on the Path by Trip tab
You can enter values for the above shipping attributes from the Shipping Transactions window, Shipping Execution Simplified UI pages, and public APIs. The public APIs that you can update are WSH_DELIVERY_DETAILS_PUB.UPDATE_SHIPPING_ATTRIBUTES for updating delivery detail information, WSH_DELIVERIES_PUB.CREATE_UPDATE_DELIVERY for updating delivery information, and WSH_TRIPS_PUB.CREATE_UPDATE_TRIP for updating trip information.
A few conditions are:
-
If the Packing Slip Report is executed successfully in Final mode, you cannot enter values for these fields: Waybill, Number of LPNs, Vehicle Number Prefix, Vehicle Number, Vehicle Item Name, and Vehicle Org.
-
If the delivery detail line is interfaced with Oracle Order Management (OM), you cannot enter values for the field Waybill.
-
If actual shipment is sent to Oracle Transportation Management (OTM), you cannot enter values for these fields: Seal Code, Vehicle Item Name, Vehicle Org, Vehicle Number, and Vehicle Number Prefix.
Folders
Using folder options, you can define your own prompt (name) for specific buttons on the window and you can hide or display any field except for the first column in each window. You can select up to three items from the action menu to appear as buttons in each window.
To Enable Folder Options
-
From the Folder menu, select New.
-
Within the Create New Folder window, enter a unique folder Name.
-
Select the options for this folder.
Select Open as Default Folder if you want this folder to be your default folder. Select Public if you want to enable anyone to be able to use this folder. Accept or define your own prompt name for the buttons and Enable or disable the Display of the buttons (you can display a maximum of three buttons at a time).
-
Click OK.
-
Select the Folder pull down menu.
-
Click Save.
Note: The options in the folders change depending on the window from which you are designating them.
Note: You can customize the fields displayed in the Shipping Transactions window by adding or hiding fields to suit your business requirements.
To show additional fields or hide existing fields, place the cursor in any column and either select Folder (from the Tools menu) > Show Field to display additional fields or Folder > Hide Field to hide selected fields, or you can right-click in any field, select Folder, then the folder option, such as Show Field. To change the prompt name of any column heading, right click on the prompt name and enter a new name.
You can save the updated Shipping Transactions window layout and use it as the new default (or you can select the original default).
To save the changes to the Shipping Transactions window layout as updates to the existing folder, select Folder > Save. To save the changes as a new folder, select Folder > Save As.
To open a saved folder, click the Open Folder icon located in the Shipping Transactions window.
Note: The Shipping Transactions window includes the following Oracle Process Manufacturing fields: Grade, Secondary Requested Quantity, Secondary Picked Quantity, Secondary Shipped Quantity, Secondary Backordered Quantity, Secondary Stage Quantity, Secondary Delivered Quantity, Secondary Requested Quantity UOM, Secondary Cancelled Quantity, Secondary Source Requested Quantity, and Secondary Source Requested Quantity UOM.
To view these fields, choose Folder > Show Fields. Select the fields from the list of values. If the Oracle Process Manufacturing (OPM) item is dual UOM controlled or lot controlled, and has a grade, then you will see values in these fields. Otherwise, these fields will be blank. Refer to Using Oracle Order Management with Process Inventory for descriptions of the process fields.
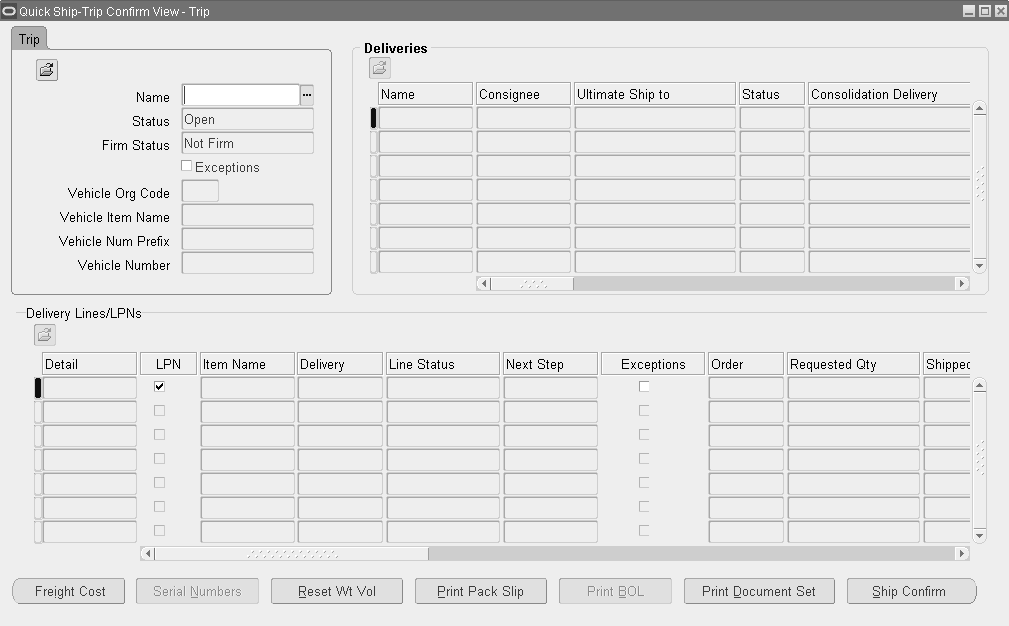
Quick Ship Window
The Quick Ship window enables you to process shipments quickly, using the minimum shipping requirements with the benefit of window layout configurability. You can access deliveries, trips, and delivery lines/LPNs within the Quick Ship window. In the Delivery Lines/LPNs section, for the staged delivery lines, you can back order material and provide a backorder reason.
Note: The entity fields in the Quick Ship window are keyboard navigable even if they are display-only. You can use the folder functionality to rearrange the fields to optimize the data entry and update.
Note: Oracle Warehouse Management provides a feature named Quick Ship. The Quick Ship window in Oracle Shipping Execution is in no way related to the Quick Ship feature of Oracle Warehouse Management.
Quick Ship does not require that you enter the amount of detailed information typical of the Shipping Transactions window, rather the bare minimum requirements are used to process a shipment.
These tasks are performed using the Quick Ship window:
-
Ship confirm deliveries
-
Enter ship quantities
-
Ship confirm trips
-
Print shipping documents
-
Enter delivery freight costs
-
View and resolve shipping exceptions
-
View delivery and trip workflows
-
Access to the Shipping Transactions window
Note: All Roles and Grants that are applicable in the Shipping Transactions window are also applicable in the Quick Ship window.
The Quick Ship window is configurable. Using the Folders feature, you can hide fields, show fields, and add tabs to the window.
Although buttons are active when no data exists on the Quick Ship window, you cannot perform the selected action without the required data, and a warning message is displayed with this information if you attempt to execute an active button without information.
Note: The Quick Ship window is right-click enabled. You can perform actions by right-clicking on the window and selecting the desired action. You can also access folder options by right-clicking. All available actions, as well as all available Folder options, are available by right-clicking within the window.
You have a choice of the default view of the Quick Ship window by defining the shipping parameter WSH: Quick_Ship_Default_View_Mode. The available default views to choose from include:
-
Delivery Confirm view: Delivery Confirm view displays one delivery record in the delivery region
-
Trip Confirm view: Trip Confirm view displays multiple deliveries in the delivery region
The Delivery Confirm view displays three regions with multiple fields. Additional fields can be displayed by right-clicking, choosing Folder, then Show Field.
Within the Quick Ship window, you can display all the same field prompt names that are available in the Shipping Transactions form.
The Trip Confirm view displays the same three regions, however the Deliveries region lists the fields in a horizontal table view.
You can navigate to the Shipping Transactions window from the Quick Ship window by selecting Shipping Transactions Form from the Tools menu. Depending on where your cursor is located within the Quick Ship window determines which window opens in the Shipping Transactions window. For example, if your cursor is in the Delivery Name field when you select Shipping Transactions Form, the Delivery window opens. If your cursor is in the Trip Name, then the Trip window opens when you select Shipping Transactions Form. If your cursor is in the Detail field, then the Detail window opens when you select Shipping Transactions Form.
Changing the Quick Ship Window View:
You can change the current view of the Quick Ship window from the Delivery Confirm view (default) to Trip Confirm view, to suit your business needs. If you typically ship confirm deliveries, then you will want to default the Delivery Confirm View. However, if you typically ship confirm trips, then you might prefer to set the default to the Trip Confirm View.
You can change the default view by defining the profile option WSH: Quick_Ship_Default_View_Mode.
To Change the Quick Ship Window View
-
Navigate to the Quick Ship window.
Quick Ship - Delivery Confirm View - Delivery window

-
From the Tools menu, select Change View.
Quick Ship-Trip Confirm View - Trip window
-
Done.
Related Topics
Using Quick Ship for Deliveries
Shipping Execution Simplified User Interface
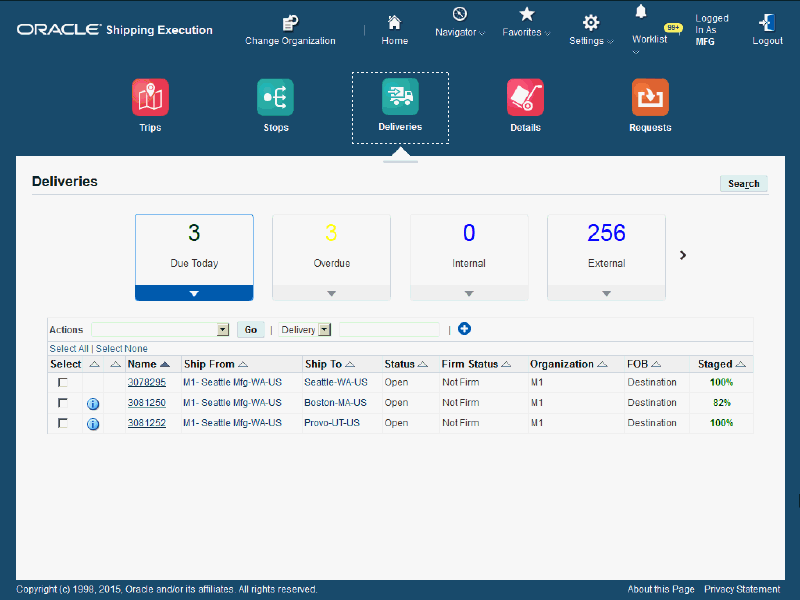
The Shipping Execution Simplified User Interface enables you to plan and manage trips, stops, deliveries, and delivery lines. The simplified user interface is an addition to and coexists with the existing Shipping Transactions window and Quick Ship window. The simplified user interface is modern and tablet-friendly. It is easy to configure and offers functional parity with shipping transactions. It shares a common foundation with the existing Shipping Transactions window and Quick Ship window.
Oracle Shipping Execution Simplified User Interface (Deliveries Selected)
To provide access to the simplified user interface, assign the Shipping Operations responsibility to each shipping user. Access to the Shipping Operations responsibility is controlled by roles. Authorization to roles can be granted through permission sets or through grants.
The Shipping Operations responsibility includes these functions:
-
Trips
-
Stops
-
Deliveries
-
Details
-
Requests
When you click one of these functions, the Shipping Execution Simplified User Interface appears, displaying the associated page with the first infotile (Due Today) selected. For example, if you select Trips, the Trips page appears displaying the trips that are due today (The Due Today infotile is selected). All pages in the Shipping Execution Simplified User Interface have the same look and feel. Filmstrips at the top of each page enable you to navigate to any of the other pages with a single click.
If you have access to multiple, but not to all organizations, then each time you navigate to one of the pages in the Shipping Execution Simplified User Interface, the Context Setting page appears. You must then select the organization you wish to work in before you can proceed. If you have access to only one organization or access to all organizations, then the Context Setting page does not appear, and you are taken directly to the simplified user interface page.
Shared Functionality Used Within the Shipping Execution Simplified User Interface Pages
Several shared functions are used throughout the simplified user interface, giving the user interface a consistent look and feel. The shared functions that can be used in the Shipping Execution Simplified User Interface are:
-
Film Strips
-
Infotiles
-
Filter field
-
Exceptions and Holds
-
Location Details
Film Strips
Film Strips

At the top of the Shipping Execution Simplified User Interface are multiple film strips. The film strips at the top of each simplified user interface page enable you to navigate to another Shipping Execution page with a single click. From the film strips, you can navigate to any of these pages:
-
Trips
-
Stops
-
Deliveries
-
Details
-
Requests
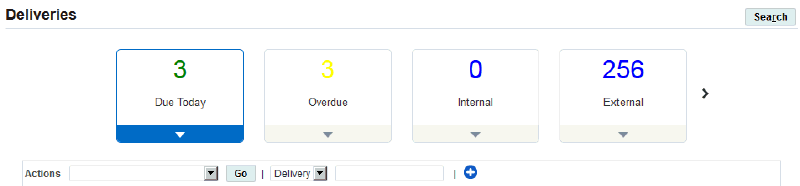
Infotiles
Infotiles

An infotile is a graphical element that summarizes information. A set of infotiles is displayed at the top of each Shipping Execution Simplified User Interface page, except for the Requests page. Each infotile displays the number of detail records associated with its information type. For example, if the Due Today infotile on the Trips page shows the number 3, then you know that there are 3 trips due today. If the Overdue infotile on the Deliveries page shows the number 5, then there are 5 deliveries that are over due. When you navigate to a page, it automatically displays the detail associated with the first infotile. Click another infotile to change the details displayed on the page.
Oracle Shipping Execution provides these predefined infotiles:
-
Due Today
-
Overdue
-
Internal
-
External
-
Staged
You can customize the SQL query for each infotile. For example, to customize the infotiles for the Trips page, use WSH_CUSTOM_PUB.Get_Trip_Tile_Info. You can also use the custom pub to change the logic that determines the color in which each number is displayed.
Oracle Shipping Execution provides this default logic for the infotiles:
| Infotile | Trips (At least Trip, Stop, and Legs exist) | Stops (At least Stop, and Legs exist) | Deliveries (At least Delivery and Non Container Details exist) | Details (Non container exist) | Color |
|---|---|---|---|---|---|
| Due Today | Count all trips for which:
|
Count all stops for which:
|
Count all deliveries for which:
|
Count all details for which:
|
More than ten records: Red Six to nine records: Yellow Five or fewer records: Green |
| Overdue | Count all trips for which:
|
Count all stops for which:
|
Count all deliveries for which:
|
Count all details for which:
|
More than 5 records: Red Three to five records: Yellow Two or fewer records: Green |
| Internal | Count all trips for which:
|
Count all stops for which:
|
Count all deliveries for which:
|
Count all details for which:
|
Records: Blue |
| External | Count all trips for which:
|
Count all stops for which:
|
Count all deliveries for which:
|
Count all details for which:
|
Records: Blue |
| Staged | Count all trips for which:
|
Count all stops for which:
|
Count all deliveries for which:
|
Count all details for which:
|
More than ten records: Red Six to nine records: Yellow Five or fewer records: Green |
Filter Field
Example of Filter Field (Deliveries page)
The Filter field appears at the top of the search results table next to the Actions menu on each page in the Shipping Execution Simplified User Interface except for the Requests page. The Filter field enables you to narrow the search. Select the Filter option related to the shipping entity and then enter the specific search criteria value, next to that field and press the Tab key. The system then filters the original search results and displays only those results that match the filter.
Exceptions and Holds
Example of Exceptions and Holds Columns (Deliveries Search Results Table)

If there is an exception associated with a record in the search results table, an exception icon appears in the first column. Otherwise, the column is empty. There are three types of exceptions icons:
-
Error: A red circle with an X indicates that an error message exists.
-
Warning: A yellow triangle with an exclamation point indicates that a warning message exists.
-
Informational: A blue circle with an exclamation point indicates that an informational message exists.
When you click an Exception icon the Update Exception page appears. Using the Update Exception page you can view the exception messages and take appropriate action if need be.
A check mark appears in the Holds column, if there are holds against the order associated with the shipping entity. Using the Sales Orders window in Oracle Order Management, you can view the sales order line and header holds and remove those holds. The order holds need to be removed from the sales order for this icon to no longer appear.
For more information about removing holds from sales orders, see Oracle Order Management User's Guide.
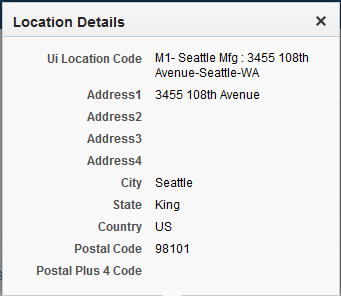
Location Details
Several pages in the Shipping Execution Simplified User Interface display one or more location fields. You can view details for each location in two ways:
-
Clicking the Location field link
-
Clicking the Location Details icon next to a location
Either action opens the Location Details page, displaying the details for the location.
Use either of these procedures to view location details:
To View Location Details Using the Location Field Link:
-
Navigate to a page in the Shipping Execution Simplified User Interface.
-
Search for the shipping entity (Trips, Stops, Deliveries, and Details) for which you want to view the location details.
-
Click the Location field link.
Location Details page
The Location Details page appears.
To View Location Details Using the Location Details Icon:
-
Navigate to a page in the Shipping Execution Simplified User Interface.
-
Search for the shipping entity (Trips, Stops, Deliveries, and Details) for which you want to view the location details.
-
Drill down on the shipping entity.
-
Click the Location Details icon next to the location.
The Location Details page appears.
Integration with Oracle Transportation Management
The integration of Oracle Shipping Execution with Oracle Transportation Management (OTM) includes reference data synchronization, release transactions, planned shipment transactions, and actual shipment transactions. All of these transactions enable Oracle Shipping Execution to send and receive information to and from Oracle Transportation Management. You can integrate Oracle Shipping Execution with Oracle Transportation Management using either delivery based integration or batch based integration.
For OTM-enabled organizations, in the Shipping Transactions window, Deliveries tab, Actions list you can select Include for Planning, Ignore for Planning, or Resend for Planning to perform the respective actions. You can also perform these actions from the Actions list on the Search Deliveries page. Use the Resend for Planning action to resend deliveries to OTM.
If you select Cancel Unshipped Lines check box in the sales order header, the batch based integration changes. The Create Batches for Transportation Planning concurrent program creates subbatches for all the sales order lines. Different subbatches are created for each sales order based on the Ship-From and Ship-To locations.
For multi-leg trips, the integration of Oracle Shipping Execution with Oracle Transportation Management includes the following steps:
-
Create the locations in EBS.
-
Execute the concurrent program Shipping-Transportation Locations Synchronization to synchronize the locations from EBS to OTM. You can then plan shipments in OTM using these locations.
-
Enable multi-leg support for delivery-based integration by setting the profile option WSH: Enable Multi-Leg Shipment for Delivery-Based OTM Integration to Yes.
-
Execute the concurrent program Planned Shipment Interface to create multi-leg trips in EBS, assign delivery to the multi-leg trips, assign freight cost at the trip level, and process trip updates that are received in EBS.
-
Ship confirm deliveries that are assigned to multi-leg trips.
-
Execute the concurrent program Shipping Outbound Interface to send the actual shipment information to OTM.
For information about the integration between Oracle Shipping Execution and Oracle Transportation Management, see Oracle Transportation Management - Integrating Oracle Transportation Management with Oracle E-Business Suite Guide.