Integration with Oracle Time and Labor
This chapter provides information about how Oracle Work in Process integrates with Oracle Time and Labor to enable employees to enter their work hours information.
This chapter covers the following topics:
- Integration with Oracle Time and Labor Overview
- Setting Up OTL-WIP Integration
- Using Time and Expenses
- Entering Timecard Information
- Extracting OTL Information to Work in Process
- Executing the Cost Manager Process
Integration with Oracle Time and Labor Overview
Employees working in a particular organization can use Oracle Time and Labor (OTL) to enter information for their work hours. OTL is the repository for this timecard information. The integration with OTL enables the Oracle Work in Process (WIP) employees assigned to work orders, to use the OTL application to enter their start and stop times or enter the duration they have worked in hours. The information that is collected is then stored in OTL Time Store. WIP then extracts this information from the OTL Time Store and charges the WIP work orders according to the time employees have spent working on these work orders.
Before you can use this functionality, complete the required setups. See: Setting Up WIP-OTL Integration.
Note: The WIP and OTL integration feature can be used only if both the Work in Process and Human Resources code level are at Release 12.2.11.
The following steps are included in the OTL and WIP integration process flow:

-
Create a work order in Oracle Work in Process.
-
Assign the employee resource instance to the work order in Oracle Work in Process.
-
Create and enter timecard information for that specific work order within OTL Time Store.
-
Review the timecard.
-
Submit the timecard.
-
Approve the timecard.
-
Extract timecard information with the Approved status from OTL Time Store to Oracle Work in Process. This extraction dynamically creates a resource transaction within Oracle Work in Process.
-
Execute the Cost Manager process. This process charges the resource transaction. You can then verify that the resource transaction is recorded and view the actual costs for the period that you charged, within the work order.
See:
Setting Up OTL-WIP Integration
To set up the WIP and OTL integration, you must:
-
Define Persons as Users: Assign an employee defined as a person in Oracle Human Resources to a user in Oracle Work in Process.
-
Define Preferences and Eligibility: Define preference hierarchies and preference values, and link them with eligibility criteria in Oracle Time and Labor.
See: Setting up Oracle Time and Labor Integration
Using Time and Expenses
There are multiple steps within the integration flow. First, the timecard information is entered for a specific work order, within Oracle Time Store (a part of Oracle Time and Labor). That information is then extracted from Oracle Time Store to Oracle Work in Process. This extraction dynamically creates a resource transaction within Oracle Work in Process. Finally, the Cost Manager process is executed. This process charges the resource transaction. After this process runs, you can view the actual costs for the period that you charged, within the work order.
This section includes the following topics:
Entering Timecard Information
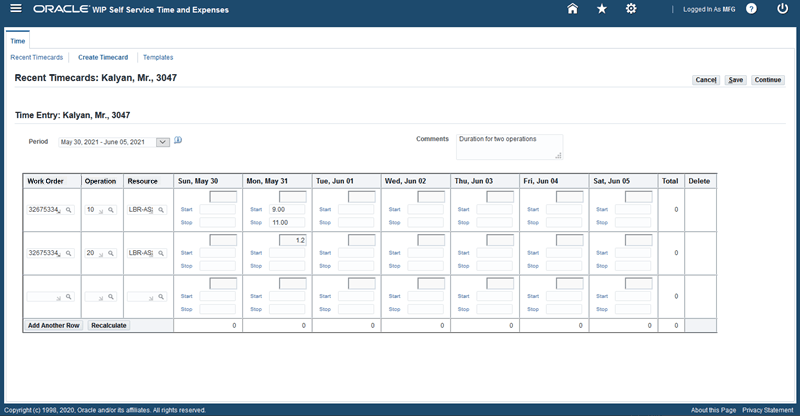
Use the Create Timecard tab in the Time page to enter timecard information for a work order, operation, and resource. When you enter the start and stop times or the duration in hours, the information is stored in OTL's Oracle Time Store. Oracle Work in Process (WIP) extracts this information and applies it to the appropriate work order and calculates the charges according to the time information that is entered.
To enter timecard information
-
Navigate to the Create Timecard tab.
From the WIP Self Service Time and Expenses responsibility, click Create Timecard.

-
Select a Period. The current period defaults.
Note: You cannot submit time for a future period.
-
In the Work Order field, select a discrete job from the list of values. Currently the WIP-OTL integration only supports discrete jobs. Work orders with a status of Released or Complete and that have operations assigned to a department which you are assigned to, are also available. If you are not assigned to a work order's operation but are a resource associated to the department on the work order's operation, you can see the work order in the list of values. After you charge time and submit the timecard and the retrieval process is executed, you are assigned to that work order's operation.
-
In the Operation field, select an operation from the list of values. Operations associated with the selected work order are available.
-
In the Resource field, select a resource from the list of values. You can choose from resources that are associated to the job's operation. You can also select ad hoc resources from the list of values.
-
In the available fields in the date columns, directly enter the work duration hours or enter both the Start and Stop times against a work order, operation, and resource.
-
In the Comment field, enter notes for the timecard.
-
Click Add Another Row to select and add multiple work orders, operations, and resources and split the duration and time spent on a work.
-
Optionally, click Recalculate to view the total hours calculated for both the period and the specific days.
-
Optionally, click Cancel to remove the information you have entered.
-
Optionally, click Save to review and submit the timecard later.
Save enables you to save a timecard for later, and the timecard is given a Working status. Oracle Work in Process cannot extract the information for timecards with Working or Submitted status from Oracle Time and Labor.
-
Click Continue, when you are ready to review and submit the timecard.
The application checks and validates your entries like the status of your job, type of job, release dates, and start and stop times.
-
Click Submit to submit the timecard. The current timecard has a Submitted status.
-
Use the Recent Timecard tab to view submitted timecards. In this tab, you can select a timecard and click the:
-
Update icon to make changes for the selected timecard.
-
Delete icon to delete the selected timecard.
-
Details icon to view information for the selected timecard.
-
-
Use the Template tab to save timecard data and reuse it in the future. You can download the template data as a CSV file that you can use in a spreadsheet.
Related Topics
Extracting OTL Information to Work in Process
You can extract all timecards in the Approved status from Oracle Time and Labor (OTL) to Oracle Work in Process (WIP). A concurrent process runs in the background and performs time charge extractions. After extraction, a resource transaction dynamically generates within WIP. Most organizations schedule this process to run automatically.
To extract information from OTL to WIP
-
Navigate to the Submit Request window.
-
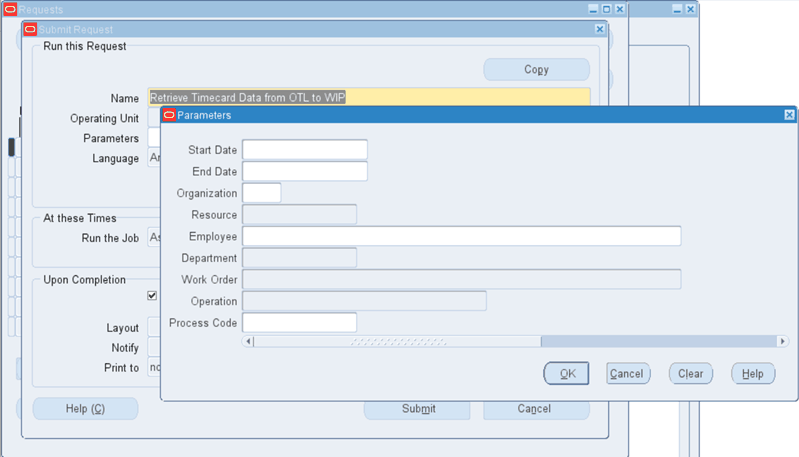
In the Name field, select Retrieve Timecard Data from OTL to WIP.

-
In the Parameters window, enter information in the following fields if you would like to filter the timecard data to be extracted from OTL to WIP:
-
Start Date: Enter the start date specify the start date of the date range.
-
End Date: Enter the end date to specify the end date of the date range.
-
Organization: Select an organization.
-
Resource: Select a resource.
-
Employee: Select an employee.
-
Department: Select a department.
-
Work Order: Select a work order
-
Operation: Select an operation.
-
Process Code: Enter information to tag the timecard data you are about to extract. This helps you to identify the data if you need to retrieve it later.
-
-
Click OK.
-
Click Submit. The request ID displays.
-
Click No to close the Decision window.
-
Click Find in the Find Requests window and query for the request ID.
-
Use the Requests page to ensure that the request is completed successfully.
-
Click View Log to review the extracted timecard data.
-
Navigate to the Pending Resource Transactions window and use the Transaction tab to view the timecard information you have extracted.
Related Topics
Executing the Cost Manager Process
You must run the Cost Manager process to charge the resource transactions. Note that most organizations schedule this process to run automatically. After this process runs, you can see the actual costs for the period that you charged, within the work order.
To execute the Cost Manager process
-
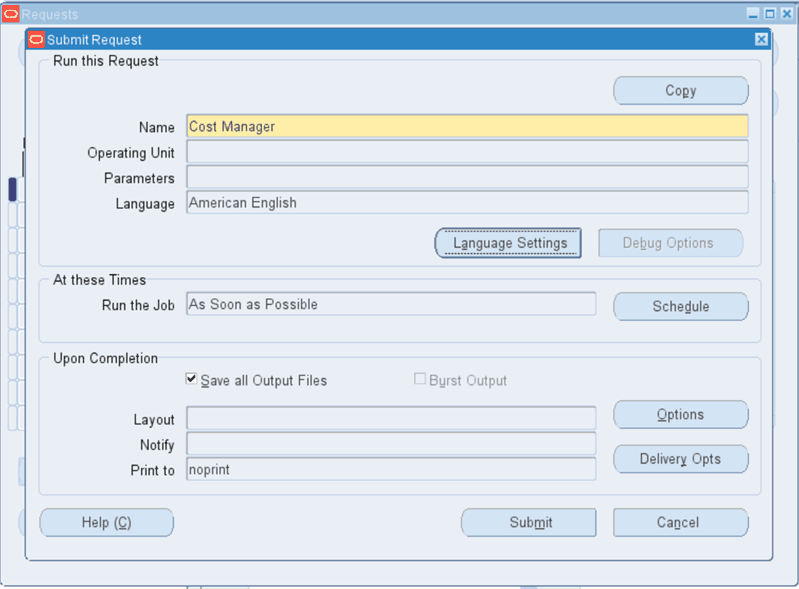
Navigate to the Submit Request window.
-
In the Name field, select Cost Manager.

-
Click Submit.
The Cost Manager program processes the pending WIP resource transactions and once the request runs and completes successfully, the resource transactions are charged. These resource transaction costs are then available in the costing tables for costing purposes.
Related Topics