MES Supervisor Workbench
This chapter describes the features of the MES Supervisor Workbench, including the ability to monitor shop floor progress on the Dashboard and to avoid potential problems through actions taken on the Supervisor Workstation.
This chapter covers the following topics:
- Overview of the MES Supervisor Workbench
- Using Tiles to Access Information
- Using the Supervisor Dashboard
- Monitoring Shop Floor Progress
- Viewing and Updating Work Order Status Details
- Rescheduling Work Orders
- Launching the MES Supervisor Job Workbench for Work Orders
- Viewing and Printing Job Traveler for Multiple Jobs
- Viewing and Resolving Exceptions
- Viewing and Managing Operations
- Viewing Operation Details
- Reserving Components for Operations
- Viewing and Managing Component Availability
- Assigning Alternate Resources
- Rescheduling Operations
- Changing Shopfloor Statuses
- Expedite and Undo Expedite
- Using Contingent Workers
- Reviewing and Editing Time Entries
- Viewing Time Entries
- Using the MES Supervisor Job Workbench
Overview of the MES Supervisor Workbench
The MES Supervisor Workbench is the starting point for supervisors to view shop floor progress and potential problems. This includes shop floor status, performance, and exceptions to shop floor workflow. The details displayed in the Supervisor Workbench are determined by the specifics of the login information. You can view the entire organization; or specify a particular department, resource, employee, or machine. This workbench has the following regions:
-
Tiles
The Tiles region provides access to information and enables you to create transactions in the following areas: Work Orders, Exceptions, Operations, and Component Availability. See: Using Tiles to Access Information
-
Dashboard
The MES Supervisor responsibility opens in the Dashboard view. This view displays performance graphs with links to detailed information in the Metrics tabbed region and a Shopfloor Progress tabbed region. See: Using the Supervisor Dashboard
-
Shopfloor Progress
The Shopfloor Progress region displays tabbed regions displaying information for Capacity Shortages, Current State, and Operator Availability. See: Monitoring Shop Floor Progress
Note: If Oracle Endeca is installed and licensed in your environment, then refer to the Oracle E-Business Suite Information Discovery Integration and System Administration Guide for detailed information about the Endeca enhancements to your product.
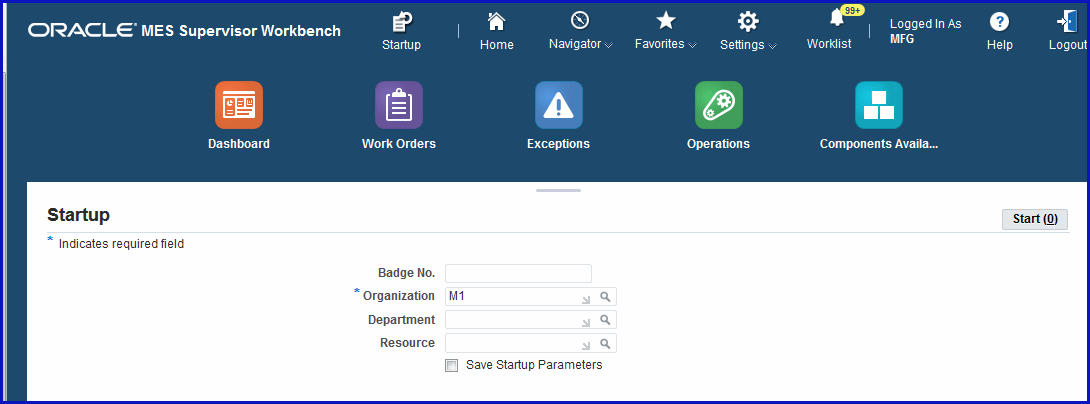
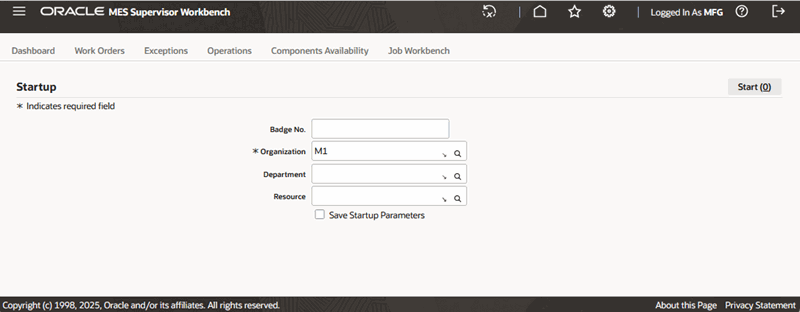
MES Supervisor Workbench Startup
The Startup page is used to enter specific parameters for organization, department, and resource. You can set different login and workbench initialization modes. For example, you can:
-
Save startup parameters from a prior login to reduce navigation for repeated parameter combinations.
-
Set different job search pages.
-
Configure organization, department, and resource access.
See: Workstation Startup and Initialization Modes
To access the MES Supervisor Workbench
-
Navigate to Startup page and select the specifics for a particular Badge Number, Organization, Department, Resource, and Employee or Machine.
The Organization field is required; select values in the other fields depending on how much detailed information you want to view.
-
Enable the Save Startup Parameters check box to save these parameters for future logins.
-
Select Start to display the Dashboard page.
-
Select a task from the Actions box to access available global actions. Choose Go to navigate to the appropriate page.
Available global actions are specified in the Global Actions parameter. These views and tasks include other workbenches and reports. See: Global Actions
-
The MES Supervisor responsibility opens in the Dashboard view, see: Using the Supervisor Dashboard
Select other tiles to access the following information:
-
Work Orders
-
Exceptions
-
Operations
-
Component Availability
-
List Search Capability
List Search is a tool that helps you quickly and easily retrieve information and create custom search criteria for future retrievals. The Work Orders and Exceptions pages in the MES Supervisor Workbench provide a List Search panel. List Search is enabled only when both the following profile option and query bean property are enabled:
-
Profile option FND: Enable List Search (FND_ENABLE_LIST_SEARCH) is set to True.
This profile can be enabled at all levels: Site, Application, Responsibility, and User. Users cannot see or update this profile option.
-
Enable List Search for a specific query bean property. List Search has two optional capabilities controlled by the profile option FND: Enable Quick Search for Query Beans (FND_ENABLE_QUICK_SEARCH_QUERYBEANS).
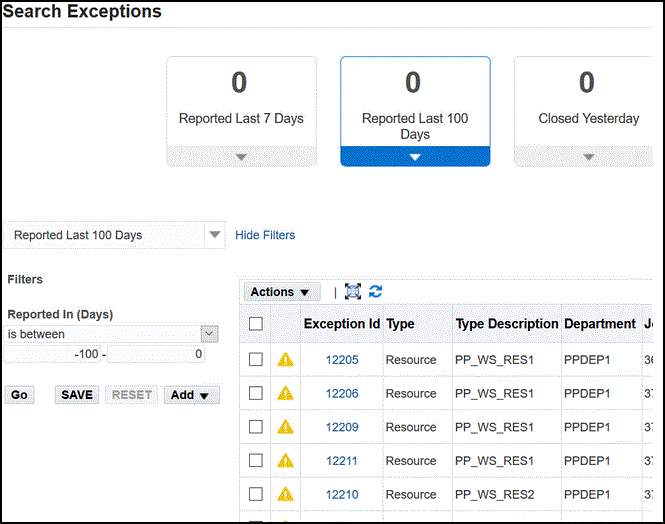
The List Search panel enables you to perform a Quick Search on one value, such as Starting Today, or create a new custom search as shown in the search panel for the specific tile you are viewing.
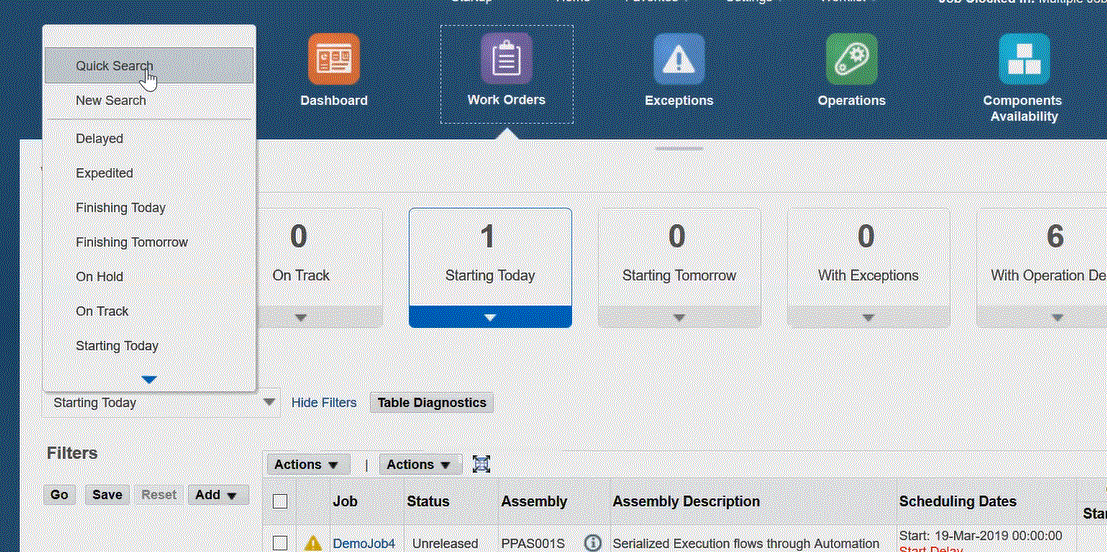
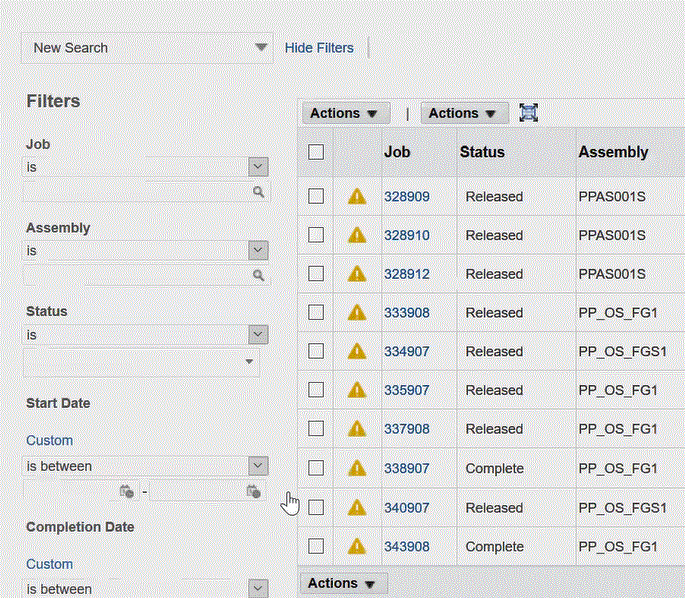
You can search based on default filters, add, and remove filters on values such as Job, Assembly, Status and so forth. You can use multiple items from a list of values. For each search criteria value, there is the option to select a conditional qualifier such as: is, greater than, is between.
The Exceptions page displays filter values such as Assembly, Exception id, Exception Type, among other choices.
You have the ability to create a custom search and save it for future inquiries. The Create Saved Search dialog box provides the option to use this criteria r as a default that can also be displayed as a tile on the page.
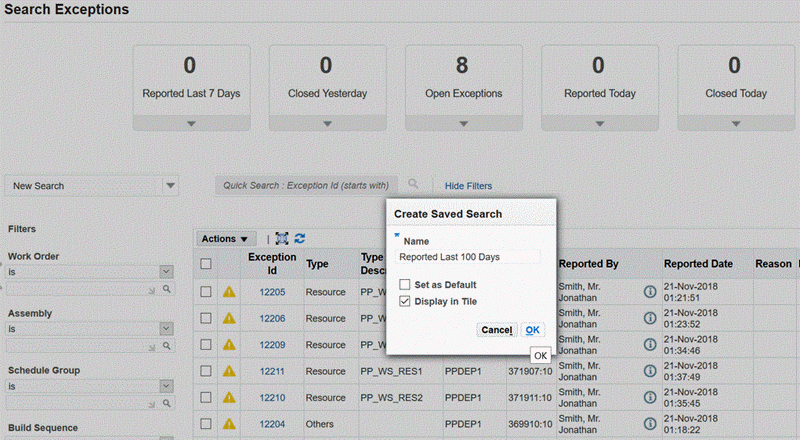
See: List Search, Oracle E-Business Suite Setup Guide, and Querying and Viewing Data, Oracle E-Business Suite User's Guide
Using Tiles to Access Information
The MES Supervisor Workbench provides tiles enabling you to access corresponding pages of detailed content for the following areas:
-
Dashboard: Enables you to navigate back to the Dashboard after accessing pages from the other tiles. See: Using the Supervisor Dashboard
-
Work Orders: Accesses the Works Orders page where you can view the dispatch list for various work order statuses and take actions. See:
-
Exceptions: Exceptions created for shop floor issues can be resolved using various options. These views enable you to see a list of the issues and take actions. See: . Viewing and Resolving Exceptions
-
Operations: Accesses the Operations page where you can view the Dispatch List showing all operations to be worked on—according to specific department, resource, resource instance, or a combination of these values per your login information. You can perform transactions and access other pages for performing and viewing transactions. See:
-
Component Availability: Component Availability Management provides the ability to view part requirements and react to unplanned situations to make adjustments. Requirements are shown in a job or component-oriented view: See: Viewing and Managing Component Availability

Using the Supervisor Dashboard
The Dashboard displays performance graphs, links to detailed information in the Metrics tabbed region, and a Shopfloor Progress tabbed region. The graphs in the Metrics region are configured using several parameters including:
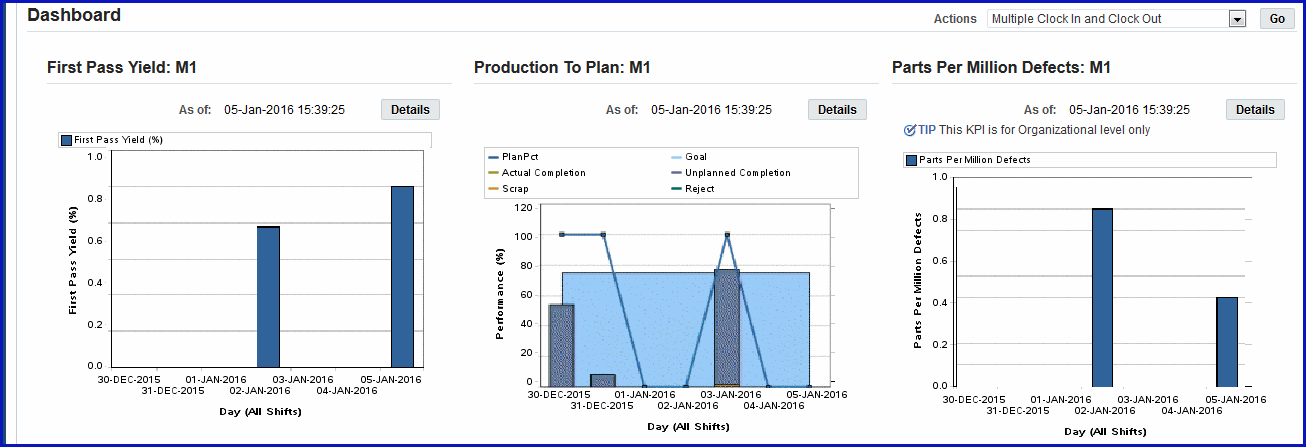
The Dashboard graphs include:
-
This graph displays the progress at the organization and department levels for the actual versus the planned production. Select Details to display both summary and detailed views.
-
Labor reporting captures both attendance and actual time spend on production for employees. These times are used for generating the labor performance views. You set targets for utilization, productivity, and efficiency at the organization and department level. Select Details to display both summary and detailed views.
-
First Pass Yield (FPY) is defined as the ratio of usable, specification conforming output from a process to its input, achieved without rework or reprocessing. The data is calculated from the move transactions performed. Select Details to display both summary and detailed views.
-
Parts per million defects refers to the defective parts per million on completed work orders. This view provides a large-scale view of your manufacturing operations and is calculated from job with statuses of Completed, Complete-No Charges, and Closed. Select Details to display both summary and detailed views.
Important: Data displayed in the graphs on the dashboard are based on time calculated in the server time zone, and not the client time zone.
Production to Plan View
The Production to Plan graph displays progress for actual production in comparison to planned production. Planned quantity is the scheduled quantity for a job operation with a scheduled end time. Actual production quantity is the number of good units completed at a job operation. This view gives supervisors the capability to monitor production and synchronize it with demand. The key performance indicators are calculated for organization and department levels. The Production to Plan KPI parameter is one of the key performance indicators on the Dashboard. See: Production to Plan KPI.
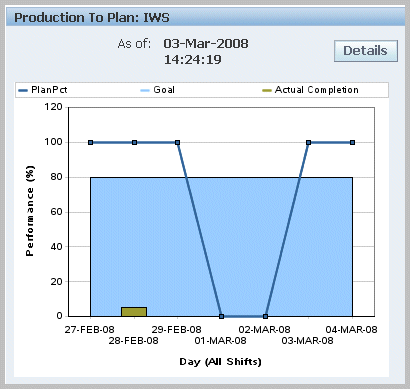
The progress percent is defined in the Production to Plan KPI parameter and can be calculated on either quantity or operation lead time. The calculated values at each job operation is then summed up, and the average is calculated at the department or organization level:
-
Quantity = [(Actual production quantity) / (Planned quantity)] * 100
-
Operation lead time = [{Sum (Actual production quantity * Operation Lead Time)} / {Sum (Planned quantity * Operation Lead Time)}] * 100
Data is used from the WIP_OPERATIONS table for planned jobs; and from the WIP_MOVE_TRANSACTIONS table for actual completion. Depending on how the parameter is set, the program also considers other factors such as job types, job statuses, scrap, reject, and unplanned completions. When the concurrent program is generated, information from these two sources, at the shift level, is calculated for the seven-day period to display in the chart for each day.
You can navigate to the Production to Plan Summary and Production to Plan Details tables by selecting Details. This view also enables you to navigate to the other Dashboard performance tables and graphs. You can set your display for:
-
Department—a particular department or all departments. This is available if you logged in without specifying the department.
-
Period Type—week or day
-
View by—a particular shift, all shifts, or a particular date (based on Period Type)
The Production to Plan Summary table displays the period, actual completion percent, unscheduled completion percent, scrap percent, reject percent, and overall progress percent of your production—based on your setup of the Production to Plan KPI parameter setup for the organization.
Select a record to display the details of that record in the Production to Plan Details table. This view displays the department, job operation, unit of measure, planned quantity, actual completion, operation lead time, and operation progress percent.
Labor Performance View
The Labor Performance graph provides visibility in managing shop floor resources using values set in the Labor Performance Metrics parameter,and calculated in the Labor Performance Metrics concurrent request. Labor Performance metrics are displayed in different time buckets for views by organization, department, resource, or employee. Aggregated data for all employees, at every shift for the previous seven days, is populated into the graph. Time is captured using shift, clock, and job information.
The Labor Performance graph displays the performance metrics and the target goals for efficiency, productivity, and utilization for a seven-day time frame.
Labor performance reporting uses the following in its calculations:
-
Calculates are only for person type resources; the calculation is based on actual times and not on resource transactions.
-
Labor metrics are calculated for non-24 hours resources (person type resources do not work 24 hours).
-
Shop floor labor resources are tracked using employee badge numbers and resource instances.
-
Data attributes are configured per organization using the parameter, Labor Performance Metrics
-
Four labor performance data elements are tracked including actual attendance, direct labor, scheduled available, and earned hours.
-
Values are used from the WIP_LABOR_PERFORMANCE_RATES table, Bill of Material department resource setups, and the Bill of Material Workday Calendar shifts.
-
Labor metrics are calculated only for resources that are attached to specific shifts.
-
Shift In and Shift Out enables the recording of actual attendance hours entered. You can enable or disable employee time and labor reporting in the parameter, Time Entry Mode
-
Actual attendance hours is not computed for the current shift until the shift ends.
-
For overlapping shifts, actual hours are credited to the shift with the earliest start date.
-
-
Clock In flags the job operation as started and records the start time for resource usage calculation. See: Clock In and Clock Out
-
Actual Attendance Hours—the number of hours an employee reports for work in a given period of time. For example, if an employee reports to work at 8:00 am and leaves at 5:00 pm; the total number of actual attendance hours is 9 hours.
-
Scheduled Available Hours—the number of hours an employee is scheduled to be available for work in a given period of time (excluding holidays, sick days, and vacation).
-
Direct Labor Hours—the total number of hours an employee reports on job operations in a given period of time.
-
Earned Hours—the total number of hours designated to produce a specific quantity of units, according to the standard routing definition. For example, if an employee reports 10 units completed in a certain operation and the standard usage rate defined on the routing is 1 hour per unit; then the employee earned 10 hours.
Note: Earned hours are not calculated for lot based resources as they cannot be attributed to a particular unit of an assembly level.
Note: Direct labor hours are used for earned hours in reporting for an employee who does not have a standard usage rate.
Using Third Party Time and Attendance Systems
MES for Discrete Manufacturing can be integrated with third party time and attendance systems to collect actual time. The WIP_TIME_ENTRY_INTERFACE table is used to enter records for Direct Labor Hours and Actual Attendance Hours. The Import Actual Times concurrent program moves the records from this table and imports them into the MES system. The Labor Performance Metrics Calculation is then generated to view labor metrics with the imported data. See: Time and Attendance Systems Integration
Labor Performance View and Labor Performance Summary
In the Labor Performance Graph, select Details to navigate to both the Labor Performance View and Labor Performance Summary tables. This view also enables you to navigate to the other Dashboard performance tables and graphs. The detail of the information displayed, and the selection of specific criteria, depends on the level of your login values entered in the startup page. You can set your display for:
-
Department - a particular department or all departments. This is available if you logged in without specifying the department.
-
Resource - a particular resource or all resources. This is available if you logged in without specifying the resource.
-
Employee - a particular employee or all employees. This is available if you logged in without specifying the employee.
-
Metrics - all metrics or you can specify efficiency, productivity, or utilization.
-
Period Type - week or day.
-
View By - a particular shift or all shifts
Select Go to display the results of your search.
-
Labor Performance View: The detail level of your search criteria is displayed in this view. You can expand or collapse the nodes for specified departments resources, and employees to review different levels of information. When you select one of the links on the node, the Labor Performance Summary table and graph are refreshed with the detail level of this information.
-
Labor Performance Summary Table: The detail level of your search criteria is displayed in this view. The table displays the labor performance metrics and targets for each metric based on the Labor Reporting parameters. It displays the period (day or week) and shift set in the search criteria.
First Pass Yield View
The First Pass Yield graph displays the ratio of usable parts to the material used for its processing, achieved without rework or reprocessing. This metric provides supervisors a view of manufacturing operations at the macro level for decision making. The view is enabled using the Supervisor Dashboard View parameter and generated through the First Pass Yield Calculation program accessed in the global actions. See: Supervisor Dashboard View
The First Pass Yield concurrent program uses the following considerations in its calculation:
-
Only operations performed are considered.
-
Net scrap or reject quantities are the final quantities moved to the Scrap or Reject intraoperation step—not the sum of quantities moved in and out of these steps.
-
Partially completed assembles not meeting quality requirements are considered moved to the Scrap or Reject intraoperation.
-
Reject transactions are reversed by moving parts out of the Reject step.
-
-
Either or both the Count Point and Autocharge fields on job operations must be enabled. See: Count Point and Autocharge Fields, Oracle Bills of Material User's Guide
The first pass yield percentages displaying on the chart are for the previous seven days from the current date.
Select Details to view First Pass Yield Summary and Details. This view also enables you to navigate to the other Dashboard performance tables and graphs. The data displayed in the summary and detail regions depends on your display parameters. You can set your display for:
-
Department - a particular department or all departments. This is available if you logged in without specifying the department.
-
Period Type - a week or day
-
View by - a particular shift, all shifts, or a particular date (based on Period Type)
In the First Pass Yield Summary Region, select view and date values to filter your display for the Scrap Percent, Reject Percent, First Pass Yield Percent values.
-
Select View - by Department or Assembly. This is available if you logged in without specifying the department.
If you select Assembly, Assembly name and Assembly Description display. If you select Department, Department Code and Department Name display.
-
Select Date - a particular date or all dates in the previous seven-day period.
Select a record to display the First Pass Yield Details for a particular assembly or department for the date parameters specified.
Parts Per Million Defects View
The Parts Per Million Defects graph displays the ratio of defective parts per million on completed work orders. This view is calculated from job with statuses of Completed, Complete-No Charges, and Closed. The view is enabled using the Supervisor Dashboard View parameter and generated through the Parts Per Million Defects Calculation program, accessed in the global actions. See: Supervisor Dashboard View
The parts per million defects percentages displaying on the chart are for the previous seven days from the As Of date field value.
The Parts Per Million Defects concurrent program uses the following considerations in its calculation:
-
The program gathers quantity completed and quantity scrapped data from the WIP_DISCRETE_JOBS table and populates data into WIP_WS_PPM_DEFECTS table.
-
Parts Per Million Defect is always calculated at organization level.
Select Details to view Parts Per Million Defects Summary and Details charts, and a table of the listing the records in a seven-day date range. This view also enables you to navigate to the other Dashboard performance tables and graphs. The data displayed in the summary and detail regions depends on your display parameters. You can set your display for:
-
Organization
-
Period Type—week or day
-
View by—a particular shift, all shifts, or a particular date (based on Period Type)
In the Parts Per Million Defects Summary Region, select shift or date values to filter your display for the Assembly and Parts Per Million Defects values. If you select date, you can see a particular date or all dates in the previous seven-day period.
Select a record to display the Parts Per Million Defects Details for a particular assembly or department for the date parameters specified.
Monitoring Shop Floor Progress
Shopfloor Progress displays tabbed regions for the status of jobs, machines, and people on the shop floor: Current State, Capacity Shortages, and Operator Availability including:
Current State
The Current State tabbed region displays a real time view of all the clocked in job operations. It provides a status of current jobs, and machines and operators.
You can filter the list of records by specifying a resource view in the View box and selecting Go. Choices are:
-
All - all resources for the job operations fitting the criteria in your login parameters
-
Machine - select a specific machine resource for job operations fitting the criteria in your login parameters
-
Labor - select a specific labor resource for job operations fitting the criteria in your login parameters
-
Assembly - select a specific assembly for job operations fitting the criteria in your login parameters
-
Department - select a specific department for job operations fitting the criteria in your login parameters
-
With Scrap/Reject - all job operations with scrap or reject fitting the criteria in your login parameters
Select a resource record, and the Dispatch List icon to navigate to the Dispatch list to view other jobs using this resource. This enables you to monitor those jobs and perform transactions.
Use the Table Setting icons to set fields for this view including Department, Job Operation, Assembly, Operator, Actual Start Date, Projected Completion Date, Quantity Scrapped, and Quantity Rejected.

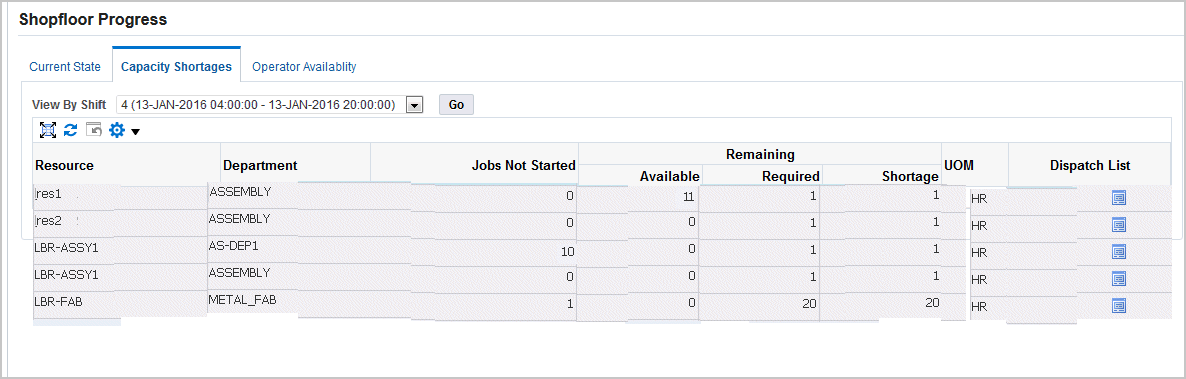
Capacity Shortages
The Capacity Shortages tabbed region displays potential capacity shortages for bottleneck resources. The jobs appearing are those whose projected completion time exceeds the shift or scheduled time.
You can set your display to a particular shift by selecting a time slot in the View By Shift box, and selecting Go. The other fields in this view include Jobs Not Started, Remaining quantities (for Available, Required, Shortage), and Unit of Measure. The resources considered when calculating capacity shortages are set in the parameter, Resources for Capacity Shortages
This view enables you to select a resource record and navigate to the Dispatch List page to view other jobs using this resource. You can then monitor those jobs and perform transactions.
Note: Resource shortages do not change the ready status of a job operation. A particular job may have shortages, but the job can display as ready on the Dispatch List and Work Content pages. The Ready Status function is designed to enable the supervisor to determine if a job is ready for work. However, you can customize how you want job readiness calculated using a client extension. See: Viewing Dispatch Lists
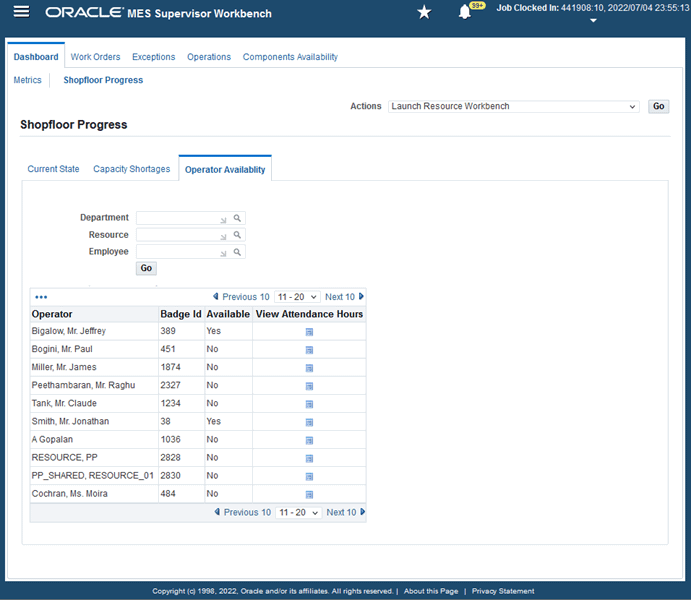
Operator Availability
The Operator Availability tabbed region provides a view of labor availability based on employees who have reported their attendance either through MES for Discrete or another time and attendance system integrated with MES. This aids supervisors in managing shop floor work. This list is dependent on the level of the login information. For example, if the supervisor logs in specifying Department, the list displays employees attached as resource instances to the department. You can:
-
Click Go to display all records.
-
Filter the list by selecting values in the Department, Resource, and Employee fields and then click Go to display the results of your search.
-
View operators listed by name, badge identification, and their available status.
-
View attendance hours of operators on the shopfloor using the View Attendance Hours page.
To view attendance hours for operators:
As a supervisor, you can view the attendance history of operators on the shopfloor using the View Attendance Hours page. Use the Discrete MES Import Actual Times concurrent request to load the shift-in and shift-out details for shopfloor operators.
-
Click the View Attendance Hours icon available for an operator.
-
The View Attendance Hours page displays the employee name and employee number of the operator.
-
Click Go to see all the shift-in and shift-out record details for the operator.
-
(Optional) Use the following criteria to search for specific time and dates for the operator's attendance:
-
Start Time Within - Enter the number of hours as the start time within which you would like to search for an operator's attendance. For example, you may want to search for attendance details for an operator within the last 10 hours.
-
End Time Within - Enter the number of hours if you want to specify a start and end time range within which you would like to search for an operator's attendance. For example, you may want to search for attendance details for an operator within 10 to 24 hours.
-
Start Date From - Enter a start date from which you would like to search for an operator's attendance.
-
Start Date To - Enter a start date if you want to specify a from and to start date range to search for an operator's attendance.
-
End Date From - Enter an end date from which you would like to search for an operator's attendance.
-
End Date To - Enter an end date if you want to specify a from and to end date range to search for an operator's attendance.
-
-
Click Go.
The table lists the start time and end time of the operator's shift-in and shift-out details. The total duration that an operator worked appears in hours. If the operator is still available, the End Time will be blank.
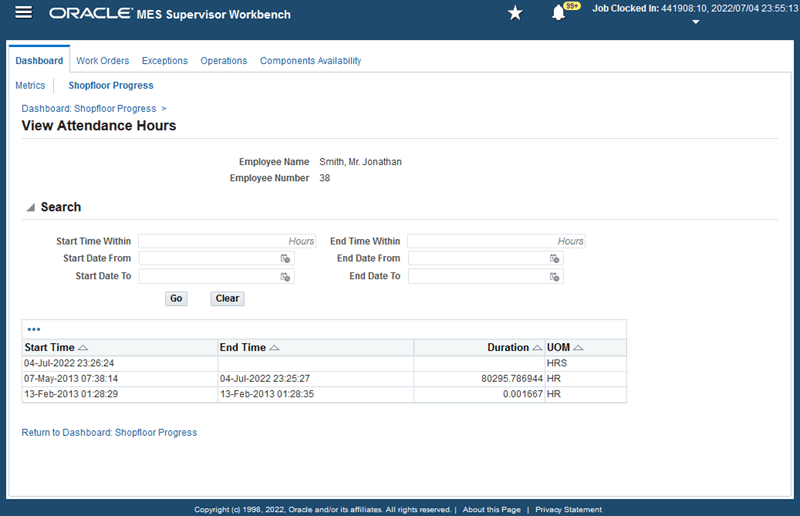
-
Click Return to Dashboard: Shopfloor Progress to go back to the Operator Availability tab.
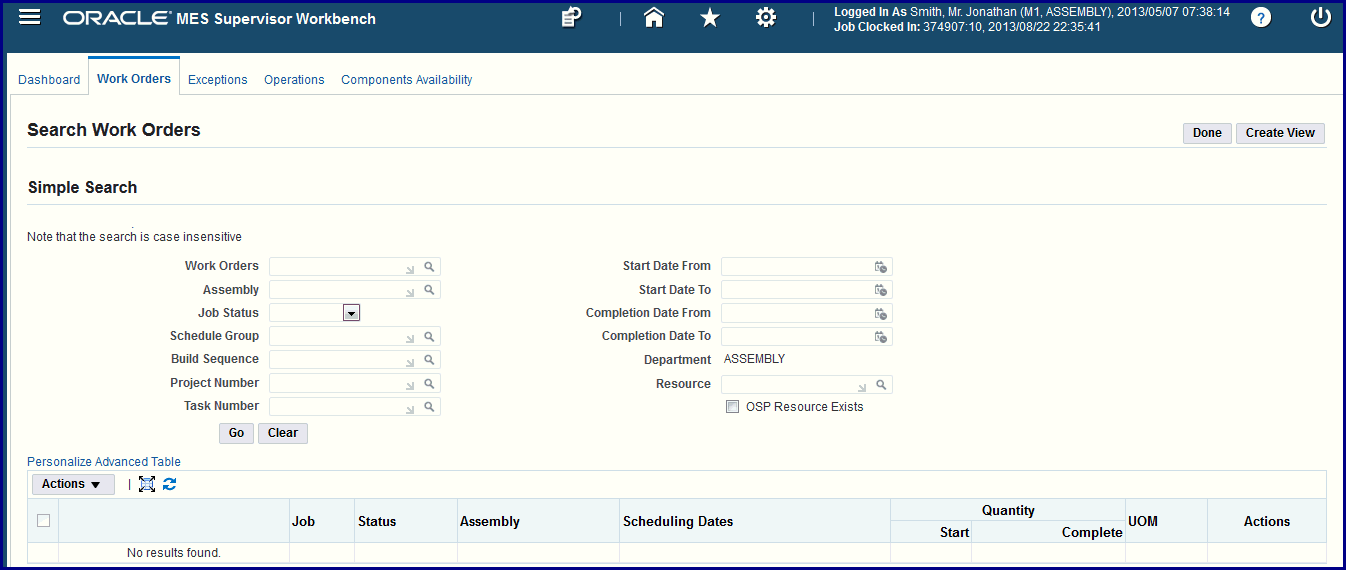
Viewing and Updating Work Order Status Details
The Work Orders page provides a job centric view of scheduling statuses listing all the jobs fitting the criteria in your Startup page parameters. You view a dispatch list of your jobs by statuses when selecting specific tabs and tiles.
To search for work orders
-
Navigate to the Work Orders page and select Search.
The Simple Search panel appears.
-
Select search criteria in the following fields:
-
Work Orders
-
Assembly
-
Job Status
-
Schedule Group
-
Build Sequence
-
Project Number
-
Task Number
-
Start Date To and From
-
Completion Date To and From
-
Department
-
Resource
-
Outside Processing Resource Exists check box
-
-
Select Go to display the results of your query.
-
If List Search capability is set up—you can search based on default filters, add and remove filters, and use multiple items from a list of values. See: List Search Capability
To view and take work order actions
-
Navigate to the Work Orders page.
-
Select tiles for a listing of jobs scheduled. Choices are shown in the following table:
Starting Today Jobs with Scheduled Start Date as today and status of Unreleased, Released, On Hold, Cancelled, Completed, and Completed No Charges. Finishing Today Jobs with scheduled completion date as today and status of Unreleased, Released, On Hold, Cancelled, Completed, and Completed No Charges. On Track Released and On Hold jobs without delays or operation delays. Delayed Released and On Hold jobs where the current date is past the Scheduled Job Completion date by more than the tolerance specified. With Exceptions Released and On Hold Jobs having open exceptions in at least one of the job operations. With Operation Delay Released and On Hold Jobs with operations that are yet to be started and include one of the following: -
Start delay: current date is past scheduled operation start date by more than the delay tolerance specified.
-
Operations that are yet to be completed and have a completion delay: current date is past scheduled operation completion date by more than the delay tolerance specified.
-
Jobs that are unreleased and first operation is delayed: current date is past the scheduled start date of the first operation by more than the tolerance specified.
On Hold Jobs that are on hold. Expedited Expedited jobs in the status of Unreleased, Released, and On Hold. Starting Tomorrow Jobs with Scheduled Start Date as the next day. Finishing Tomorrow Jobs with Scheduled Completion Date as the next day. 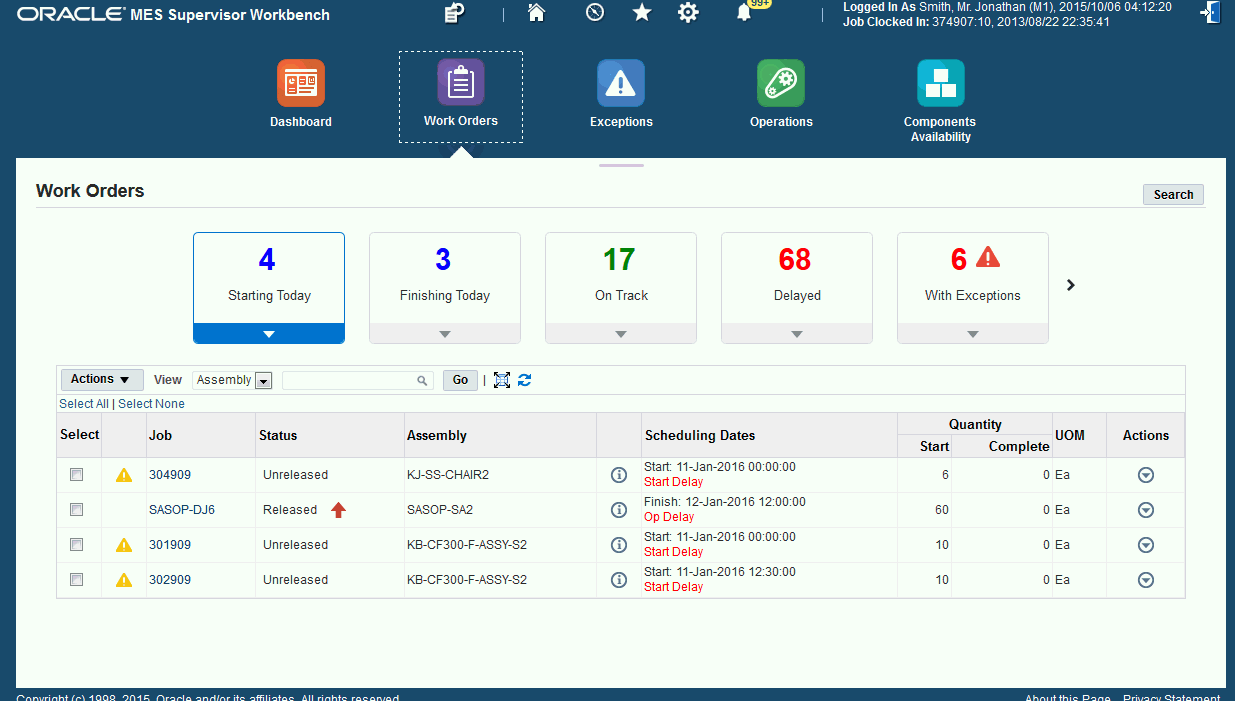
The fields appearing in the table for all statuses are Job Number, Job Status, Assembly Number, Scheduling Dates, Quantity Start and Complete numbers, Unit of Measure, and available Actions.
-
-
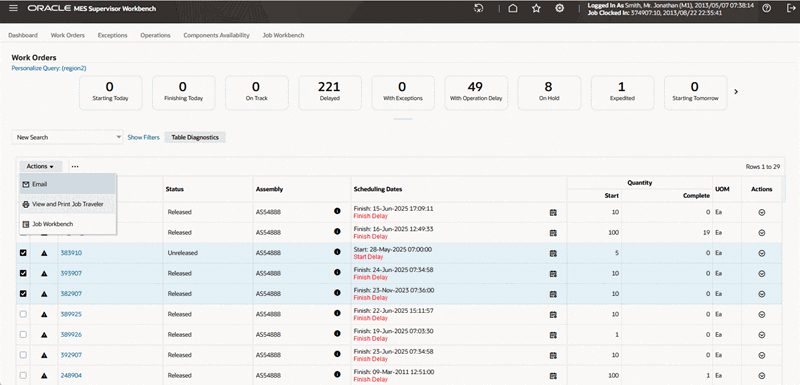
You have the option to select one or multiple records listed in the table and choose Email in the Actions box to send the work order records to another employee.
-
You can filter the list of records by specifying Status, Job, or Assembly in the View box, or selecting a value and choosing Go.
The results of your query appear in the table.
-
Select the Job link to navigate to the Work Order Detail page for this record to view details and perform actions. See: Viewing and Maintaining Work Order Details
-
Select the Schedule icon that appears in the Scheduling Dates field to reschedule work orders that are unreleased, released, complete or on hold. See: Rescheduling Work Orders.
-
Select the Actions column for a specific record and choose one of the following available actions for a work order. Specific actions are available depending on the work order status:
-
Email: Sends an email with the job summary detail information to a designated party.
-
Put Jobs On Hold
-
Cancel Job
-
Release or Unrelease Job
-
Expedite
-
Add Notes: Navigates to the Update Note page to add text regarding this job. See: Updating Job Notes
-
Generate Assembly Serial Numbers for serialized assembly jobs.
-
Viewing and maintaining work order Details
You can navigate to the Work Order details page by selecting a work order link. This page enables you to view information regarding a specific work order, select more detailed information, and choose actions.
To view details for a specific work order
-
Navigate to the Work Order details page for a selected work order.
Information displays in fields in the following regions with the associated fields:
-
Overview: Status, Job Description, Assembly, Current Operation, Job Type, Planner, Customer, Expedited, Class, Quantities, and Unit of Measure.
-
Dates: Scheduled Start, Scheduled Completion, Actual Start, and Actual Completion
-
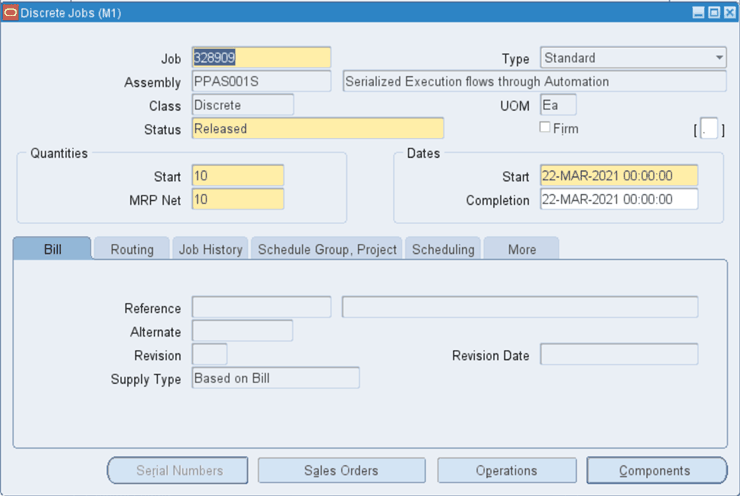
Bill: Reference, Alternate, Description, Supply Type, Revision, Revision Date
-
Routing: Reference, Alternate, Description, Supply Type, Revision, Revision Date, Serialization Start Operation
-
-
In the Details column, you can access detail information in the following regions:
-
Operations
-
Exceptions
-
Components
-
Resources
-
Instructions
-
Notes
-
Serial Numbers
-
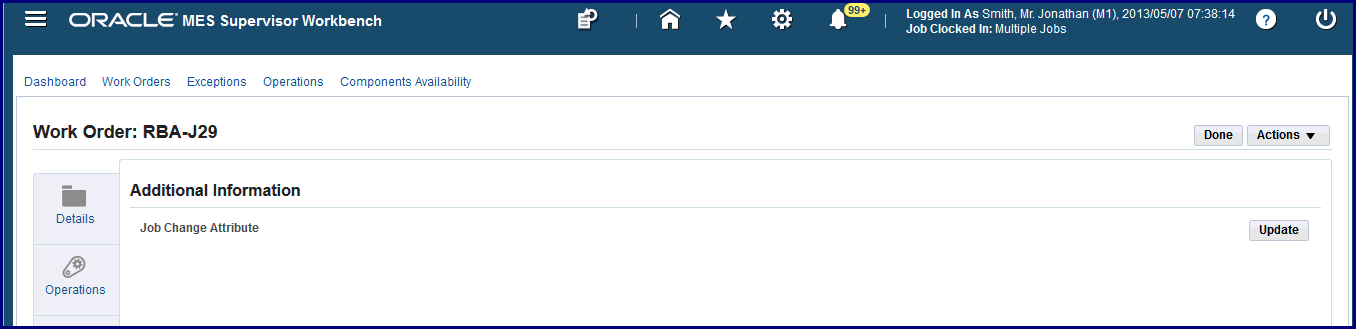
Additional Information
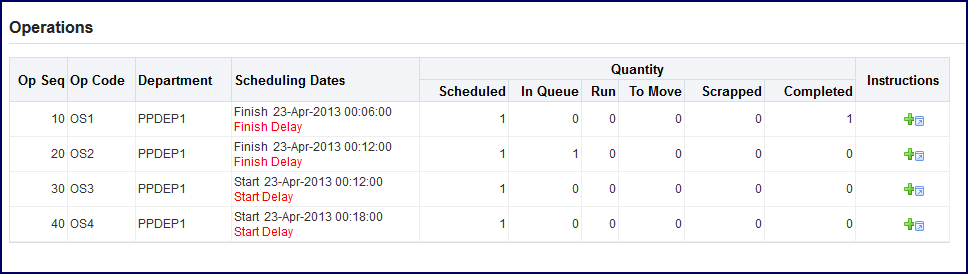
Operations: You can view each Operation Sequence and Code, Scheduling Dates, the Quantities and status in each Operation Step, and Instructions. See: Viewing and Managing Operations
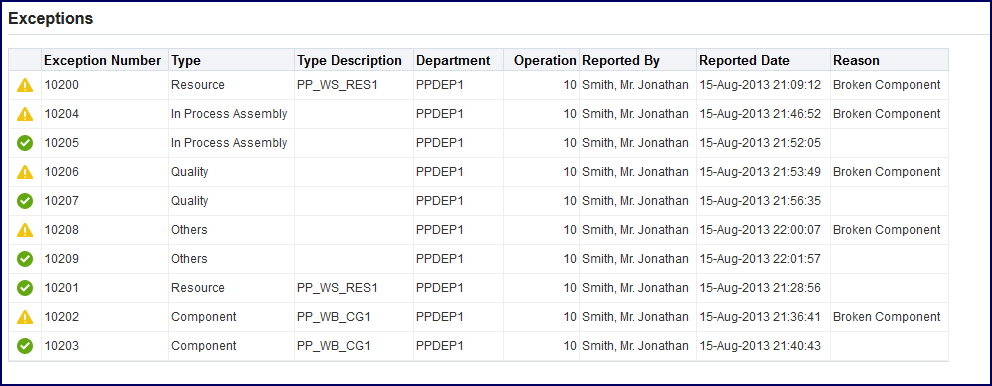
Exceptions: You can view a listing of exceptions for this work order record displaying details on Type, Description, Department, Operation, Reported By, Reported Date, and Reason. See: Viewing and Resolving Exceptions
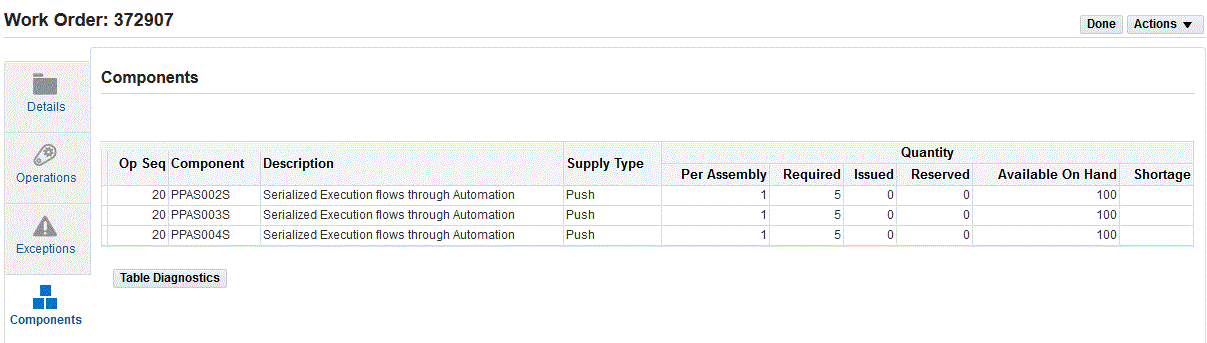
Components: You can view the component details for Component number, Description, Supply Type; and Quantities Per Assembly Required, Issued, Reserved, Allocated, Backordered, Available On Hand, and Shortages. See: Viewing and Managing Component Availability
Resources: You can view details for Resource Sequence, Resource Department, Description; and Quantities Required, Applied, Open, and Shortages.

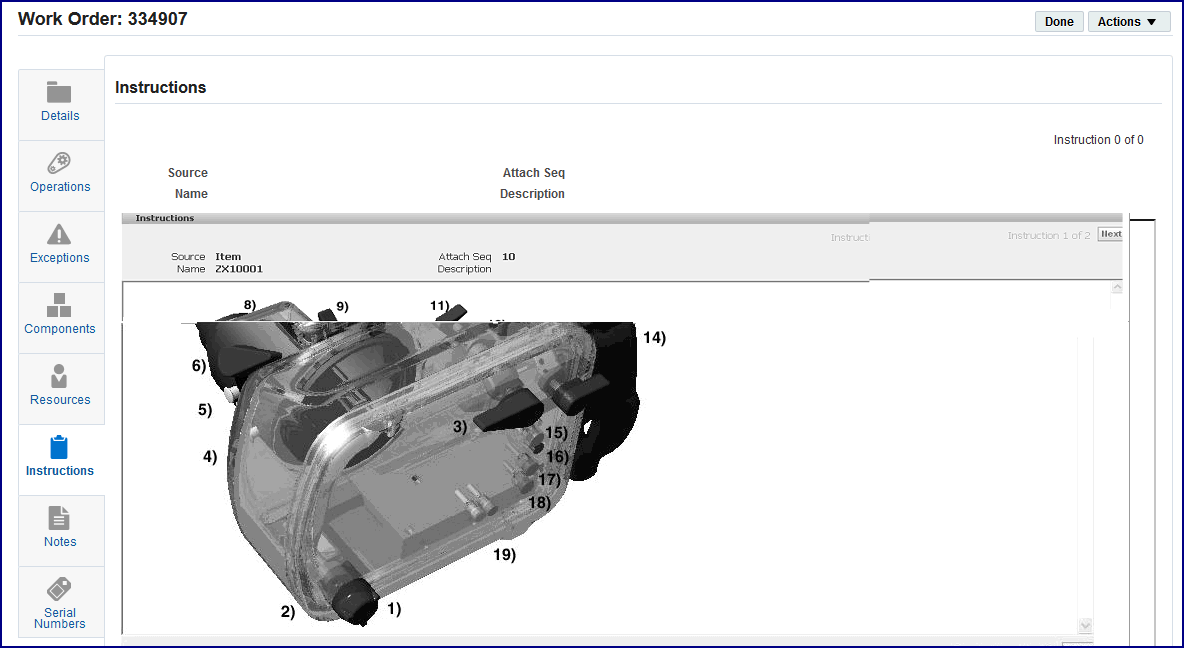
Instructions: You can setup a sequential display of instructions needed to perform the operation. See: Configuring Document Attachments
Notes: Information and notes can be viewed and created on the Update Note page. See: Updating Job Notes
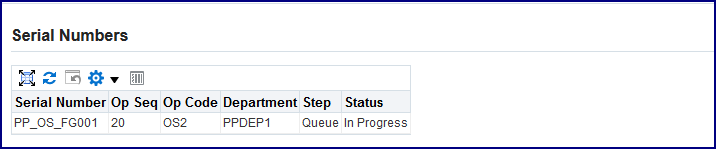
Serial Numbers: You can view a listing of serial numbers data regarding this work order including : Serial Number, Operation Sequence, Operation code, Department, Step, and Status.
Additional Information: Descriptive flexfield data appears if you defined descriptive flexfield structures. See: Using Descriptive Flexfields
-
-
The following options are available in all the regions in the Actions box:
-
Email Job
-
Put Job On Hold
-
Cancel Job
-
Unrelease Job
-
Expedite
-
Add Notes
-
-
Select Done to close any of the detail pages and navigate back to the Work Orders page.
Rescheduling Work Orders
You can use the Reschedule Work Order page to reschedule work orders that are unreleased, released, complete or on hold.
To reschedule a work order
-
Navigate to the Work Orders page and search for work orders. Follow the steps given in Viewing and Updating Work Order Status Details to search for work orders.
-
The Work Orders page displays information for work orders in the Job, Status, Assembly, Scheduling Dates, Quantity Start and Complete, UOM, and Actions columns. Note that you can only reschedule work orders with the status of Unreleased, Released, Completed or On Hold.
-
In the Scheduling Dates field for a work order, click the Reschedule icon.
-
The Reschedule Work Order page appears. This page displays the existing schedule start and scheduled completion dates that have been saved for the work order.
-
To reschedule the work order, select a start date in the Schedule Start Date field or the scheduled completion date in the Scheduled Completion Date field.

-
Click Cancel to cancel your changes.
-
Click Apply to reschedule the work order.
-
View the changes in the Work Orders page.
-
The changes in the work order schedule will also reflect in the Discrete Jobs, Operations, and Resource Requirements windows.
Note: You can also reschedule work orders, operations, resources, and resource instances using the MES Supervisor Job Workbench. See: See: Using the MES Supervisor Job Workbench
Launching the MES Supervisor Job Workbench for Work Orders
You can launch the Job Workbench from the Work Orders tab on the MES Supervisor Workbench.
-
In the Work Orders tab, select the work orders you would like to view in the Job Workbench.
-
From the Actions menu, select Job Workbench.
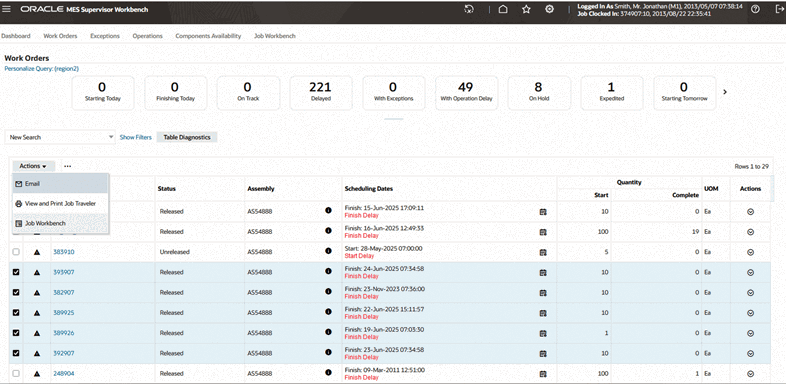
-
Your selected work orders display in the H-Grid Tree and Gantt Chart on the Job Workbench. You can view and reschedule the work order, operations, resources, and resource instances on the Job Workbench.

Note: The MES context setting applies automatically in the Job Workbench filters.
You can view and reschedule the work order, operations, resources, and resource instances on the Job Workbench. See: Using the MES Supervisor Job Workbench
Viewing and Printing Job Traveler for Multiple Jobs
You can view and print the Job Traveler for multiple jobs in the Work Orders page using the View and Print Job Traveler action.
Note: You can print the Job Traveler for a maximum of 15 work orders.
To view and print Job Traveler for multiple jobs:
-
On the Work Orders page, select multiple jobs.
-
From the Actions list of values, select View and Print Job Traveler.
Print Job Traveler for Multiple Jobs
-
You can then review details for all the selected job in the Job Traveler report that opens per the Job Traveler template you have set.
Viewing and Resolving Exceptions
Exceptions are reported and displayed for situations preventing work on job operations. They can include material shortages, labor balancing problems, machine downtime, and quality problems. When an exception is reported, a workflow is invoked and notifications are sent to the appropriate recipients to signal that there are production issues. When notified about exceptions, you can view other job operations affected and take action. Exception types are in the following categories:
-
Resource
-
Component
-
In Process Assembly
-
Quality
-
Others
The same exception can be created for any or all of the impacted jobs. Various resolutions are available. You can choose a record and select an action to resolve the production problem. For example, for the following exception types, you can:
-
Resource: Assign Alternate Resources, Assign Shopfloor Statuses, Put Jobs on Hold, Reschedule Jobs
-
Component: Assign Shopfloor Statuses, Put Jobs on Hold, Reschedule Jobs
-
In Process Assembly: Reschedule Jobs
-
Quality, Other, and User Defined: Assign Alternate Resources, Assign Shopfloor Statuses, Put Jobs on Hold, Reschedule Jobs
Additionally, you can define a custom exception type using the Oracle Applications Lookup functionality.
The Exception page can be accessed from the Exceptions tile on the MES Supervisor Dashboard and the View Exception job operation action if set up as actions on the Dispatch List and Work Content pages.
To view a summary listing of exceptions to production work
-
Navigate to the Exceptions page.
If accessed from the Exceptions tile on the MES Supervisor Dashboard, all exceptions fitting the criteria in your Startup parameters appear in a table on the page. You can view the list in the following categories by selecting tiles for:
-
Open Exceptions
-
Reported Today
-
Reported Yesterday
-
Reported Last 7 Days
-
Closed Today
-
Closed Yesterday
-
Closed Last 7 Days
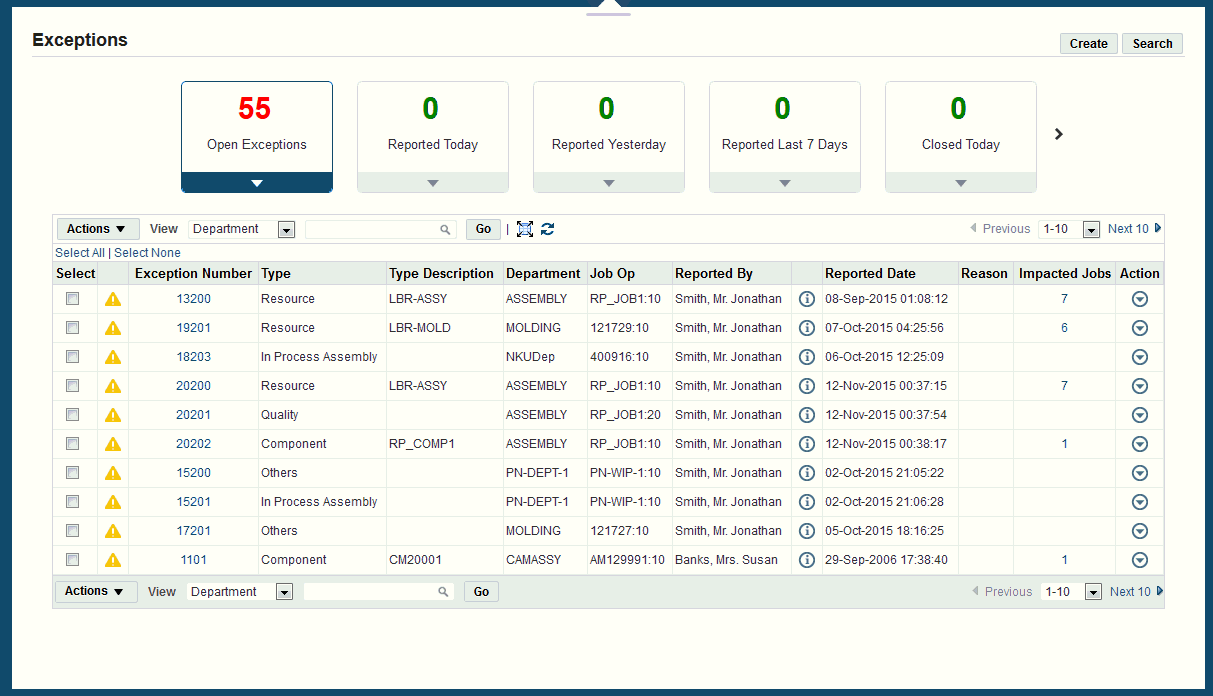
Exception data appears in a table in the following fields:
-
Exception Number
-
Exception Type
-
Type Description
-
Department
-
Job Operation
-
Reported By
-
Reported Date
-
Reason: Reason codes for various exceptions are set up in the parameter: Reason Codes for Exception Types
-
Impacted Jobs
-
Action
-
-
Select Create to navigate to the Report Exceptions page to create new records, see: Reporting Exceptions
-
Select Search to navigate to the Simple Search Exceptions page to find and filter exception records. See: Searching for Exceptions
-
Select one or multiple records listed in the table and choose one of the following options in the Actions box:
-
Email: Sends an email with the exception summary detail information to a designated party.
-
Add Notes: Navigates to the Update Note page to add text regarding this exception. See: Updating Job Notes
-
-
You can filter the records in the table display by selecting either Department or Exception Type in the View box. Then select a value and choose Go.
The results of your query appear in the table.
-
In the summary table, select an Exception Number link to navigate to the Exception page, see: Viewing an Exception Detail Record
-
In the Impacted Jobs column, select the number link for a particular record to navigate to the Impacted Jobs page. See: Viewing and Adding Exceptions to Impacted Jobs
-
Exceptions created for shop floor issues can be resolved using various options. Depending on the status, select a record and one of the following choices available for resolution in the Actions drop-down icon:
-
Email: Sends an email with the exception summary detail information to a designated party.
-
Resolve: If this exception has been corrected, selecting Resolve closes this record.
-
Add Notes: Navigates to the Update Note page to add text regarding this exception. See: Updating Job Notes
-
Assign Alternate Resources: Navigates to the Assign Alternate Resources page enabling a switch from the current resource group to an alternate resource group. See: Assigning Alternate Resources
-
Assign Shopfloor Statuses: Enables you to change the status of a specific interoperation step. See: Changing Shopfloor Statuses
-
Put Jobs On Hold: Changes the job status to On Hold.
-
Reschedule Jobs: Navigates to the Reschedule Operation window to change scheduling direction and start dates. See: Rescheduling Operations
-
To search for exception records
Navigate to the Search Exceptions page.
This page enables you to search for specific exceptions and filter long lists of exception records.
-
In the Simple Search region, select values related to your search in the following fields:
-
Work Order
-
Assembly
-
Start Date From and To
-
Completion Date From and To
-
Schedule Group
-
Build Sequence
-
Project Number
-
Task Number
-
Exception Identification
-
Department
-
Type
-
-
Select Go to display the results of your search.
-
If List Search capability is set up—you can search based on default filters, add and remove filters, and use multiple items from a list of values. See: List Search Capability
-
Select Done to navigate back to the Exceptions page.
-
Select Create View to navigate to the Create View page listing attributes that can be edited to change the view or filter the data that is displayed.
Viewing an exception detail record
Navigate to the Exception page for a specific exception record.
In the Exception region, the following fields appear for this record:
-
Exception ID number
-
Value of the designated Exception Type if this is a Resource or Component exception.
-
Status
-
Attachments
-
Reported By
-
Reported Date: This field displays the date and number of days since reported.
-
Type, one of the following Exception Types:
-
Resource
-
Component
-
In Process Assembly
-
Quality
-
Others
-
-
Reason: Reason codes for various exceptions are set up in the parameter. Reason Codes for Exception Types
-
-
If attachments exist, select the View link to open the Attachments dialog box to view a summary window of existing attachments. This window enables you to view, update, publish, and delete the attachment file.
-
Select Add Attachments to add files, URLs, or text. See: Oracle E-Business Guide Suite Attachments, Oracle E-Business Suite User's Guide
-
In the Job Details region of the page, information appears for this record in the following fields:
-
Job Operation
-
Scheduled Start and End Dates
-
Description
-
Job Status
-
Operation code
-
Assembly
-
Assembly Description
-
Job Start Quantity
-
Assembly Serial Number
-
Customer
-
-
You have the option to add informational text in the Notes region of the page. Enter text in the Notes region and select Add.
All note text appears in the section after the Notes region.
-
The Actions drop-down box enables you to perform the following actions:
-
Resolve: If this exception has been corrected, selecting Resolve closes this record.
-
Email: Sends an email with the exception summary detail information to a designated party.
-
-
Select Impacted Jobs to navigate to the Impacted Jobs page to see other jobs affected by this exception. See: Viewing and Adding Exceptions to Impacted Jobs
-
Select Apply to save changes to this record.
Viewing and Adding Exceptions to Impacted Jobs
This page displays information for all job operations affected by a specific exception.
To add exceptions to impacted jobs
-
Navigate to the Impacted Jobs page for a particular exception record.
A summary table appears with information for the jobs in the following fields: Job number, Status, Assembly number, Schedule Dates, Quantity Start and Complete values, and Unit of Measure.
-
Use the Cut Off Date field to select a date to change the calculated shortage values by date. Select Refresh to show the results in the table.
-
Shift end time is used as the end time value in the calculation.
-
If the shortage calculation is based on Component Shortage Calculation Level: of Subinventory, the shortages displayed are based on the specific subinventory. See: Component Availability Calculations
-
-
To send an email with the exception summary detail information to a designated party, select one or multiple records listed in the table. Choose Email in the Actions box.
-
Select a Job link to navigate to the Work Content page for this work order.
This enables you to view details of the work order and take actions. See: Viewing Work Content
-
Review and select the relevant records, and select appropriate tasks for specific work orders in the Actions box . TheActions include the following:
-
Email Job
-
Put Job On Hold
-
Cancel Job
-
Unrelease Job
-
Expedite
-
Add Notes to navigate to the Update Note page to enter job information details. See: Updating Job Notes
-
-
Select Done to close this page.
Related Topics
WIP Exception Notification Workflow
Viewing and Managing Operations
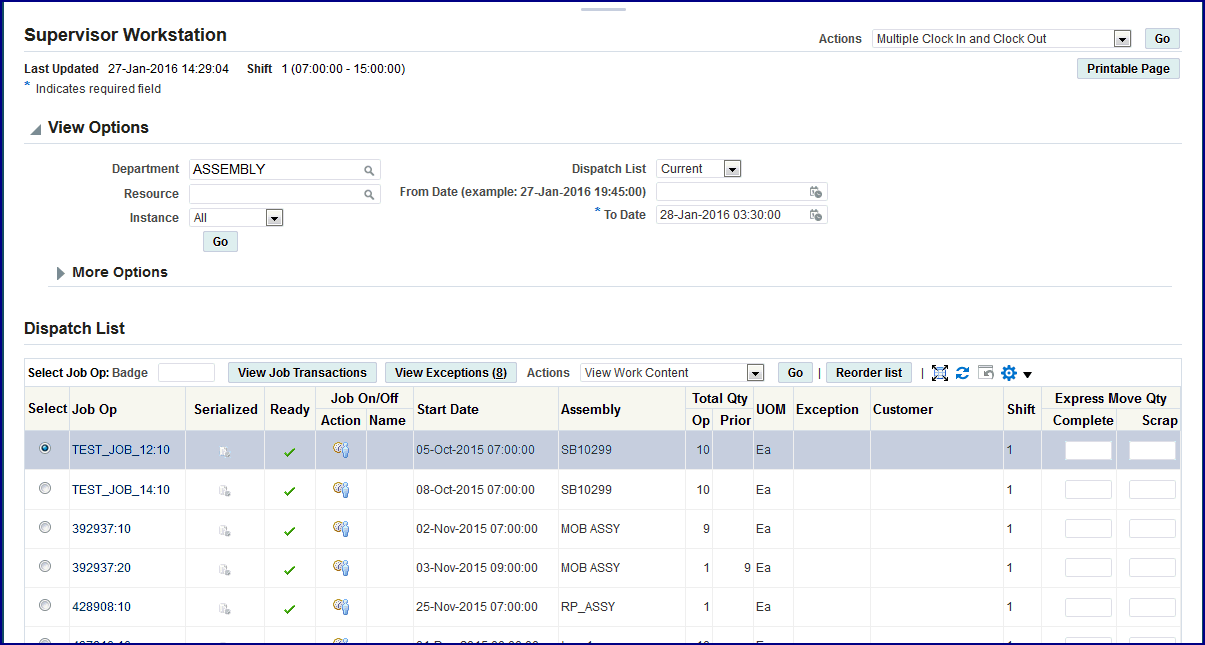
The Operations tile on the Supervisor Workstation enables you to navigate to the job operation Dispatch List page. Dispatch lists are a listing of all job operations to be worked on—according to specific department, resource, resource instance, or a combination of these values. You can perform express move transactions and access other pages for performing and viewing transactions.
To view operations on the Supervisor Workstation
-
Select the Operations tile to navigate to the Supervisor Workstation Dispatch List.
-
Use the View Options and More Options regions to filter the records.
The results of your query appear in the table. You can reorder the records display. This list is based on operation schedule times including:
-
Current: Job operations with assembly quantities in all steps except Scrap and Reject.
-
Scheduled: Job operations with assembly quantities in all steps except Scrap and Reject, plus all other job operations having schedule times within time range.
-
Upstream: Job operations that have quantities in Queue, Run and To Move steps in their immediate preceding count point operation within the time range.
-
-
You can perform tasks or view a variety of operation features, see: Viewing Dispatch Lists
Reordering Job Operations on the Dispatch List
You can change the order and rearrange job operations on the dispatch list. This action enables you to group job operations together on the dispatch list. Reordering may be performed for more efficient display and processing of job operations with similar setups, components, or for expediting.
Note: To adjust to the changes and dynamic nature of the shop floor, the supervisor might need to re-order the dispatch list. Because the Dispatch list is a supervisor or scheduler function, Oracle recommends that you limit access to this action.
To reorder job operations on the dispatch list
-
Navigate to the Reorder Dispatch List page.
Job operations from your dispatch list display in a table view; all operations are shown as in your dispatch list, including any filtering performed on the list. The fields appearing on the page are set in the parameter, Dispatch List Ordering Criteria
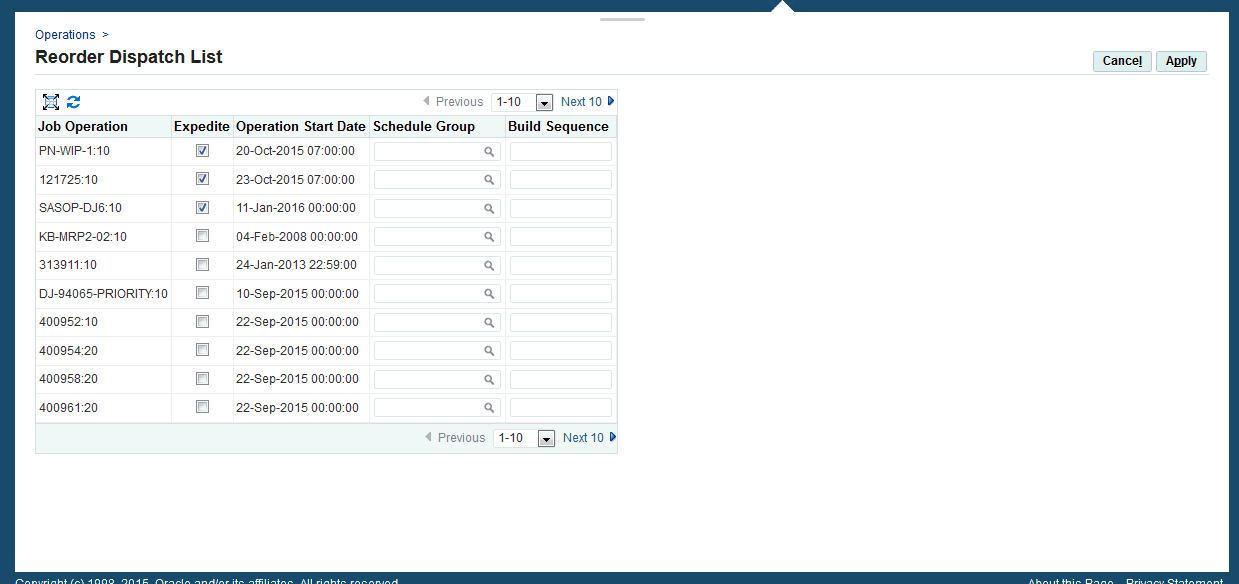
The ordering is performed first by the Expedite column changes, then by the attributes. Changing the values of the attributes creates the reordering.
-
Select the job operations you want to expedite by enabling the Expedite check box.
-
Select values in the attribute fields according to your preference for reordering the list.
-
Select Apply to save your work.
The dispatch list refreshes with your changes.
Related Topics
Reserving Components for Operations
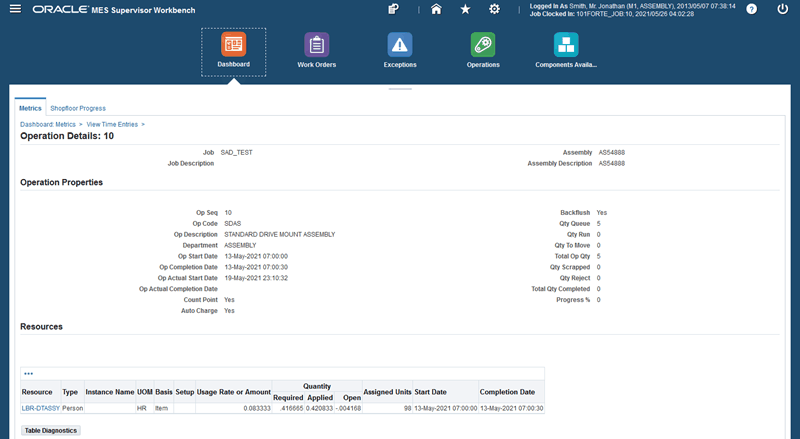
Viewing Operation Details
You can view operation details for a selected job operation in the Supervisor Workbench using the Operations tab or the Work Content page. Select the View Operation Detail action as a button or choice list action to ensure the action appears in the Dispatch list and Work Content actions. See: Job Operation Actions and Work Content Actions
To view operation details:
-
On the Operations tile or tab, select a job operation in the Dispatch List. See: Viewing and Managing Operations
Alternatively, select a job operation in the Dispatch List and then select the View Work Content action to open the Work Content page.
-
From the Actions list of values, select View Operation Detail.
-
Click Go.
-
On the Operation Details page that opens, you can review information in the following regions:
-
Operation Properties - This region shows information about this operation including description, department, dates, quantity at the intraoperation steps, and progress percent. You can use the Update button to update the progress percent. See: To update job operation progress percent
Operation Properties
-
Resources - This region show information about the type of resource, instance name, unit of measure, basis, set up, usage rate or amount, quantity details (required, applied and open), assigned units, the start date, completion date, and the firm type.
-
Time Entries - This region shows information about the resource, instance name, start and end dates, duration, unit of measure, reported by, charge, and status.
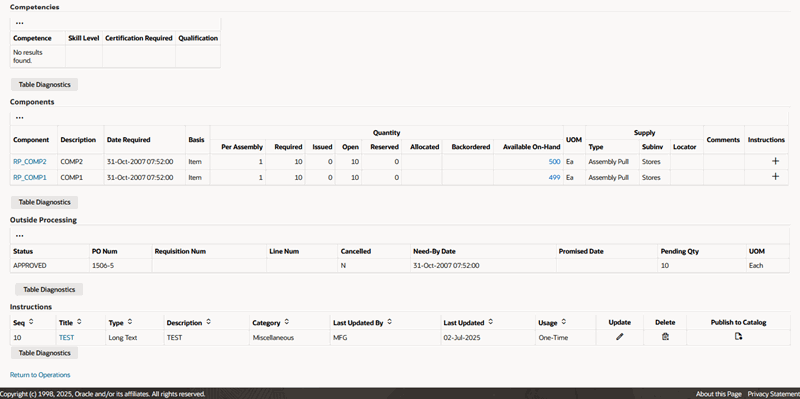
-
Competencies - If you set up the labor skills validation to certify the qualifications of operators performing transactions, this region shows information about the competence, skill levels, certification required, and qualification for the operation.
-
Components - This region provides information about the component name, description, required date, basis, quantity details (per assembly, required, issued, open, reserved, allocated, backordered, and available on-hand), unit of measure, and supply details (supply type, subinventory, and locator). Comments if any display and you can also use the Add Attachment icon in the Instructions field to add any additional information for the component.
-
Outside Processing - This region shows information about the status, purchase order number, requisition number, line numbers, cancelation information, need-by and promised dates, pending quantity and the unit of measure for the outside processing operation.
-
Instructions - If you have set up sequential instructions to perform an operation, this region provides the sequence, title, type, description, category, usage, when the operation was updated and by whom, deletion and publish to catalog information for the operation.
To update job operation progress percent
-
In the Operation Properties region on the Operation Details page, click the Update button.
Update Progress Percent
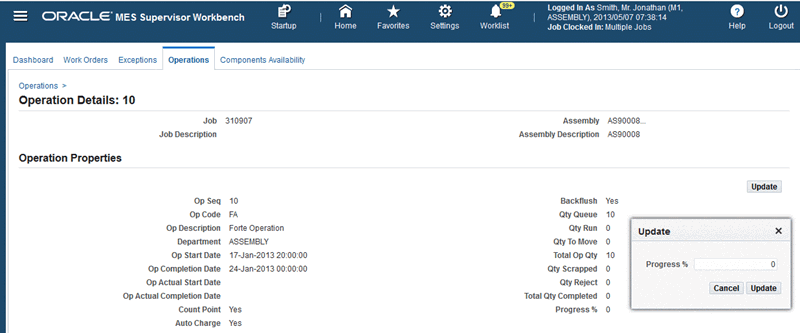
-
On the Update popup page that opens, enter a value between 0 and 100 in the Progress % field.
-
Click Update.
When you update the progress percent for a job operation, this update will display in the Operation Properties region when you open the Operation Details page for the job operation using the View Operation Detail action in the Dispatch list as well as from the Work Content page actions.
-
Reserving Components for Operations
You can perform material reservations for a selected job operation in the Supervisor Workbench using the Operations tab or the Work Content page. Select the Reserve Components action as a button or choice list action to ensure the action appears in the Dispatch list and Work Content actions. See: Job Operation Actions and Work Content Actions
To reserve components:
-
On the Operations tile or tab, select a job operation in the Dispatch List. See: Viewing and Managing Operations
Alternatively, select a job operation in the Dispatch List and then select the View Work Content action to open the Work Content page.
-
From the Actions list of values, select Reserve Components.
-
Click Go.
A message appears that components for the operation have been reserved.
-
Open the Operation Details page for the job operation for which you reserved components. See: Viewing Operation Details
-
Use the Components region on the Operation Details page to view information about the material reservations you created for the job operation.
Viewing and Managing Component Availability
Component Availability Management enables production schedulers to react to unplanned component shortage situations and make adjustments. You can take stock of open component requirements of work orders at a point of time, and set up the system to order production of jobs in a specified priority sequence. The Components Availability region provides both a job and a component view.
Job View
-
The Job View shows components available or required in relationship to the work order details, and is visible on either a single table view by allocation order or in the following regions:
-
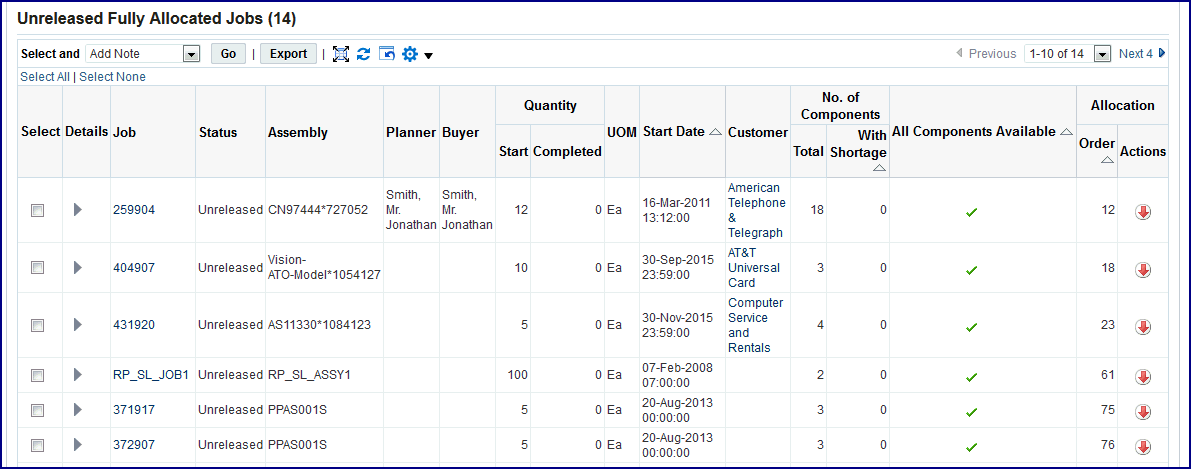
Unreleased Fully Allocated Jobs
-
Unreleased Partially Allocated and Unallocated Jobs
-
In Process Jobs
-
-
Jobs are marked as either having all components available or having component shortages.
-
Job inclusion criteria enables production schedulers to review open component requirements and take actions such as releasing work orders that have all components available; or canceling, putting on hold, or changing resources of work orders.
-
Forced allocation provides the ability for component requirements for a job to be exchanged or deallocated. Components can be deallocated from some jobs and allocated to others starting with the top most priority, using on-hand balances of the components.
Component View
-
The Component View shows information on component buyer, quantities, and subinventory.
Component Availability Calculations
-
Use the Component Availability Calculations parameter to define components and allocations. For each organization and calculation level record, you can define the following settings:
-
Reservations - Selecting the Reservation check box enables you to create or update component reservations for multiple work orders based on job priority rules, job inclusion criteria, and the components inclusion criteria that you define.
-
Job Priority Rules - Setting these rules defines the chronological priority order of job operation components considered for allocation.
-
Job Inclusion Criteria - Defining these criteria determines which jobs are considered in the component availability calculation.
-
Component Inclusion Criteria - Defining these criteria determines which components are considered with various options for the component availability calculation.
-
Forced Allocation Rules - Setting these rules determines which allocated jobs would be exempted from deallocation.
-
-
Select Launch Component Availability Calculations to generate data using the Launch Component Availability Calculations concurrent request. This program calculates and lists the job operations based on the setup for component availability calculations.
To view component availability in the job oriented view
-
Navigate to the Component Availability page and select the Job View tabbed region.
You have the option to view the information in a categorized or single view. The Single View table displays all work order records in a table by allocation order.
The Categorized View table displays three regions including:
-
Unreleased Fully Allocated Jobs
-
Unreleased Partially Allocated and Unallocated Jobs
-
In Process Jobs
-
-
Use the Filter Options region to restrict the data displayed by selecting values in the following fields:
-
Assembly
-
Status
-
Job
-
Start Date From and To
-
All Components Available
-
Demand Class
-
Schedule Group
-
Build Sequence
-
Base Assembly
-
Planner
-
Customer
-
Sales Order
-
Ship Date From and To
-
Project Number
-
Task Number
-
-
Select Go.
The results of your query appear in the three regions.
In the categorized view, depending on the region, job information appears in a table in the following fields:
-
Details
-
Job number
-
Job Status
-
Assembly number
-
Planner
-
Buyer
-
Quantity Start and Completed numbers
-
Unit of Measure
-
Start Date
-
Customer
-
Number of Components: Total and With Shortage
-
All Components Available flag
-
Allocation: Order and Actions
-
-
Select a Job link record to navigate to the details page for a particular work order, see: Viewing Job Details
-
Select the Customer name link to view sales order summary information.
-
In the Actions column, select the drop-down arrow to choose one of the following actions, depending on the region:
-
Unreleased Fully Allocated Jobs region: Unallocate
-
Unreleased Partially Allocated region: Force Allocate
-
-
Select Details to show the listing of components by Operation Sequence. The information appears in the following fields:
-
Operation Sequence
-
Component
-
Supply Subinventory
-
Date Required
-
On Hold
-
Projected Availability
-
Open Quantity
-
Shortage
-
Unit of Measure
-
Available
-
Expected Supply

-
-
Select the Component link to navigate to the Component View tabbed region showing all the work orders using this component.
See: Component View
-
Select the Expected Supplies icon to show a summary of the quantity and dates of the component ordered.
-
Review and select the relevant records, and select appropriate tasks for specific work orders in the Actions box.
-
Select Add Notes to navigate to the Update Note page to enter job information details. See: Updating Job Notes
-
Other choices depending on if the job meets the appropriate criteria are:
-
Cancel Job
-
Put Job On Hold
-
Release Job
-
Unrelease Job
-
-
-
After you select the action, select Go.
-
You have the option to select records in the tables and select Export. This action will save or open the details as a comma separated values file (.csv) for a spreadsheet.
-
Select Switch to Single View Table to view all work order records in a table by allocation order.
-
Use the Filter Options region to restrict the data displayed by selecting values and selecting Go.
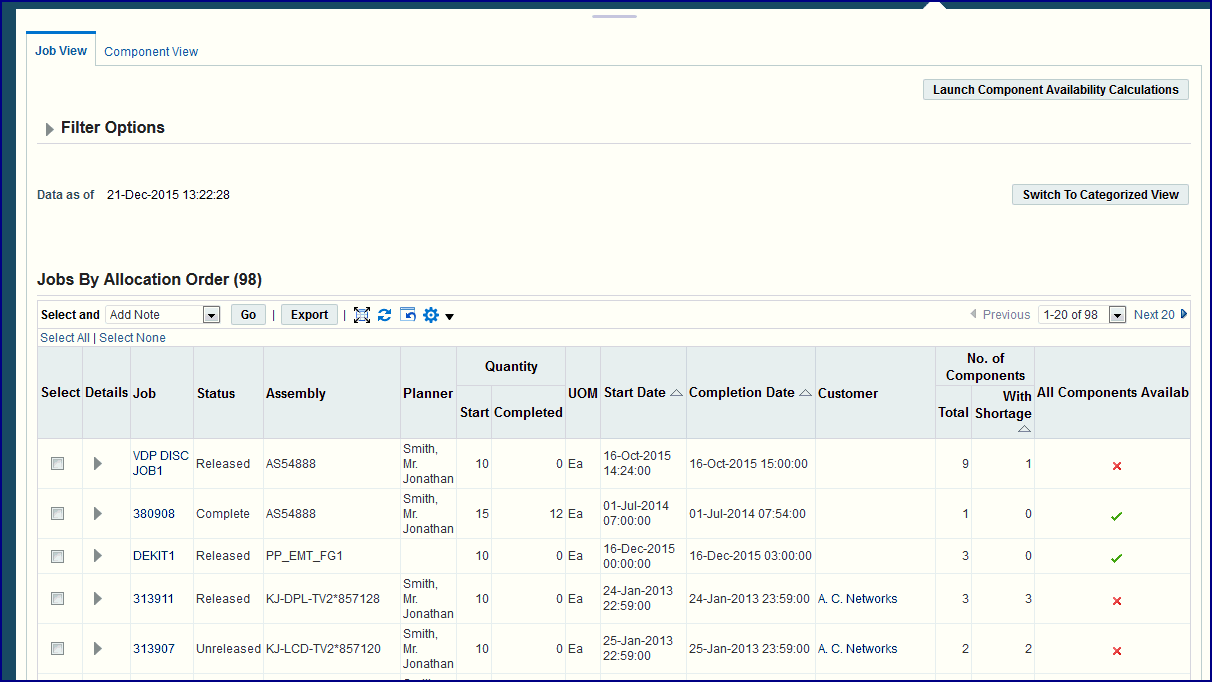
-
In the single view, information appears in a table in the following fields:
-
Details
-
Job number
-
Job Status
-
Assembly number
-
Planner
-
Quantity: Start and Completed values
-
Unit of Measure
-
Completion Date
-
Customer
-
Number of Components: Total and With Shortage
-
All Components Available flag
-
-
This view enables you to select records and perform actions. Select appropriate records, and in the Select and field, choose one of the following actions relevant to your component availability situations:
-
Add Note
-
Cancel Job
-
Put Job On Hold
-
Release Job
-
Unrelease Job
-
To view component availability in the component oriented view
Navigate to the Component Availability page and select the Component View tabbed region.
-
Use the Filter Options region to restrict the data displayed by selecting values.
There are two sections in the Filter Options region, select search criteria in the following fields:
Show Components with
-
Component
-
Supply Type
-
Date Required From and To
-
Buyer
-
Category
-
Component Available
-
Subinventory
-
Locator
Show Components of Jobs with
-
Assembly
-
Status
-
Job
-
Start Date From and To
-
Completion Date From and To
-
Demand Class
-
Schedule Group
-
Build Sequence
-
Planner
-
Customer
-
Sales Order
-
Ship Date From and To
-
Project Number
-
Task Number
-
-
Select go to show the results of your search.
Information appears in the following columns:
-
Component
-
Buyer
-
Subinventory
-
On Hand
-
Open Quantity
-
Shortage
-
Unit of Measure
-
Expected Supplies
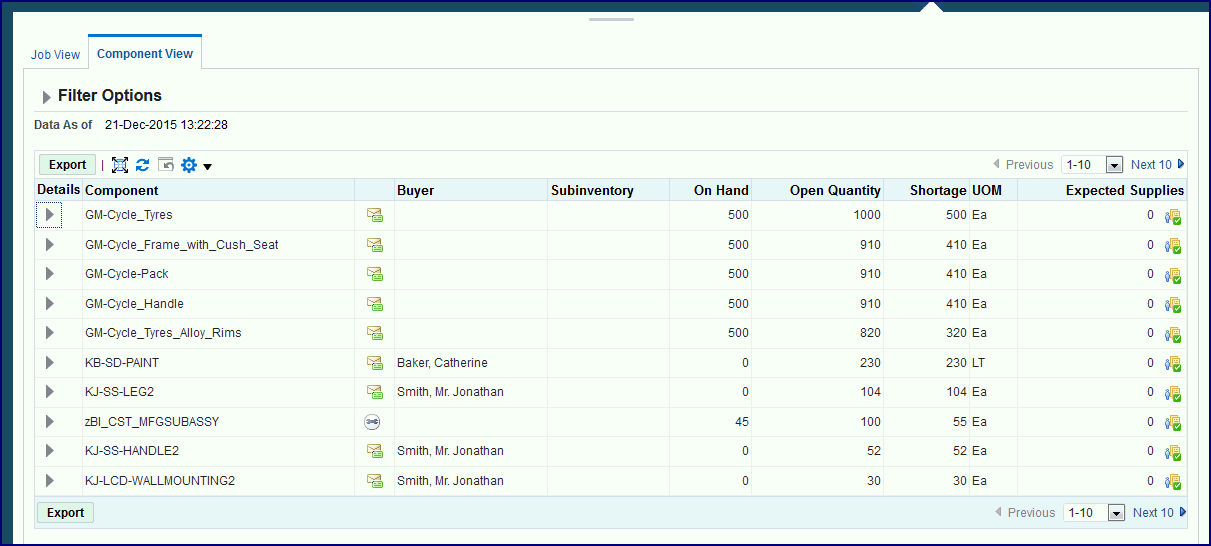
-
-
You have the option to select records and choose Export. This action will save or open the details as a comma separated values file (.csv) for a spreadsheet.
-
Select Details to show the listing of all jobs requiring a specific component. The information appears in the following fields:
-
Select the Expected Supplies icon to view a dialog window showing any orders for components.
Assigning Alternate Resources
You can use alternate resources to resolve production problems on the shop floor. Resources can be substituted in groups, enabling a switch from the current resource group to an alternate resource group. If several resources are available, they display in a drop-down box.
To assign alternate resources
-
Navigate to the Assign Alternate Resources page.
The page displays job number and description, assembly number and description, operation number and description.
The Resource table displays information about the available resources. The Required Amount and Available Amount indicates the resource load.
-
Select the resource you want to assign in the Resource box.

-
Enable the Group radio button if this is a resource group.
-
Select Apply to save your work.
Rescheduling Operations
You can reschedule operations to resolve exceptions in bottleneck job operations. You have the option to change scheduling direction, and start dates. Material and resource requirement dates are also updated. Use Oracle planning products to reschedule discrete jobs by modifying discrete job operations, importing modified jobs and schedules, and replanning planned orders using Oracle planning products.
Note: You can also use the WIP: Ignore Completed Operations in Backward Scheduling profile to enable the backward scheduling of in-progress and yet to start operations only, without affecting completed operations. This is also applicable for mid-point scheduling of operations that are earlier than the mid-point operation. See: Profile Option Descriptions, Oracle Work in Process User's Guide
To reschedule an operation
-
Navigate to the Reschedule Operation page.
Information displays in fields for Job, Job Description, Operation Sequence, Operation Description, and Actual Start and Completion Dates.
-
Select a direction in the Scheduling Direction field, choices are:
-
Forward: Scheduling begins at the start date and calculates a production end date.
-
Backward: Scheduling begins at the production end date and calculates a production start date.
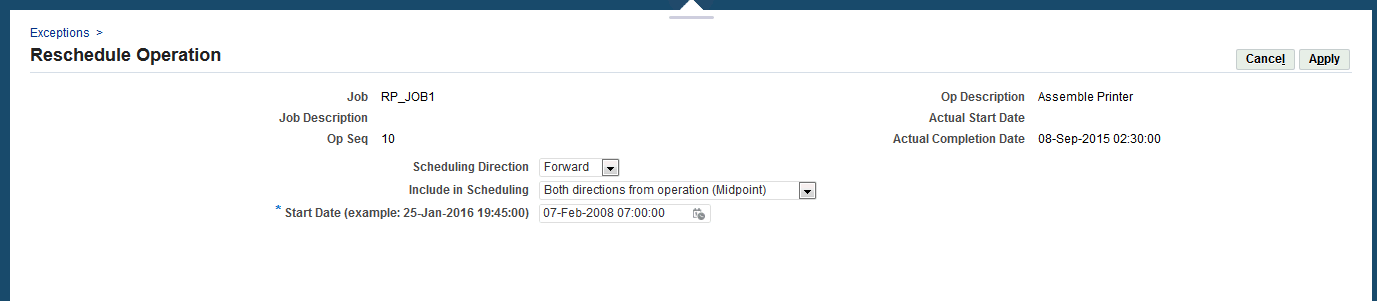
-
-
Select a value in the Include in Scheduling field, used to set the automatic scheduling option. Choices are:
-
Backward from operation (Midpoint Backward): Moves only the selected and prior operations, keeping them in sequence, when a time slot is located to move this specified operation. Next operations are not rescheduled.
-
Both directions from operation (Midpoint): Reschedules all prior and next operations when a time slot is found for the operation. Prior operations are backward scheduled. Next operations are forward scheduled.
-
Forward from operation (Midpoint Forward): Moves only the selected and next operations, keeping them in sequence, when a time slot is located to move this specified operation. Prior operations are not rescheduled.
-
Operation Only: Only the operation that is selected is scheduled. Prior and next operations are not rescheduled.
-
-
Select a value in the Start Date field to begin the rescheduling process.
-
Select Apply to save your work.
Related Topics
Rescheduling Discrete Jobs, Oracle Work in Process User's Guide
Changing Shopfloor Statuses
You may need to change the status of a job operation because exception problems. When you display the Assign Shopfloor Statuses page, existing exceptions display in a table view list. This page enables you to change the status of a specific interoperation step. The job progresses through the routing until it reaches that step
To change the status of the job operation
-
Navigate to the Assign Shopfloor Statuses page.
Exceptions display in a table view, the number of records in the list is dependent on your selection from the Exceptions page.
-
In the Job Op field, select the interoperation step for the status change.
-
In the Status field, select the new status for this interoperation step.
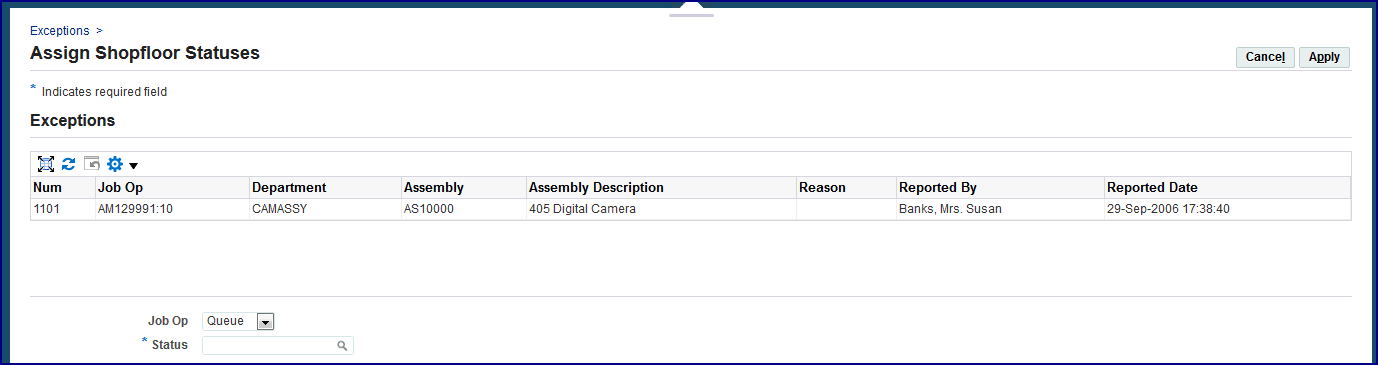
-
Select Apply to save your work.
Expedite and Undo Expedite
Any job operation can be moved to top priority on the dispatch list. Scheduled operation start and end times are not changed—the operation is moved on the display to make it prominent. The Ready column displays an arrow icon indicating the operation is expedited. Since expediting is performed at the job level, all operations are affected—and moved and marked on the dispatch list.
Using Contingent Workers
A contingent worker is typically a self-employed individual or an agency supplied worker. Contingent workers can perform many of the roles assigned to your employees. This type of worker is not paid in your payroll; they submit payment invoices to your accounts payable department or can be set up in the Oracle Services Procurement using Oracle Time and Labor to generate payment invoices automatically.
Note: Contingent workers exist as a separate category of worker from short-term or fixed-term contractors who are hired directly by your organization and are paid in your payroll.
MES for Discrete Manufacturing pages show contingent worker data along with other employees in the login context of the MES Workstation and the MES Supervisor Workbench. You can also view worker information in the following pages:
-
Work Content page: the Current Working Employees region shows employees and contingent workers clocked in and clocked out.
-
Supervisor Workbench: Monitoring Shop Floor Progress—the Current State region displays a real time view of the status of operators, and Operator Availability region provides of view of labor availability.
-
Supervisor Workbench: Labor Performance Metrics displays the performance metrics and the target goals when employees perform a Shift In and Shift Out.
Contingent workers assigned as resource instances can use the Reporting Resource Usage and Report My Time pages for time entry. Resources are tracked using employee badge numbers and resource instances. Your employees can use their Employee Number interchangeably as their Badge Number for transactions. However, a contingent worker requires a badge number to perform transactions.
Note: The contingent worker requires a unique badge number; badge sharing between an employee and a contingent worker in the same organization is not supported.
See: Contingent Workers, Oracle Human Resources Management Systems Workforce Sourcing, Deployment, and Talent Management Guide
To setup a contingent worker
-
Define the contingent worker in the Oracle Human Resources application. See:
-
Hiring an Applicant (People Window and Application Window), Oracle Human Resources Management Systems Workforce Sourcing, Deployment, and Talent Management Guide
-
Entering Contingent Worker Information, Oracle Human Resources Management Systems Workforce Sourcing, Deployment, and Talent Management Guide
-
Workforce Sourcing and Deployment, Oracle Human Resources Management Systems Implementation Guide
-
-
Navigate to the Resources window in Oracle Bills of Material.
-
Assign the contingent worker to a specific resource.
See: Defining a Resource, Oracle Bills of Material User's Guide
-
On the Resources window, select Employees.
-
On the Employees window select:
-
Number or Name for your contingent worker
-
Type: Contingent
-
-
Save your work.
Reviewing and Editing Time Entries
Shop floor time entry captures resource times using Job On and Job Off, Clock In and Clock Out. Employee, contingent worker, machine, and job time is tracked by user login identification and employee badge number, and controlled by the settings of several parameters, see: Shop Floor Time Entry
Shop floor supervisors can search time entries across all job operations and by all employees in the Review Time Entries page. This page enables you to edit and submit the records.
To review operator time entry
-
Navigate to the Review Time Entries page.
Work order records appear in the table according to your login and startup parameters.
-
You can filter the records appearing in the table using the following search criteria:
-
Assembly Serial Number
-
Work Order
-
Assembly
-
Operation Sequence
-
Department
-
Resource
-
Instance
-
Reported Badge number
-
Reported By
-
Start and End Time Within
-
Start Date From and To
-
End Date From and To
Select Go to display the results of your query appear in the table.
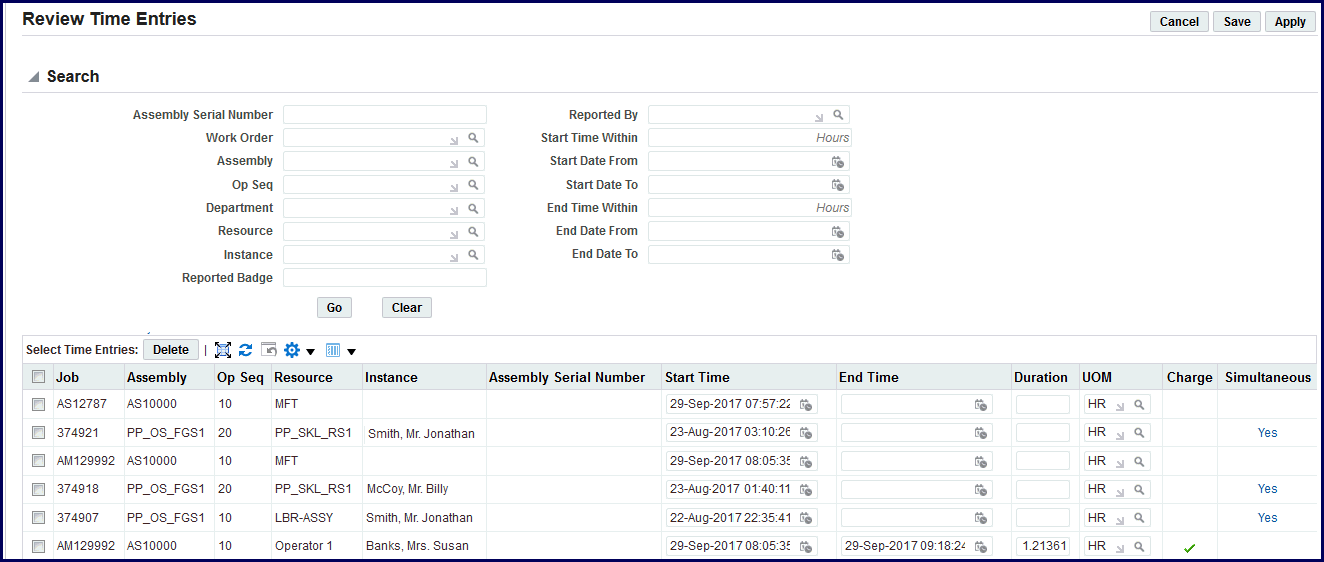
-
-
Enter values in the Start Time and End Time fields. The other fields automatically calculate the correct values. Optionally, you can change the value in the Unit of Measure field.
-
Select Save to save your work in draft as you are completing a long list of transactions.
-
Select Apply to save the time entries.
Viewing Time Entries
You can use the View Time Entries page to search and view the history of Job On and Job Off and Clock In and Clock Out information. You can view the duration of an employee, contingent worker, or machine that were engaged for a job. Select and add View Time Entry in the Update Parameter: Global Actions page to ensure that you can select this as an action from the MES Supervisor Workbench and open the View Time Entries page. See: Global Actions Parameter
To view time entries
-
Navigate to the View Time Entries page. You can default the values for department, resource, and instance fields to appear in the table according to your login and startup parameters.
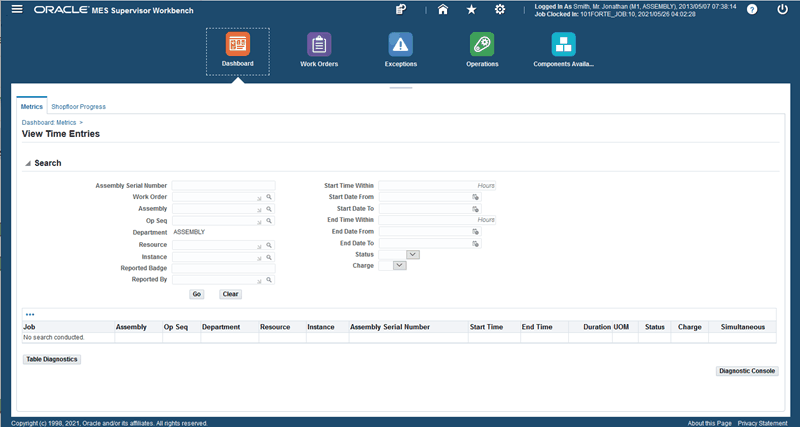
-
You can filter the records appearing in the table using the following search criteria:
-
Assembly Serial Number
-
Work Order
-
Assembly
-
Operation Sequence
-
Department
-
Resource
-
Instance
-
Reported Badge Number
-
Reported By
-
Start Time Within
-
End Time Within
-
Start Date From and To
-
End Date From and To
-
Status
-
Charge
-
The Status can be closed or pending. Pending refers to clock-outs that are pending or are under review.
-
Select Yes in the list of values for Charge to filter your view according to only time entries that are being charged. Otherwise, select No.
-
-
Click Go to display the results of your query.
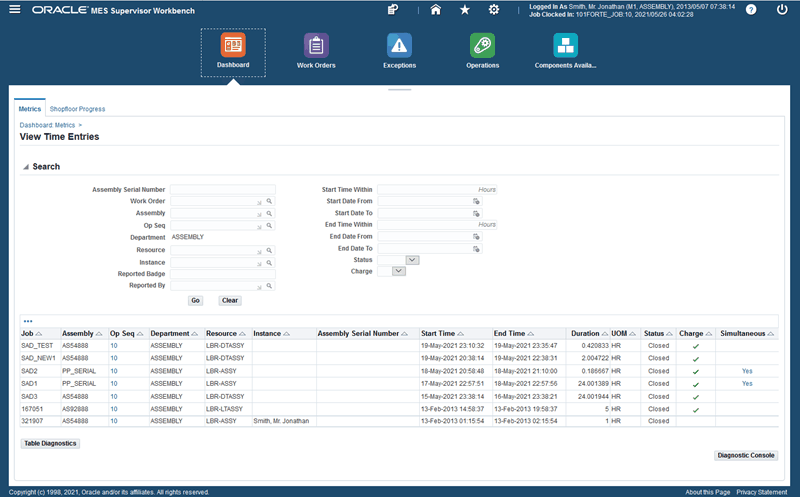
-
Click the links in the Op Seq column to view the details of resources engaged in the operation.
-
Click the links in the Simultaneous column to see the clock in time entry information for a resource on other jobs and operations in the same time frame. This enables you to view overlapping time entries.

Using the MES Supervisor Job Workbench
On the MES Supervisor Workbench, select the Job Workbench tab for a graphical view of schedule details of a work order, operations, resources, and resource instances. The H-Grid and the Gantt chart panes on the Job Workbench enable a visually interactive display of work orders on the shop floor that you can use to view and reschedule work orders, operations, resources, and resource instances. You can define the work order information that you want to see on the workbench and also how you would like to display your selected work order information on the workbench. You can adjust the date range of the job horizon view and the width of the Gantt chart. The following topics help you to setup and use the Job Workbench:
You can also open the Job Workbench from the MES Supervisor Workbench's Work Orders tab. See: Launching the Job Workbench for Work Orders
Starting Up the Job Workbench:
When you open the MES Job Workbench, you can define the organization for which you would like to view work orders. You can also view information for work orders based on a specific department and resource.
-
Navigate to the MES Supervisor Workbench and click the Job Workbench tab.
-
Click Startup from the page menu.
-
Use the Organization field to select an organization to ensure that all the department and resource information for that organization displays.
-
Optionally, in the Department field, select a department to display only the departments with jobs that are already defined.
-
Optionally, in the Resource field, select from the list of resource codes to display only the resources that are defined to a department.
-
Select Save Startup Parameters if you would like to save your selection.
-
Click Start.
On the MES Workbench, click the Job Workench tab to see job information.
Setting Job Workbench Filters:
You can select the work order information that you would like to see on the Job Workbench.
-
Navigate to the MES Supervisor Workbench and click the Job Workbench tab.
-
To filter Job Workbench information, click Filter.
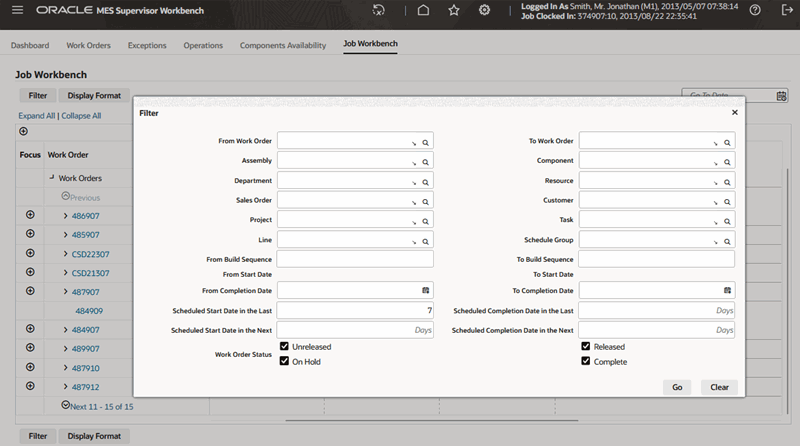
-
In the Filter pane that opens, optionally select values in the following fields:
-
From and To Work Order
-
Assembly
-
Component
-
Department
-
Resource
-
Sales Order
-
Customer
-
Project
-
Task
-
Line
-
Schedule Group
-
From and To Build Sequence
-
From and To Start Date
-
From and To Completion Date
Note: If you select a department in the Startup filter, the Department field is read-only in the job filter. If you select a resource in the Startup filter, both the Department and Resource are read-only fields in the job filter.
-
-
Enter the number of days in the following fields to specify the days within which you would like to display information:
-
Scheduled Start Date in the Last
-
Scheduled Completion Date in the Last
-
Scheduled Start Date in the Next
-
Scheduled Completion Date in the Next
Note: When you initially start the Job Workbench, the Scheduled Start Date in the Last field defaults to 7 days. Additionally, if you enter the number of days in either Scheduled Start Date in the Last or Scheduled Start Date in the Next, then the From Start Date and To Start Date fields are not enabled. If you enter the number of days in either Scheduled Completion Date in the Last or Scheduled Completion Date in the Next, then the From Completion Date and To Completion Date fields are not enabled.
-
-
Select from the following Work Order Status types to display on the workbench:
-
Released: Select to see work orders that are transactable.
-
Unreleased: Select to see work orders that are planned but not released for work and are not yet transactable.
-
On Hold: Select to see work orders that are on hold and are not progressing through the production cycle.
-
Complete: Select to see work orders that are complete and for which charges are allowed.
Note: All the job status are checked by default. Clear or select a job status check box to display jobs with a specific job status on the Job Workbench.
-
-
Click Clear to clear your job filter selections.
-
Click Go to apply and view your selected information on the Job Workbench.
Setting Job Workbench Display Preferences:
You can select how the data displays in the H-Grid pane and the width of the Gantt chart on the Job Workbench using the Display Format. Data display on the workbench is controlled by preferences you select in the Display Format.
-
Navigate to the MES Supervisor Workbench and click the Job Workbench tab.
-
To set display features on the Job Workbench, click Display Format.
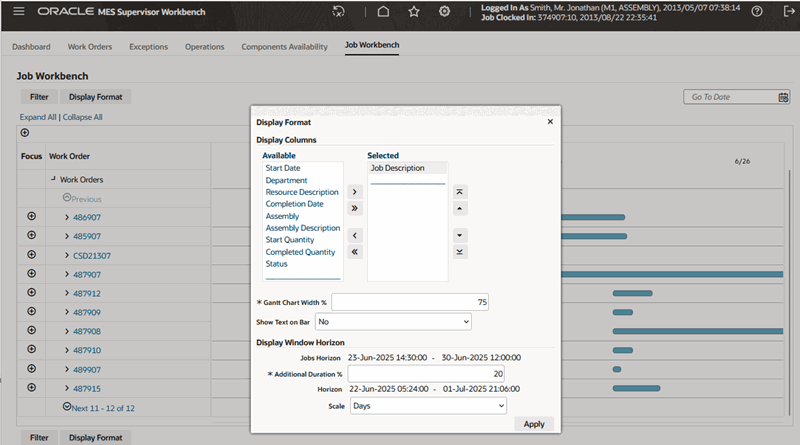
-
In the Display Columns pane, select the information you want to display on the workbench from the Available column, and move them to the Selected column.
Select from the following information attributes:
-
Start Date
-
Department
-
Resource Description
-
Completion Date
-
Job Description
-
Assembly
-
Assembly Description
-
Start Quantity
-
Completed Quantity
-
Status
The attributes you select display as columns in the H-Grid on the Job Workbench.
-
-
In the Gantt Chart Width % field, enter the percentage to determine the width of the Gantt chart display. The default Gantt chart width percentage is 75. Note that the allowed Gantt chart width percentage is between 50 and 75.
-
Set the Show Text on Bar to Yes to show the work order number, operation or resource on the Gantt chart bars, or else, select No.
-
Jobs Horizon indicates the date range view (from the job start date to the job end date) that displays on the Gantt chart, within which you can reschedule jobs on the Gantt chart.
-
Additional Duration (%) allows you to increase your job horizon view on the Gantt Chart. The default is 20 percent.
-
Depending on the Additional Duration (%) field value, you can select the Scale as the following:
-
Minutes
-
Hours
-
Days
-
Weeks
-
Months
-
Years
The scale on the Gantt chart changes according to your selection.
-
-
Click Apply.
Viewing Work Orders on the Job Workbench:
The Job Workbench displays the following panes:
-
H-Grid Tree Hierarchy: The Job Workbench tree displays your work orders and the associated operation, resource, and resource instances on the shopfloor. The Job Workbench displays 10 work orders records at a time and also displays the associated operations and resources for each work order. You can use the next and previous arrows to view additional records. You can expand and collapse these records.
-
Gantt Chart: The Job Workbench's Gantt chart includes a timeline in a horizontal bar chart for information that displays on the tree. The Gantt Chart pane displays the corresponding tree records.
-
Navigate to the MES Supervisor Workbench and click the Job Workbench tab.
You can also open the Job Workbench from the MES Supervisor Workbench's Work Orders tab. See: Launching the Job Workbench for Work Orders
-
Click Expand All to expand all the work order nodes to view the following tree levels:
-
Work Order
-
Operation
-
Resource
-
Resource Instance
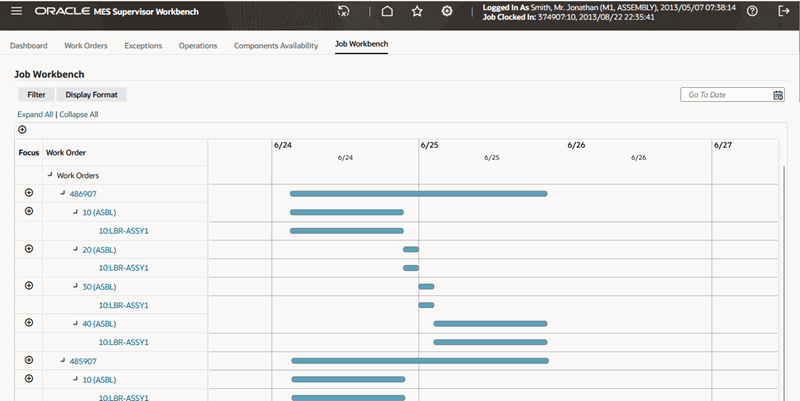
-
-
Click Collapse All to collapse all the tree levels to the main work order nodes.
-
Alternatively, click to expand a specific work order, operation, resource, and resource instance.
-
Click the Focus icon for a work order to only view operations, resources, and resource instance details of that specific work order in the Gantt chart. Click the Work Orders link that appears above the Focus column to go back to displaying all the work orders.
-
Use the Go To Date field to enter a specific start date to display work orders from that specific start date on the Gantt chart. Ensure that the start date that you enter is within the horizon that you set for the Gantt chart display. See: Setting Job Workbench Display Preferences.
-
Click the linked work order to see work order details. See: To view details for a specific work order section in Viewing and Updating Work Order Status Details.
-
Click the linked operation to see operation details. See: Viewing Operation Details.
-
Click the linked resource to see resource details.
-
On the Gantt chart pane, select a work order, operation, resource, or resource instance bar to view the bar details that display.
Use the work bar details to view the following:
-
Work Order
-
Description
-
Assembly
-
Assembly Description
-
Status
-
Start Quantity
-
Quantity in Queue
-
Completed Quantity
-
UOM
-
Line
-
Schedule Group
-
Build Sequence
-
Project
-
Task
-
Firm
-
Date Released
-
Date Completed
-
Start Date
-
End Date
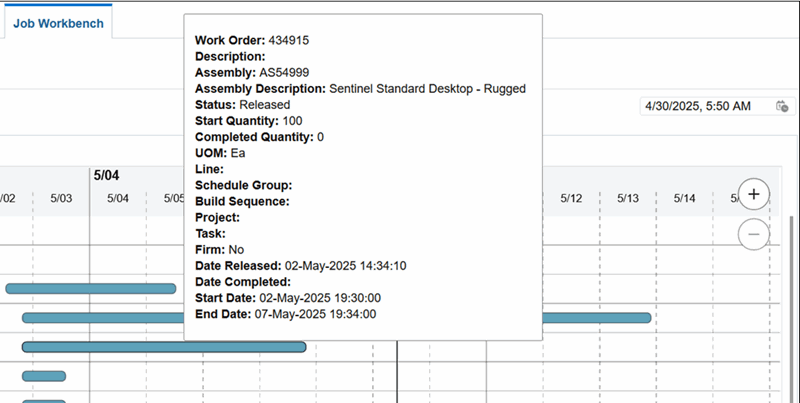
Use the operation bar details to view the following:
-
Operation Sequence
-
Description
-
Operation Code
-
Department
-
Quantity in Queue
-
Quantity Running
-
Quantity to Move
-
Quantity Rejected
-
Quantity Scrapped
-
Quantity Completed
-
Progress %
-
Start Date
-
End Date
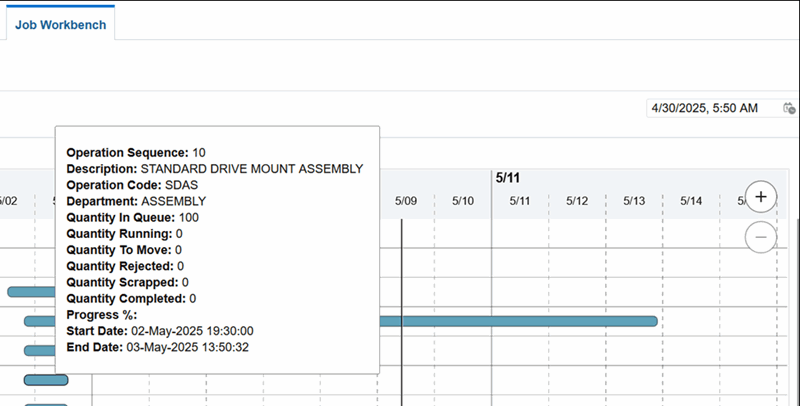
Use the resource bar details to view the following:
-
Resource Sequence
-
Resource
-
Description
-
Usage Rate
-
UOM
-
Basis Type
-
Assigned Units
-
Scheduled
-
Charge Type
-
Start Date
-
End Date
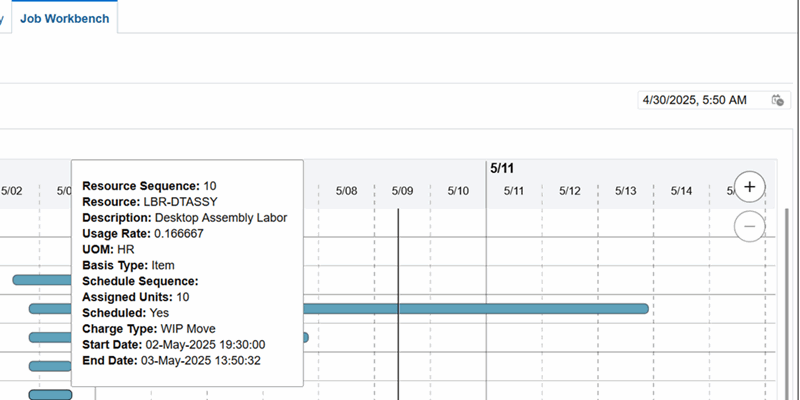
Use the resource instance bar details to view the following:
-
Work Order
-
Operation Sequence
-
Resource Sequence
-
Instance Type
-
Start Date
-
End Date
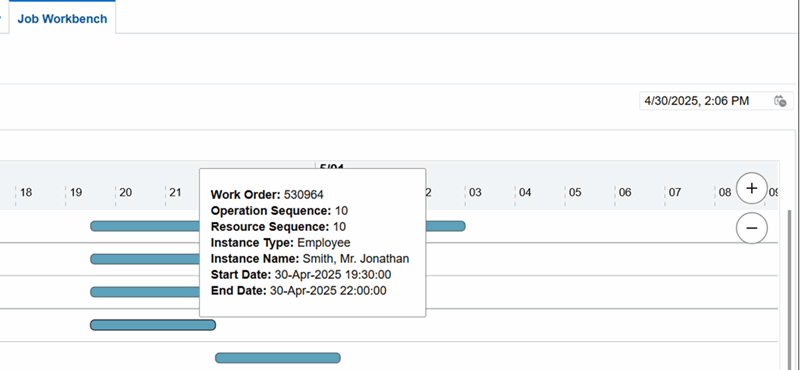
-
-
Use the Zoom In (+) and Zoom Out (-) icons to change the Gantt View.
Automatically Reschedule Work Orders on the Job Workbench:
You can automatically reschedule a work order on the Gantt chart. The work order is moved forward or backward.
-
Expand the work order node to display operations, resources, and resource instances.
-
On the Gantt Chart, select the work order bar that you would like to reschedule and right-click.
-
Click Reschedule Work Order.
-
The Reschedule Work Order popup opens. You can use it to view the work order, description, assembly, status, and the start and completed quantities.
-
To reschedule a work order, view the current scheduled start and completion date of a work order and then update either the scheduled start date or the scheduled completion date of the work order.
-
Click Cancel if you do not want to reschedule the work order.
-
Click Apply to reschedule the work order.
Automatically Reschedule Operations on the Job Workbench:
You can automatically reschedule an operation on the Gantt chart. The operation is moved forward or backward.
-
Expand the work order node to display operations, resources, and resource instances.
-
On the Gantt Chart, select the work order operation bar that you would like to reschedule and right-click.
-
Click Reschedule Operation.
-
The Reschedule Operation popup opens. You can use it to view the job, description, operation sequence, operation description, start and end dates.
-
To reschedule an operation, provide information for the following fields:
-
Scheduling Direction - Optionally, select from the following:
-
Forward
-
Backward
-
-
Include in Scheduling - Select from the following:
-
Both directions from operation (Midpoint):
-
Forward from operation (Midpoint Forward)
-
Backward from operation (Midpoint Backward)
-
Operation Only
For more information about these options, see: Rescheduling Operations
-
-
Start Date - Enter a new start date.
-
-
Click Cancel if you do not want to reschedule the operation.
-
Click Apply to reschedule the operation.
Manually Reschedule Work Orders, Operations, Resources, and Resource Instances on the Job Workbench:
You can manually reschedule any work order, operation, resource, and resource instance on the Gantt chart within the job horizon that you set that work order and its associated nodes.
-
Expand the work order node to display operations, resources, and resource instances.
-
On the Gantt Chart, select the the work order, operation, resource, or resource instance bar that you want to manually reschedule.
-
Position your cursor at the start or end of a bar.
-
Drag the end of the bar forward to change the end date. Drag the beginning of the bar backward to change the start date. The bar details display and shows the Start and End Dates change when you move the bar to the respective direction.
Depending on whether you are manually rescheduling a work order, operation, resource, or resource instance, note the following:
-
You cannot move the beginning of the work order bar backward before the date of an existing operation.
-
You cannot move the end of the operation bar forward beyond the date of the work order.
-
You cannot move the end of the resource bar forward beyond the end date of the operation.
-
When you manually reschedule a resource, the resource instances are also rescheduled accordingly.
-
-
When you drag or resize the bar, the rescheduled dates are automatically saved and are committed to the database.