Global Actions
This chapter describes global action views and tasks displayed in the MES Supervisor Workbench and the MES Workstation.
This chapter covers the following topics:
- Global Actions
- Printing the Discrete Job Routing Sheet
- Report Resource Usage
- Searching for Jobs
- Customizing Global and Job Operation Actions
Global Actions
Global actions are views and tasks based on site, role, organization and department. Global action display is set using the Global Actions parameter, see: Global Actions. These actions can include:
-
Launch Job Workbench, see: Using the Job Workbench, Oracle Work in Process User's Guide
-
Launch Resource Workbench, see: Using the Resource Workbench, Oracle Work in Process User's Guide
Printing the Discrete Job Routing Sheet
You can print the Discrete Job Routing Sheet to list information about the job, operations, customer, routing steps, requirements, resources. Report sorting can be by job, schedule group, and build sequence. You can set a simple or advanced schedule to automatically submit this report.
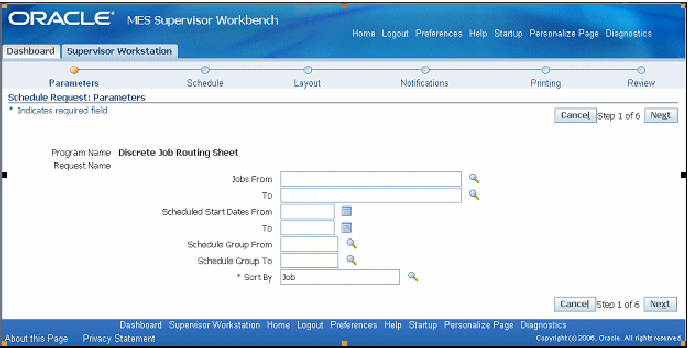
The pages for this concurrent program display a chronology of steps, or a process train, showing where you are in the process. The train displays Parameters, Schedule, Layout, Notifications, Printing, and Review.
To print the Discrete Job Routing Sheet
-
Select the Print Discrete Job Routing action to navigate to the Discrete Job Routing Sheet program.
The Schedule Request Parameters page appears. The step train displays the steps to complete with the Parameter step highlighted.
-
Enter the appropriate report submission information in the following fields:
-
Jobs From and To: Select a beginning and an ending job to restrict the report to a range of jobs.
-
Schedule Start Dates To and From: Select a beginning and an ending date to restrict the report to a range of scheduled start dates.
-
Schedule Group From and To: Select a beginning and an ending schedule group to restrict the report to a range of schedule groups.
-
-
Choose one of the following Sort By options:
-
Job
-
Schedule Group, Build Sequence—sort by the schedule group, then by build sequence within the schedule group
-
-
Select Next to display the other pages, and select the details appropriate for your report. The process train highlights each step as you proceed. This includes:
-
Schedule
-
Layout
-
Notifications
-
Printing
-
Review
-
-
Select Submit to generate the report.
Report Resource Usage
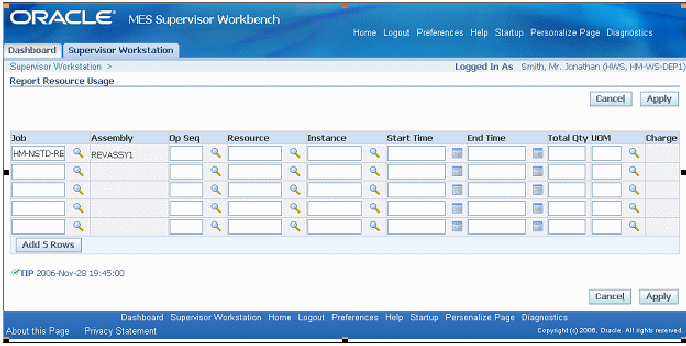
The Report Resource Usage page enables you to change and charge resources and resource instances. You can also change resource charges to other units of measure. If the entry is time based, the system uses the Charge Resource at Report Time parameter. Otherwise, the resource charge occurs when you save your record.
The start time comes from all sources including clock actions, time card entry, and resource usage charging at both resource and instance levels. In each situation when the time is modified, the actual resource start and completion time is recalculated. Operation actual time and job actual time only use resources with a scheduled flag set to Yes.
If the parameter Charge Resource at Report Time is enabled, and the job operation is flagged as autocharge—the Charge check box displays a check symbol.
To report resource usage
-
Navigate to the Report Resource Usage page.
-
Select the appropriate information in the following fields:
-
Job
-
Operation Sequence
-
Resource
-
Instance
-
-
Enter a value in two of these fields—Start Time, End Time, and Total Quantity. The other field will automatically calculate the correct value.
-
Optionally, you can change the value in the Unit of Measure field.
-
Select Apply to save your work.
Searching for Jobs
The Search Jobs page enables you to search for a specific job for performing transactions on that job. Actions available are set on the Search Job Operation Actions parameter. You can set this page as your Startup page in the Job Selection Mode parameter. See: Search Job Operation Actions
To search for jobs
-
Navigate to the Search Jobs page.
-
In the Search region, select from the following values in the Attribute field:
-
Job Name - If you select a job name, you can view the job and all the job operations associated to the job.
-
Sales Order - If you select a sales order, you can also select an order line.
-
Kanban Card - If you select a kanban card, you can view only the most current job and job operation associated to that kanban card.

-
-
Select Go to display the results of your search.

The job information displays including Type, Status, Assembly, Assembly Description, Job Quantity Start and Completed, Unit of Measure, Start Date, Completion Date, Customer, and Sales Order.
The status of the job operations display in the Job Operations region including Ready Status, Operation Start and Completion Dates, Operation Quantities in the interoperation steps, and any exceptions logged.
Specific transactions can be performed depending on how you set up the Search Job Operation Actions parameter.
Customizing Global and Job Operation Actions
The Global Actions and Job Operation Actions parameters enable you to display or restrict a number of seeded actions available on the MES Workstation and MES Supervisor Workbench. See:
You can add other reports and functions you use on a regular basis to these actions. This is accomplished by setting up these menu options in the Form Functions and Manufacturing Lookups windows.
To set up a customized global or job operation action
-
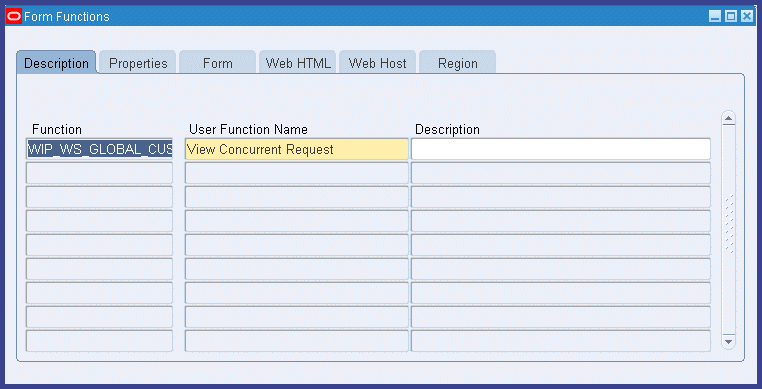
Navigate to the Form Functions window.
See: Form Functions Window, Oracle E-Business Suite System Administrator's Guide - Security
Note: In this setup example, the View Concurrent Request page is used as an example of a non-seeded global or job operation action. You can use other reports and actions not included in the seeded environment.
-
Create a new function by entering the following values.
Note: The number part of the FORM_FUNCTION_NAME_NUMBER value is what is entered as the Code in the lookup. The key to this capability is to create a form function name with a number:
-
In the Description tabbed region enter a Function Name and User Function Name:
-
Function Name, for example:
Global Action: WIP_WS_GLOBAL_CUSTOM_1001
or
Job Operation Action: WIP_WS_JOBOP_ACTIONS_CUSTOM_1001
-
User Function Name: for example: View Concurrent Request
-
-
In the Properties tabbed region, enter in the Type field: SSWA jsp function
-
In the Web HTML tabbed region, enter the HTML Call value:, for example: OA.jsp?akRegionCode=FNDCPREQUESTVIEWPAGE=0
-
-
Save your work.
-
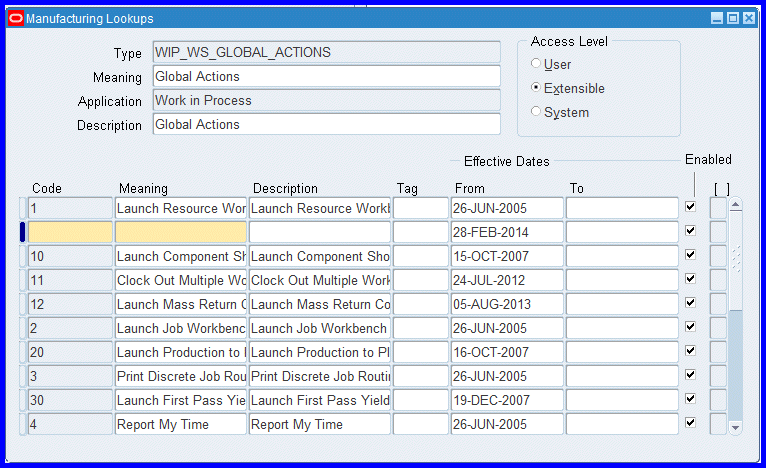
Navigate to the Manufacturing Lookups window.
See: Application Utilities Lookups and Application Object Library Lookups, Oracle E-Business Suite Developer's Guide
-
Search for the following record using these search parameters:
-
Type: WIP_WS_GLOBAL_ACTIONS or WIP_WS_JOBOP_ACTIONS
-
Meaning: Global Actions or Job Operation Actions
-
Application: Work in Process
-
Description: Global Actions or Job Operation Actions
-
-
Place your cursor in the Code field, and select New to create a new entry.
A new row appears for entering data.
-
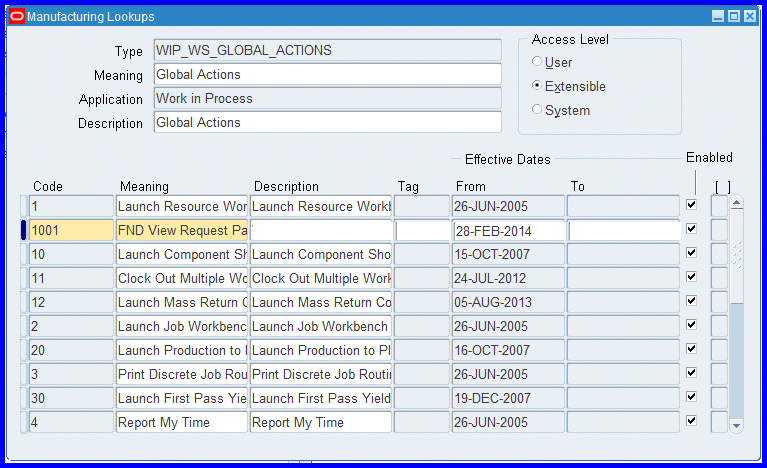
In the new row that appears, in the Code field, enter the numeric value you created in the Form Functions window.
For example, if you entered the custom function name WIP_WS_GLOBAL_CUSTOM_1001, enter 1001 as the Code value.
When the numeric value is identical to the form function number, Oracle code calls the respective function when the action is selected.
-
In the Meaning field, enter the name of the program, and in the Description field enter the description of the program.
For this example of viewing the concurrent request page, use:
-
Meaning: FND View Request Page
-
Description: View Concurrent Requests page
-
-
Save your work.
-
Navigate to the Manufacturing Execution Workstation Parameters page.
-
Select a parameter level. Your choices are Site, Role, Organization, or Department. Depending on the level selected, other level specific values are required.
-
Select Go to display the Workstation Parameters page.
-
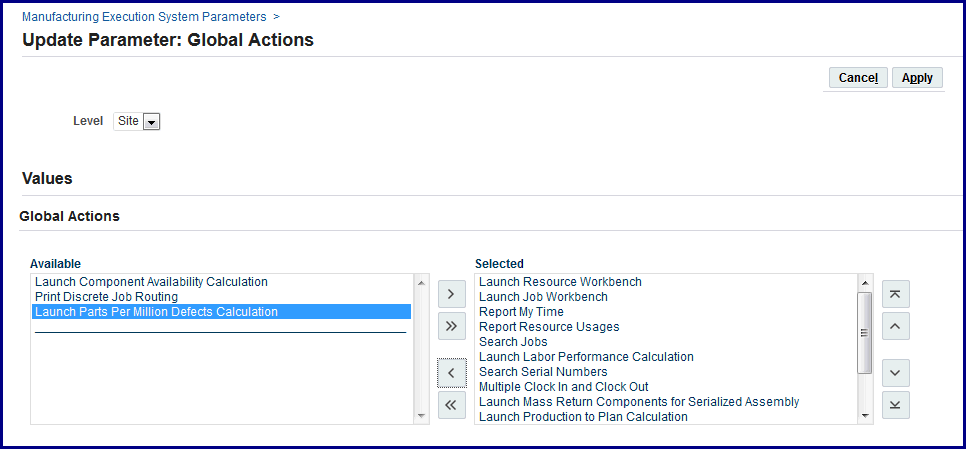
Select the appropriate parameter, either Global Actions or Job Operation Actions, and choose Update.
-
Select the new action you added from the Available box—and move to the Selected box.
The order listed in the Selected box, is the order displayed on the page. Use the Arrow tool to change the order they appear in the pop-list.
Now when you are in either the MES Workstation and MES Supervisor Workbench - based on site, role, organization and department access - this task appears as an action.