Site Hierarchies
This chapter covers the following topics:
- Overview of Site Hierarchies
- Creating Hierarchies
- Updating Hierarchies
- Viewing Site Hierarchies
- Using the Hierarchy Workbench
Overview of Site Hierarchies
A hierarchy is a tree representation of the relationships between multiple sites, grouped by common characteristics at several levels. This logical grouping acts as a visual aid and enables you to drill down to site details. The hierarchy functionality in Site Hub provides for organizations with a large number of sites to create relationship roles between sites. You can create hierarchical structures for your sites according to both site and hierarchy purposes and attributes.
The Site Hub Hierarchy Workbench enables you to manage hierarchies, their nodes, and associated sites. You can:
-
Create hierarchies.
-
Add site records to a hierarchy.
-
Create new nodes on a hierarchy structure.
-
Create and view parent-child relationships between sites in a hierarchy.
-
Edit hierarchies. For example, you can move and copy members.
Access the Site Hub Hierarchy Workbench through the following navigation:
-
Site Management User > Site Management User > Site Home > Home > Hierarchies > Hierarchy Workbench
Related Topics
Defining Hierarchy Relationship Rules
Creating Hierarchies
A hierarchy is a tree representation of multiple sites, grouped at several levels. You can create hierarchical structures for your sites, categorizing business purposes for both the hierarchy and its associated sites. You can add or remove nodes and sites after you have created the hierarchical structures.
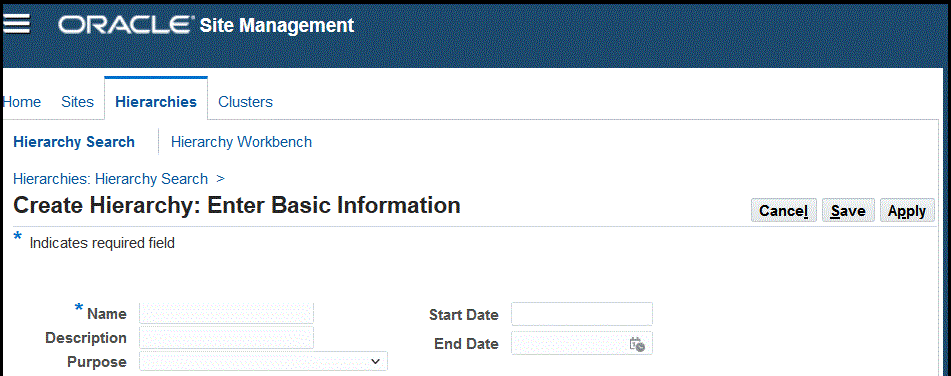
To create a site hierarchy
-
Navigate to the Create Hierarchy: Basic Information page (Site Management User > Site Management User > Site Home > Home > Hierarchies), and click the Create button.
-
Enter a value in the Name field.
-
(Optional) enter values in the Description, Purpose, Start Date, and End Date fields.
-
Save your work by selecting one of the following options:
-
Click Apply to save your record and return to the Hierarchies page.
-
Click Save to display the Hierarchy Workbench page.
-
Updating Hierarchies
You can perform update transactions, such as create and add sites and nodes, and update hierarchy attributes using the Hierarchy Workbench.
To update records using the Hierarchy Workbench
-
Navigate to the Hierarchy Workbench (Site Management User > Hierarchies > Hierarchy Workbench).
-
Search for the hierarchy and add it to the Hierarchy List,
-
Click the Update Hierarchy button to access the Hierarchy Workbench to make changes to the hierarchy.

The Hierarchy Workbench page appears.
-
Use one of these methods to move hierarchies:
-
Drag and drop the hierarchy from the Hierarchy List pane to the Edit Pane 1 pane or Edit Pane 2 pane.
-
Right-click the hierarchy you want to move and select one of the following options:
-
Move to pane1 - this action moves the hierarchy to Edit Pane 1
-
Move to pane2 - this action moves the hierarchy to Edit Pane 2
-
-
-
Highlight the hierarchy and right-click to access the following options in the context menu:
-
Expand - Select to expand and view any associated child nodes.
-
Collapse - Select to hide any associated child nodes.
-
Move Member - Select to move the member from Edit Pane 1 to Edit Pane 2, or to a different location in the same pane. Available only if there is a hierarchy in Edit Pane 2. You can also use the Drag and Drop action to move the member to another location in the destination pane or within the same pane.
-
Copy Member - Select to copy the highlighted hierarchy from one hierarchy to another hierarchy. You can also use the Drag and Drop action to copy the member to another location in the destination pane or within the same pane.
-
Create Site - Select to create a Child, Sibling Before, Sibling After. A site must exist to create a sibling before or after.
Sibling Before and Sibling After options are disabled for root nodes in the edit panes.
-
Add Site - Select to create a Child, Sibling Before, Sibling After. A site must exist to add a site sibling before or after.
Sibling Before and Sibling After options are disabled for root nodes in the edit panes.
-
Create Node - Select to create a Child, Sibling Before, Sibling After. A node must exist to create a sibling before or after.
Sibling Before and Sibling After options are disabled for root nodes in the edit panes.
-
Remove - Select the hierarchy member that you want to remove. Any associated child members will also be removed.
-
Update - Select to update the attributes (name, purpose, description) for the nodes and sites for the hierarchy member.
Note: You cannot update the root hierarchy from the Hierarchy Workbench.
-
Callout - Select to set up a custom page to enter transactions for your environment's requirements. The data that appears in the panes is passed to the custom page.
See Custom Hierarchy Page for more information.

-
-
Click Apply to save your work.
-
To edit the record, highlight the object, right-click and select Update. For more information, see: Using the Hierarchy Workbench
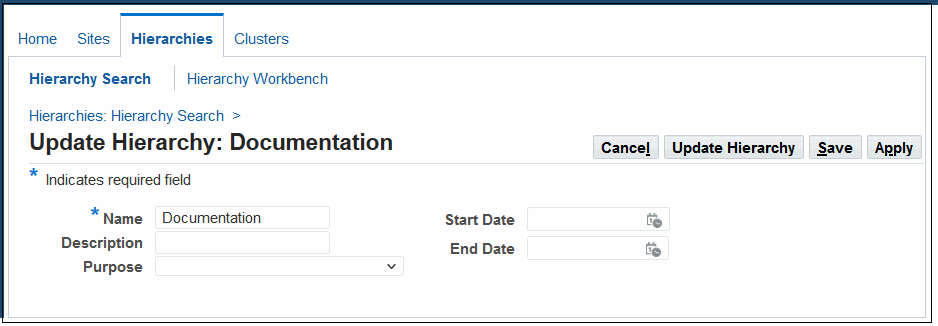
Updating Hierarchy Attributes
-
Click the Update Attributes icon for the hierarchy.
The Update Hierarchy Attributes page appears.
-
Edit the following fields if needed:
-
Name
-
Description
-
Purpose
-
Start Date
-
End Date
-
-
Click Save or Apply to save your work.
Viewing Site Hierarchies
Site Hub enables you to search and view hierarchies as follows:
-
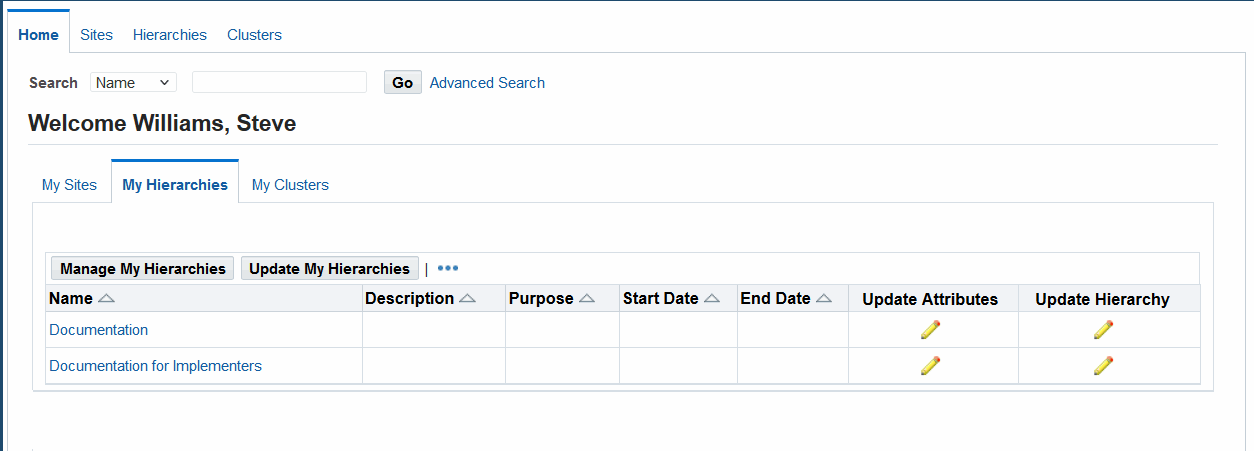
My Hierarchies tabbed region on the Site Management User Home region
Records appearing in this region are selected in the Manage My Hierarchies page for those hierarchies you frequently access.
-
Hierarchies tabbed region of the Site Management User workbench
This tabbed region displays the Hierarchies Simple Search page where you can navigate to pages to view, create, and update hierarchy records.
-
Hierarchy Workbench
You can navigate to the Hierarchy Workbench and perform searches directly on the workbench.
To access records using the My Hierarchies page
-
Navigate to the My Hierarchies page.
The hierarchies you have identified as My Hierarchies appear on this page.
-
This page enables you to select:
-
Manage My Hierarchies to choose your default record display. These records display on the My Hierarchies page, and when you enable the My Hierarchies check box on the Hierarchies page. See: Managing Favorites
-
Update Hierarchies to navigate and display all records on this page on the Hierarchy Workbench for editing. See: Using the Hierarchy Workbench
-
Hierarchy Name link to navigate to the View Hierarchy page.
-
Update Attributes to navigate to the Update Hierarchy page for a specific record.
-
Update Hierarchy to navigate and display a specific record on the Hierarchy Workbench. See: Using the Hierarchy Workbench
-
To view site hierarchies on the Hierarchy tabbed region
-
Navigate to the Hierarchies page.
-
Enter search criteria values in Name, Description, or Purpose fields.
You also have the option to select the My Hierarchies check box to display the Favorites records, see: Searching for Information
-
Select Show More Search Options to display search criteria fields for dates and status.
Note: The hierarchy search function is designed to search either by date or status, not both values simultaneously.
-
Select Go to display the results of your search.
-
The Hierarchies page enables you to select:
-
Update Hierarchies to navigate and display all records on this page on the Hierarchy Workbench for editing. See: Using the Hierarchy Workbench
-
Add to My Hierarchies to add a record to your favorites list, see: Managing Favorites
-
Create to navigate to the Create Hierarchy: Enter Basic Information page for defining new records, see: Creating Hierarchies
-
Update Attributes to navigate to the Update Hierarchy page for a specific record.
-
Update Hierarchy icon to navigate to the Hierarchy Workbench for editing an individual record, see: Using the Hierarchy Workbench
-
Hierarchy Name link to navigate to the View Hierarchy page.
-
-
Select the Name link for a record.
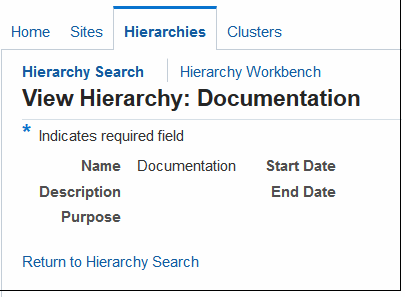
On the View Hierarchy page the hierarchy record details display such as Name, Description, Purpose, Start and End Dates, and associated attribute pages.
-
Select a record in the Page box to view an associated attribute page.
-
Select Go to display the page.
Using the Hierarchy Workbench
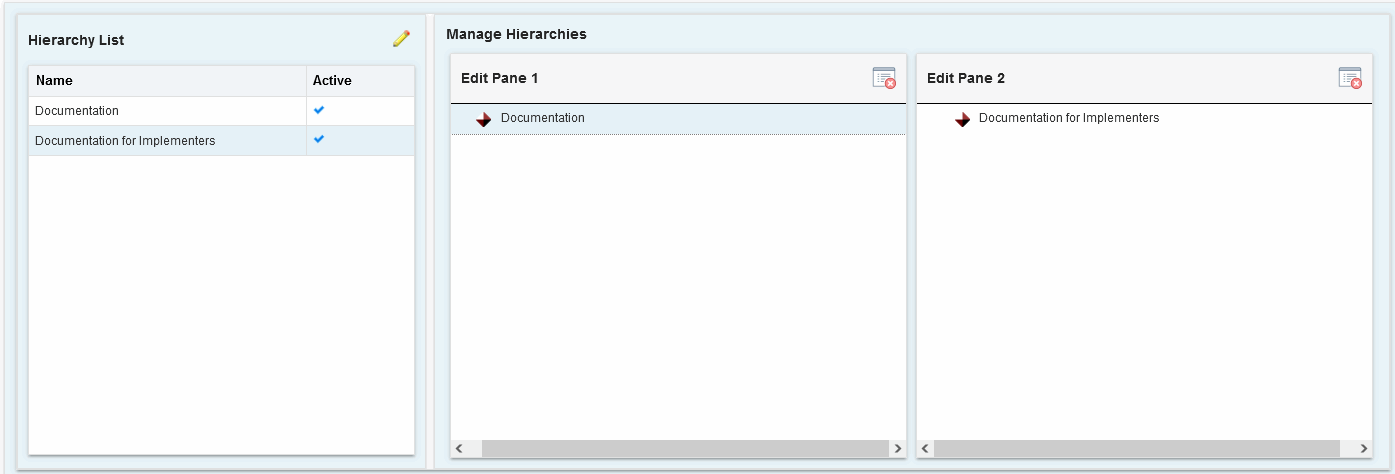
The Hierarchy Workbench consists of four panes. When you navigate to the workbench by selecting hierarchy records from the search pages, they appear in the Hierarchy List pane. The records in the list can be moved to the Edit Panes as you drag and drop when performing edits on them. Associated hierarchy and site attribute details display on the Attributes pane when specific records are selected. This workbench enables you to:
-
Search and add hierarchy records.
-
Drag and drop records for performing edits.
-
View assigned hierarchy and site attribute details.
-
Create new nodes on the structure.
-
Create new hierarchy records.
-
Add site records to the hierarchy structure.
-
Navigate to site records for editing.
For a summary of navigation moves on the Hierarchy Workbench, see: Hierarchy Workbench Navigation
Role Based Access Behavior in the Hierarchy Workbench
In the Hierarchy Workbench, the View privilege is required to display attributes, a lock icon appears if the View privilege is not granted:
-
Adding a parent to a site, or adding a child node to a site, are edits to the hierarchy—not to the site.
-
If view and edit hierarchy rights are not granted, only the site name is visible and the ability to update is not available.
-
If view hierarchy privilege is granted, that user or group has the ability to drag site records from that hierarchy to another hierarchy record, even if edit hierarchy privilege is not granted. You can prevent this behavior by not granting view access to users for specific hierarchies.
See: Setting Up Role Based Access Control, and Overview of Role Based Security Access
Searching in the Hierarchy Workbench
You can search the Hierarchy Workbench for hierarchies in the Hierarchy List, sites in the Edit Panes, and Nodes in the Edit Panes:
-
The search can be filtered by selecting a value in the Search in box for All, Hierarchy List, Edit Pane 1, or Edit Pane 2.
-
You can move up or down the list of records selecting Previous and Next.
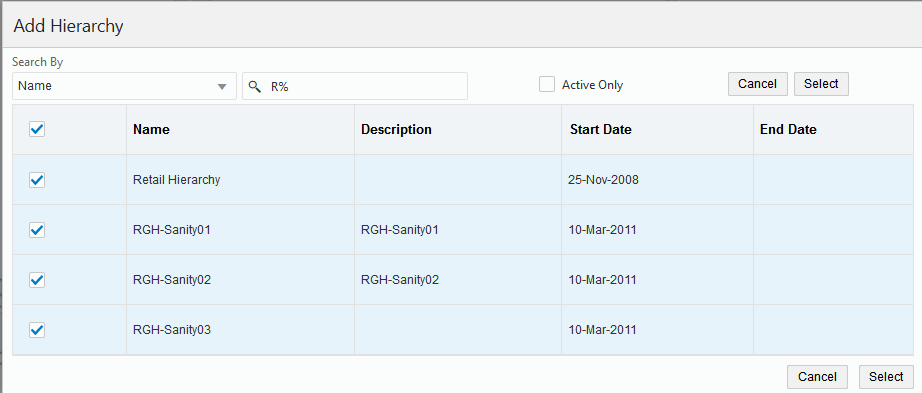
To add hierarchy records in the Hierarchy Workbench
-
Select the Add Hierarchy (pencil) icon in the Hierarchy List pane, and the Add Hierarchy popup appears.
The Add Hierarchy search box appears.
-
Select a Search By value: Name or Description.
-
Enter search criteria, and the applicable values appear.
-
Select the check box for the records to display on the Hierarchy Workbench. Only the hierarchy records that are active or with no end date appear for selection.
-
Click Select to display the records on the Hierarchy Workbench.
Click the Sort button on the Name column to sort the hierarchies in ascending or descending order.
To search for a hierarchy element in the Hierarchy Workbench
Now that you have added hierarchies to the Hierarchy Workbench, you can view associated information and also make changes to the hierarchies.
-
On the Hierarchy Workbench, enter a value in the Look for field.
-
Select a value in the Search in field. Values are All, Hierarchy List, Edit Pane 1, and Edit Pane 2.
This action enables you to narrow your search if there is a large number of hierarchy records and associated children records in the workbench.
-
Select Find, Previous, or Next to search for records.
The system highlights the hierarchy.
To move records on the Hierarchy Workbench
Set up relationship rules to define constraints on what moves are allowed. For more information, see: Defining Hierarchy Relationship Rules
-
Select a record on the Hierarchy List pane by left-clicking the record with your mouse.
-
Highlight the record, and drag and drop the record into one of the edit panes.
Repeat this action as required with the records you want to display. You can edit two hierarchies at any one time.
Important: Keyboard users should press Shift+F10 to display the Context Menu to move the selected hierarchy to an edit pane.
-
Drag and drop records from one pane to the other pane as needed.
-
Highlight a record that you would like to edit. Keyboard users should press Shift+F10 to display the Context Menu to move the selected hierarchy to an edit pane.
-
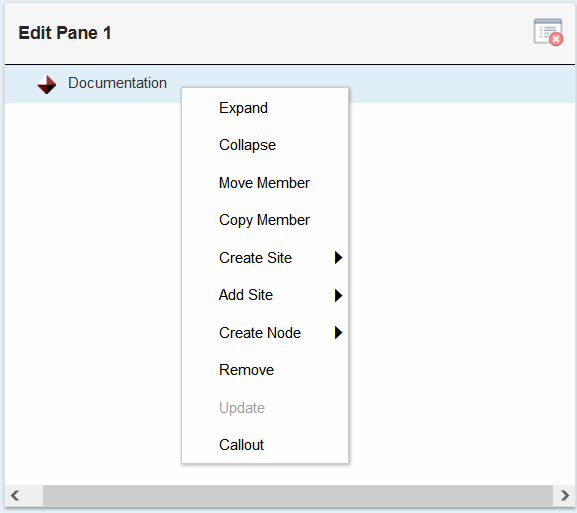
Right-click the record, and select one of the following options:
-
Expand: To expand the hierarchy to view any child hierarchies.
-
Collapse: To collapse the hierarchy.
-
Move Member: To move the hierarchy to a different hierarchy location, within the same pane or the other edit pane. The moved hierarchy will appear at the bottom of the hierarchy in the destination hierarchy.
Note: The moved hierarchy appears in the new destination only.
-
Copy Member: To copy the hierarchy to the other edit pane. The hierarchy appears at the bottom of the hierarchy.
Note: The copied hierarchy now appears in both hierarchies.
-
Create Site: To create a new site record to add to the hierarchy. Select to create a Child, Sibling Before, Sibling After. A site must exist to create a sibling before or after.
-
Add Site: To add sites to a hierarchy. Select to create a Child, Sibling Before, Sibling After. A site must exist to add a site sibling before or after.
-
Create Node: To add new nodes to a hierarchy. Select to create a Child, Sibling Before, Sibling After. A node must exist to create a sibling before or after.
-
Remove - Select the hierarchy member that you want to remove. Any associated child members will also be removed.
-
Update: Select to update the attributes for the member, such as the name, purpose, and description.
-
Callout - Select to set up a custom page to enter transactions for your environment's requirements.
See Custom Hierarchy Page for more information.
-
Clear Edit Pane button: To remove records from one edit pane.
See: Hierarchy Workbench Navigation
Note: Role Based Access Behavior in the Hierarchy Workbench
If view hierarchy privilege is granted, that user or group has the ability to drag site records from that hierarchy to another hierarchy record, even if edit hierarchy privilege is not granted. You can prevent this behavior by not granting view access to users for specific hierarchies. . See: Setting Up Role Based Access Control, and Overview of Role Based Security Access
-
To view attribute details for hierarchies and sites
-
Select either a hierarchy record, or site record, in any of the panes on the workbench.
The assigned attributes appear at the bottom of the workbench page.
See: Viewing and Creating Site Attribute Assignments, and Viewing and Creating Hierarchy Attribute Assignments
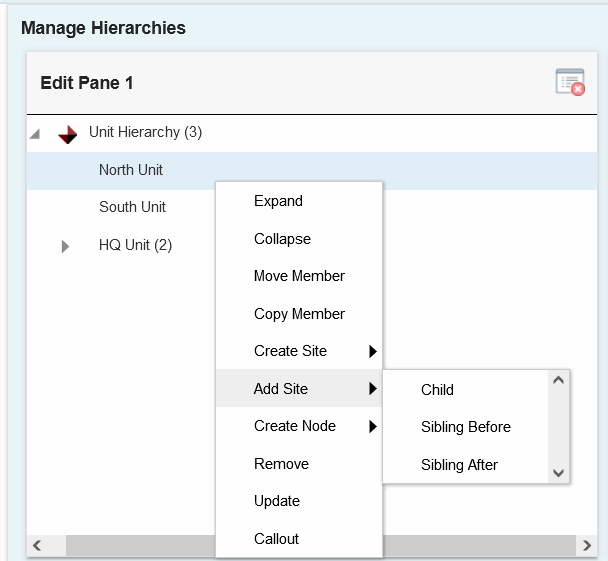
To add sites to a hierarchy record
-
Drag and drop the hierarchy in an edit pane.
-
Right-click the hierarchy and select Add Site.
The Add Site dialog box appears.
Select one of the following options to indicate where in the hierarchy you want the new site to be added:
-
Child
-
Sibling Before
-
Sibling After
-
-
Select a Search By value: Name or Number.
-
Name: Enter the value or a partial value + %.
-
Number: Enter the specific site number. If you do not know the specific site number, you can enter % and the system returns all records.
-
-
Select a record and choose Select to display it on the Hierarchy Workbench.
-
Click the Select All check box to select all the records.
-
Click the check box for the individual records to be added.
-
-
Click Apply to save your work.
Note: When you click Apply, any changes made to the objects in both edit panes are saved.
-
Select the Update icon to navigate to the Update Site page to change details for the site record, see: Updating Site Records
To create a node for a hierarchy record
-
Select a record or area where you want to insert this new node, and right-click.
Select one of the following options:
-
Child
-
Sibling Before
-
Sibling After
The Create Node dialog box appears.
-
-
Enter the following information:
-
Name (required) - Unique value for the name of this node
-
Purpose (optional) - Destination of the node on the hierarchy
-
Description (optional)
-
-
Select OK to save your work.
Hierarchy Workbench Navigation
The following table summarizes the Hierarchy Workbench navigation actions between the Edit panes.
Select (highlight) one or more objects (sites or nodes) in a hierarchy structure, and right-click to select one of the menu transactions:
| Transaction | Navigation |
|---|---|
| Expand | Expands the object to display any associated child records. |
| Collapse | Collapses the object to hide any associated child records. |
| Move Member | Select Move Member, and then select a destination node or site to add as a Child, Sibling Before or Sibling After the destination. |
| Copy Member | Select Copy, and then select a destination node or site to copy as a Child, Sibling Before or Sibling After. |
| Create Site | Select Create Site, and then select a destination node or site to create as a Child, Sibling Before or Sibling After. Enter details. |
| Add Site | Select Add Site, and then select a destination node or site to add as a Child, Sibling Before or Sibling After. Choose from the list of values. |
| Create Node | Select Create Node, and then select a destination to create as a Child, Sibling Before or Sibling After. Enter details. |
| Remove | Select Remove. |
| Update | Select Update, and enter details. |
| Callout | Select to set up a custom page to enter transactions for your environment's requirements. The data on the panes is passed to the custom page. See Custom Hierarchy Page for more information. |
| Clear Edit Pane | Click the Clear Edit Pane button to remove data in a pane. |