Site Hub Administrator
This chapter covers the following topics:
- Overview of Administrator Role
- Site Attributes
- Viewing and Creating Site Attribute Assignments
- Creating Attributes
- Location Attributes
- Viewing and Creating Location Attribute Assignments
- Viewing and Creating Trade Area Groups
- Trade Area Group Attribute Groups
- Viewing and Creating Trade Area Group Attribute Assignments
- Hierarchy Attributes
- Viewing and Creating Hierarchy Attribute Assignments
- Creating Hierarchy Attribute Pages
- Viewing and Defining Hierarchy Display Settings
- Defining Hierarchy Relationship Rules
- Setting Up Search Functions
- Setting Import Formats
- Using the Import Interface
- Associating Value Sets to Attributes
- Viewing and Creating User Defined Functions
Overview of Administrator Role
The Site Hub Administrator contains tabbed regions for search and setup of attribute groups, map preference, value sets, and role security. There is also an import interface and you can generate a database view of third party system data integrated with your site data.
Search site criteria and results formats are defined in this role to help users search for sites. You can also define import formats for new site creation.
The tabbed regions enable you set the following features:
-
View, create, and update site attributes and assignments
-
Predefine search criteria information to personalize common searches
-
Customize the format display of search results
-
Select a site import format for downloading and uploading information for site creation using Microsoft Excel
-
View, create, and update location attributes and assignments
-
View, create, and update trade area definitions
-
Search and create trade area attributes and assignments
-
View, create, and update hierarchy attributes and assignments
-
Predefine search criteria information to personalize common searches
-
Customize the format display of search results
-
Setup relationship rules for organizations and sites in the hierarchy
-
Setup icons for sites and nodes displayed in the hierarchy and associate attribute pages
-
Set map image icons and window information
-
Ability to carry out high speed site data import for large data sets
Miscellaneous for Value Sets and Functions
-
Associate value sets with attributes
-
Create new value set records
-
View and create user defined functions
-
Control security according to roles in the organization
-
Set privileges and group attributes within the appropriate sites
Site, Location, Trade Area, and Hierarchy Attributes
Attributes associated to a site can capture functional areas including business characteristics, physical characteristics, financial information, and competitive information. In order to capture relevant site data for your business needs, you can define an unlimited number of attribute groups. Each attribute group can store up to 40 character, 20 numeric and 10 date attributes.
Sites may have similar attributes such as a collection of stores or branches that are similar in size, merchandise, or services offered. Site Hub provides the following features for attributes:
-
A comprehensive list of attributes can be defined for segments of industries, designated as Purposes in Site Hub. For example, in the retail industry—site purposes can include department stores, specialty stores, supermarkets, convenience stores, and chain drug stores.
-
You can define and use unlimited number of attribute groups for a site.
-
Ability to define custom attributes specific to your business requirements.
-
Ability to use attributes from third party external applications.
-
Grouping of attributes based on business functions.
-
Ability to create attribute pages for ease of data entry and viewing of attributes.
-
When searching for sites—search criteria enables you to search based on specific attribute values. For example, in the Advanced Search function, you can use several criteria to select one or more attributes by using keywords or the list of values to return focused search results.
Attribute Pages
An attribute page is a view used to view, create, and edit different attributes from the various attribute group categories. An attribute page is a way of categorizing attribute groups and displaying them separately in these categories based on different functional areas, and therefore can contain one or many attribute groups. You can create attribute pages for each site, location, and trade area group entity; and assign corresponding attribute groups to these pages.
-
Sites: Attribute pages can be created for the various site purposes, see: Creating Site Attribute Pages
-
Locations: Attribute pages can be created for each country, and you can also assign multiple attribute pages to a specific country, see: Creating Location Attribute Pages
-
Trade Areas: Attribute pages can be created for various trade area groups, and you can assign multiple pages to a single trade area group, see: Creating Trade Area Attribute Pages
-
Hierarchies: Attribute pages can be created for various hierarchies, and you can assign multiple pages to a single hierarchy attribute group, see: Creating Hierarchy Attribute Pages
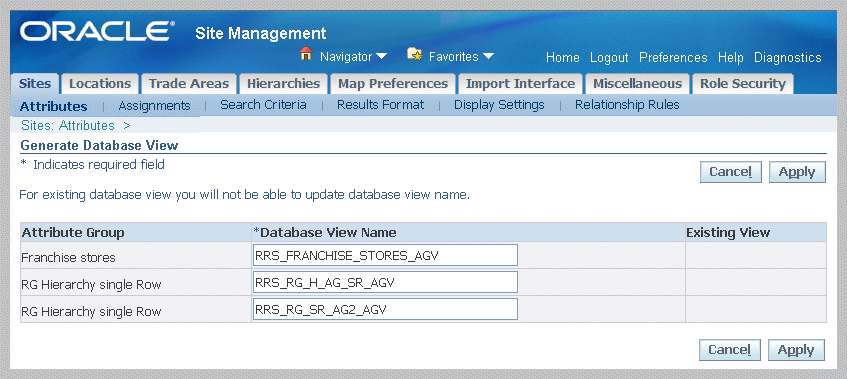
Generating Database Views
You can generate a database view for reading user-defined attribute data with third party systems.
To generate database views
-
Navigate to the Attributes region of the Sites, Locations, or Hierarchies tabbed region of the Administrator.
-
Select the attribute groups you want included in your database view.
-
Select Generate Database View to display the Generate Database View page.
-
You have the option to change the value in the Database View Name field if this attribute group was not included in an existing database view.
-
Select Apply to save your work.
The new database views appear on the search results table.
Related Topics
Viewing and Creating Trade Areas
Site Attributes
Site attributes are characteristics of sites and are defined by their names and values, and saved within attribute groups. You can reuse the same attribute group across different sites. An unlimited number of attribute groups can be defined. Third party system data can be integrated, and you can generate a database view of existing attributes by selecting Generate Database View.
The Sites tabbed region of the Site Administrator home page opens displaying existing site attribute groups—you can filter the display by using a combination values. The Sites tabbed region also provides access to pages to:
-
Create and update site attributes
-
Create and update site attribute assignments
-
Personalize search criteria
-
Manage display formats for search results
-
Manage the exporting and importing of site data using the Import Format function
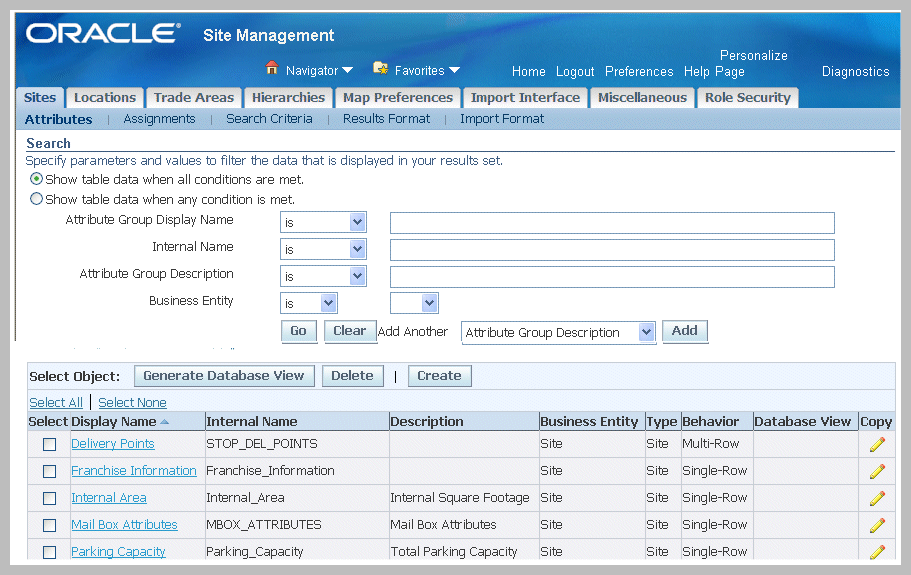
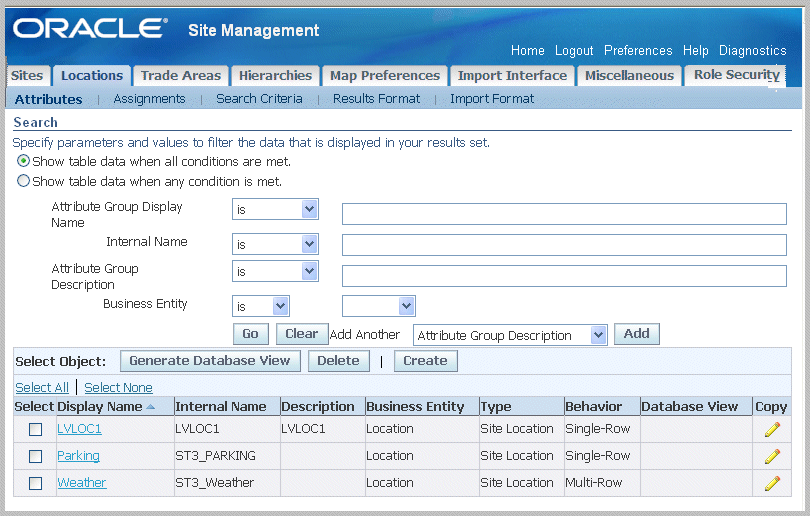
Viewing, Creating, and Editing Site Attribute Groups
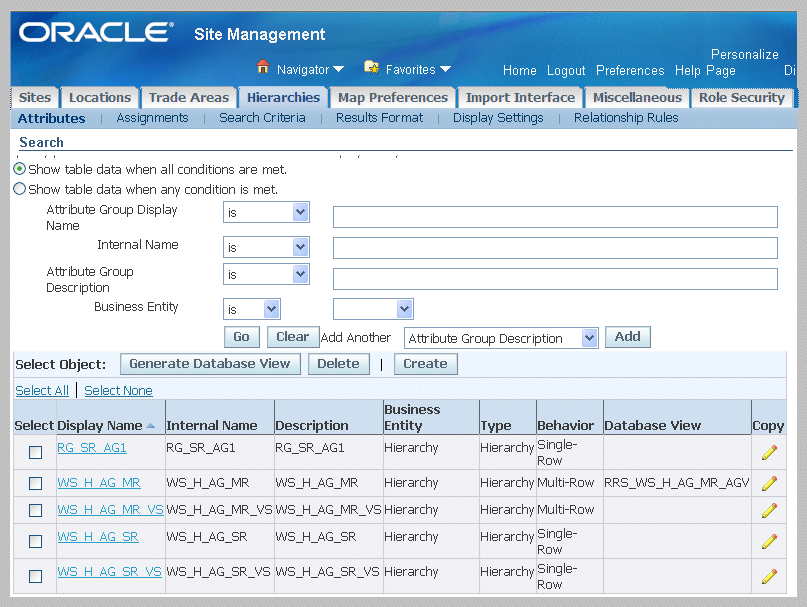
The Site Hub Administrator pages opens with all existing site attribute groups displayed.
To view site attribute group details
-
Navigate the Sites tabbed region of the Administrator.
-
You can filter the display by using a combination of values including attribute group display and internal name, attribute group description, or business entity. See: Searching for Information
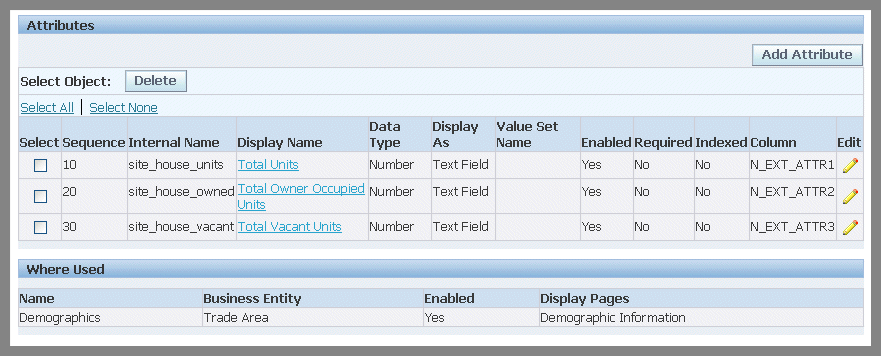
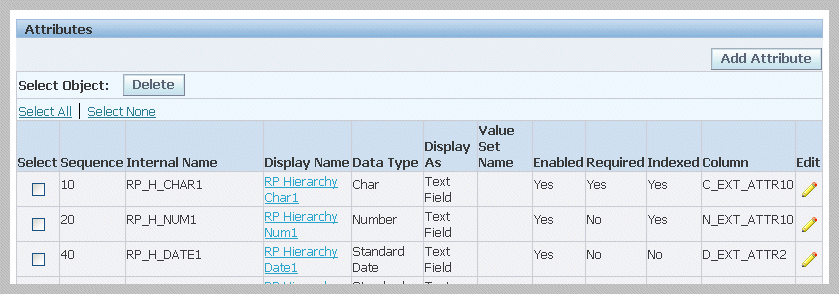
The results region displays records in a tabular format with the following information: Display Name, Internal Name, Description, Business Entity, Type, Behavior, and Database View.
-
Select a record in the Display Name field to navigate to the Attribute Group Details page.
This page displays information in the following fields for this attribute record:
-
Internal Name—internal name for the page
-
Display Name—name displayed on the page
-
Description—a description of the attribute category
-
Behavior:
-
Single-Row associates one attribute value with each attribute—that is, data is captured in a one-to-one relationship.
-
Multi-Row associates multiple sets of attribute values with the same attribute—that is, data is captured as a table of values.
-
-
Number of columns in the page layout—the number of columns to appear in the attribute group pages.
-
Number of rows in the page layout—the number of rows to appear in the attribute group pages. This field only appears for multi-row attribute groups.
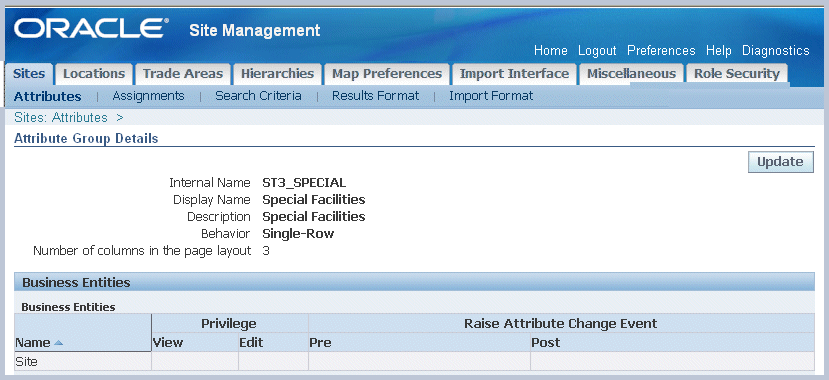
The Business Entities region lists business events compiled in the Oracle Integration Repository. This tool is shipped as part of Oracle E-Business Suite. Users who are granted the Integration Analyst role can navigate to the Oracle Integration Repository through the Integration Repository responsibility. Users who are granted the Integration Developer role or the Integration Administrator role can access the Oracle Integration Repository through the Integrated SOA Gateway responsibility.
-
-
This page enables you to select:
-
Update to navigate to the Edit Attribute Groups for Site page to make changes.
-
Maintain Unique Key to navigate to the Maintain Unique Key page for this attribute group. This function applies only to multi-row attributes. A unique key is any set of attributes whose values can be used to uniquely identify a row within the attribute group. See: Defining Item Attributes and Attribute Groups, Oracle Product Information Management Implementation Guide
-
Add Attribute to navigate to the Create Attribute page to create new attribute records. See: Creating Attributes
-
To create an attribute group for a site
-
Navigate the Sites tabbed region of the Administrator, select Create to display the Create Attribute Group for Site page.
-
Enter a value in the Internal Name field; and the name you want displayed on the page in the Display Name field. The Internal Name value cannot be updated once a record has been created.
-
Optionally in the Description field, you can enter a description of the attribute category.
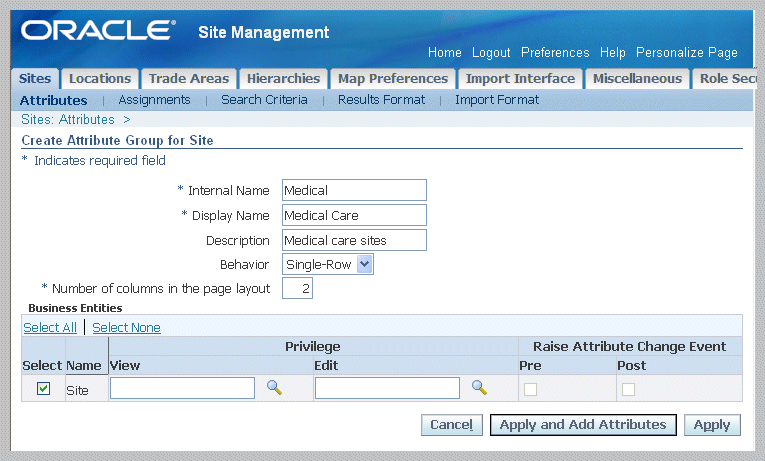
-
Select a value in the Behavior field:
-
Single-Row associates one attribute value with each attribute
-
Multi-Row associates multiple sets of attribute values with the same attribute
-
-
Enter a value in the Number of columns in the page layout. This is the number of columns to appear in the attribute group pages. The default value is 2.
-
If you selected Multi-Row a the value in the Behavior field, you can select a value in the Number of rows in the page layout field. This is the number of rows to appear in the attribute group pages. The default value is 5.
The Business Entities region lists business events compiled in the Oracle Integration Repository. This tool is shipped as part of Oracle E-Business Suite. Users who are granted the Integration Analyst role can navigate to the Oracle Integration Repository through the Integration Repository responsibility. Users who are granted the Integration Developer role or the Integration Administrator role can access the Oracle Integration Repository through the Integrated SOA Gateway responsibility.
-
Select Apply to save your work. Or select Apply And Add Attributes to save and add attributes to this record. See: Creating Attributes
To create a site attribute group by copying an existing record
-
Navigate the Sites tabbed region of the Administrator, select the record you want to copy in the results region, and choose Copy.
The Create Attribute Group for Site page displays with some values from the original record.
-
Enter a unique value in the Internal name field. This value cannot be updated once a record has been created.
-
You have the option to select new values in the Display Name and Description fields
You cannot change the Behavior value, but you can change the values in the Number of columns and Number of rows fields.
-
Select Apply to save your work.
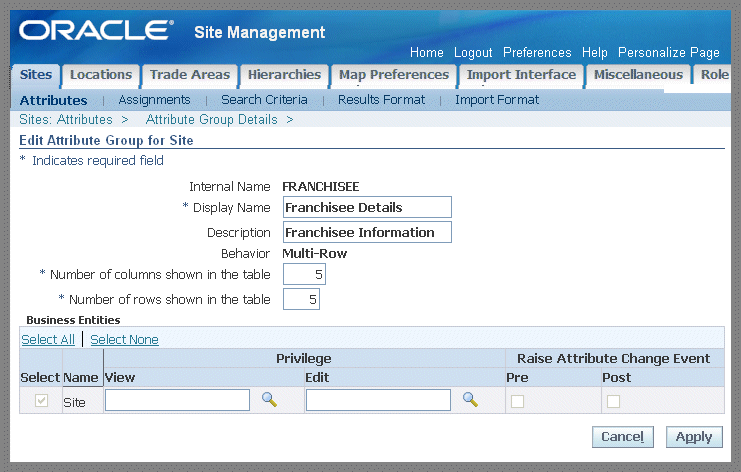
To edit a site attribute group record
-
Select an attribute group record navigate to the Attribute Group Details page.
-
Select Update to display the Edit Attribute Group for Site page.
-
You have the option to change the values in the following fields:
Note: The Internal Name and Behavior type fields cannot be updated once an attribute group has been created.
-
Display Name
-
Description
-
Single-Row Behavior
-
Number of columns in the page layout—the number of columns to appear in the attribute group pages
-
-
Multi-Row Behavior
-
Number of columns shown in the table—the number of columns to appear in the attribute group pages.
-
Number of rows shown in the table—the number of columns to appear in the attribute group pages.
-
The Business Entities region lists business events compiled in the Oracle Integration Repository. This tool is shipped as part of Oracle E-Business Suite. Users who are granted the Integration Analyst role can navigate to the Oracle Integration Repository through the Integration Repository responsibility. Users who are granted the Integration Developer role or the Integration Administrator role can access the Oracle Integration Repository through the Integrated SOA Gateway responsibility.
-
-
Select Apply to save your work.
Related Topics
Defining Item Attributes and Attribute Groups, Oracle Product Information Management Implementation Guide
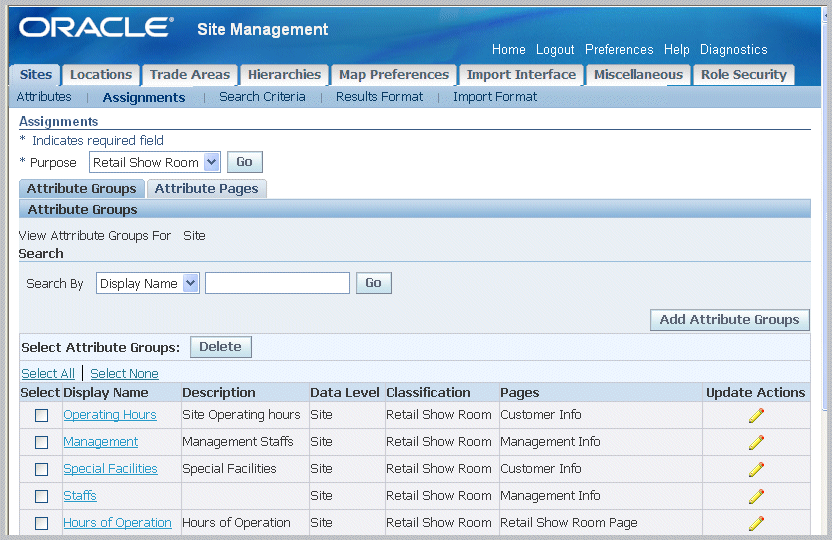
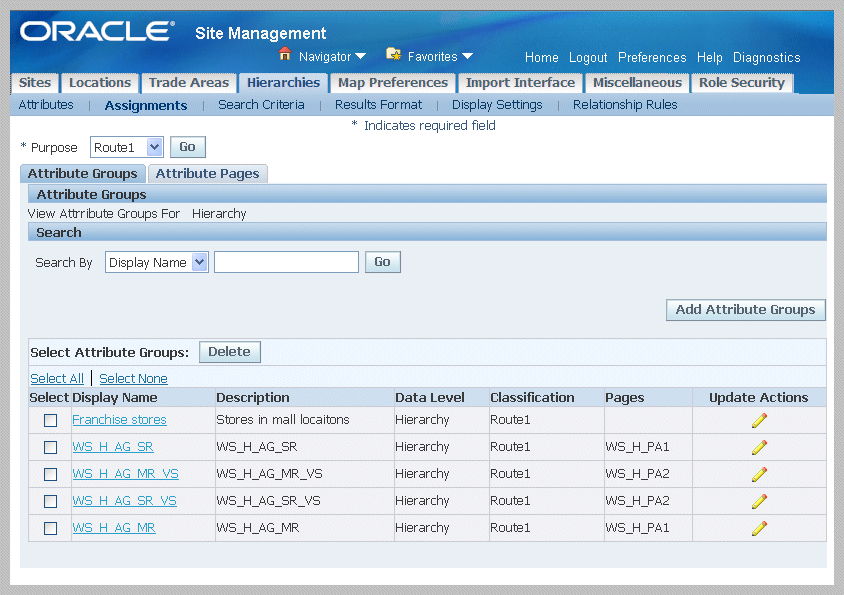
Viewing and Creating Site Attribute Assignments
Attributes define the characteristics of the site, and purposes specify the function used for the site. Assigning an attribute group to a site purpose is an important step for viewing and editing associated attributes for sites with corresponding purposes.
See: Site Attributes
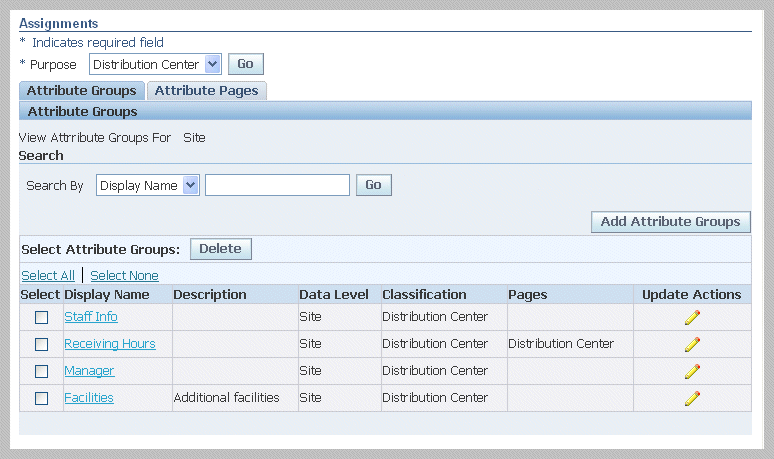
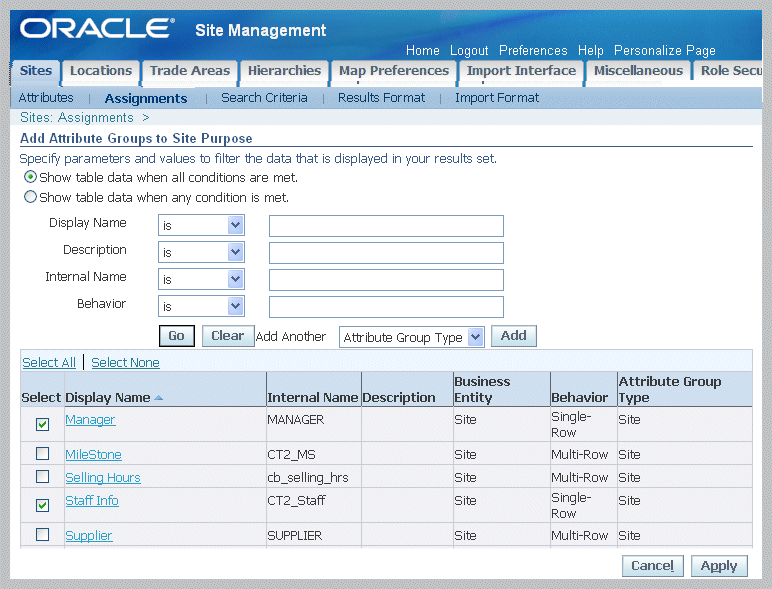
To add attribute groups to site purpose
-
In the Sites tabbed region of the Administrator, select Assignments.
-
In the Assignments page, select a value in the Purpose field, and select Go.
All the attribute groups assigned to this site purpose display in the results table.
-
In the Attribute Groups tabbed region, select Add Attribute Groups to display the Add Attribute Groups to Site Purpose page.
You can filter the display by using a combination of attribute group Display Name Description, Internal Name, and Behavior. Or you can select Add to add other search parameters, see: Searching for Information
-
In the results region, select the records you want to add to this site purpose.
-
Select Apply. The new records appear on the Assignments page.
To view and update site attribute group assignments
-
Navigate to the Sites Assignments page.
-
Choose a value in the Purpose field, and select Go to display the attribute assignments for that purpose.
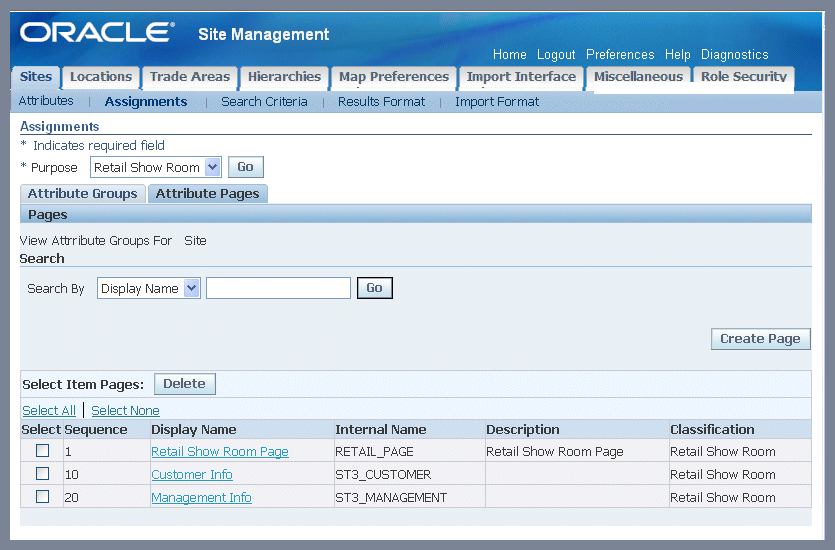
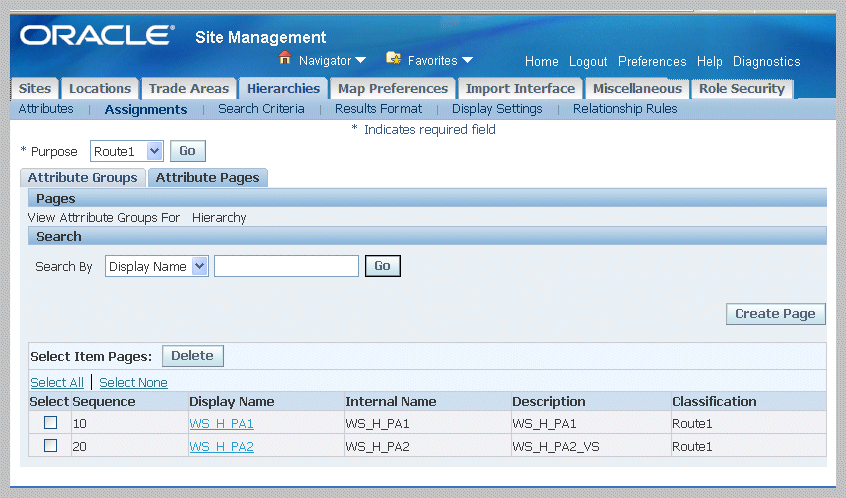
Records display in a table. You can view details in the Attribute Groups or Attribute Pages tabbed regions.
-
The Attributes Group tab displays all the assignments for the purpose selected
-
The Attribute Pages tab displays all the pages defined for the purpose selected
-
-
Select Add Attribute Groups if you want to add attributes to specific site purpose records. See: Viewing and Creating Site Attribute Assignments
-
Select Update Action to navigate to the Actions page. See: Adding Actions to an Attribute Group, Oracle Product Information Management Implementation Guide
-
In the Attribute Pages tab, select a record to display the Attribute Group Details page. See: Viewing, Creating, and Editing Site Attribute Groups
Creating Site Attribute Pages
Site attribute pages are created for the various site purposes, and assigned attribute groups for ease of data entry and viewing. For each page, you can choose the attributes displayed and the specific order they are listed. You can also assign multiple attribute pages to a single site purpose.
To create site attribute pages
-
In the Sites tabbed region of the Administrator, select Assignments.
-
Select a value in the Site Purpose field, and select Go.

-
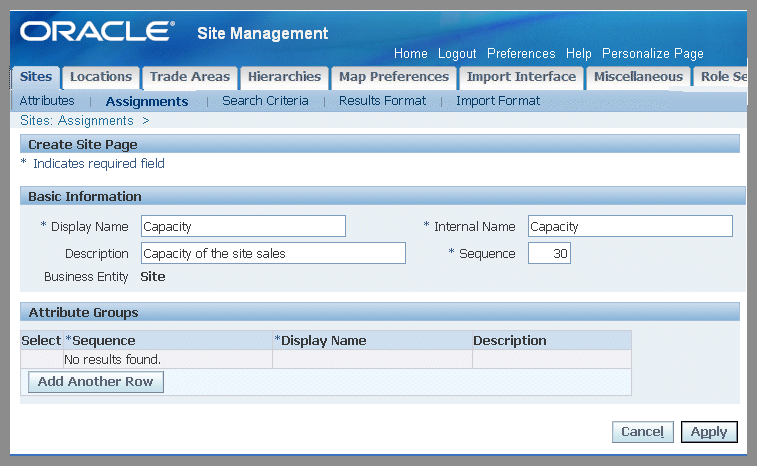
Select the Attribute Pages tab, and in the Pages region select Create Page.
-
In the Create Site Page region, create an attribute page for the site purpose by entering data in the Basic Information region:
-
Display Name—name displayed on the page
-
Description—a description of the attribute category
-
Internal Name—internal name for the page, this value cannot be updated once a page has been created
-
Sequence—sequence number for each page associated with an attribute group, the sequence number determines the order pages are listed
-
-
In the Attribute Groups region, select Add Another Row to add attributes groups to this page. To add an existing attribute group:
-
Enter a Sequence number
-
Select an existing Display Name value
-
-
Select Apply to save your work.
The attributes for this purpose, and the display sequence appear in the Pages region.
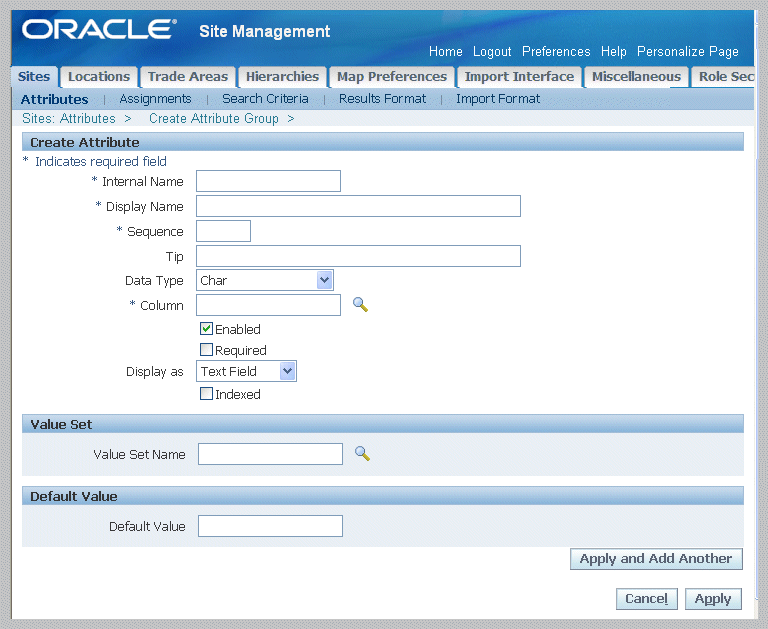
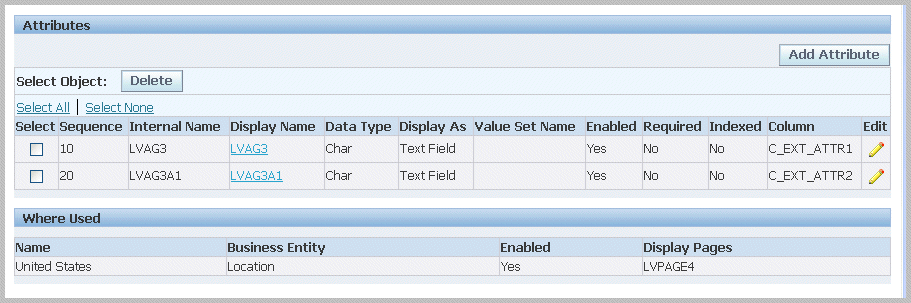
Creating Attributes
Attributes are characteristics of sites and defined by their names and values. Site Hub provides seeded attributes, and you can create customized attributes specific to your business requirements.
To create an attribute
-
Navigate to the Create Attribute page.
For a detailed explanation of the fields, see: Defining Item Attributes and Attribute Groups, Oracle Product Information Management Implementation Guide
-
Enter values in the required fields:
-
Internal Name—internal name for the page, this value cannot be updated once a page has been created
-
Display Name—name displayed on the page
-
Sequence—number used to determine the order listed of the attribute when creating attribute pages
-
-
Optionally, you can enter a value in the Tip field; this is another description of the attribute that appears on pages.
-
Select a value in the Data Type field.
The data type that you select determines the values that are available in the Column, Value Set, and Display As fields. Your options are Char (character), Number, Standard Date, Standard Date Time, and Translatable Text.
-
Select a value in the Column field.
This data is used to specify the column name where the attribute is stored in the database table, for example, N_EXT_ATTR1. Available values are determined by the value selected in the Data Type field.
-
You have the option to enable the Enable and Required check boxes:
-
Enabled—specifies if the attribute is available for use. If the attribute is enabled, specify whether or not the attribute is required or not.
-
Required—if required, you must use this attribute value when saving data for an object using the attribute group it is associated with.
-
-
Display As—determines how the attribute appears on the page. Available values are determined by the data type selected. Your choices are Text Field, Checkbox Dynamic URL, Hidden, Radio Group, Static URL, and Text Area.
-
Specify whether or not you want the attribute to be indexed. The Indexed check box is used with sort criteria templates; only indexed attributes are available as sort criteria in result formats.
-
In the Value Set region, optionally you can select a record that is used as a set of constraints for the attribute.
Site Hub enables you to create user-defined attributes with validation logic to support the needs of your organization. See: Defining Value Sets for User-Defined Attributes, Oracle Product Information Management Implementation Guide
-
In the Default Value region, you can enter a default value for this attribute. If you've selected a value set, the value set's constraints apply to the default value.
-
Select Apply to save your work. Or select Apply and Add Another Attribute to save the record and create another one.
Location Attributes
Sites are your place of business, and defined in the context of a country. The location of a site can be an actual or planned structure such as a building, town, occupied area—or any geographical place associated with trade purposes. Geographical places can also contain specific areas within them such as a spaces in a warehouse designated for a specific purpose. Global Location Numbers (GLN) provide a standard to identify legal entities and locations. You can use this identification for physical entities and locations such as a particular room in a building, warehouse, and room within a building.
Viewing, Creating, and Editing Location Attribute Groups
The Locations tabbed region in the Administrator displays all existing site location attribute groups. Third party system data can be integrated, and you can generate a database view of all attributes. This region also provides access to pages to view, create, and update location attribute assignments.
Note: Location attributes and attribute pages are required to be associated to a country for site data entry.
To view location attribute group details
-
Navigate to the Locations tabbed region of the Administrator.
You can filter the display by using a combination of attribute group display and internal name, attribute group description, or business entity. See: Searching for Information
The results region displays records in a tabular format with the following information: Display Name, Internal Name, Description, Business Entity, Type, Behavior, Database View.
-
Select a record to display the Attribute Group Details page.
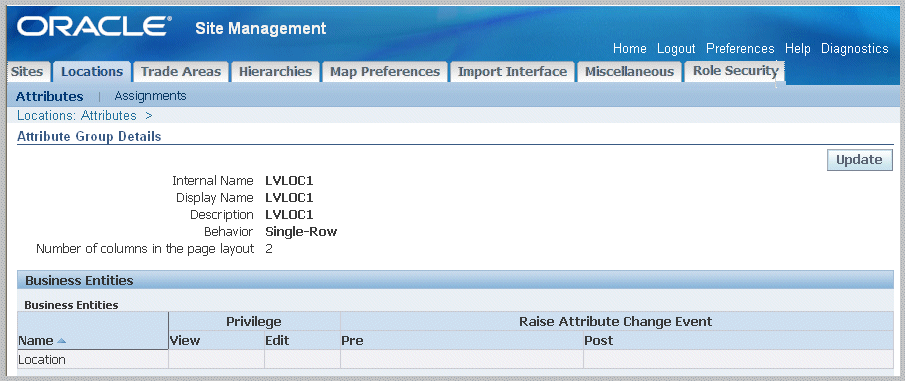
This page displays information in the following fields for this attribute record:
-
Internal Name—internal name for the page
-
Display Name—name displayed on the page
-
Description—a description of the attribute category
-
Behavior—Single-Row or Multi-Row
-
-
This page enables you to select:
-
Update to navigate to the Edit Attribute Groups for Site Location page to make changes.
-
Maintain Unique Key to navigate to the Maintain Unique Key page for this attribute group. This function applies only to multi-row attributes. A unique key is any set of attributes whose values can be used to uniquely identify a row within the attribute group. See: Defining Item Attributes and Attribute Groups, Oracle Product Information Management Implementation Guide
-
Add Attribute to navigate to the Create Attribute page to create new location attribute records. See: Creating Attributes
-
To create an attribute group for a location
-
Navigate the Locations tabbed region of the Administrator, select Create to display the Create Attribute Group for Location page.
-
Enter a value in the Internal Name field; and the name you want displayed on the page in the Display Name field. The Internal Name value cannot be updated once a record has been created.
-
Optionally in the Description field, you can enter a description of the attribute category.
-
Select a value in the Behavior field:
-
Single-Row associates one attribute value with each attribute
-
Multi-Row associates multiple sets of attribute values with the same attribute
-
-
Enter a value in the Number of columns in the page layout. This is the number of columns to appear in the attribute group pages. The default value is 2.
-
If you selected Multi-Row a the value in the Behavior field, you can select a value in the Number of rows in the page layout field. This is the number of rows to appear in the attribute group pages. The default value is 5.
The Business Entities region lists business events compiled in the Oracle Integration Repository. This tool is shipped as part of Oracle E-Business Suite. Users who are granted the Integration Analyst role can navigate to the Oracle Integration Repository through the Integration Repository responsibility. Users who are granted the Integration Developer role or the Integration Administrator role can access the Oracle Integration Repository through the Integrated SOA Gateway responsibility.
-
Select Apply to save your work. Or select Apply And Add Attributes to save and add attributes to this record. See: Creating Attributes
To create a location attribute group by copying an existing record
-
Navigate the Location tabbed region of the Administrator, select the record you want to copy in the results region, and choose Copy.
The Create Attribute Group for Location page displays with the values from the original record.
-
Enter a unique value in the Internal name field. This value cannot be updated once a record has been created.
-
You have the option to select new values in the Display Name and Description fields
You cannot change the Behavior value, but you can change the values in the Number of columns and Number of rows fields.
-
Select Apply to save your work.
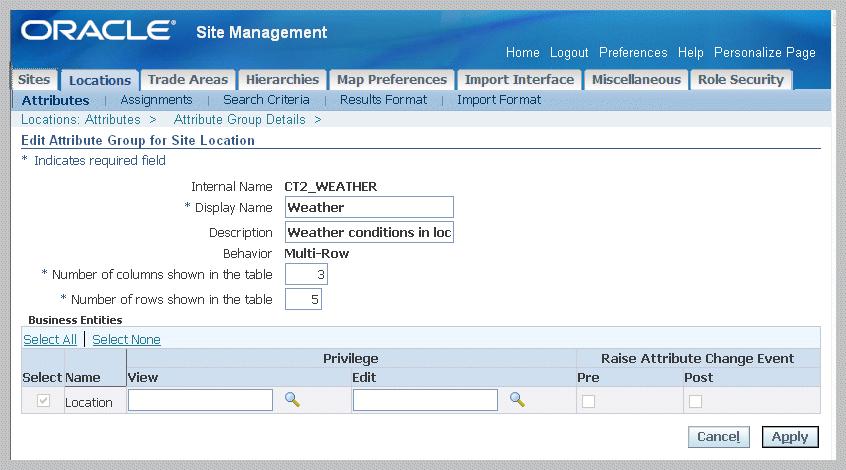
To edit a location attribute group record
-
Navigate to the Edit Attribute Groups for Site Location page.
-
You have the option to update the following fields.
Note: The Internal Name and Behavior type fields cannot be updated once an attribute group has been created.
-
Display Name
-
Description
-
Single-Row Behavior
-
Number of columns in the page layout—the number of columns to appear in the attribute group pages
-
-
Multi-Row Behavior
-
Number of columns shown in the table—the number of columns to appear in the attribute group pages.
-
Number of rows shown in the table—the number of columns to appear in the attribute group pages.
-
The Business Entities region lists business events compiled in the Oracle Integration Repository. This tool is shipped as part of Oracle E-Business Suite. Users who are granted the Integration Analyst role can navigate to the Oracle Integration Repository through the Integration Repository responsibility. Users who are granted the Integration Developer role or the Integration Administrator role can access the Oracle Integration Repository through the Integrated SOA Gateway responsibility.
-
-
Select Apply to save your work.
Viewing and Creating Location Attribute Assignments
Location attributes capture characteristics of the geographical place associated in the context of a country. Assigning a location attribute group to a country is an important step for viewing and editing associated locations. It is also a required step if you are creating location attribute pages.
See: Location Attributes
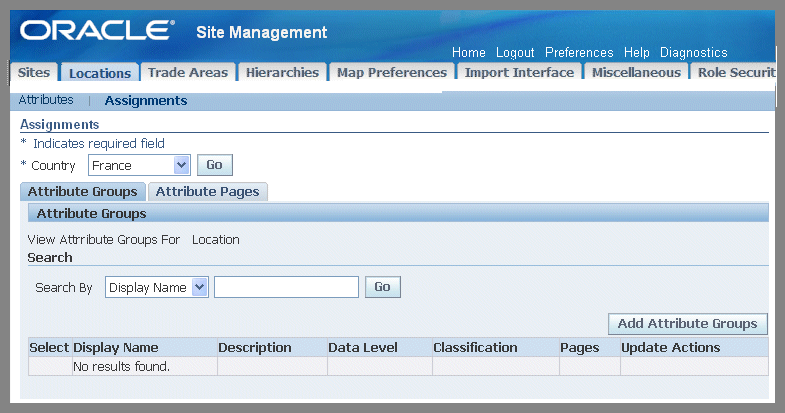
To add attribute groups to a country location
-
In the Locations tabbed region of the Administrator, select Assignments to display the Assignments page.
-
Choose a value in the Country field, and select Go.
Countries already assigned to this location display in the Attribute Groups tabbed region.
-
Select the Attribute Groups tabbed region, and select Add Attribute Groups to display the Add Attribute Groups to Country page.
You can filter the display by using a combination of attribute group display and internal name, attribute group description, or business entity. See: Searching for Information
-
In the results region, select the records you want to this country.
-
Select Apply. The new records appear on the Assignments page.
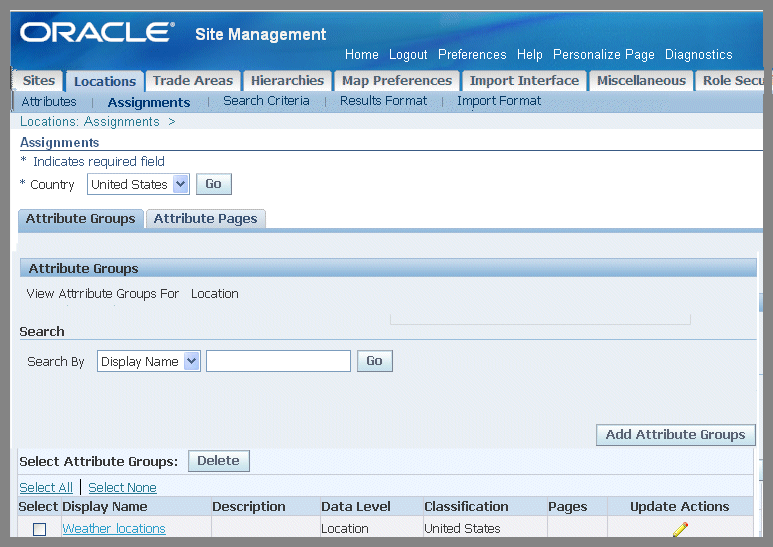
To view and update location attribute assignments
-
In the Locations tabbed region of the Administrator, select Assignments to display the Assignments page.
-
Choose a value in the Country field, and select Go to display the attribute assignments for that country location.
Records display in a table. You can view assignment details in the Attribute Groups or Attribute Pages tabbed regions.
-
Select Add Attribute Groups if you want to add attributes to specific country records.
-
Select a record to display the Attribute Group Details page. See: Location Attributes
-
Select Update Actions to navigate to the Actions page, see: Adding Actions to an Attribute Group, Oracle Product Information Management Implementation Guide
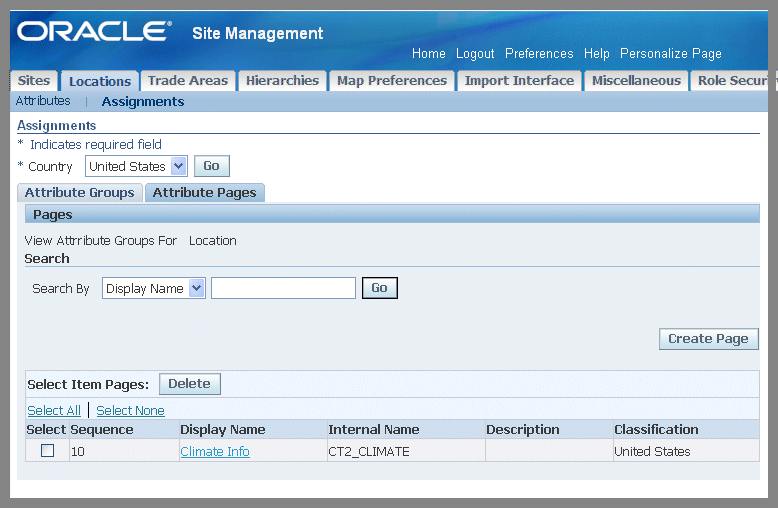
Creating Location Attribute Pages
Attribute pages can be created for each country record for ease of data entry and viewing. You can assign multiple attribute pages to a specific country. For each page, you choose the attributes displayed and the specific order they are listed.
To create location attribute pages
-
Navigate to Assignments in the Locations tabbed region of the Administrator.
-
Select a value in the Country field, and select Go.
-
Select the Attribute Pages tab, and in the Pages region select Create Page.
-
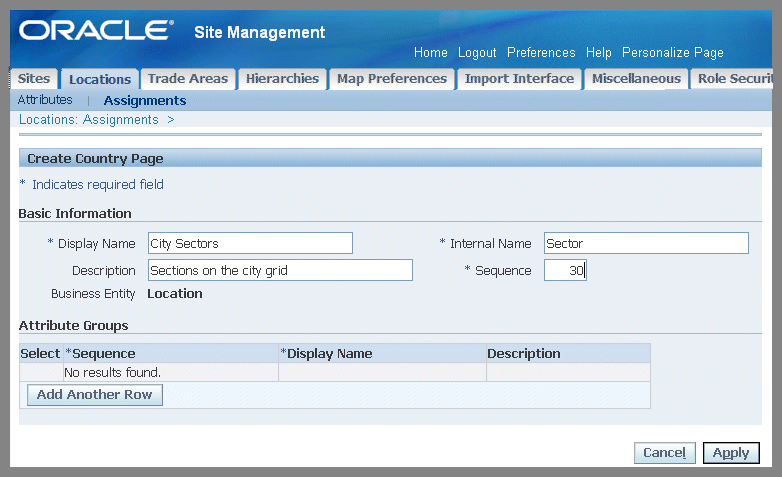
In the Create Country Page, create an attribute page for the location by entering data in the Basic Information region:
-
Display Name—name displayed on the page.
-
Description—a description of the attribute category.
-
Internal Name—internal name for the page, this value cannot be updated once a page has been created.
-
Sequence—sequence number for each page associated with an attribute group, the sequence number determines the order on the pages.
-
-
Select the Attribute Groups tabbed region, and select Add Another Row to add attributes groups to this page. To add an existing attribute group:
-
Enter a Sequence number
-
Select an existing Display Name value
-
-
Select Apply to save your work.
The attributes for this purpose, and the display sequence appear in the Pages region.
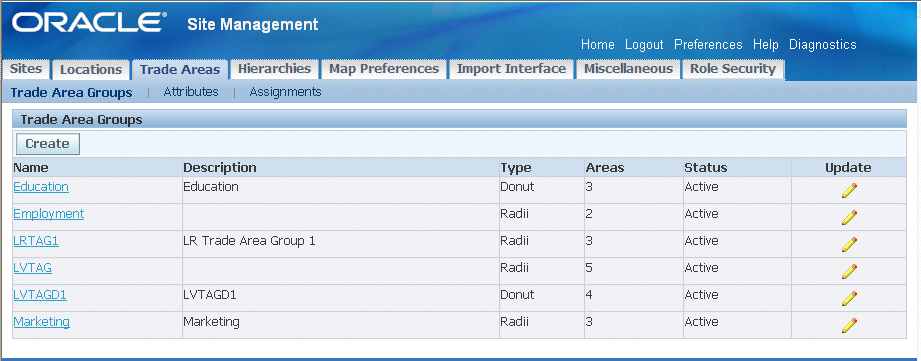
Viewing and Creating Trade Area Groups
Site Hub provides trade area support by giving you the ability to define multiple trade area groups for each site. Trade area groups are used to define trade regions. They are used for site selection screening and market analysis—primary, secondary and tertiary trade areas are used in the site selection process. For example, the primary trade areas could be defined as the nearest source of customers, secondary as residential neighborhoods where customers live, and the tertiary trade area can consist of customers farther away. For each trade area you can:
-
Define up to 5 trade areas for each of your sites.
-
Capture demographics in the attributes.
-
Integrate with Google Maps providing visual comparison of trade areas and competitor sites.
A trade area group can be used for multiple sites, and one site can be associated to multiple trade area groups.
To view trade area groups
-
Navigate to the Trade Areas tabbed region the Administrator.
Trade area groups are listed in a table with the following information: Name, Description, Type, Areas, and Status.
This page enables you to select:
-
Create to create a new record
-
A name record to navigate to the View Trade Area Group detail page
-
Update to edit information
-
-
Select a trade area group record to display the View Trade Area Group detail page.
In the Basic Information region, you can view the Name, Status, Description, Number of Trade Areas, Type, and Unit of Measure.

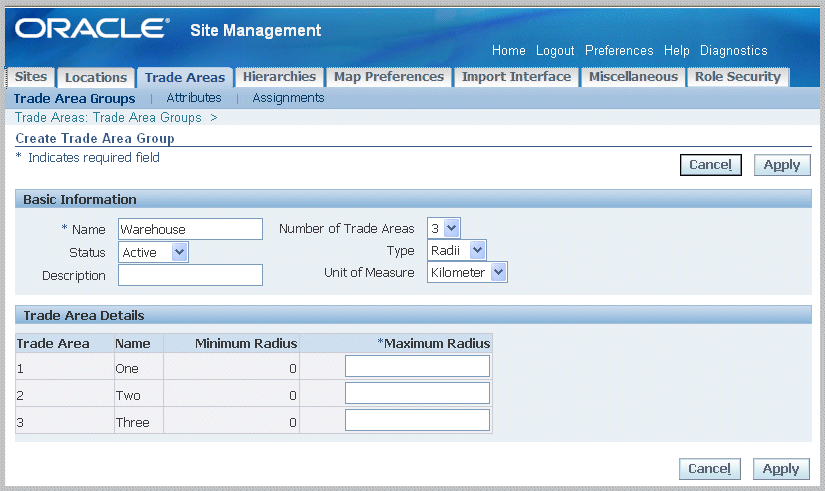
To create a trade area group record
-
Select Create to navigate to the Create Trade Area Group page.
-
In the Basic Information region, enter a unique value in the Name field.
-
In the Status field, set the value to Active.
Trade area groups cannot be deleted if attributes have been associated to the record. You can set these records to the Inactive status if you no longer want to use them.
-
Select information in the following fields:
-
Description—optionally you can enter information to describe this trade area.
-
Number of Trade Areas—select the number of trade areas that use this group designation. You can define up to 5 trade areas.
-
Type:
-
Donut—a collection of concentric trade areas, each independent of it's inner or outer trade area. For example, the first trade area can be defined as 0 to 2 miles, the second trade area as 2 to 5 miles, and the third trade area 5 to 10 miles.
-
Radii—a collection of concentric trade areas, each inclusive of it's inner trade area. For example, The first trade area is defined as 0 to 2 miles, the second as 0 to 5 miles, and the third trade area as 5 to 10 miles.
-
-
Unit of Measure—used in mapping, Kilometers or Miles.
-
-
In the Trade Area Details region, set a Maximum Radius for each of the trade areas selected.
-
Select Apply to save your work.
To update a trade area group
-
Select a trade area group record on the Trade Areas tabbed region of the Administrator, and choose Update.
The Update Trade Area Group page appears.
-
Edit applicable information in the Name, Status, Description, and Unit of Measure fields.
Note: The Number of Trade Areas and Type fields are not enabled for updates.
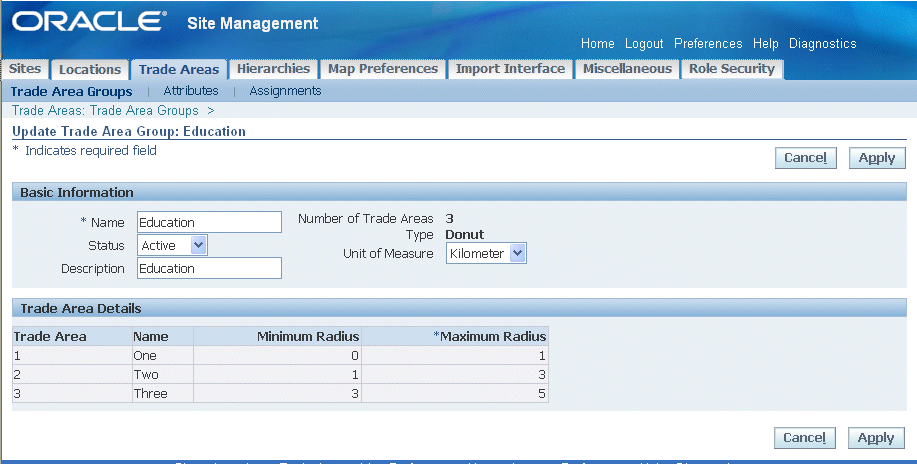
-
Select Apply to save your work.
Trade Area Group Attribute Groups
Trade area group attributes provide the ability to define multiple trade areas for each site. You can:
-
Capture demographics in the attributes.
-
View a mapped comparison of trade areas and competitor sites.
-
Represent different functional processes of a business such as marketing or advertising; different trade areas are represented as concentric circles around the site.
Viewing, Creating, and Editing Trade Area Group Attribute Groups
The Trade Area Group Attribute page opens with all existing records displaying.
To view trade area group attribute group details
-
Navigate to the Trade Areas tabbed region of the Administrator, and select Attributes.
-
You can filter the display by using a combination of values including attribute group display and internal name, attribute group description, or business entity. See: Searching for Information
The results region displays records in a tabular format with the following information: Display Name, Internal Name, Description, Business Entity, Type, Behavior, and Database View.
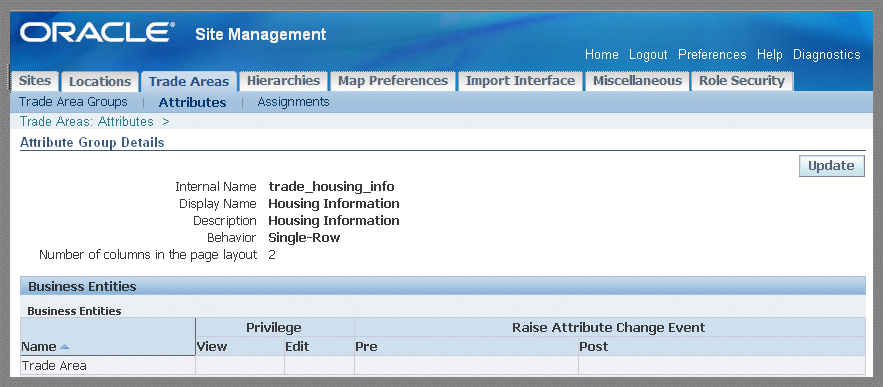
-
Select a record in the Display Name field to navigate to the Attribute Group Details page.
This page displays information in the following fields for this attribute record:
-
Internal Name—internal name for the page
-
Display Name—name displayed on the page
-
Description—a description of the attribute category
-
Behavior—Single-Row or Multi-Row
The Business Entities region lists business events compiled in the Oracle Integration Repository. This tool is shipped as part of Oracle E-Business Suite. Users who are granted the Integration Analyst role can navigate to the Oracle Integration Repository through the Integration Repository responsibility. Users who are granted the Integration Developer role or the Integration Administrator role can access the Oracle Integration Repository through the Integrated SOA Gateway responsibility.
-
-
This page enables you to:
-
Select Update to navigate to the Edit Attribute Groups for Trade Area Groups page to make changes.
-
Select Maintain Unique Key to navigate to the Maintain Unique Key page for this attribute group. This function applies only to multi-row attributes. A unique key is any set of attributes whose values can be used to uniquely identify a row within the attribute group. See: Defining Item Attributes and Attribute Groups, Oracle Product Information Management Implementation Guide
-
Select Add Attribute to navigate to the Create Attribute page to create new trade area attribute records. See: Creating Attributes
-
To create an attribute group for a trade area group
-
Navigate the Trade Areas tabbed region of the Administrator, select Create to display the Create Attribute Group for Trade Area Group page.
-
Enter a value in the Internal Name field; and the name you want displayed on the page in the Display Name field. The Internal Name value cannot be updated once a record has been created.
-
Optionally in the Description field, you can enter a description of the attribute category.
-
Select a value in the Behavior field:
-
Single-Row associates one attribute value with each attribute
-
Multi-Row associates multiple sets of attribute values with the same attribute
-
-
Enter a value in the Number of columns in the page layout. This is the number of columns to appear in the attribute group pages. The default value is 2.
-
If you selected Multi-Row as the value in the Behavior field, you can select a value in the Number of rows in the page layout field. This is the number of rows to appear in the attribute group pages. The default value is 5.
The Business Entities region lists business events compiled in the Oracle Integration Repository. This tool is shipped as part of Oracle E-Business Suite. Users who are granted the Integration Analyst role can navigate to the Oracle Integration Repository through the Integration Repository responsibility. Users who are granted the Integration Developer role or the Integration Administrator role can access the Oracle Integration Repository through the Integrated SOA Gateway responsibility.
-
Select Apply to save your work. Or select Apply And Add Attributes to save and add attributes to this record. See: Creating Attributes
To create a trade area attribute group by copying an existing record
-
Navigate the Sites tabbed region of the Administrator, select the record you want to copy in the results region, and choose Copy.
The Create Attribute Group for Trade Area page displays with the values from the original record.
-
Enter a unique value in the Internal name field. This value cannot be updated once a record has been created.
-
You have the option to select new values in the Display Name and Description fields.
You cannot change the Behavior value, but you can change the values in the Number of columns and Number of rows fields.
-
Select Apply to save your work.
To edit a trade area attribute group record
-
Select an attribute group record to navigate to the Attribute Group Details page.
-
Select Update to display the Edit Attribute Group for Trade Area page.
-
You have the option to change the values in the following fields:
Note: The Internal Name and Behavior type fields cannot be updated once an attribute group has been created.
-
Display Name
-
Description
-
Single-Row Behavior
-
Number of columns in the page layout—the number of columns to appear in the attribute group pages
-
-
Multi-Row Behavior
-
Number of columns shown in the table—the number of columns to appear in the attribute group pages.
-
Number of rows shown in the table—the number of columns to appear in the attribute group pages.
-
The Business Entities region lists business events compiled in the Oracle Integration Repository. This tool is shipped as part of Oracle E-Business Suite. Users who are granted the Integration Analyst role can navigate to the Oracle Integration Repository through the Integration Repository responsibility. Users who are granted the Integration Developer role or the Integration Administrator role can access the Oracle Integration Repository through the Integrated SOA Gateway responsibility.
-
-
Select Apply to save your work.
Viewing and Creating Trade Area Group Attribute Assignments
Assigning a trade area attribute group to a trade area is used in capturing trade demographics for viewing. It is also a required step for creating trade area group attribute pages.
Assign trade area attribute groups to trade area groups
-
In the Trade Areas tabbed region of the Administrator, select Assignments.
-
Select a value in the Trade Area field, and select Go.
-
Select the Attribute Groups tabbed region, and select Add Attribute Groups to display the Add Attribute Groups to Trade Area Group page.
You can filter the display by using a combination of attribute group display and internal name, attribute group description, or business entity. See: Searching for Information
-
In the results region, select the records you want to add to this trade area group.
Select Apply. The new records appear on the Assignments page.
To view and update trade area attribute group assignments
-
In the Trade Areas tabbed region of the Administrator, select Assignments to display the Assignments page.
-
Choose a value in the Trade Area Group field, and select Go to display the attribute assignments for that purpose.
-
In the Attribute Groups tabbed region, select Add Attribute Groups if you want to add attributes to specific trade area group records.
-
Select a record to display the Attribute Group Details page. See: Trade Area Group Attribute Groups
-
Select Update Actions to navigate to the Actions page, see: Adding Actions to an Attribute Group, Oracle Product Information Management Implementation Guide
Creating Trade Area Group Attribute Pages
Attribute pages can be created for each trade area for ease of data entry and viewing. You can assign multiple attribute pages to a specific trade area group. For each page, you can choose the attributes displayed and the specific order they are listed.
To create trade area group attribute pages
-
In the Trade Area tabbed region of the Administrator, navigate to the Assignments region.
-
Select a value in the Trade Area Group field, and select Go.
-
Select the Attribute Pages tab, and in the Pages region select Create Page.
-
In the Create Trade Area Page, create an attribute page for the trade area by entering data in the Basic Information region:
-
Display Name—name displayed on the page
-
Description—a description of the attribute category
-
Internal Name—internal name for the page
-
Sequence—sequence number for each page associated with an attribute group, the sequence number determines the order of the pages
-
-
Select the Attribute Groups tabbed region, and select Add Another Row to add attributes groups to this page. To add an existing attribute group:
-
Enter a Sequence number
-
Select an existing Display Name value
-
-
Select Apply to save your work.
The attributes for this purpose, and the display sequence appear in the Pages region.
Hierarchy Attributes
Hierarchy attributes are characteristics of hierarchical structures created for your sites. They are defined by their names and values, and saved within attribute groups. You can reuse the same attribute group across hierarchy records. Hierarchies are associated with a hierarchy purpose, providing the ability to categorize the hierarchy and its attribute structure. Nodes of the structure can be associated with these attributes. An unlimited number of attribute groups can be defined. Third party system data can be integrated, and you can generate a database view of existing attributes by selecting Generate Database View.
The Hierarchies tabbed region of the Site Administrator home page opens displaying all existing hierarchy attribute groups—you can filter the display by using a combination values. The Hierarchies tabbed region also provides access to pages to:
-
Create and update hierarchy attributes
-
Create and update hierarchy attribute assignments
-
Personalize search criteria
-
Manage display formats for search results
Viewing, Creating, and Editing Hierarchy Attribute Groups
The Hierarchies tabbed region opens with all existing attribute groups displayed.
To view hierarchy attribute group details
-
Navigate the Hierarchies tabbed region of the Administrator.
-
You can filter the display by using a combination of values including attribute group display and internal name, attribute group description, or business entity. See: Searching for Information
The results region displays records in a tabular format with the following information: Display Name, Internal Name, Description, Business Entity, Type, Behavior, and Database View.
-
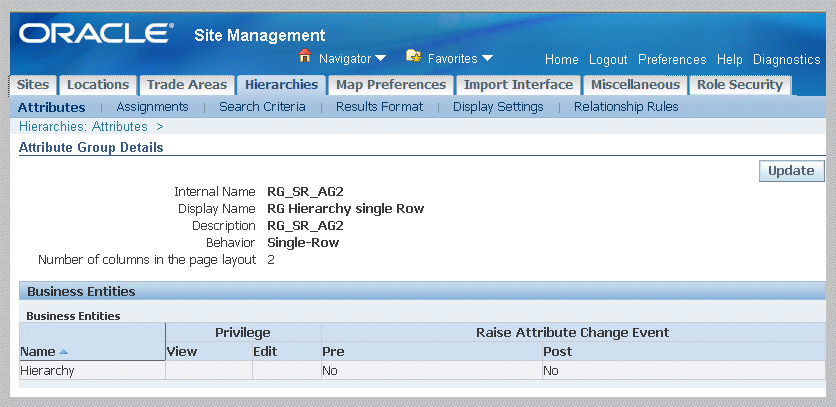
Select a record in the Display Name field to navigate to the Attribute Group Details page.
This page displays information in the following fields for this attribute record:
-
Internal Name—internal name for the page
-
Display Name—name displayed on the page
-
Description—a description of the attribute category
-
Behavior:
-
Single-Row associates one attribute value with each attribute—that is, data is captured in a one-to-one relationship.
-
Multi-Row associates multiple sets of attribute values with the same attribute—that is, data is captured as a table of values.
-
-
Number of columns in the page layout—the number of columns to appear in the attribute group pages.
-
Number of rows in the page layout—the number of rows to appear in the attribute group pages. This field only appears for multi-row attribute groups.
The Business Entities region lists business events compiled in the Oracle Integration Repository. This tool is shipped as part of Oracle E-Business Suite. Users who are granted the Integration Analyst role can navigate to the Oracle Integration Repository through the Integration Repository responsibility. Users who are granted the Integration Developer role or the Integration Administrator role can access the Oracle Integration Repository through the Integrated SOA Gateway responsibility.
-
-
This page enables you to select:
-
Update to navigate to the Edit Attribute Groups for Hierarchy page to make changes.
-
Maintain Unique Key to navigate to the Maintain Unique Key page for this attribute group. This function applies only to multi-row attributes. A unique key is any set of attributes whose values can be used to uniquely identify a row within the attribute group. See: Defining Item Attributes and Attribute Groups, Oracle Product Information Management Implementation Guide
-
Add Attribute to navigate to the Create Attribute page to create new attribute records. See: Creating Attributes
-
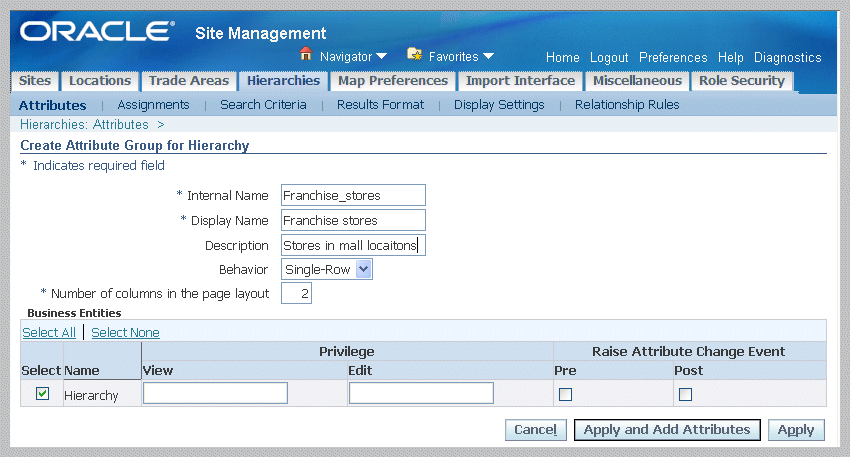
To create an attribute group for a hierarchy
-
Navigate the Hierarchies tabbed region of the Administrator, select Create to display the Create Attribute Group for Hierarchy page.
-
Enter a value in the Internal Name field; and the name you want displayed on the page in the Display Name field. The Internal Name value cannot be updated once a record has been created.
-
Optionally in the Description field, you can enter a description of the attribute category.
-
Select a value in the Behavior field:
-
Single-Row associates one attribute value with each attribute
-
Multi-Row associates multiple sets of attribute values with the same attribute
-
-
Enter a value in the Number of columns in the page layout. This is the number of columns to appear in the attribute group pages. The default value is 2.
-
If you selected Multi-Row a the value in the Behavior field, you can select a value in the Number of rows in the page layout field. This is the number of rows to appear in the attribute group pages. The default value is 5.
The Business Entities region lists business events compiled in the Oracle Integration Repository. This tool is shipped as part of Oracle E-Business Suite. Users who are granted the Integration Analyst role can navigate to the Oracle Integration Repository through the Integration Repository responsibility. Users who are granted the Integration Developer role or the Integration Administrator role can access the Oracle Integration Repository through the Integrated SOA Gateway responsibility.
-
Select Apply to save your work. Or select Apply And Add Attributes to save and add attributes to this record. See: Creating Attributes
To create a hierarchy attribute group by copying an existing record
-
Navigate the Hierarchies tabbed region of the Administrator, select the record you want to copy in the results region, and choose Copy.
The Create Attribute Group for Hierarchy page displays with some values from the original record.
-
Enter a unique value in the Internal name field. This value cannot be updated once a record has been created.
-
You have the option to select new values in the Display Name and Description fields
You cannot change the Behavior value, but you can change the values in the Number of columns and Number of rows fields.
-
Select Apply to save your work.
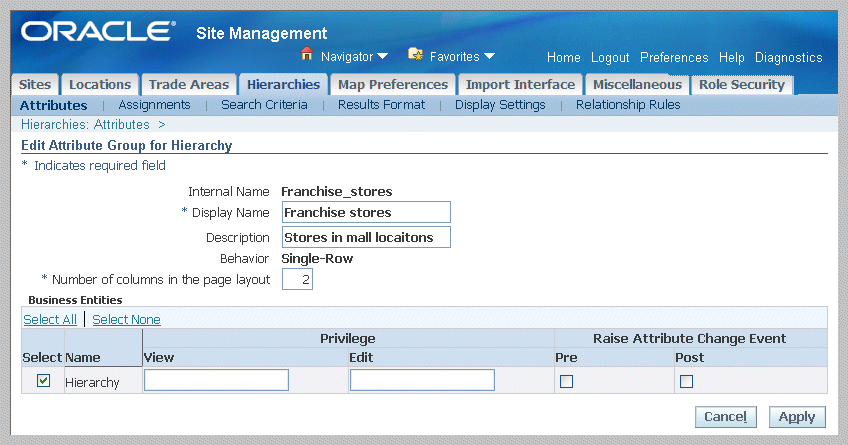
To edit a hierarchy attribute group record
-
Select an attribute group record navigate to the Attribute Group Details page.
-
Select Update to display the Edit Attribute Group for Hierarchy page.
-
You have the option to change the values in the following fields:
Note: The Internal Name and Behavior type fields cannot be updated once an attribute group has been created.
-
Display Name
-
Description
-
Single-Row Behavior
-
Number of columns in the page layout—the number of columns to appear in the attribute group pages
-
-
Multi-Row Behavior
-
Number of columns shown in the table—the number of columns to appear in the attribute group pages.
-
Number of rows shown in the table—the number of columns to appear in the attribute group pages.
-
The Business Entities region lists business events compiled in the Oracle Integration Repository. This tool is shipped as part of Oracle E-Business Suite. Users who are granted the Integration Analyst role can navigate to the Oracle Integration Repository through the Integration Repository responsibility. Users who are granted the Integration Developer role or the Integration Administrator role can access the Oracle Integration Repository through the Integrated SOA Gateway responsibility.
-
-
Select Apply to save your work.
Related Topics
Defining Item Attributes and Attribute Groups, Oracle Product Information Management Implementation Guide
Viewing and Creating Hierarchy Attribute Assignments
Attributes define the characteristics of the hierarchy, and purposes specify the function. Assigning an attribute group to a hierarchy purpose is an important step for viewing and editing associated attributes for hierarchies with corresponding purposes.
See: Hierarchy Attributes
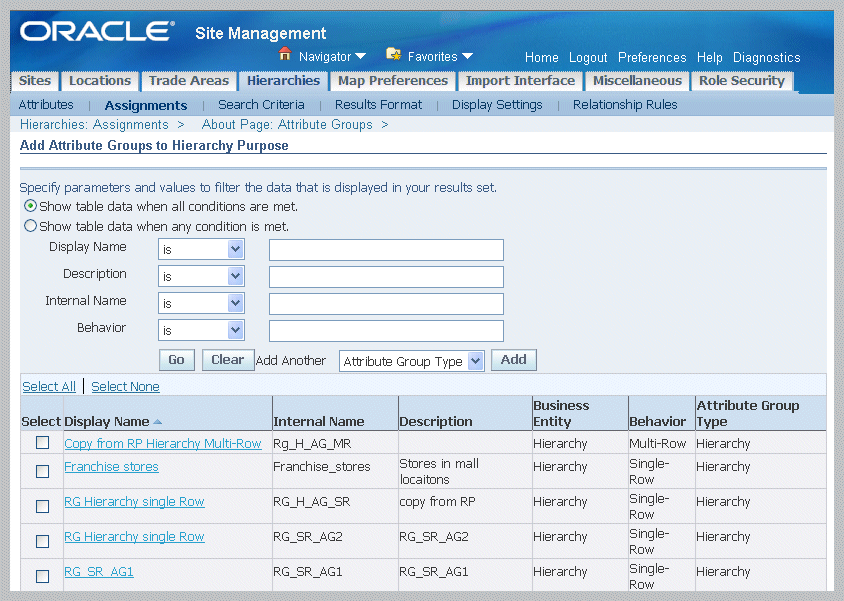
To add attribute groups to a hierarchy purpose
-
In the Hierarchies tabbed region of the Administrator, select Assignments.
-
In the Assignments page, select a value in the Purpose field, and select Go.
All the attribute groups assigned to this hierarchy purpose display in the results table.
-
In the Attribute Groups tabbed region, select Add Attribute Groups to display the Add Attribute Groups to Hierarchy Purpose page.
You can filter the display by using a combination of attribute group Display Name Description, Internal Name, and Behavior. Or you can select Add to add other search parameters, see: Searching for Information
-
In the results region, select the records you want to add to this hierarchy purpose.
-
Select Apply. The new records appear on the Assignments page.
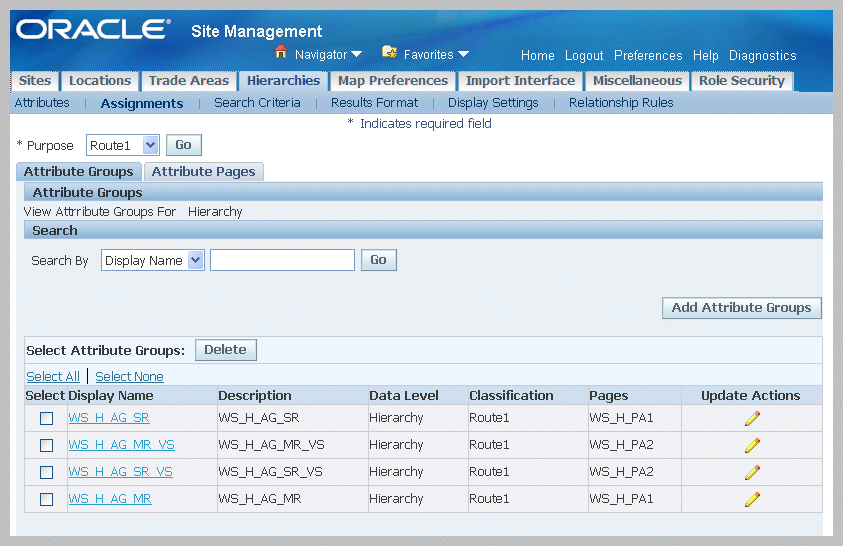
To view and update hierarchy attribute group assignments
-
Navigate to the Hierarchies Assignments page.
-
Choose a value in the Purpose field, and select Go to display the attribute assignments for that purpose.
Records display in a table. You can view details in the Attribute Groups or Attribute Pages tabbed regions.
-
The Attributes Group tab displays all the assignments for the purpose selected
-
The Attribute Pages tab displays all the pages defined for the purpose selected
-
-
Select Add Attribute Groups if you want to add attributes to specific site purpose records.
-
Select Update Action to navigate to the Actions page. See: Adding Actions to an Attribute Group, Oracle Product Information Management Implementation Guide
-
In the Attribute Pages tab, select a record to display the Attribute Group Details page. See: Viewing, Creating, and Editing Hierarchy Attribute Groups
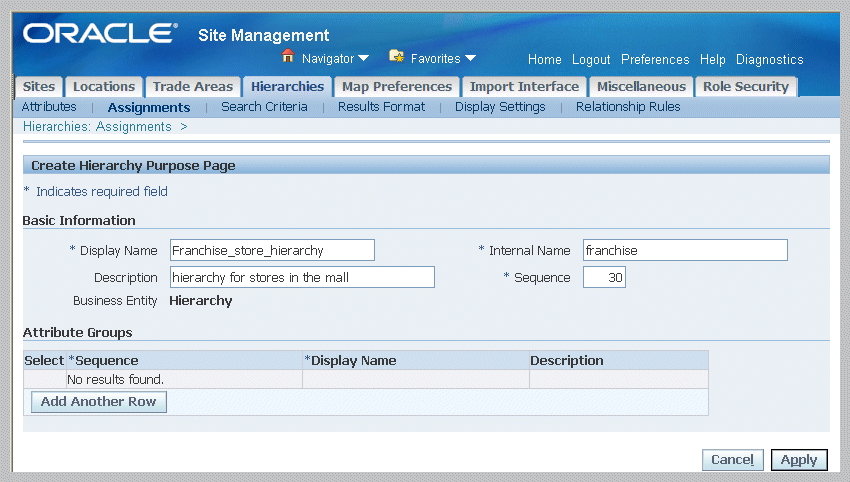
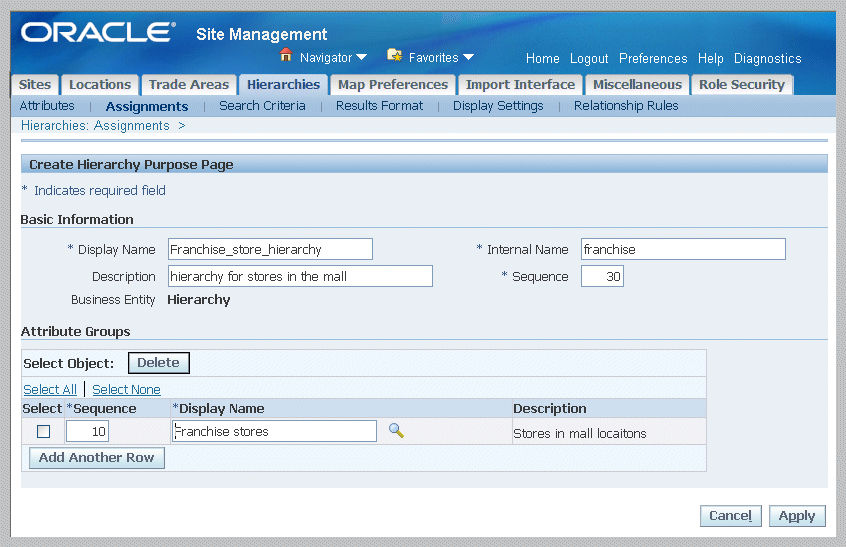
Creating Hierarchy Attribute Pages
Hierarchy attribute pages are created for the various hierarchy purposes, and assigned attribute groups for ease of data entry and viewing. For each page, you can choose the attributes displayed and the specific order they are listed. You can also assign multiple attribute pages to a single hierarchy purpose.
To create hierarchy attribute pages
-
In the Hierarchies tabbed region of the Administrator, select Assignments.
-
Select a value in the Hierarchy Purpose field, and select Go.
-
Select the Attribute Pages tabbed region.
The pages that currently exist display in the table.
-
Select Create Page.
-
In the Create Hierarchy Page region, create an attribute page for the hierarchy purpose by entering data in the Basic Information region:
-
Display Name—name displayed on the page
-
Description—a description of the attribute category
-
Internal Name—internal name for the page, this value cannot be updated once a page has been created
-
Sequence—sequence number for each page associated with an attribute group, the sequence number determines the order pages are listed
-
-
In the Attribute Groups region, select Add Another Row to add attributes groups to this page. To add an existing attribute group:
-
Enter a Sequence number
-
Select an existing Display Name value
-
-
Select Apply to save your work.
The attributes for this purpose, and the display sequence appear in the Pages region of the Assignments page.
Viewing and Defining Hierarchy Display Settings
Hierarchy structures and their associated sites are viewed on the Hierarchy Workbench. The Display Settings page in the Site Administrator is used to upload images as markers for particular hierarchy and site purposes, and associate attribute pages to these purposes for viewing on the Hierarchy Workbench. You can:
-
Set different icons for site and hierarchy records. This offers a visualization of the hierarchy and associated site purposes.
-
Upload image files of any file size for icons on the Hierarchy Workbench. Images are sized when uploaded.
-
Associate hierarchy and site purposes to attribute pages to view on the workbench.
See: Overview of Site Hierarchies
To view and define hierarchy display icons
-
Navigate to the Hierarchies Display Settings page.
-
In the Icons tabbed region, a list of the existing hierarchy or site and icon associations display in the table.
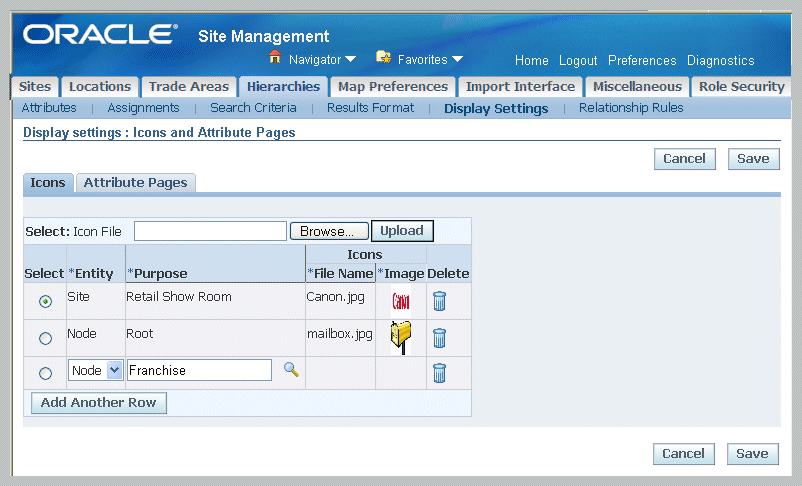
-
Select Add Another Row, and select an Entity type. Choices are Site or hierarchy Node.
-
Select a value in the Purpose field according to the type of Entity selected:
-
Site: Site Purpose
-
Node: Hierarchy Purpose
Note: Purposes are associated to only one icon record.
-
-
To import an image, select an entity record in the Icons table.
-
Select Browse to search for a graphic image in the Icon File box, and select it.
-
Select Upload to associate it with the record.
-
Save your work.
To view and associate hierarchy and site purposes with attribute pages
-
Navigate to the Hierarchies Display Settings page, the Attribute Pages tabbed region.
-
In the Entity field, select the entity type, Hierarchy or Site.
-
For Hierarchy, you see the association of hierarchy purpose records with hierarchy attribute pages.
-
For Sites, you see the association of hierarchy and site purpose records, with site attribute pages.
-
-
To create an association with a hierarchy purpose and hierarchy attribute page, select Hierarchy in the Entity field.
-
Select Add Another Row, and select a value in the Hierarchy Purpose field.
-
Select a Hierarchy Attribute Page value in the Attribute Page field.
-
Save your work.
-
To create an association with a hierarchy site purpose and site attribute page, select Site in the Entity field.
-
Select Add Another Row, and select a value in the Hierarchy Purpose field.
-
Select a value in the Site Purpose field.
-
Select a value in the Site Attribute Page value Attribute Page field.
-
Save your work.
Defining Hierarchy Relationship Rules
Organizations with a large number of sites often have parent and child relationships between their sites. Site Hub provides the ability to create site-to-site and site-to-node relationships in the context of a hierarchy. Relationship rules enable you to:
-
Define the permissible combinations of sites and nodes in a hierarchy if rules are set on the Relationship Rules page. If rules are not set, there are no restrictions on relationships between sites and nodes
-
Define rules based on site and node purposes for a particular hierarchy purpose.
-
Create allowable associations between nodes and sites as identified by their purposes. Relationship rules define site, node, and purpose drag and drop destinations on the hierarchy.
To view and define hierarchy relationship rules
-
Navigate to the Relationship Rules page.
-
Select a value in the Hierarchy Purpose box to display the existing parent and child relationships for that purpose. The information displays in a tabular format including:
-
Parent Type: Hierarchy Node or Site
-
Parent Node or Site Purpose
-
Child Type: Hierarchy Node or Site
-
Child Node or Site Purpose
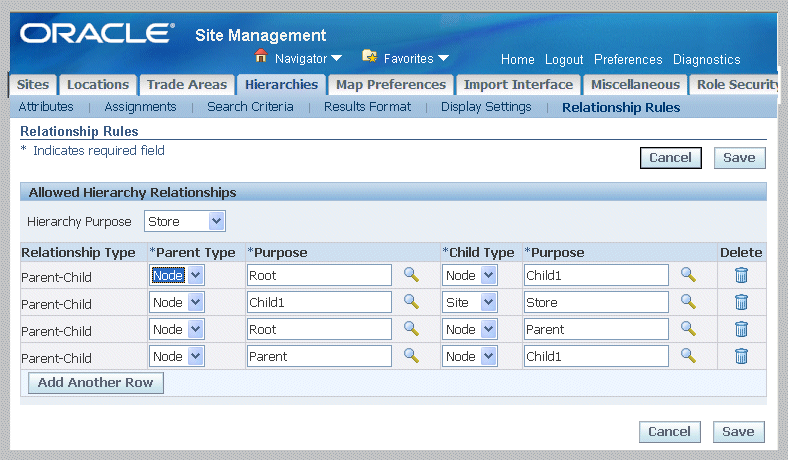
-
-
To define a new rule, select Add Another Row, and select a value in the Parent Type field. Choices are hierarchy Node or Site type.
-
Select the applicable purpose associated to the Parent Type, that is, the site or hierarchy purpose.
-
Select the Child Type for this Parent Type, choices are Node or Site.
-
Select the associated Purpose value for the Child Type.
-
Save your work.
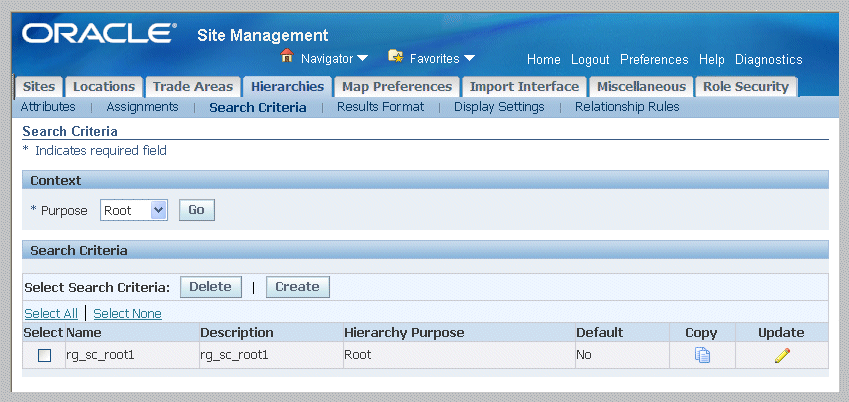
Setting Up Search Functions
The search functions in Site Hub enable you to create different search criteria for different business processes. You can personalize your search criteria. For site searches you can use a context—a combination of site purpose, country of location, and trade area group. For hierarchy searches you use hierarchy purpose values.
Different results formats enable specific attributes to be included in the result set and to be exported for various roles. You can define results formats across different attribute groups, and define import formats across attribute groups. Import formats are used to import and create new site and hierarchy records into Site Hub using the Microsoft Excel application.
To view and create site search criteria
-
Navigate to the Site Search Criteria page
-
Select a value in the site Purpose field.
-
Optionally, you can select values in the Trade Area Group and Country fields.
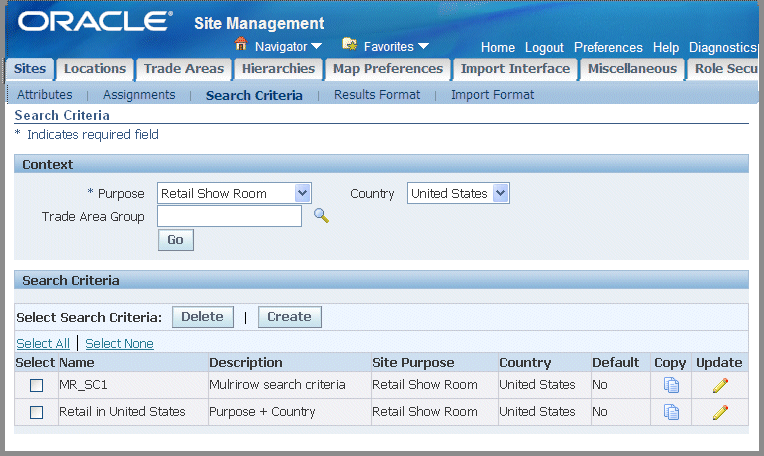
-
Select Go. Search criteria results records are displayed in the table.
This page enables you to access other pages to create, copy, and update search criteria. See: Managing Search Criteria, Oracle Product Information Management Implementation Guide
To view and create hierarchy search criteria
-
Navigate to the Hierarchy Search Criteria page.
-
Select a value in the hierarchy Purpose field.
-
Select Go. Search criteria results records are displayed in the table.
This page enables you to access other pages to create, copy, and update search criteria. See: Managing Search Criteria, Oracle Product Information Management Implementation Guide
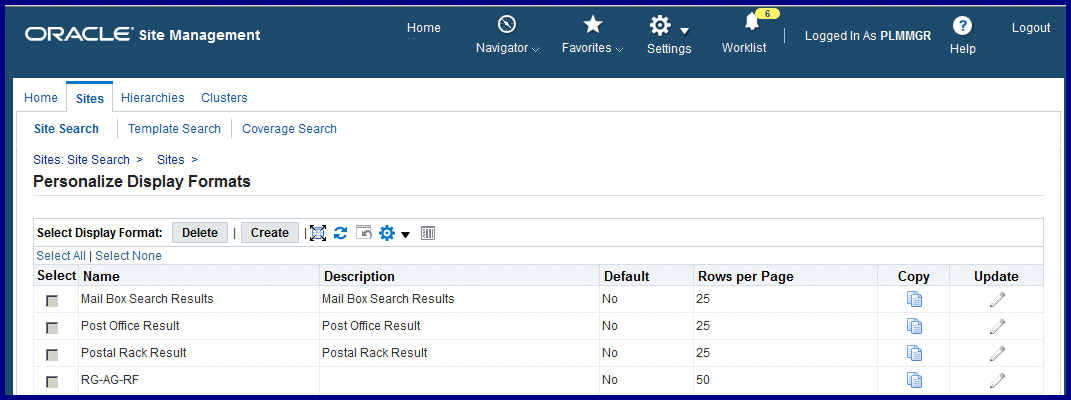
To personalize site search result formats
-
In the Site Simple Search page, select Personalize to display the Personalize Display Formats page.
The table displays the results of the search. The following fields appear for this record: Name, Description, Site Purpose, Country, Default, Rows per Page.
-
Select Create to navigate to the Create Display Format page to create search results formats. See: Managing Display Formats, Oracle Product Information Management Implementation Guide
This page also enables you to navigate to pages to Copy or Update this record.
To define formats for your search results
-
Navigate to the Results Format page from either the Sites or Hierarchies tabbed regions.
-
For sites, in the Context region, select a value in the Purpose field. Optionally you can select values in the Country and Trade Area Group fields.
For hierarchies, select a value in the Purpose field.
-
Select Go to display the results of your search in the Display Formats region.
This page enables you to create a new record; or select a record for update or copy. See: Managing Display Formats, Oracle Product Information Management Implementation Guide
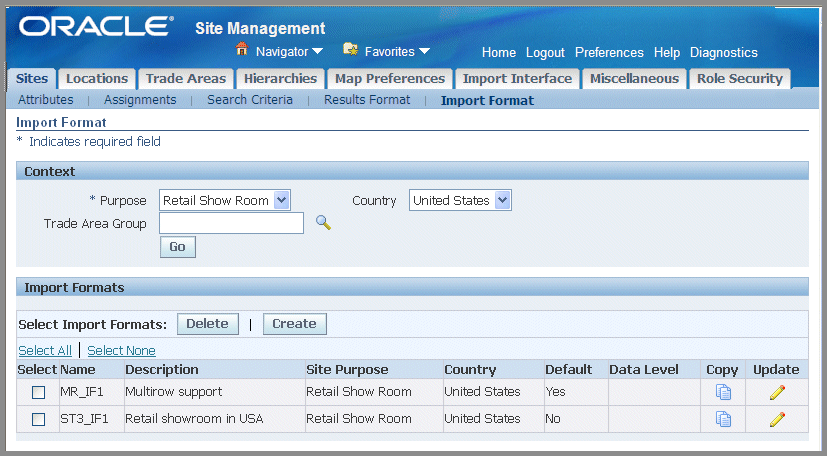
Setting Import Formats
Site Hub enables the importing of new site records using a spreadsheet. You select a site import format for exporting records, and download the data to create sites. An import format identifies the particular site purpose these imported records inherit, and the attribute groups defined for the purpose.
To view formats for importing sites
-
Navigate to the Import Format page.
-
In the Context region, select a value in the Purpose field. Optionally you can select values in the Country and Trade Area Group fields.
The context values are used to filter the search criteria for existing format records.
-
Select Go to display the results of your search in the Import Formats region.
Information displays for the records in the following fields: Name, Description, Site Purpose, Default, and Data Level. This page enables you to create, update, and delete records.
To create an import format
-
Select Create to display the Create Import Format page.
-
Enter a value for this format in the Name field, and optionally enter a description.
-
Enable the Set as Default check box if you want this to be your defaulted import format.
Note: There can be only one default import format for each site purpose.
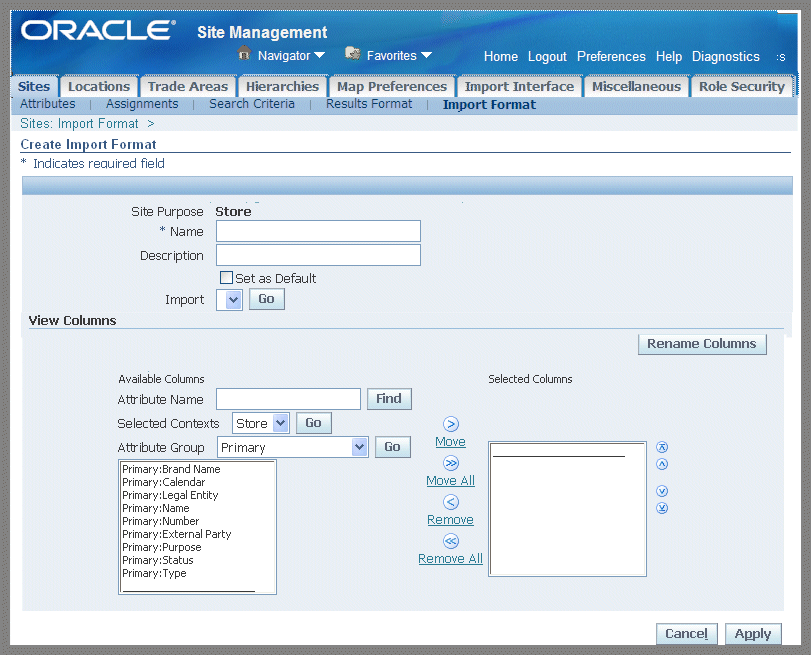
-
Select attribute column values in the View Columns region. Search for attribute column values by selecting values in the following fields:
-
Attribute Name
-
Selected Contexts
-
Attribute Group
-
-
Select Go to display the results of your search.
-
Select records in the Available Columns box—and move to the Selected box using the Arrow tool.
-
You have the option to customize your import format by renaming the attribute columns. Select Rename Columns to navigate to the Rename Columns page.
The original column names of the records selected appear on this page.
-
Enter the new column names in the New Column Name field, and select Apply to save your work.
See: Managing Display Formats, Oracle Product Information Management Implementation Guide
The Create Import Format page refreshes with the new column names.
-
Select Apply to create your import format.
To create an import format by copying another record
-
Select a record on the Import Format page, and choose Copy.
The Copy Import Format page displays showing the same values as the original record.
-
Enter a unique value in the Name field.
-
You have the option to use the defaulted values, or select new values in the Description and Set as Default fields.
You also have the option to use the attribute column values defaulted in the Selected Columns box, or you can move or delete values using the Arrow tool.
-
Select Rename Columns to navigate to the Rename Columns page to customize attribute column names.
-
Enter the new column names in the New Column Name field, and select Apply to save your work.
See: Managing Display Formats, Oracle Product Information Management Implementation Guide
The Copy Import Format page refreshes with the new column names.
-
Select Apply to create your import format.
To create modify an import format
-
Select a record on the Import Format page, and choose update to display the Edit Import Format page.
-
You can modify all values with the exception of the values entered in the Context fields of Purpose, Country, and Trade Area Group. You can update:
-
Name
-
Description
-
Set as Default
-
Selected Columns
-
Column Names
-
-
Select Apply to save your work.
Using the Import Interface
You can import large volumes data sets to Site Hub using the import interface. The bulk import interface provides the ability to carry out high speed data import. The program is a concurrent program for importing site and user-defined attribute records into Site Hub. Before executing this program, insert the site and attribute data in the following tables in the Oracle Electronic Technical Reference Manual (eTRM):
-
RRS_SITES_INTERFACE
-
RRS_SITE_UA_INTF
-
RRS_LOCATION_UA_INTF
-
RRS_TRADEAREA_UA_INTF
During the import process, and moved to the base tables after it is validated.. Invalid rows of data are copied over to an error log. The RRS_INTERFACE_ERRORS table contains any errors generated during processing of the batch. The invalid rows can be corrected and resubmitted for processing.
Associating Value Sets to Attributes
Oracle Application Object Library uses values, value sets and validation tables as components of flexfields and standard request submission. In Oracle Site Hub, attributes capture all the detailed information about sites. When creating your attributes, you can create records with validation logic to support the needs of your organization. This functionality is enabled by associating value sets with your attributes. It is recommended that you create value sets before defining your attribute groups. Value sets have the following features in Site Hub:
-
Attributes can have a static or dynamic list of valid values, or a range of values.
-
You can optionally specify a value set with data type and validation rules to be applied when entering data.
-
Value sets can be reused for different attributes.
-
You can create child value sets that are subsets of a parent value set.
The parent value set includes all possible values while the child value sets include some of the values from the parent value set.
See: Overview of Values and Value Sets, Oracle E-Business Suite Flexfields Guide
To search for and view existing value set records
-
Navigate to the Maintain Value Sets page in the Miscellaneous tabbed region of the Administrator.
All existing records appear in the Value Sets region of the page.
-
You can filter records by entering values in the Value Set Name, Description, Data Type, and Validation Type fields—and selecting Go.
The results of your search appear in the Value Sets region of the page. See: Defining Value Sets for User-Defined Attributes, Oracle Product Information Management Implementation Guide, and Value Set Windows, Oracle E-Business Suite Flexfields Guide
To create a value set record
-
Navigate to the Create Value Set page.
-
Enter information in the Value Set Name and Maximum Size fields.
-
Enter information in the fields:
-
Value Set Name
-
Description
-
Data Type
-
Maximum Size
-
Validation Type
See: Value Set Windows, Oracle E-Business Suite Flexfields Guide , and Defining Value Sets, Oracle E-Business Suite Flexfields Guide

-
-
Select Apply to save your work.
Viewing and Creating User Defined Functions
You can add user defined functions and actions to define your own custom logic to existing pages. This can be accomplished without having to customize the entire page. By first setting up user defined attributes, you can then execute user defined functions with those attributes. Using different algorithms, you can calculate values by passing attribute values to functions.
Functions use input and output parameters of various data types such as string, integer, or Boolean. You can:
-
Use Java, URL, or PL/SQL functions
-
Map these parameters to attributes and object primary key values. Actions are trigger points for functions displayed as buttons or links on the page.
-
Determine the conditional visibility of the button and the label displayed on the button itself.
-
Prompt the user based on the user's input.
Note: User defined functions are available for user defined attributes only.
To view and create user functions
-
Navigate to the Functions page.
All existing user defined functions appear in the Results region in a table with the following columns: Description, Display Name, Function Type, Internal Name.
-
You can filter and search the record display. Select a column value in the Search By field, and optionally enter a word or partial word in the text box field.
-
Select Go to display the results of your search.
-
To edit a function record, select a record and select Update to display the Edit Function page.
-
To create a user defined function, select Create Function.
-
On the Create Function page, enter the following information:
-
Internal Name: Internal name of the function.
-
Display Name: Name of the function as it appears on the page.
-
Description
-
Function Type: Whenever you define a function, there must be an underlying implementation of that function. The supported function types are:
-
Java: When you select Java, specify the class in which the method resides and the method that implements your custom logic.
-
PL/SQL: When you select PL/SQL, specify the package and the procedure that implements your custom logic.
-
URL: Specifies that the URL link. Specify the link.
-
-
-
Select Apply to save your work.
-
To create a user-defined function, and to create parameter mappings for a function, see: Creating User-Defined Functions for Item Attributes, Oracle Product Information Management Implementation Guide