Site Mapping
This chapter covers the following topics:
- Overview of Site Hub Map Functionality
- Defining Site Map Preferences
- Site Geocoder Program
- Viewing Site Map Details
- Polygon Geometry Visualization
- Searching Coverage Areas
Overview of Site Hub Map Functionality
Site Hub offers the ability to view sites on a map using Google Maps. The geographic location of sites is an important component of ongoing business processes such as merchandise selection, revenue forecasts, competitive analysis, and marketing. You can also set information such as competitor sites and trade areas. You can set site icons, launch a geocoder program to geocode sites and configure views for visualizing site specific data in Google Maps.
Polygon site capability offers the ability to define a site zone defined by a group of vertices. This feature defines geographic zones businesses and industries such as retail, government, marketing, and insurance areas. Geofencing functionality enables you to dynamically create polygon mapping to connect sites by dragging and clicking on the map directly.
The Administrator role is used to configure the map display in the Map Preferences tabbed region, and access the Geocoder concurrent program used to create the map. The map is viewed from the Sites tab region in the Site user role and provides the following:
Defining Site Map Preferences
Site Hub offers the ability to view sites on a map using Google Maps. The geographic location of sites is an important component of ongoing business processes such as merchandise selection, revenue forecasts, competitive analysis, and marketing. You can also set information such as competitor sites and trade areas. The Map Preferences tabbed region consists of two pages: Map Preferences is used to set map icons and window information, and Geocoder is the concurrent program used to create the map.
The Map Preferences tabbed region enables you to:
-
Upload images to be displayed as markers for a site purpose, enabling you to easily distinguish sites on a Google Map. These markers can be used for your own sites, competitor sites, potential sites, and different trade areas for the various trade area groups of sites. You have the ability to define areas on the map for point or polygon geometry site purposes:
-
In point geometry, you upload images defining sites on the map.
-
In polygon geometry, you can define the color of the fill area or polygon on the map.
-
-
Upload image files of any file size for icons on the map. Images are automatically sized when uploaded. A default marker is shown if an image is not uploaded and set for display for a site purpose.
-
Select attribute pages for a site, location, or trade area group. The pages display for each entity when you select the site on the map. For example:
-
Site entity—set an attribute page for each site purpose
-
Location entity—set an attribute page for each country
-
Trade area entity—set an attribute page for each trade area group
-
-
Set scheduling details in the Geocoder concurrent program to obtain the spatial coordinates of the site.
For information on the basics of Google Maps viewing, searching, displays, and problem resolution—access the Google Maps Help Center at maps.google.com/support/?hl=en.
Map Setup
Google maps can be used in Site Hub without setting up map preferences, but the profile options must be set to use default functionality.
Setting up map functionality in your environment
-
If using Google Maps JavaScript API Version 2, obtain the Google Map key from Google, Inc.
If you are using Google Maps JavaScript API Version 3, this key is not required. Proceed to the instructions in Step 4.
The key is obtained from this site: google.com/apis/maps/signup.html. The key is generated based on the hostname of the application server.
-
Navigate to the Personal Profile Values window, and select the profile option CSF: Google Map Key.
-
Enter the map key you obtained form Google, Inc. into the Default Value field, and save your record.
-
Select the profile option RRS: Google Map Client ID, and enter the client identification provided by Google, Inc.
The Client ID is obtained after purchasing an Enterprise license from Google. See: google.com/enterprise/
-
Generate the Locations Spatial Index Rebuild concurrent request in the Trading Community Manager responsibility.
This program builds a spatial index on the HZ_LOCATIONS table. See: Locations Spatial Index Rebuild, Oracle Trading Community Architecture Administration Guide.
-
Set the profile option, Applications Server-Side Proxy Host And Domain to your proxy server name.
-
Set the profile option, Applications Proxy Port to your proxy port.
-
Optionally, you can set the profile option RRS: Trade Area Group Map Layout Type to set trade areas on the map as filled with color, or not.
-
Save your work.
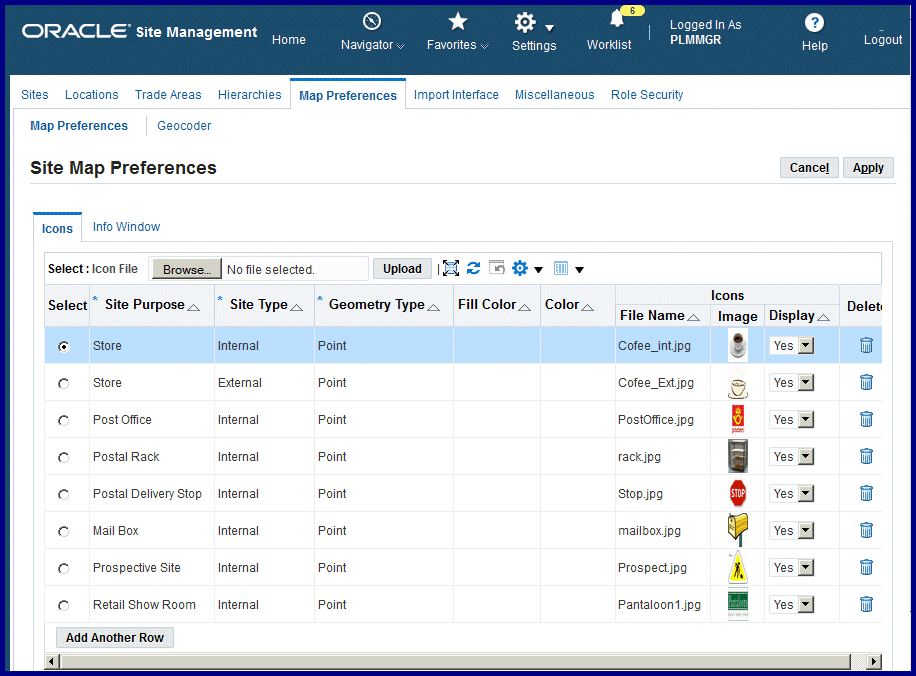
To define site map preferences
-
Navigate to the Map Preferences tabbed region and the Map Preferences section.
In the Icons tabbed region, a list of the existing map site purposes and geometry types appear in a table format.
-
Select Add Another Row, and select a record in the Site Purpose field.
This is the primary business purpose of the site.
-
In the Site Type field, select whether this record is either an Internal or External site.
-
Select a value in the Geometry Type field, your choices are:
-
Point: Points can represent buildings or other location points for your site purpose. You can upload an image icon to define the site on the map.
-
Polygon: Polygons form an implied closed area representing a location. You select a color to fill the area on the map, but do not upload an image file. See: Polygon Geometry Visualization
-
-
If this Site Purpose record is Point Geometry Type, you can import an image for the map by selecting a value in the Icon File box by using the Browse button.
-
In the Choose File to Upload dialog box, select a record, choose Open, and then choose Upload
The file name appears in the File Name field, and the image icon appears in the Image field. If icons are not uploaded for a record, a default marker is displayed.
Note: The Fill Color and Color fields and not enabled for Point Geometry Types.
-
Select a value in the Display field.
Your choices are Yes or No. This sets whether or not the site is mapped with this icon. If set to No, the default icon is used on the map.
-
If this Site Purpose record is Polygon Geometry Type, select a polygon color for the area by entering an HTML color code number in the Fill Color field. For example, color code numbers can be:
-
Green: #008000
-
Red: #FF0000
-
Yellow: #FFFF00
-
-
Choose Apply.
The color number entered appears in the Color field.
Note: The File Name, Image, and Display fields are not enabled for Polygon Geometry Types.
-
Select Apply to save your work.
-
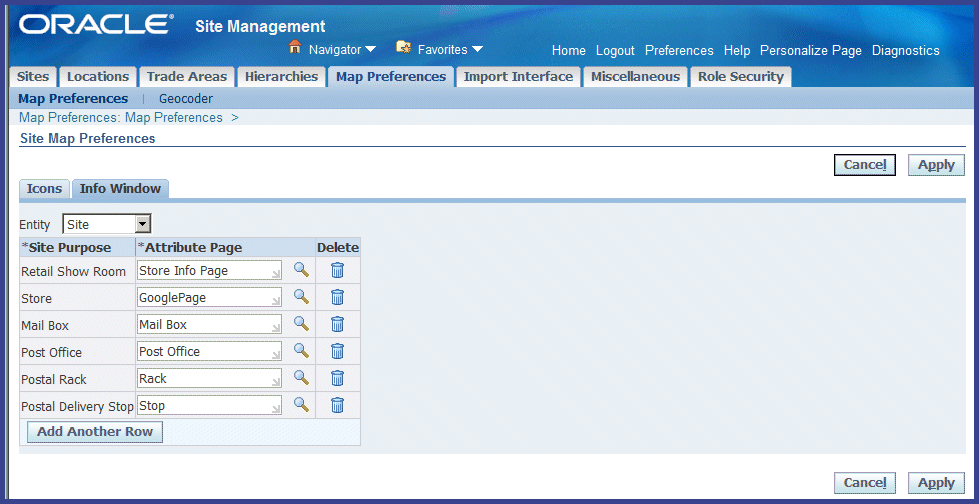
In the Information Window tab you can view and add attribute pages for Site, Location, and Trade Areas. Select an entity value:
-
Site—select a Site Purpose and Attribute Page value
-
Location—select a Country and Attribute Page value
-
Trade Area—select a Trade Area Group and Attribute Page value
Note: The Site, Trade Areas, and Location entities display in the Information Window if existing Attribute Pages are assigned to a Site Purpose.
-
-
Select Apply to save your work.
Related Topics
Google Maps Help Center: maps.google.com/support/?hl=en
Setting Your Personal User Profile, Oracle E-Business Suite User's Guide
Site Geocoder Program
The Geocoder program is a concurrent request based on geometry coordinates used to view sites on a Google Map. The program calculates the geocodes using Google programming interfaces to find geodetic coordinates, that is, the latitude and longitude of a site. These coordinates are based on the primary address of the site, and the information is stored in Site Hub for spacial analysis around a site.
The Geocoder enables scheduling from geocoding for new sites, specific sites and purposes, or sites that had errors and were not geocoded during site creation. You can launch this program for a large number of sites, typically after a bulk import.
The profile option, RRS: Default Geocoding Preference, is used to set the default value for launching this program when creating site records. If set to System Generated, the program uses the address fields entered in the site record and is automatically launched when the record is saved. If set to User Entered, the program uses the longitude and latitude values and must be manually launched. See: Profile Options
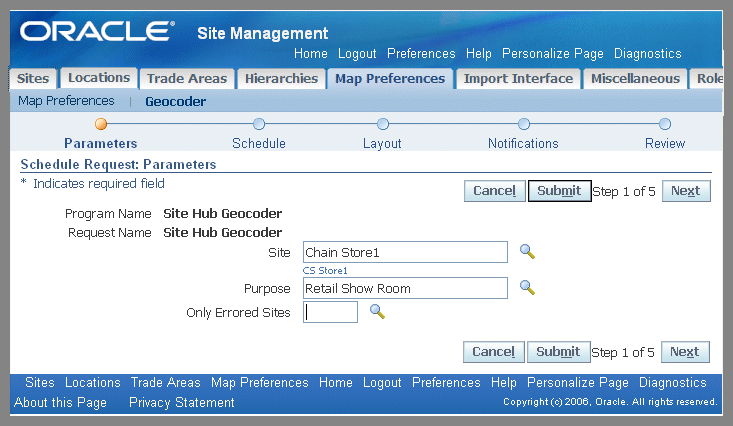
To launch the Geocoder concurrent program
-
Navigate to the Geocoder page.
-
You have the option to select values in the following fields:
-
Site field if you want to run this program for a specific site.
-
Purpose field if you want to run this program for sites with a specific purpose.
-
Only Errored Sites field if you want to run this program for site records that were not mapped during site creation.
-
-
Select Submit to launch the Geocode concurrent request, or select Next to set scheduling parameters.
-
If you select Next, the Schedule Request: Schedule page appears. The process train highlights each step as you proceed through the pages where you can select runtime details for this request including:
-
Schedule—Start Dates, Recurrence, Interval, Schedule Name
-
Notifications—Recipients
-
Review
-
-
Select Submit to launch the report.
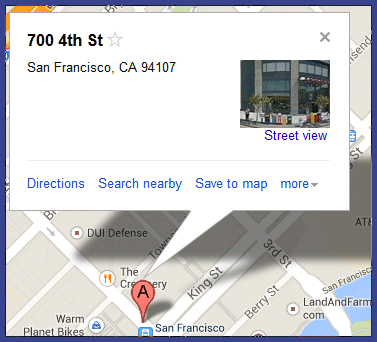
Viewing Site Map Details
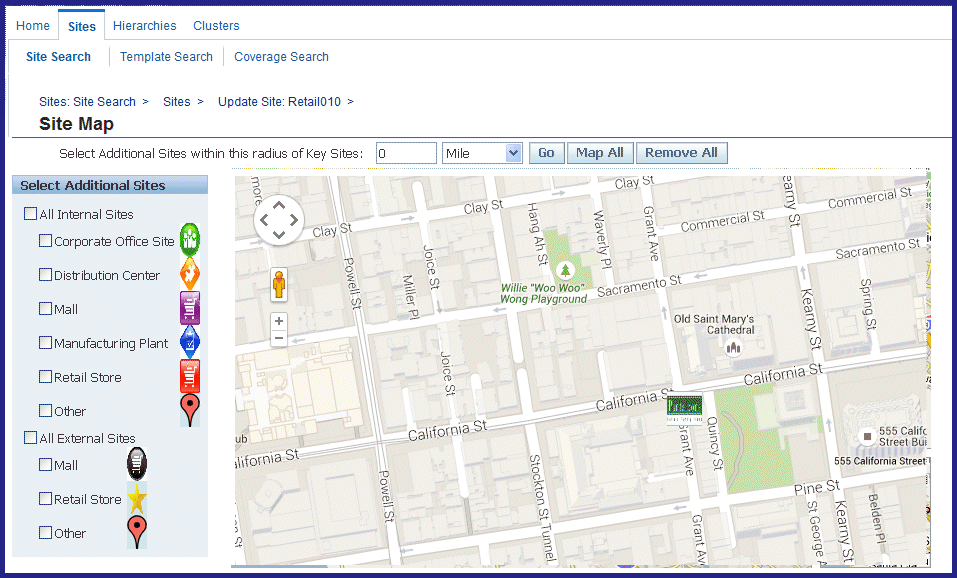
You can see the location and other data of a site viewed on a map. The map enables you to select criteria for the type of site information you want displayed. For example, you can select all external sites within a specific radius. The page view consists of a Site Map and Mapped Details regions for the sites selected. The Mapped Details region displays the site summary details in a tabular format. Features of the site map include:
-
Attribute Pages
If attribute pages are associated with a site, when you click the site icon on the map, a dialog box displays with the page information setup.
-
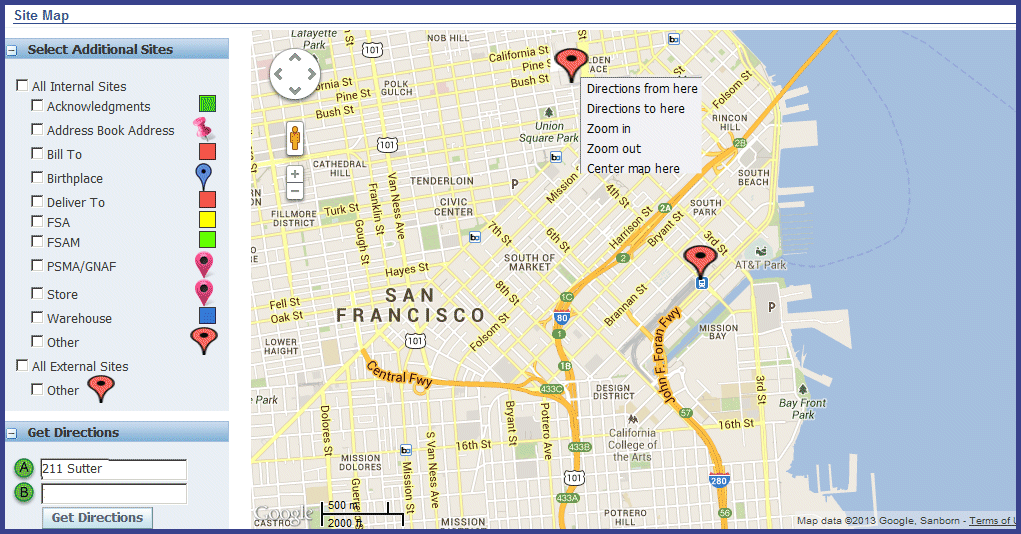
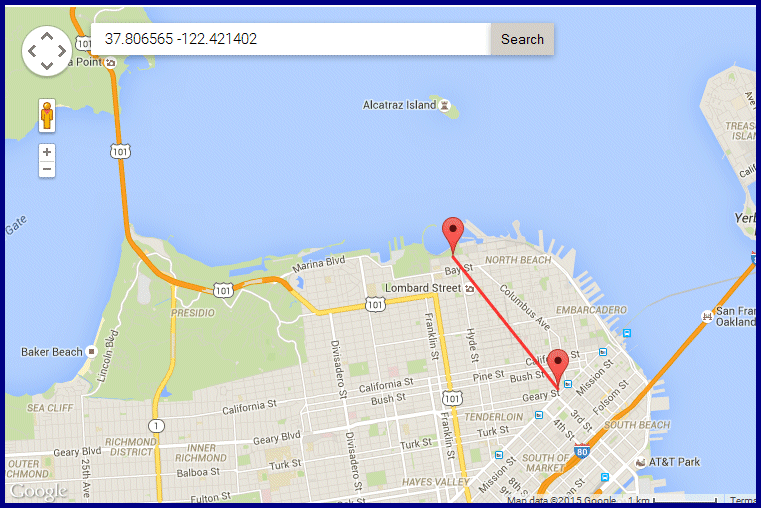
Directions From and To a Site
Basic navigation features provide the capability to get directions from one point to another on a map.
-
Key Sites
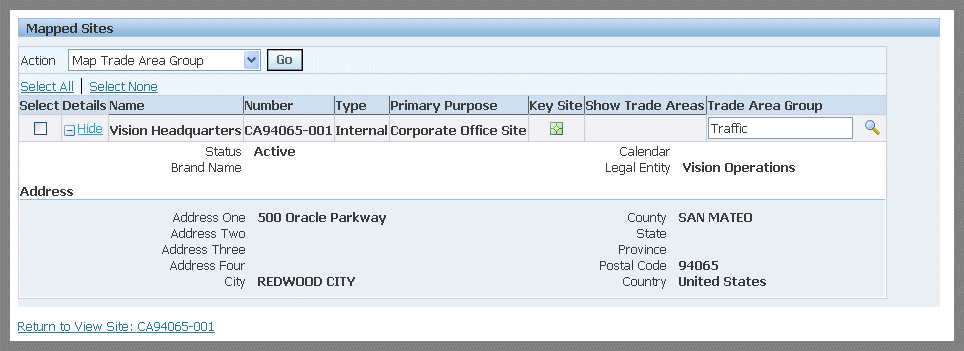
The site you use to access the map is designated as the key site. Key sites are the focal point for comparisons (internal, external, trade regions) with other sites on the map. This designation can be changed, or you can define other sites as key sites in the Actions in the Mapped Sites region.
-
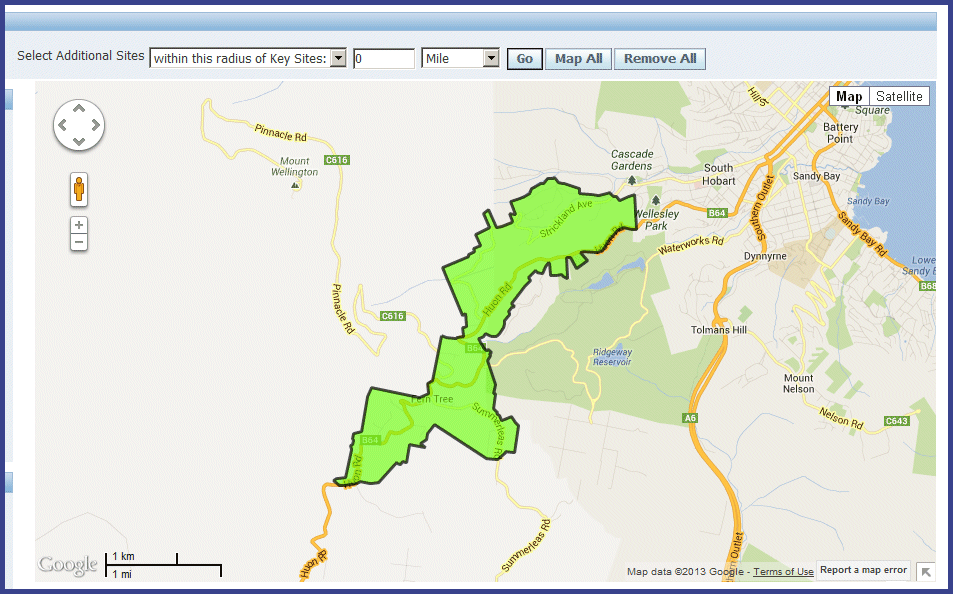
Polygon Geometry Visualization
Polygons form a closed area on the map. These polygons represent areas such as sales territories, public sector parcels, and insurance risk coverage. These areas are outlined on the map by specific colors.
-
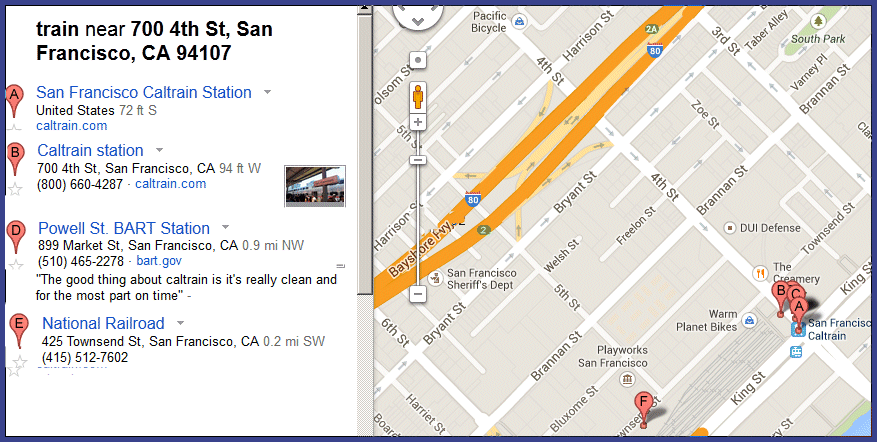
Search Nearby
You have the ability to search for places within a specified area by supplying keywords or other search criteria.
-
Site Icons
Icons are defined for internal and external sites. External sites are sites not owned by your organization such as competitor sites.
-
Sites Not Mapped
Sites unable to be mapped are listed in the Key Sites Not Mapped region. Sites are listed in this area when there is missing or invalid geographical or purpose data.
-
Street View
Views from many locations in the world are available. These images appear after zooming in to a location on a map. Using the keyboard or mouse, the horizontal and vertical viewing direction and zoom level can be selected.
-
Trade Area Groups
Trade area groups are represented by concentric circles defined for trade area group regions.
Note: For information on the basics of Google Maps viewing—access the Google Maps Help Center at maps.google.com/support/?hl=en.
To view site map details
-
On the View Site page, select View Map.
The Site Map is also accessed by selecting multiple records on the Sites page, and choosing Map All.
In the Map Preferences setup, if you selected point geometry, images define site icons on the map.
If you selected polygon geometry, a closed polygon area represents areas for the site purpose on the map. See: Polygon Geometry Visualization
-
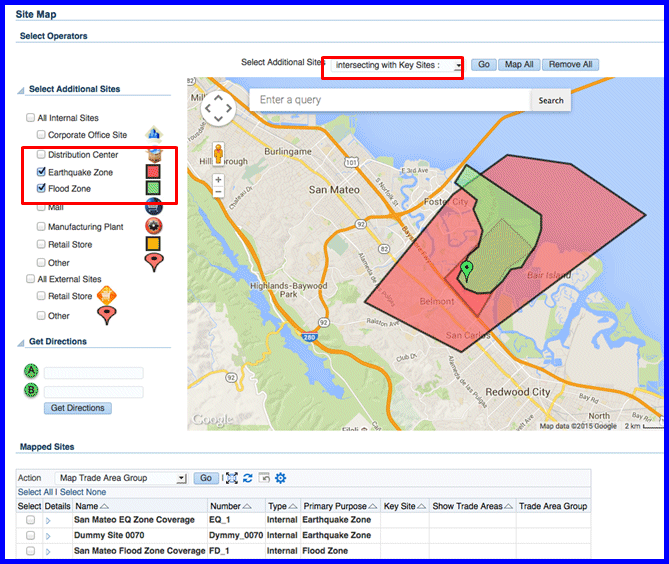
In the Select Additional Sites column, select site purpose icons for your sites to display on the map.
All icons uploaded in the Site Map Preferences window, the Icons tab, are displayed. Default icons display if there is no icon uploaded and associated with a site purpose. See: Defining Site Map Preferences
-
In the Select Additional Sites within this radius of Key Sites box, select a distance and unit of measure for the display of the sites.
-
Select Go to display the results of your search.
The additional sites appear in the Mapped Sites detail table. Site summary details are displayed for Name, Number, Type, Primary Purpose, Key Site, Trade Areas, and Trade Area Group fields.
Select Show to display the information for Status, Brand Name, Calendar, Legal Entity, and Address details.
-
You can add or remove the sites on the map display by selecting Map All or Remove All.
When your select Remove All, the site defined as the Key Site, remains on the map display.
-
Obtaining directions from one site to another is available if you are using Google Maps JavaScript API Version 3. You can also zoom in or out, or center the map around the site location.
Right-click with your cursor on the starting point site location. A menu appears with the following choices:
-
Directions from here
-
Directions to here
-
Zoom in
-
Zoom out
-
Center map here
-
-
Select Directions from here or Directions to here, depending on which site location is the starting or ending point for directions.
The address appears in the Get Directions section, in the A field.
-
Right-click with your cursor on the ending point site location.
The address appears in the Get Directions section, in the B field.
-
Select Get Directions.

The path from site A to site B, and a side panel with the directions, appear on the map.
-
If you are using Google Maps JavaScript API Version 3, Street View images are available for selected sites. Navigate to these images using the following methods:
-
Drag the Pegman icon onto the location on the map.
A full-size image displays of the location selected.
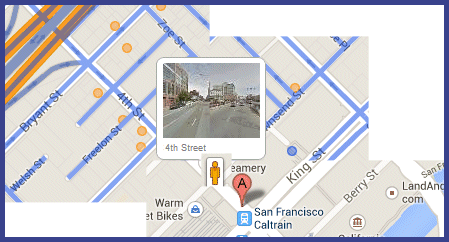
-
Left-click with your cursor on the site.
A dialog box appears with a small scale view of the Street View photo. You can select the photo to view a full-size image.
-
-
In Google Maps JavaScript API Version 3, you can select Search Nearby to query businesses, points of interest, or other landmarks located near the selected site. Enter keywords, addresses, or numbers applicable to your search in the Search nearby box.
-
Select Search. The results of your search appear on the map, with a listing of sites on the map border.
-
If attribute pages are associated with a site, when you click the site icon on the map, a dialog box displays with the page information setup.
-
You can select site records in the table, and select one of the choices In the Action box:
-
Map Trade Area Group
Displays the concentric circles around the regions setup for the site representing the trade area group region. These areas are defined on the Create Trade Area Group page. See: Viewing and Creating Trade Area Groups
-
Remove Trade Area Group
Removes the displayed concentric circular trade area group region.
-
Remove Site
Clears the site icon from the map.
-
Compare Up To 5 Sites
Accesses the View Comparisons page to compare sites and entity attributes for comparison of data. See: Comparing Sites
-
Designate Key Site
Enables you to specify other sites as key sites for data comparison.
-
Remove Key Site Designate
Clears the key site designation for selected sites.
-
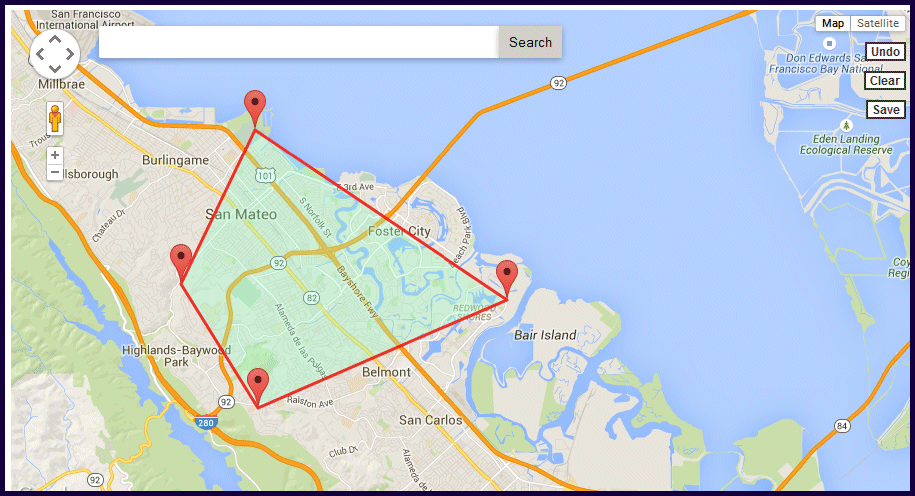
Polygon Geometry Visualization
Polygons are composed of connected lines forming an implied closed area or zone. Polygon site locations can be used to define coverage area. For example, polygon areas can represent:
-
Retail marketing or sales territories.
-
Public Sector law enforcement, parcel data, and zip code areas.
-
Oil and natural gas oil fields.
-
Insurance fire break, flood, and earthquake zones.
Polygon data consists of coordinate pair values, one vertex pair for each line segment of the polygon. Features include:
-
A point in a polygon can represent a building location; a line string might represent a road, or flight path.
-
The ability to create bulk import of polygon sites.
-
Coverage areas can be queried for an address or geocode coordinates.
Note: Different polygons can overlap with each other. However, one polygon cannot have lines that cross into each other creating overlapping borders. The coverage must be one continuous closed area.
There are two creation methods for polygon sites on the site map:
-
Geofencing enables these areas to be created using mouse action. See: Creating Geofence Map Zones
-
Software releases of Oracle Site Hub previous to Release 12.2.5, polygon sites are defined using special-purpose programming, Structured Query Language (SQL). See: Creating Polygons Using an SQL Statement
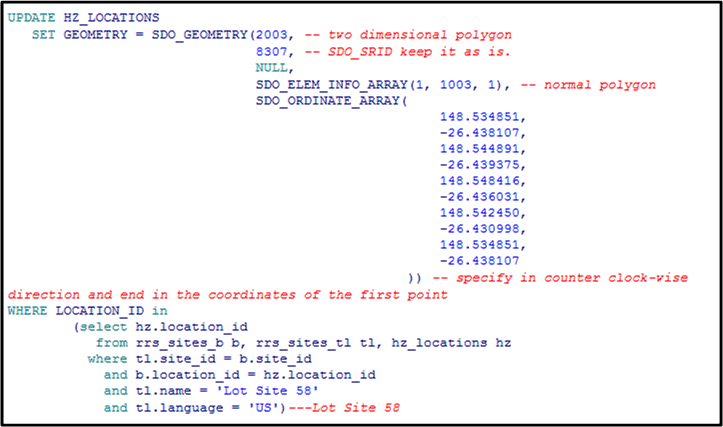
Creating Polygons Using an SQL Statement
You can create and manage polygon geometry for a site by using a Structured Query Language (SQL) program designed to define these objects, similar to the following example:
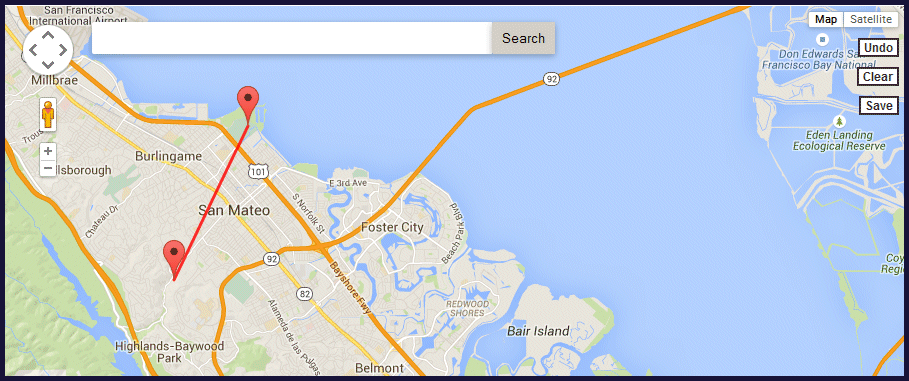
Creating Geofence Map Zones
Geofencing enables you to dynamically create polygon sites using several methods to place the markers on the site map:
-
Left-click a location with your mouse; this adds a marker at that point. Continue this mouse action until the selections form a closed area.
-
Add an address in the map's Search box to place a marker. Continue adding addresses until the selections form a closed area.
-
Enter the longitude and latitude values in the Search box to place a marker on the map. Continue entering geodetic coordinates until a closed area is formed.
-
Drag markers on the map to modify a polygon shape.
When creating these forms, the Site Map page contains options to:
-
Undo the action of creating the last marker added to the map.
-
Clear to eliminate all markers you added to the polygon on map.
-
Save to temporarily save your draft work on the polygon on the map.
Note: This feature only uses Google map functionality.
To create polygon site Basic Information
-
Navigate to the Create Site page.
-
Select the Draw Site on Google Map method, and select Create.
The Create Site: Basic Information page appears.
-
Enter values in the Name and Number fields. If profile option RRS: Auto Default Site Number is set to Yes, the next number in the sequence appears. You can change the defaulted value to any unique value.
-
Optionally you can enter values in the following fields:
-
Type—identifies if the site is an Internal or External site
-
Status—Active or Inactive
-
Brand Name—company's identifying name, specified in the Site Hub Lookups
-
Calendar—BOM Calendar for the inventory organization associated with the site
-
Legal Entity—defined legal name
-
-
Use one of the following methods to create the polygon site.
To create a site by drawing on a map
-
On the Map region of the page, select a location on the map and left-click with your mouse to insert a marker on the map.
-
Select a second location on the map and left-click with your mouse to insert another marker; this connects the two markers with a line.
-
Continue to select locations on the map to insert markers until you form a closed polygon area.
-
Save your work.
To create a site adding addresses on the map to place markers
-
After entering the site Basic Information, add an address in the map Search box.
-
Select Search to place the marker.
-
Continue adding addresses in the Search box and choosing Search until the selections form a closed area.
-
Save your work.
To create a site adding longitude and latitude coordinates on the map
-
After entering the site Basic Information, add longitude and latitude coordinates in the map Search box.
-
Select Search to place the marker.
-
Continue adding longitude and latitude coordinates in the Search box and choosing Search until the selections form a closed area.
-
Save your work.
Searching Coverage Areas
Coverage search provides the ability to query the qualifying area included for a given radius or intersecting sites for an address or geocode meeting your search criteria.
To search the qualifying area for site coverage
-
Navigate to the Sites tabbed region or a specific site record, and choose Coverage Search.
The Site Map page appears. If you navigated to this page from a specific site, the site marker appears on the map.
-
If a specific site was not selected, enter the address or geocode coordinates in the Search box. Select Go to display the site location on the map.
-
In the Select Additional Sites column, select the qualifying site purpose icons you want to include in the coverage search.
-
Set the key site used as the center of the coverage search by selecting a marker, and left-click with your mouse to display the site address.
-
Select Set as Key Site.
-
In the Select Additional Sites box, choose how your want the coverage search calculated. Choices are:
-
within this radius of Key Sites
-
intersecting Key Sites
-
-
Enter a value for the range of the area you want to included in the coverage, and the unit of measure used for this boundary area. Choices are either Kilometer or Mile.
-
Select Go to display the results of your search.
-
The key site in the search appears as a marker in the polygon area .
-
Polygon shapes are the sites either intersecting or within the radius of the target location key site, depending on the selection.
-
Mapped site coverage details selected appear in the Mapped Sites section.
-