Setting Up G-Invoicing
This chapter covers the following topics:
- G-Invoicing Overview
- Setting Up G-Invoicing
- Administering G-Invoicing
- Organizational Groups in G-Invoicing and Oracle E-Business Suite
- Setting Up Access Control
- Setting G-Invoicing Options
- Pulling Organizational Groups and Data
- Pulling TAS-BETC Details for a Group
- Pulling GT&Cs
- Pulling Groups for GT&Cs
- Pushing and Pulling IGT Orders
- Pulling and Pushing Performance Records
- Intragovernmental Performance Integration with Oracle Payables
- Intragovernmental Performance Integration with Receiving
- Intragovernmental Deferred Performance Integration Program
- Viewing Request Status and Group Information
- Configuring Descriptive Flexfields for GT&C and Agency Information
- Configuring Descriptive Flexfields for Performance Accounting Transactions
G-Invoicing Overview
The Oracle E-Business Suite (EBS) solution for G-Invoicing works with the federal G-Invoicing application to facilitate the processing and accounting of intragovernmental buy and sell transactions. The solution is integrated with Oracle Contract Lifecycle Management for Public Sector, Oracle Purchasing, and Oracle Projects, and other products play supporting roles.
As a federal program agency, you can use the EBS G-Invoicing solution to:
-
Broker IGT buy and sell transactions through a common data repository.
-
Exchange data related to agencies and groups, General Terms and Conditions (GT&Cs), orders, modifications, and performance records.
-
Improve auditability by associating related transactions with a common identifier.
-
Integrate data from these activities into your accounting systems.
The following diagram shows the exchange of G-Invoicing data between the requesting agency, the federal G-Invoicing application, and the servicing agency.
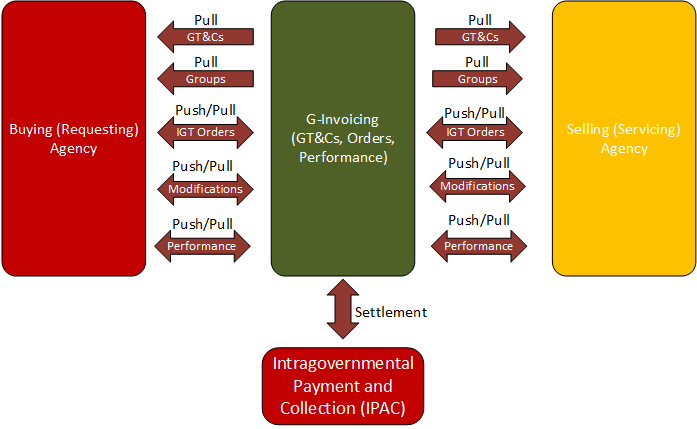
Oracle EBS uses REST services to communicate with the federal G-Invoicing application. Federal agencies push and pull IGT data to and from the federal application. Data pulled into EBS is validated, and corresponding transactions are created within EBS.
The EBS G-Invoicing solution includes the following features:
-
Default attributes from GT&Cs for order creation and validation
-
Predefined and customizable user defined attribute (UDA) templates and document styles
-
A tracking mechanism for intragovernmental transactions
-
A request log
How Oracle EBS and the Federal G-Invoicing Application Work Together
The overall sequence of events for an IGT is as follows:
-
A servicing or requesting agency creates GT&Cs in the federal G-Invoicing application.
-
Both agencies use the federal application to approve the GT&Cs.
-
The requesting agency pulls the approved GT&Cs from the federal application into EBS.
-
The requesting agency creates an order in Oracle CLM or Oracle Purchasing and then pushes the order to the federal application.
-
The servicing agency pulls the order from the federal application, uses Oracle Projects to add any required information and accept the order, and then pushes it back to the federal application.
-
The servicing agency fulfills or begins working on the order, reporting performance on the order upon fulfillment or over time.
-
The requesting agency records the received quantity against delivered performance and pushes the performance details to the federal G-Invoicing application.
Setting Up G-Invoicing
-
Review My Oracle Support Document 2600811.1, G-Invoicing Integration, for details about EBS G-Invoicing integration and patches.
-
Confirm your use of Oracle E-Business Suite (EBS) Release 12.2.7 or later.
-
Implement either Oracle Contract Lifecycle Management for Public Sector (CLM) or Oracle Purchasing.
-
If you are using Oracle Purchasing, apply Patch 28654205:R12.PO.D.
-
Implement Buyer Work Center for user defined attributes (UDAs).
-
Implement Oracle General Ledger for integration with accounting, Oracle Federal Financials for TAS definition and related setup, and Oracle Payables for invoices, receipts, and payments.
Note: Reimbursable orders are supported only in Buyer Work Center, and local blanket releases are not supported by the EBS G-Invoicing solution.
To set up the EBS G-Invoicing solution:
-
Set up access control for G-Invoicing.
See also the Bureau of the Fiscal Service resources website: https://www.fiscal.treasury.gov/g-invoice/resources.html.
-
Enter security certificate and schema details and associate system IDs in the G-Invoicing Options page.
See G-Invoicing Options.
-
Set the following profile options:
Summary of Profile Options Profile Option Admin Update Levels User Required Value Description G-Invoicing Service Host Site No Yes - Use this profile option to set the service host and port details.
Obtain the service host value from the document G-Invoicing System Interface Specifications - Pull for general terms and conditions, orders and performance at https://fiscal.treasury.gov/g-invoice/resources.html.
Example host names:
Production: ws.igt.fiscal.treasury.gov
Quality Assurance Current: .ws.igt.fiscal.treasury.gov
Quality Assurance Future: qaf.ws.igt.fiscal.treasury.gov
Functional Test: ft.ws.igt.fiscal.treasury.govG-Invoicing Service Path Site No Yes - Use this profile option to set the service path details.
Obtain the service host value from the document G-Invoicing System Interface Specifications - Pull for general terms and conditions, orders, and performance at https://fiscal.treasury.gov/g-invoice/resources.html.
Example: /ginv/servicesG-Invoicing Integration Admin Site, Application No Yes - Enter the email address of the administrator to notify about problems communicating with the federal G-Invoicing application. FV: Federal Enabled Responsibility Yes Yes - To display and use the Intragovernmental option in the Requisitions window, set this profile option to Yes at the responsibility or user level. Note: Setting this profile option to Yes enables the funding official to approve IGT orders.
MO: Default Operating Unit Site, Application - - - Enter the operating unit that you want to use by default. -
Include lookup codes for the PO IGT Object Class Code that exactly match the object class codes used in the federal G-Invoicing application.
-
To find the object class codes, log in to the Treasury portal, click the Requesting Agency tab, navigate to Orders, Schedules, and then Funding Information. The lookup codes are listed in the Object Class Code drop-down list.
-
In EBS, switch to the Functional Administrator responsibility. Click the Core Services tab and then the Lookups tab. Search for the PO IGT Object Class Code lookup type in the Lookup Types page. Add the lookup codes that you require for your business.
For more information about lookups for G-Invoicing, see Predefined Lookups in CLM.
-
-
Check and, if necessary, update the document style for intragovernmental transactions (IGTs). This document style is used for creating general terms and conditions (GT&Cs).
-
Switch to the CLM Purchasing Super User or the Purchasing, US Federal responsibility. Click Setup, then Purchasing, and then Document Styles.
-
To use the predefined document style, IGT Document Style:
-
If you are using Oracle Purchasing, then leave this document style as it is (unless you are using a custom workflow).
-
If you are using Oracle CLM, then select the CLM Enabled option. On the Document Styles page, enter IGT Document Style in the Name field. Select the CLM Enabled check box and click Apply.
-
-
To use a custom document style, use the Documents Styles page to create a new document style.
-
Select IGT Enabled. When you select this option, the document style is associated with IGTs and update is disabled.
-
Select UDA Enabled.
-
Select CLM Enabled.
-
In the Document Controls region, in the Approval Workflow field, select PO IGT APPROVAL.
-
In the Workflow Startup Process field, select PO IGT Approval Top Process.
-
Note: The line types used for G-Invoicing are Goods and Services. Temp Labor does not apply to IGTs. Therefore, the Commodities region on the Document Styles page includes only goods and services as purchase bases. By default, both types are selected.
For more information about custom document styles, see Document Styles.
-
-
(Conditional) If you are using Oracle Approvals Management (AME), configure an approval workflow.
Include the following elements:
-
Attribute: IGT_FLAG
-
Condition: IGT_FLAG (Y)
-
Approver group (approvers other than the funding and program officials, who are the post approvers)
-
IGT Signature Group: IGT_SIGN_GROUP
-
Rule: IGT_SIGNATURE_RULE
Note: On the IGT Order page, you can enter program and funding officials as post approvers. After the approvers from the AME workflow approve the order, the approval notification is sent to the post approvers.
-
-
(Optional) Enable e-signatures for program and funding officials.
If you use e-signatures for IGT order approval in Oracle CLM or Oracle Purchasing, then enable e-signatures for the program and funding officials.
Using the CLM Purchasing Super User or the Purchasing, US Federal responsibility, click Setup, then Purchasing, and then Document Styles.
Select an IGT document style and click Update.
In the Document Controls region, select Enable e-Signature for Program and Funding Official.
Click Apply.
-
Set purchasing options.
Using the CLM Purchasing Super User or the Purchasing, US Federal responsibility, click Setup, then Organizations, and then Purchasing Options. The Purchasing Options page appears.
-
(Optional) If you want a specific buyer to be automatically assigned to all GT&Cs, specify that buyer in the Buyer field in the Document Defaults region.
Note: A default buyer is mandatory in the purchasing options. If you want to set up multiple buyers to be used depending on certain attributes, then use the custom hook PO_CUSTOM_IGT_PKG to populate buyer names.
-
In the Receipt Accounting region, specify when to accrue expense items: at period end, or at receipt.
-
In the G-Invoicing Defaults region, in the Document Style for Pull field, select the default document style that you created in the Document Styles page. All global and local styles that are related to the selected operating unit (OU) are available in this field. If you select a local document style, it must have the same OU as the one selected in the purchasing options.
-
-
Enter a default ship-to location in either the supplier details or the financial options.
Use the CLM Purchasing Super User or the Purchasing, US Federal responsibility.
-
Click Buyer Work Center, then Suppliers, and then Purchasing and then enter the ship-to location for the supplier site.
-
Search for a supplier and click Update.
-
In the side navigation panel, click Purchasing.
-
For financial options, click Suppliers and then Purchasing, and enter the ship-to location.
-
-
Review the predefined UDA templates and associated attributes, and compile each template before use.
-
From the home page, select either the CLM Purchasing Super User or the Purchasing, US Federal responsibility.
-
Click Setup, then Attribute Setup Workbench, then Attribute Templates.
-
If you are using the predefined template, verify that the template has all the usages and attributes listed in this guide and that it is compiled.
For details on attribute templates, see Appendix: Attributes and Usages for Templates in G-Invoicing.
The predefined attribute template for GT&Cs has only one header template. For IGT orders there are four templates: Header, Line, Schedule, and Distribution.
Note: If you use a custom UDA templates, create each template by first selecting a predefined template and then copying the usages, attributes, and groups. For modifications, you must also copy the document numbering and ensure that the template has modification context. If there is a change in an attribute group or template, then compile the template before you use it.
See Attribute Groups, Actions, and Functions for Templates in G-Invoicing for more information.
-
-
Create a servicing agency as a supplier and set the servicing agency location code (ALC) as the supplier site. Provide global details (the Trading Partner Agency Identifier) under Organizations, ALC for the bank account under Banking Details (click Show Bank Account Details) in the Edit Supplier page.
-
Enter the requesting ALC in the buying agency bank account details in the Federal Controls page.
Select the Payables Super User responsibility, then Setup, then Bank Account, then Account Controls, and then Federal Controls.
-
Add the Federal IGT UOM context to the UOM DFF, and set the IGT flag for the context to Yes.
Only the UOMs that you add to the Federal IGT UOM are used in intragovernmental transactions.
-
To set up a UOM that is published in the G-Invoicing Portal and already exists in Oracle Purchasing, set the IGT flag to Yes for the Federal IGT UOM context.
-
To set up a UOM that is published in the G-Invoicing Portal but does not exist in Oracle Purchasing, create the UOM in Oracle Purchasing and then set the IGT flag to Yes for the Federal IGT UOM context.
Note: According to the federal G-Invoicing specifications, only the UOMs that are published in the federal G-Invoicing Portal are accepted.
See: Defining Units of Measure, Oracle Inventory User's Guide
For G-Invoicing, Oracle CLM and Oracle Purchasing include the lookup type PO_IGT_UOM. Enable either the IGT UOM Context attribute1 (if it is not used for another purpose) or add the UOM codes in the PO_IGT_UOM lookup type. The IGT requisition and order pages display these units of measure.
When you define a unit of measure in EBS, ensure that the value of the UOM field in EBS matches the UOM code in G-Invoicing, and the value of the UOM Name field in EBS matches the UOM Description in G-Invoicing.
For example, if the federal G-Invoicing application has the UOM code KG with the description kilogram, then in EBS you must enter KG in the UOM field and kilogram as the UOM name. If these values are not set correctly, then the pull process for seller-facilitated orders (SFO) could fail.
-
-
Enter security certificate details and associate the system IDs that you received from the Treasury with the appropriate operating units. Do this on the G-Invoicing Options page.
See G-Invoicing Options for more information.
For more information about configuring keystore and truststore details and copying the Fiscal Service schema, refer to My Oracle Support Document 2600811.1, G-Invoicing Integration.
-
(Conditional) Update line types.
If you are using Oracle CLM or Oracle Purchasing as a financial system and you pull approved orders to track obligations and performance, then you must set the default categories for goods and services line types. If the unit price is equal to $1 for all the schedules in an order line, then the lines are treated as amount-based lines. Otherwise, they are treated as goods-based lines. Based on the above condition, the system derives the first line type available that has an assigned category.
To set a default category for each line type, perform the following steps.
-
Select either the CLM Purchasing Super User or Purchasing, US Federal responsibility.
-
Click Setup, then Purchasing, then Line Types.
-
Locate the Goods line type and click Update.
-
In the Update Line Type page, select a category and click Apply. The value specified in this page is used by default when an IGT order is created.
You can override the line type and category using the custom hook PO_IGTORD_CUSTOM.
-
Repeat Steps 3 and 4 for the Services line type.
Note: If the FOB point is Source or Origin, then two-way matching is used by default. If the FOB point is Destination or Other, then three-way matching is used.
-
Administering G-Invoicing
The following tasks accomplish the actual exchange of data. Schedule concurrent programs to run regularly to maintain the flow of data.
-
Pull group definitions for requesting and servicing agency accounts from the federal G-Invoicing application by running the Intragovernmental Groups for Agency Interface Program. After you run this program, the application automatically runs another program to pull the TAS-BETCs.
See Pulling Organizational Groups and Data and Pulling TAS-BETCs for a Group for more information.
-
Pull GT&C data from the federal G-Invoicing application by running the Intragovernmental Agreements (GT&C) Interface Program. After you run this program, the application automatically runs another program to process the retrieved data and create the GT&Cs in EBS.
See: Pulling GT&Cs
-
Pull groups that are assigned to GT&Cs in the federal G-Invoicing application into Oracle EBS. When an agency user creates an IGT order and selects GT&Cs, only the groups and ALCs assigned to the selected GT&Cs are available.
-
Push order data from Oracle EBS to the federal G-Invoicing application by running the Intragovernmental Orders Interface Program.
See: Pushing and Pulling IGT Orders
Note: You do not need to schedule or run the PO IGT Order Generate & Push XML concurrent program manually. The PO IGT Order Generate & Push XML program generates the XML after the order is approved within the requesting agency.
-
Pull performance transactions into Oracle EBS.
-
(Optional) Set up and maintain group security for IGT documents.
You can use the predefined securing attribute IGT_GROUP_ID to restrict a user's access only to documents for a specific group or groups. In the Users window, click the Securing Attributes tab, select the IGT_GROUP_ID attribute, and enter the group ID. You can grant a user access to multiple groups by associating the user with more than one group ID.
Note: You can get the group ID from the federal G-Invoicing application or from a GT&C document.
See Organizational Groups in G-Invoicing and Oracle E-Business Suite for more information.
Organizational Groups in G-Invoicing and Oracle E-Business Suite
In the federal G-Invoicing application, administrators control access to intragovernmental transaction (IGT) documents by group assignment. Each user in the federal G-Invoicing application belongs to a group, and can only access IGT documents for that group. Documents with controlled access include GT&Cs, orders, and performance records, and attachments to those documents.
Groups in Oracle E-Business Suite
To push and pull IGT data to and from the federal G-Invoicing application, the group structures in your agency's system must mirror the group structures in the federal application. Oracle EBS accomplishes this through the association of a system ID with an agency and operating unit. See G-Invoicing Options for more information about this association.
After you pull group information (See Administering G-Invoicing and Pulling Organizational Groups and Data) the following information is available in Oracle EBS:
-
Groups for GT&Cs
-
Groups in agency accounts
-
TAS and BETCs details for groups
Who Can Access G-Invoicing Data in Oracle EBS
Oracle EBS uses operating units to control access to IGT documents in Oracle CLM, Oracle Purchasing, and Oracle Projects. Optionally, you can further restrict access at the user level by using the predefined IGT_GROUP_ID securing attribute to associate a user with a specific group or groups. If a user is not associated with a group, then the user can view IGT documents for all groups in the same operating unit.
Viewing Group Details
Users at a requesting agency can view group information based on their security setup. The group information is available in the following locations:
-
GT&Cs tab: In the Controls region, the Requesting Group Information and Servicing Information regions display operational group names and agency location codes. When you create an IGT order, you must select requesting and servicing group details and ALC details.
-
IGT Orders: In the Headers subtab, the Requesting Group Information and Servicing Information regions display operational group names and agency location codes.
Setting Up Access Control
Access to Oracle G-Invoicing is set up using Role Based Access Control (RBAC). If you create a custom responsibility or menu structure, refer to the following tables to set up access control.
The following roles, menus and functions control access to the G-Invoicing features.
| Role Name | Role Code | Description |
|---|---|---|
| IGT Configuration Role | UMX|IGT_CONFIG | Allows the user to access and update the G-Invoicing Options, G-Invoicing Requests, and G-Invoicing Groups pages. |
| IGT GTC Viewer Role | UMX|IGT_GTC_VIEWER | Allows the user to view GT&Cs in Oracle CLM and Oracle Purchasing. |
| IGT Order Manager Role | UMX|IGT_ORDER_MANAGER | Allows the user to create, modify, and view orders in Oracle CLM and Oracle Purchasing. Allows the user to access the G-Invoicing Groups TAS/BETCs page. |
| IGT Order Viewer Role | UMX|IGT_ORDER_VIEWER | Allows the user only to view orders. |
| IGT Performance Manager Role | UMX|IGT_PERFORMANCE_MANAGER | Allows the user to create and view performance transactions. |
| IGT Performance Viewer Role | UMX|IGT_PERFORMANCE_VIEWER | Allows user to grant view only access to performance transactions. The user can only view EZ invoices. If the agency has the UMX|IGT_EZ_MANAGER role (IGT EZ Manager Role), then they can update EZ invoices, accept or reject an EZ invoice. |
| IGT EZ Manager Role | UMX|IGT_EZ_MANAGER | Allows the user to create and update EZ invoices, accept or reject an EZ invoice. |
| Menu Name | Menu Code |
|---|---|
| PO IGT View GT&C Sub Tab | PO_IGT_GTNC_SUBTAB |
| PO IGT Orders Sub Tab | PO_IGT_ORDERS_SUB_TAB |
| PO IGT Order Modifications Sub Tab | PO_IGT_ORDER_MODS_SUB_TAB |
| PO IGT Performance Sub Tab | PO_IGT_PERF_SUB_TAB |
| PO Unprocessed IGT Request Sub Tab | PO_IGT_UNPRSSD_REQ_SUBTAB |
| iProcurement: Non-Catalog Request IGT | ICXPOR_NONCATALOG_IGT |
| User Function Name | Function Code |
|---|---|
| G-Invoicing Configuration Page | PO_IGT_CONFIG_FN |
| PO GT&C Summary Page | PO_IGT_GTNC_SUMMARY |
| PO GT&C Details Page | PO_IGT_GTNC_DTLS |
| PO IGT Orders Summary Page | PO_IGT_ORDERS_SUMMARY |
| PO IGT Order Modifications Summary Page | PO_IGT_ORDER_MOD_SUMMARY |
| PO IGT Performance Summary Page | PO_IGT_PERF_SUMMARY |
| PO IGT Performance View/Update Page | PO_IGT_PERF_VIEW_UPDATE |
| iProcurement: Non-Catalog Page IGT | ICXPOR_NONCAT_PAGE_IGT |
| PO IGT Notifications | PO_IGT_NOTIF |
| Performance Notification | PO_IGT_PERF_NOTIF |
| G-Invoicing Requests Page | PO_IGT_REQUESTS_FN |
| G-Invoicing Groups Page | PO_IGT_GROUPSTREE_FN |
| G-Invoicing TASBETC Page | PO_IGT_TASBETC_FN |
| Permission Set Name | Permission Set Code |
|---|---|
| IGT Configuration Permission Set | IGT_CONFIG_PS |
| PO IGT View GTC Permission Set | PO_IGT_VIEW_GTC_PS |
| PO IGT Update Order Permission Set | PO_IGT_UPDATE_ORDER_PS |
| PO IGT View Order Permission Set | PO_IGT_VIEW_ORDER_PS |
| PO IGT Update Performance Permission Set | PO_IGT_UPDATE_PERFORMANCE_PS |
| ICX Intragovernmental Request Permission Set | ICX_NONCAT_IGT_PS |
| Grant Name | Permission Set Name | Access Role | Responsibility |
|---|---|---|---|
| IGT GTC Viewer Grant | PO IGT View GTC Permission Set | IGT GTC Viewer Role | CLM Super User or Purchasing, US Federal |
| IGT Order Manager Grant | PO IGT Update Order Permission Set | IGT Order Manager Role | CLM Super User or Purchasing, US Federal |
| IGT Order Viewer Grant | PO IGT View Order Permission Set | IGT Order Viewer Role | CLM Super User or Purchasing, US Federal |
| IGT Configuration Grant | IGT Configuration Permission Set | IGT Configuration Role | CLM Super User or Purchasing, US Federal |
| IGT Performance Manager Grant | PO IGT Update Performance Permission Set | IGT Performance Manager Role | CLM Super User or Purchasing, US Federal |
| ICX: Intragovernmental Request Access Grant | ICX Intragovernmental Request Permission Set | ICX: Intragovernmental Request Access Role | CLM iProcurement or Federal iProcurement |
Setting G-Invoicing Options
Use the G-Invoicing Options page to add security certificate and schema details and to associate system IDs.
Adding Security Certificate and Schema Details
Prerequisites
You must complete the following steps before you add security certificate details:
-
Configure keystore and truststore details to integrate with the federal G-Invoicing application.
-
Copy the Fiscal Service schema to the Oracle E-Business Suite middle tier to enable REST services integration with the federal G-Invoicing application.
To add security certificate details, perform the following steps:
-
From the Home page, click the CLM Purchasing Super User responsibility.
-
Click Setup, then Organizations, and then G-Invoicing Options.
-
In the Security Certificate Details region, enter a truststore path and a truststore password. The path is the location in which you store the certificate provided by the Treasury.
-
Enter a keystore path and a keystore password. The path is the location in which you store the certificate that you provide for verification.
-
In the Schema Details region, enter the order schema path. This is the location of the Order Schema XSD file.
-
Enter the performance schema path. This is the location of the Performance Schema XSD file.
Associating System IDs
Each federal agency has one or more system IDs allocated to it. In Oracle EBS, agencies generally correlate with operating units. To ensure the accurate exchange of G-Invoicing data between Oracle EBS and the federal G-Invoicing application, you must associate each system ID with the appropriate agency and operating unit.
-
In the Associate System IDs region, select the agency type. If the requesting and servicing agencies share the same organization hierarchy and have the same system ID, then select Both. Otherwise, select Requesting Agency.
-
Select the operating unit to associate with the system ID.
-
Enter the system ID provided to you by the federal government.
-
In the Requesting Agency Order Creation and Approval list, select the initiation point or interface origin for your orders.
If you plan to create and approve intragovernmental orders in EBS, then select E-Business Suite. If you are using EBS as a financial system and the federal G-Invoicing application to create intragovernmental transactions, then select G-Invoicing. The default value is E-Business Suite.
You can switch the value from G-Invoicing to E-Business Suite but not vice-versa. If you create a transaction using an operating unit and associate it to a system ID, then you cannot delete the row on the G-Invoicing Options page.
-
In the GT&C Response Type, select XML or JSON type.
-
In the Order and Performance Response Type, select XML or JSON type.
Oracle EBS now includes JSON support for interfacing GT&C, orders, and performances with federal G-Invoicing to conform with the US Treasury mandate for faster data transmission and smaller file sizes. This change allows the JSON-based interface to coexist with the existing XML-based interface.
Note: If you are using the 7600 Easy (EZ) Invoicing functionality, then you must select JSON response type. For the other features, you can choose either XML or JSON.
-
Click Apply.
To remove this mapping, click Delete. Once you create a transaction in the operating unit associated with the system ID, then the Delete option is disabled.
Important: Each time you apply a consolidation patch, you should return to this page and click Apply.
Pulling Organizational Groups and Data
To pull group definitions from the federal G-Invoicing application into Oracle EBS, run the Intragovernmental Groups for Agency Interface Program. Schedule this program to run as often as needed to keep the G-Invoicing data current.
When you run this program, the application automatically runs the Intragovernmental TAS-BETCs for Group Interface Program. See Pulling TAS-BETCs Details for a Group for more information.
-
If you are in a different responsibility, switch to CLM Purchasing Super User.
-
On the home page, click Reports and then Schedule Requests.
The Schedule Request: Define page appears.
-
Select New Request.
-
In the Program Name field, enter Intragovernmental Groups for Agency Interface Program.
-
In the Parameters tab, enter the following details:
-
Agency Type: Select Requesting Agency.
-
Operating Unit: Select the operating unit for which you want to pull the group information.
-
-
Submit the concurrent request.
When the concurrent program successfully pulls the group hierarchy and its information, you can see the details in the G-Invoicing Groups page. From the Home page, using either the CLM Purchasing Super User or the Purchasing, US Federal responsibility, click Setup, then Organizations and then G-Invoicing Groups.
Pulling TAS-BETC Details for a Group
Normally, you do not need to perform this task because when you run the Intragovernmental Groups for Agency Interface Program, the application automatically runs the Intragovernmental TAS-BETCs for Group Interface Program to pull TAS-BETC details. However, if you encounter errors, then you can run this program manually.
When the pull TAS and BETC program is run, the system pulls only the TAS and BETCs for groups that have been updated since the last program run. This improves performance as the child request is spawned only for modified groups.
-
If you are in a different responsibility, switch to CLM Purchasing Super User.
-
On the Home page, click Reports and then click Schedule Requests. The Schedule Request: Define page appears.
-
Click New Request.
-
In the Program Name field, enter Intragovernmental TAS-BETCs for Group Interface Program.
-
In the Parameters tab, enter the following details:
-
Agency Type: Select Requesting Agency.
-
Operating Unit: Select the operating unit for which to pull TAS-BETC details.
-
Pull TAS-BETCs: Select from the value, For All Groups or For Modified Groups for which to pull TAS-BETC details.
Based on the selected value, the system runs child requests to pull TAS-BETCs for all groups or for only modified groups.
The groups that were modified after the last pull of groups request are considered as the recently modified groups. While comparing dates, the system considers only the truncated date, not the time stamp.
-
-
Submit the concurrent request.
Note: Schedule this program to run as often as required to keep the G-Invoicing data current.
After you pull TAS-BETC details, you can view the details for a specific group. Select the CLM Purchasing Super User or the Purchasing, US Federal responsibility. Click Setup, then Organizations, then G-Invoicing Groups TAS/BETCs, and search for a group.
Pulling GT&Cs
When you pull GT&Cs, the program returns a list of GT&Cs and attachments, for which Oracle EBS then pulls the XML data and stores it locally.
Note: Oracle EBS pulls GT&C data based on the parameters available in the concurrent program.
If GT&Cs are subsequently modified then Oracle EBS pulls the data again, based on the last-modified date, to synchronize with previously created GT&Cs. Schedule the concurrent program to run regularly to keep the data current.
To pull GT&C data from the federal G-Invoicing application to Oracle EBS, run the Intragovernmental Agreements (GT&C) Interface Program.
-
If you are in a different responsibility, switch to CLM Purchasing Super User.
-
On the home page, click Reports and then click Schedule Requests. The Schedule Request: Define page appears.
-
Click New Request.
-
In the Program Name field, enter Intragovernmental Agreements (GT&C) Interface Program.
-
In the Parameters tab, enter the following details:
-
Agency Type: Select Requesting Agency.
-
Request Mode: Keep the default value, which is Pull.
-
Request Type: Select Get GT&C List.
-
Operating Unit: Select the operating unit for which to pull GT&C data.
-
Agency Location Code: Optional. Specify an ALC for which to retrieve GT&Cs.
If you do not specify an ALC, then the application retrieves the data for all ALC codes mapped to the specified OU.
-
Document Number: Optional. Enter a GT&C number (from the federal G-Invoicing application) to retrieve GT&Cs for that document.
If you leave this field blank, then the application retrieves GT&Cs for all documents that are in the status that you select in the Document Status field.
-
Document Status: Select Closed or Open for Orders. The program retrieves data for GT&Cs in the selected status.
-
Process Error Documents: The default value is No. Select Yes to process documents that had errors during the last attempt. If you select Yes and specify a GT&C number, then only that document is processed. If you do not specify a GT&C number, then all GT&Cs with errors are processed.
-
-
Submit the concurrent request.
Note: After you run the Intragovernmental Agreements (GT&C) Interface Program to retrieve GT&C data, the Intragovernmental Agreements (GT&C) Import Program runs automatically to process retrieved data and creates the GT&Cs in Oracle EBS. You do not need to submit a request to run the import program unless the first run ends with errors. In that case, correct the errors and then run the import program again with the Process Error Documents parameter set to Yes.
The requesting administrator receives a notification when this concurrent program has run. The notification contains a list of GT&Cs that were created or modified or that ended with errors. The administrator can review the errors and take appropriate action.
Note: Schedule this program to run as often as required to keep the G-Invoicing data current.
Pulling Groups for GT&Cs
After you pull GT&Cs from the federal G-Invoicing application, you must pull information about the groups associated with each GT&C.
To pull groups for GT&Cs in Oracle EBS, run the Intragovernmental Groups for GT&C Interface Program.
-
If you are in a different responsibility, switch to CLM Purchasing Super User.
-
On the home page, click Reports and then click Schedule Requests. The Schedule Request: Define page appears.
-
Select New Request.
-
In the Program Name field, enter Intragovernmental Groups for GT&C Interface Program.
-
In the Parameters tab, enter the following details:
-
Agency Type: Select Requesting Agency.
-
Operating Unit: Select the operating unit for which to pull GT&C data.
-
GTC Number: To pull group information for a specific GT&C, enter the GT&C number.
If you do not enter a number, then the application processes all the pending requests while pulling GT&Cs and GT&C modifications.
See Pulling GT&Cs for more information.
-
Process Error Documents: Select Yes to process error logs. If you select Yes and specify a GT&C number, then only that GT&C is processed. If you do not specify a GT&C number, then all GT&Cs with errors are processed. The default value is No.
-
-
Submit the concurrent request.
Note: Schedule this program to run as often as required to keep the G-Invoicing data current.
Pushing and Pulling IGT Orders
Requesting agencies create and preapprove orders in Oracle Purchasing or Oracle CLM and then push order data to the G-Invoicing application. Servicing agencies then pull the data into Oracle Projects, where they add and update their details as required. After a servicing agency provides the necessary information and approves an order in Oracle Projects, the servicing agency pushes the same order back to the federal G-Invoicing application using the same concurrent program. At that point, the order status in the federal G-Invoicing application changes to Open.
To pull or push orders, run the Intragovernmental Order Interface Program.
-
If you are in a different responsibility, switch to CLM Purchasing Super User.
-
On the home page, click Reports and then click Schedule Requests. The Schedule Request: Define page appears.
-
Select New Request.
-
In the Program Name field, enter Intragovernmental Orders Interface Program.
-
In the Parameters tab, enter the following details:
-
Agency Type: Select Requesting Agency.
-
Request Mode: Select Push to send data to or Pull to retrieve data from the federal G-Invoicing application.
-
Request Type:
-
If the request mode is pull, then select from the following values:
Get Order Attachment
Get Order List
Get Order by ID
-
If the request mode is push, then select from the following values:
Post Attachments
Post Orders
-
-
Operating Unit: Specify the operating unit.
-
Agency Location Code (Optional): To retrieve data for a specific agency, select its agency location code (ALC).
-
Document Number (Optional): To run the program for a specific order, enter the document number.
-
Document Status (Optional): If you specify a status, then the program only processes documents that are in that status.
-
Process Error Documents: If you select Yes and specify an order number, then errors for only that order are processed. If you do not specify a order number, then all orders with errors are processed. The default value is No.
-
-
Submit the concurrent request.
Note: Schedule this program to run as often as required to keep the G-Invoicing data current.
Note: After an order is approved within the requesting agency, the PO IGT Order Generate & Push XML process generates the XML.
You need not run the program manually, because it runs automatically when the Intragovernmental Orders Interface Program runs successfully.
Pulling and Pushing Performance Records
To pull or push performance transactions in XML format, run the Intragovernmental Performance Interface Program.
-
If you are in a different responsibility, switch to CLM Purchasing Super User.
-
On the home page, click Reports and then click Schedule Requests. The Schedule Request: Define page appears.
-
Select New Request.
-
In the Program Name field, enter Intragovernmental Performance Interface Program.
-
In the Parameters tab, enter the following details:
-
Agency Type: Select Requesting Agency.
-
Request Mode: Select a request mode.
-
Request Type: Select a request type from the list.
-
Operating Unit: Select the operating unit to retrieve data for that OU.
-
Agency Location Code: Select an agency location code to retrieve data for that agency. You can leave this parameter blank to retrieve data for all ALCs defined for the OU.
-
Order Number (Optional): Enter the order number to run the program for a specific order.
-
Performance Number (Optional): Enter the performance number to run the program for a specific order.
-
Performance Status: (Optional): Select the performance status to run the program for a specific performance status.
Agencies can now pull deleted performances by selecting the performance status.
-
Process Error Documents: If you select Yes and specify a performance number, then errors for only that document are processed. If you do not specify a document number, then all errors are processed. The default value is No.
-
-
Submit the concurrent request.
Note: Schedule this program to run as often as required to keep the G-Invoicing data current.
Intragovernmental Performance Integration with Oracle Payables
This concurrent program creates an invoice without invoice validation, accounting, and payment. The status in the history table displays Success Invoicing. If you use this concurrent program, then you will need to validate, account, and post to GL manually or using Oracle Payables programs.
To run the Intragovernmental Performance Integration to Payables concurrent program
-
If you are in a different responsibility, switch to CLM Purchasing Super User.
-
Click Requests and then click Submit a New Request.
-
In the Name field, enter Intragovernmental Performance Integration to Payables Program.
The Submit Requests: Define window appears.
-
Select an operating unit.
-
(Optional) Select an order number.
-
Select an invoice type:
-
Prepayment Invoice (advance performance)
-
Standard Invoice (delivery performance)
-
Credit Memo
-
-
In the Process Error Documents field, select Yes or No. If you select Yes and specify an order number, then only that order is processed. If you do not specify an order number, then all orders with errors are processed. The default value is No.
Intragovernmental Performance Integration with Receiving
When FOB is Destination, this concurrent program creates receipts for delivery performance and corrections to receipts when there is an adjustment to a delivery performance.
To run this program, perform the following steps.
-
Navigate to the CLM Purchasing Super User responsibility or Purchasing responsibility.
-
Click Requests.
-
Select Submit a New Request. The Submit Requests: Define window appears.
-
Search for and select the Intragovernmental Performance Integration to Receiving Program.
-
Select your operating unit.
-
Optional. Select the order number.
-
In the Process Error Documents field, select Yes or No. If you select Yes and specify an order number, then only that order is processed. If you do not specify a document number, then all orders with errors are processed. The default value is No.
Intragovernmental Deferred Performance Integration Program
This concurrent program creates journal entries. To run the program, perform the following steps.
-
Select the CLM Purchasing Super User responsibility.
-
Click Requests.
-
In the Find Requests window, click Submit a New Request.
-
Query Intragovernmental Deferred Performance Integration Program. The Parameters window appears.
-
Enter your operating unit.
-
(Optional) To pull the deferred performance for a specific order, enter the order number.
-
In the Reverse Previous Period Pending Deferred Payments field, select Yes or No.
This option is used to reverse deferred payment performances on the requesting side as accrual reversal in the subsequent period.
If the servicing agency submits a deferred payment at the month end, and the requesting agency pulls it at the month end, and there is no subsequent deferred payment for the same order line schedule, then the deferred payment status will be Informational and will not change to Deleted.
If you select Yes, then the deferred payments that are pending in an Informational status at the end of the previous period are reversed and the reversal journal is created in the current period.
-
Indicate whether you want to process documents that have errors. Transactions that error due to period validity or other issues are reprocessed to create journals and reversals.
If you select Yes and specify an order number, then errors for only that order are processed. If you do not specify an order number, then all orders with errors are processed. The default value is No.
Viewing Request Status and Group Information
Administrators can view G-Invoicing requests to track the request status of each exchange of data with the federal G-Invoicing application. You can also view request and response XML by document number. To view the request status along with the IGT document number and related parameters, navigate to the G-Invoicing Requests page.
Viewing Organizational Group Structure
Users with the Order Manager (Administrator) and Order Viewer roles can view TAS and BETC details on the G-Invoicing Groups TAS/BETCs page. This page displays the information that was defined in the federal G-Invoicing application and pulled into Oracle E-Business Suite.
You can access this page from the Order Summary page and the Update Order page.
This page displays the following details related to organizational group structure:
-
Group name
-
Description
-
ID
-
Status
-
Agency Location Code
-
Creation Date
-
Last Update Date
-
Deactivation Date
The TAS Filters region displays the following details:
-
Agency Identifier
-
Allocation Transfer Agency (ATA)
-
Subaccount
-
Main Account
Viewing TAS and BETC Details for a Group
Enter the agency type, the operating unit, and the group name to retrieve the TAS and BETC details. There may be multiple TAS and BETC combinations available for a group.
The G-Invoicing Groups TAS/BETCs page displays the following details:
-
Sublevel Prefix
-
Agency ID
-
Availability Type
-
Beginning Period of Availability (BPOA)
-
Ending Period of Availability (EPOA)
-
Main Account
-
Subaccount
-
Business Event Type Code (BETC)
Configuring Descriptive Flexfields for GT&C and Agency Information
You must add the DFF context code PR_IGT_AGENCY_INFO for the requisition header DFFs to capture GT&C and agency information. This is done in Oracle Purchasing.
Add the DFF context
-
Switch to the Purchasing, US Federal responsibility.
-
Click Setup, then Flexfields, then Descriptive, and then Segments. The Descriptive Flexfield Segments window appears.
-
In the Title field, query Requisition Headers.
-
Unfreeze the flexfield definition.
-
In the Context Field Values multi-record block, in a new record, enter PR_IGT_AGENCY_INFO in the Code field.
-
With the new record selected, click Segments. The Segments Summary window appears.
-
Add the following segments for the context you defined:
| Number | Name | Window Prompt | Column | Value Set |
| 10 | SOURCE_DOC_ID | GT&C | ATTRIBUTE | PO_IGT_GTNC_DOC |
| 15 | REQ_GROUP_INFO | Requesting Group | ATTRIBUTE | PO_IGT_REQ_GROUP_F |
| 20 | REQ_ALC_INFO | Requesting ALC | ATTRIBUTE | PO_IGT_REQ_ALC_F |
| 25 | SER_GROUP_INFO | Servicing Group | ATTRIBUTE | PO_IGT_SERV_GROUP_F |
| 30 | SER_ALC_INFO | Servicing ALC | ATTRIBUTE | PO_IGT_SERV_ALC_F |
Defining Segments
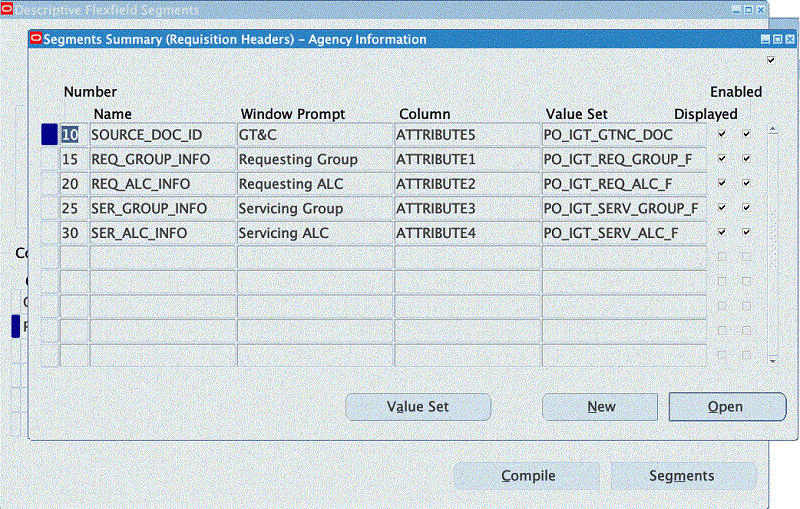
Note: Ensure that the DFF attribute name is as given in the DFF Definitions for GT&C and Agency table above. In the Column field, enter any attribute available at your site. The value sets displayed in the table are predefined and you can use them when defining attributes. Mark all the attributes as required and entered when creating IGT requisitions in Oracle Purchasing.
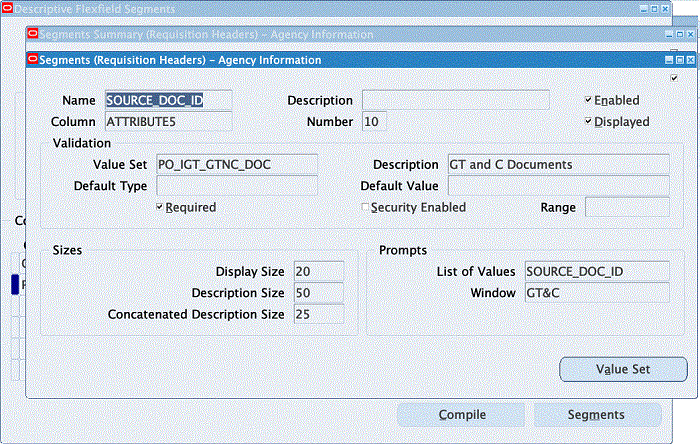
Define a DFF for GT&Cs and Associate a Value Set
Define a DFF for GT&Cs and associate a value set as shown in the DFF Definitions for GT&C and Agency table above and in the Segments (Requisition Headers) image:
Segments (Requisition Headers)
Define a DFF for the Requesting Agency ALC and Associate a Value Set
Define a DFF for the requesting agency location code (ALC) and associate a value set as shown below:
Defining Value Sets for Requesting Agency Information
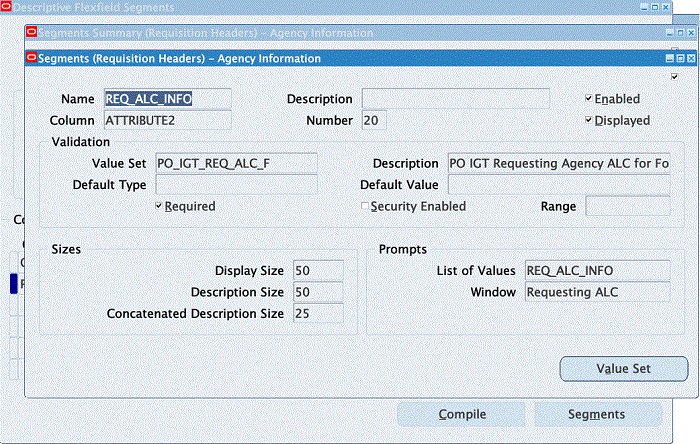
Define a DFF for the Servicing Agency ALC and Associate a Value Set
Define a DFF for the servicing agency location code (ALC) and associate a value set as shown below:
Defining Value Sets for Servicing Agency
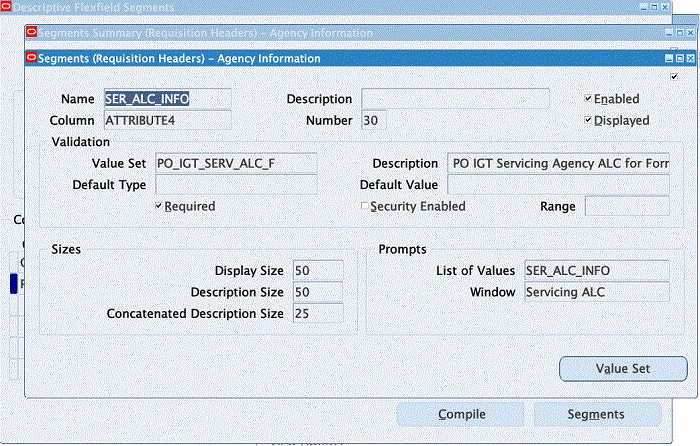
TAS Validation Extension
Add a custom validation and extension to validate TAS.
Validate the TAS derived for the funding segment in the charge account against the requesting group entered for the DFF. Retrieve the requesting group and the requesting ALC captured in DFFs and invoke the following program:
icx_por_igt_validations.validate_igt_tas_betc
Configuring Descriptive Flexfields for Performance Accounting Transactions
Set up the following DFFs to maintain a link between performance transactions and the corresponding receiving transactions.
Note: Do not set up DFFs to link performance transactions with Oracle Payables invoices. That connection is already defined using the reference columns of the invoice tables.
| Application | Title | Context | Segments | |||
|---|---|---|---|---|---|---|
| Sequence Number | Name | Window Prompt | Column | |||
| Purchasing | RCV_SHIPMENT_HEADERS | IGT Performance | 10 | Performance Number | Performance Number | ATTRIBUTE |
| 20 | Performance ID | Performance ID | ATTRIBUTE | |||
| Purchasing | RCV_SHIPMENT_LINES | IGT Performance | 10 | Performance Number | Performance Number | ATTRIBUTE |
| 20 | Performance Detail Number | Performance Detail Number | ATTRIBUTE | |||
| 30 | Performance Detail ID | Performance Detail ID | ATTRIBUTE | |||
| Purchasing | RCV_TRANSACTIONS | IGT Performance | 10 | Performance Number | Performance Number | ATTRIBUTE |
| 20 | Performance Detail Number | Performance Detail Number | ATTRIBUTE | |||
| 30 | Performance Detail ID | Performance Detail ID | ATTRIBUTE |
Defining Descriptive Flexfields for Performance Accounting
When you define each DFF for performance accounting, use the exact title, context, and name specified in the DFF Definitions for Performance Accounting Transactions table above. You can use any available attributes for the columns.
To define the RCV_SHIPMENT_HEADERS DFF:
-
Switch to the Application Developer, US Federal responsibility.
-
Click Flexfield, then Descriptive, and then Register.
The Descriptive Flexfields window appears.
-
Query the Purchasing application, with the table name RCV_SHIPMENT_HEADERS.
-
Deselect the Protected option.
-
Copy the title and define the DFFs as shown in the DFF Definitions for Performance Accounting Transactions table.
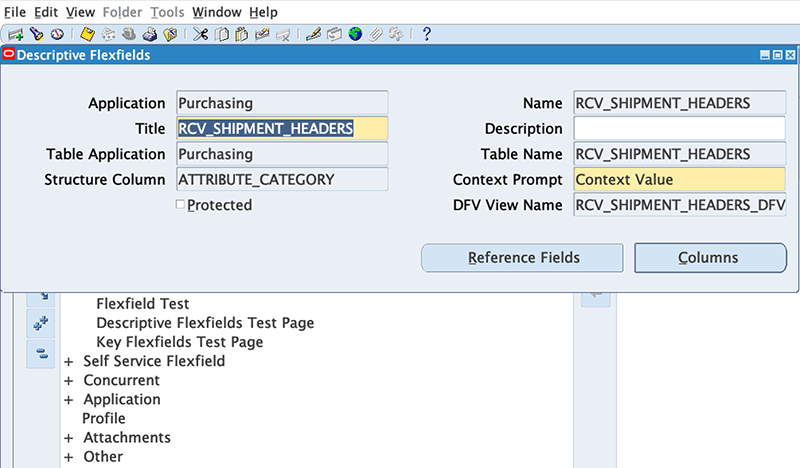
-
To verify the attributes registered for the title, click Columns.
The Columns window appears, displaying the column name attributes for the RCV_SHIPMENT_HEADERS table.
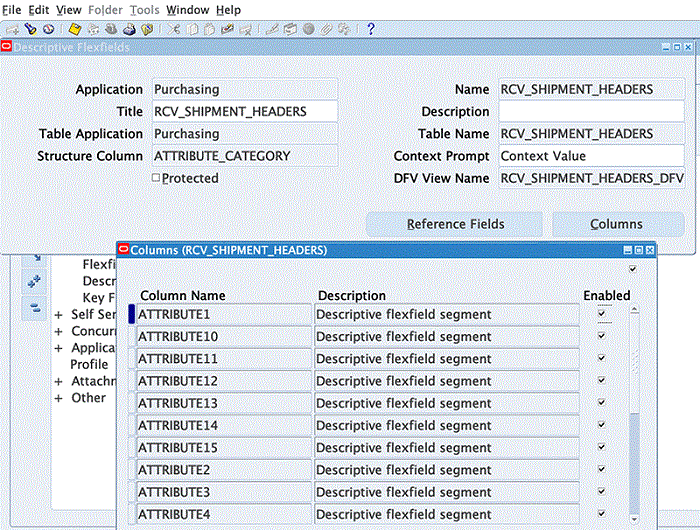
To create the receiving shipment headers DFF context:
-
Switch to the Purchasing, US Federal responsibility.
-
Click Setup, then Flexfield, then Descriptive, and then Segment.
-
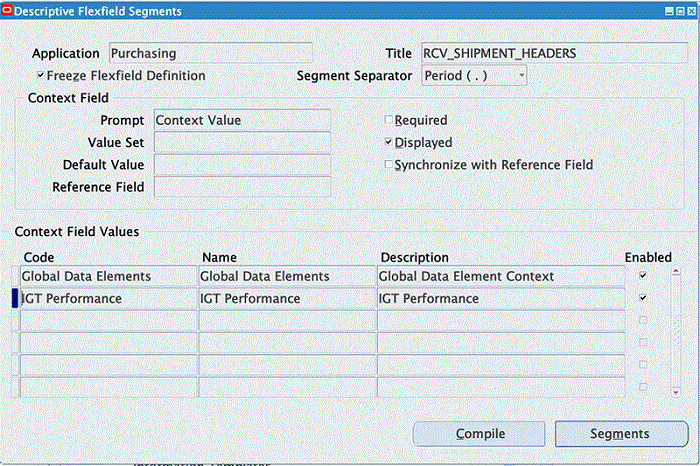
In the Title field, query RCV_SHIPMENT_HEADERS.
The Descriptive Flexfield Segments window appears.
-
Unfreeze the flexfield definition.
-
In a new row in the Context Field Values multi-record block, enter IGT Performance.
This is the agency information defined as a DFF for the context.
-
Save your work.
-
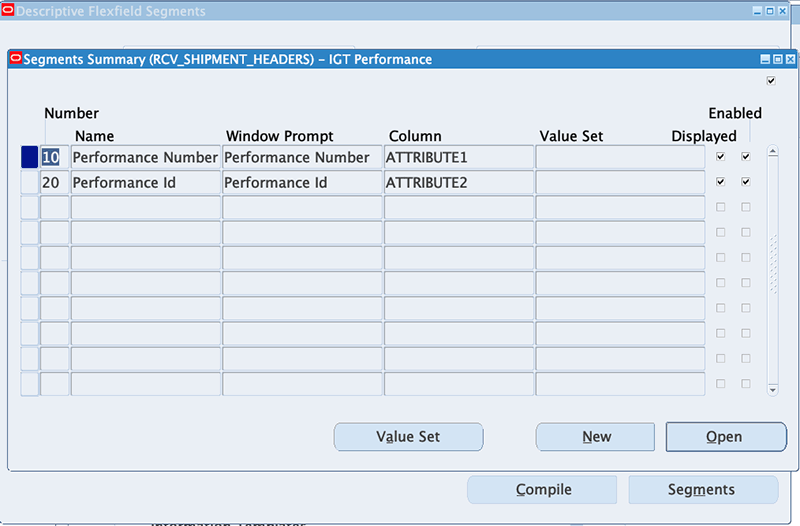
Click Segments.
The Segments Summary window appears.
-
Add the segments for the DFF for the context you defined, as shown in the DFF Definitions for Performance Accounting Transactions table.
Note: You can change the title for the table, so refer to subsequent instructions for the exact table and title for setting up the DFF.
Defining Receiving Shipment Lines (RCV_SHIPMENT_LINES)
-
Switch to the Application Developer, US Federal responsibility.
-
Select Flexfield, then Descriptive, and then Register.
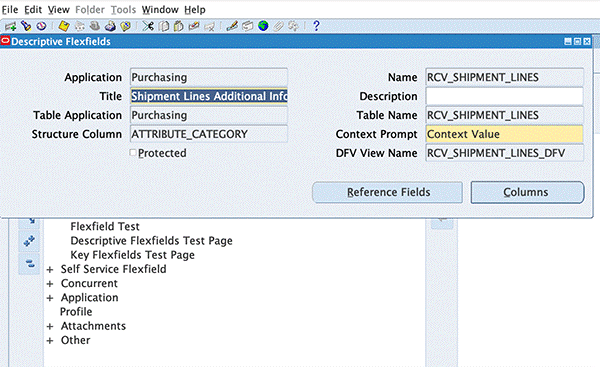
The Descriptive Flexfields window appears.
-
Query the Purchasing application, using table name RCV_SHIPMENT_LINES.
-
Deselect the Protected option.
-
Copy the title and the DFF definition from the DFF Definitions for Performance Accounting Transactions table.
-
Save your work.
-
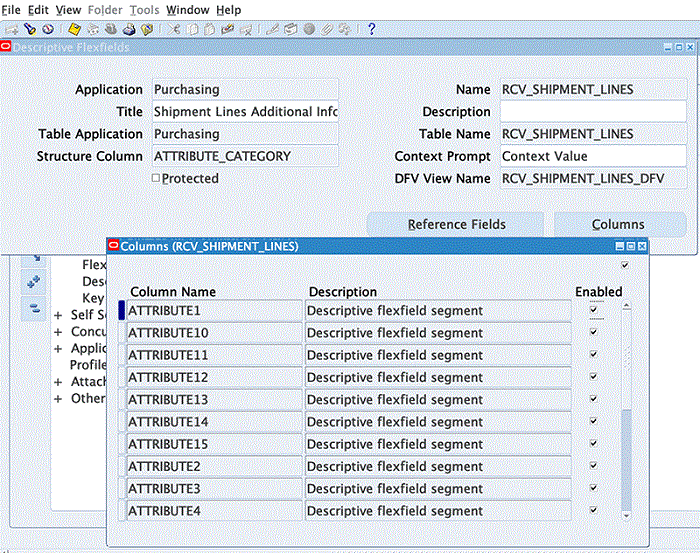
To verify the attributes registered for the title, click Columns.
The Columns window appears, showing the columns attributes for the table.
To create the receiving shipment headers DFF context:
-
Switch to the Purchasing, US Federal responsibility.
-
Select Setup, then Flexfield, then Descriptive, and then Segment.
-
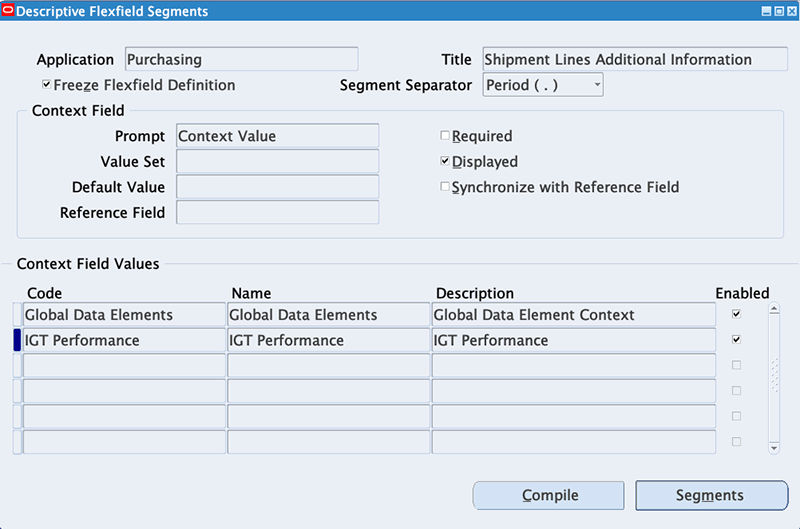
Query the Purchasing application, using Shipment Lines Additional Information as the title.
The Descriptive Flexfield Segments window appears.
-
Unfreeze the flexfield definition to add the context.
-
Enter IGT Performance in the Context Field Values region.
This is the agency information defined as DFF for the context.
-
Save your work.
-
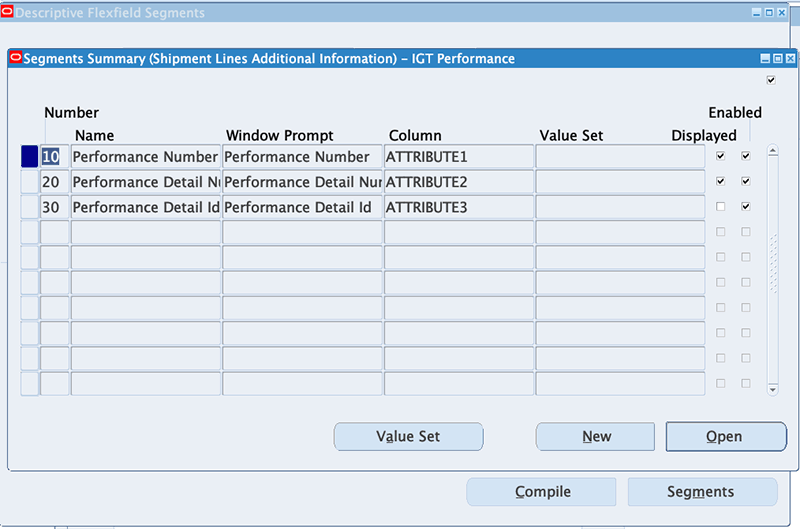
Click Segments.
The Segments Summary window appears.
-
Add the segments for the context you have defined, as shown in the DFF Definitions for Performance Accounting Transactions table.
To define receiving transactions (RCV_TRANSACTIONS):
-
Switch to the Application Developer, US Federal responsibility.
-
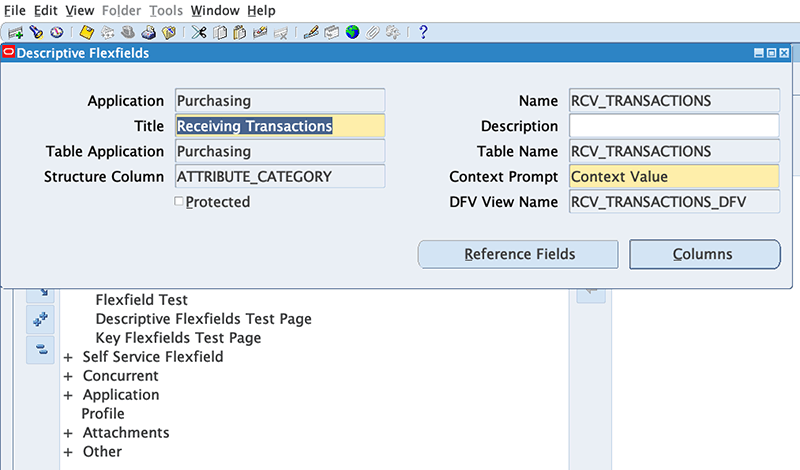
Select Flexfield, then Descriptive, and then Register.
The Descriptive Flexfields window appears.
-
Query the Purchasing application, using table name RCV_TRANSACTIONS.
-
Deselect the Protected option.
-
Copy the title and then define the DFF as shown in the DFF Definitions for Performance Accounting Transactions table.
-
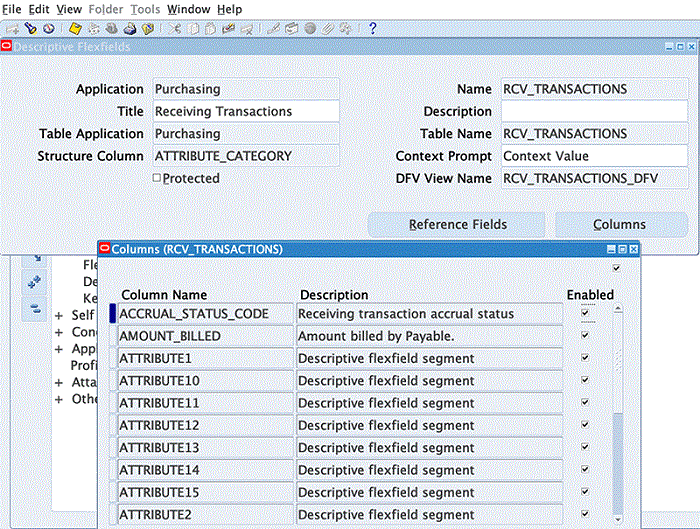
To verify the attributes registered for the title, click Columns.
The Columns window appears, showing the columns attributes for the table.
To create the receiving transaction DFF context:
-
Switch to the Purchasing, US Federal responsibility.
-
Click Setup, then Flexfield, then Descriptive, and then Segment.
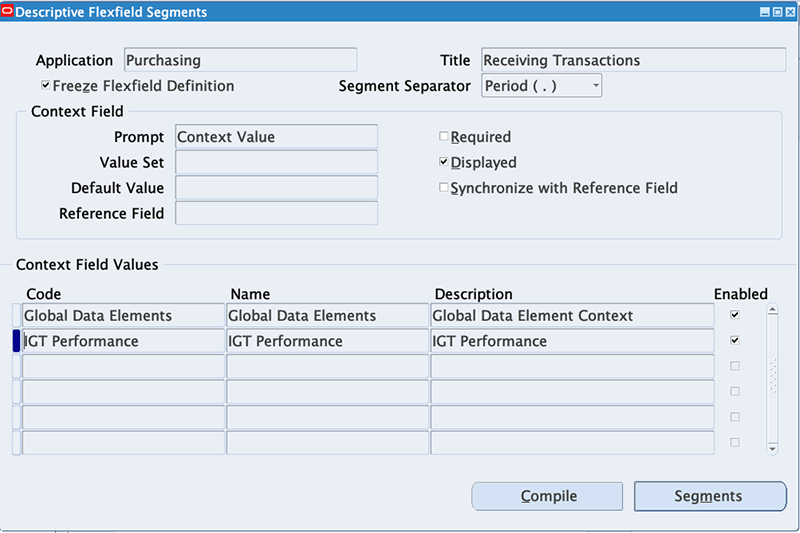
-
Query the Purchasing application, using the title Receiving Transactions.
The Descriptive Flexfield Segments window appears.
-
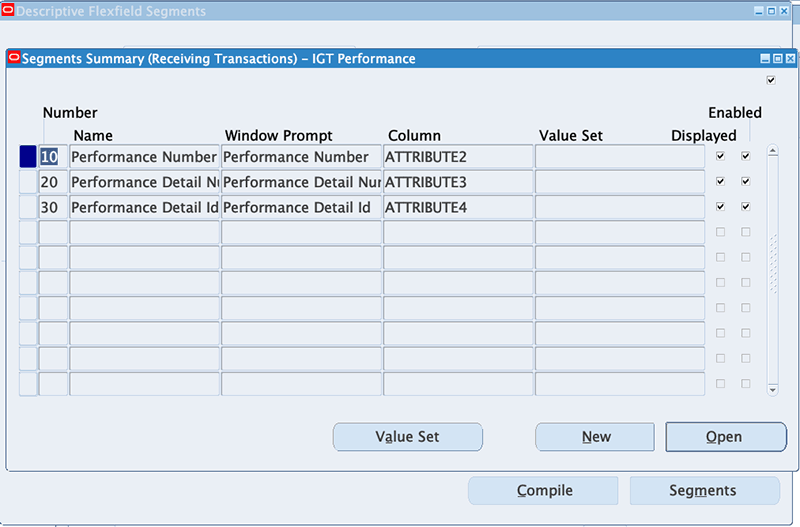
Unfreeze the flexfield definition to add the context.
-
In the Context Field Values multi-record block, in a new record, enter IGT Performance.
This is the agency information defined as a DFF for the context.
-
Save your work.
-
Click Segments.
The Segments Summary window appears.
-
Add the segments for the context you have defined, as shown in the DFF Definitions for Performance Accounting Transactions table.
