Bills of Material
This chapter provides you with everything you need to know to define and use bills of material.
This chapter covers the following topics:
- Overview of Bills of Material
- Creating a Bill of Material
- Copying Bill and Routing Information
- Referencing Common Bills and Routings
- Assigning Descriptive Elements
- Creating Reference Designators
- Assigning Substitute Components
- Defining Item Revisions
- Defining Bill or Routing Operation Documents
- Attaching Files
- Checking for Bill Loops
- Modifying Components and Bills
- Mass Changing Bills of Material
- Viewing an Indented Bill of Material
- Comparing Bills of Material
- Viewing Item Usage
- Bills of Material Field Reference
- Bill/Component Validation Rules
- Creating a Product Family
Overview of Bills of Material
Oracle Manufacturing and Oracle Order Management use bills of material to store lists of items that are associated with a parent item and information about how each item is related to its parent. Oracle Manufacturing supports standard, model, option class, and planning bills of material.
Bill of Material Types
A standard bill of material is the most common type of bill and lists the mandatory components, the required quantity of each component, and information to control work in process, material planning, and other Oracle Manufacturing functions. Examples include bills for manufacturing assemblies, pick-to-order bills, kit bills, and phantoms.
A configuration bill (a type of standard bill) is a set of option choices made from a model bill that comprise a buildable, sellable product. Configuration items and bills are automatically created from model bills after a customer chooses options on a sales order. Or, you can manually create configuration bills by choosing options directly from a model bill.
A model bill of material defines the list of options and option classes you can choose in Oracle Order Management to order a configuration. A model bill also specifies mandatory components or included items that are required for each configuration of that model. You do not order or build the model itself: you order and build configurations of the model. A model bill can be either assemble-to-order or pick-to-order.
An option class is an item that groups optional components on a bill. An option class is an item that becomes a level in your model bill of material. Option classes can also have mandatory components that apply for all of its options. For example, when you order a computer, the monitor is an option class, and the specific type of monitor you order is an option within that option class. An option class bill can be either assemble-to-order or pick-to-order.
A planning bill of material is a bill of material structure that includes a percentage distribution for its components. The percentages associated with the components on a planning bill of material do not need to add to 100%. You can define alternate and common planning bills, where the bill you reference as a common must be another planning bill.
Planning items can be nested within one another any number of times. When you nest planning items, Oracle Master Scheduling explodes forecasts level by level and applies planning percentages at each level.
You can define an engineering bill of material as an alternate for a manufacturing bill. The typical use for an alternate engineering bill is to prototype variations from the primary bill that produce the same assembly.
You can specify a list of item catalog descriptive elements for model and option class engineering bills. After you release the engineering bill to manufacturing and take customer orders for specific configurations, Bills of Material creates the new configuration item and automatically assigns values to each catalog descriptive element.
Oracle Engineering users are allowed to assign manufacturing and engineering items as components to an engineering bill. Bills of Material users can assign only manufacturing items as components to manufacturing bills.
Phantoms
A phantom assembly is a non-stocked assembly that lets you group together material needed to produce a subassembly. When you create a bill of material for a parent item, you can specify whether a component is a phantom. One bill of material can represent a phantom subassembly for one parent item, and a stocked subassembly for another parent item.
Oracle Work in Process explodes through a phantom subassembly to the components as if the components were tied directly to the parent assembly. You can define routing for phantoms assemblies the same way as other assemblies. Work in Process ignores phantom assembly routings when you define a job or repetitive schedule.
You can compute manufacturing and cumulative lead times for phantom assemblies that have routings. If you do not want to offset the components of a phantom assembly in the planning process, exclude the phantom item from the lead time calculations.
In general, phantom assemblies behave like normal assemblies when they represent a top level assembly, such as when you master schedule them or manufacture them using a discrete job. As a subassembly, however, they lose their identity as distinct assemblies and are a collection of their components. The components of the phantom subassembly are included on the job and on the pick list of the job-not the phantom itself.
Oracle Master Scheduling/MRP plans the phantom subassembly using the lot-for-lot lot-sizing technique. Otherwise, the same rules apply to phantoms as for other assemblies. Set the lead time of a phantom to zero to avoid lead time offset during the planning process.
When model or option class bills are components to another bill of material, the component supply type is phantom. See: Two-Level Master Scheduling, Oracle MRP User's Guide.
The cost rollup treats phantom assemblies the same as regular assemblies. The phantom is treated as a distinct entity; the cost elements of the phantom (material, resource, and so on) are added to the cost elements of the higher assembly. Also, the full cost rollup process sets the pending phantom assembly burden to 0.
Primary and Alternate Bills of Material
A primary bill is a list of the components you most frequently use to build a product. An alternate bill is another list of components for the same basic assembly. The primary bill is the default for rolling up costs, defining a job, and calculating cumulative item lead times.
You must define a primary bill before you define an alternate. A primary bill can have many alternate bills. Any bill of material type can have an alternate.
Oracle Master Scheduling/MRP uses the primary bill to plan your material. Oracle Order Management uses the primary bill for model and option class products to list available options.
When you build an item, roll up costs, and perform other functions that use bills of material, you can specify whether to use the primary bill (the default) or an alternate bill. You can also use engineering change orders to control changes to primary and alternate bills of material.
Use alternate bills to account for manufacturing variations that produce the same assembly, by specifying the parent item number and an alternate name when you create a bill. You cannot enter new revisions for alternate bills of material.
You can use an alternate to define an engineering bill or routing. The alternate used as a prototype variation from the primary manufacturing bill that produces essentially the same assembly.
Bills and routings can share alternate labels. If you create an alternate bill with the same label as an alternate routing, components are assigned to operations on the alternate routing. If there is no routing with the same alternate label, components are assigned to operations on the primary routing.
Item and Routing Revisions
You can define any number of revisions for the item and any number of routing revisions for an item's routing.
Important: Item revisions and routing revisions function alike and are discussed together below. However, item revisions and routing revisions are two distinct pieces of information. They are created and maintained separately and have no influence over each other.
Assign each revision a unique three character alphanumeric revision identifier (such as A, B, B1, and so on) and a revision date. Revisions are sorted according to ASCII rules. Each revision must be greater than the previous revision. Therefore, you cannot use revision 10 after revision 9 because, according to ASCII sorting, 10 precedes 9.
Use letters and/or numbers to label revisions. Letters are always upper case and numbers may include decimals. To ensure that revisions sort properly (according to ASCII sorting rules), decimals should always be followed by a number. Therefore, valid revisions can include: A, B, 1, 2, A1, B1, 1A, 1B, 0.0, 0.1, A.0, A.1, and so on. When you create an item or a routing, the beginning revision defaults to the value for Starting Revision in the Organization Parameters window.
When you create or update a bill of material or routing, you can choose to create a new revision or modify an existing revision. When adding new revisions, you should be sure that the revision date you enter does not overlap with other existing revision dates. Revisions are time-stamped, so you can determine the latest revision for multiple revisions defined on the same date. New revision numbers must be greater than the revision number of the currently effective revision.
Different versions of a bill of material or routing can be defined within the same revision. You can change component information for bills or operation information for routings without modifying the revision.
For example, assume that you defined an initial revision A on 18-AUG and made a change on 20-AUG without creating a new revision. If you make another change on 22-AUG, you can create a new revision B, effective 22-AUG. There are now three different versions of the item: revision A of 18-AUG, revision A of 20-AUG, and revision B of 22-AUG.
Components
Bills of Material restricts the types of items you can assign as components based on the type of bill you are defining.
The following table lists valid components for each parent item type.
| Parent BOM Item Type | Component BOM Item Type |
|---|---|
| Standard Item | Standard Item |
| Model Item | Standard Item, Model Item, Option Class Item |
| Option Class Item | Standard Item, Model Item, Option Class Item |
| Planning Item | Standard Item, Model Item, Option Class, Planning Item |
Each bill of material can have many components. For each component, you specify attributes, such as operation sequence, item sequence, usage quantity, yield, supply type, supply subinventory and locator, and others.
The following table lists valid component attributes for each type of bill.
| Component Attributes | Standard Parent Item | Model Parent Item | Option Class Parent Item | Planning Parent Item |
|---|---|---|---|---|
| Item | Yes | Yes | Yes | Yes |
| Item Sequence | Yes | Yes | Yes | Yes |
| Operation Sequence | Yes | Yes | Yes | No |
| Effective Date Range | Yes | Yes | Yes | Yes |
| Planning Percent | No | Yes | Yes | Yes |
| Yield | Yes | Yes | Yes | No |
| Enforce Integer Requirements | Yes | Yes | Yes | Yes |
| Include in Cost Rollup | Yes | Yes | Yes | No |
| Supply Type | Yes | Yes | Yes | No |
| Supply Subinventory | Yes | Yes | Yes | No |
| Supply Locator | Yes | Yes | Yes | No |
| Mutually Exclusive Options | No | Yes | Yes | No |
| Optional Flag | No | Yes | Yes | No |
| Check ATP | Yes | Yes | Yes | No |
| Minimum Quantity | No | Yes | Yes | No |
| Maximum Quantity | No | Yes | Yes | No |
| Basis | No | Yes | Yes | No |
| Include in Shipping Doc. | Yes | Yes | Yes | No |
| Required to Ship | Yes | Yes | Yes | No |
| Required for Revenue | Yes | Yes | Yes | No |
| Quantity | Yes | Yes | Yes | No |
| Descriptive Flexfield | Yes | Yes | Yes | Yes |
| Comments | Yes | Yes | Yes | Yes |
Access Control by Item Type
Control access to bills of material by item type using the following profile options:
-
BOM: Standard Item Access
-
BOM: Planning Item Access
-
BOM: Model Item Access (also controls access to option class items)
Each profile option can have either a Yes or No value. A Yes value indicates that you can create and update bills for the associated item type. For example, you might specify No at the site level for BOM: Standard Item Access profile to restrict access for creating standard bills. But you might specify Yes for BOM: Planning Item Access profile option at the user level for specific engineers so they can update engineering bills of material for planning items.
Note: Profiles are ignored in query mode. A user with no access to any type of item can query all types of bills.
Related Topics
Primary and Alternate Bills of Material
Item and Operation Sequence Fields
Engineering Bills of Material and Routings, Oracle Engineering User's Guide
Defining Item Revisions, Oracle Inventory User's Guide
Item and Operation Sequence Fields
Supply Subinventory and Locator Fields
Mutually Exclusive and Optional Fields
Check ATP (Available to Promise) Field
Minimum and Maximum Quantity Fields
Bill / Component Validation Rules
Consolidated Bill of Material Report
Supply Types, Oracle Work in Process User's Guide
Bills of Material Profile Options
Defining Items, Oracle Inventory User's Guide
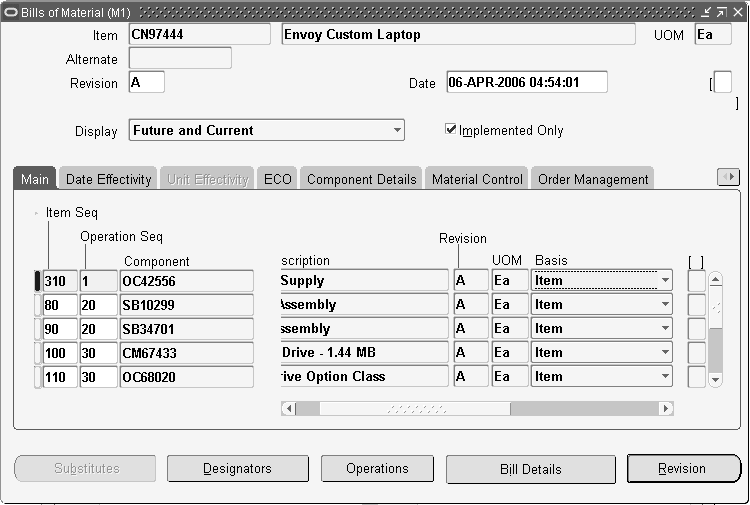
Creating a Bill of Material
A bill of material contains information on the parent item, components, attachments, and descriptive elements. Each standard component on a bill can have multiple reference designators and substitute components.
You can create an engineering, manufacturing, or asset (maintenance) bill, copy an existing bill, or reference a common bill. When you create a bill, it exists only in the current organization. To use a bill in another organization, you must either copy it or reference it as a common. You can define bills of material with dual UOM items as assembly and component items.
The procedure below describes how to create a bill. In addition, see: Setting Up Maintenance Bills of Material, Oracle Enterprise Asset Management User's Guide, Copying Bill and Routing Information, and Referencing Common Bills and Routings.
Prerequisites
- Define the parent item and all components as inventory items and set the BOM Allowed attribute to Yes and BOM Item Type to model, option class, planning or standard. See: Defining Items, Oracle Inventory User's Guide .
To create a bill of material
-
Navigate to the Bills of Material window.
Note: If your current responsibility does not include the Privilege to Maintain security function, you can only view bill information. If so, enter selection criteria in the Find Bills window and choose the Find button. The Bills Summary folder window appears.
-
Enter the parent item for which you are creating a bill, and if you are creating an alternate bill, enter the alternate.
Note: Bills and routings can share alternate labels. If you create an alternate bill with the same label as an alternate routing, components are assigned to operations on the alternate routing. If there is no routing with the same alternate label, components are assigned to operations on the primary routing.
-
If you are updating or viewing a bill, use the Display poplist to display all, current, or future and current components effective as of the revision date you specify. Check the Implemented Only field to further restrict the components to display. See: ECO Statuses, Oracle Engineering User's Guide.
The Bills of Material window contains the following tabbed regions: Main, Date Effectivity, Unit Effectivity, ECO, Component Details, Material Control, Order Management, Shipping, and Comments.
-
Enter the item sequence, operation sequence, and the component item. See: Item and Operation Sequence Fields.
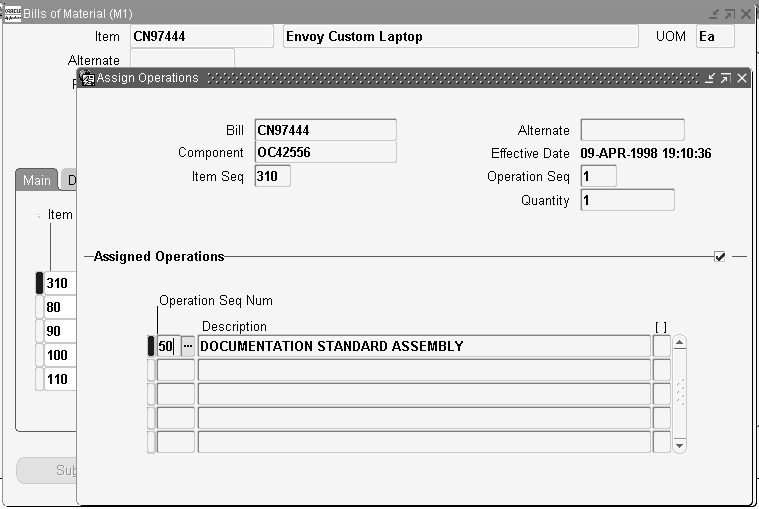
If you need to specify an additional operation within this operation, choose the Operations button to navigate to the Assign Operations window.
In the Operation Seq Num field column, enter the additional operation sequences to perform, along with the operation listed in the Bills of Material window.
Additional Information: The Operations button is only enabled for optional components.
Specifying Additional Operations Example
In an automobile factory, one operation sequence on an automobile's bill of material is Install Wheels. The front wheels require 5 percent more torque than the back wheels during this operation. Ensure that this extra torque operation is performed by specifying the Additional Torque operation in the Assign Operations window for the Install Wheels operation sequence.
-
In the Basis field, select whether the quantity of the component used is a fixed amount (Lot) or increases linearly along with the quantity produced (Item).
If the component quantity required increases or decreases linearly along with changes to the work order or job quantity, then select Item. If the component quantity required remains the same regardless of the work order or job quantity, then select Lot.
Basis Field Constraints
-
You can define the Basis field as Item or Lot for mandatory components in an ATO Option Class or an ATO Model bill of material.
-
You can only define the Basis field as Item for option items, option classes or submodels in an ATO Option Class or ATO Model bill of material.
-
You can only define the Basis field as Item for any component in an ATO or PTO Model or Option class.
-
You can only define the Basis field as Item when the WIP Supply Type is Phantom. See: Phantoms.
See: Fixed Component Usage, Oracle Work in Process User's Guide
-
-
In the Main tabbed region, enter either the Quantity or Inverse Usage used to make one unit of this assembly item at the current operation.
The Inverse Usage field calculates a fractional quantity for you in the Quantity field, to 42 decimal places. Use the Quantity field when the quantity used is a whole number. Use the Inverse Usage field when the quantity used is a fractional number. When you enter a value in either field, the system automatically calculates and populates the value in the other field. Inverse usage is also available using Work in Process, Shop Floor Management, and Product Hub.
The Quantity and Inverse Usage fields can include negative or decimal values, subject to the following rules:
-
Pick-to-order bills cannot have fractional component quantities if Oracle Order Management is installed.
-
Pick-to-order option class components cannot have negative values.
-
Components with Check ATP turned on cannot have negative or zero quantities.
-
If the component has Quantity Related turned on, then the component quantity cannot be fractional or negative.
-
If an implemented component has Quantity Related turned on, then the component quantity must be equal to the number of reference designators. See: By-Product Recovery, Oracle Work in Process User's Guide.
Important: The planning process in Oracle Master Scheduling/MRP ignores negative requirements on standard discrete jobs and components with a negative usage on a bill of material when netting supply and demand.
Note: If you enter a negative quantity for a component, you should enter either Assembly pull or Operation pull for the supply type to ensure that you transact the material when you build the bill.
The Revision field displays the current revision of the component as of the revision date of the parent item.
The Eng Item field displays a checkmark if the item is defined as a prototype item in Oracle Engineering. See: Overview of Engineering Prototype Environment, Oracle Engineering User's Guide.
-
-
Select Auto Request Material to automatically create move orders or purchase orders for the component item.
-
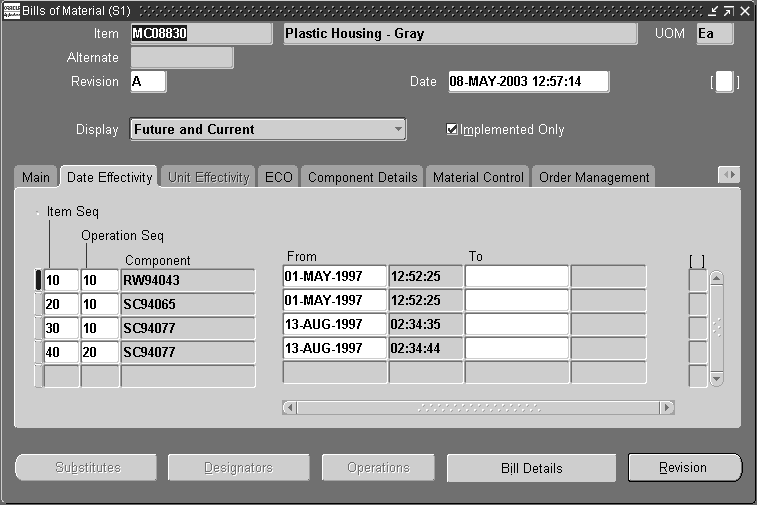
Open the Date Effectivity tabbed region and enter the effective date range for each component. See: Effective Date Fields.
The Date Effectivity tab is disabled if the BOM item's effectivity control is set to Model/Unit Number. See: Bills of Material Attribute Group, Oracle Inventory User's Guide.
-
Open the Unit Effectivity tabbed region and enter the effective unit number range for each component. The unit number list of values displays all of the unit numbers defined in the master organization. See: Model/Unit Effectivity, Oracle Project Manufacturing Implementation Manual.
The Unit Effectivity tab is disabled if the BOM item's effectivity control is set to Date. See: Bills of Material Attribute Group, Oracle Inventory User's Guide.
-
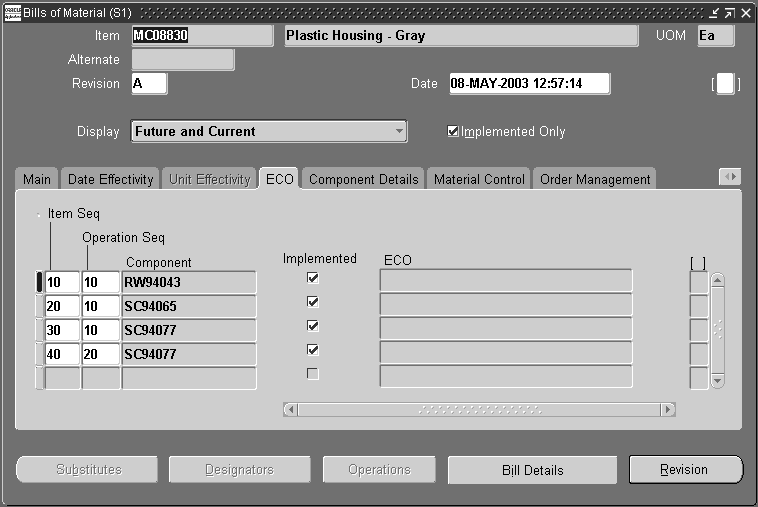
Open the ECO tabbed region and verify the following:
The Implemented check box indicates whether the component is implemented.
Unchecked: Component is on a pending Engineering Change Order (ECO)
Checked: Component is on an implemented ECO or was added directly to the bill
If the component is part of a pending or implemented ECO, the ECO field displays this ECO.
-
Open the Component Details tabbed region and enter the planning percent. See: Planning Percent Field.
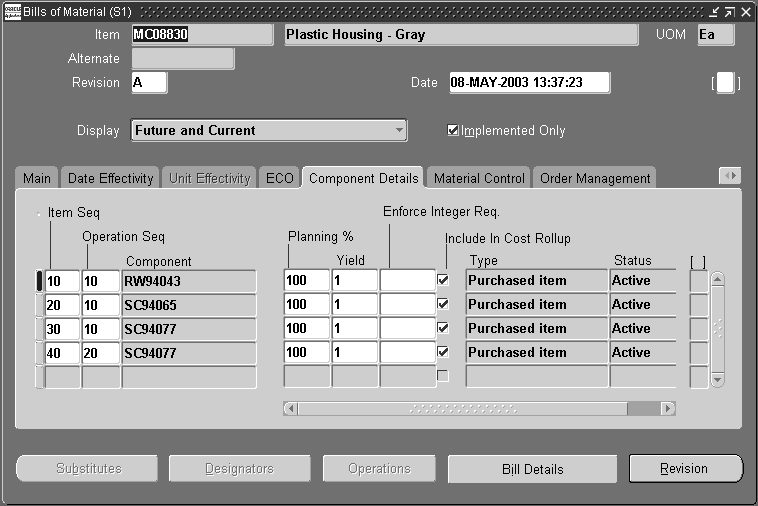
Enter the yield. See: Yield Field.
Enter the Enforce Integer Requirement, or select a value from the list of values. Acceptable values are up, down and none. See: Enforce Integer Requirements.
Indicate whether the component should be included in cost rollups. If enabled, the material cost of this component, but not the routing cost, is included in the cost of the parent item.
-
Optionally, open the Material Control tabbed region and enter the supply type. See: Supply Types, Oracle Work in Process User's Guide.
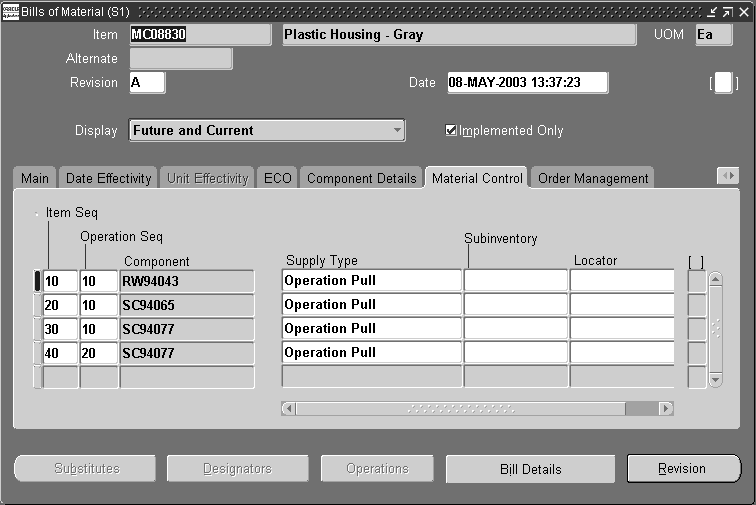
Enter the supply subinventory and the locator. See: Supply Subinventory and Locator Fields.
If you have set the BOM: Default WIP Supply Values for Components profile option to Yes, these values default from the item master. If any of these values are left blank, Work in Process will read the values contained in the item master. See: Bills of Material Profile Options.
-
For model, option class, and kit bills, open the Order Management tabbed region and enter the minimum and maximum sales order quantities. See: Minimum and Maximum Quantities.
Note: You can add ATO items as components to a PTO Kit bill. You can also make ATO items as mandatory or optional components to a PTO Model BOM.
Indicate whether to check ATP. See: Check ATP (Available to Promise) Field.
Indicate whether the component is optional and mutually exclusive. See: Mutually Exclusive and Optional Fields.
Enter the sales order basis. See: Sales Order Basis Field.
-
Open the Shipping tabbed region, and choose whether the component should be listed on shipping documents, required to ship, or required for revenue. See: Shipping Details Fields.
-
Open the Comments tabbed region, and enter any comments about the component.
-
Choose buttons to perform related tasks:
Substitutes: Assign substitute components. See: Assigning Substitute Components.
Designators: Create reference designators. See: Creating Reference Designators.
Operations: Specify additional operation sequences within a bill of material operation sequence. See the step explaining the Operations button, described previously in this procedure.
Bill Details: Reference common bills. See: Referencing Common Bills and Routings.
Revision: Define item revisions. See: Defining Item Revisions.
Related Topics
Copying Bill and Routing Information
Referencing Common Bills and Routings
Assigning Descriptive Elements
Creating Reference Designators
Assigning Substitute Components
Deleting Components and Operations
Bill / Component Validation Rules
Bill of Material Listing Report
Bills of Material Profile Options
Customizing the Presentation of Data, Oracle E-Business Suite User's Guide
Copying Bill and Routing Information
You can save time defining new, similar bills or routings by copying their information rather than creating them manually.
You can copy a bill or routing from your current organization or from another organization that shares your same item master organization. You can then modify your new bill or routing as necessary.
You can copy any revision of a primary or alternate bill or routing.
Subinventory and locator information are not copied across organizations.
Bills of Material Only
When you copy bills from your current organization, everything is copied to the new bill including the supply type and the supply subinventories and locators.
You can only copy bills between items having the same BOM Item Type attribute. For example, if the new bill is a model bill, you can only copy existing bills that are model bills.
Know the structure of the bill you are copying, since the copy function only copies single level components of the bill. For example, if the parent item whose bill you want to copy has single level components that are subassemblies, the bill copy function will not copy the components of the subassembly.
When you copy the bill from another organization, the components on the bill you are copying must exist in the target organization. The supply subinventories and locators are not copied. Substitute component items must also exist in the target organization to be copied.
When copying an engineering bill to manufacturing, only those single-level manufacturing (not engineering) components are copied.
Routings Only
When copying from another organization, only operations occurring in departments that exist in both organizations are copied. Similarly, only resources that exist in both organizations are copied. The resource must also belong to the same department in the target organization.
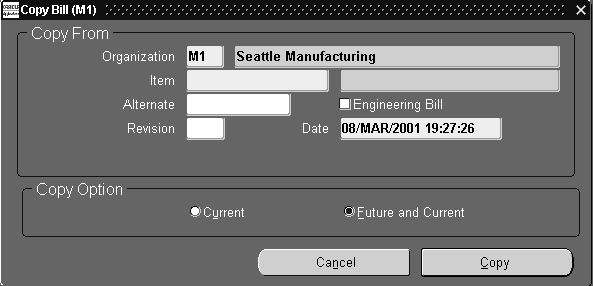
To copy a bill of material:
-
Navigate to the Bills of Material window, and enter an assembly number in the Item field.
-
Choose Copy Bill From in the Tools menu to display the Copy Bill window if this item does not have an associated bill of material.
-
If this item does have an associated bill of material, select an alternate bill type from the Alternate list of values window, and choose OK.
Note: You can only use one assembly number and alternate type combination once.
-
In the Copy Bill window, enter the item number for the bill you want to copy in the Item field.
-
Enter any other information to specify the assembly bill of material to copy such as Organization, Alternate, Revision, and Revision Date.
-
If the new bill created is an engineering bill of material, enable the Engineering Bill check box.
-
All: All components and operations.
Current: Components or operations effective on the revision date.
Future and Current: Current and all future components and operations.
-
Choose Copy.
A Note appears stating what has been copied to this new bill of material such as components, references, and operations.
-
Choose OK to close the dialog box and display the Bills of Material window.
You can now edit fields for this copied bill of material to create a new version of this bill for your assembly.
-
Save your record and close the window.
To copy a routing:
-
Navigate to the Routings window, and enter an assembly number in the Item field.
Note: You can access the Routings window from both the Navigator or the Tools menu in the Bills of Material window.
-
Choose Copy Routing From in the Tools menu to display the Copy Routing window if this item does not have an associated routing.
-
If this item does have an associated routing, select an alternate routing type from the Alternate list of values window, and choose OK.
Note: You can only use one assembly number and alternate type combination once.
-
In the Copy Routing window, enter the assembly number for the bill you want to copy in the Item field.
-
Enter any other information to specify the assembly routing to copy such as Organization, Alternate, Revision, and Revision Date.
-
If the new routing created is an engineering routing, enable the Engineering Routing check box.
-
Select a copy option:
-
All: All components and operations.
-
Current: Components or operations effective on the revision date.
-
Future and Current: Current and all future components and operations.
-
-
Choose Copy.
A Note appears stating what has been copied to this new routing such as operations, resources, and instructions.
-
Choose OK to close the dialog box and display the Routings window.
-
You can now edit fields for this copied routing to create a new version of this routing for your assembly.
-
Save your record and close the window.
Related Topics
Bill / Component Validation Rules
Defining Items, Oracle Inventory User's Guide
Referencing Common Bills and Routings
Any two items that are of the same bill type can share common bills and routings. If two different items share the same bill or routing, you can define the bill or routing once and then maintain one copy instead of two.
The following notes apply to both bills and routings:
-
You cannot reference another bill or routing as a common if that bill or routing also references a common. In other words, you cannot create a chain of common references.
-
You can only reference another bill or routing as a common if it has the same alternate name assigned to it.
-
If the current bill you are creating is a manufacturing bill, the common bill must also be a manufacturing bill.
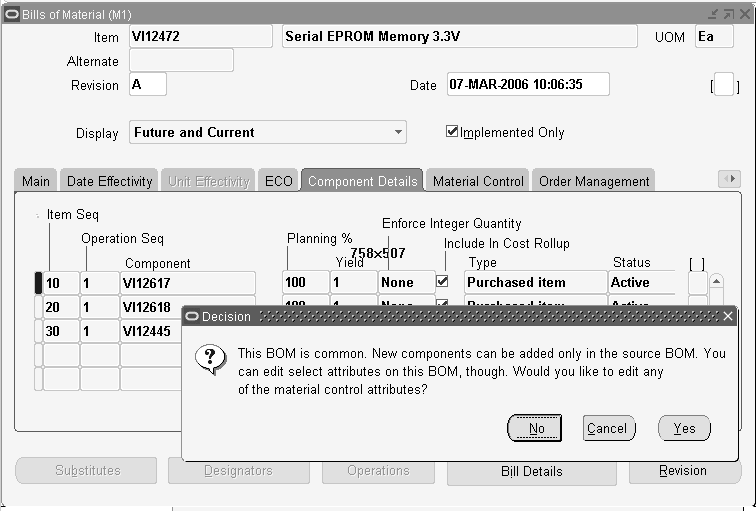
Common Bills of Material
If two or more organizations manufacture the same item using the same bill of material, you can define the bill in one organization and reference it from the other organizations. Necessary changes must then be made to the referenced bill. Optionally, you can reference all but the following five fields in a bill, maintaining these fields by individual bill of material.
-
Supply Type
-
Subinventory
-
Locator
-
Operation Seq
-
Include In Cost Rollup
You can create a common bill within the same organization, and across multiple organizations. You have the option to create common bills in all organizations under the current organization in the chosen organization hierarchy, or create common bills in all organizations that have the same item master organization as the current organization and are accessible by the user responsibility. Sharing bills across multiple organizations minimizes the maintenance of your bills of material.
When you enter orders for models, kits, and assemblies in Oracle Order Management, you must define all bills of material in your item master organization (your OE: Item Validation Organization profile option value). Using common bills of material, you can share bills of material that exist in your manufacturing organizations with your item master organization.
When you define a bill for a new assembly, you can reference another assembly and organization as a common bill of material. You do not need to make any further entries for the bill of material.
The following notes apply to bills of material:
-
You can only reference bills from organizations that have the same item master organization as the current organization.
-
If components already exist for the new bill, you cannot reference another bill as a common.
-
If your new assembly is in a different organization than the bill you reference, all component items must exist in the new bill's organization. This also applies to substitute components.
Common Routings
The following notes apply to routings:
-
You cannot reference a routing outside your current organization.
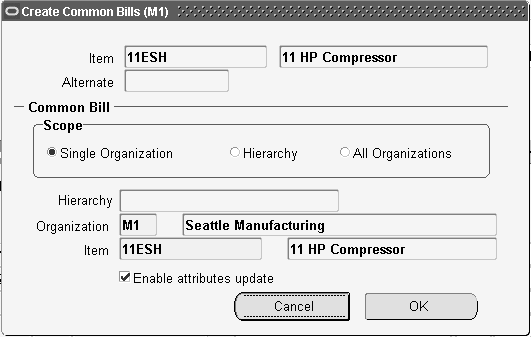
To reference a common bill:
-
In the Bills of Material window, find the bill that you want to use as the source, or common, bill.
-
Navigate to the Create Common Bills window. Do this by choosing Create Common Bill from the Tools menu.
-
In the Scope region, select one of the following three options:
-
Single Organization
-
Hierarchy
-
All Organizations
If you select Single Organization, enter the organization and item that will reference the common bill. If you select Organization Hierarchy, enter the required name of the organization hierarchy. In this case, the common bill created is referenced by all organizations below the current organization in the chosen organization hierarchy. If you select All Organizations, then the common bill created is referenced by all organizations that have the same item master organization as the current organization.
-
-
Optionally, select the Enable attributes update box.
Selecting this box enables you to update the following fields in the bills that reference this common bill.
-
Supply Type
-
Subinventory
-
Locator
-
Operation Seq
-
Include in Cost Rollup
Note: Initially, the values in the above fields within the bills that reference the source bill are copied from the source bill, but you can change these values at a later time.
The profile option BOM: Default WIP Supply Values for Components governs the behavior for defaulting the Supply Type, Subinventory, and Locator field values for components in the common bill. If this profile value equals Yes, then the item attributes Supply Type, Subinventory, and Locator for the component in the source organization default to the common bill of material in another organization. If this profile value equals No, then the Supply Type value in the source bill is retained in the common bill. The Subinventory and Locator field values default to NULL in the common bill.
Caution: Once you enable the material control attributes in a common bill and save the bill, you cannot disable the attributes. If you need to disable the attributes, then delete the bill and enter a new bill.
Additional Information: You can choose to enable the above attributes at a later time, too. To do this find a common bill. Select one of the above five fields. A message appears and asks if you would like to edit any of the five attributes. Choose Yes. You can now update the above five fields.
-
-
Choose OK.
Tip: In addition to navigating to the Create Common Bills window, you can also create common bills by running the concurrent program Create Common Bills.
To identify the common bill used:
Use the Bill Detail window to identify the common, or source, bill referenced by the bill in the Bills of Material window.
-
From the Bills of Material window, choose Bill Detail.
The Common Bill region in the Bill Detail window identifies the organization and item used as the source (common) bill. If the Organization and Item fields are blank, then the bill in the Bills of Material window is not referencing a common bill.
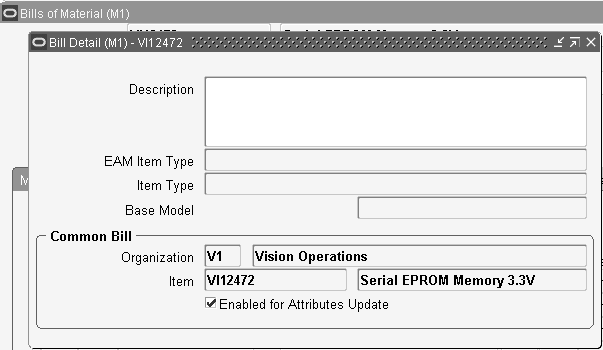
-
Optionally, select the Enabled for Attributes Update box to enable you to update the following fields in the bill that references a source (common) bill.
-
Supply Type
-
Subinventory
-
Locator
-
Operation Seq
-
Include in Cost Rollup
If this box is selected, you can change the values in these fields so that they are different than the source (common) bill.
Caution: Once you select the Enabled for Attributes Update box, you can no longer change the above field values in the common bill and have them default in to this bill.
-
To reference a common routing:
-
In the Routings window, enter the item for which you want to create a routing.
-
Navigate to the Common Routing window. Do this by choosing Assign Common Routing from the Tools menu.
-
In the Common Item field, select the item routing that you want to use as the source (common) routing.
-
Choose OK.
The operations from the common routing default into the Operations region.
-
Save your work.
Related Topics
Creating Organization Hierarchies, Using Oracle HRMS-The Fundamentals
Assigning Descriptive Elements
For each model and option class bills only, you can specify a list of item catalog descriptive elements. Values are assigned to catalog descriptive elements when new configuration item are created. The descriptive element value of the chosen option is assigned for each descriptive element.
Prerequisites
- For model bills, you must assign the item to a catalog group. See: Defining Item Catalog Groups, Oracle Inventory User's Guide.
To assign descriptive elements
-
Navigate to the Descriptive Elements window.
-
Enter a descriptive element to assign automatically based on the option chosen in the current bill.
For model bills, you can only specify a descriptive element name within the model item catalog group. For option class bills, you can specify a descriptive element name from any catalog group.
When you order a configuration, Bills of Material automatically creates and assigns the configuration item to the model's item catalog group, and assigns values to the descriptive elements in this group.
Related Topics
Overview of Configure to Order
Creating Reference Designators
Reference designators are sequenced comments and instructions that pertain to a component. For example, you may have drawings that clarify the assembly process for certain components, or further instructions for the use of a large quantity of the same component. You can specify whether to assign one reference designator for every usage of the component or assign any number of reference designators to the component.
Planning bills and model, option class, and planning components cannot have reference designators.
Reference designators are sorted in alphanumeric order on inquiries and reports. You can also specify a comment for each reference designator.
To create reference designators
-
Navigate to the Reference Designators window. Do this by choosing the Designators button from the Bills of Material window.
-
Indicate whether you want component quantity related to the number of reference designators.
Off: Assign any number of reference designators to each component (the default). The number of reference designators is independent of the component quantity. With Quantity Related unchecked, if the usage quantity of the component is four, you could, for example, define six or more reference designators.
On: Use one reference designator per usage of the component. The component usage quantity must be a positive integer in order for you to use this option. When the bill requires a quantity of four of a given component, you assign four reference designators to that component, one for each usage.
-
Do one of the following:
-
Enter a reference designator for the component. (A reference designator must be ten characters or less.)
-
Choose the Add Range or Delete Range button to open the Range window. Enter a prefix and a suffix for the range of reference designators to add or delete. For example, if you enter A as the Prefix, 1 and 4 as the starting and ending values, and XYZ as the Suffix; A1XYZ, A2XYZ, A3XYZ, and A4XYZ are the reference designators.
-
To number reference designators, use the Starting Value field to define the beginning value for a range of reference designators. Then either enter the number of values to add or delete, or define the ending value in the Ending field.
-
-
Save your work.
Assigning Substitute Components
You can assign any number of substitute items to each bill component and you can assign the same substitute item to more than one component. The substitute item quantity is the quantity needed to replace the full component quantity. The quantity can differ from the component usage quantity. Oracle Master Scheduling/MRP reports these substitutes on some planning reports, such as the MRP Detail Report. Oracle Work in Process does not consider substitute items in its pick lists.
Planning bills and model, option class, and planning components cannot have substitute components. Items with dual unit of measure can also be added as substitute components.
To assign substitute components
-
Navigate to the Substitute Components window. Do this by choosing the Substitutes button from the Bills of Material window.
-
Enter a substitute item for the component. If you are using Bills of Material, use a manufacturing item; if you are using Oracle Engineering, use an engineering or a manufacturing item.
-
Enter the quantity of the substitute item needed to replace the full component quantity. This quantity can differ from the bill usage quantity of the component.
Defining Item Revisions
A bill of material revision is an item revision which indicates that the components of an item have changed. You do not have to use item revisions when you change bills of material, however, in some industries, it is best to create a new item revision when you change a bill of material.
To define an item revision
-
Navigate to the Item Revisions window. Do this by choosing the Revisions button from the Bills of Material window.
-
Enter the effective date of the item revision.
Related Topics
Defining Bill or Routing Operation Documents
You can attach documents to bills of material or to routing operations.
To define bill or routing operation documents
Related Topics
Attachments, Oracle E-Business Suite User's Guide
Attaching Files
You can attach text and files, such as spreadsheets, graphics, and OLE objects to bills of material, engineering change orders, routings, routing revisions, and routing operations.
For example, an attached file may include comments, such as a graphical representation of the bill structure, or detailed instructions and schematic diagrams for routing operations.
To attach files
-
From the Bills of Material, Engineering Change Orders, Routings, or Routing Revisions window, choose the Attachments icon.
Note: To attach a file to a bill or ECO, position the cursor in the header region. To attach a file to a routing operation, position the cursor in the Operations region.
Related Topics
Defining Bill or Routing Operation Documents
Attachments, Oracle E-Business Suite User's Guide
Checking for Bill Loops
Bill loops occur when a bill is assigned as a component to itself somewhere in the multilevel structure of the bill. The loop check program searches for such loops.
The Check for Loops program can be run from the Tools menu of the Bills of Material window.
To check for bill loops
-
Navigate to the Bills of Material window.
Note: The Check for Loops item on the Tools menu is only available when creating a new bill, after that new bill has been saved.
-
Choose Check for Loops from the Tools menu.
Related Topics
Modifying Components and Bills
You can receive notification when components and bills are modified by subscribing to Oracle Workflow events.
Prerequisites
Your system administrator can help you subscribe to Oracle Workflow events. Refer to the Oracle Workflow User's Guide and Oracle Workflow Developer's Guide for more information on business events and how to subscribe to them.
The following Oracle Bills of Material business events trigger Oracle Workflow events:
| Business Event | Workflow Event |
|---|---|
| Creating a bill of material | oracle.apps.bom.structure.created |
| Changing a bill of material | oracle.apps.bom.structure.modified |
| Deleting a bill of material | oracle.apps.bom.structure.deleteSuccess or oracle.apps.bom.structure.deleteError |
| Creating a component | oracle.apps.bom.component.created |
| Changing a component | oracle.apps.bom.component.modified |
| Deleting a component | oracle.apps.bom.component.deleteSuccess or oracle.apps.bom.component.deleteError |
Related Topics
Overview of the Oracle Workflow Business Event System, Oracle Workflow User's Guide
To Create or Update an Event Subscription, Oracle Workflow Developer's Guide
Mass Changing Bills of Material
Use the Mass Change Bills window to mass change your manufacturing or engineering bills of material. You can define a mass change to add, delete or replace a component, alter a component quantity or yield, or change other component information. You can mass change all using bills of material or choose a subset of bills by item range, item category, or item type. You can mass change primary and alternate bills of material for each using assembly. For engineering bills, you can schedule the mass change for a future effective date. For manufacturing bills, you can implement the changes immediately. You can also report effective changes for all using assemblies or components.
If you are using Oracle Engineering, you can create an engineering change order (ECO) from the mass change order that affects both engineering and manufacturing bills. You can then implement the ECO and report on any effected using assemblies.
Bills of Material or Engineering take into account all the actions you enter to determine if the change is applicable. For example, suppose you add component A and delete component B. This change is made only if component A does not exist and component B does exist on the selected bills. The change is applied only if both conditions are met. In this example, two records are affected.
Prerequisites
- You must create at least one bill of material. See: Creating Bills of Material.
- You must create at least one change order type. See: Defining ECO Types, Oracle Engineering User's Guide.
To mass change bills of material
-
Navigate to the Mass Change Bills window.
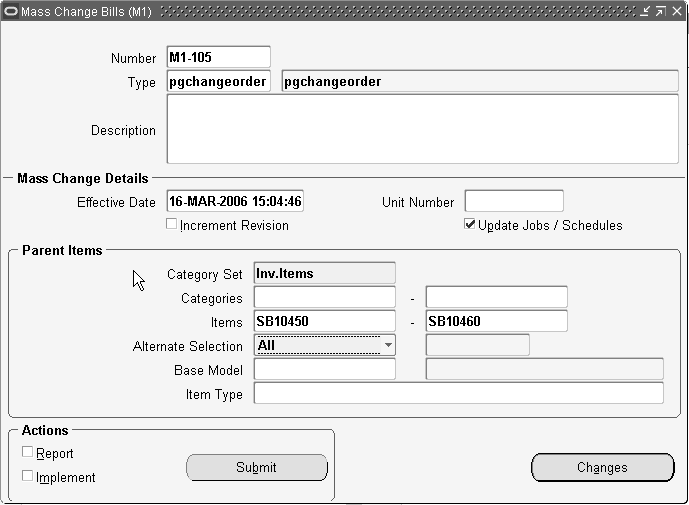
-
Enter a mass change order number and a change order type. If you have Engineering installed and have set up ECO Autonumbering, a default value will appear. See: Defining ECO Autonumbering, Oracle Engineering User's Guide.
The change order type describes your changes and determines the type of bills to modify.
-
Enter the effective date for the change (for engineering bills only).
Note: You cannot enter a future effective date for revised item associated with editable common bill.
-
Select a single item unit number.
-
Indicate whether to increment the parent item's revision by 1 (numeric based revisions only).
Note: Revisions are sorted as per ASCII rules. Each revised number must be greater than the previous revised number. Therefore, you cannot revise to 10 after revision 9 because according to ASCII sorting 10 precedes 9. If the current revision is 9 and increment revision check box is checked, then the mass change program will result in an error. To avoid this, set default revision as 001 instead of 1. Then the mass change increment revision functionality will not return an error until the revision reaches 999.
-
Indicate whether to update Work in Process material requirements of any unreleased discrete job, or any release or unreleased repetitive schedule associated with the parent items.
-
Specify the parent items to change.
You can use a category set, a category range, or an item range. Alternatively, indicate whether to change all primary bills, all primary and alternate bills, or a specific alternate bill.
Optionally, enter a base model to mass change configuration items related to this model that meets your other selection criteria.
If the mass change involves editable common BOM assemblies, then the mass change ignores the editable common bills when you update the non-material control attributes.
-
Enter an item type for the parent items.
-
Choose the Changes button to enter component changes.
Caution: If you do not wish to replace the values for the Supply Type, Supply Subinventory, and Supply Locator fields, you must enter the current value when executing a mass change. If you leave the Supply Type, Supply Subinventory, and Supply Locator fields blank when entering component changes, their values will be replaced by the blank (null) value when the mass change is executed.
-
When finished, select the action(s) to take.
For Bills of Material, select Report (to see affected bills), Implement (to perform the mass change), both, or neither.
For Engineering, select Report, Create ECO, both, or neither.
If you make no selection, the mass change order is saved for you to work on later.
Note: You cannot undo a mass change. However, you can create another mass change to reverse the effects of a previous mass change.
-
Choose the Submit button to launch the selected actions.
To enter component changes
-
Choose the Changes button on the Mass Change Bills window.
-
For each component item to change, indicate the action to perform. You can add or delete components to or from a parent item.
Or, you can update existing information about the component on the parent item. With this option a new row is created that you enter new information into.
-
In the Main tabbed region, enter the item sequence, operation sequence, the quantity, and the inactive date for each component. See: Item and Operation Sequence Fields.
-
Open the Component Detail tabbed region and enter the planning percent. See: Planning Percent Field.
Enter the yield and indicate whether the component should be quantity related and included in cost rollups. See: Yield Field.
-
Open the Material Control tabbed region and enter the supply type. See: Supply Types, Oracle Work in Process User's Guide.
Enter the supply subinventory and locator identifiers. See: Supply Subinventory and Locator Fields.
-
For model, option class, and kit bills, open the Order Entry tabbed region and enter the minimum and maximum sales order quantities. See: Minimum and Maximum Quantity Fields.
Indicate whether to check ATP. See: Check ATP (Available to Promise) Field.
Indicate whether the component is optional and mutually exclusive. See: Mutually Exclusive and Optional Fields.
-
Open the Shipping tabbed region, and choose whether the component should be listed on shipping documents, required to ship, or required for revenue. See: Shipping Details Fields.
To set Engineering Change Order (ECO) options
For Oracle Engineering only.
-
From the Mass Change Bills window, choose the Tools menu item and choose Set ECO Options.
-
Use the Plan check box to indicate whether you want Oracle Master Scheduling/MRP to include the revised item in the planning process.
-
Indicate whether each revised item's effective date is based upon the planned item's use-up date. If so, check the Use Up check box.
-
Enter an item whose use-up date is tied to each revised item effective date. The default is the use-up item associated with the plan name. This can be the revised item or a component of the revised item.
Oracle Alert automatically notifies the planner for the revised item if the use-up date changes based on information from a new MRP plan.
Note:
-
In the Engineering Change Orders form, you will be able to query the implemented mass change orders for bills of material and view their details.
-
It is recommended to use specific Change Order Types for mass changing bills of material. You can query only those specific Change Order Types in ECO form.
-
-
You can create engineering change orders (ECOs) for items in Inactive or Obsolete item status that have the BOM Allowed item attribute set to Yes. This attribute controls whether a bill of material can be created for an item or whether an item can be included in a bill of material. This allows you to manage change orders for inactive or obsolete items that require service during their warranty period. It does not validate the status of the Item.
Related Topics
Bill / Component Validation Rules
Engineering Change Order Schedule Report, Oracle Engineering User's Guide
Overview of Engineering Change Orders, Oracle Engineering User's Guide
See Also
Engineering Change Order Schedule Report, Oracle Engineering User's Guide
Overview of Engineering Change Orders, Oracle Engineering User's Guide
Viewing an Indented Bill of Material
An indented (multilevel, exploded) manufacturing or engineering bill of material displays the structure of a manufacturing or engineering item.
To view an indented bill of material
-
Navigate to the Indented Bill of Material window.
-
In the Find Indented Bills window, enter the item and/or the alternate for the bill.
Note: If you entered an alternate, the explosion process will search for all components with the same alternate label. If, at any level, an alternate with the same label is not found, the primary is used. The explosion process then continues searching for the original alternate label.
-
Enter the revision, the revision date, and the number of levels to explode for this bill. See: Bills of Material Profile Options.
-
Select a Display option: All, Current, or Future and Current components effective as of the revision date you specify.
Use the Implemented Only field to further restrict the components displayed. See: Engineering Change Orders Field Reference, Oracle Engineering User's Guide.
-
Select a sort option for each level of the bill, by operation sequence then item sequence, or item sequence then operation sequence.
-
Indicate whether to see costing information, and if so, enter the cost type.
You can simulate product costs for budgeting and planning analysis purposes. To do so, the Privilege to View Cost security function must be enabled for the responsibility.
Indicate whether to view lead time and/or material control information, and whether to use planning percents when calculating component quantities.
Any field that is checked here causes a corresponding tabbed region to appear on the Indented Bill of Material window.
-
Choose the Find button to explode the bill.
The Indented Bill of Material window appears and displays the first level of the bill.
The Components window contains the following tabbed regions, some of which may be disabled according the display options you selected: Item Details, Bill Details, Quantities, Effectivity, Material Control, Lead Time, Order Entry, Costing, and Shipping.
-
Use the control buttons to expand or collapse portions of the indented bill. You can only expand up to the explosion level indicated in the Find window.
Related Topics
Item and Operation Sequence Fields
Supply Subinventory and Locator Fields
Mutually Exclusive and Optional Fields
Check ATP (Available to Promise) Field
Minimum and Maximum Quantity Fields
Overview of Lead Time Management
Bill of Material Structure Report
Supply Types, Oracle Work in Process User's Guide
Searching for Data (Using Query Find), Oracle E-Business Suite User's Guide
Searching for Data (Using Query Operators), Oracle E-Business Suite User's Guide
Searching For Data, Oracle E-Business Suite User's Guide
Searching For Data (Performing Query-by-Example and Query Count), Oracle E-Business Suite User's Guide
Comparing Bills of Material
You can compare any two bills. For example, compare the primary to an alternate bill, the same bill across organizations, or the current revision of an item to a future revision.
Note: The two assemblies and their attributes are referred to as Bill 1 and Bill 2, or simply as 1 and 2.
To compare two bills of materials
-
Navigate to the Bill Components Comparison (or the Report Bill of Material Comparison) window.
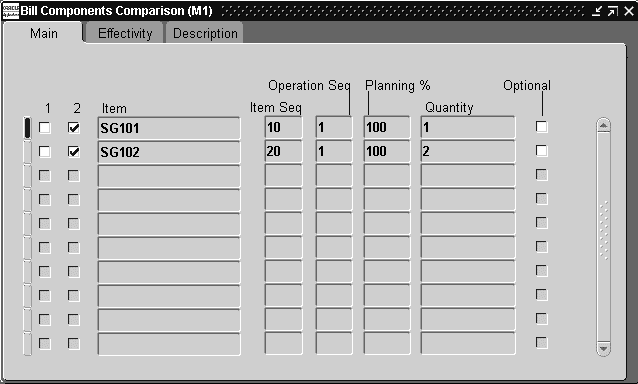
-
In the Find Bills to Compare window, enter selection criteria for Bill 1. Do the same for Bill 2.
-
Check comparison criteria check boxes for the attributes to compare the bills on.
-
Select an Order By option: by item sequence then operation sequence, or by operation sequence then item sequence.
-
To view only the differences between bills, check the Differences Only check box.
-
Choose the Compare button to compare the bills online. (If you are running the Bill of Material Comparison Report, choose the Report button.)
The Bill Components Comparison window displays both bills. Two columns of check boxes, one for assembly #1 and one for assembly #2, indicate if the component appears in the assembly.
The Main tabbed region displays the item and operation sequences, the planning percent, the quantity, and whether the item is optional.
The Effectivity tabbed region displays the effective date range and whether the item is implemented.
Related Topics
Item and Operation Sequence Fields
Bill of Material Comparison Report
Viewing Item Usage
View an imploded list of all the using assemblies for a specified component.
To view item where used
-
Navigate to the Find Item Where Used window.
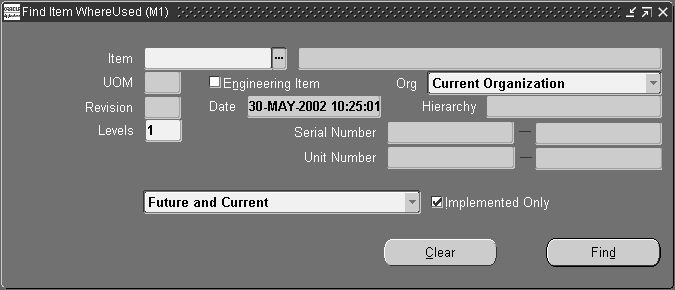
-
In the Find Item Where Used window, enter the item, the revision, the revision date, and the number of levels to implode for this bill of material.
Tip: Only Current components effective as of the revision date you specify will be displayed.
-
Indicate whether you need to inquire about component usage for the current organization, the current organization and all subordinate organizations in the chosen organization hierarchy, or all organizations that have the same item master organization as the current organization. You have the ability to specify the organization hierarchy name because current organizations can be accessed from more than one organization hierarchy.
Additional Information: Use the Implemented Only field to further restrict the components to display.
-
Choose the Find button to open the Item Where Used window.
The level bill of material where the inventory item appears in the using assembly is displayed, starting at 1 (level 2 signifies the parent of level 1; level 3 signifies the parent of level 2, and so on.)
The Item Where Used window has three tabbed regions: Item Details, Bill Details, and Effectivity.
The Item Details tabbed region displays the revision, the type, and the status for the component.
The Bill Details tabbed region displays the alternate, whether the bill is an engineering bill, the usage quantity (of the item in the immediate parent assembly), the ECO that implemented the component (if it has been implemented), and the operation sequence.
The Effectivity tabbed region displays the effective date range and whether the item is implemented. See: Effective Date Fields.
-
Use the control buttons to expand or collapse portions of the indented item usages.
Related Topics
Viewing An Indented Bill of Material
Consolidated Bill of Material Report
Creating Organization Hierarchies, Using Oracle HRMS-The Fundamentals
Searching For Data (Using Query Find), Oracle E-Business Suite User's Guide
Searching For Data (Using Query Operators), Oracle E-Business Suite User's Guide
Searching For Data (Searching For Information), Oracle E-Business Suite User's Guide
Searching For Data (Performing Query-by-Example and Query Count), Oracle E-Business Suite User's Guide
Bills of Material Field Reference
This section describes the use of certain major fields.
Item and Operation Sequence Fields
Item Sequence Field
The item sequence indicates the sequence of the item on the bill. It is used to sort components on reports and when choosing options from a model bill in Oracle Order Management. This defaults to the value of the highest existing component item sequence plus the value of the BOM: Component Item Sequence Increment profile option. If this profile option is not set, the default is 10. You can override or change this number.
Operation Sequence Field
Every routing carries operations. You can use the Routings form to assign operations to routings. Each operation must have a sequence number called the Operation Sequence Number.
On a bill, the operation sequence indicates the order in which you perform operations on a routing. You can have the system automatically generate Operation Sequence Numbers using a user-defined increment factor. A profile must be created where you can indicate how much the Operation Sequence Number will increment every time a new operation is generated. You can change the generated value if necessary in the Routings form. Valid values range from 1 to 9999999.
You can assign any component to any operation on the routing, including all components to the same operation (such as the first operation). The planning process assigns material requirement dates based on the operations to which you assign each component.
You can define bills of material for items with or without routings. If you use routings, you can either define the bill first or the routing first.
With component-to-operation assignments, you can schedule and issue component material to the operation that requires the component on the exact requirement date. You can also assign the same component on the bill to different operations on the routing, with different usage quantities for each assignment.
If no routing exists for the item, all components default to operation sequence 1. You cannot change this value until you define a routing for the item. After you define the routing, you can update your bill of material with routing operations if you want specific component-to-operation assignments.
If you define the routing before you define a bill, assign components to valid routing operations, or an operation sequence 1 when you define the bill. If you define an alternate routing and then define the alternate bill, you can assign components to the alternate routing operations. If you define an alternate bill and no alternate routing exists, you can assign components to the primary routing operations.
Effective Date Fields
Effective date fields appear throughout Oracle Manufacturing products. These are defined as follows:
-
Effective From / Effectivity Date: First date and time the component or operation becomes effective. For components, the effective date is the first day a component becomes effective for a bill. For routings, it is the first day an operation becomes effective in a routing.
-
Effective To / Disable Date: Last date and time the component or operation is effective. After this date, you can no longer assign the operation to a routing. From this date, you can no longer assign the component to a bill.
-
Inactive On: The first date and time the component or operation is inactive. As of 12:00AM on this date, you can no longer assign the component to a bill or the operation to a routing. If this date equals the effective date, the component or operation is inactive.
To avoid confusion, make sure that effective dates for one revision do not overlap with those of another.
For example, if you must introduce three new components to a bill in a specific order, you should assign each change to the appropriate parent item revision. So, component 1 of revision B may be effective today, component 2 of revision C tomorrow, then component 3 of revision D may be effective the following day. If there are two operations on a routing and you replace the first operation with a new operation, you should set the effective date for the new operation to the date the operation you are replacing becomes inactive.
Effective dates can be either the current date or a date in the future; you cannot enter a date in the past.
For components, the default effective date is the later of the current date or the date entered for the bill. If an inactive date already exists for the operation sequence/item combination, the default effective date of any subsequent rows with the same operation sequence/item combination is the same as the inactive date. That means that the subsequent operation sequence/item combination becomes effective immediately after the previous one becomes inactive.
You cannot assign duplicate components to the same operation with overlapping effective date ranges. For example, suppose component A001 at operation 10 is effective from 10-JAN to 14-FEB. You may not add another component A001 at operation 10 to the bill with an effective date of 10-FEB.
Use Oracle Master Scheduling/MRP to identify any overlapping effective dates.
Yield Field
The yield is the percentage of the component that survives the manufacturing process. A yield factor of 0.90 means that only 90% of the usage quantity of the component on a bill actually survives to be incorporated into the finished assembly.
To compensate for the expected gain or loss, any function that explodes a bill of material increases or decreases the material requirements for the component, based on the yield.
| component requirements = component usage quantity / component yield |
For example, when Master Scheduling/MRP plans a component with a usage quantity of 10 units per assembly and a component yield of 50% (or 0.5), the resulting component requirements increase to 20 units per assembly.
Note: You cannot enter component yield for an option class item or for any components of a planning bill.
The default is 1, indicating 100% yield (no loss or gain).
Planning Percent Field
Master Scheduling/MRP uses component planning percentages in forecast explosions through planning, model, and option class bills of material.
Assign planning percentages to components on model, option class, and planning bills.
Note: You can assign planning percents to mandatory components on model or option class bills only if the Forecast Control attribute is set to Consume and Derive.
Enter a component planning percent to specify a distribution percentage for the components. You can enter a planning percent greater than 100 to overplan a component. The default is 100.
Enforce Integer Requirements
The Enforce Integer Requirements attribute enables you to generate demand in integer quantities and eliminate pegging partial quantities across the demand. If you pass the demand in integer values for lower level components in the BOM, you avoid passing fractional values across the BOM. This enables pegging to reflect the true integer nature of supply and demand. You can select from one of three following values:
-
Up: The system rounds the gross requirements for every demand for the component to the next higher integer value. To set the value to up, you must set the item master attribute Rounding in Oracle Inventory.
-
Down: The system rounds the gross requirements for every demand for the component to the next lower integer value.
-
None: This is the default value. Leaving the value at none allows pegging in fractional quantities across the BOM.
Additional Information: If you use Oracle Work in Process, select None. Oracle Work in Process does not support Enforce Integer Requirements.
Extended Quantity Field
The extended quantity of the component used in the parent item is calculated as follows:
| ((explosion quantity of parent item x component usage quantity) / component yield) / (1 - shrinkage rate for parent) |
Supply Subinventory and Locator Fields
Work in Process pulls components from the supply subinventory and the locator within the subinventory during backflushing.
Assign a supply subinventory and locator, if applicable, to components that have a supply type of Assembly pull or Operation pull. You must specify a supply locator if you have mandatory locator control for the supply subinventory. The system validates any item subinventory and locator restrictions you defined during your Oracle Inventory setup.
Mutually Exclusive and Optional Fields
The following pertains to options for model and option class bills. All components are mandatory on standard and planning bills. Model and option class bills can have both mandatory and optional components.
The Optional field indicates whether the component is mandatory or optional. The Mutually Exclusive field applies only to option class bills and indicates whether you can choose one or many options within an option class.
Oracle Order Management uses the Mutually Exclusive check box in combination with the Optional check box to determine the number of option items you can or must choose to order the components of the option class bill. Refer to the table below for details on how the Optional check box and the Mutually Exclusive check box work together.
| Description | [ ] Mutually Exclusive(default) | [X] Mutually Exclusive |
|---|---|---|
| [X] Optional | Choose any number or no options on the option class bill | Choose one or no options on the option class bill |
| [ ] Optional (default) | Choose at least one option on the option class bill | Choose one, and only one, option on the option class bill |
Minimum and Maximum Quantity Fields
Oracle Order Management uses the minimum and maximum quantities to determine the number of optional items available when orders are placed for components on option class bills. If you enter a minimum sales order quantity, you must also enter a maximum sales order quantity. You can only enter a minimum and maximum quantity range that contains the quantity for the component. If you update the component quantity, the minimum and maximum values are changed to include the new component quantity.
Caution: These attributes do not apply to mandatory standard components.
Sales Order Basis Field
If the component is an option class item, you must indicate whether you want to override the default quantity for the option class when a sales order is entered (the default). Option class quantities affect the mandatory standard components assigned to the option class.
If you select None for the Sales Order Basis field, Oracle Order Management can override the default quantity for the option class. Order Management defaults the total quantity to release as the component quantity multiplied by the option class extended quantity.
If you select Option class for the Sales Order Basis field, Order Management cannot override the default quantity for the option class. Order Management calculates the total quantity to release as the component quantity multiplied by the option class extended quantity.
Note: Set the sales order basis to Option class for an ATO option class component. When creating a configuration bill, Oracle Manufacturing computes the total quantity required for a mandatory standard component as the component quantity multiplied by the option class extended quantity-regardless of the quantity entered on the sales order.
Shipping Details Fields
-
Shippable: Indicates whether the component item is shippable. The default is determined by the value of the Shippable Item attribute in the item master.
-
Include on Ship Docs: Indicates whether Oracle Order Management prints the components on external shipping documents, such as pack slips and commercial invoices. The default is off.
-
Required to Ship: Indicates whether the component is required to ship the order. You can only update this check box if the Assemble to Order item attribute for the assembly item in the Define Item window is disabled. This attribute only affects PTO included items (not ATO items or configurations).
-
Required for Revenue: Indicates whether the component is required to recognize revenue before you ship the order. You can only update this check box if the Assemble to Order item attribute for the assembly item in the Define Item window is disabled. This attribute is recognized by the Receivables Interface in Order Management. Required for Revenue components prevent their parent item from invoicing until they are shipped. For example, if you have an option class bill with a non-optional component with the Required for Revenue attribute set to Yes, then the option class will not invoice until the non-optional component has shipped. This field does not affect mandatory or optional components for an ATO item or configuration.
Related Topics
MPS/MRP Planning Attributes, Oracle Inventory User's Guide
Overview of Material Requirements Planning, Oracle MRP User's Guide
Bills of Material Profile Options
Overview of Material Control, Oracle Work in Process User's Guide
Overview of Material Requirements Planning, Oracle MRP User's Guide
Overview of Material Requirements Planning, Oracle MRP User's Guide
Overview of Material Requirements Planning, Oracle MRP User's Guide
Overview of Two-Level Master Scheduling, Oracle MRP User's Guide
Overview of Two-Level Master Scheduling, Oracle MRP User's Guide
Overview of Material Control, Oracle Work in Process User's Guide
Bill/Component Validation Rules
The following bill and component validation rules apply when defining, copying, or mass changing bills of material:
-
Depending on the setting of the profiles that limit access to different bill types (BOM: Model Item Access, BOM: Planning Item Access, BOM: Standard Item Access), you may not be able to modify bills.
-
You cannot add a component with an operation sequence number that does not exist in the routing. The only exception is for operation sequences that are equal to 1.
-
You cannot add a component to a bill where the component item is the same as the parent.
-
You cannot add a component to a bill where the same component, with the same operation sequence and effectivity, already exists on the bill.
-
Only manufacturing items can be added to manufacturing bills.
-
You cannot add a component to a bill that is being referenced as a common bill from another organization, where the component does not exist in the other organization.
-
You cannot add components to common bills.
-
For ATO, PTO, and phantom bills where the parent item has ATP Components set to No, you receive a warning when you add a component that has either the item attributes Check ATP set to Yes or ATP Components set to Yes. The warning says "Order details for the parent item specifies NO for ATP Components", but you can add the component.
-
You cannot add an optional component to a bill that is neither model or option class.
-
You cannot add a component, whose planning percent is not equal to 100, to a standard bill.
-
You cannot add a mandatory component, whose planning percent is not equal to 100 and has the Forecast Control attribute set to Consume or None, to a model or option class bill.
-
When adding a component to a bill, the mass change will set the Check ATP component attribute to No if the component quantity is less than or equal to 0.
The following table presents the validation rules used for adding components to different bill types.
| Description | Planning | PTO Model | PTO Option Class | PTO Item (kit) | ATO Model | ATO Option Class | ATO Item | Standard Item |
|---|---|---|---|---|---|---|---|---|
| Planning Bill | Yes | Yes | Yes | Yes | Yes | Yes | Yes | Yes |
| PTO Model Bill | No | Yes | Yes | Yes | Yes | No | Yes | Yes |
| PTO Option Class Bill | No | Yes | Yes | Yes | Yes | No | Yes* | Yes |
| PTO Item (kit) | No | No | No | Yes | No | No | Yes | Yes |
| Configuration Item Bill*** | No | No | No | No | Yes | Yes | Yes | Yes |
| ATO Model Bill | No | No | No | No | Yes | Yes | Yes | Yes |
| ATO Option Class Bill | No | No | No | No | Yes | Yes | Yes | Yes |
| ATO Item Bill | No | Yes*** | No | Yes | No | No | Yes** | Yes |
| Standard Item Bill | No | No | No | No | No | No | Yes** | Yes |
Note: ATO Items can ONLY appear under PTO Models as mandatory components.
Table Values
-
Yes: You can add this component type to this bill type.
-
No: You cannot add this component type to this bill type.
-
*: These components must be mandatory.
-
**: These components are treated as standard subassemblies.
-
***: The Configuration Item must have a Base Model. ATO Model and ATO Option class components will get WIP Supply Type Phantom.
“Configured" items are Assemble to Order (ATO) items that have a base item identification. ATO items have the Assemble to Order attribute set to Yes. Pick to Order (PTO) items have the Pick Component attribute set to Yes.
For example, if the parent item is a PTO model, it is not allowed to have a component that is a planning item, it is allowed to have a component that is a configured item.
Related Topics
Copying Bill and Routing Information
Referencing Common Bills and Routings
Deleting Components and Operations
Mass Changing Bills of Material
Creating a Product Family
A product family is a grouping of products whose similarity in resource usage, design, and manufacturing process facilitates planning at an aggregate level. A product family cannot be a part of a Standard, Model, Option Class, or Planning Bill of Material. Consequently, a product family is a single level bill. Members of a product family can belong to one and only one product family. You will be able to plan based on the planning percentages and effectivity of the product family members.
Caution: You must make sure that the Product Family flex structure is configured to match the System Items structure. If the System Items structure is changed it should be reflected in the Product Family structure as well. See: System Items (Item Flexfield), Oracle Inventory User's Guide.
To create a product family item
-
Navigate to the Master Item window.
Additional Information: If you are a Flow Manufacturing customer, select Product Family from the Flow Manufacturing window. The product family template is automatically applied.
-
Apply the product family template. See: Item Templates, Oracle Inventory User's Guide.
To define a default template for product family items, you must select a template from the INV: Product Family Item Template Name profile option. The template assigned in this profile option will be automatically applied when you create a new product family item.
Note: You are not required to use the product family template. If you choose not to use a template, make sure that you define the correct product family attributes. Specifically, the item must be an inventory item and the BOM Item Type must be Product Family. The item must also be BOM allowed.
Each product family corresponds to an item category. A new category is added for each product family item that is defined. The relationship between the product family item and the product family category is established by the equality of their concatenated key flexfield segment values. The category has the same name as the product family item. Consequently, product family item categories have the same flexfield structure as the System Items Flexfield. A new structure called Product Family has been defined for the Item Categories Flexfield. Each product family member item and the product family item itself are assigned to the corresponding category within the Product Family category set. The assignment is removed when an item is no longer a member of a product family.
To assign product family members
-
Navigate to the Product Family window.
Note: If you are using Oracle Flow Manufacturing, you can select Product Family Members from the Flow Manufacturing menu.
-
Select a product family item.
-
Select item members of the product family. The description, type, forecast control, and planning method for the member items are displayed for the items selected.
Additional Information: When an item is included in a product family, it will be automatically assigned to the same category as the family item.
-
Commit the record by selecting Save from the File menu.
Additional Information: You can commit a record without assigning planning percentages. The default planning percent is 100. The default effectivity date is the system date.
To assign planning percentages to product family members
-
Navigate to the Product Family window. Do this by selecting Defining Product Families from the Bills of Material menu.
-
To assign planning percentages for a member item, choose the Allocation button.
-
Enter the product family member's planning factor.
-
Enter effectivity dates for the item. Effectivity dates cannot overlap.
-
Optionally, enter comment text.
-
Commit the record by selecting Save from the File menu.
Additional Information: You can commit a record without assigning planning percentages. The default planning percent is 100. The default effectivity date is the system date.
Related Topics
Overview of Flow Manufacturing, Oracle Work in Process User's Guide
Creating a Flow Routing, Oracle Flow Manufacturing User's Guide
Overview of Mixed Model Map, Oracle Flow Manufacturing User's Guide