Routings
This chapter tells you everything you need to know to use routings.
This chapter covers the following topics:
- Overview of Routings
- Creating a Routing
- Creating a Standard Operation
- Viewing Resource Usage
- Routings Field Reference
Overview of Routings
A routing defines the step-by-step operations you perform to manufacture a product. Each routing can have any number of operations. For each operation you specify a department that determines the resources you may use for that operation.
Primary and Alternate Routings
A primary routing is the list of operations most frequently performed to build a product. You can define one primary routing and many alternate routings an item. When you define a new primary routing, you specify only the item (no alternate name) and you can assign a routing revision. For example, you can define a routing for an item that includes two operations-an assembly and a testing operation. You typically build your product with these operations, so you define this routing as the primary routing for the item.
The following table presents an example primary routing.
| Item | Alternate Name | Operation Sequence | Description |
|---|---|---|---|
| A | n/a | 10 | Assembly |
| n/a | n/a | 20 | Test A/B |
You can define an alternate routing to describe a different manufacturing process used to produce the same product. Unlike a new primary routing, specify the item and alternate name to define an alternate routing. You must define a primary routing before you can define alternate routings, and you can define any number of alternate routings for an item. For example, you have three test machines, one new machine capable of performing both tests A and B and two older machines that can only perform test A or test B. Ideally you would like to use the new machine that can perform both tests, but if it is unavailable, you use the other machines to complete the job.
The following table presents an example of a primary and alternate routing for Item A.
| Item | Alternate Name | Operation Sequence | Description |
|---|---|---|---|
| A | n/a | 10 | Assembly |
| n/a | n/a | 20 | Test A/B |
| A | Split Test | 10 | Assembly |
| n/a | n/a | 20 | Test A |
| n/a | n/a | 30 | Test B |
Bills and routings can share alternate labels. If you create an alternate bill with the same label as an alternate routing, components are assigned to operations on the alternate routing. If there is no routing with the same alternate label, components are assigned to operations on the primary routing.
Engineering Routings
You can define an engineering routing as an alternate for a manufacturing routing. This would typically be used to prototype a variation from the primary routing that produces the same assembly.
Both engineering and manufacturing routings share the same resource, department, and standard operation information.
Flow Routings
In a Flow Manufacturing environment, products are produced on a flow line to meet customer demand. Typically one flow line makes a mix of products.
Product Synchronization is the process of defining your product's process flow. This is done through the Flow routing where you are able to define processes, events and operations for your flow line. Although you can only define processes, events, and operations using Oracle Flow Manufacturing, you are defining them in windows owned by Oracle Bills of Material.
Dynamic Routings
Paths that jobs take are not always known at creation. Depending on initial operations and their results, operation flexibility is frequently required. There can be numerous possibilities defined as part of a routing network, any one of them being selectable based on the outcome of the last operation, within the job performed. All possible operation paths that a route may flow through are first determined. This networked, predefined path definition provides for dynamic, flexible operation.
Lot-Based Flow Routing
A flow route is defined as a comprehensive routing network. It enables you to model your shop floor, define possible re-work points, or it can be linear. Conceptually, a flow routing consists of a series of nodes and paths, which make up the entire routing network.
A WIP lot will begin with any one of the possible routes that a job can potentially take, which consists of a route having only the beginning and ending tasks. As the job progresses through the production cycle, you can populate the Build Class route with the operations that the WIP lot actually goes through, selectable from the Flow Route. Within each sector, the operations that a WIP lot can progress to will be mapped out in the lot-based type routing. All operations that the WIP lot can potentially progress to are listed as operations for the lot-based routing. Lot-based routings are extensions of standard routings, and have network entities defined for their operations.
Operations
To define a routing operation you first specify an operation sequence number to indicate the order to perform operations. Components in your bill of material can reference an operation sequence. Next, you can choose either a standard operation, or you can enter a new operation.
Sequence of Operations
Routings define the step-by-step descriptions, or operations, for manufacturing an assembly. Each operation on a routing defines a specific portion of the manufacturing process for the assembly. You can use operations to identify the location, the quantity, and the state of completion of the assemblies you are currently manufacturing.
For each component item on the bill of material associated with a routing, you can specify the operation sequence where you require the item. You can then only issue material where and when it is needed. See: Creating a Bill of Material.
Standard Operation
A standard operation is a commonly used operation that you define as a template to default operation information when you define routings. When you define a new operation on a routing, you can specify a standard operation whose information Bills of Material copies into the operation you are currently defining. You can then change any of the copied information for the new operation. See: Creating a Standard Operation.
Setup Standard Operation
A setup standard operation is the same as a standard operation except that it defines an operation used for setting up machine type resources only. Use the setup standard operation to specify the operation used during changeovers. See: Defining Resource Setup Information.
Backflushing Transactions
You can specify at what point in the routing you backflush component material. Moves automatically backflush the appropriate components at the time they are needed. You can postpone the backflush of material at time-critical operations until a later operation. See: Issuing and Returning Specific Components, Oracle Work in Process User's Guide.
Minimum Transfer Quantities
You can set the minimum quantity that you move from an operation when you define a routing. The Move Transactions window in Oracle Work in Process issues a warning when you move a quantity less than this minimum.
Attachments
You can attach files, which may include instructions, to routing operations. See: Attaching Files to Bills and Routing Operations.
Option Dependent Operations
When you define routings for model and option class items, you can indicate the operations that appear in a configuration item's routing only if you choose an option that references that operation. Bills of Material automatically creates a configuration item's routing including all operations that are not option-dependent and any option-dependent operations referenced by a chosen option. See: Configure to Order Environments.
Resource Usage
You can associate multiple resources with an operation on a routing. For each resource, you can determine if you want to include that resource in scheduling and lead time calculations. You can also collect costs for a resource on a routing if you specified the resource as a costed resource. See: Defining a Resource. If a resource is unavailable, you can define alternate resources. An alternate resource can be a single resource or a set of resources.
Resource parents and resource sets are used to group similar resources. Routings can then be defined with their general resource requirements, while WIP lots are tracked with the usage of the specific resources. While a resource can belong to several resource sets, a resource can only belong to one parent resource. When a WIP lot is at an operation with a parent resource or resource set attached to it, you are prompted to enter a valid resource used in processing the WIP lot.
Alternate Resources
You can define alternate resources for each resource. You can define an alternate resource or set of alternate resources to describe a different manufacturing step used to produce the same product. For example, you have a routing for an item TEST. The routing includes an operation with operation sequence number 70. The operation includes two operation resources, R1 (resource sequence 10) and R2 (resource sequence 20). The Substitute Group Number 10 groups the substitute resources R3, R4, and R5. These three resources are further classified into Replacement Group 10 and 20. Replacement Group 10 includes the resource R3 and Replacement Group 20 contains the resources R4 and R5. If the resources R1 or R2 are not available, you can replace them with either Replacement Group 10 or 20, so either R3 or R4 and R5 can replace R1 or R2. The following table describes how this example is set up in the Operation Resources and Operation Alternate Resources windows.
| Resource | Resource Seq | Substitute Group Number | Replacement Group |
|---|---|---|---|
| R1 | 10 | 10 | n/a |
| R2 | 20 | 10 | n/a |
| R3 | 10 or 20 (default) | 10 (default) | 10 |
| R4 | 10 or 20 (default) | 10 (default) | 20 |
| R5 | 10 or 20 (default) | 10 (default) | 20 |
Item or Lot-Based Resources
You can specify resource usage as a fixed rate per job for activities such as setup and teardown, and variable rates for resources whose usage depends on the number of units processed. For lot based resources you choose the Lot basis type and your usage rate is fixed, and for item based resources you choose the Item basis type to indicate that your usage rate is variable.
For example, you might define an operation where you schedule lot based and item based resources, as presented in the following table:
| Operation Sequence | Resource Sequence | Activity | Resource | Usage | UOM | Basis | Resource Unit Cost |
|---|---|---|---|---|---|---|---|
| 10 | 1 | Queue | Time | 1 | HR | Lot | $0 |
| n/a | 2 | Run | Labor 01 | .2 | HR | Item | $10 |
Oracle Cost Management divides lot based resource usages by lot size to determine item costs. For example, you might define a lot based resource that represents time spent setting up a machine, and a resource that represents the time to tear down the machine for the next job or schedule. You could schedule and collect costs for both the setup and tear down resources.
Resource Scheduling
You can specify usage rates either as resource units per item unit, or the inverse - item units per resource unit. For example, you could specify usage rate for a machine hour resource in either units per hour, or hours per unit. For each routing operation, you can specify multiple resources and usage rates.
For each resource, you can specify whether to schedule it, and whether it overlaps the prior or next operation. If you specify that a resource overlaps the prior operation, Oracle Work in Process schedules the resource so that the last resource on the prior operation ends at the same time as this resource. Conversely, if you specify a resource that overlaps the next operation, Work in Process schedules the resource so that the first resource on the next operation begins at the same time as this resource.
You can schedule alternate resources more than once in a routing operation with the help of different schedule sequence numbers. You can also use the same alternate resource to set up different activities or activities with varying usage rates for the same operation.
Resources can be defined as simultaneous or alternates with other resources, independent of an assembly's routing. Two or more resources can be scheduled to be working concurrently within the same job operation. For example, a drilling machine and machinist must be scheduled at the same time. Each operation contains a scheduled sequence of resources. You can define the sequence in which resources are consumed. The information in the Schedule Seq field is only used when constraint based scheduling is enabled in Oracle Production Scheduling, though. See: Creating a Routing and Defining Simultaneous and Alternate Resources, Oracle Production Scheduling User's Guide. You can create a different resource or group of resources that can be used to substitute the primary resource or group of resources within a job operation. For example, if unskilled labor is unavailable to perform a task, it can be substituted with skilled labor. The scheduling system will schedule the skilled labor if the unskilled labor is fully committed. This is referred to as alternative scheduling.
Work in Process schedules assuming that the department uses up to the number of assigned units of the resource simultaneously - up to the number that exist in the department.
If you specify that a resource is available 24 hours (such as time in a drying area), Work in Process schedules it around the clock regardless of shifts. See: To assign a resource to a routing operation.
Resource Charging Method
You can associate multiple resources with an operation on a routing, and for each resource you can determine how the resource is charged. You can automatically charge resources in Work in Process based on move transactions and purchase order receipts (for outside processing). You can also manually charge resources. See: Overview of Resource Management, Oracle Work in Process User's Guide.
You can collect and group resource charges by activity for cost reporting. See: Manufacturing Standard Cost Transactions in Oracle Cost Management User's Guide.
Resource Capacity Modifications
For each resource on a shift, you can override the number of resource units available (such as number of machines) and specify additions or reductions to the amount of time the resource is available on that shift. These capacity modifications are assigned to simulation sets that you can use later when you generate a capacity plan or schedule discrete jobs or repetitive schedules to simulate capacity changes. See: Overview of Capacity Planning, Oracle Capacity User's Guide.
Resource Usage Rate or Amount
The usage rate or amount is the amount of the resource consumed at the operation, either the quantity per item or per lot. If you assign more than one resource unit to work at an operation, Work in Process considers the number of units when scheduling a resource at an operation. (Assign the usage rate for the resource as the total quantity per item or lot, regardless of the number of resource units you specify.) For example, if you define a machine resource to require 10 hours per item and you assign 2 resource units to the resource, Work in Process automatically schedules 2 machines for 5 hours.
Standard Resource Costs
When you define a routing, you specify the resources you use to build the items, and each resource has costs associated with it. By defining the routing with specific resources, you establish standard resource costs for any item that uses the routing. See: Setting Up Standard Costing for Manufacturing in Oracle Cost Management User's Guide.
Outside Processing
You can define outside processing resources and then assign these resources to operations on a routing. Work in Process considers any operation that has an outside processing resource as an outside operation. See: Outside Processing, Oracle Work in Process User's Guide.
Labor Skill Validation
You can define competencies for a resource to perform a particular operation. Labor Skill Validation ensures that job operations are performed by competent operators who have the required qualifications, competencies and certifications. This prevents potential errors and issues that arise from incompetent operators performing job operations.
Related Topics
To switch between a primary and alternate routing
Primary and Alternate Bills of Material
Defining Flow Manufacturing Standard Processes, Oracle Flow Manufacturing User's Guide
Defining Flow Manufacturing Standard Events, Oracle Flow Manufacturing User's Guide
Defining Flow Manufacturing Standard Line Operations, Oracle Flow Manufacturing User's Guide
Creating a Network Routing, Oracle Shop Floor Management User's Guide
Setup Steps (Defining Parameters), Oracle Shop Floor Management User's Guide
Creating a Routing
For each routing, define the operations, the sequence to perform them, and the resources required at each operation. You can define either a primary or an alternate routing. If you are a Flow Manufacturing customer you can also create a Flow Routing. See: Creating a Flow Routing, Oracle Flow Manufacturing User's Guide.
Caution: You cannot create routings for planning or pick-to-order items.
Note: Use attachments, such as detailed operation instructions, for routing operations. See: Attaching Files.
You can create a routing manually, copy an existing routing, or reference a common routing. See: Copying Bills and Routing Information. See: Referencing Common Bills and Routings.
The procedure below describes how to manually create a routing.
Prerequisites
- You must define at least one department before you can create a routing.
- BOM Allowed must be set to Yes for the item you are creating a routing for.
To create a routing
-
Navigate to the Routings window.

Note: If your current responsibility does not include the Privilege to Maintain security function, you can only view routing information. If so, enter selection criteria in the Find Routings window and choose the Find button. The Routings Summary folder window appears.
-
Enter a manufacturing item for which you will create a routing.
-
If you are creating an alternate routing, enter an alternate. For a primary routing, do not enter an alternate. See: Primary and Alternate Routings.
-
If you are updating an existing routing, enter the routing revision and the effective date.
To update the revision, choose the Routing Revisions button to open the Routing Revisions window. See: To create or update a routing revision.
-
If you would like this routing to be capable to promise, then select the Capable to Promise checkbox. See: Capable to Promise (CTP), Oracle MRP User's Guide.
Note: Capable to promise describes an available to promise calculation that considers both available material and capacity of manufacturing and distribution resources. You are able to define one and only one CTP routing for each item.
-
Select a display option to display All, Current, or Future and Current operations effective as of the revision date you specify.
To enter completion subinventory and locator information, or view a common routing, choose the Routing Details button to open the Routing Details window. See: Completion Subinventory and Locator.
-
Enter the operation sequence, or let the system automatically generate it for you, according to your profile setup. See: Item and Operation Sequence Fields.
-
To copy or reference standard operations into a routing, use the Operation Code list of values. You can define a new standard operation by selecting Standard Operations from the Tools menu.
If you use a standard operation code, the operation information for that code will be copied into the operation you are currently defining. You can then update that information as desired. See: Creating a Standard Operation.
Tip: You can assign the same standard operation to more than one operation sequence within the same routing.
The Routings window has five tabbed regions: Main, WIP, Date Effectivity, Operation Yield, ECO, and Description.
-
Enter the department in which the operation is performed.
-
For operations in ATO model or option class routings only, indicate whether the operation is option dependant, that is, whether the operation is dependant on the choice of an optional component. All mandatory components and their related operations appear on the routing for each configuration. The default is enabled. See: Overview of Configure to Order.
-
Optionally, enter the item's manufacturing lead time percent required to complete all previous operations on the routing. See: Calculating Lead Times.
If the manufacturing lead time equals 10 days and all previous operations combined require 2 days, the lead time percent is 20%.
-
Open the Date Effectivity tabbed region and enter an effective date range. See: Effective Date Fields.
-
Open the WIP tabbed region and select Count Point and Autocharge options. See: Count Point and Autocharge. See: Charge Type.
Indicate whether to backflush components on shop floor moves at this operation. A backflush transaction automatically pulls Operation pull components from inventory. Work in Process also pulls all Operation pull components at non-backflush operations preceding this operation (through the previous completed backflush operation.) See: Backflush Transaction Options, Oracle Work in Process User's Guide.
Enter the minimum transfer quantity of assemblies to move from this operation to the next. Work in Process will warn you if you attempt to move a number less than this value. If you used a standard operation, this value defaults to minimum transfer quantity defined for the standard operation. Otherwise the default is 0.
-
Open the Operation Yield tabbed region. You can define routing networks for Standard, Flow, and Lot-based routings.
If the routing is standard or lot-based, then the Yield, CUM Yield, Reverse CUM Yield, and Include in Rollup fields will display. To enable Operation Yield in Shop Floor Management, enter expected operation yields for each operation listed. For example, enter 0.9 for a 90% yield. These fields are displayed for Shop Floor Management enabled organizations.
-
Indicate whether the operation yield is to be considered in the cost rollup, as required by the costing team.
-
Open the ECO tabbed region and verify the following:
The Implemented check box indicates whether the component is implemented.
Checked: Operation is on a pending Engineering Change Order (ECO)
Unchecked: Operation is on implemented ECO or was added directly to the routing
-
Open the Description tabbed region and enter a description of the operation.
To calculate lead times for a routing
You can create and calculate lead times from the Routings form.
-
Navigate to the Routings form.
-
Query on a manufacturing item's routing.
-
From the main menu, select Tools > Compute Lead Times or Rollup Lead Times.
If the item's Effectivity Control attribute is set to Date, a concurrent program will run automatically to calculate the lead times. If the item's Effectivity Control attribute is set to Model/Unit Number, a window will display to enter the Unit Number parameter. When this number is entered, a concurrent program will launch, calculating lead time attributes. See: Bills of Material Attribute Group, Oracle Inventory User's Guide.
See also:
Defining Bill or Routing Operation Documents
Deleting Components and Operations
Customizing the Presentation of Data in a Folder, Oracle E-Business Suite User's Guide
See Also
Creating a Network Routing, Oracle Shop Floor Management User's Guide
Setup Steps (Defining Parameters), Oracle Shop Floor Management User's Guide
To switch between a primary and alternate routing
From the Routings window you can switch between Primary and Alternate routings.
-
Navigate to the Routings window.
-
Perform a query to display the alternate routing which you would like to switch to the primary routing.
-
Choose the Actions menu and select Switch to Primary.
Note: Switch To Primary option appears in Actions menu.
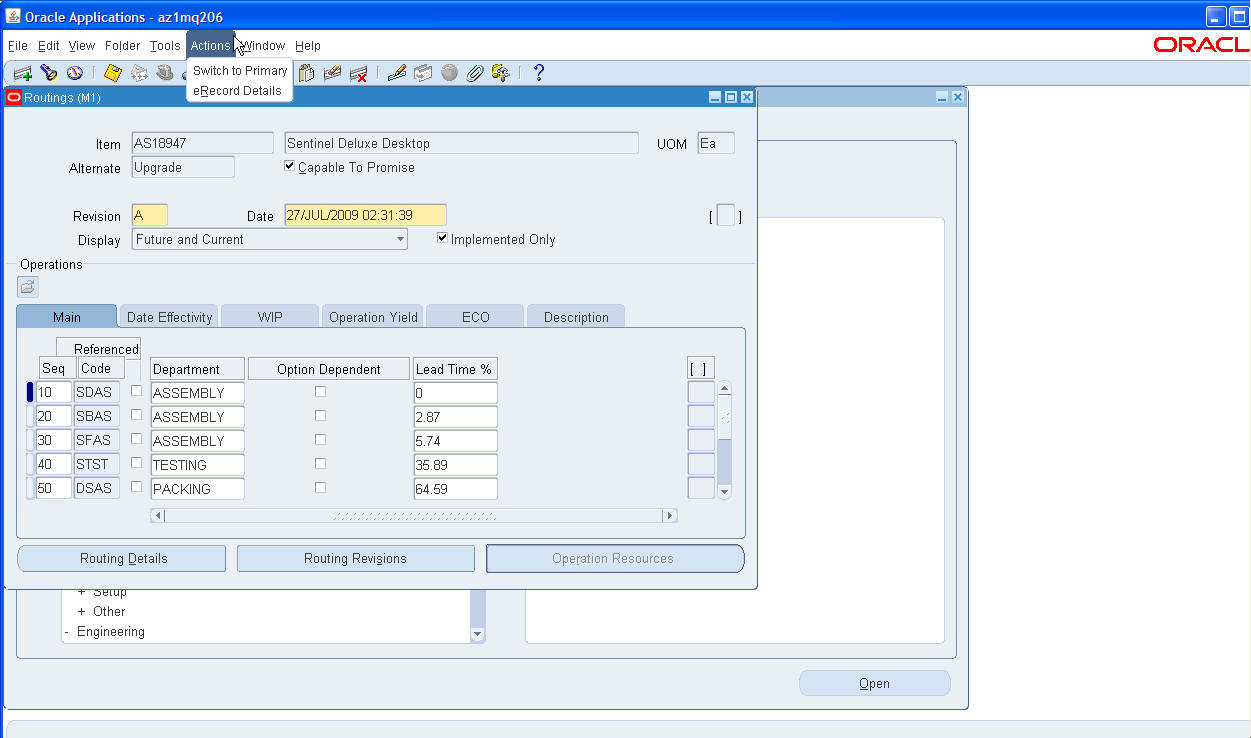
-
After the switch is completed a message will appear confirming the switch. Choose OK.
To assign a completion subinventory and locator
-
Navigate to the Routing Details window. You can do this by choosing the Routing Details button from the Routings window.
-
Enter the completion subinventory and locator.
See Also
Completion Subinventory and Locator
To begin using serial number tracking at an operation
The Serialization Start Op Seq flag in the Routing Details window indicates that item tracking with serial numbers begins at this particular operation. This enables you to track items using serial numbers prior to the completed transaction. See: Viewing Serial Genealogy, Oracle Inventory User's Guide.
-
Navigate to the Routing Details window.
-
In the Serialization Start Op Seq field, enter the operation sequence number where you want to begin tracking items with serial numbers.
Important: You must check this field to use serial number tracking for Oracle Work in Process transactions. See: Serial Number Tracking Throughout Manufacturing, Oracle Work in Process User's Guide.
To define competencies for performing routing operations
-
Query on the manufacturing item's routing.
-
Select the Check Skill check box for the operation sequence for which you would like to define the competence.
-
Click on the Operation Competencies button.
Operation Competencies button will be enabled only when you select Check Skill check box.
-
Select the Competence level for the operation sequence.
Based on the Competence selected, the skill level values for the selected competence appear in the drop down menu of the Skill Level field.
-
Enter the skill level.
-
Enter the qualification required for the competence.
-
Save your work and close the Operation Competencies window.
See Also
Moving and Completing Assemblies., Oracle Manufacturing Execution System for Discrete Manufacturing User's Guide
Operator Skill Validation., Oracle Manufacturing Execution System for Discrete Manufacturing User's Guide
Adding and Updating Operations., Oracle Work in Process User's Guide
Qualification Types., Oracle HRMS Workforce Sourcing, Deployment, and Talent Management Guide
Defining Competencies., Oracle HRMS Workforce Sourcing, Deployment, and Talent Management Guide
To create or update a routing revision
-
Navigate to the Routing Revisions window. You can do this by choosing the Routing Revisions button from the Routings window.
-
Enter the routing revision.
-
Enter an effective date and time.
The implementation date, which is either the date the revision was added or the date the routing was transferred from Oracle Engineering, is displayed. If the routing was transferred from Engineering, the ECO text is displayed.
See Also
See Transferring or Copying Engineering Items, Bills, and Routings, Oracle Engineering User's Guide
To assign a resource to a routing operation
-
Navigate to the Operation Resources window. You can do this by choosing the Operation Resources button from the Routings window.
-
Enter the sequence number of the resource and the resource name. You can use any resource assigned to the department. Valid values for sequence range from 1 to 9999999 and must be unique for the operation.
-
Select a basis type by which to charge and schedule the resource. The default is the basis specified for the resource.
Item: Charge and schedule the resource by multiplying the usage rate by the job or schedule quantity for the assembly. Select Item when your charges fluctuate with quantity change.
Lot: Charge and schedule the resource by charging the usage rate or amount once per job or schedule. Select Lot when your resource usage quantity is the amount required per job or schedule, for example, setup charges.
-
Enter a value for the Rate or Amount in either the Usage or Inverse fields. That is, enter the resource consumed at the operation (per item or per lot) or it's inverse. Entering a value for either field updates the other field.
Resources with time-based unit of measures must have usage rates greater than zero.
Enter an inverse when you know the number of units a resource can process (rather than the duration an assembly unit consumes the resource. For example, if you know a resource can process 10 units per hour, enter 10 for the inverse.
Usage or Inverse can be negative only for resources that cannot be scheduled and where the charge type is neither PO move nor PO receipt.
-
Open the Scheduling tabbed region and enter the Schedule Sequence Number. Two or more resources can be scheduled to be working concurrently within the same job operation. Simultaneity is implemented by having more than one resource with the same Schedule Sequence Number.
Note: The Schedule Sequence Number field is independent of the resource sequence, which is used only as part of the primary key to list the resources. The Schedule Sequence Number shows the actual sequence of each resource used in the operation.
-
Optionally, enter the Substitute Group Number.
Resources with the same substitute group number are substituted together with alternate resources that have the same substitute group number as the operation resource and the same replacement group number. See: Alternate Resources for an explanation of using the Substitute Group Number field when defining alternate resources.
-
Enter the number of assigned units to the resource. See: Resource Usage.
-
If the unit of measure of the resource is time-based, select a schedule value. See: Schedule and Defining a Resource.
Caution: When defining either primary or alternate resources within the same Schedule Sequence Number, you must set the Schedule field value for the next resource to:
-
Prior or No if another resource within the same Schedule Sequence Number has a Schedule field value of Prior
-
Next or No if another resource within the same Schedule Sequence Number has a Schedule field value of Next
-
-
Enter the resource ffset percent within this routing.
For example, a value of 50 means that you utilize the resource when the routing is half completed. This value is automatically calculated when you compute the lead time for the assembly.
-
Indicate which resource is the principle resource, within a group of simultaneous resources.
Users can schedule two or more resources to work concurrently within the same routing operation by having more than one resource with the same schedule sequence number. The Principal Flag defines which resource to use first when there is a choice. Similarly, when defining alternate resources, you must define one of the alternates as the principal substitute resource within a replacement group. Although you can have many replacement groups, you can only designate one principle resource per replacement group.
-
Open the Costing tabbed region and enter an activity to perform when you use the resource. Use activities to group resource charges for cost reporting. The default is the activity associated with the resource. See: Defining Activities and Activity Costs in Oracle Cost Management User's Guide.
-
Indicate whether to charge jobs or schedules based on the standard rate defined for the resource (default).
Off: Use this option if you import charges from an outside labor system and want to record actual costs, or to record the labor rate of an employee.
On: For outside processing resources, if you charge a job and repetitive schedule at the standard rate, Oracle Purchasing computes any purchase price variance and posts it to the rate variance account.
-
Select a charge type. The default is the charge type specified for the resource. See: Charge Type.
-
Optionally, you can define substitute resources for each primary resource group defined. This enables you to specify resource sequences that can replace the primary resource group.
-
Enter the substitute resource name.
This is one of the resources that may replace the resource group.
-
Enter the Replacement Group.
This is used to group substitute resources together, to substitute a resource group. See: Alternate Resources under Resource Usage for an explanation of using the Replacement Group field when defining alternate resources.
-
Select a basis type by which to charge and schedule the resource. The default is the basis specified for the resource.
-
Enter a value for the Rate or Amount in either the Usage or Inverse fields. That is, enter the resource consumed at the operation (per item or per lot) or it's inverse. Entering a value for either field updates the other field.
See Also
To roll up costs
From the Routing window, you can perform a single-level cost rollup for the currently-selected routing.
-
Navigate to the Cost Rollup window. Do this by choosing Cost Rollup from the Tools menu.
-
Enter the cost type.
-
Enter the effective date and time to determine the structure of the bill of material to use in the cost rollup. You can use this to roll up historical and future bill structures using current rates and component costs. The default is the current date and time.
-
Indicate whether to include unimplemented engineering change orders (ECO).
-
Indicate whether to produce the Indented Bill of Material Cost Report, which lists the detailed cost structure by level.
-
Choose OK.
See Also
Indented Bills of Material Cost Report, Oracle Cost Management User's Guide.
Creating a Standard Operation
Standard operations are commonly used operations that you can define as a template for use in defining future routing operations. If you assign the operation code of standard operation in a routing, then the standard operation information is copied into the operation you are currently defining. You can then modify the operation information in your new operation.
You can also create setup standard operations that are used only when setting up machine type resources. When defining resource setup information (see: Defining Resource Setup Information), you have the option of specifying the standard operations used during changeovers.
Prerequisites
- You must define at least one department before you can define a standard operation. See: Defining a Department.
To create a standard operation
-
Navigate to the Standard Operations window.
-
Enter a unique operation code to identify a standard operation.
Note: If Oracle Warehouse Management is installed, the Standard Operations form is used to define which resources of a given department are required in order to perform a warehouse task. Oracle Warehouse Management refers to standard operations as Task Types. The rules engine uses the Code defined for the Standard Operation to reference the Task Type. A bulk picking task may require a forklift machine and a pallet picker manual resource. Oracle Warehouse Management uses a rules based system to determine the task type, or standard operation, each task should be associated with. Tasks of a given type are then dispatched to users associated with the resource definition, who have the qualified equipment for the task available to them. See: Set Up Warehouse Task Types, Oracle Warehouse Management Implementation Guide.
-
Enter the minimum transfer quantity of assemblies to move from this operation to the next.
-
For operations in ATO model or option class routings only, indicate whether the operation is option dependant, that is, whether the operation is dependant on the choice of an optional component. All mandatory components and their related operations appear on the routing for each configuration. The default is enabled. See: Overview of Configure to Order.
-
Select your Count Point and Autocharge options. See: Count Point and Autocharge.
-
Indicate whether to backflush components on shop floor moves at this operation.
A backflush transaction automatically pulls Operation pull components from inventory. Work in Process also pulls all Operation pull components at non-backflush operations preceding this operation (through the previous completed backflush operation.)
-
Select the Check Skill option to enable check skill.
If the Check Skill option is selected, then you have to capture the requirement for skill check.
Tip: The value in this check box is only a default value in routing and can be overridden in the Routing window.
-
If you are creating operations for a Shop Floor Management enabled organization, see: To create a standard operation for a Shop Floor Management enabled organization. If not, choose the Operation Resources button to assign resources to the standard operation. See: To assign a resource to a standard operation.
To create a standard operation for a Shop Floor Management enabled organization
-
To enable operation yield in Shop Floor Management, enter the Yield for each operation listed. The valid values range between zero and one. This field is displayed for Shop Floor Management enabled organizations.
-
Indicate whether this operation yield needs to be considered in the cost rollup, as required by the costing team. This field is displayed for Shop Floor Management enabled organizations.
-
Select the Shop Floor Transaction tab and select the following fields, if appropriate. See: Oracle Shop Floor Management User's Guide for information about each field. This tab is enabled for Shop Floor Management enabled organizations.
-
Lowest Acceptable Yield
-
Use Organization Settings
-
Queue Mandatory Flag
-
Run Mandatory Flag
-
To Move Mandatory Flag
-
Show Next Operation by Default
-
Show Lot Attributes
-
Show Scrap Codes
-
-
Optionally, select the Stocking Point tab and enter the default subinventory and locator for the standard operation.
-
Optionally, choose Codes and Exclusions to enter Bonus Codes, Scrap Codes, and Responsibility Exclusions for a Shop Floor Management enabled organization.
To define operation competencies for standard operations
Use the Operation Competencies window to enter the competencies required for carrying out the operation. You can add the competency for a resource only once and you cannot enter duplicate records in the operation competency set.
For standard operations and routing, the Check Skill option will remain unchecked when imported. For discrete jobs created through the interface, the job operations will have competencies and check Skill values inherited from the routing. While adding standard operations through the interface the values for Check Skill and competencies will be inherited from standard operation.
Competence and Skill Level are related fields. The Skill Level field is enabled if you enter value in the Competence field and tab out and the Skill Level will have the values relevant to that Competence.
The competencies defined in the resource definition are added to the operation by selecting the assigned resources in the list of values and clicking the Add button.
-
Navigate to the Operation Competencies window by choosing Operation Competencies from the Standard Operations window.
-
Create a standard operation.
-
Select the Check Skill check box.
-
Click on the Operation Competencies button.
Operation Competencies button will be enabled only when you select Check Skill check box.
The Operation Competencies window opens. Based on the Competence selected, the skill level values for the selected competence appear in the drop down menu of the Skill Level field.
-
Enter the skill level.
-
Enter the qualification required for the competence.
-
Save your work and close the Operation Competencies window.
See Also
Moving and Completing Assemblies, Oracle Manufacturing Execution System for Discrete Manufacturing User's Guide
Operator Skill Validation, Oracle Manufacturing Execution System for Discrete Manufacturing User's Guide
Adding and Updating Operations, Oracle Work in Process User's Guide
Qualification Types, Oracle HRMS Workforce Sourcing, Deployment, and Talent Management Guide
Defining Competencies, Oracle HRMS Workforce Sourcing, Deployment, and Talent Management Guide
To enter codes and exclusions
Use the Codes and Exclusions window to define the bonus and scrap codes available for this operation at manufacturing execution time. See: Bonus and Scrap Codes, Oracle Shop Floor Management User's Guide. This window also enables you to exclude certain job roles from updating this operation at manufacturing execution time. Responsibility exclusions identify job roles that cannot perform this operation. For example, you can exclude users assigned to the Accounting responsibility from updating a grinding machine operation.
If you gain something or lose something at this operation, you assign either a bonus or scrap code to it. At manufacturing execution time, use the bonus or scrap code available for this operation. Use the responsibility to indicate who cannot perform this operation. For example, a foreman shouldn't be able to use the grinding machine.
-
Navigate to the Codes and Exclusions window by choosing Codes and Exclusions from the Standard Operations window.
-
Select the Bonus Codes tab and enter the sequences and codes for this operation.
-
Select the Scrap Codes tab and enter the sequences and codes for this operation.
-
Select the Responsibility Exclusions tab and enter the responsibilities to exclude from updating this operation.
-
Save your work and close the Codes and Exclusions window.
To assign a resource to a standard operation
-
In the Standard Operations window, choose the Operation Resources button to assign resources to the standard operation. See: To assign a resource to a routing operation.
Caution: To assign resources to the standard operation, follow the same steps as you would to assign a resource to a routing operation with one exception. When assigning resources to a standard operation, the Schedule Sequence Number field in the Resources window, Scheduling tab does not exist. If you use the Schedule Sequence Number functionality, you must manually update this field when adding a new operation to a routing using the Standard Operations window.
-
If the unit of measure of the resource is time-based, select a schedule value. See: Schedule and Defining a Resource.
Caution: When defining either primary or alternate resources within the same Schedule Sequence Number, you must set the Schedule field value for the next resource to:
-
Prior or No if another resource within the same Schedule Sequence Number has a Schedule field value of Prior
-
Next or No if another resource within the same Schedule Sequence Number has a Schedule field value of Next
-
-
To create a setup standard operation
Use a setup standard operation only when specifying the standard operation used during a changeover in the Changeover Times window. You cannot use a setup standard operation as a routing operation. See: Defining Resource Setup Information.
-
Create a setup standard operation the same way you create a standard operation (see: To create a standard operation), omitting the steps used to create standard operations for a Shop Floor Management enabled organization.

Related Topics
Defining Activities and Activity Costs, Oracle Cost Management User's Guide.
Defining Bill or Routing Operation Documents
Manufacturing Standard Cost Transactions, Oracle Cost Management User's Guide
Setup Steps (Defining Parameters), Oracle Shop Floor Management User's Guide
Overview of Shop Floor Control, Oracle Work in Process User's Guide
Viewing Resource Usage
You can view the operations and routings that use a particular resource.
To view resource usage
-
Navigate to the Resource WhereUsed window.
-
Enter the name of the resource for which to view the operation and routing usage.
-
Enter an effective date. Operation information effective on this date is displayed.
The Resource WhereUsed window contains four tabbed regions: Operation Details, Resource Details, Descriptions, and More.
The Operation Details tabbed region displays the operation sequence, department, the effective date range, and the routing in which the resource is used.
The Resource Details tabbed region displays the resource, the basis type, the usage rate (or amount) and its inverse, and the number of resource units assigned.
The More tabbed region displays the resource sequence, the activity for the resource, the scheduling type (Yes, No, Prior, Next), and whether this is an engineering routing.
Related Topics
To assign a resource to a routing operation
Routings Field Reference
This section describes the use of certain major fields.
Completion Subinventory and Locator Fields
In a routing, you can define the completion subinventory and locator where you store finished assemblies upon completion. When you define a job or repetitive schedule, Work in Process uses these values as the default, and you can change the completion subinventory and locator if necessary. Upon completion of assemblies, the completion subinventory and locator you defined for the job and repetitive schedule is the default, and you can change these values if necessary.
Count Point and Autocharge Fields
You can define which operations in a routing record move transactions by defining how resources are consumed at that operation.
The Count Point and Autocharge check boxes work together. In the following discussion, the Count Point and Autocharge check boxes can be set to either on or off. However, you cannot set Count Point on and Autocharge off.
When you move assemblies from an operation with Count Point on / Autocharge on operation to another count point operation set the same way, Work in Process automatically completes all Count Point off / Autocharge on count point operations between them.
To transact a Count Point off / Autocharge off count point operation, you must explicitly move assemblies into and out of that operation. Moving assemblies past a Count Point off / Autocharge off count point operation acts as though the operation did not exist in the routing. This is particularly useful for rework or debug operations that are performed on a portion of the assemblies you process.
If you issue components with a supply type of Operation pull to an assembly at a Count Point off / Autocharge off count point operation, Work in Process backflushes these components when you move out of the Count Point off / Autocharge off count point operation into a count point operation that allows backflushing. Work in Process never pulls components with a supply type of Assembly pull from Count Point off/ Autocharge off count point operations. However, you must turn Backflush on for Count Point off / Autocharge off count point operations. The Backflush field should always be turned on for the last operation in a routing. See: Overview of Shop Floor Control, Overview of Shop Floor Control.
In the following example, the routing has five operations. The second and fourth operations are not count points, and you must explicitly move units in and out of the fourth operation if you want to charge the job or repetitive schedule for the consumed resources.
The following table presents an example of count point operations.
| Operation Sequence | Description | Count Point | Backflush | Instructions |
|---|---|---|---|---|
| 10 | Assembly 1 | Yes-Autocharge | Yes | n/a |
| 20 | Assembly 2 | No-Autocharge | No | n/a |
| 30 | Painting | Yes-Autocharge | Yes | If color and texture do not meet standards, send to Op 40. If job meets standards, send to Op 50. |
| 40 | Painting Rework | No-Direct charge | Yes | Sand finish and repaint to meet standards. |
| 50 | Packaging | Yes-Autocharge | Yes | Ship directly to customer site when finished with this operation. |
Count Point off / Autocharge on
Assign this count point to operations that you always perform in a routing, but where you do not want to monitor assembly moves into, out of, and through the operation. For example, choose this count point for non-bottleneck operations that are not labor or time-intensive, such as inspection or minor assembly operations.
Work in Process automatically completes the operation and charges its WIP move resources to your job or schedule when you record a move transaction through or beyond the operation, as with Count Point on / Autocharge on count point operations.
Work in Process does not default the operation, unlike Count Point on / Autocharge on count point operations. You can still record movements into, out of, and through the operation by overriding the default in Work in Process.
Count Point off / Autocharge off
Assign this count point to operations that you do not typically perform in a routing. For example, a rework operation that you only perform on occasion. If you choose this count point for an operation, Work in Process does not complete the operation and charge its resources to your job or schedule unless you explicitly record a move transaction into and through the operation.
Work in Process does not default the operation. You can still record movements into, out of, and through the operation by overriding the default in Work in Process.
Count Point on / Autocharge on
Assign this count point to operations you want to automatically default as destination operations in the Move Transactions window. You should always assign this count point to the final operation in a routing, to insure that you record move transactions into the operation, and then record completion transactions.
You can automatically complete and charge operations in a routing with this count point. Work in Process automatically completes an operation and charges its WIP Move resources to your job or schedule when you record a move transaction through or beyond the operation.
For operations that you always perform in a routing, you can also monitor assembly moves into, out of, and through the operation. For example, choose this count point for critical, time-intensive, or bottleneck operations.
Schedule Field
-
Yes: Include this resource when scheduling an operation from a job or repetitive schedule and calculating manufacturing lead time for the assembly.
-
No: Do not include scheduling the operation or calculating the lead time.
-
Prior: Include this resource when scheduling a job or schedule by backward scheduling the previous operation from the end of this resource. Use this option when setup resources can work in parallel with previous operations. The lead time is calculated the same way Work in Process schedules the job or repetitive schedule.
-
Next: Include this resource when scheduling a job or repetitive schedule by forward scheduling the next operation from the start of this resource. Use this option when the teardown of the current operation can overlap with the execution of the next operation. The lead time is calculated the same way Work in Process schedules the job or repetitive schedule.
Charge Type Field
You can determine how each resource is charged in Work in Process. When an operation completes, Work in Process records the units applied to the job or repetitive schedule in the resource unit of measure. You can charge resources manually or automatically.
-
Manual: Work in Process does not automatically charge this type of resource to a job or repetitive schedule. You must manually charge it to a job or repetitive schedule using Work in Process.
-
PO Receipt: Automatically charge this resource upon receipt of a purchase order in Oracle Purchasing. The assemblies are not automatically moved to the next operation upon receipt, so you must manually move them using Work in Process.
-
PO Move: Automatically charge this resource upon receipt of a purchase order in Oracle Purchasing and move the assemblies to the Queue intraoperation step of the next operation, or to the To move intraoperation step if this is the last operation.
-
WIP Move: Work in Process automatically charges this type of resource to a job or repetitive schedule when you complete an operation.
Related Topics
Assembly Completions and Returns, Oracle Work in Process User's Guide
Overview of Shop Floor Control, Oracle Work in Process User's Guide