Quality Workbench
This chapter provides you with overviews and instructions for using the Quality Workbench.
This chapter covers the following topics:
- Overview of the Quality Workbench
- Data Collection Using the Quality Workbench
- Nonconformance Management
- Corrective Action Management
- Finding Skip Lot Inspections
Overview of the Quality Workbench
The Quality Workbench provides an enhanced user interface for entering quality data and performing analysis even in retrieving quality results from collection plans with large number of records or attachments as well as complex parent child plans. Benefits of using the Quality Workbench include:
-
Managing quality results by business process. Select from the following four tabs to enter or view results: Collection Results, Nonconformances, Corrective Actions, and Skip Lot Inquiry.
-
Viewing the hierarchical relationship between parent and child collection plans. Expand the view to show results that are related in the parent-child hierarchy, then select a view link to view individual result details.
-
Entering and viewing each quality result on one page versus by row. The page view shows more fields at once. You must scroll to the right to view all fields by row in the forms based user interface.
-
Searching for quality results using several criteria at once.
-
Personalizing quality results data entry and views.
-
Enabling multiple row entry for standalone and parent plans.
-
Displaying defined collection plan elements grouped in blocks during single row data entry. These region blocks are specified using the Region Name field in the Collection Plan Setup form.
-
Displaying defined numeric collection element values as rating bars when entering, and updating results for both single row and multiple rows.
-
Displaying validation and error messages on the results entry.
-
Executing online actions while entering values in collection elements like assigning a value to the collection elements, displaying messages to the operator and rejecting the input.
-
Exporting results records to spreadsheets.
-
Deleting records that are saved in the workbench.
-
Reading or updating data collected from devices associated with collection plan elements, if Oracle Manufacturing Execution System (MES) for Discrete Manufacturing is installed.
-
Displaying results in view mode on a popup allowing users to view result details without navigating out.
-
Displaying person card links on the Hgrid in view mode allowing users to view person information details.
You can also access the Quality Workbench menu in the Forms Navigator. When you use the Quality Workbench, the organization you are working in displays in the page header. Also, when you navigate from forms to the Quality Workbench, the same organization context is retained. Note that as in Forms, dependent elements remain disabled until the parent values are entered
Quality Workbench supports online actions based on collection element values as well as online validations of collection elements values. You can also use the Quality Workbench to overwrite values assigned through collection actions.
Note: The top menu of the Quality Workbench can be viewed as icons by setting the profile option FND: Top-Level Menu Display Mode as Icons and Links.
Data Collection Using the Quality Workbench
The methods of quality data collection using the Quality Workbench are the same for all types of collection plans, including nonconformances, dispositions, corrective actions, and plans with parent - child relationships. Using the Quality Workbench, you can search for and find a collection plan, then enter, view, or change quality results. You can also personalize the data entry/view pages of collection plans at different levels (site, responsibility, and organization).
This section includes the following topics:
Finding a Collection Plan
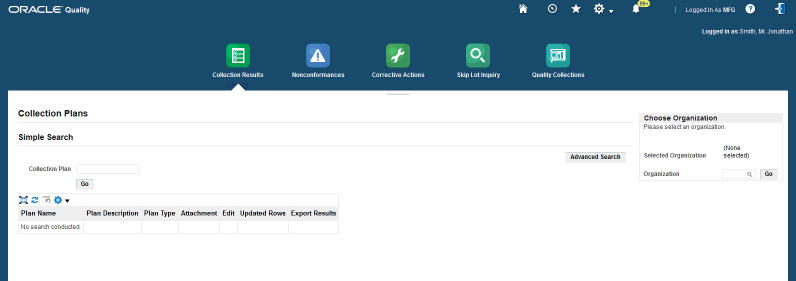
The Quality Workbench provides four tabs that automatically narrow your search capabilities by organization:
-
Collection Results tab - search through all collection plans
-
Nonconformances tab - search through only nonconformance/disposition master plans
-
Corrective Actions tab - search through only corrective action master plans
-
Skip Lot Inquiry tab - search through only skip lot inspection collection plans
You have the option to view the top menu of the Quality Workbench as tabs or as icons. To view the Quality Workbench as icons, set the value of the profile option FND: Top-Level Menu Display Mode as Icons and Links. You can also access the Top-level Menu Display Style in the Home page under Settings > Preferences and set it as Icons and Links to render the Quality Workbench top menu as icons.
You can perform a simple or advanced search within each tab. A search returns the list of collection plans matching your search criteria, including all child plans. You can also bookmark each of the Quality Workbench Collection Results, Nonconformances, and Corrrective Actions tabs separately.
Tip: Use your internet browser to bookmark one or each of the Collection Results, Nonconformances, and Corrective Actions tabs as separate search pages. This gives you quick and easy access to the Quality Workbench search page that you need.
To find a collection plan using a simple search
-
Navigate to the Quality Workbench - Collection Results Search Page.
-
Select the appropriate collection plan tab or icon.
The Collection Results tab enables you to search through all collection plans. The Nonconformances, Corrective Actions, and Skip Lot Inquiry tabs narrow your search to those types of collection plans.
-
Enter the organization in which you want to search in the Organization field.
You can use the flashlight button to access the list of valid organizations.
-
Select the Go button to select the organization.
-
Enter a plan name or a partial plan name in the Collection Plan field to search for a collection plan.
-
Select the Go button.
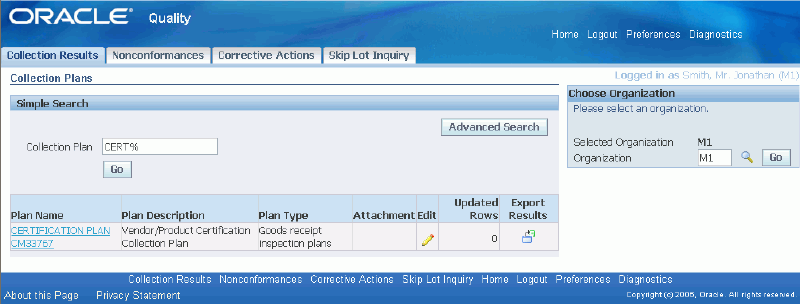
Click on the plan name to access the details.
To find a collection plan using an advanced search
-
Select the Advanced Search button to access more search criteria.
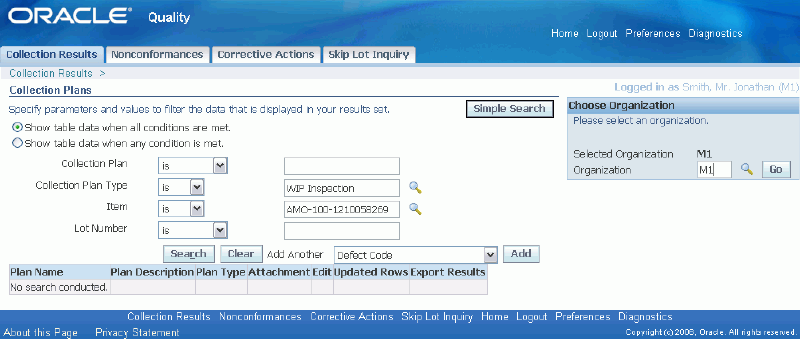
-
Enter the search criteria parameters and values.
-
Optionally, select additional search criteria in the Add Another field from the pull down list. Select the Add button to include the additional search criteria in the advanced search.
Note: Only those collection elements shipped with the Oracle Quality product are available in the pull down list to select as additional search criteria.
-
Select the Search button.
-
Select the collection plan name to display the details.
You can use the Delete icon to delete previously saved result records. Use the Add Data button to enter quality results.
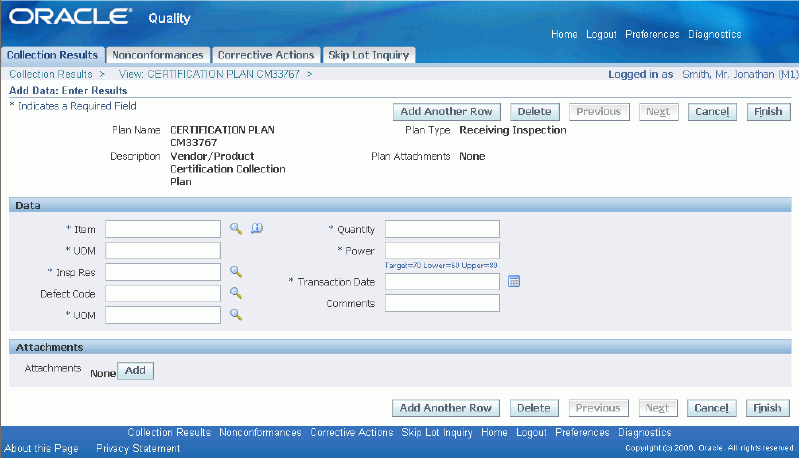
Entering Quality Results
Once you locate a collection plan using the Quality search capabilities, you can enter quality results for the plan.
-
Select a Plan Name from the search results on the Quality Workbench - Collection Results Search Page. See: Finding a Collection Plan.
The list of quality results data previously collected appears in the Quality Workbench - View Results page.
Alternatively, select the pencil icon in the Edit column in the appropriate plan name row. No previously collected data appears when using this method.
-
Select the Add Data button to add quality results. Depending on the collection plan set up, the standalone parent collection plans displays either in single row mode or multiple rows. Child plans display depending on the setup in Parent-Child relationship definition.
Note: The single row mode or multiple row mode display of collection plans in transactions is governed by the transaction setup.
You can use the Add Another Row button that is available in the single row entry display to add another row.
You can use the delete button to delete a result.
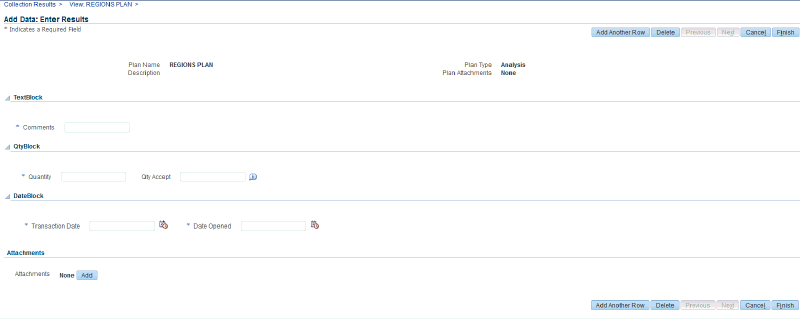
If the regions are defined on the Collection Plan setup form, then the elements would be grouped according to the regions.
-
To display multiple rows in standalone collection plans or parent plans, select the option to display multiple rows in the Collection Plans definition form. See: Creating Collection Plans

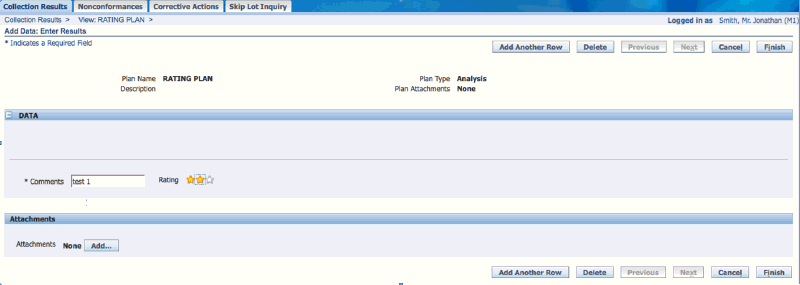
To display collection elements as rating bars for single row or multiple row modes, select the check box Display as Rating Bar on the Workbench when defining collection element values. See: Defining Collection Plan Element Values
Rating bar in single row data entry and update
Rating bar in multiple row data entry and update
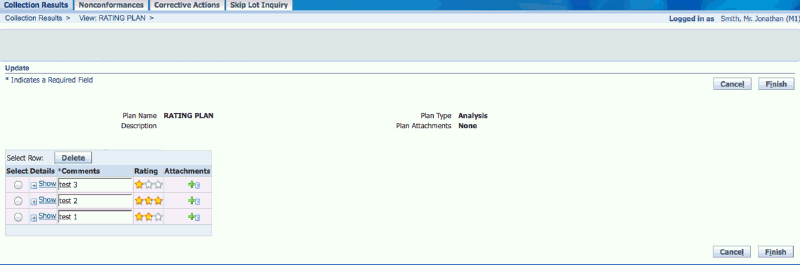
While entering quality results for multiple rows, you can use the Duplicate button to duplicate results and the Delete button to delete a result. Use the Add Another Row button to add another row.
-
If the plan is associated with a quality item specification, the Quality Workbench - Select Specification page appears. If there are no quality item specifications associated with the plan, then the Quality Workbench - Enter Results page appears.
To optionally find and assign specifications
-
Enter search criteria in the Search region.
-
Select Go.
The specifications that are valid for your search criteria appear.
-
Select the specification that you want to use while entering this quality result by selecting the icon in the Select Specification column.
The Quality Workbench - Enter Results page appears with the specifications shown under each field.
To enter quality results (continued)
-
Optionally, select View to view the plan level attachments, if any.
-
In the Data region, enter a result record. All result fields display in this region in two columns. The following mechanisms are used to simplify data entry:
Flashlight button: Displays the Search and Select List of Values page. From this page, you can search and select from a list of valid values.
Pull down list: Select a valid value from a list. Pull down lists only appear in the Quality Workbench if they are enabled for the collection plan element. See: Defining Collection Plan Element Values.
Long tip button: Displays the description of the field name. This button looks like a text bubble with the letter "i" inside.
Date picker button: Displays a calendar. Use pull down lists within the calendar to select a month and year, then select a day.
-
Optionally, in the Comments region, enter your comments.
Comments entered can help with problem collaboration. Up to five comments fields are available for each result.
-
Optionally, in the Attachments region, select the Add button to add an attachment to this quality results record ( See: Attaching Collection Plans, Specifications, Results Lines).
-
Select the Finish button.
This returns you to the Quality Workbench - Enter Results page.
-
Optionally, select the Plan Name of the record you just finished or another record to view or make changes to the record before saving the record to the database.
-
Click the Save button on the H-Grid page to save your changes and remain on the H-Grid page. A message in the Information region of the H-Grid page displays the generated sequences that informs you of the effects of online actions associated with the collection elements.
-
Click on Apply to save your changes and navigate back to the Quality Workbench-Collection results Search page. A message in the Information region of this page displays the generated sequence that informs you of the effects of online actions associated with the collection elements.
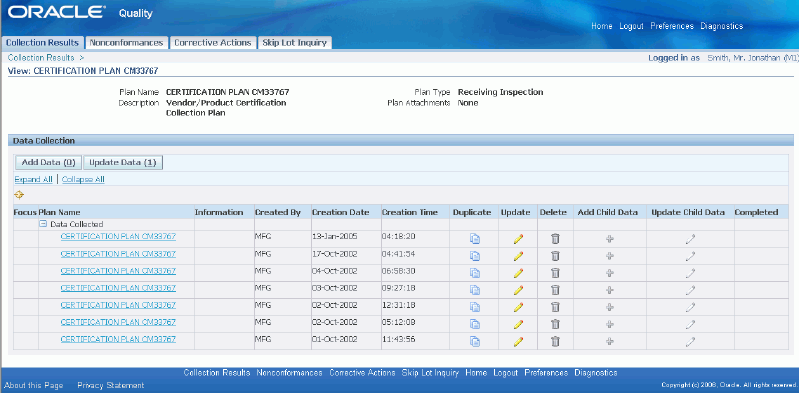
Viewing Quality Results
Once you locate a collection plan using the Quality search capabilities, you can view the quality results previously entered for the plan or the plan header information.
To view a quality result
-
Select a Plan Name from the search results on the Quality Workbench - Collection Results Search Page. See: Finding a Collection Plan.
The list of quality results data collected appears in the Quality Workbench - View Results page, if any results exist.
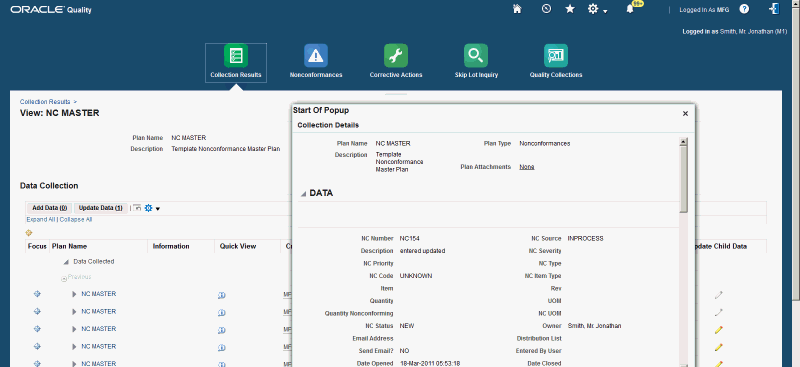
Click the Quick View icon on the HGrid to display quality result details in view mode on a popup without having to navigate out.
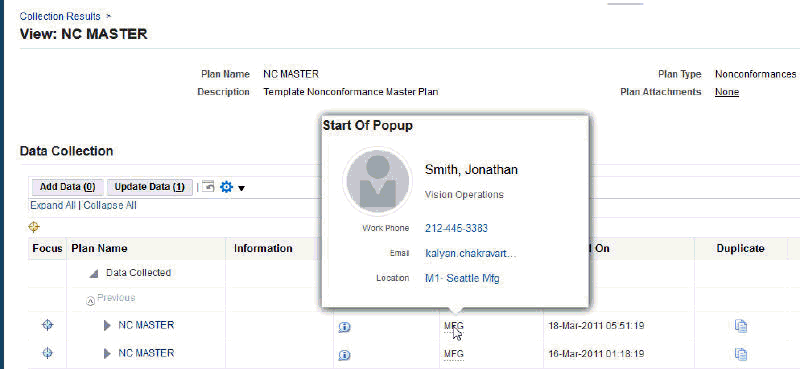
Click the links in the Created By column to view person card detail information defined for a user.
-
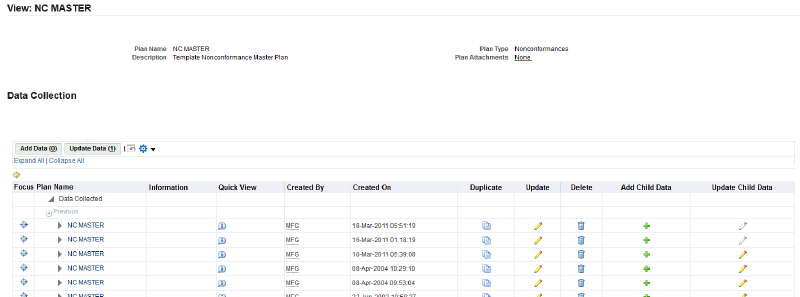
Optionally, view a child quality result by selecting the plus sign in the caret next to the plan name.
A hierarchical representation of the relationship between parent and child plans called the H grid in the Quality Workbench pages enables you to navigate from parent to child results within the same page.
If more than one child result exists, then the list of child plans appears. Select the appropriate child plan.
-
Select a quality result from the Plan Name column.
The information column is useful in determining which quality result to select. You can choose up to five fields to display in this column. Choose which fields to display in the information column when you set up the collection plan. See: Defining Collection Plan Elements.
Updating Quality Results
You can update a quality result entered at any time. For example, you can add a comment to a quality result if you have more information to share that could aid in problem resolution.
To update a quality result
-
Select a Plan Name from the search results on the Quality Workbench - Collection Results Search Page. See: Finding a Collection Plan.
The list of quality results data collected appears in the Quality Workbench - View Results page.
-
Select a pencil button from the Update column for the appropriate quality result.
The information column is useful in determining which quality result to select. You can choose up to five fields to display in this column. Choose which fields to display in the information column when you set up the collection plan. See: Defining Collection Plan Elements.
If there is more than one result entered for a plan, the list of results entered appears.
-
Optionally, view a child quality result by selecting the plus sign in the caret next to the plan name.
A hierarchical representation of the relationship between parent and child plans called the H grid in the Quality Workbench pages enables you to navigate from parent to child results within the same page.
If more than one child result exists, then the list of child plans appears. Select the appropriate child plan.
-
Optionally, change or add data in any collection element field.
-
Optionally, in the Comments region, change or add a comment.
-
Optionally, in the Attachments region, select the Add button to add an attachment to this quality results record( See: Attaching Collection Plans, Specifications, Results Lines).
-
Select the Finish button.
This returns you to the Quality Workbench - Enter Results page.
-
Optionally, select the Plan Name of the record you just finished or another record to view or make changes to the record before saving the record to the database.
Note: You cannot update a quality results record belonging to a history plan.
-
Click the Save button on the H-Grid page to save your changes and remain on the H-Grid page. A message in the Information region of the H-Grid page displays the generated sequences that informs you of the effects of online actions associated with the collection elements.
-
Click on Apply to save your changes and navigate back to the Quality Workbench-Collection results Search page. A message in the Information region of this page displays the generated sequence that informs you of the effects of online actions associated with the collection elements.
Entering Parent - Child Quality Results
You can find, enter, view, and update parent - child quality results using the same methods described previously (See: Finding a Collection Plan, Entering Quality Results, Viewing Quality Results, and Updating Quality Results). A hierarchical representation of the relationship between parent and child plans called the H grid in the Quality Workbench pages enables you to navigate from parent to child results within the same page.
Note: Ensure that a dependent element is disabled till you enter the parent element. Also note that you cannot update Parent-Child Criteria elements.
To enter parent - child quality results
-
If not previously entered, enter parent quality results as described in Entering Quality Results.
-
Find the parent quality results as described in Finding a Collection Plan.
-
Optionally, add a child quality result by selecting the plus sign in the Add Child Data column of the Quality Workbench - View Results page.
If more than one child plan exists, then the list of child plans appears. Select the appropriate child plan.
-
Enter quality results for the child plan as described in Entering Quality Results for the Quality Workbench - Enter Results page.
Customizing Your View of Quality Results
System Administrators have the authority to customize views of the Quality Workbench by user or by responsibility. Each Quality Workbench page has a Personalize Page link, enabling the customization of each page by field using the Oracle Applications Personalization Framework. See: Oracle Applications Framework Personalization Guide, My Oracle Support, Note Number: 268969.1 .
Exporting Quality Results
You can export quality results to external applications. You can search for the required rows of results, view the results in a tabular form and then export the viewed results.
To export results
-
Search for the required plan on the Quality Workbench - Collection Results Search Page. See,Finding a Collection Plan.
-
Click on the Export Results icon for the required plan on the search results region to initiate the export. The Export Collection Results displays.
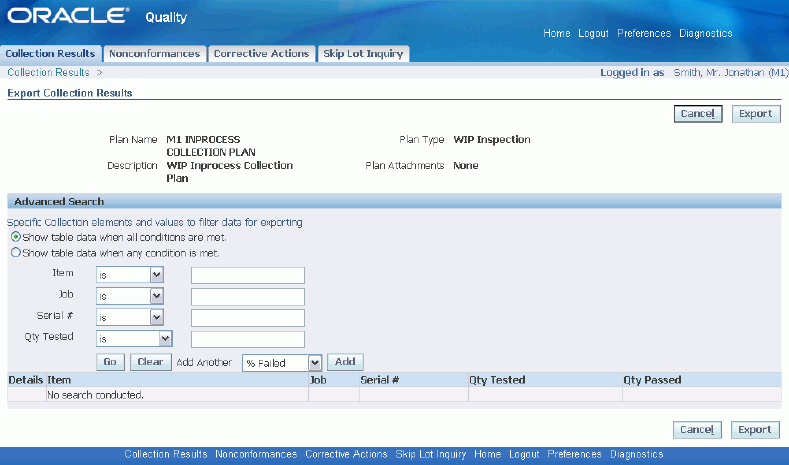
-
You can export the entire results or alternatively you can export selected rows from the collection results. Enter a combination of criteria in the Advanced Search region to select the result you want to export. Click on Go.
-
View the search results that displays in the Details region. Click on Export to export the results. The results will be exported to a spreadsheet, which you can save and view.
Collecting Device Data in Standalone Quality Workbench
If you have installed Manufacturing Execution System (MES) for Discrete Manufacturing, you can collect device data for a collection plan in the standalone Quality Workbench. You would need to set up device data and link collection elements in the collection plan to these devices. See: Device Integration Setup, and Defining Collection Plan Elements.
If you set up collection plan elements as device enabled in a collection plan and associate them with appropriate devices, you can collect the data for the collection plan elements from devices. You can collect the device data in the entry or update mode in standalone quality workbench.
The device enabled collection plan elements display in the Device Enabled Elements region. The check boxes for each element is checked by default when the page displays. You can collect device data for all or selected device enabled collection plan elements. You can uncheck the collection plan elements for which you do not want the device data and select Read Device to populate the device data.
To enter quality results in standalone quality workbench
-
Select a Plan Name from the search results on the Quality Workbench - Collection Results Search Page. See: Finding a Collection Plan.

-
In the Device Read Enabled Elements region, select the elements and click on Read Device. The values will display in the Data region. The data for the elements will display according to how they have been defined in the collection set up plan. For example, if the element is setup with Override disabled, data captured from device will be visible but cannot be updated.
-
The device data that is captured is online device data, generated at the time of measurement. The application captures the data immediately from the measuring equipment. The data is not historic.
-
The device data that is collected from devices associated to each collection plan element is independent. One data is not dependent on any other data. Dependent data is not supported currently.
-
-
You can manually override device data if the collection plan element is not setup as Read Only and if override is enabled.
-
Click on Finish to save your work.
To update quality results in the standalone Quality Workbench
-
Select a Plan Name from the search results on the Quality Workbench - Collection Results Search Page. See: Finding a Collection Plan.
-
Click on Update and update the data.
Related Topics
Entering Quality Results Directly
Nonconformance Management
Oracle Quality provides nonconformance templates for you to copy and use to enter quality problems. The nonconformance templates are a set of collection plans that enable everyone involved with the quality problem and solution (such as the inspector, quality engineer, and members of the Material Review Board) to communicate their findings and actions (See: Solution Templates, Oracle Quality Implementation Guide).
You can manage nonconformances from the Quality Workbench as well as from the Oracle Quality forms. Managing nonconformances includes the following steps. Each step is explained in detail in Process Steps, Oracle Quality Implementation Guide.
-
Recording nonconformances
-
Reviewing nonconformances
-
Segregating nonconforming material
-
Entering nonconformance details and assigning actions
-
Determining and initiating disposition
-
Closing the nonconformance
You can accomplish each step using the procedures described previously for collection plans in general (See: Data Collection Using the Quality Workbench). The procedure for recording nonconformances is slightly different and is described next (See: Recording Nonconformances).
This section includes the following topic:
Recording Nonconformances
When you, your supplier, or your customer discovers material outside of your quality standards, you can record this nonconformance. Record the nonconformance in a copy of one of the nonconformance master plan templates provided with Oracle Quality (See: Step 2 - Copy from Template Collection Plans, Oracle Quality Implementation Guide).
To record a nonconformance
-
Select a Plan Name from the search results on the Quality Workbench - Nonconformances Search Page. See: Finding a Collection Plan.
The list of nonconformance data collected, if any, appears in the Quality Workbench - View Nonconformance page.
-
Select an action from the Actions pull down list.
The action explains the source of the nonconformance. Choices include, but are not limited to: Customer Return, In Process, Internal Process, Inventory, Maintenance, Other Sources, Receiving, Service, and Supplier.
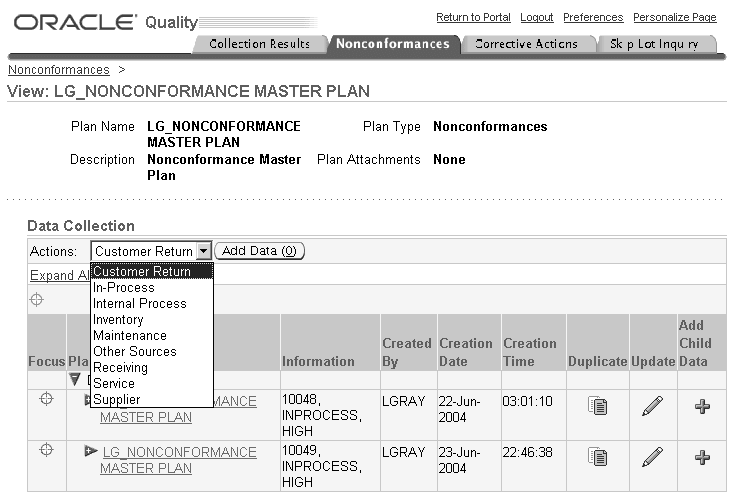
-
Select the Add Data button to add nonconformance results.
The Quality Workbench - Enter Nonconformance page appears. The process of recording a nonconformance is the same as entering any other type of quality result from this point on (See: Entering Quality Results). As you collect more details about the nonconformance and determine its disposition, you can record this information in the child plans of the nonconformance master plan(See: Entering Parent - Child Quality Results). Once you are ready to resolve the problem causing the nonconformance, you can enter a corrective action request (See: Corrective Action Management).
The nonconformance templates include collection elements that can trigger the sending of notification emails to a distribution list once you save the nonconformance. For example, once you save the nonconformance, you can notify the Material Review Board, quality engineer, or anyone else by e-mail.
Oracle Quality supports the personalization of nonconformance data entry pages for different types of nonconformance sources.
Corrective Action Management
Oracle Quality provides Corrective Action Request (CAR) templates for you to copy and use to enter quality problem solutions. The CAR templates are used similarly to the nonconformance templates, except that they address the solution to the nonconformance problem (See: Corrective Action Process, Oracle Quality Implementation Guide).
You can manage CARs from the Quality Workbench as well as from the Oracle Quality forms. The process of managing different types of CARs is described in Chapter 12, Implementation, Oracle Quality Implementation Guide. The different types of CARs include, but are not limited to:
-
Customer initiated request
-
Customer initiated request with supplier
-
Internal request
-
Internally initiated request with supplier
-
Request supplier action
You can create CARs using the procedures described previously for collection plans in general (See: Data Collection Using the Quality Workbench). The procedure for submitting a CAR can vary depending on the type, but is explained in Chapter 12, Implementation, Oracle Quality Implementation Guide. The procedure for submitting a CAR is similar to the procedure for recording nonconformances (See: Recording Nonconformances), except that the Actions pull down list referred to in this procedure includes the CAR types listed above. Oracle Quality supports the personalization of corrective actions data entry pages for different CAR types.
Finding Skip Lot Inspections
You can find skip lot inspections (See: Skip Lot Inspections) using the same method you use to find collection plans in the Quality Workbench. Once you find a skip lot plan, you can view the inspection history, plan state, or frequency change history.
To find skip lots
-
Navigate to the Skip Lot Criteria page.
You can search on any of the given fields within this page.
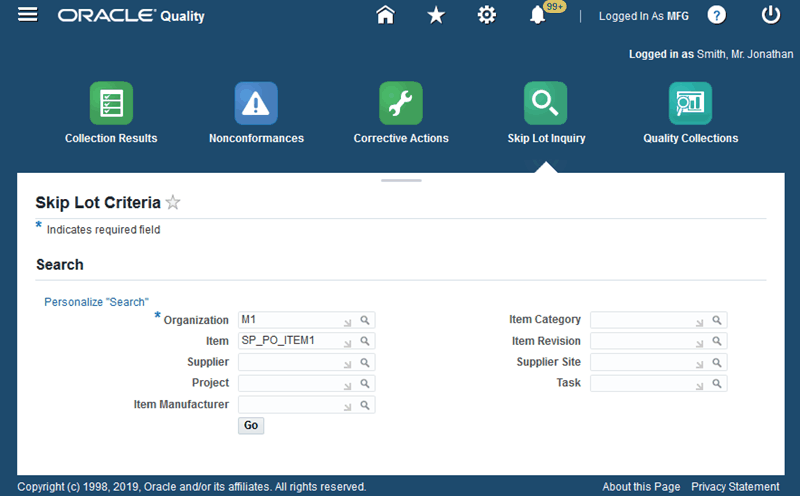
-
Enter your search criteria, then select Go.
The Skip Lot Criteria Results page appears.

To optionally view a skip lot inspection history
Select the eyeglasses icon in the Inspection History column for the row you want to view.
The Inspection History page appears.
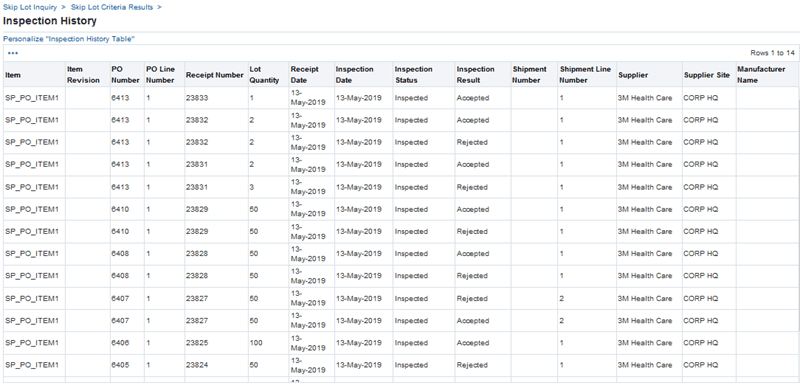
Use this page to view details like Item, Item Revision, PO Number, PO Line Number, Receipt Number, Lot Quantity, Receipt Date, Inspection Date, Inspection Status, Inspection Result, Shipment Number, Shipment Line Number, Supplier, Supplier Site, and Manufacturer Name.
Note that you also view the accepted as well as the rejected partial quantities for each receipt.
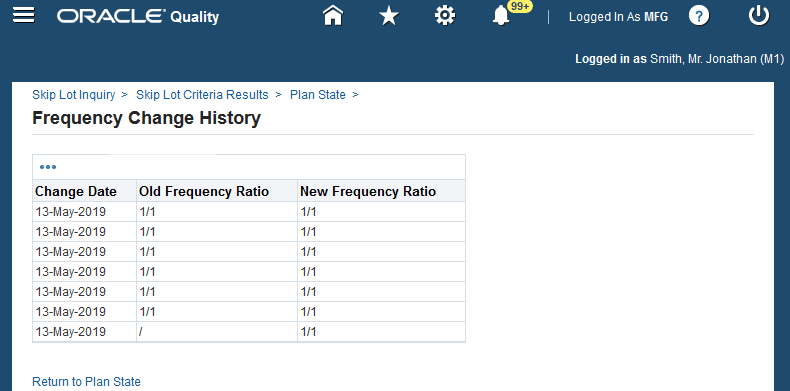
To optionally view the plan state or frequency change history
From the Skip Lot Criteria Results page, select the eyeglasses icon in the Plan State column for the row you want to view.
The Plan State page appears.
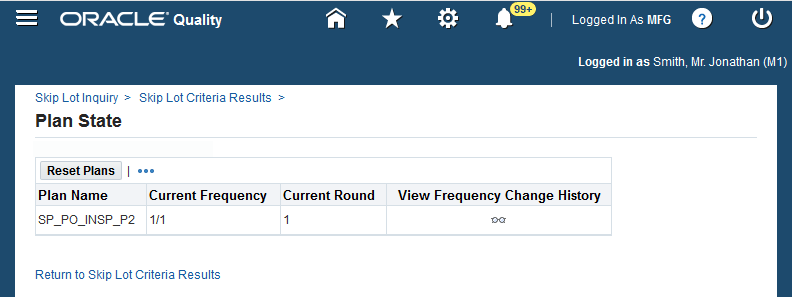
Optionally, select the eyeglasses icon in the View Frequency Change History column for the row you want to view.
The Frequency Change History page appears.