Setting Up Security
This chapter covers the following topics:
- Overview of Security Topic Organization
- About Service Request and Case Security
- Configuring Data Security for Service Request Attachments
- Setting Up Service Request Data Security Process Overview
- About Mapping Responsibilities
- Creating a Responsibility Mapping
- Updating a Responsibility Mapping
- Turning Standard Service Security On or Off
- Creating Your Own Custom Security
- Enabling Responsibility Mappings for Oracle iSupport
Overview of Security Topic Organization
This group of topics explains how you can restrict user access to service request and case data.
-
About Service Request and Case Security provides an overview.
-
Setting Up Service Request Data Security outlines the major steps.
-
Creating Your Own Custom Security provides guidelines for organizations who want to set up their own custom security.
The rest of the topics provide detailed procedures:
About Service Request and Case Security
Oracle TeleService supports both function and data security provided with all applications. See Oracle E-Business Suite Security Guide for details.
In addition, your application provides standard service security, data security built on top of the standard application security. This makes it possible for you to restrict by responsibility the ability of users to view and update service requests and related objects by service request (case) type.
Note: The security features for service requests and cases are identical. If you are implementing Case Management, then read case for every mention of service request in this guide and in the user interface used for setup.
To enable standard service security, you must map responsibilities to service request types and turn the standard security on according to the procedures in this chapter.
Note: If you are running multiple service applications in the same database instance, then you must map responsibilities to service request types and turn standard security on to keep users from one application accessing service requests of the other.
For example, an implementation running both Customer Support (to support customers) and Service Desk (to support employees) must create separate service request types and mappings for each application to prevent agents helping employees from viewing service requests logged for customers.
Note: Standard service security relies on the global application context that is set by the application framework on login. If you are using the Service Request public APIs to create and update service requests in an asynchronous manner, then the original application context may be lost. For this reason, you must set the global application context (user_id, resp_id, and resp_appl_id) to the original application context values to ensure that the user had appropriate access to the service request data.
Features of Standard Service Request Security
Standard service request security:
-
Prevents users from creating, viewing, and modifying all service request data related to the service request types not mapped to their responsibility. This includes service request tasks, notes, and interaction history. It even prevents users from viewing relationships of a service request to other service requests of types they cannot access.
-
Excludes them from the lists of resources used for service request ownership and tasks assignment.
Note: For work assignment with the standard service request security enabled, you must make sure every employee has a user account and that the user account is associated with the resource.
If you are assigning service requests or tasks to nonemployee resources who access the service requests or tasks through a third party software application, then you do not have to set up users for them.
-
Prevents them from retrieving service requests via searches
-
Prevents them from retrieving service requests via the Oracle Knowledge Management application
Standard security secures service request data not just in Oracle TeleService, but in all applications that use service requests. (See How Turning on Standard Service Security Impacts Other Applications.)
Turning service security on or off does not affect objects such as tasks and notes that are not attached to service requests.
Read-Only and Other Access Types
Standard service security provides either no access or create/update access. It does not distinguish between read-only access and update access.
To provide users with read-only access, you must implement custom data security.
The HTML-based Oracle TeleService modules provide a read-only page for agents with read-only permissions.
The Forms-based Oracle TeleService module and Oracle Depot Repair, however, displays the service request in the edit mode. Users who are restricted to read-only access get no indication that updates are disallowed until they attempt to save their changes and the application displays an error message.
Effect of Turning on Standard Service Security on Other Applications
Turning on standard service security affects all applications and Oracle application foundation modules that use service requests to different degrees:
-
Oracle iSupport
Customers creating service requests on the Web are subject to Oracle iSupport's own security, which is based on the customer: Customer contacts have access only to service requests for their organization.
You can create responsibility to service request type mappings to prevent customer contacts from creating service requests of types not mapped to their responsibility. However, this restriction is for creation only. Those contacts are not restricted from viewing or updating any service request permitted by Oracle iSupport security.
When agents work with customer-created service requests in other service applications, however, they are subject to full standard security restrictions (the same as for any other service request.)
-
Tasks
Tasks enforces standard service security only partially. Task standalone forms display all service request tasks regardless of the service request type. However, agents are prevented from making updates in all Task windows.
-
Assignment Manager
The Assignment Manger enforces standard service security fully. This means this module assigns only resources that have access to the service request type.
-
Oracle Inbound
If you have set up an Interactive Voice Recognition (IVR) system to route calls based on customer entering service request numbers, then these calls are routed only to agents who have access to service requests of this type.
Agents transferring calls regarding service requests to other agents are restricted to transferring the calls only to agents with access to the service request type.
All telephony implementations must map at least one agent in the call center to each service request type coming through the call center.
-
Universal Work Queue
The UWQ enforces standard security fully. This means:
-
Work queues of each agent display only those service requests of types the agent can access.
-
The number of service requests displayed in each node sums up only information agents can access.
-
The tasks nodes display all tasks, including all service request tasks. However, the agent cannot view the details of service request tasks they cannot access.
-
The Next Work and Request Work buttons assign only work the user can access.
-
-
Oracle Depot Repair
Oracle Depot Repair enforces service security fully.
-
Oracle Enterprise Asset Management
Users associating work orders to service requests can only see and select those service requests of types they can access.
-
Oracle Installed Base
Oracle Installed Base usually permits users to view all the service requests logged for a customer's product. Turning the standard security restricts that view to those service requests of types mapped to the responsibility.
-
Oracle Field Service and Oracle Field Service Technician Portal
Standard security affects the availability of service request details for dispatchers and technicians. For users to be able to drill down to view service request details, you must ensure that their responsibility has the appropriate service request types mapped.
Configuring Data Security for Service Request Attachments
You can control the visibility of service request attachments through the Role-Based Access Control (RBAC) feature of the Oracle E-Business Suite Technology stack.
You can configure role-specific view and edit permissions for service request and case attachments. Use the role-based access setup to allow only service request creators to view and edit service request attachments. You can restrict other agents from accessing the same attachments.
This topic provides information about how to configure data security for service request attachments.
Configuring data security
-
Create a new document category using the Application Developer responsibility, Document Categories window.
Navigation: Application Developer > Attachments > Document Categories.
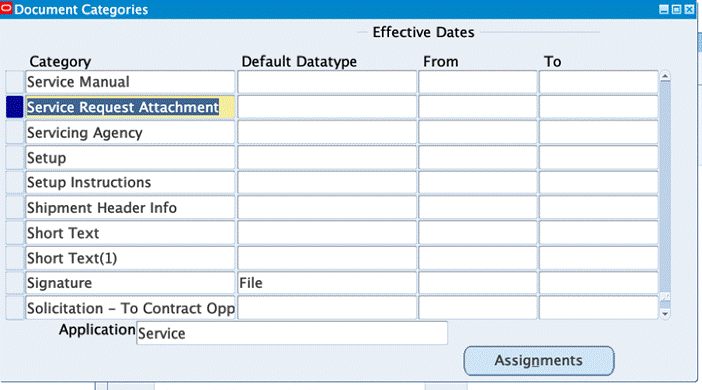
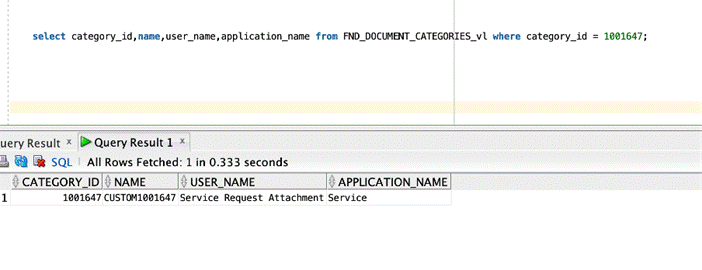
Use SQL Query to note down the NAME of the document category.
In this example, the document category is Service Request Attachment (USER_NAME) and the NAME is CUSTOM1001647 as show in the screenshot.
-
Create a role and grant using the User Management responsibility.
-
Navigate to the Roles & Responsibilities page.
-
In the Search region, select Roles & Responsibilities as the type.
-
In the Name field, enter the responsibility name: Customer Support Specialist.
-
Select Service as the application.
-
Click Go.

-
Click on View in Hierarchy.
-
Click Create Role, and create a role under "Miscellaneous" category.
-
Click Save.
-
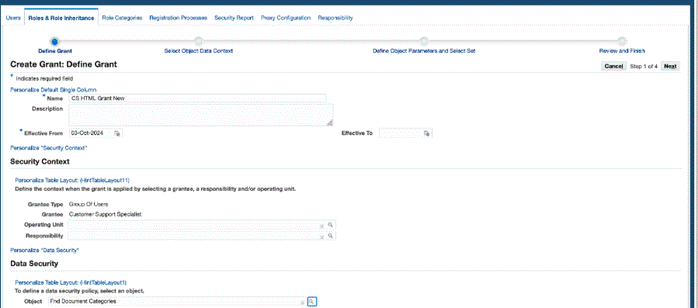
Click Create Grant: and create a Grant as follows:
Enter a name, description, and select Fnd Document Categories as the object.
-
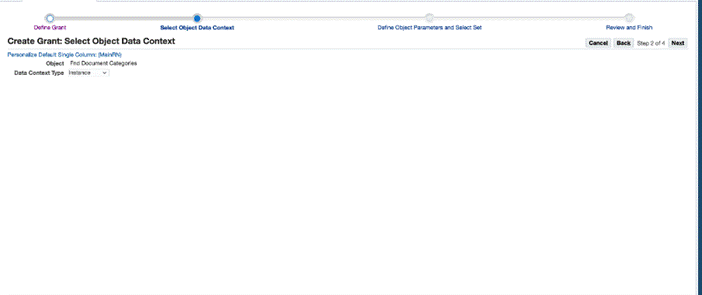
On the Create Grant: Select Object Data Context page, select Instance as the data context.
-
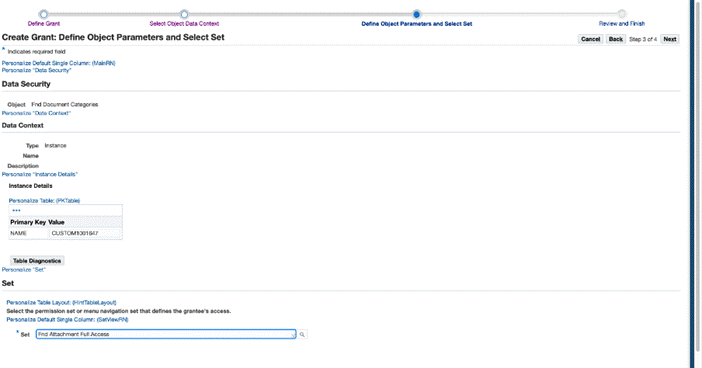
On the Create Grant: Define Object Parameters and Select Set page:
-
In the Instance Details region, enter the name of the category created in Step 1.
-
In the Set region, select the set Fnd Attachment Full Access, which is a seeded set used for FND DOCUMENTS object. This set gives full edit access to attachments for roles that have this permission.
-
-
Click Next, check the details and click Finish.
-
Now, click Add Note for the Customer Support Specialist responsibility and select the role that you just created.

-
-
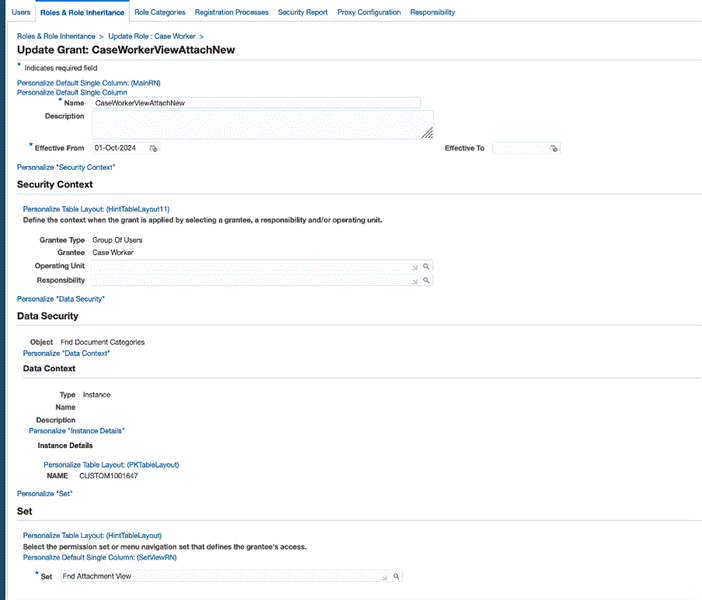
Repeat the same steps for the Case Worker responsibility but ensure that you use the Fnd Attachment Viewer as the set because for the Case Worker responsibility view only capability is to be granted.
Create the role as follows:

Create the grant as follows:
-
Use Personalization feature to make changes to the Attachments region for the Customer Support Specialist and Case Worker responsibilities.
Customer Support Specialist Responsibility
-
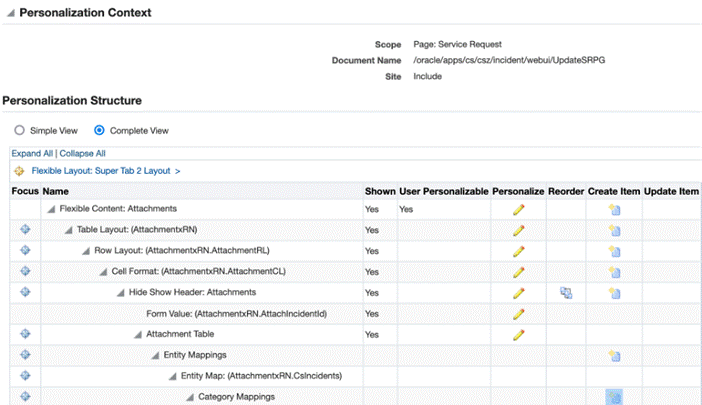
Using the Customer Support Specialist responsibility, navigate to the Update Service Request page.
-
Click Settings and then select Personalize Page.
-
For the Problem and Diagnosis region, choose SITE as the personalization level.
-
Click Create Item icon under Entity Map: AttachmentsxRN.CsIncidents
-
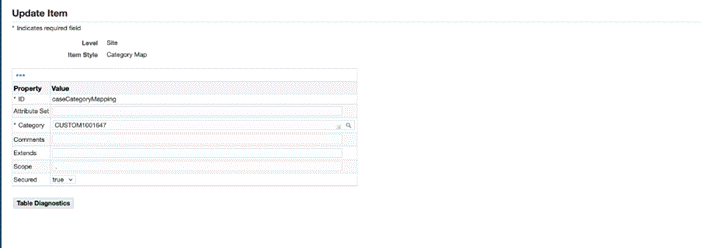
Create a categoryMap as follows.
-
Specify an ID, add the category as the new Category NAME that was create in Step 1
-
Ensure to specify secured property as true.
-
After completing these steps, any attachment that you add from the Customer Support Specialist responsibility will be editable by the service request owner.
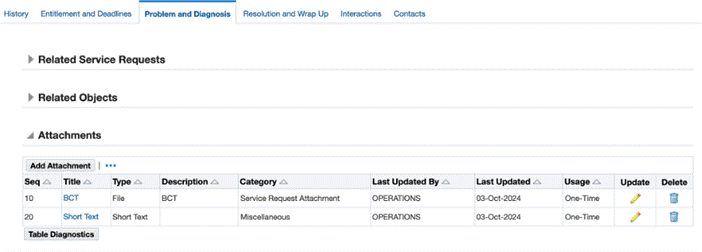
-
Case Worker Responsibility
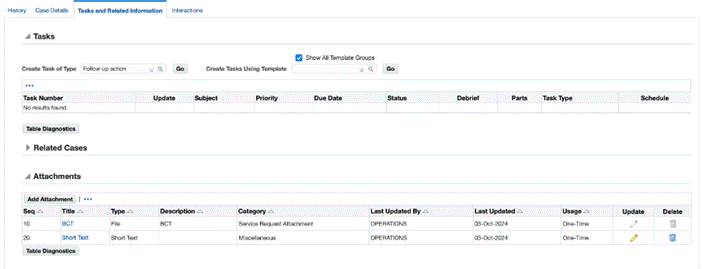
Similarly, for the Case Worker responsibility, personalize the UpdateCasePG.xml to create an entity map as shown in the screenshot.

Notice that the attachments on the service request, when viewed from the Case Worker responsibility, the attachments belonging to the newly created category are in View mode and are not editable.
Setting Up Service Request Data Security Process Overview
Use this high-level procedure to guide your implementation of the service request security.
To use the standard security provided with your application
-
Under the Service responsibility, navigate to Setup, then Mapping, and select Responsibility Mapping and map each responsibility to the service request types you wish users to access. Unmapped responsibilities cannot view or modify any service requests or related objects. For detailed procedures, see Mapping Responsibilities to Service Request Types.
-
Navigate to Setup, then Rules, and select Service System Parameters and turn standard security on. For details, see Turning Security On or Off.
To implement custom data security
-
Create custom security according to procedures described in Oracle E-Business Suite Security Guide - . See Creating Your Own Custom Security for guidelines.
-
Navigate to Setup, then Rules, and select Service System Parameters and turn the custom security on by selecting Custom Security from the Service Request Security drop-down list. For details, see Turning Security On or Off.
About Mapping Responsibilities
This group of topics explains why and how you map responsibilities to service request types and status groups. It covers:
Uses of Responsibility Mappings
You create mapping between service request types, responsibilities, and status groups for two reasons:
-
As part of standard service security setup to specify which responsibilities get to access which service request types
If you are using standard service request security, then you must specify which service request types an agent can use by mapping service request types to responsibilities.
-
To specify different status groups for different responsibilities that use the service request type.
By mapping different status groups to different responsibilities, you can specify different behavior for different users of the same service request type. By making different statuses or transitions available, you can, for example, permit only managers to set a service request to a Closed status. See Status Groups and Status Transitions and About Mapping Status Groups to Service Request Types and Responsibilities.
If you do not specify a status group when mapping a service request type to a responsibility, then the application uses the default mapping created in the Service Request Types page.
The mapping of status groups is independent of standard security. This means that the mappings work even if you choose to use custom security.
Note: If you are automatically closing duplicate service requests using the status update feature offered by service request relationships, then you must include the seeded statuses of "Waiting", "Clear", and "Closed" and the status group transition rules must permit all statuses to transition to the status of "Closed" for the responsibility creating the relationship. For more information, see Service Request Linking to Specify Duplication and Other Relationships.
Where You Create and Update Responsibility Mappings
You create and update mappings from the Service Responsibility Setup page. (Navigation: Setup, Mapping, Responsibility Mapping).
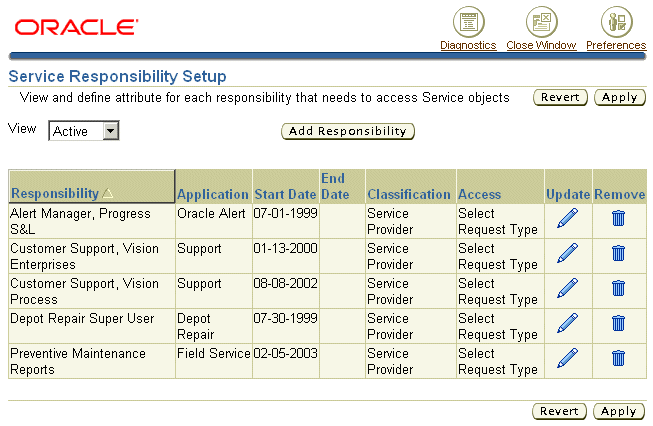
From this page you can:
-
Click Add Responsibility to create a mapping . See Creating a New Responsibility Mapping.
-
ClickUpdate to update an existing mapping. See Updating a Responsibility Mapping.
-
Click Remove to delete a mapping.
Notes:
By default, the page displays only active mappings. You can change the view by making an alternate selection from the View list:
-
All: Includes active, inactive, and planned mappings.
-
Planned: Limits the display to mappings that are not yet in effect.
-
Active: (the default) Displays only mappings that are currently in effect.
Creating a Responsibility Mapping
Use this procedure to map service request types and status groups to responsibilities.
To map a responsibility
-
Under the Service responsibility, navigate to Setup, then Mapping, then Responsibility Mapping.
The Service Responsibility Setup page appears.
-
Click Add Responsibility.
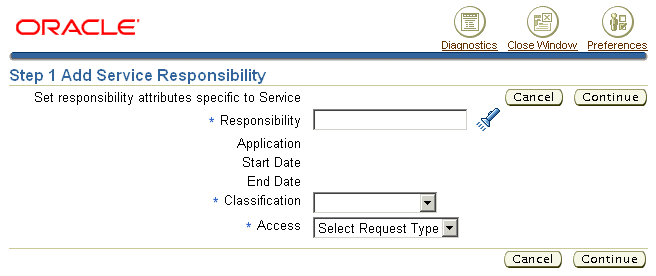
The Step 1 Add Service Responsibility page appears.
-
Select the responsibility you want to map.
-
Use the Classification list to specify "Service Provider" if the mapping is intended for Oracle TeleService or other agent-facing service applications. Choose "Self Service User" for Oracle iSupport.
If you selected "Self Service User", you can only map those service request types that have been set up with the Web Entry check box selected. For details, see Setting Up Service Request Types.
If you selected "Service Provider", you can specify any service request types, including those specific to Oracle iSupport.
-
Select the type of mapping you wish to create using the Access list:
-
To grant this responsibility access to all Service Request Types, select All Request Types. If you have selected Self Service User in the last step, then you are mapping the responsibility only to those Service Request Types that are specified for Web entry.
Note: Granting All Request Types access provides access not only to all existing Service Request Types, but also all of those created in the future.
-
To enable access for this responsibility to a subset of service request types, select Select Service Request Type.
-
-
Click Continue.
Step 2 Map Responsibility to Service Request Types page appears.
-
If you selected Select Service Request Type, then select one or more types:
-
Click Add Another Row.
-
Select a Service Request Type.
-
-
To specify a status group for this service request type and responsibility, select it from the Status Group list. For users of this responsibility, the selection you make here overrides the mapping you have made in the Service Request Types page. If you do not make a mapping here, then the application automatically uses the mapping you have entered in Service Request Types page.
-
Optionally, enter dates in the Start Date and End Date fields if you to restrict the availability of this mapping.
-
Click Finish to save your entries and return to the Service Responsibility Setup page.
Updating a Responsibility Mapping
Use this procedure to update a responsibility to a service request type and status group mapping.
To update a responsibility mapping
-
Under the service responsibility, navigate to Setup, then Mapping, and select Responsibility Mapping.
The Service Responsibility Setup page appears in a browser window.
-
To change the classification or acess type for this mapping:
-
Click Update Responsibility.
The Update Responsibility Setup window appears.Here you can select a different access type and classification.
-
Click Apply.
You are returned to the Mapping of Responsibility to Service Request Types page.
-
-
Click Update next to the mapping you wish to update.
The Mapping of Responsibility to Service Request Types page appears.
On this page you can:
-
Remove a service request type from the mapping, by entering an end date.
-
Specify a service request status group.
-
Map additional types using the Add Another Row button.
-
Turning Standard Service Security On or Off
Use this procedure to turn on or turn off service request security.
Note: If you turn standard service security on or off while users are accessing the application, then you may have to bounce the Apache server after you have changed the setting.
Prerequisites:
You must map service request types to responsibilities or create your own custom security framework before turning security on as a second step. Turning security on as a first step prevents all users from accessing service requests, tasks, and other related business objects.
To turn security on or off
-
Navigate to Setup, then Rules, and select Service System Parameters.
The Service System Parameters page appears.
Note: Only the Security region relates to security. The second Self Service region, is for restricting customer access to service request types during service request creation in Oracle iSupport. See Enabling Responsibility Mappings for Oracle iSupport.
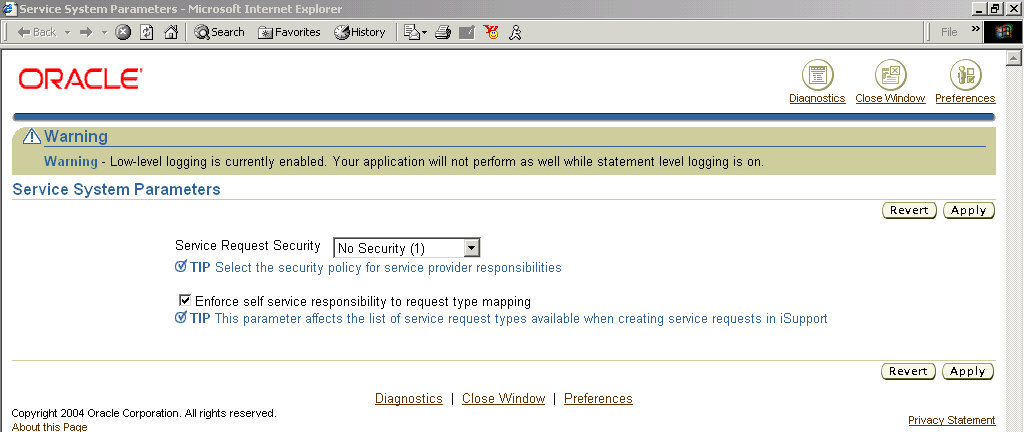
-
Using the Service Request Security list, select one of the following:
-
No Security: to turn off security and make all service requests and related tasks available to all users.
-
Standard Security: to enable service security supplied with the application.
-
Custom Security: to disable the seeded security and turn on your own custom security.
-
-
Click Apply.
Creating Your Own Custom Security
Your organization can create its own custom security framework according to the concepts and procedures described in Oracle E-Business Suite Security Guide.
For example, you may want to:
-
Restrict users to view only privileges
-
Restrict the ability of users to view service requests by status.
Limiting users to only viewing service requests with the status of Open, for example. You can do so, by inserting a WHERE clause in the SQL statement of the object instance set predicate.
-
Restrict access to service requests, tasks, and other business objects to specific responsibilities or individuals
You can accomplish this by selecting a more restricted grantee such as a responsibility or a resource. By default, all seeded grantees are global.
The custom security you create replaces the standard security provided with your application.
Note: The application expects all grants to obey the following rules:
-
Anyone with create access to a service request must also have read and update access to the service request.
-
Anyone with update access to a service request must also have read access to the service request.
When you turn service security off, the predefined grants are disabled.
You can use the predefined data as a guide for creating custom security. See Standard Service Security Predefined Data for a list of predefined data.
Enabling Responsibility Mappings for Oracle iSupport
You can restrict customer contacts from creating service requests by service request type. To do so, you create the same responsibility to service request type mappings used in standard service security and then turn on the mappings using the procedure below.
Prerequisites:
You must map Oracle iSupport responsibilities to service request types that have been specified as Web Enabled. (See Mapping Responsibilities to Service Request Types.)
To use mappings to restrict request creation in Oracle iSupport
-
Under the Service responsibility, navigate to Setup, then Rules, and select Service System Parameters.
The Service System Parameters page appears.
-
To restrict Oracle iSupport users from creating service requests of types mapped to their responsibility, select the Only Service Request Types Mapped to User's Responsibility option. This restricts only the creation of service requests; not the ability to access existing requests.
Note: You can use the mappings for this purpose even when standard security is turned off.
-
Selecting All Web Enabled Service Request Types permits users to create service request of any type specified as Web Entry enabled. Any mappings you have created are disabled.
-
Click Apply.