Basic Service Request Setups
This chapter covers the following topics:
- Setting Up Business Processes
- About Statuses, Status Groups, and Service Request Types
- Setting Up Service Request Statuses
- Setting Up Status Groups
- Setting Up Service Request Types
- Grouping Service Request Types into Categories for Oracle iSupport
- Setting Up Service Request Severities
- Setting Up Service Request Urgencies
- Setting Up Problem Codes
- Setting Up Resolution Codes
- Setting Up Service Request Templates
- Setting Up Default Response and Resolution Times
- Setting Up Task Types and Priorities for Service Request Tasks
- Setting Up New Note Types for Service Requests and Tasks
- Setting Up Descriptive Flexfields for Advanced Service Request Searches
- Indexing Note and Summary Text for Searches
- Enabling Integration with Oracle Enterprise Asset Management
- About Oracle Workflow Processes Included with Your Application
- Setting Up the List of Values for the Language Field
- Obtaining a List of Valid System Profiles and Lookups
- Merging Customer Accounts Associated with Different Parties
- Merging Service Requests
Setting Up Business Processes
Business processes are required for setting up the default service level agreement, Oracle Service Contracts' coverage templates, and for Charges.
To setup business processes
-
Under the Service responsibility, navigate to Setup, then Charges, and select Service Business Process.
The Service Business Process window appears.
-
Enter a name and optional description.
-
Specify the applications where you wish this business process to be visible by selecting the appropriate check boxes:
-
Depot Repair: Oracle Depot Repair
-
Field Service: Oracle Field Service
-
Service Request: Oracle TeleService (all modules).
-
-
If you are using Charges, you must also associate service activities to the business process in the Service Activities region. See Setting Up Business Processes, Service Activities, and Billing Types for Charges.
-
Click Save.
About Statuses, Status Groups, and Service Request Types
This topic explains the various elements you use to model your service request business processes:
Service Request Statuses
Service request statuses provide a classification system you can use to track the stage of a response to a customer problem from the initial customer contact to its resolution.
The application provides the following seeded statuses:
-
Cancelled by User
-
Clear
-
Closed
-
Open
-
Planned
-
Waiting
However, you can set up any number of statuses appropriate for different types of customer problems.
For example, for billing problems you may want to include "Invoice Disputed", "Dispute Denied", and "Invoice Corrected", for equipment exchanges: "Received", "Fixed", and "Shipped Back to Customer."
Statuses can also:
-
Specify what service request updates are permissible
You can specify if a user is permitted to update a service request in a specific status.
For example, if you use Charges to bill customers for service and you calculate the amount to be billed only after work has been completed, then you may want to permit agents working on "Open" service requests to update the information about the customer problem, but not the charges. When the work is completed and the service request has the status of "Closed", then you may want to bar agents from updating the problem information, but permit them to modify the charges.
-
Indicate the service request is responded to or resolved and automatically fill in the date and time in the Responded On or Resolved On fields.
-
Indicate a service request is on hold.
This is important if you are implementing automatic work distribution where agents click the Next Work or Get New Work buttons to work on the most urgent service request. When an agent sets a service request to an on-hold status, the application ignores the service request when determining the highest priority service request. See Implementing Work Assignment and Distribution .
-
Indicate a service request requires approval or an electronic signature.
Extra setups are required, including the creation of special intermediate statuses the service request is set to while it is waiting for action. For details, see Electronic Approvals and Records.
-
Alert an agent that a customer has replied to an e-mail sent regarding a service
Integration with Oracle Email Center makes it possible for agents to send e-mails to customers in the context of the service request. The application stores the e-mails and any customer replies in the service request history. You can set up a special status (for example, "Email Received") that alerts agents that a new reply has arrived in a service request. For details, see Enabling Oracle Email Center.
Service Request Status Groups and Status Transitions
Status groups make it possible for you to specify:
-
Which statuses can be used for which problem
-
Permissible status transitions
-
Different behavior for different classes of users
Statuses for Specific Problems
By grouping your statuses in status groups and mapping them to different service request types, you can specify which service request statuses are going to be available for which customer problem.
For example, a status of "Invoice Corrected" makes sense as a status of a service request for a billing question and "Repaired" as a status for inhouse equipment repairs, but not vice versa.
Permissible Status Transitions
Status groups also make it possible for you to specify the permissible status transition rules for each status in the group (which statuses can be set to which).
You specify the initial status of the service request when agents or customers create it and the transition rules that determine what statuses agents or customers can choose for a service request of a given status.
For example, all new service requests get the initial status of "New", but you do not want to permit agents to reset a service request back to "New" after it has already been worked on. You may not want to permit agents to turn a "Closed" service request back to "Open" because the work is already completed.
Note: Status transition rules govern only which statuses users can select, they do not determine whether the information in the service request can be updated or not. You determine whether users can modify information when you set up the statuses themselves.
Different Behavior for Different Users
By creating multiple status groups with different status transition rules and mapping them to different responsibilities, you can reserve certain actions only for designated users.
For example, if you want to permit only agent supervisors to close service requests of type Refund. In this case you:
-
Create a status group for the agents that does not permit a transition to the "Closed" status.
-
Create a status group for the supervisors that permits the transition to "Closed."
-
Map the agent status group to the agent responsibility and the service request type Refund.
-
Map the supervisor status group to the supervisor responsibility and the service request type Refund.
See About Mapping Status Groups to Service Request Types and Responsibilities.
Service Request Types
Agents use service request types to categorize the service request.
If you have implemented Oracle iSupport, then customers themselves can also use service request types to categorize their problems when they create a service request on the Web.
Examples of service request types include:
-
Request for Information
-
Customer Complaint
-
Billing Issue
-
Installation Request
-
Preventive Maintenance Visit
-
Return
-
Depot Repair
You can set up service request types to:
-
Channel different types of customer problems and inquiries to different groups in your organization
This is accomplished by associating service request types with different responsibilities. For example, you can restrict only accountants to viewing and updating billing service requests and service organizations to restrict access to Installation Requests to the field service organization.
-
Provide data security
Responsibility to service request type mappings provide data security not just for the service request information itself, but also for all related information including service request tasks, notes, and interaction history.
Agents that are barred from using a service request type cannot view or modify any service request related information.
-
Restrict agents to using appropriate problem and resolution codes
Problem codes and resolution codes provide agents with a quick and consistent way of classifying customer problems and resolutions. You can specify which codes map service request types to problem codes and resolution codes to restrict selection to those appropriate to the problem.
-
Automatically create tasks when a service request is created
You can use service request types along with Problem Codes, Items, and Item Categories to generate tasks that must be performed to resolve the customer problem. The agents or dispatchers assign these tasks to engineers who will do the work.
-
Capture additional information about a customer problem
You can set up service request types to capture additional information you may need to resolve the customer problem.
For example, a government agency receiving a call about an abandoned vehicle must capture the make, model, color, and the license plate number so the towing service knows which vehicle to tow away and what tow truck to send to do the job.
Based on the information entered, the application can automatically create different tasks and check if the new service request is a duplicate.
The application provides two different and incompatible methods of capturing additional service request information. The appropriate method depends on the application module you are setting up:
-
If you are using the Contact Center (Oracle Forms) to capture the additional information use the method described inCapturing Additional Service Request Attributes in the Contact Center.
-
For all other modules, including Case Management, use the method described inCapturing Additional Service Request Information with Extensible Attributes.
-
-
Launch Oracle Workflow processes
Each service request type can be linked to an Oracle Workflow process that can be automatically launched when agents create or update a service request of this type.
-
Specify different response and resolution times
Service request types are mapped to specific business processes. Each business process permits you to specify different response and resolution times either through individual service contracts created in Oracle Service Contracts or through the default service level agreement (SLA) you set up as part of your service application implementation (See Setting Up Default Response and Resolution Times).
-
Enable integration with Oracle Enterprise Asset Management
You can specify a service request type to display Enterprise Asset Management work orders in service requests.
-
Specify type of electronic record you want to generate
If you are implementing Oracle E-Records to capture electronic records you can set up each service request type to capture either a detailed record or an abbreviated record. See Electronic Approvals and Records.
About Mapping Status Groups to Service Request Types and Responsibilities
After you set up status groups, you must specify where they are to be used by mapping them to service request types.
You can do this in one of two ways:
-
If all users of that service request type are going to be using the same status group, then you can map the service request group directly to the service request type on the Service Request Type window. (See Setting Up Service Request Types.)
-
To specify different status groups for different classes of users, you must map the status groups to a combination of the service request type and the responsibility. This is accomplished using the Service Responsibility Setup page (Setup, then Mapping, then select Responsibility Mapping). See Mapping Responsibilities to Service Request Types and Status Groups.
About Final Statuses Aborting Existing Oracle Workflow Processes
You can set up a service request to automatically launch a workflow whenever an agent creates or updates it. Because each update launches a new instance of the workflow, each service request can have multiple instances of the workflow running at the same time. (For details about associating workflows to service request types, see Setting Up Service Request Types. )
If a workflow is running and an agent sets the service request to a status you flag as Final, then the application takes one of two possible actions:
-
Warns the agent with a message that an instance of the workflow is running and permits the agent to terminate the workflow by clicking a button in the message text.
-
Aborts any instances of the workflow automatically without warning the agent.
To automatically abort the workflow without the warning messages, you must select the Abort Workflow on Final Status without Warning check box in the Service Request Type window. If you don not select this check box, then agents always receive a warning.
Service Request Type Categories for Customers Using Oracle iSupport
You can make it easier for customers logging in to their Oracle iSupport portal to select the correct service request type by classifying service request types into categories. For example, by creating different categories for product problems and for order problems you shorten the lists of service request types a customer or agent must choose from and increase accurate classification of a problem.
You can upload images customers can use as visual cues to identify the categories on their screen. A printer icon may represent the printer service request type category and a currency symbol the invoice category, for example.
Any service request types you do not map to a category appear for Oracle iSupport users under the heading Other.
If you restrict access to service request types by mapping them to Responsibilities, the category appears as long as the Responsibility has access to at least one of the service request types in the category.
Setting Up Service Request Statuses
The status of a service request tracks the status of a customer problem from the initial customer contact to resolution. The status controls the information that a service request can be updated with. For details, see Service Request Statuses.
To set up a service request status
-
Navigate to the Service responsibility, Setup, Definitions, HTML Setup, and then Service Request Statuses.
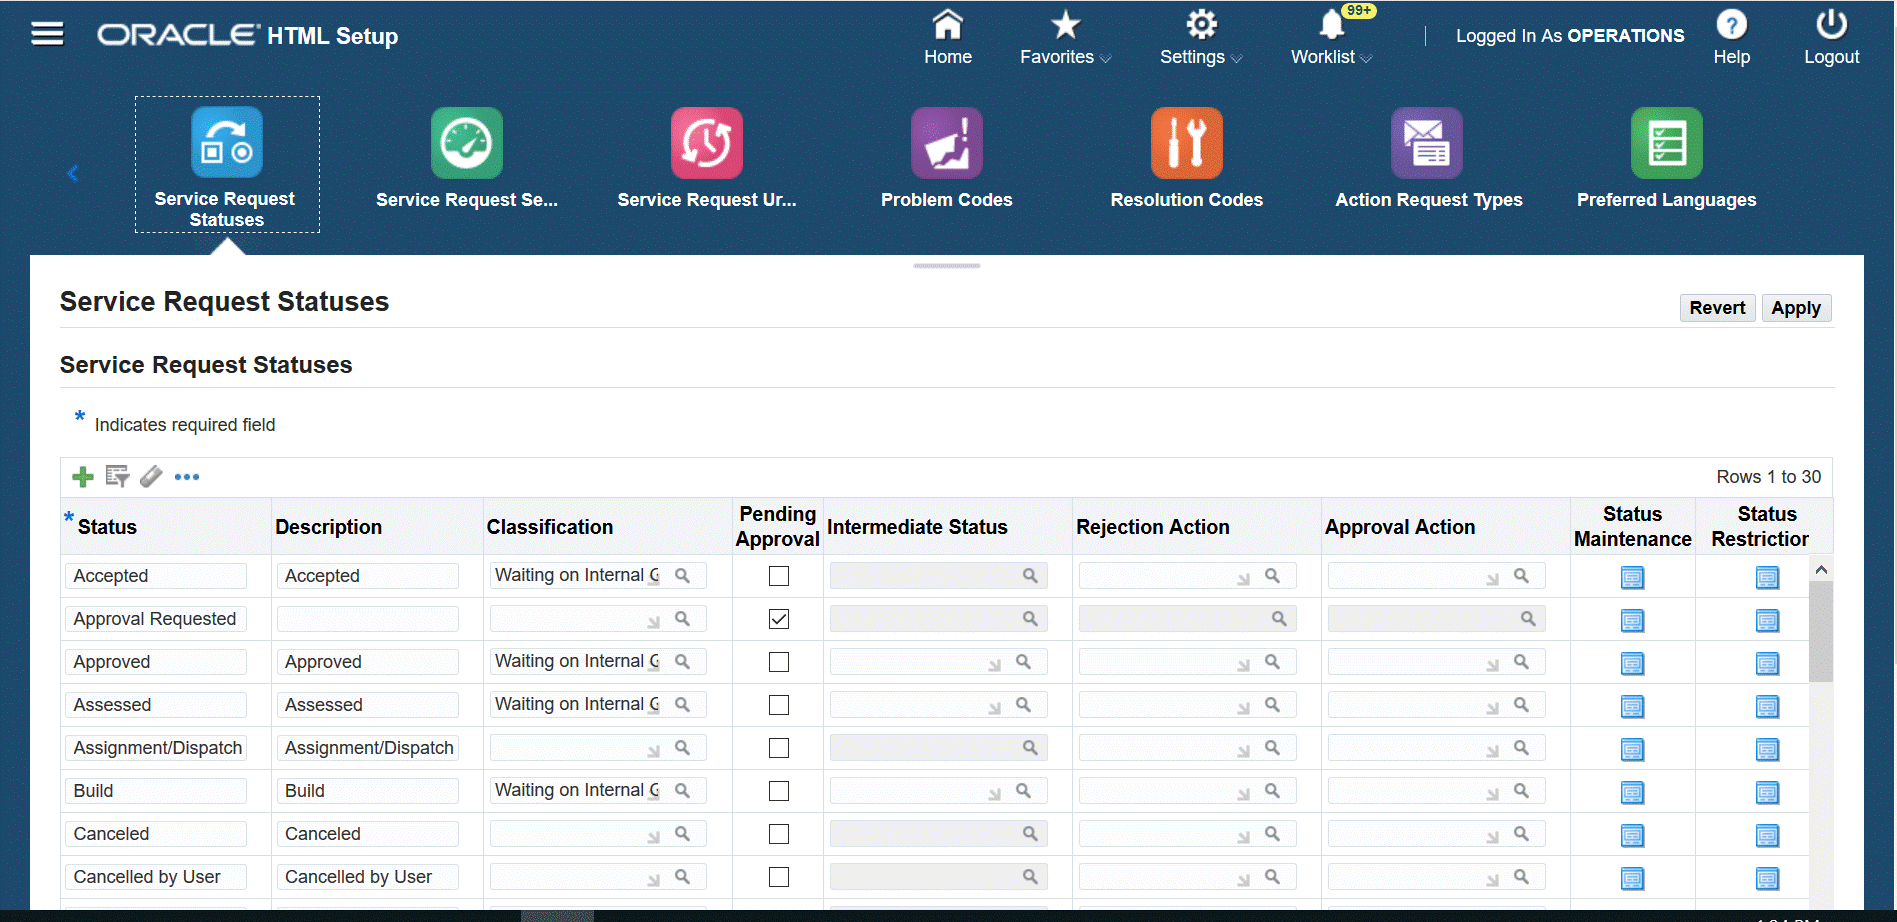
The Service Request Statuses page appears.
-
Click the + icon. A row appears at the bottom of the table where you can enter the required details.
-
Enter a name in the Status field. The text you enter here is displayed in the Status List of Values (LOV) in the Service Request window.
-
By selecting the Responded check box in the Status Maintenance window, you can set a status to automatically fill in the date and time in the Responded On field of the service request. The date and time reflect the time the agent sets the service request to this status.
-
By selecting the Resolved check box in the Status Maintenance window, you can set a status to automatically default the date and time in the Resolved On field of the service request if the agent has not done so manually. The date and time reflect the time the agent sets the service request to this status.
-
Select the Final check box if you want the application to:
-
Enter the date in the Closed field of a service request.
The Closed field appears in the Service Request window header.
-
Terminate any instances of the workflow you have associated with the service request of that type in the Service Request Types page. For more information, see About Final Statuses, Aborting Existing Oracle Workflow Processes.
-
-
To use a status as the initial status of a service request, select the Initial check box in the Status Maintenance window. You can map different service requests types to have a different initial statuses. For example, you may designate a service request created by a customer using Oracle iSupport as "Opened by customer" and a service request opened by service agent in the Service Request window as "New".
Note: Triggering and intermediate statuses that are used for e-record and e-signature capture cannot be designated as initial statuses.
-
If you are using automatic work distribution to deliver the next service requests to an agent, then you may wish to designate a status as on hold by selecting the On Hold check box in the Status Maintenance window. An on-hold status indicates that work on the service request is temporarily suspended because an agent is waiting for more information from the customer or for spare parts to become available, for example.
Automatic work distribution permits agents to request the next most urgent piece of work from the Universal Work Queue by clicking the Next Work button.
Placing a service request on hold excludes the service request from the pool of work evaluated by the application when the agent requests the next highest priority work item.
Without an on-hold status, the application delivers the same service request over and over again if it happens to be the item with the highest priority.
For more information, see Implementing Work Assignment and Distribution.
-
Select the Include in Duplicate Checking check box in the Status Maintenance window to include the status in the Status list on the Automatic Status Updates Rules page. This status can be used for identifying duplicate service requests.
-
Using the Classification list, you can classify each status as:
-
Waiting on Customer
-
Waiting on Support
-
Waiting on Internal Group
-
Waiting on External Group
The HTML-based Service and Case Management modules display this classification on the Agent Dashboard for every service request in agent queues (Waiting On field). The application also uses the classifications to calculate the agent and group performance displayed in the Key Performance Indicators region. See Understanding and Setting Up Key Performance Indicators.
-
-
Optionally, enter start and end dates for the status to restrict status use. By specifying a future start date you can delay the use of a new status. You can inactivate a status by setting an end date.
-
A check mark in the Predefined check box indicates the status was predefined by Oracle. You cannot delete a predefined status, but you can modify its wording or remove it from use by entering an end date.
Oracle includes the following predefined statuses:
-
Cancelled by User
-
Clear
-
Closed
-
Open
-
Planned
-
Waiting
-
-
You can use the Text Color field to assign a color to the text that the support agent sees in the Status field of the service request.
-
To restrict users from updating certain types of information, select one or more in the Status Restrictions window:
-
Disallow Request Update: Prevents users from updating the service request.
-
Disallow Task Update: Prevents users from updating tasks related to the service request in the Service Request window. (Tasks can still be modified from the JTF Tasks user interface.)
-
Disallow Charge Update: Prevents users from updating charges
-
Disallow Owner Update: Prevents users from updating service request ownership
-
Disallow Product Update: Prevents users from updating product information
-
Disallow Charge: Prevents users from entering charges information
Note: The Intermediate Status and Rejection status fields as well as the Pending Approval check box are used only for setting up approvals and electronic signatures using Oracle E-Records. See Electronic Approvals and Records.
-
-
Optionally, you can enter the descriptive flexfield information in the flexfield ( [ ] ) column.
-
Click Apply to save your changes.
-
Repeat the above procedure for all the statuses you need for all of your service request types.
You are now ready to group the statuses you have created into status groups specific to each service request type according to the procedure outlined in Setting Up Status Groups.
Setting Up Status Groups
You can use status groups to specify for each service request type:
-
Which statuses can be used for service requests of a type
-
The initial status for a service request
-
The permissible status transition rules for each status in the group.
For an overview of status groups and their function see About Statuses, Status Groups, and Service Request Types.
Prerequisites
Before creating status groups, you must create the statuses by following the procedure outlined in Setting Up Service Request Statuses.
To set up status groups:
Under the Service responsibility, navigate to Setup, then Rules, and select Status Groups and Transitions.
The Status Group Summary page lists status groups that have already been set up and provides the launching point for updating, copying, and creating status groups and their transitions.
Notes:
-
You can either create a group by clicking Update or copy and modify an existing group by clicking Duplicate (the icon showing two sheets of paper).
-
The Status Group Definition you use to create status groups is divided into four regions.
Note: You must scroll down to view all regions.
-
Use the first two regions on the page to specify the status group name and add the statuses.
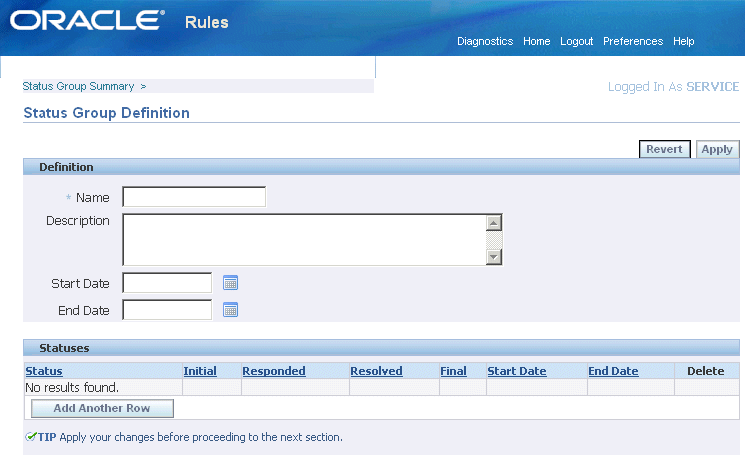
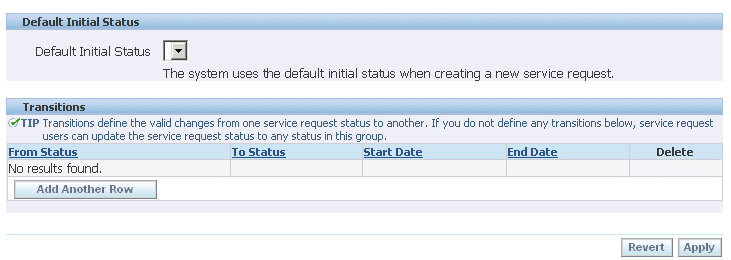
You must specify the default initial status for a service request type using this status group, and define the permissible status transitions at the bottom of this page.
-
You must add all statuses and click Apply to save your work before selecting the default initial status or entering transition rules.
-
You can only select a status as an initial status if it has been set up as an initial status in the Service Request Statuses page.
Note: If you are automatically closing duplicate service requests using the status update feature offered by service request relationships, then you must include the seeded status of "Waiting", "Clear", and "Closed" and the status group transition rules must permit all statuses to transition to the status of "Closed". See Service Request Linking to Specify Duplication and Other Relationships.
-
Select a task template for all statuses. The Service: Auto Task Generation on Service Request Status Transitions profile controls whether the task template is used to create new tasks when the service request status transitions from one status to another. By default, the value is set to No. If the value is set to No, irrespective of what values are set in the task template column in the Status Group Definition page, auto tasks are not generated on status transition. If the profile option is set to Yes, then tasks are generated based on the task template value on the status transition is executed. You can select from any one of the following values:
-
None - No action is taken when the service request status changes.
-
Task Template Mapping - Task template is derived based on the problem code, service request type, item, and item category when the service request status changes.
-
List of effective task template groups associated to document type of service request - Task template groups associated with the document type of service request are alphabetically displayed.
Note: If the "To Status" in the Status Group Definition page is in a status that has the "Disallow Request Update" check box selected, then tasks are NOT generated.
-
-
Select a workflow for all statuses. The Service: Auto Launch Workflows on Service Request Status Transitions profile controls whether the workflow is launched on the status transition. By default, the profile is set to No. If the value is set to No, then workflows are not launched on status transitions. If the profile is set to Yes, then workflows, if specified, are launched on status transitions.
Note: : In the Status Group Definition page, the Workflow LOV lists all workflows with item type of SERVEREQ
Setting Up Service Request Types
Agents and customers set up service request types to categorize the service requests.. For more information about service request types, see Service Request Types.
Prerequisites:
-
You must create the object you want to link to the service request type. For example, to link a service request type to a status group, you must first create the status group.
-
If you create service requests for Oracle Installed Base item instances, then you must create business processes that the application uses to lookup customer entitlements in Oracle Service Contracts.
You must create at least one dummy business process even if you do not use Oracle Service Contracts. This is because the application requires a business process to look up the default service agreement when an agent enters an Oracle Installed Base instance in the service request.
To create a service request type
-
Navigate to the Service responsibility, Setup, Definitions, HTML Setup, and then Service Request Types.
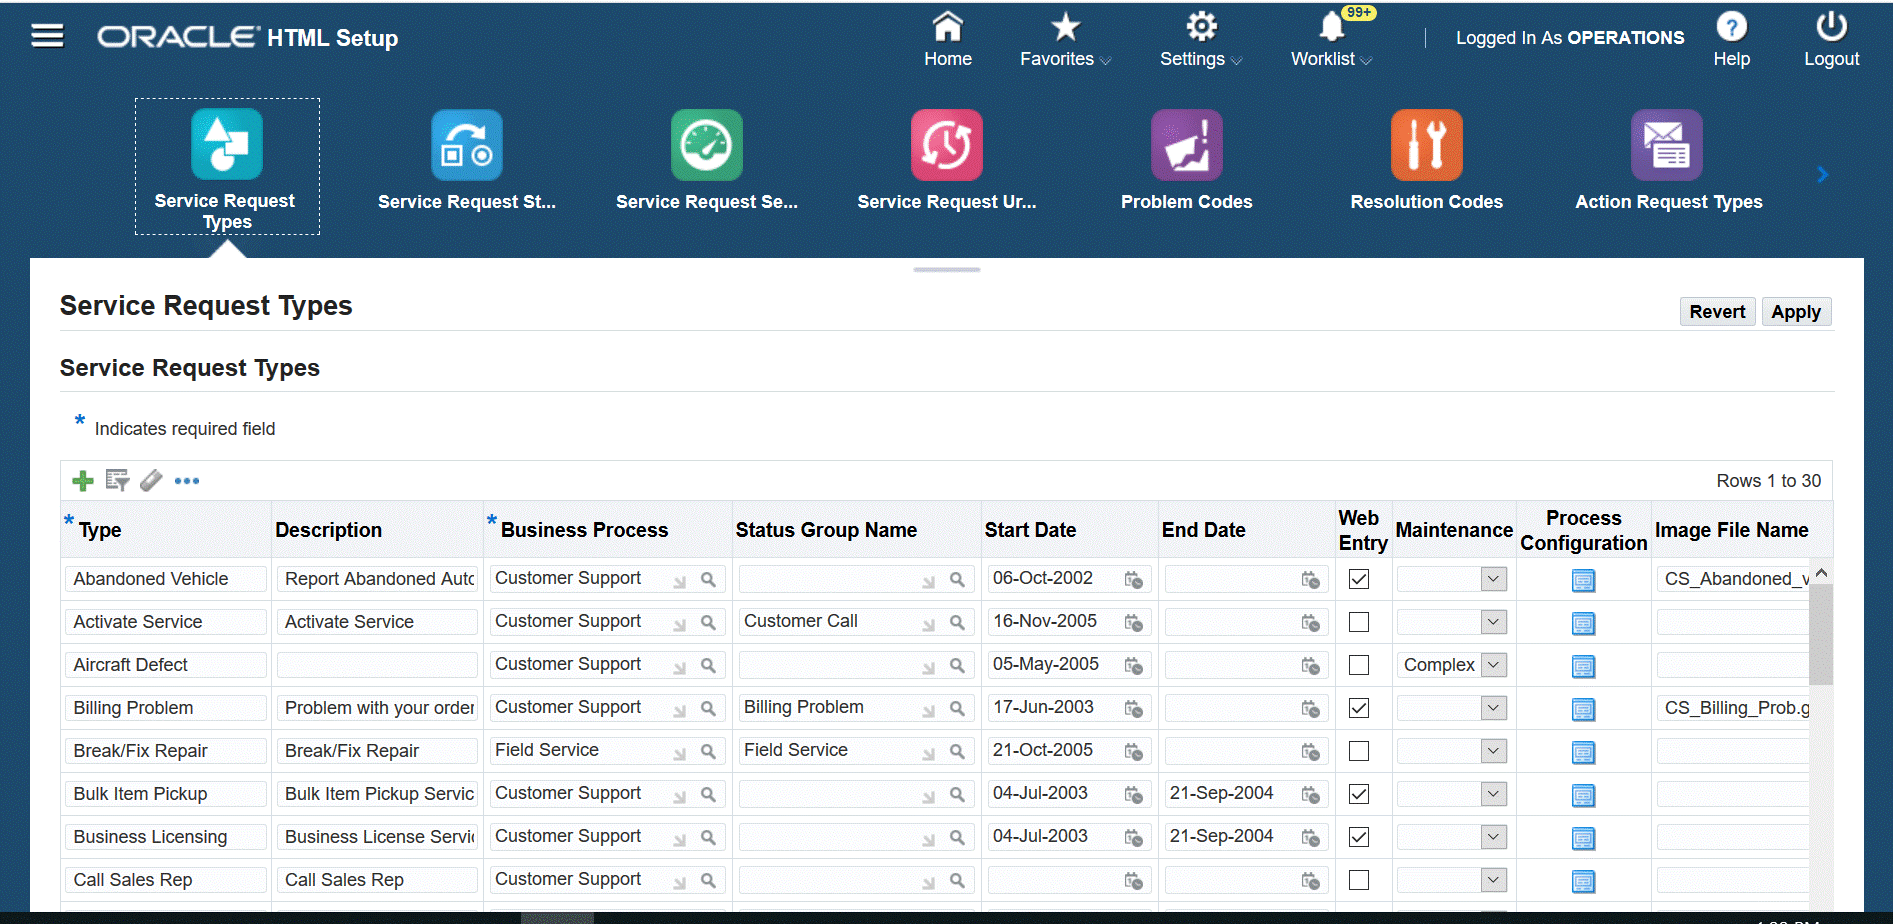
The Service Request Types page appears.
-
Click the + icon. A row appears at the bottom of the table where you can enter the required details.
-
Enter a name for the service request type in the Type field. This is the text agents see in the Type list of values in the Service Request window.
-
If the service request type is going to be used for creating service requests for Oracle Installed Base item instances (products the customer owns), then select a business process from the Business Process list of values. The business process supplies the response and resolution times specified in Oracle Service Contracts or in the default service level agreement.
-
Optionally, enter start and end dates. By specifying a future start date you can delay the use of a new service request type. You can inactivate a type by setting an end date.
-
Enter a description for the service request type.
-
If you have set up a status group for this service request type, then select it using the Status Group Name list of values (LOV).
Note: Use the mapping in a separate setup by using multiple status groups to specify different behaviors for different users. See About Mapping Status Groups to Service Request Types and Responsibilities. This alternative way of mapping status groups to service request types and responsibilities supersedes the mapping you make here.
-
To make this service request type available to customers who are creating service requests on the Web using Oracle iSupport, select the Web Entry check box.
-
To enable the service request type for Oracle Enterprise Asset Management, select Asset in the Maintenance list.
-
To enable the service request type for Oracle Complex Maintenance, Repair, and Overhaul, select Complex in the Maintenance list.
-
Optionally, associate an Oracle Workflow process to be included in the Workflow list of values (LOV). This can be a process you have created or one that is included with your application. Use item type SERVEREQ for Complex maintenance and EAMSRAPR for Asset maintenance.
Your application includes three predefined workflows, which are a part of the SERVEREQ item type and appear in the Workflow LOV (See About Oracle Workflow Processes Included with Your Application.):
-
Duplicate Check and Autotask Create for iSupport and Email Center Created SR
Check for potential duplicates when service requests are created in Oracle iSupport and Oracle Email Center
-
Call Support Process
Use this workflow only under special circumstances if you are using Oracle TeleService.
-
Customer Support Event Process
Do not associate this workflow here. It is used by Oracle TeleService internally.
-
-
If you have associated a workflow, then select one or both of the related check boxes in the Process Configuration window:
-
Auto Launch Workflow: Launches workflow automatically when a service request is created and updated. If you have selected the Auto Launch Workflow check box for any service request type, then you must set the set the system profile Service: Auto Launch Workflow to Yes.
-
Abort Workflow on Final Status without Warning: Selecting this check box aborts without warning any instances of the workflow you have associated with this service request type whenever an agent sets that service request's status to a status that is flagged as Final in the Service Request Statuses page. (See Setting Up Service Request Statuses.)
If you do not select this check box, then the agent always receives a warning if a workflow is about to be terminated and has a chance to cancel the abort.
-
-
If you are implementing Oracle E-Records to capture electronic records, you can have the application capture a detailed e-record by selecting the Detail ERES Record check box in the Process Configuration window. By default, the application generates an abbreviated record. See Electronic Approvals and Records.
-
If the service request type is being used in Oracle iSupport, then you can display an image to help customers select the correct type during request creation.
For example, a computer hardware company may present users with an icon of a printer for the Printer Trouble and an icon of a monitor for Monitor Trouble. To display the image, upload the image to APPL_TOP in the OA_MEDIA directory and enter the name in the Image File Name field.
-
Optionally, you can enter the descriptive flexfield information in the flexfield ( [ ] ) column.
-
Click Apply to save the changes.
Grouping Service Request Types into Categories for Oracle iSupport
Create categories of service request types and include icons to make it easier for customers using Oracle iSupport to select the correct service request type for their problem. For more information, see Service Request Type Categories for Oracle iSupport.
To create a category and map it to service request types
-
Under the iSupport Administrator responsibility, navigate to Request Type Administration, then select Request Type Categories.
-
From the Request Type Categories Page, you can create new categories or modify existing ones. To create a category:
-
Click Create on the Request Type Categories page.
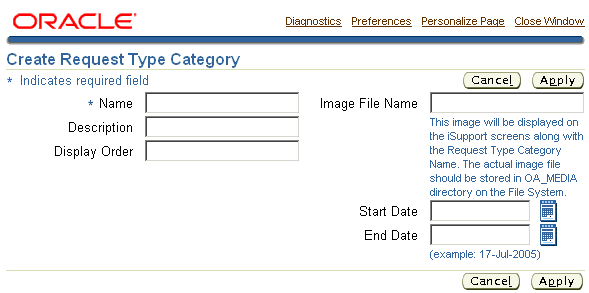
The Create Request Type Category page appears.
-
The category name, which displays in the customer's Web portal page, is the only mandatory field.
-
Enter a sequence number in the Display Order field to specify a specific order in which you wish the categories to appear in the list of values.
-
If the category you are creating is being used in Oracle iSupport, then you can display an image to help customers identify the category visually. To display the image, upload the image to APPL_TOP in the OA_MEDIA directory and enter the name in the Image File Name field. This image is not displayed in any of the Oracle TeleService modules.
-
Click Apply.
-
-
Click the Mapping icon.
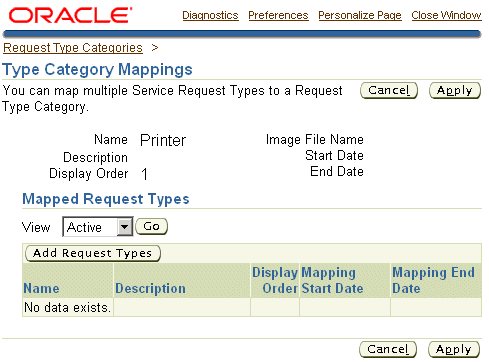
The Type Category Mappings page Appears.
-
Click Add Request Types.
-
On the Search page, you can select multiple service request types to map at the same time, so you can display them all by using the "%" sign in the Search field.
-
Click Select to return to the Type Category Mapping page.
-
You can specify an order for the way the service request types appear in the list of values by entering numbers in the Display Order field.
-
Click Apply.
Setting Up Service Request Severities
You can define service request severities such as High, Medium, and Low to assist in setting service request priority. Service Request Severity is a mandatory field in the service request, where it reflects the support agent's perception of the request.
To set up a service request severity
-
Navigate to the Service responsibility, Setup, Definitions, HTML Setup, and then Service Request Severities.
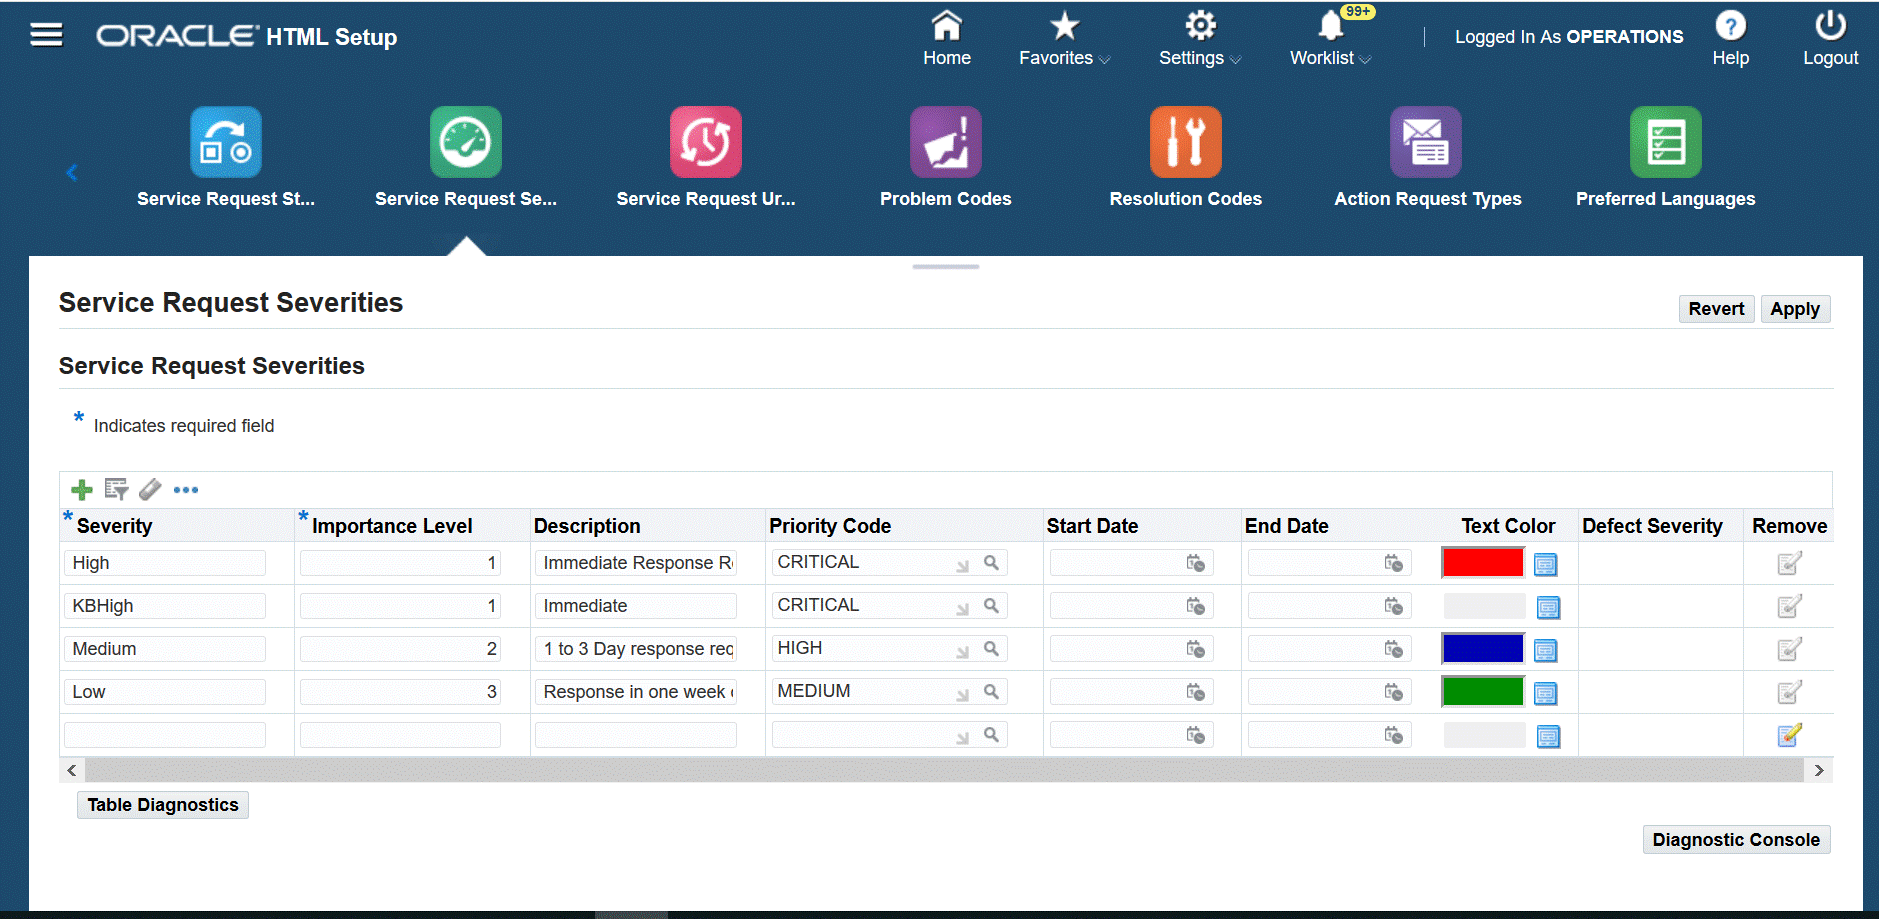
The Service Request Severities page appears.
-
Click the + icon. A row appears at the bottom of the table where you can enter the required details.
-
Enter a severity name in the Severity field.
-
Enter a numerical value in the Importance Level field. The importance level indicates the importance of this particular severity with respect to other defined severities.
If you are implementing automatic workload balancing for automatic work assignment, then you must group the severities into four categories, 1 through 4, where 1 represents the severities of the highest priority and 4 represents those of the lowest priority. See Implementing Service Request and Task Assignment.
-
Optionally enter a description of the severity.
-
If you are enabling automated work distribution, where agents assign work to themselves in the Universal Work Queue by using the Get Work and Next Work buttons, then you must use the Priority Code list of values (LOV) to select one of the four priorities: critical, high, medium, or low.
The application uses the priority you enter here together with the service request due date to calculate the most urgent work item to assign to agents when they click the Get Work and Next Work buttons.
The Priority Code maps to the Global Priority Levels in the Universal Work Queue.
For more information on automatic assignment topics, see Implementing Service Request and Task Assignment.
-
Optionally, enter start and end dates to control the use of severities. By specifying a future start date you can delay the use of a new severity. You can inactivate a severity by setting an end date.
-
Optionally, select a text color in the Text Color field to display the severity in this color on the Service Request window.
-
If a descriptive flexfield is enabled for this page, select the appropriate values.
-
Click Apply to save the changes.
-
Set up the severity you want to use as a default by setting the system profile option Service: Default Service Request Severity at the site level. This setting is required if you are creating service requests using the actions architecture on the Contact Center Install Base tab.
Setting Up Service Request Urgencies
You can define service request urgencies to provide an indicator of the customer's perception of the urgency of the service request. Urgency is an optional field in service requests.
Following are some examples of service request urgencies:
-
Inoperable
-
Partially Operable
-
Not Urgent
To set up service request urgencies
-
Navigate to the Service responsibility, Setup, Definitions, HTML Setup, and then Service Request Urgencies.
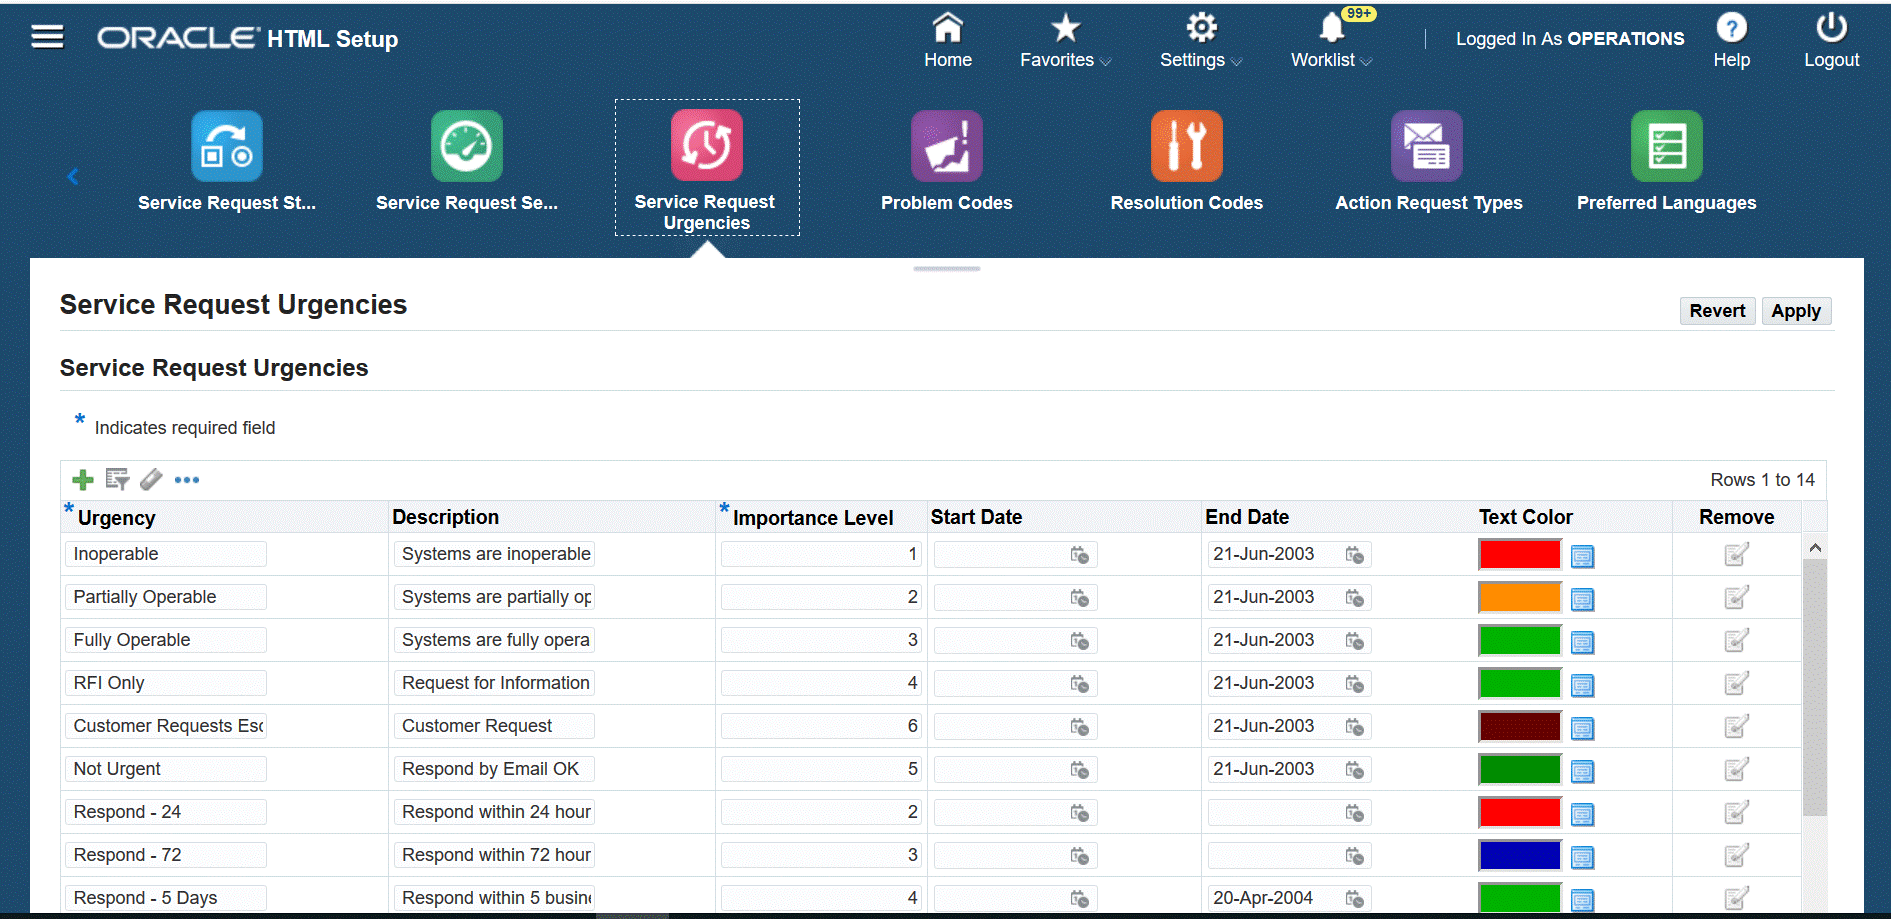
The Service Request Urgencies page appears.
-
Click the + icon. A row appears at the bottom of the table where you can enter the required details.
-
Enter an urgency name in the Urgency field. The urgency name appears in the Urgency list of values in the service request.
-
Enter a numerical value in the Importance Level field. The importance level indicates the importance of this particular urgency with respect to other defined urgencies. You can have multiple urgencies with the same importance level.
-
Optionally, enter a description and start and end dates to control the availability of urgencies.
-
You can select a text color using the Text Color field list of values.
-
Click Apply to save your service request urgency.
Setting Up Problem Codes
About Problem Codes
Service request problem codes provide service agents with a standard way to classify customer requests.
For example:
-
Hardware Problem
-
Software Problem
-
Shipping Damage
Agents can enter one problem code per service request using the Problem Code list of values. Entry is optional by default.
Problem codes are implemented using the standard Oracle Applications lookup code of type REQUEST_PROBLEM_CODE. The associated lookup codes are user definable.
Note: The Case Management module uses problem codes as Issue Types.
About Problem Code Mapping
Because the list of all problem codes can be large, you can use the procedures in this section to narrow an agent's choice to only those problem codes that are appropriate to each customer problem. You can do this by mapping problem codes to service request types, inventory items (individual items or categories), or a combination of the two.
Note: You can map a problem code to multiple objects.
For example, if you have customers calling in with billing questions or computer hardware problems, then you may wish to map the available problem codes to the two Service Request Types to prevent an agent from accidentally making the wrong problem code entry. You do not want an agent to enter "Incorrect labor rate" in a service request about a faulty hard drive, for example, or "Replacement needed" for a billing question.
You can restrict the use of problem codes further by inventory item category to prevent an agent from using the wrong problem code for a particular product, for example, using "New battery required" for a service request that involves the replacement of the hard drive.
If you do not create a mapping for a problem code, agents can use it in any service request.
You can map problem codes to the following valid permutations:
-
A Service Request Type alone
-
An inventory item alone
-
An inventory item category alone
-
A Service Request Type and an inventory item
-
A Service Request Type and an inventory item category
Suppose you create eight problem codes, A through H, and two mappings, for example:
-
Mapping 1: Problem codes A, B, and C to Service Request Type T1
-
Mapping 2: Problem codes D and E to T1 and inventory item P1
You leave problem codes F, G, and H unmapped.
Here are the available problem codes for an agent creating a service request:
-
If an agent does not enter either Service Request Type T1 or product P1, then the available problem codes are limited to the unmapped problem codes F, G, and H.
-
Agents entering item P1 with different Service Request Types are also limited to the unmapped problem codes.
There is no mapping defined for item P1 alone, so entering the item without the Service Request Type T1 does not make any difference.
-
If the agent selects Service Request Type T1 but does not enter the item P1, then the available problem codes are: A, B, and C as well as the unmapped problem codes F, G, and H.
-
If the agent selects type T1 and item P1, then the available problem codes are: A, B, C, D, and E as well as the unmapped problem codes F, G, and H.
A, B, and C are valid for Service Request Type T1 and all inventory items.
D and E are valid for the T1 and P1 combination.
Defining Service Request Problem Codes
Use this procedure to define problem codes.
Prerequisites:
If you plan to use a large number of problem codes in your organization, you can map problem codes to service request types, items, and item categories. This way an agent sees only the problem codes that are relevant to the customer problem at hand. If you plan to create these mappings, you should plan them before creating any problem codes. See Restricting the Use of Problem Codes.
To set up problem codes:
-
Navigate to the Service responsibility, Setup, Definitions, HTML Setup, and then Problem Codes.
The Problem Codes page appears.
-
Click the + icon. A row appears at the bottom of the table where you can enter the required details.
-
Enter a problem code in the Code field.
-
Enter a meaning. A meaning is a brief description of the code.
-
Optionally, enter a full description of the code in the Description field.
-
Optionally, enter start and end dates to control the use of problem codes. By specifying a future start date you can delay the use of a new problem code. You can inactivate a problem code by setting an end date.
-
Leave the Tag field empty. It is not used for problem codes.
-
Select the Enabled check box to make the code available for use.
-
Optionally, enter the descriptive flexfield, if it is defined.
-
Click Apply to save your problem code.
-
After you finish entering your problem codes, you are ready to restrict their use by mapping them to service request types, inventory items, and item categories. See Mapping Problem Codes.
Mapping Problem Codes
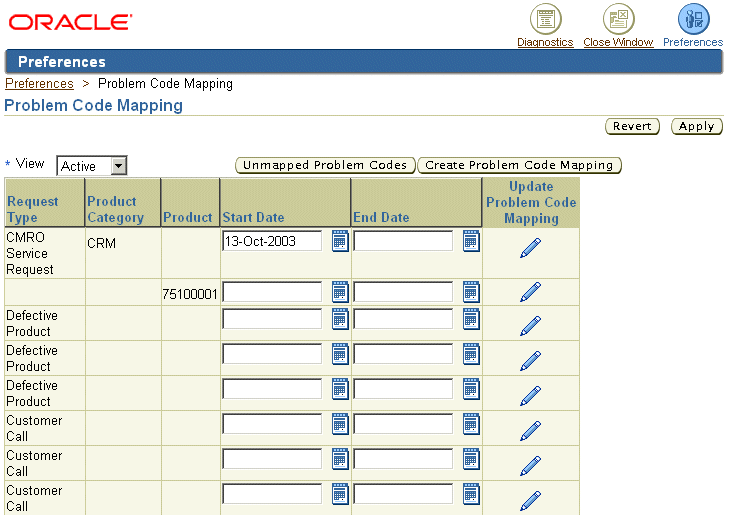
You create and edit problem code mappings from the Problem Code Mapping page available by navigating under the Service responsibility to Setup, Mapping, Problem Code Mapping.
Notes:
-
For an explanation of problem code mapping see About Problem Code Mapping.
-
You can create a mapping in one of two ways:
-
You can view a list of unmapped problem codes and select those you want to map by clicking Unmapped Problem Codes.
-
If you know the codes you want to map, create the mapping directly by clicking Create Problem Code Mapping.
-
-
When updating an existing mapping, you cannot update the mapping criteria, only the list of mapped problem codes.
-
To disable a particular mapping or make it available only at a future time, enter a date in the End Date or Start Date fields and click Apply. End dating a mapping is useful if you have made an error in your setup as it frees up mapped problem codes for reuse.
-
You can restrict the display of existing mappings by making a selection from the View list:
-
Active: to view all mappings in effect. This is based on the start and end dates.
-
All: to view all current, planned, and end dated mappings.
-
Planned: to view only mappings that have a future start date.
-
Creating a New Problem Code Mapping
Use this procedure to create a new problem code mapping. You can reuse the same problem code for multiple mappings.
Prerequisites:
-
You must first set up Service Request Types, problem codes, inventory items, and item categories.
-
Display existing mappings by navigating to Setup, then Mapping, and select Problem Code Mapping under the Service responsibility.
-
On the Problem Code mapping page, click Create Problem Code Mapping.
Note: To view unmapped codes first, click Unmapped Problem Codes.
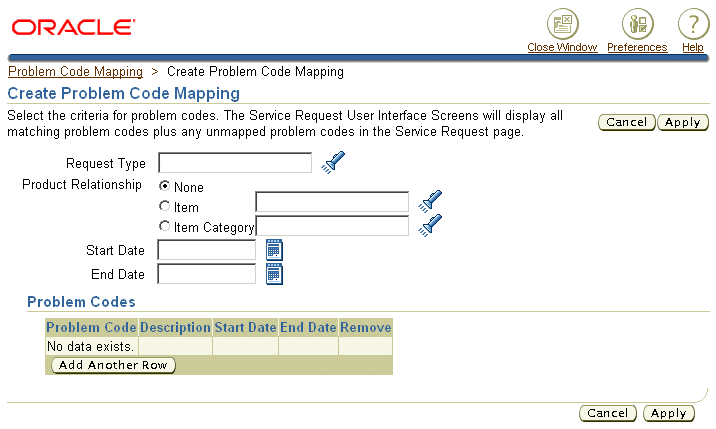
The Create Problem Mapping page appears.
-
Select the object or combination of objects you wish to map. You can map problem codes to a Service Request Type alone or in combination with either an item or an item category:
-
To map problem codes to a Service Request Type, select the type using the Request Type list of values (the flashlight icon).
-
To map to an inventory item or an item category, select either the Item or the Item Category option and use the list of values to make your selection.
-
-
Select any problem codes you wish to map using Add Another Row.
Note: The list of all problem codes includes those that are already mapped. If you accidentally select a mapped code, an error is displayed when saving this mapping.
-
Click Remove before you save the mapping to remove the mapped codes.
-
Click Apply when you are done.
Setting Up Resolution Codes
About Resolution Codes
Resolution codes provide a uniform way for agents to specify how a service request is resolved. For example:
-
Unit Replaced
-
Patch Sent
-
Documentation Sent
Agents can enter one resolution code per service request using the Resolution Code list of values. By default, the resolution code is optional.
Resolution codes are implemented using the standard Oracle Applications lookup code of type REQUEST_RESOLUTION_CODE. You can define the lookup codes using the procedure outlined in Setting Up Service Request Resolution Codes.
About Mapping Resolution Codes
You can specify which resolution codes are relevant to which service requests by mapping resolution codes to problem codes, service request types, inventory items (individual items or categories), or a combination of the three.
Note: You can use the same resolution code in multiple mappings.
You can map resolution codes to the following valid permutations:
-
A service request type
-
An inventory item
-
An inventory item category
-
A problem code
-
A service request type and an inventory item
-
A service request type and an inventory item category
-
A service request type and a problem code
-
An inventory item and a problem code
-
An inventory item category and a problem code
-
A service request type, an inventory item, and a problem code
-
A service request type, an inventory item category, and a problem code
For example, if customers report problems with computer hard drives from different manufacturers, you can create separate resolution codes for each manufacturer and map them to a combination of problem code and manufacturer (represented by inventory item categories). This way you ensure agents select the correct resolution code.
Suppose you have three brands of hard drives Toshiba HD, IBM HD, and Seagate HD. You can create three resolution code mappings described in the following table:
| Mapping | Problem Code | Item Category | Mapped Resolution Codes |
|---|---|---|---|
| Mapping 1 | Hard Drive Failed | Toshiba HD |
|
| Mapping 2 | Hard Drive Failed | IBM HD |
|
| Mapping 3 | Hard Drive Failed | Seagate HD |
|
This mapping ensures that agents select the correct resolution code for each hard drive make.
Agents can use unmapped resolution codes in all service requests.
Setting Up Service Request Resolution Codes
Use this procedure to set up resolution codes.
-
Navigate to the Service responsibility, Setup, Definitions, HTML Setup, and then Resolution Codes.
The Resolution Codes page appears.
-
Click the + icon. A row appears at the bottom of the table where you can enter the required details.
-
Enter a code in the Code filed.
-
Enter the wording you wish agents to see in the list of values in the Meaning field.
-
Optionally, enter a description in the Description field.
-
You can restrict the availability of the code using the start or end dates.
-
Leave the Tag field empty. It is not used for resolution codes.
-
Select the Enabled check box to make the code available for use.
-
Click Apply to save your changes.
-
If you plan to use a large number of resolution codes in your organization, you can map resolution codes to problem codes, service request types, items, and item categories. This way an agent sees only the resolution codes that are relevant to the customer problem at hand. See Mapping Resolution Codes.
Mapping Resolution Codes
You can restrict the use of resolution codes by mapping them to service request types, product categories, products and problem codes.
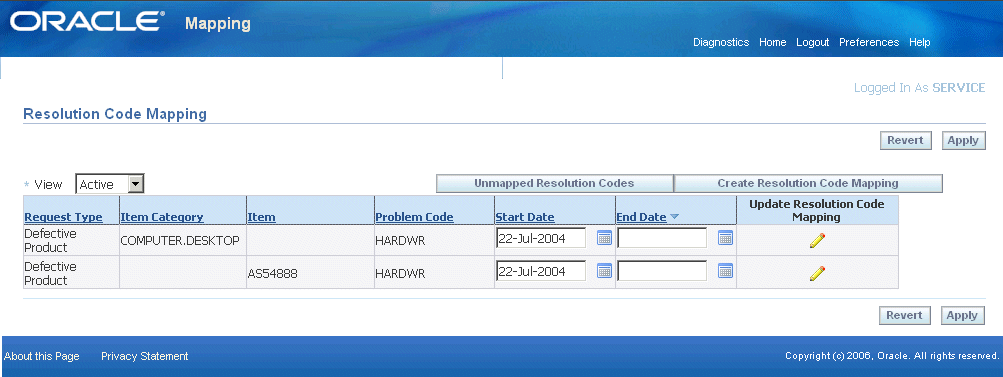
You create and the mappings from the Resolution Code Mapping page available under the Service responsibility by navigating to Setup, Mapping, Resolution Code Mapping. The procedure for mapping resolution codes is the same as for problem codes.
Notes:
-
You can create a mapping in one of two ways:
-
Click Unmapped Resolution Codes to view a list of unmapped resolution codes and select those you want to map.
-
Click Create Resolution Code Mapping to create the mapping directly, if you know which codes you want to map.
-
-
When updating an existing mapping, you cannot update the mapping criteria, only the list of mapped resolution codes.
-
You can control the availability of the mapping using the End Date or Start Date fields. Setting an end date for a mapping is useful if you have made an error in your setup as it frees up mapped resolution codes for reuse.
-
You can restrict the display of existing mappings by making a selection from the View list:
-
Active: to view all mappings in effect.
-
All: to view all current, planned, and mappings, which have reached their end date.
-
Planned: to view only mappings that have a future start date.
-
Creating a Resolution Code Mapping
Use this procedure to create a resolution code mapping.
Prerequisites:
-
You must first set up service request types, problem codes, resolution codes, inventory items, and item categories.
-
Display existing mappings by navigating to Setup, Mapping, Resolution Code Mapping under the Service responsibility.
-
You can create a mapping in one of two ways:
-
Click Unmapped Problem Codes by selecting problem codes from a list of unmapped codes.
-
Click Create Problem Code Mapping if you know which codes you want to map.
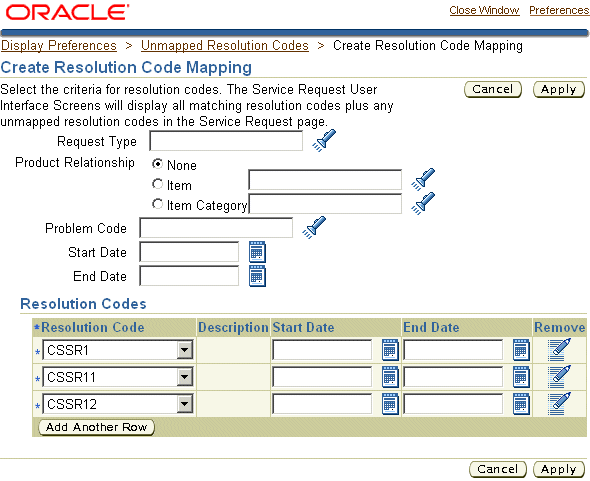
The Create Resolution Code Mapping page appears.
-
-
Select the object or combination of objects you wish to map:
-
To map resolution codes to a service request type, select the type using the Request Type list of values (the flashlight icon).
-
To map an inventory item or an item category, select either the Item or the Item Category option and use the list of values to make your selection.
-
To map a problem code, select it.
-
-
To limit the availability of this mapping, enter dates in the Start Date and End Date fields.
-
Enter any additional resolution codes you wish to map. For each code:
-
Click Add Another Row.
-
Select the code using the Resolution Code list.
Note: The list of all resolution codes includes those that are already mapped. If you accidentally select a mapped code, an error message is displayed when you save the mapping.
-
-
Click Remove to remove any mapped code. You can remove codes only before you save the mapping.
-
Click Apply.
Setting Up Service Request Templates
About Service Request Templates
To create standard service requests you can define service request templates. Oracle TeleService administrators define the templates and the service agents use these templates to create service requests with predefined information. Using a template saves time for the service agents. After you create a template, you can make it active or inactive by setting start and end dates.
To create a service request template:
-
Navigate to the Service responsibility, Setup, Definitions, and then Service Request Templates.
The Service Request Templates page appears.
-
Click Create. The Create Service Request Template page appears.
-
Enter a name and description. Enter the required details for all the sections in the template: General Attributes, Customer Information, Item Information, and Owner Information. In the Field Properties section, select the Required check box for the fields that you would like to make mandatory. To display and update the fields select the Display and Update check boxes respectively.
-
Click Save to save and further update the template.
-
Click Apply to save this template to the list of service request templates.
To update the service request template:
-
Navigate to the Service responsibility, Setup, Definitions, and then Service Request Templates.
The Service Request Templates page appears.
-
Click the Update icon for your template.
The Update Service Request Template page appears.
-
Perform all the updates to the template.
-
Click Save and then Apply.
Mapping Service Request Templates
You can associate the service request template with specific users, applications, and responsibilities by mapping the template.
To map a service request template:
-
Navigate to the Service responsibility, Setup, Definitions, and then Service Request Templates.
The Service Request Templates page appears.
-
Click Template Mapping.
The Service Request Template Mapping page appears.
-
Select your template from the Template Name drop-down list. Click Define Mapping.
The Define Template Mapping page appears.
-
Use the Application, Responsibility, and User tabs to provide the mapping criteria.
-
Click Save and then Apply.
Creating Service Requests from Service Request Templates
After you create and map the service request template, you can use it to create service requests. Service agents save time on the Agent Dashboard page by creating service requests from templates. You can create service requests from service request templates in the Customer Support HTML module of Oracle TeleService and in Oracle Email Center.
Templates for Service Requests in Customer Support HTML Module of Oracle TeleService
To create a service request from service request templates in the Customer Support HTML module of Oracle TeleService:
-
Navigate to the Customer Support Specialist responsibility, Customer Support, and then Queued Work Selection.
The Agent Dashboard page appears.
-
In the Service Request Work Queues section, click the Create drop-down button. Select Create Service Request from Template.
The Create Service Request from Template window appears.
-
Select your template from the Service Request Template drop-down list.
The Create Service Request from Template page appears.
-
Enter the required details on the Create Service Request from Template page.
-
Click Apply. The Agent Dashboard page displays the new service request number with a link to access and update it.
Templates for Service Requests in Oracle Email Center
To create a service request from service request templates in Oracle Email Center:
-
Navigate to the Email Center Agent Console responsibility and then Home.
-
Click the Customer tab.
-
Search for the customer for whom you want to create a service request.
-
Select the person and click Create a Message. The Compose page appears.
-
Click Create from Template in the Service Request region.
-
Select your template from the Service Request Template drop-down list. The Create Service Request from Template page appears.
-
Enter the required details and click Apply. The Service Request region on the Compose page displays the service request number.
Setting Up Default Response and Resolution Times
Use this procedure to set up default service request response and resolution times by business process and service request severity.
Service request types are mapped to specific business processes. Each business process permits you to specify different response and resolution times either through individual service contracts created in Oracle Service Contracts or through the default service level agreement you set up as part of your service application implementation.
When agents create a service request not covered by a contract, the application uses the default resolution and response times for the business process to calculate the deadlines for responding and resolving the service request and automatically sets the default Respond By and Resolve By dates.
The SLA is calculated based on the value specified in the Service: Date to Calculate SLA profile option, and either the reported date or the date on which the service request is created.
If an agent later selects a contract for the service request or enters an install base item covered by a contract, these default times get overwritten by those specified in the contract.
To set up default response and resolution times:
-
Set up an Oracle Service Contract coverage template with the reaction times and resolution times for each business process and service request severity as described in the Oracle Service Contracts User Guide.
Note: The template you create is for setting up default reaction times and resolution times only. It cannot be used to set up default pricing information such as discounts and labor rates.
-
Navigate to Others, Profile System Values and set the system profile option Service: Default Coverage for SLA to the name of the template you have created.
Setting Up Task Types and Priorities for Service Request Tasks
This step is required to use service request tasks. The procedure includes only service request related requirements, please see Oracle Common Application Calendar Implementation Guide for more detail on the task set up.
To set up task types and priorities
-
Under the Service responsibility, navigate to the Task Type Setup window (Setup, Task Management, Task Types).
-
All existing task types are displayed. To make task types available for service requests:
-
Click Map Types.
The Mapping Objects window appears.
-
For each task type, use the lists of values to enter Service Request in the Source Object field and the task type in the Task type field.
-
Save your work.
-
-
Navigate to Setup, then Task Management, then select Task Priority.
The Task Priority window appears displaying existing task priorities.
-
To make task priorities available for service request tasks:
-
Click Map Priority.
The Mapping Objects window appears.
-
For each task type, use the lists of values to enter Service Request in the Source Object field and the task priority in the Task Priority field.
-
Save your work.
-
-
For each task priority you want to use with service request tasks:
-
Associate the source Service Request to the task priority.
-
Save your work.
Setting Up New Note Types for Service Requests and Tasks
Use note types to classify the information your organization keeps on service request, tasks, and customers. This procedure is a guideline for setting up new note types. For additional details, see the Setting Up Notes section of the Oracle Common Application Calendar Implementation Guide.
The application includes the following seeded note types for use with service requests:
-
Action
-
Cause
-
Changes
-
Fact
-
Objective
-
Problem Description
-
Resolution Description
-
Symptom
You can create additional note types for use with service requests, with tasks and with customers.
To set up a new note types
-
Under the Service responsibility, navigate to Setup, then Notes, then select Note Types and create the note type. The codes for predefined service note types start with "CS_", but you can use any unique code you want.
-
Navigate to Setup, then Notes, then Source and Note Type Mapping and use the Mapping Objects window to map the note type to the object where you are going to be using it. The following table lists the objects you can map and where the mapping displays:
Source Object Where the Note Type appears Party Contact Center Service Request Service requests in all Oracle TeleService modules Task Manager Tasks in all modules. Oracle iSupport does not expose task notes. Public Service Requests Service requests in Oracle iSupport To have notes created with your note type appear in multiple objects, you must map the note type multiple times. For example, for a note to appear in both Oracle TeleService and on the Oracle iSupport Web portal customers user to access service request information, you must map its note type to both Service Request and Public Service Request.
The application does not use entries in the Application field for the mapping.
-
To use the note type for knowledge searches, you must map the note type to a Knowledge Management statement type. For more information see the "Integration" chapter of the Oracle Knowledge Management Implementation and Administration Guide.
Setting Up Descriptive Flexfields for Advanced Service Request Searches
Using the Additional Information and Additional Information for Agent descriptive flexfields (DFFs), you can set up business specific search criteria to search for service requests. The Item field in the Advanced tab of the Find Service Requests window lists the Additional Information and Additional Information for Agents flexfield segments and the context values to enable you to perform business specific searches.
To set up descriptive flexfields for Advanced Service Request Search
-
Under the Application Developer Responsibility, navigate to Flexfield, then select Descriptive, Segments. The Descriptive Flexfield Segments window appears.
-
Search for Additional Information in the Title field using the Query Enter / Query Run search method available from the View menu. The Descriptive Flexfield Segments window lists the available address styles.
-
Create a record in the Context Field Values region but do not select the Freeze Flexfield Definition check box.
-
Enter the name of the style in the Code and Name fields.
-
Enter an optional description.
-
Click Segments. The Segments Summary window appears.
-
Enter the segments and details of segments.
-
Save your work and click Freeze Flexfield Definition.
-
Click Compile.
-
Repeat the steps to add segments for the Additional Information for Agent DFF.
You can use these segments in the Find Service Requests window, Advanced tab. See "About the Find Service Requests Window" for more information.
Indexing Note and Summary Text for Searches
You must run the Service Request: Synchronize Text Index Program concurrent program to make it possible for agents to search for text in the summary and note fields of service requests. By setting this concurrent program to frequently, you can ensure that agents can search recently created service requests.
Some of the options to run the program are as follows:
-
Synchronize: This must be done at least once a day, preferably, during less traffic times.
-
Optimize/Rebuild: This must be done based on the size of data, and on a need basis
You must use these options when an index is corrupted or when upgrading the index.
To run the Service Request: Synchronize Text Index Program concurrent program
-
Under the System Administrator Responsibility, navigate to Security, then Responsibility, then select Request.
-
Query for the group "Support Reports".
-
Add the Service Request: Synchronize Text Index Program concurrent program to the list.
-
Save.
Enabling Integration with Oracle Enterprise Asset Management
Agents can create service requests for internal assets maintained in Oracle Enterprise Asset Management using either the Service Request window or the Service Request Update page in Customer Support. The Contact Center does not support the creation of these types of service requests.
Agents can view work orders created in Oracle Enterprise Asset Management related to the service request, but the life cycle of the work order is not in any way tied to the service request life cycle. Closing work orders tied to a service request does not close the service request and vice-versa.
To enable the Oracle Enterprise Asset Maintenance integration
-
Set up Oracle Enterprise Asset Management according to the procedures described in the Oracle Enterprise Asset Management User's Guide.
-
Select the Asset Maintenance check box while setting up service request types. See "Setting Up Service Request Types" for more information.
-
If you are using the Service Request window (Oracle TeleService), then use the Forms Folder tool to add the following two fields to the Service Request window header:
-
Inventory Org
-
Maintenance Org
These fields are enabled for entry only for asset maintenance service requests.
-
-
Set the default maintenance organization in the system profile Service: Default Maintenance Organization.
If you have set the system profile Service: Validation Inventory Organization to the inventory master organization (the recommended setting), the list of values includes all of the subordinate maintenance organizations.
If Service: Validation Inventory Organization is set to an inventory organization subordinate to the master inventory organization, then the list of values of the maintenance organizations is restricted to those maintenance organizations for that subordinate organization.
About Oracle Workflow Processes Included with Your Application
Your application includes four Oracle Workflow processes:
-
Call Support Process
This process notifies the individual service request owner each and every time a service request of this type is created or updated. The owner can set the status of the service request to Closed by clicking the Resolved button on the notification.
This process has been superseded by a more flexible notifications process which implementers can use to selectively notify both service request owners and customer contacts of service related events. See "Setting Up Notifications" for more information. You may want to associate this workflow to a type only if the resolution functionality is important to you.
If you associate this workflow with a service request type and also use the new notifications feature, owners may receive two notices for the same event.
-
Customer Support Event Process
This process notifies service request owners and contacts of different events related to service requests and is used by the notifications feature of Oracle TeleService. See "Setting Up Notifications" for more information.
-
Duplicate Check and Autotask Create for iSupport and Email Center Created SR
This Oracle Workflow process checks for potential duplicate service requests when customers create service requests using Oracle iSupport or agents create service requests from within Oracle Email Center. If the process finds a potential duplicate, it notifies the service request owner.
When customers create a service request of a type set up with extended attributes, the program instead alerts the individual you specify in the Alert Recipient field of the Service Request Attributes Configuration window. You must be sure to select the Autolaunch check box to enable this process.
-
E-mail Notification Generic Process
This sample process initiates when a task of type "Email Follow-up" is created for service requests that have been set up with additional Contact Center attributes. (For information about the workflow process, see"Sample Generic E-mail Notification Workflow" for more information.. For details about capturing the attributes, seeCapturing Additional Service Request Attributes in the Contact Center.)
The process gets the task attribute details (such as requester, approver, or subject) from the values you enter on the Optional tab of the Task Type: Attribute Configuration window and sets a due date for the approver to acknowledge the e-mail notification.
The due date is set based on the service request creation date and the number of days you enter in the Offset for Due Date attribute. An e-mail is sent to the Approver with the text entered in the Subject, Message Header, Message Body, and Message Footer attribute. If the approver does not acknowledge the message by the end of the due date, the process sends a reminder notification. If the approver acknowledges any of the notifications (the original or a reminder), the workflow terminates. Otherwise, after sending the maximum number of reminders specified in the Email Reminder Counter attribute, the workflow fails and terminates.
When the process completes successfully, the workflow updates the task status to Completed. If the processing fails, the process sets the task status to Cancelled. You can modify these statuses by setting the following system profiles:
-
CUG_TASK_FAILED_STATUS
-
CUG_TASK_SUCCESS_STATUS
-
Setting Up the List of Values for the Language Field
Use this procedure to set up the list of values (LOV) for the Language field in the Service Request. Agents can use this field to indicate a customer's preferred language for a specific service request.
Note: The language preference agents enter using this LOV remain specific only to individual service requests. The preference is not stored in the customer record itself. This means that selecting a language preference in a service request does not modify the customer's overall language preference which is entered in the Preferred Language field in the Party Information tab of the Contact Center.
To set up the list of values for preferred languages
-
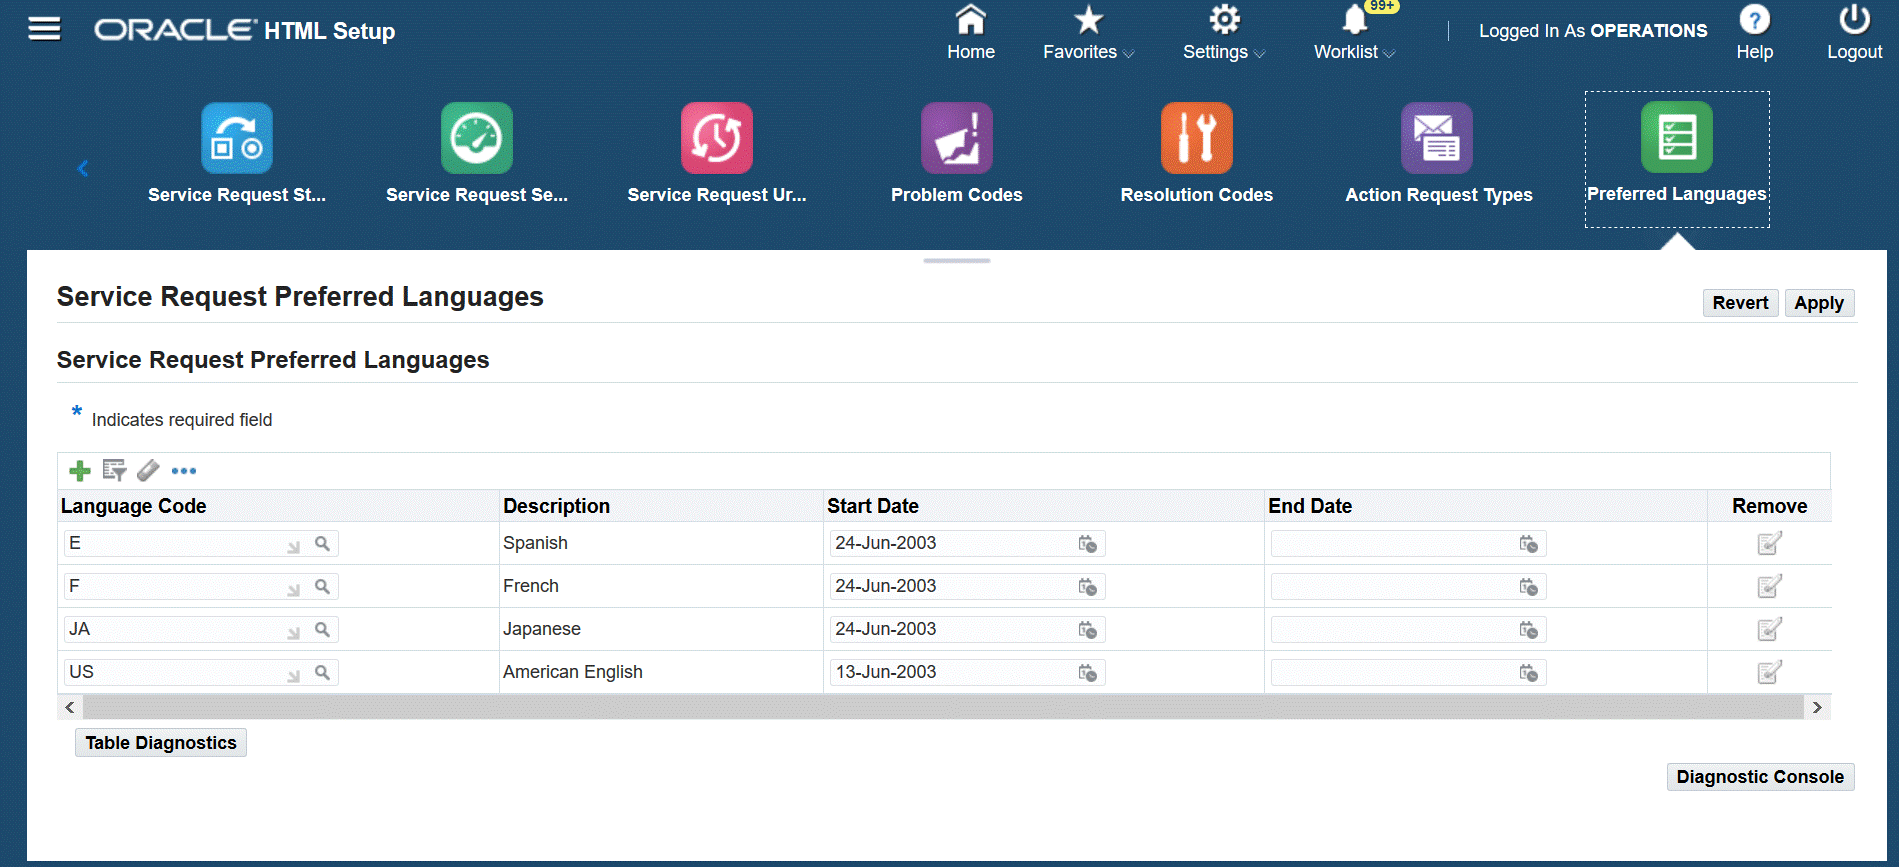
Navigate to the Service responsibility, Setup, Definitions, HTML Setup, and then Preferred Languages.
The Service Request Preferred Languages page appears.
-
Click the + icon. A row appears at the bottom of the table where you can enter the required details.
-
Use the Language Code LOV to select the languages you wish to add to the list of values in the Preferred Language field.
The language name the agent sees in the LOV appears in the Description field.
-
Optionally, enter dates to limit the availability of your entry.
-
Click Apply.
Obtaining a List of Valid System Profiles and Lookups
You can obtain a list of Oracle TeleService system profiles and lookups by logging in under the Functional Administrator responsibility, selecting the Core Services tab and either the Profile Categories or the Lookups subtab.
Note: List of system profiles and lookups you obtain from the Oracle Forms-based user interface may include legacy data.
Both system profiles and lookups are categorized by application. The two relevant applications for Oracle TeleService are:
-
Service
For all service request related features.
-
Customer Care
For all customer information and Contact Center related system profiles.
The system profiles are also categorized by the function they serve. For example, the Service Work Management category under the Service application includes system profiles you need for work assignment and distribution.
A category may not include all system profiles that you need to set up a feature. This is because the categories apply only to system profiles owned by Oracle TeleService. For example, for Work Management, you must set up system profiles from a number of foundation modules, including the Universal Work Queue. You must check with the appropriate procedures in this guide to find all the relevant system profiles for any feature.
For detailed information on how to use the features of the administrator interface, see the Oracle E-Business Suite Setup Guide..
Merging Customer Accounts Associated with Different Parties
To merge customer accounts associated with different parties, service administrators can run the Account Merge program that is available from the Receivables Manager responsibility.
You can use this feature to:
-
Merge and resolve duplicate records to ensure that accurate customer data is available.
-
Move transactions that are tied to one account to another account in a different party without losing the history of the transactions.
For example, Customer A of Party 1 and Customer B of Party 2, each has one Bill-To site and one Ship-To site. You can transfer activity from customer account A of Party 1 to customer B of Party 2 by merging like site uses, for example, Bill-Tos merged with Bill-Tos.
When the Account Merge program runs, information that is available in the following components will be considered for merge:
-
Service Request Party Header
-
Service Request Charge Line Account
-
Service Request Bill-To Party
-
Service Request Ship-To Party
-
Service Request Bill-To Account
-
Service Request Ship-To Account
-
Service Request Bill-To Site
-
Service Request Ship-To Site
Example - Understanding Account Merge Across Parties
For example, ABC Applications Software is a customer account that belongs to the party Vision Operations and ABC Corp Worldwide is a customer account that belongs to the party Vision Services. For business reasons, there is a requirement to merge ABC Applications Software with ABC Corp Worldwide.
The Account Merge process is run to merge the customer account ABC Applications Software with ABC Worldwide. After the program completes successfully, service requests, charges, orders, notes, invoices, and other standard financial transactions of ABC Applications Software are merged with ABC Corp Worldwide.
Verifying Details of Merged Fields
You can use the Audit Report to verify the details of merged fields. Administrators can query the CS_INCIDENTS_AUDIT_B table to verify the details.
Merging Service Requests
To identify duplicate service requests and to include them in the merge process, run the Party Merge process. For more information about how to run the Party Merge process, see the "Party Merge" chapter in the Oracle Trading Community Architecture User Guide. Use the Service: Batch Size for Merging Service Requests profile option to specify the batch size for the Party Merge process.
Prerequisite
Before you run the Party Merge process, set the Service: Batch Size for Merging Service Requests profile option. This is a site-level profile option with a default value of 5000, which indicates the number of records or the batch size. Service request data uses the profile option during the party merge process.