Capturing Additional Service Request Information with Extensible Attributes
This chapter covers the following topics:
- Extensible Attribute Overview
- Extensible Attribute Basic Concepts
- Setting Up Service Request Extensible Attributes
- Setting Up Value Sets
- Setting Up Attributes and Attribute Groups
- Specifying the Service Request Types Where Attributes Appear
- Creating Regions (Pages) to Display Attributes
- Service Request Extensible Attributes
- Creating Custom Functions for Attributes
- Example of How Extensible Attributes Are Used in Practice
Extensible Attribute Overview
Extensible attributes permit you to capture additional information in service requests and cases. They are available in the Customer Support, Service Desk, and Case Management modules of Oracle TeleService.
Note: To capture additional information in service requests created in the Contact Center, you must use a different and incompatible architecture. See Capturing Additional Service Request Attributes in the Contact Center.
Extensible attributes, also called user defined attributes, improve on the existing descriptive flexfield architecture on which they are built in the following ways:
-
You can capture an unlimited number of additional attributes. (The number of descriptive flexfields is fixed.)
-
Extensible attributes permit multirow entries making it possible for agents to enter multiple items on the same service request. (Descriptive flexfields permit only a single row.)
-
You can capture global attributes (visible in all service requests) as well as attributes specific to a service request type.
Note: Extensible attributes do not display in Oracle iSupport. If you require customers to enter or view the additional information via Oracle iSupport, then you must use descriptive flexfields or the alternate architecture available in the Contact Center.
Extensible Attribute Basic Concepts
Before you start creating extensible attributes, you must be familiar with a few concepts used in the user interface:
-
Value Sets
-
Attributes
-
Attribute Groups
-
Pages
Value Sets
Value sets specify the list of values or list agents use to make their entries. Using value sets ensures agents enter only valid data.
You can enter the values for a value set directly in the interface, or generate the list from a database table with a PL/SQL query.
In addition, you can use a value set to specify the maximum number of characters the attribute can capture. The maximum is 150 and the default is 30 characters.
Note: To capture large amounts of text, use service request notes instead.
Value sets also have an alternate use. Instead of providing a list of values, you can use a value set to restrict the range of permissible values. For example, you can specify that agents can enter only numbers between 1 and 10 for the number of abandoned cars. The agents enter the number manually, rather than from a list, but receive an error message for entries outside that range.
Attributes and Attribute Groups
An attribute is the field that captures additional piece of information.
You can specify the attribute to be rendered in different ways on the user interface. It can appear as a text box, a group of option a list (called "poplist" in the user interface), a list of values, or a check box, depending on the information you wish to capture.
If agents are making an entry from a list, then you must specify the value set to be used to make the entry.
You must create an attribute as part of an attribute group.
You specify an attribute group to be multirow to enable agents to enter information about multiple items into the service request. For example, by creating a multirow attribute group for discarded furniture, agents can enter information on multiple pieces of furniture to be picked up on the same service request.
You can specify if the attributes in the attribute group are going to appear globally in all service requests or only in service requests of specific request types by mapping the group either to all service request types or to one or more individual service request types.
Pages
You specify how the attributes appear in the service request by creating different regions, called pages. Each page provides the heading under which the groups of attributes are displayed. You can display multiple attribute groups in one page. If you create multiple pages, you can specify the order in which they appear in the service request.
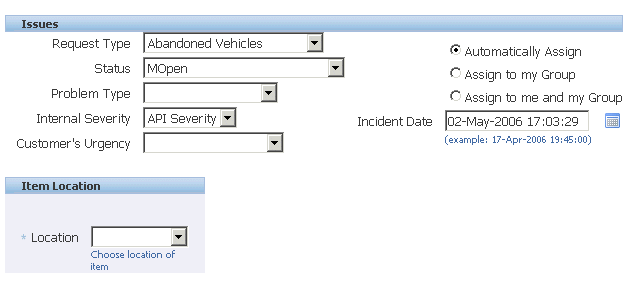
Where Extensible Attributes Are Displayed
Extensible attributes appear both in the Service Request page and the Advanced Search Page.
Service Request Page
Extensible attributes are displayed in the Service Request page below the Issues region.
Global attributes, those available for all service request types, are displayed first, followed by attributes mapped to the specific service request type.
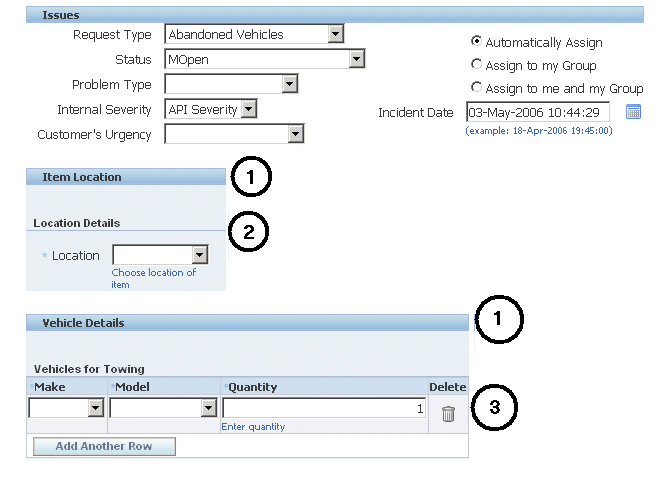
The pages and the attribute groups provide headings that organize the attributes on the page. The image below highlights some of these by number:
-
Region headings, such as "Item Location" and "Vehicle Details", come from the entries you make during page setup (the Display Name field for the page).
-
Attribute group headings, such as "Location Details", come from the attribute group (the Display Name field for the attribute group).
You can choose to omit this level of heading on the page by making the wording of the attribute group heading identical to the page heading during setup.
Asterisks mark attributes you have designated as required.
-
You can set up attributes of different kinds. This is an example of a multirow attribute group. All attributes in the attribute group appear in one row. To add additional rows, agents click on the Add Another Row button which is rendered automatically.
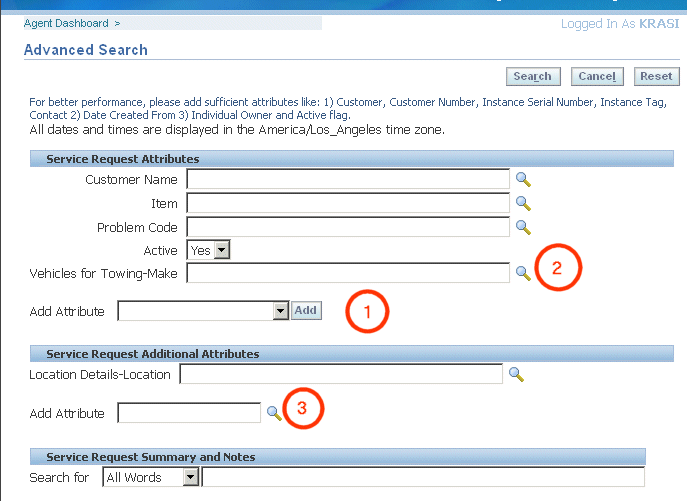
Advanced Search Page
Agents can also use the extensible attributes in advanced searches available from the Dashboard page.
Agents can add any indexed attributes you have created as search criteria by using the Add Attributes list in the Service Request Attributes region (see item identified by number 1 in the Advanced Search page image below).
The attribute displays with its attribute group display name hyphenated in front (2), for example: "Vehicles for Towing- Make".
Agents can add any nonindexed attributes they want for searching in the Service Request Additional Attributes region below (3), for example: "Location Details - Location".
Number of Supported Attributes
Each service attribute group can have as many as 125 attributes:
-
50 character attributes
-
25 number attributes
-
25 date attributes
-
25 unit of measure attributes
By creating additional attributes groups, the application effectively gives you the ability to capture an unlimited number of additional service request information.
Personalization
You cannot use the personalization feature of the Oracle Applications Framework to move or modify individual attribute regions, headings, or fields. You must use the extensible attributes architecture to do so.
The only permitted personalization is moving or hiding the region where extensible attributes are displayed.
Extensible Attribute Architecture
The capture of additional service request attributes is based on the user defined attribute architecture developed for Oracle Product Hub.
You can obtain additional details about using this architecture by referring to the Attributes and Functions chapter of the Oracle Product Hub User's Guide and the Oracle Product Hub Implementation Guide.
Oracle TeleService supports all features of the architecture except for attribute security. The data security for extensible attributes is the same as for all other service request information: Any user who has access to the service request can also access the information entered in the additional attributes.
Oracle TeleService extends the architecture by mapping functions between attribute groups and service request types. Information on this feature is covered by this guide exclusively.
Extensible Attributes for Customers and Associated Parties
You can use the same extensible attribute architecture to capture additional information for database objects other than service requests.
If you are using Case Management, you can use extensible attributes to capture information about the parties associated with a case. For example, an investigative agency may want to capture the height, hair color, and eye color of suspects in a case. The setup of attributes for associated parties is very similar but not identical to the setup of service request attributes. (See Setting Up Associated Party Extensible Attributes.)
The Trading Community Architecture customer model also uses the same extensible attribute architecture. This means that you can capture additional attributes with customer data. This way the information is visible across all Oracle E-Business Suite applications rather than just in Oracle TeleService.
A social services agency may want to capture details about the past criminal history of its clients with the client record, for example. A retailer may want to capture the garment sizes and color preferences for customers to aid in marketing efforts.
Setting Up Service Request Extensible Attributes
Use this overview to guide you through the process of setting up the capture of additional information for service requests. Follow the references in each step for a general procedure and an example.
To capture additional service request information using extensible attributes
-
If agents are using lists of values or lists to make their entries, then create the value sets.
-
For a general procedure, see Setting Up Value Sets.
-
For a simple example, see Example of Value Set Setup for Item Location.
-
-
Create the attributes as part of an attribute group.
-
For a general procedure, see Setting Up Attributes and Attribute Groups.
-
For an example, see Example of Attribute Group Setup for Item Location.
-
-
Specify the attribute groups that you want to display globally or map them to specific request types where you want them to appear.
-
For a general procedure, see Specifying the Service Request Types Where Attributes Appear.
-
For an example, see Example of Mapping Attribute Group to Service Request Types.
-
-
Optionally, create custom functions to perform calculation based on agent entries, for example, calculating the total number of items entered into the service request. See Creating Custom Functions for Attributes.
-
Create the regions where the attributes are displayed in the Service Request page.
-
For a general procedure, see Creating the Regions Where the Attributes Are Displayed.
-
For an example, see Example of Page Setup to Display an Attribute Group.
-
Setting Up Value Sets
Use this procedure to set up lists of values that users use to enter data in an attribute.
To set up value sets
-
Navigate to Setup, then Definitions, then Request Extensible Attributes, and select Value Sets.
The Maintain Value Sets page appears.
-
Click Create.
The Create Value Set page appears.
-
Enter a unique name and an optional description. Users do not see either of these entries.
-
If the extensible attribute entries are going to be numbers:
-
Choose Number from the Data Type list.
-
Enter the maximum field size of up to 150 characters in the Maximum Size field. The default is 30 characters.
-
Optionally enter a range for valid values.
-
-
If the information to be captured is a date, then:
-
Select Standard Date or Standard Date Time from the Data Type list. This selection captures time information as well.
-
Optionally, enter a range for valid dates. You can use
$SYSDATE$to represent the current date and time.
-
-
If the information to be entered is a character string, then:
-
Select Char from the Data Type list.
-
Enter the maximum field size of up to 150 characters in the Maximum Size field. The default is 30 characters.
-
-
Choose the validation type:
-
To have agents make the entry in the field manually, choose None.
-
If agents are going to be choosing from a list or a list of values and you plan to enter the values for the list manually, then choose Translatable Independent.
-
If the list of values is generated dynamically from a database table, for example, if the attribute is dependent on another attribute, then select Table. See Example of Dependent Attribute Setup.
You must enter a PL/SQL query for the table from which you want to generate the list. You must be familiar with the application table structure and know PL/SQL before using this option.
-
-
If agents are selecting from a list, then specify if that list is to be a list, by choosing the Pop-list option, or a list of values.
-
Click Update.
-
If the list is not generated from a table, then you must create the list value manually by clicking Create in the Values region.
You can order the values in the list using the Sequence field. To add additional entries, click Add Another.
If you have chosen Translatable Independent, then agents see the descriptions you enter in the translated value for the language you are logged in.
Setting Up Attributes and Attribute Groups
Use this procedure to create the extended attribute fields that capture the additional service request information. You create extended attributes as part of an attribute group. Attribute groups organize attributes under a heading on the Service Request page. By mapping attribute groups to service request types, you specify where the attributes appear.
Prerequisites:
To enable agents to choose values from a list or to restrict entries to a range, set up a value set first. See Setting Up Value Sets.
To set up attributes and attribute groups
-
Under the Service responsibility, navigate to Setup, then Definitions, then Request Extensible Attributes, and select Attribute Groups and Attributes.
Note: If you want to create attributes for associated parties, you must instead navigate to Setup, then Definitions, and select Associated Parties for Case Management, Party Roles Extensible Attributes, Attribute Groups And Attributes.
The Attribute Groups page appears.
-
Click Create.
The Create Attribute Group for Type Flexfield page appears.
-
Enter an internal name and a display name. The display name is the title the agent view above the groups of attributes.
Note: If you do not want to have two separate headings for the page and for the attribute group, then make sure the Display Name entry is the same for the attribute group as for the page.
-
To permit entry of multiple rows, select the Multi-Row check box. See Example of Multirow Setup.
Note: Data security at the extensible attribute level is not supported. The data security for extensible attributes is the same as for all other service request information: Any user who has access to the service request can also access the information entered in the additional attributes.
-
Click Apply and Add Attributes.
The Create Attribute page appears.
-
Enter a unique internal name and the display name. The display name is the field name the user views.
-
Specify the order in which the attribute appears by entering a number in the Sequence field.
-
Choose a data type. If you have created a value set for use with this attribute, then the data type must be the same as that of the value set. The Translatable Text data type is not supported.
-
Enter "%" (the percent sign) in the Column field and click the List of Values icon. The application displays the available columns. Choose any column. After you use a column, it no longer appears on this list.
-
Make sure that Enabled is selected.
-
If entry in this field is required, then select Required. Required fields are indicated on the page with an asterisk.
-
Specify the appearance of the field by making a choice from the Display As list:
The available values are determined by the data type you have specified:
-
Checkbox: Displays a check box. If this is deselected, it stores the value of N. Selecting the check box stores a value of Y. If you enter Y in the default field, the check box is selected by default.
-
Dynamic URL: You can use this method to display a URL with service request parameters, such as the incident location, which the agents can use to access Internet services, to obtain a map of the area, for example.
To use this feature you must add parameters, such as
street=$StreetName$&postalcode=$ZipCode$,to the Dynamic URL field.However, agents can only click on this URL in the read only service request page. In the service request creation and update pages, the URL displays in an entry field, so agents must copy and paste it into a separate browser window. For this reason, this display method is of limited use for service applications.
-
Hidden: Choosing this value does not display the attribute in the user interface. Use this selection to store a value of a function, for example.
-
Radio Group: Displays a group of options corresponding to the values in the value set you specify. You must specify a value set with discrete set of values that you have entered.
-
Static URL: This method displays a URL in the Service Request page, but agents can only click on it in the read only Service Request page (displayed only for agents who do not have update access). In the service request creation and update pages, the URL displays in an entry field, so agents must copy and paste it into a separate browser window. For this reason, this display method is of limited use for service applications.
-
Text Area: Displays a bigger text area. You are still limited to the 150 character maximum.
-
Text Field: Displays a text field. If you specify a value set, then the field displays with a list or a list of values indicator.
-
-
Selecting the Indexed check box indexes the field in the database for faster searching. If selected, the attribute appears among the most frequently used attributes at the top of the Advanced Search page. For an example of how this page displays for agents, see Advanced Search Page.
Note: Limit the number of indexed attributes to only those fields frequently used for searching. Adding indexed fields affects your database performance.
-
If you have created a value set for this attribute, then enter it in the Value Set Name field.
-
Optionally, enter the Default Value.
-
If you are making this service request attribute group to be multirow, then each row agents enter must be unique. You must specify the attributes that specifies unique entries:
-
Click Maintain Unique Key in the Attribute Group Details page.
-
Use the arrow buttons to specify the attributes by moving them from the Attributes column to the Unique Key Attributes column.
-
Click Apply when you are done.
-
Specifying the Service Request Types Where Attributes Appear
Map the attribute groups to either all service request types or to a specific service request type for the attributes to be visible to the user. You can map the same attribute group to multiple service request types.
Prerequisites:
You must create the attributes and attribute groups. See Setting Up Attributes and Attribute Groups.
To associate attribute groups to service request types
-
Under the Service responsibility, navigate to Setup, then Definitions, then Request Extensible Attributes, and select Associate Attribute Groups.
The Associate Attribute Groups page appears.
-
Choose the service request type or All Request Types from the Classification list.
Mapping attribute groups to All Request Types makes them visible in all service requests regardless of service request type.
-
Click Add Attribute Groups.
The Add Attribute Groups to Classification page appears listing all of the attribute groups.
-
Use the Search field to narrow down the list, if necessary.
-
Select the attribute groups you want to add and click Apply.
Creating Regions (Pages) to Display Attributes
Use this procedure to create the region where the attributes are displayed. The setup user interface uses the term "page" instead of region.
If you are exposing attributes from multiple attribute groups in a service request type, you can choose to display the attributes under one heading by creating just one region (page) or you can create multiple regions so the attributes appear with their own headings.
For example, you create two attribute groups: one to capture information about a driver and the other to capture information about the vehicle they are driving. You can display both the attribute groups in one region under one heading, "Car and Driver" or display them in two separate regions under separate headings "Car" and "Driver".
Prerequisites:
-
Create attribute groups and attributes
-
Map attribute groups to the service request types.
To associate attribute groups to service request types
-
Under the Service responsibility, navigate to Setup, then Definitions, then Request Extensible Attributes, and select Page Associations.
The Service Request Extension Pages page appears.
-
If you are creating pages for attribute groups that are visible globally, then choose All Request Types from the Classification list. Otherwise, choose the service request type where the attributes are to be displayed.
-
Click Create Page.
-
The Create Extension Page page appears.
-
Enter a text for the heading for the region in the Display Name field.
Note: If you make the wording exactly the same as the display name for the attribute group, the application displays only the page heading.
-
Enter a unique internal name. Agents do not see this name.
-
Enter a sequence number. If you are displaying attributes in multiple regions, the sequence number determines the order in which the regions are displayed in the service request user interface.
-
Click Add Another Row.
-
Use the list of values to enter the attribute groups you want to add to this page. Your entry in the Sequence field determines the sequence in which the attribute groups display on the page.
Note: The list of attribute groups is filtered by the mapping you have created previously.
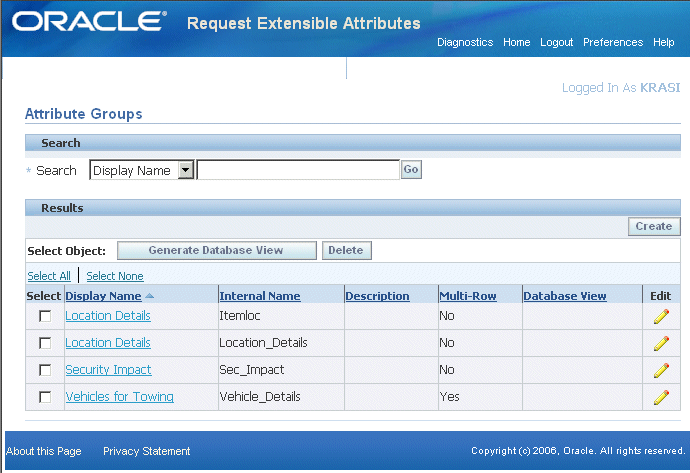
Service Request Extensible Attributes
You can create and display the extensible attributes for a service request.
This page displays the following details:
-
The Extensible Attributes Header region displays the following key service request attributes in read only mode:
-
Service Request Number - A unique system generated number assigned to the service request.
-
Type - The request type for the service request. The type affects the assignment of this service request to other agents for resolution, and determines who can view and update the service request.
-
Status - Displays the status signifying where the service request is in its progress towards resolution.
-
Incident Date - The date when the incident took place.
-
Creation Date - The date when the service request is created.
-
Last Update Date - The date when the service request was last modified.
-
Customer Name - The name of the customer who logged the service request.
-
Customer Number - The number assigned to the customer.
-
Account Number - The account number of the customer.
-
Item - The Oracle Installed Base item for which the service request is logged.
-
Item Instance - The Oracle Instald Base instance.
The extensible attributes that are defined for the selected service request type are displayed in the Global region.
You can update these attributes, but if the service request is in Closed status or the Disallow Update check box is selected for the service request status, these attributes are displayed in the read only mode.
Creating Custom Functions for Attributes
You can create custom functions for making calculations based on entries in attributes. For example, you can add a Calculate Total button that sums the entries in a multiple row field and stores the result in another attribute.
A function can be a Java method or a PL/SQL function. An application administrator must first implement the function either in the database, if it is PL/SQL stored procedure, or for Java functions, the function can be created and saved in a directory that is part of the Java classpath.
The Create Function page is available under the Service responsibility by navigating to Setup, Definitions, Request Extensible Attributes, Functions.
The button or URL that triggers the function is called an action. You create an action after you have mapped the attribute groups to service request types. Navigate to Setup, then Definitions, then Request Extensible Attributes, and select Attribute Group Associations and click Update Actions.
For more information, see the Implementing User Defined Functions section in the Oracle Product Hub Implementation Guide and the Creating User Defined Functions section in the Oracle Product Hub User's Guide.
Example of How Extensible Attributes Are Used in Practice
This section explains how a city government agency responsible for disposing of solid waste, including the towing of abandoned vehicles, can use extensible attributes to capture additional information it needs about the vehicle to be picked up.
In addition to the address, the agency must know the location of the items to be picked up. They can be on the street, in a drive way, or on the sidewalk.
Because this information must be captured for all items, the agency creates a global extensible attribute. See Example of Global Extensible Attribute Setup.
For Abandoned Vehicles, the agency must know the vehicle's make, model, and color, information that determines the type of tow truck it must send.
Because this information must be captured for vehicles, but not for furniture, or appliances, the agency sets this attribute to display only for the Abandoned Vehicles service request type.
In addition, the agency must make the list of values for the model dependent on the entry the agent makes for the car model. This way agents see just the models relevant to the make they have entered. This setup is discussed in Example of Dependent Attribute Setup.
Because the agency may have to pick up more than one vehicle at a single address, it must set up the vehicles to capture multiple rows. See Example of Multiple Row Setup.
Example of Global Extensible Attribute Setup
An agency wants to capture the location of items to be picked up. As this information must be captured for all service requests, the agency sets up a global attribute.
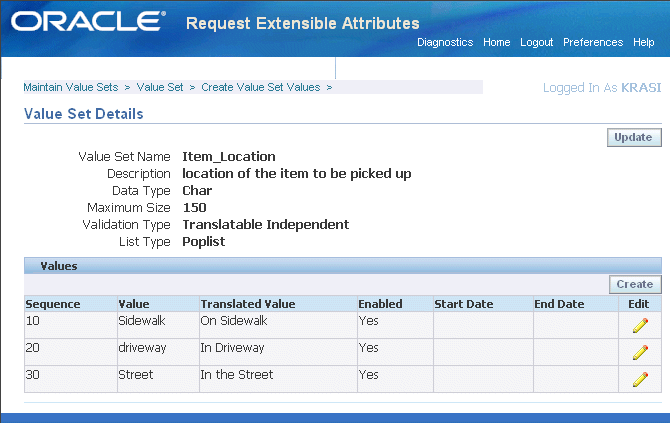
Example of Value Set Setup for Item Location
The agency wants to enter the location of the items to be picked up using a list of values to ensure standard locations for reporting:
-
On the Create Value Set page, enter the following:
-
Value Set Name: ITEM_LOCATION
-
Validation Type: Translatable Independent
This validation type makes it possible for you to display each value in the list how you want the agent to see it.
-
Display Type: List
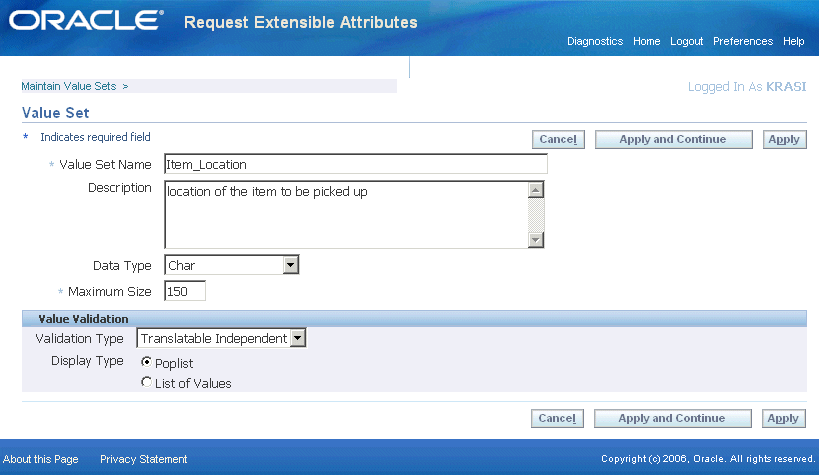
-
-
Click Apply and Continue, and enter the values one by one:
-
On sidewalk
-
In drive way
-
In the street
Note that the Translated Value field is where you enter the text the agent see.
The image below provides an example of one of the values:
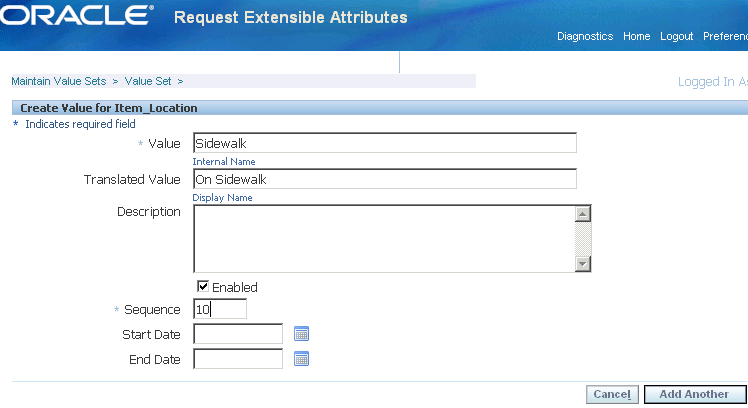
-
Here is what the final value set looks like:
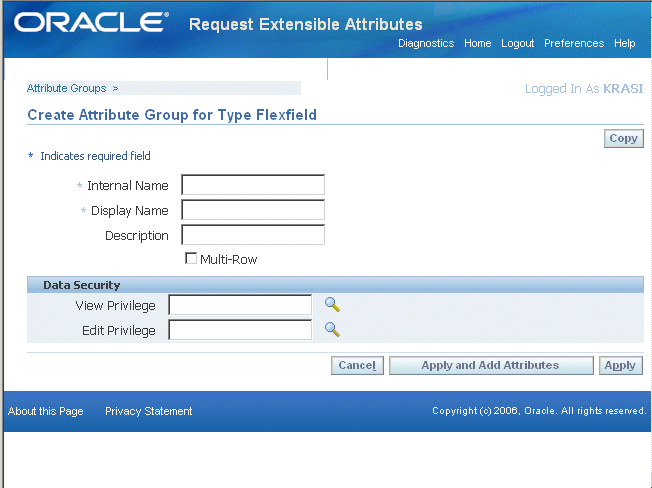
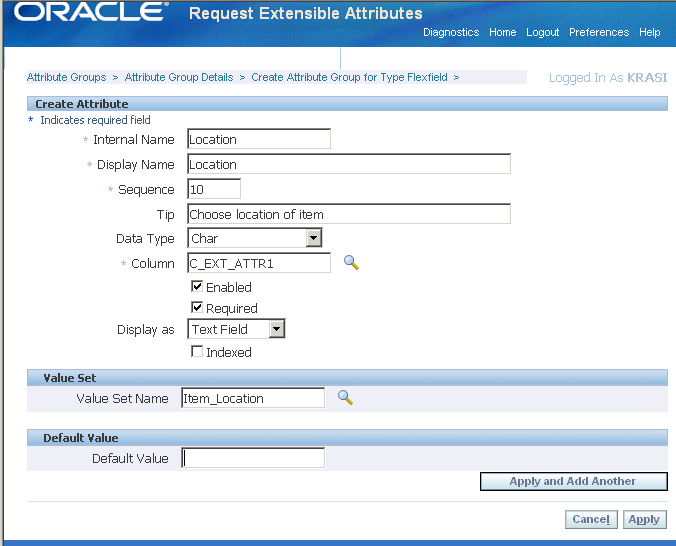
Example of Attribute Group Setup for Item Location
The following is an example of how you can set up a simple attribute to capture additional details on item location.
Example of Item Location attribute group setup:
-
On the Create Attribute Group for Type Flexfield page, enter the following:
-
Internal Name: Itemloc
-
Display Name: Item Location
This provides the heading agents see for the attribute group in the service request.
The following screen image shows the setup:

-
-
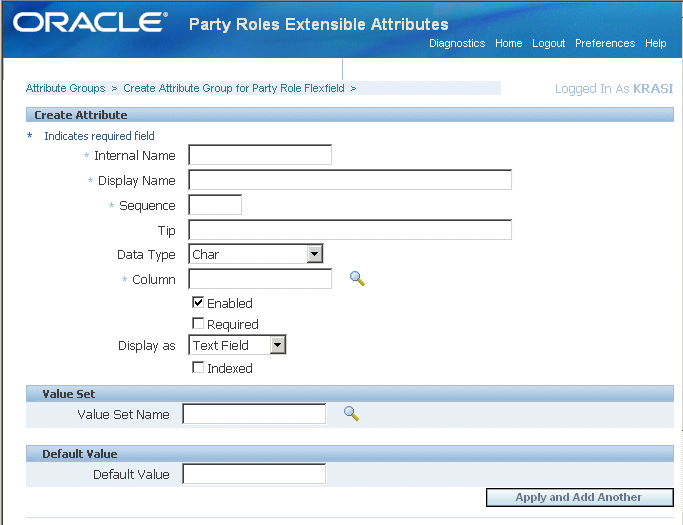
Create the attribute.
There is only one attribute to create for this attribute group: a text field where agents make an entry by using a list from the value set Item_Location.
Enter the following details:
-
Internal Name: Location
-
Display Name: Location
This is the name that appears as the label for the list.
-
Sequence: 10
The number you enter here is unimportant as there is only one attribute in this attribute group.
-
Tip: <Enter an optional tip text here. The formatting is constrained by the length of the field itself. If the tip is long, it wraps to fit the width of the field.>
-
Data Type: Char
-
Column: Choose any available column.
-
Enabled check box: Selected
-
Required check box: Selected
You want to require agents to choose a location.
-
Display as: Text Field
-
Indexed check box: Deselected
You do not need to index this field as agents do not use it for searching.
-
Value Set Name: Itemloc
This is the internal name of the value set you created.
The image below shows the entries:
-
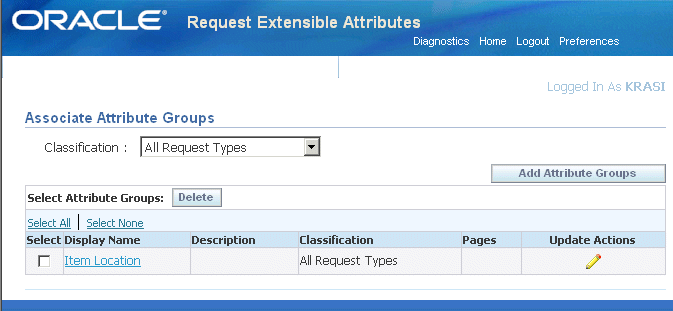
Example of Mapping Attribute Group to Service Request Types
As you want to capture the location in all request types, you must map the attribute group to all request types.
Mapping an attribute group to make it global:
-
Navigate to Setup, then Definitions, then Request Extensible Attributes, and select Page Associations.
-
Select All Request Types from the Classification list.
-
Add the Item Location attribute group.
The following image displays the completed mapping:
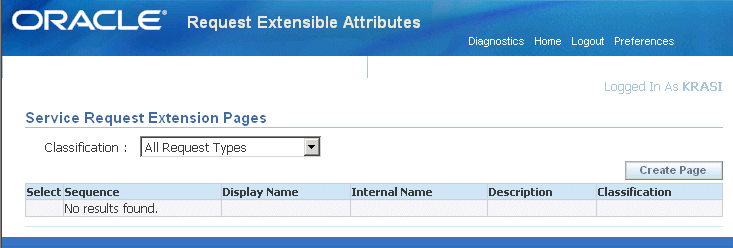
Example of Page Setup to Display an Attribute Group
You must create the region of the service request page where the attribute are displayed.
To create a page for the Item Location attribute group:
-
Navigate to Setup, then Definitions, then Request Extensible Attributes, and select Page Associations.
-
Click Create Page to display the Create Service Request Extension Page.
-
Enter the following:
-
Display Name: Item Location
The text you enter in this field appears as the region heading. If the text is exactly the same as the Display Name of the Attribute group including capitalization, then only one heading is displayed for this region instead of two.
-
Internal Name: Item_Location
-
Sequence: 10
The number you enter here is unimportant as you are capturing the information from only one attribute group.
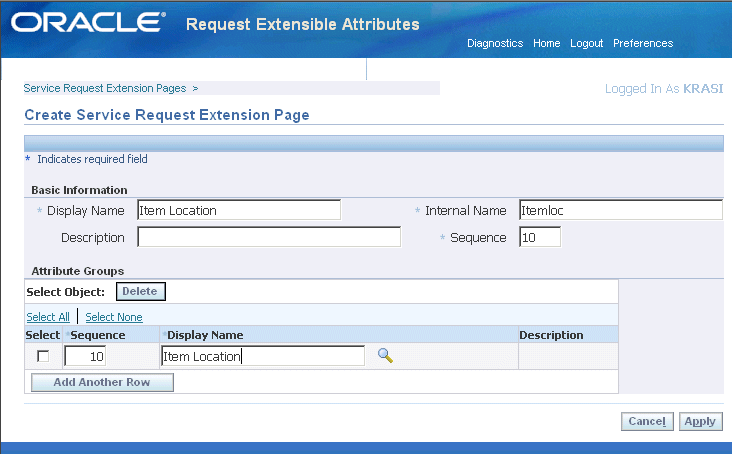
The resulting Item Location region appears in the Service Request just below the Issue region. (Note that, because the Page and Attribute Group display names are the same, the attribute heading does not appear):
-
Example of Multiple Row Attribute Setup
The agency may need to tow more than one vehicle from a given location at a time, hence, the Abandoned Vehicles attribute group must be made multiple row.
The application requires that each row agents enter must be unique. For example, an agent cannot enter the two following identical rows:
| Make | Model | Color |
|---|---|---|
| Ford | Taurus | White |
| Ford | Taurus | White |
For this reason, you must create a third attribute, "No. Items", to cover the possibility that there are more than one car of the same make, model, and color. If multiple cars of the same make and models or two or more cars of unknown model and make must be towed, then the agent enters the number in this field.
You can default "1" in this field, so that agents need not make an entry every time:
| No. Items | Make | Model | Color |
|---|---|---|---|
| 1 | Ford | Taurus | White |
To set up the multiple row entry:
-
Create the three value sets: Make, Model, and Quantity.
-
Create the attribute group Vehicle_Details, and select the Multi-Row check box.
The following image shows the attribute group setup.
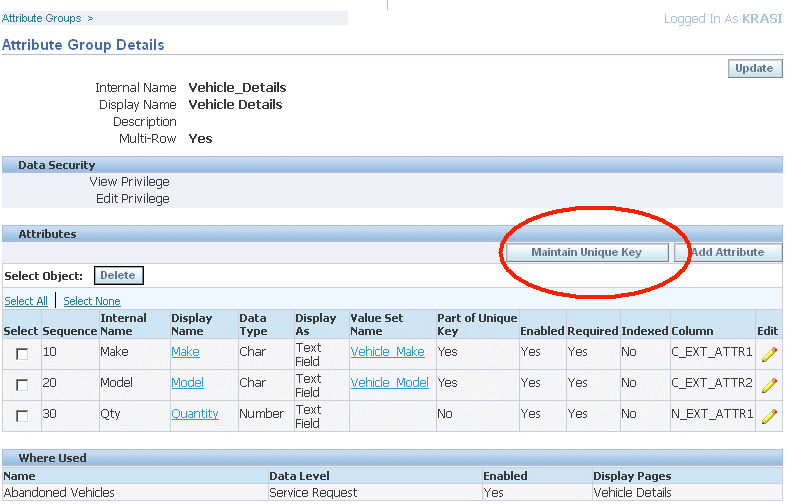
-
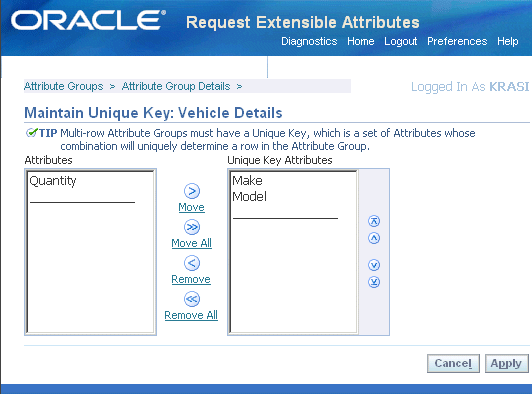
Click the Maintain Unique Key button (highlighted in the image above) and specify which fields are used to guarantee unique entries.
Move the attributes to the Unique Key Attributes column using the arrow keys. In this case, the unique key attributes are Make and Model (as displayed below).
Example of Dependent Attribute Setup
You can make the entry of one attribute, such as the model, dependent on the entry of another, the make of another vehicle.
To set up the entry of one attribute to be dependent on the value of another:
-
Create a database table that stores the relationships between the two attributes, the vehicle make and model. The database table VEHICLE_MODEL contains the following data:
Make Model Toyota Tercel Toyota Camry Honda Civic Toyota Unknown Honda Accord Honda Unknown Ford Focus Ford Mustang Ford Unknown Unknown Unknown
The Unknown values permit agents to make an entry even if they don't know the make and model.
Note: If you do not want to create new tables, you can add the data into the FND lookup table.
-
Define a value set Vehicle_Make_Values as a list with the following values:
-
Toyota
-
Honda
-
Ford
-
Unknown
-
-
Define an attribute group called Vehicle_Information.
-
To the attribute group Vehicle_Information, add the attribute Vehicle_Make (using the internal name Vehicle_Make) and set the value set to Vehicle_Make_Values.
-
Define the dependent values set Vehicle_Model_Values:
Field Value Name Vehicle_Model_Values List Type List of Values Validation Type Table For the Validation Table Information enter:
Field Value Table Name VEHICLE_MODEL Name (Value Column) Model Type (Value Column) Char Size (Value Column) 30 Where Clause make=:$ATTRIBUTEGROUP$.Vehicle_Make Note that you can add any number of conditions to the Where Clause and that "$ATTRIBUTEGROUP$" is a reserved word.
-
Add the attribute Vehicle_Model to the Vehicle_Information attribute group and set the value set to Vehicle_Model_Values. The sequence of this attribute must be larger than that of Vehicle_Make attribute.