Setting Up Associated Parties
This chapter covers the following topics:
- About Party Roles and Party Role Groups
- Setting Up Party Roles and Party Role Groups Process Overview
- Creating a Party Role
- Updating a Party Role
- Creating a Party Role Group
- Updating a Party Role Group
- Capturing Associated Party Information in a Case
- Setting Up Associated Party Extensible Attributes
- Mapping Attribute Groups to Associated Party Roles
- Specifying the Display of Attributes on the Add Party Page
About Party Roles and Party Role Groups
Each time agents associate an individual to a case, they must select a party role from a list of values to describe the role the individual plays in the case. You must set this list up using the procedures in this chapter. For a smuggling case, the roles you may include suspect, lawyer, investigator, and forensic specialist, for example. Social service agency cases may instead require case worker, teacher, and psychologist.
You can group the party roles you create into party role groups. Party role groups make it possible for agents to display only associated parties from that group filtering out the others. For example, choosing "Defense Team" in the Update Case page limits the information displayed to defense lawyers, legal assistants, and witnesses on the case.
Party role groups are also useful for keeping groups involved in a case appraised of its progress. You can set up the application to automatically notify interested parties either by role or role group when the case status changes, new information is added, or the case is reassigned. (See Setting Up Notifications.)
By setting up the notification for the defense team party role group, you can notify the entire defense team with one set up.
Contacts
There is one predefined party role (Contact) and one predefined role group (Contacts).
The Contact party role is special because a contact in a case must either be an employee or have an existing relationship with the customer:
-
If the case customer is a person (for example, Andre Beaulie), the contact must either be the person himself (Andre Beaulie) or a party related to the customer (for example, Mary Beaulie - Spouse of - Andre Beaulie).
-
If the case customer is an organization (for example, Business World), the contacts must be relationship parties related to the customer party in the Trading Community Architecture (TCA) party model (for example, Andre Beaulie - Employee of - Business World).
For this reason, you must not use the Contact role or the Contacts role group if you are not exposing customer information in your application.
About Sort Order
You can define the order in which party roles and party role groups appear in the lists of values and on the Update Case page.
Creating a sort order is optional. By default, the application displays party roles and groups in alphabetical order. The application sorts first by the order and then alphabetically.
Note: If you do create a sort order, then use sequences of whole numbers large enough to permit inserting new values in the future. For example, 10, 20, 30, instead of 1,2, and 3.
For example, you can create party roles and groups as listed in the table below:
| Party Role | Sort Order |
|---|---|
| Suspect | 10 |
| Judge | <no entry> |
| Defense Attorney | <no entry> |
| Witness | 20 |
| Prosecution Attorney | - |
| Lead Investigator | - |
| Source | 30 |
| Party Role Group | Sort Order |
|---|---|
| Defense Team | 10 |
| Prosecution Team | 20 |
| Legal Team | - |
| Court | - |
You then map the party roles into the groups as follows:
| Party Role Group | Party Role(s) |
|---|---|
| Defense Team |
|
| Prosecution Team |
|
| Legal Team |
|
| Court |
|
The setup has the following effect on the Update Case page where you enter associated parties:

The View Group list contains the following:
-
Defense Team
-
Prosecution Team
-
Court
-
Legal Team

The Add list displays the following:
-
Suspect
-
Witness
-
Source
-
Defense Attorney
-
Judge
-
Lead Investigator
-
Prosecution Attorney
The application sorts the display of parties by the party role sort order, the party role name, and the party name.
When you do not restrict the list by group, you can view the associated parties ordered as follows:
-
Suspect
-
Witness
-
Source
-
Defense Attorney
-
Judge
-
Lead Investigator
-
Prosecution Attorney
Choosing View Group: Defense Team displays:
-
Suspect
-
Witness
-
Defense Attorney
Choosing View Group: Prosecution Team displays:
-
Witness
-
Source
-
Lead Investigator
-
Prosecution Attorney
Choosing View Group: Legal Team displays
-
Defense Attorney
-
Prosecution Attorney
The Role list in the Advance Search page displays the same order as the Add list in the Update page.
Setting Up Party Roles and Party Role Groups Process Overview
Use this general procedure to set up party roles and role groups. For an overview, see About Party Roles and Party Role Groups.
Prerequisites::
You must plan out the party roles and party role groups before you start.
To set up party roles and role groups
-
Set up party roles:
-
Under the Service responsibility, navigate to Setup, then Definitions, and select Associated Parties for Case Management, Party Roles.
The Party Role summary page appears displaying existing party roles including the seeded Contact party role.

-
Click Create to create party roles. See Creating a Party Role.
-
If you are not exposing customer fields in your implementation, then click Update and enter an end date to disable the predefined Contact party role .
-
-
Set up party role groups and map the party roles to them:
-
Navigate to Setup, then Definitions, and select Associated Parties for Case Management, Party Role Groups.
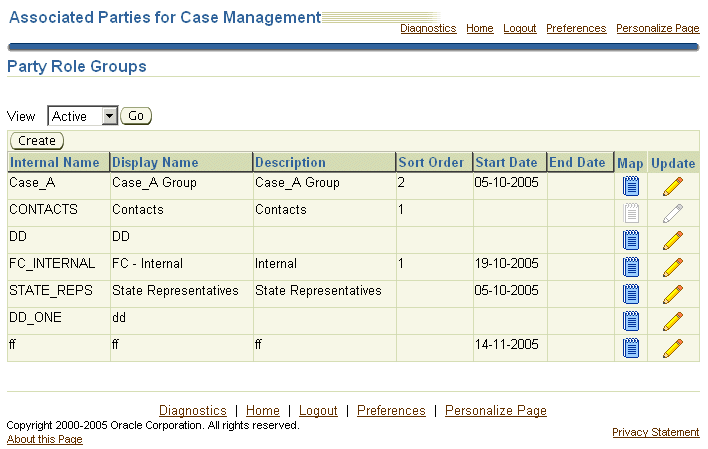
The Party Role Groups summary page appears displaying existing party role groups including the seeded Contacts group.
-
Click Create to create party role groups andMap. to map the roles to them.For details, see Creating Party Role Groups.
-
If you are not exposing customer information in your implementation, click Update next to Contacts and disable the predefined role group by entering an end date.
-
Creating a Party Role
Use this procedure to create party roles.
To create a party role
-
Click Create on the Party Roles page.
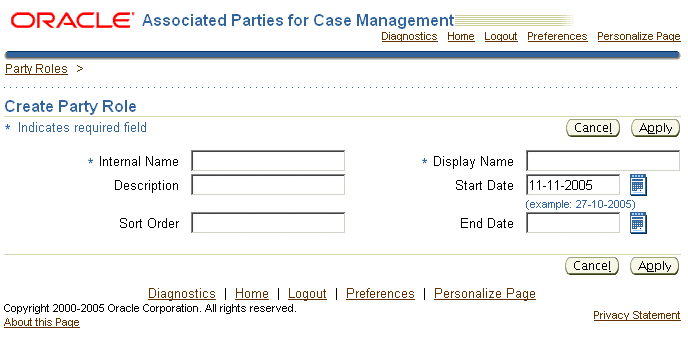
The Create Party Role page appears.
-
Enter a unique Internal Name (not visible to users) and the Display Name (the name visible to agents). In the Internal Name, you are permitted to use only alphabetic characters and the underline character, "_".
Note: You cannot update the Internal Name after you save.
The other entries are optional.
The sort order field makes it possible for you to define the order in which the party roles appear in lists of values and search results. If you do not set up a sort order, then all roles you define are sorted alphabetically. See About Sort Order.
Updating a Party Role
Use this procedure to update a party role.
To update a party role
-
Click Update next to the entry you want to update on the Party Roles page.
The Update Party Role page appears.
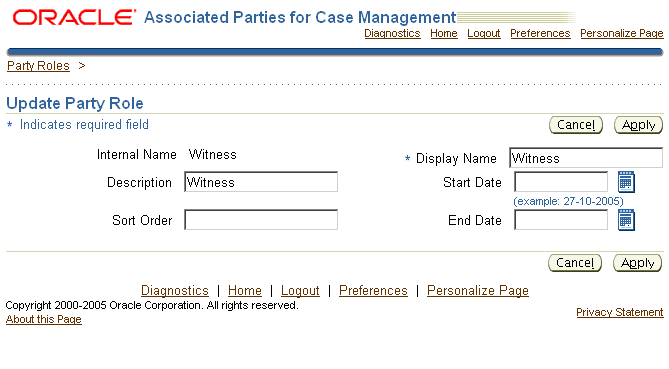
You can update:
-
The name the agent sees, the Display Name
-
The description
-
The sort order (for details, see About Sort Order)
You can remove the role from use by entering an end date.
-
Creating a Party Role Group
Use this procedure to group party roles into party role groups. Party role groups organize party roles in lists of values and simplify notifications of parties associated to cases. For an explanation, see About Party Roles and Party Role Groups.
Prerequisites:
Set up the party roles first. See Creating a Party Role.
To create a party role group
-
Click Create on the Party Role Groups page.
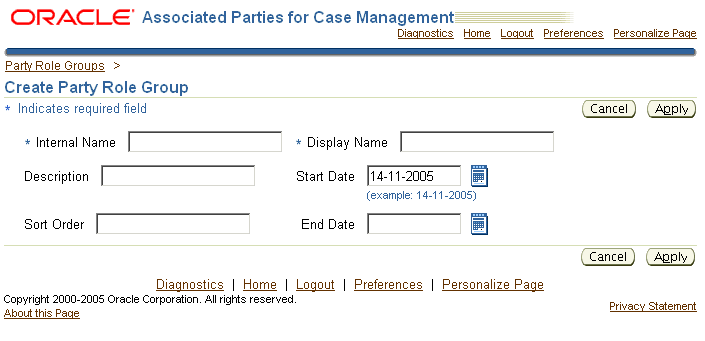
The Create Party Role Group page appears.
-
Enter a unique Internal Name (not visible to users). You are permitted to use only alphabetic characters and the underline character, "_".
Note: You cannot update the Internal Name after you save it.
-
Enter the name users see in the Display Name.
The other entries are optional.
The sort order field makes it possible for you to define the order in which the party role groups appear in lists of values and search results. If you do not set up a sort order, then the application sorts the groups alphabetically. For more information, seeAbout Sort Order.
-
Click Apply to save and return to the Party Role Groups page.
-
Click Map next to the new group and enter the party roles you want to include in the group on the Party Role Mappings page.
Updating a Party Role Group
From the Party Role Group page:
-
Click Map to modify the list of roles available for the group by .
-
Click Update, to:
-
Remove the group from use by entering an end-date
-
Change the sort order (see About Sort Order)
-
Change the name of the group.
-
Capturing Associated Party Information in a Case
You can capture information about the parties you associate to a case using the same extensible attribute architecture that is used for capturing service request information.
For example, an investigative agency can use attributes set up with this architecture to capture charges against a suspect in a case. A social service agency can use it to capture eligibility information for benefits.
Many of the concepts and setups are identical to those used for service request extensible attributes and are not repeated in this chapter. Before you start implementing associated party extensible attributes, you must be familiar with the detailed discussion in Capturing Additional Service Request Information with Extensible Attributes.
Agents enter the attributes immediately after they associate a party to a case, on the Add Party: Enter Attributes page shown below. The image includes a multi-row Charges attribute that has been set up to enter charges against a suspect:
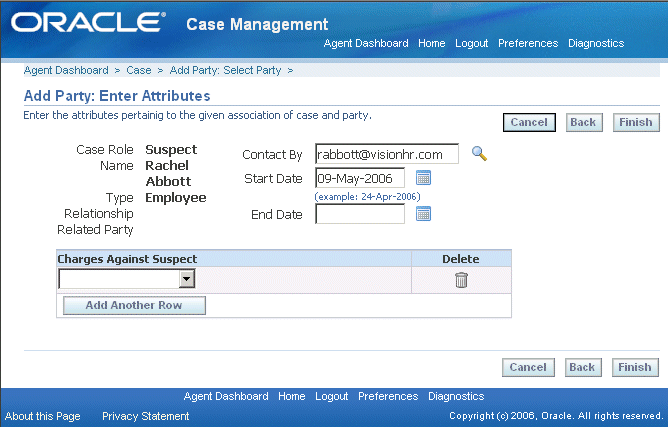
Associated party extensible attributes capture information about the parties and employees as they relate to a particular case. This information is stored with the case rather than the party or employee record. This means the information captured is not available in other cases or when viewing the party information itself.
Note: If you want to capture general information about a party, such as hair color or eye color, for example, then you must set up extensible attributes for the party instead. See Oracle Trading Community Architecture documentation for details.
Associated party extensible attributes improve on the existing descriptive flexfield architecture on which they are built in the following ways:
-
You can capture an unlimited number of additional attributes.
-
Extensible attributes permit multiple row entries.
-
You can capture different information for parties with different roles in the case. For suspects this may be charges, for witnesses it may be their location, and for lawyers on the case, their availability.
However, these attributes do not appear on the search page. This means that, in difference to service request extensible attributes, you cannot search on the information agents enter. You can only search on the associated party and role itself.
For example, if you enter John Smith as a suspect in a case and enter the charges against him using this feature, you cannot search for the case by those charges later. You can only search for all cases involving John Smith as a suspect and examine them one by one to see what the charges are.
Setting Up Associated Party Extensible Attributes
Use this general procedure to guide you through the associated party extensible attribute setup. Follow the references in each step for more details.
Although many steps (including the creation of value sets and attribute groups) are almost identical to those for creating service request extensible attributes, use the navigation and pages described here for your setup. The attribute groups you create are specific to associated parties. You cannot reuse the attribute groups you have setup for service requests here.
Prerequisites:
You must first set up party roles. See About Party Roles and Party Role Groups.
To set up extensible attributes for associated parties
-
If agents uselists of values or lists to make their entries, then create the value sets:
-
Navigate to Setup, then Definitions, and select Associated Parties for Case Management, Party Roles Extensible Attributes, Value Sets.
-
In the Maintain Value Sets page, click Create to create the value set.
-
For more information about specific fields in the creation page, see Setting Up Value Sets.
-
For a simple example, see Example of Value Set Setup for Item Location.
-
For an example of how you can make the entry of one attribute dependent on another, see Example of Dependent Attribute Setup.
(You can have the list of available values depend on the entry an agent has made in another attribute. For example, the list of charges depend on the law that the suspect has broken.)
-
-
Create the attributes themselves as part of an attribute group:
-
Navigate to Setup, Definitions, Associated Parties for Case Management, Party Roles Extensible Attributes, Attribute Groups And Attributes.
-
Click Create on the Attribute Groups page to create the attribute group and attributes.
-
For a general procedure, see Setting Up Attributes and Attribute Groups.
-
For an example, see Example of Attribute Group Setup for Item Location.
-
-
-
Map the attribute groups to the associated party roles. See Mapping Attribute Groups to Associated Party Roles.
-
Optionally, navigate to Setup, then Definitions, and select Associated Parties for Case Management, Party Roles Extensible Attributes, Functions, and create custom functions. See Creating Custom Functions for Attributes.
-
Create the regions in the Add Party: Enter Attributes page where the attributes display. See Specifying How Attributes Display on the Add Party Page.
Mapping Attribute Groups to Associated Party Roles
Use this procedure to specify the attributes you want to capture with associated party roles. To capture charges for suspects, for example, you map the Charges attribute group to the Suspect role. You can map multiple attribute groups to a role.
This procedure is a part of the required setup for associated party attributes. SeeSetting Up Associated Party Extensible Attributes.
Prerequisites:
You must create the attribute groups and attributes first.
To map attribute groups to associated party roles
-
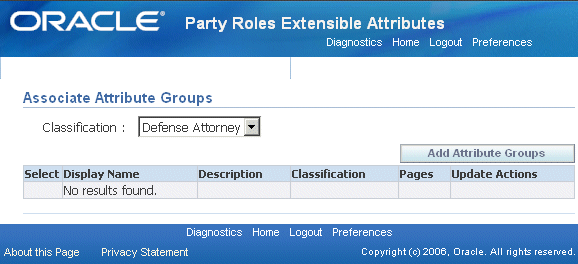
Navigate to Setup, then Definitions, and select Associated Parties for Case Management, Party Roles Extensible Attributes, Attribute Group Associations.
The Associate Attribute Groups page appears.
-
Choose the associated party role from the Classification list.
-
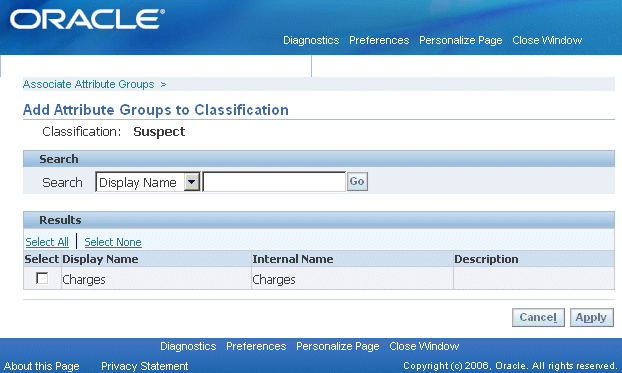
Click Add Attribute Groups.
The Add Attribute Groups to Classification page appears.
-
Select the attribute group (you can search for it if required first).
-
Click Apply.
Specifying the Display of Attributes on the Add Party Page
Use this procedure to specify how an attribute displays on the Add Party: Enter Attributes page.
This procedure is a part of the required setup for associated party attributes. See Setting Up Associated Party Extensible Attributes for details.
Prerequisites:
You must first set up the associated party attributes.
To specify the display of attributes on the page
-
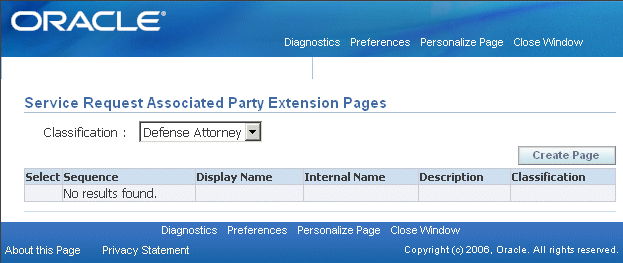
Navigate to Setup, then Definitions, and select Associated Parties for Case Management, Party Roles Extensible Attributes, Page Associations.
The Service Request Associated Party Extension Pages page appears.
-
Choose the associated party role you want to set up from the Classification drop-down list.
-
Click Create Page.
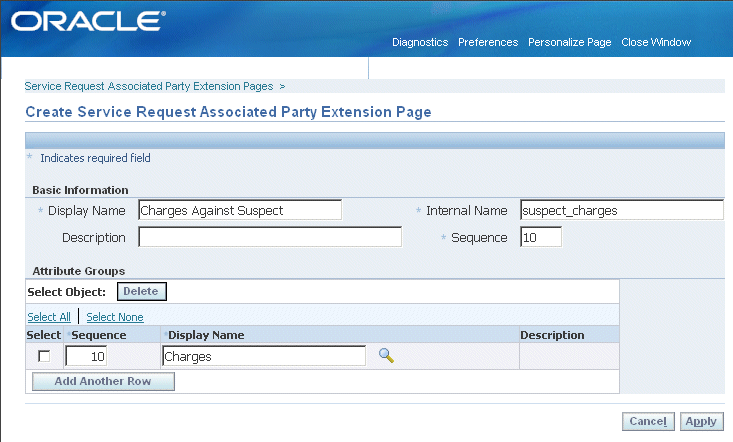
The Create Service Request Associated Party Extension Page appears.
-
Enter the following details:
-
The text you enter in Display Name becomes the heading for the region. (If you enter the same string as the Display Name for the attribute group, then the attribute group heading does not appear in the page.)
-
The Internal Name must be a unique page name (but can have the same name as the attribute group).
-
Unless you are entering multiple pages, the sequence number does not matter.
-
-
Add the attribute group(s). The sequence specifies the order in which multiple groups appear in the page.