Implementing Charges
This chapter covers the following topics:
- Overview of Charges
- Setting Up Charges Process Overview
- Using the Charges Order Management Flexfield Mapping Page
- About Setting Up Business Process, Service Activity, and Billing Type
- Key Charges Concepts
- Process Overview for Business Process, Service Activity and Billing Types Setup
- Setting Up Additional Service Billing Types
- Associating Billing Types with Billing Categories
- Setting Up Service Activities
- Associating Service Activities to Business Processes
- Setting Up Items in Oracle Inventory
- Guidelines for Setting Up Items in Inventory
- About Setting Up Labor Schedules for Pricing Labor
- Setting Up the Contract Labor Schedule
- Setting Up the Default Labor Schedule
- Restricting Agent Use of Operating Units for Charge Lines
- Setting Up Rules for Specifying the Default Operating Unit
- Modifying the Display of Charges on Customer Invoices
- Setting Up Charges System Profiles
- About Setting Up Remaining Charges System Profiles
- Setting Up the Default Sort Order on the Charges Tab
- Setting Up the Default Service Request Business Process
- Specifying the LOV Type for Price List
- Preventing Errors from Recalculating Prices in Oracle Order Management
- Setting Up Charges User Hooks
- Setting Up Charges Submission
Overview of Charges
Charges is a component of the Oracle TeleService application that is used by many Oracle applications including Oracle Field Service and Oracle Depot Repair.
Using Charges you can:
-
Create orders for shipments
-
Create return orders (RMA)
-
Bill customers for any services provided to them
Charges features make it possible to:
-
Create and view charge lines (shipments, returns, and billing)
-
Create and view estimated charge lines and convert them to actual charges
-
Roll up charge lines (labor, material, expenses) into a defined item (labor, material, and expenses)
-
Associate charge lines with an existing order
-
Apply contract terms and conditions to charge lines. For example, discounts and labor pricing.
-
View coverage information for a contract
-
Submit charge lines to Oracle Order Management through Oracle Quoting
-
Achieve multi-currency compliance
Key user procedures for Charges are outlined in Charges User Procedures.
Architecture of Charges
Charges is available in both, Forms based Service and Contact Center modules and the HTML based modules of TeleService.
It integrates with the following Oracle applications:
-
Oracle Field Service
-
Oracle Depot Repair
-
Oracle Contracts
-
Oracle Quoting
-
Oracle Inventory
-
Oracle Installed Base
-
Oracle Order Management
The following diagram illustrates the architecture and data flow for Charges:
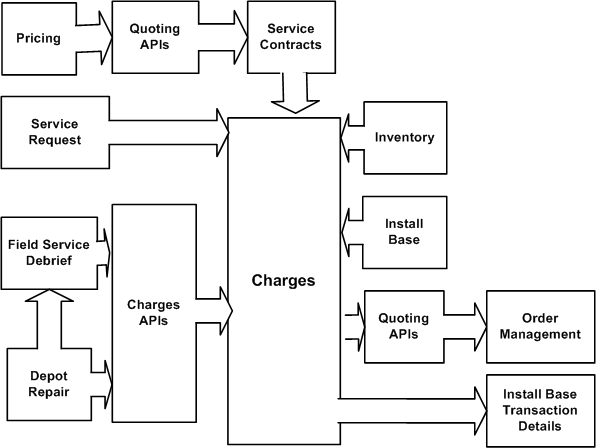
Charges integrates with Oracle Order Management for returns, shipments, and billing through APIs provided by Oracle Quoting. When you book an order (shipment or return), Oracle Quoting APIs pass the order to Oracle Order Management, an application that determines how the order is filled and shipped. Oracle Quoting APIs then give you a confirmation number that is displayed in Charges in the Line Number field. After the invoice cycle is complete, the invoice number and the invoice date are also displayed on the Order Status tabbed page of the Charges window in the Invoice Number and Invoice Date fields respectively. If an order line is split in Oracle Order Management, then Charges displays the status of the first line.
Oracle Service Contracts, Oracle Inventory, and Oracle Installed Base integrate directly with Charges, whereas Oracle Field Service Debrief, Oracle Advanced Pricing, and Oracle Depot Repair communicate with Charges through Charges APIs. Oracle Advanced Pricing communicates with Charges through Oracle Quoting APIs.
Setting Up Charges Process Overview
This procedure provides an overview of the major steps required to set up the Charges module of Oracle TeleService. Follow the references in each step for details.
Prerequisites:
You must complete implementation of the following applications:
-
Oracle Order Management
-
Oracle Inventory
-
Oracle Advanced Pricing price lists
The following are optional:
-
Oracle Installed Base
-
Oracle Service Contracts
-
Oracle Field Service
To set up Charges
-
Set up or verify the setups of your inventory items. The application uses inventory items not only for tracking physical items but also for pricing labor and expenses. You set up labor items in Oracle Inventory and price them using price lists in Oracle Advanced Pricing. See Setting Up Items in Oracle Inventory.
-
Implement Oracle Order Management. For example, you must set up Line Types, Defaulting Rules, and Oracle Workflow processes assigned to the different line types and headers.
-
Set up labor schedules for pricing labor in Oracle Service Contracts and a default schedule for labor not covered by contract. See About Setting Up Labor Schedules for Pricing Labor.
-
Set up any discounts for the labor items within Oracle Service Contracts. See the Oracle Service Contracts Implementation Guide for details.
-
Set up the rules for defaulting the operating unit, the financial entity that is used for billing and receiving payments from the customer. See Setting Up Rules for Defaulting the Operating Unit.
-
Set up business processes, service activities, and billing types as described in Setting Up Business Processes, Service Activities, and Billing Types.
-
To have agents ship or receive items tracked by Oracle Installed Base, you must set up the Install Base Transaction Subtypes. See About Topics Relating to Charges and Oracle Installed Base.
-
Optionally, you can modify the way charges are displayed on customer invoices. See Modifying the Display of Charges on Customer Invoices.
-
Specify the following profile options that define the behavior of Charges.
Profile Option Description Charge: Default Price List This profile option obtains the default price list. The price list set up in this profile determines the price of the items in the charge lines when there is no contract attached The valid values for this profile are all active price lists defined in the system. Service: Action For Missing Account/Account Site in Charges This profile determines whether an account has a site or site usage when a charge line is submitted If the profile is set to Abort Submission of Charges, then an error is displayed and the process is ended. If the profile is set to Allow Automatic Creation of Account/Account Site, then an account or account site usage is automatically created. Service: Allow Charge Operating Unit Update This profile determines whether the default operating unit can be modified. If the profile is set to Yes, the default operating unit can be updated. If set to No (default value), you cannot update the operating unit. If the profile Charges: Enable Ship Sourcing Rule is set to Yes, and the agent selects the inventory organization from another operating unit, the operating unit is displayed by default in the operating unit. Even if the profile Service: Allow Charge Operating Unit Update is set to No, and then too the operating unit is displayed by default. Service: Auto Launch Workflows on the Service Request Transitions This profile determines if workflows must be launched during service request status transitions. If the profile is set to Yes, the workflow that is mapped to a status transition is launched. Service: Action For Missing Account/Account Site in Charges This profile determines whether an account has a site or site usage when a charge line is submitted If the profile is set to Abort Submission of Charges, then an error is displayed and the process is ended. If the profile is set to Allow Automatic Creation of Account/Account Site, then an account or account site usage is automatically created. Service: Allow Charge Operating Unit Update This profile determines whether the default operating unit can be modified. If the profile is set to Yes, the default operating unit can be updated. If set to No (default value), you cannot update the operating unit. If the profile Charges: Enable Ship Sourcing Rule is set to Yes, and the agent selects the inventory organization from another operating unit, the operating unit is displayed by default in the operating unit. Even if the profile Service: Allow Charge Operating Unit Update is set to No, and then too the operating unit is displayed by default. Service: Auto Launch Workflows on the Service Request Transitions This profile determines if workflows must be launched during service request status transitions. If the profile is set to Yes, the workflow that is mapped to a status transition is launched. Service: Charge Line Default Price List This profile option determines the price list that defaults to the Price List field, when a charge line is created using the Service Request window, Charges tab or the Create Charges page.
Select any one of the following values:-
Use Price List from Customer Account Setup
-
Use Service Request Price List
-
Use Price List from Service Activity Code Setup
-
Use Price List from Customer Account Setup
-
Do not default
Important: To use the price list of a customer account or a service activity code as the default price list, complete the steps in the following order:
-
Set the Service: Enable Advanced Pricing in Charges profile option value to Enable with Default Price List.
-
Select any one of the following values for the Service: Charge Line Default Price List profile option.
-
Use Price List from Service Activity Code Setup
-
Use Price List from Customer Account Setup
-
See Setting Up a Price List for a Service Activity Code and Setting Up a Price List for a Customer Account.
Service: Charges Autosubmit Mode This system profile specifies when charges should be submitted to Oracle Order Management. The available values for this profile are all Service lookups with lookup type CS_CHG_AUTO_SUBMIT_MODE. Service: Charges Book Order Automatically This site level profile option determines how you want Oracle Order Management to handle Charges orders: -
Set to Yes to add charges to booked orders or automatically create orders in Oracle Order Management with a status of Booked. If there is an existing booked order for the bill to party, then the application adds charges to it. If there are no booked orders, Charges creates a new order and books it automatically. This is true even if there are open Entered orders.
-
If you select the default setting of No, the orders are in the Entered status. The order must be booked before the customer is billed. If there is an open Entered order for the bill to party, then the application adds charges to it.If there are only Booked orders or if there are no open orders at all, then Charges creates a new order.
Service: Charges – Default Business Process from SR This profile obtains the default business process from the service request type on new charge lines. If the profile is set to Yes (default value), then the default business process on the charge line is set based on the value specified in the service request type. Service: Charges Default Conversion Type This profile specifies the default conversion type for converting the transactional currency from Service debrief to the billing currency that is used in Charges. This used only for expense lines. Available values are Corporate, EMU Fixed, Spot or Use. Service: Charges Default Max Roll Days This profile specifies the maximum rollup days in the past that can be used while checking a rate for conversion. This is used for converting the transaction currency from Service debrief to the billing currency used in Charges and is used only for expense lines. Service: Charges Default Sort Order This profile sorts the charge lines by default in the order specified by this profile. Available values are all Service lookups where lookup_type = CS_CHG_SORT_ORDER. Service: Charges Pricing Date This profile sets the item price date on the charge line based on the incident date or the system date.
If the profile is set to "Use Charges Creation/Update Date", then the system date is used as the date on the charge line.
If the profile is set to "Use Service Request Incident Date", then the incident date is used as the date on the charge line.Service: Charges – Use Long List LOV for Price List This profile determines the display of the price lists in the Charges tab. If this profile is set to Yes, then agents must enter the search criteria before displaying the list of values for price lists. If set to No, it displays the short list of values format. Service: Charges Restrict Parent and Return by Instance on Service Request This profile option determines the Parent Instance list of values for Charges. If the profile option value is set to Yes, then the Parent Instance list displays all instances in the service request products and descendant products. If the profile option value is set to No, then the Parent Instance list displays all those install base instances owned by the service request customer and its related parties.
If the profile is set to Yes and parent instance is present then the return instance list of values will display only the parent instance and its descendants. If the parent instance is not present, then the return instance's list of values will display all the instances in the service request products and its descendants. If the profile is set to No then the return instance list displays all the instances owned by the service request customer and its related parties.Service: Check debrief status when submitting charges This profile specifies whether to check if any unprocessed debrief lines exist before submitting charge lines to Oracle Order Management. The value that is set in this profile is also used in the Auto Submit Program when submitting charge lines. If the profile is set to Yes, then program checks for the status of the debrief lines before submitting charges. Service: Default Manual Modifier This profile determines if an adjustment line must be created in Oracle Order Management to account for the contractual discounts. If this profile contains a value, an adjustment line is created for the contractual discount. Service: Default Incident Owner as the Salesperson for Orders This profile option determines whether the value in the Incident Owner field of a service request charge line defaults to the Salesperson field in the Sales Orders window of Oracle Order Management.
To ensure that the incident owner value passes from a charge line to the sales order, you must associate the resource or owner with the Support Sales Representative role in the Resource window. See Setting Up Resource Groups.Service: Default Return Type This profile defaults the return type for Charges return lines. You can select one of the following values: -
Normal Defective – Select this if the part or item is fine at first, but then stopped working after the warranty period
-
DOA - Select this if the part or item is defective on arrival
-
Excess - Select this if the part or item is an extra part
-
Warranty - Select this if the part or item is broken and is still under warranty
Service: Default Task Template Groups LOV Behavior This profile determines the default behavior of the Task Template LOV on the Service Request task details section. Available values are Show All Task Template Groups for Service Request and Filter Task Template Groups by Service Request Attributes.
If this profile is set to "Show All Task Template Groups for Service Request", the "Show All Task Templates" check box above the task template group LOV is selected by default and the LOV will display all effective task template groups defined for application of Service and document type of Service Request. If this profile is set to "Filter Task Template Groups by Service Request Attributes", then the check box is not selected and the LOV displays the effective and matching task template groups based on the values of the four service request attributes of service request type, item, item category, and problem code.Service: Enable Advanced Pricing in Charges This profile option enables integration between Oracle Advanced Pricing and Oracle TeleService Charges feature and supports various pricing features for the charge lines in the Charges window and on the Charges HTML user interface.
The integration supports some of the following features of Oracle Advanced Pricing:-
Pricing qualifiers
-
Pricing modifiers
-
Static and dynamic formulas
-
Secondary price lists
-
Price breaks
The profile option has the following values:-
Enable with Default Price List: If you select this value, then Oracle Advanced Pricing calculates the price adjustment using the default price list. The Price List field in the following user interfaces displays the default price list:
-
Pricing Rules subtab in the Service Request window, Charges tab
-
Pricing region on the Create or Update Charge page
To use the price list of a customer account or a service activity code as the default price list, complete the steps in the following order:
-
Set the Service: Enable Advanced Pricing in Charges profile option value to Enable with Default Price List.
-
Select any one of the following values for the Service: Charge Line Default Price List profile option.
-
Use Price List from Service Activity Code Setup
-
Use Price List from Customer Account Setup
-
-
-
Enable Without Default Price List: If you select this value, then Oracle Advanced Pricing calculates the price adjustment using the best price from "QP_PREQ_PUB.PRICE_REQUEST", an Oracle Quoting API.
-
No: The default value is No. If you set the value to No or leave it blank, then Oracle TeleService applies only basic pricing on item pricing.
Service: Enable Ship Sourcing Rules This profile determines if the Inventory Org and Sub Inventory LOVs in Charges must consider ship-sourcing rules when displaying the list of inventory organizations and sub inventories. This profile is used in conjunction with the profile Service: Restrict Operating Unit by MOAC.If the profile Service: Enable Ship Sourcing Rules is set to Yes and the profile Service: Restrict Operating Unit by MOAC is set to No, the Inventory Organization and Sub Inventory LOV displays a de-normalized list of list of inventories as given by the Spares API.
If both profiles are set to Yes, the LOV displays inventories and sub inventories as given by the Spares API but filters out the ones that the user does not have access to as determined by the security profile assigned to the user.
If both profiles are set to No, the inventories and sub inventories are displayed, filtered by the operating unit on the charge line.Service: Enable Currency Conversion in Charges UI If this value is set to No, the base currency of the selected price list is set as default and cannot be modified. If the profile is set to Yes, then the base currency of the selected price list is set as default. The currency field is an LOV that displays all currencies defined in the multi-currency conversion list tied to the selected price list. Users can choose a currency from this LOV and the price fields are automatically converted to display prices in the selected currency. Service: Enable Return Routing Rules This profile determines if the Inventory Org and Sub Inventory LOVs in return Charges must consider return routing rules when displaying the list of inventory organizations and sub inventories. This profile is used in conjunction with the profile Service: Restrict Operating Unit by MOAC.
If the profile Service: Enable Return Routing Rules is set to Yes and the profile Service: Restrict Operating Unit by MOAC is set to No, the Inventory Organization and Sub Inventory LOV displays a de-normalized list of list inventories as given by the Spares API.
If both profiles are set to Yes, the LOV displays inventories and sub inventories as given by the Spares API but filters out the ones that the user does not have access to as determined by the security profile assigned to the user.
If both profiles are set to No, the inventories and sub inventories are displayed, filtered by the operating unit on the return charge line.Service: Post Zero Charges to OM This profile option controls the Oracle TeleService zero charge lines that are posted to Oracle Order Management.
The profile option values are as follows:-
Exclude Charge Lines with Zero Charge Services: This value considers only those charge lines for posting if the net price for a service activity is manually updated to zero for one of the following components.
-
Price Adjustment
-
Override Unit Price
-
Contract Discount Amount
Important: This profile option value does not consider the charge line for submission for a service activity if only the Zero Charge check box is selected for the charge line. The charge net price must be zero because of price adjustment, contract discount, or overriding of the unit price.
-
-
Post Only Nonzero Charge Lines: If you select this value, then all charge lines with net price other than zero are posted.
-
Post All Charge Lines: If you select this value, then regardless of the after warranty cost, which is the net price, all charge lines are posted. This is the default value.
Service: Restrict Operating Unit by MOAC This profile determines whether the Operating Unit LOVs in Service Request and Charges must display only operating units that the user can access based on the user's security profile. If the profile is set to No (default value), then the LOV shows all active operating units. If the profile is set to Yes, then the LOVs display operating units accessible to the user as determined by the user's security profile. -
-
If you are using Oracle Field Service, you can automate the submission of charges to Oracle Order Management.
-
You can set up price lists for charge lines. See Setting Up Price Lists for Charge Lines.
-
You can set up complex pricing structures in the form of price lists, price formulas, and modifiers. The integration between Oracle Advanced Pricing structure and Oracle TeleService charges enables you to use these pricing structures for service request charge lines. See Setting Up Integration Between Oracle Advanced Pricing and Oracle TeleService Charges.
-
You can define descriptive flexfields (DFFs) for Oracle TeleService and Oracle Order Management, and then map flexfields of both products to pass service DFF values to the sales order for which the service charges are billed to the customer. You can view the DFF values at the header and line levels for a sales order. See Configuring and Mapping Oracle TeleService and Oracle Order Management Descriptive Flexfields (DFFs).
Setting Up Price Lists for Charge Lines
To use default price lists for charge lines, you can set up price lists for service activity codes or customer accounts. The following profile options use these default price lists:
The following sections explain how to set up a price list for a service activity code and a customer account.
Setting Up a Price List for a Service Activity Code
To set up a price list for a service activity code:
-
Log in to the Service responsibility.
-
Navigate to the Service Activities page.
-
For the required service activity and billing type, create a line in the Order Management Header & Line Types region by selecting operating unit, order type, and line type.
-
Switch to the Order Management Super User responsibility.
-
Navigate to the Transaction Types window.
-
Query the operating unit, the order category, and the line type that you created in the Service Activities page.
-
Define a price list and save the record.
When an agent creates a charge line, the price list defaults to the Service Activity field only after the agent selects an item. Oracle TeleService calculates and displays the price based on the price list that is attached to that service activity code.
Setting Up a Price List for a Customer Account
To set up a price list for a customer account:
-
Log in to the Order Management Super User responsibility.
-
Navigate to the Customers page.
-
In the Account Number field, query for the required customer account.
-
In the Accounts region, click the account number. The Update Account page appears.
-
In the Order Management tab, select a price list.
-
Save the record.
The price list defaults based on the customer account. When an agent creates a charge line, Oracle TeleService calculates and displays the price based on the price list that is attached to that customer account.
Setting Up Integration Between Oracle Advanced Pricing and Oracle TeleService Charges
Using Oracle Advanced Pricing, customers can set up complex pricing structures in the form of price lists, price formulas, and modifiers. The integration between Oracle Advanced Pricing structure and Oracle TeleService charges enables you to use these pricing structures for service request charge lines.
A few examples on how you can use the integration between Oracle Advanced Pricing structure and Oracle TeleService charges.
Pricing structure can be set up to automatically apply:
-
Discount on a service request charge line. You can create a discount modifier line to create a negative price adjustment. For example, to give a 10 percent discount.
-
Discount based on an item category. Price List can be set up to add a discount using modifier based on Item Category from Inventory.
-
Discount based on the End Customer Name attribute: Price List can be set up to add a discount using modifier based on customer class from Receivables.
-
-
Promotional deal on a service request charge line. When the customer orders one or more specified items on the same order, you can create a promotional goods modifier line to add a new item to an order and provide a price adjustment or benefit for the item.
-
Surcharge on a service request charge line. You can create surcharge modifier line to add a positive price adjustment. For example, to apply a ten percent special charge to a customer's order.
-
Price break on a service request charge line. You can use a price break modifier to apply a variable discount or surcharge price adjustment to a pricing request based on the conditions of the break type.
To enable the Oracle Advanced Pricing integration, complete the following steps:
-
Set the value for the Service: Enable Advanced Pricing in Charges profile option to any one of the following values:
-
Enable with Default Price List
-
Enable Without Default Price List
The default value is No.
-
-
Define the following in Oracle Advanced Pricing.
-
Define Qualifiers: Using Oracle Advanced Pricing, define qualifiers that you want to apply for charge lines in TeleService. Qualifiers determine eligibility rules governing who can receive a particular price, discount, promotion, or benefit. Qualifiers and qualifier groups can then be used with Oracle price lists and modifiers. See the Qualifiers and Qualifier Groups chapter in the Oracle Advanced Pricing User's Guide.
-
Define Modifiers: Using Oracle Advanced Pricing, define modifiers that you want to apply for charge lines in TeleService. Modifiers enable you to set up price adjustments (for example, discounts and surcharges), benefits (for example, free goods and coupons), and freight and special charges that can be applied immediately to pricing requests or accrued for later disbursement. See the Modifiers chapter in the Oracle Advanced Pricing User's Guide.
Important: When you create modifier lines, ensure that you select only those qualifier contexts and qualifier attributes that this integration supports.
The following table lists the seeded qualifier contexts and qualifier attributes that the Advanced Pricing and TeleService Charges integration will support:
Qualifier Context Qualifier Attribute Customer End Customer Name Account Type Agreement Name Agreement Type Customer Class GSA Invoice to Party Site Party ID Sales Channel Ship To Party Site Customer Account Site Customer Name Modifier List Pricelist Party Information Customer Party Ship to Party Site Bill to Party Site Order Line Category Note: Attribute mapping step is not required to be performed as this integration uses seeded qualifier contexts and qualifier attributes.
You can navigate to the Pricing Transaction Entity – Attribute Linking window in Advanced Pricing to review attribute mapping using the following values:
Pricing Transaction Entity: Order Fulfillment
Context Type: Qualifier Context
-
In the Assigned to PTE region, you can find information such as code, name, description, and whether the qualifier is seeded and enabled.
-
Click the Link Attributes button. The Link Attributes window appears.
-
Select one of the qualifier codes and click Attribute Mapping. For qualifiers used in TeleService charges, the application is Order Capture and the Request Type is ASO.
-
-
Run the Build Attribute Mapping Rules concurrent request after you complete the pricing structure setup. This program maps the attributes that are used in the pricing setup. See the Running the Build Attribute Mapping Rules Program (Attribute Mapping Only) topic in the Oracle Advanced Pricing Implementation Guide.
Viewing Price Adjustments in Oracle TeleService
You can view price adjustments for charges in the following windows and pages. Price adjustment is applied on both charge lines and debrief lines.
-
Service Request window, Charges tab: In this tab, for a charge line, click the button next to List Price to see details about the pricing modifiers that are applied on the charge line.
-
Charges HTML page, Pricing region: Click the View Price Adjustments button to get information about the pricing modifiers that are applied on the charge line.
-
Configuring and Mapping Oracle TeleService and Oracle Order Management Descriptive Flexfields (DFFs)
To configure and map TeleService DFF segments to the Order Management sales order header and line DFF segments, complete the following steps:
Define segments for flexfields
-
Define segments for the following descriptive flexfields based on your business requirements.
-
Oracle TeleService flexfields:
-
Additional Information
-
Additional Information for Agents
-
Estimate Details additional info
-
-
Oracle Order Management flexfields:
-
Additional Header Information
-
Additional Line Attribute Information
-
After you define the flexfields, the flexfields are available in Service windows and HTML pages.
The following table lists the windows and HTML pages that display the DFFs:
Oracle TeleService Descriptive Flexfield Window HTML Page Additional Information Service Request, Header region Service Request, Header region Additional Information for Agents Service Request, Workbench tab Service Request, Summary region Estimate Details additional info Service Request, Charges tab Charges and Logistics, Actuals region -
-
Use the Charges Order Management Flexfield Mapping HTML page to map the TeleService DFF segments to Oracle Order Management DFF segments. This task is required to pass Service flexfield segments data to the Order Management flexfield segments during the charge line submission process. See Using the Charges Order Management Flexfield Mapping Page.
After the mapping of flexfields is complete, when support specialists add values to the TeleService flexfield segments and submit the charge lines, the service DFF segments are included in the charges data passed to Order Management by the charge line submission process.
-
By default, the TeleService DFFs are not displayed on the Service Request HTML pages.
For support specialists to add values to the DFF segments, you must display the DFFs using Oracle Framework Personalization.
Display the Additional Information and Additional Information for Agents DFFs
To display the Additional Information and Additional Information for Agents DFFs:
-
On the Service Request page (UpdateSRPG), select Personalize Page in the Settings menu. The Personalize Page: Service Request page appears.
-
Click the Edit icon for the Summary region. The Personalize Page Hierarchy page appears.
-
For the following components, set the Rendered property to True:
Flex: (SRHeaderSummaryxRN.InternalFlexField)
Flex: (SRHeaderSummaryxRN.ExternalFlexField)
Display the Estimate Details additional info flexfield segments
To display the Estimate Details additional info flexfield segments:
-
On the Create or Update Charges (CsChargeCreateUpdatePG) select Personalize Page in the Settings menu. The Personalize Page: Create or Update Charges page appears.
-
Scroll to the row: Flex: (CsActItemDetailsRN.ActualsItemDFF).
-
Click the Personalize icon. The Personalize Flex : (CsActItemDetailsRN.ActualsItemDFF) page appears.
-
Set the Rendered property to True and click Apply.
After you complete personalization, the DFFs will appear in the following pages and regions:
| Oracle TeleService Descriptive Flexfield | HTML Page |
|---|---|
| Additional Information | Service Request, Header region |
| Additional Information for Agents | Service Request, Summary region |
| Estimate Details additional info | Charges and Logistics, Actuals region |
Using the Charges Order Management Flexfield Mapping Page
To pass TeleService flexfield values to sales order flexfields in Order Management, you must first configure the flexfields. See Configuring and Mapping Oracle TeleService and Oracle Order Management Descriptive Flexfields (DFFs). Then, map the flexfields using the Charges Order Management Flexfield Mapping page.
Charges Order Management Flexfield Mapping Page
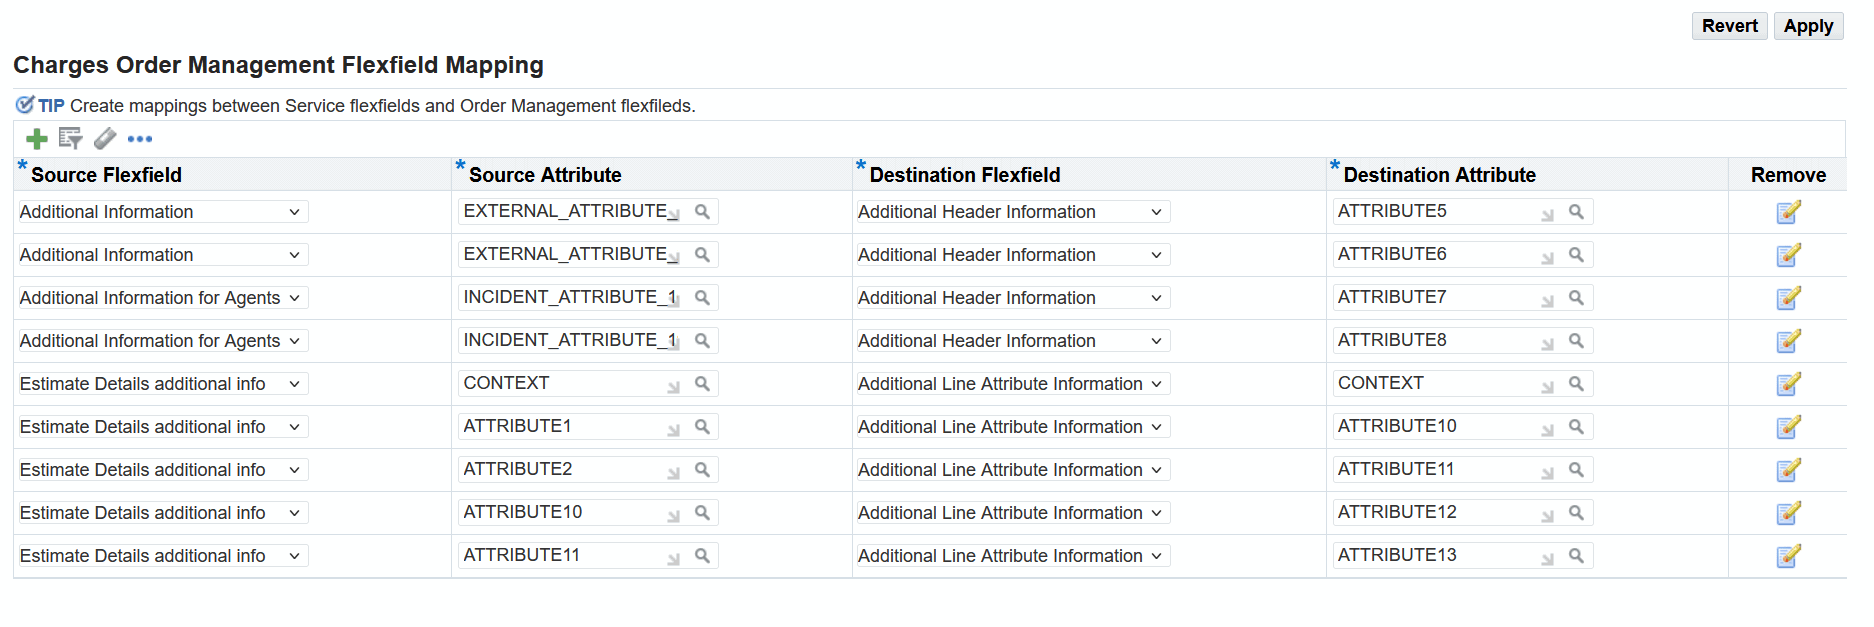
Description of Columns
-
The Source Flexfield and Source Attribute columns belong to TeleService.
-
The Destination Flexfield and Destination Attribute columns belong to Order Management.
To map flexfields:
-
Select the required source flexfield.
-
Select the source attribute, which is the flexfield segment.
-
Select the destination flexfield.
-
Select the destination attribute, which is the flexfield segment.
-
Click Apply to save the Charges Order Management flexfield mapping.
For example, you map:
-
Additional Information and Additional Information for Agents flexfields of TeleService to the Additional Header Information flexfield of Order Management.
-
Estimate Details additional info flexfield of TeleService to the Additional Line Attribution Information flexfield of Order Management.
About Setting Up Business Process, Service Activity, and Billing Type
This section explains how to set up the classification system your agents use to enter the labor, parts, and expenses that are processed, shipped, and billed through Oracle Order Management.
This section covers:
Key Charges Concepts
To enter a charge line, an agent must select:
-
A business process
-
A service activity
-
An inventory item
-
If the item is a physical item which is tracked by Oracle Installed Base, such as a product being returned for repair, then the agent must also enter an instance number.
Business Process
A business process provides a general classification of the work performed. Examples include depot repair, field service, and customer support. The business process is the first entry agents make on a charge line.
Service Activity
Each business process is associated with a list of activities that can be performed as part of that process.
For example, if the business process involves shipment of a replacement piece of equipment to the customer, the return of the defective equipment, and the installation of the new piece of equipment at the customer site by a field service technician, then you may want to set up three activities "Ship Replacement", "Return Defective Equipment", "Install Replacement Equipment".
You must classify each activity as either of type "order" or of type "return." Order activities can be related to bill only lines, or the shipment of items to customers. Return activities are used for recording customer returns of items they own.
In the above case the Ship Replacement and Install Replacement Equipment are activities of type order. The Return Defective Equipment is of type return.
Service activities are reusable: you can associate one activity to multiple business processes.
The activity the agent selects determines which inventory items they can enter in the charge line. However, activities restrict the list of inventory items only indirectly through an inventory classification called a billing type.
Billing Types
Billing types are used to categorize items in inventory for use in service applications. For example, you associate the labor billing type with all of the different labor rates in inventory, and the material billing type with all of the parts and equipment in inventory that can be sold to customers.
By associating billing types with service activities you determine what items an agent can enter in a charge line for a given activity.
You can associate multiple billing types to a single service activity. For example, a repair activity may have billing types of material (the parts used in the repair), labor, and expenses (travel).
Note: You can create your own billing types for material and expenses, but you must use the predefined Labor billing type for all labor.
You may choose to associate the Ship Replacement activity from the above example, with two billing types: material (the new piece of equipment) and expense (shipping charges).
The Return Defective Equipment activity may just have one billing type: material (the equipment being returned).
The Install Replacement Equipment activity may be associated with three billing types: Material (for any additional parts needed by the field technician), labor (the labor involved in installing the new equipment), and expenses (any non-itemized costs).
The application comes with several billing types defined for you, but you can add as many additional billing types as you like by modifying the lookup code MTL_SERVICE_BILLABLE_FLAG.
For an item to appear in the list of items in Charges, you must associate it with a billing type.
Billing Categories
If you have created any additional billing types, you must classify them as either material or expense. (Charges does not support any additional labor billing types, only the predefined Labor billing type.) The categorization, using Billing Categories, ensures it is processed correctly by Charges and other applications that use Charges, including Oracle Field Service.
Business Processes, Service Activities, and Billing Types in Contracts
Oracle Contracts uses business processes, service activities, and billing types to specify the level of coverage and discounts for a customer. A contract may cover different business processes differently. For example, a customer's service level agreement may provide free customer support over the phone, offer a 10 percent discount for inhouse depot repairs, but charge the customer fully for field service visits.
Process Overview for Business Process, Service Activity and Billing Types Setup
This topic outlines the major steps you need to perform to set up the business processes, service activities, and billing types classification system.
To set up business processes, service activities, and billing types
-
The application includes predefined material, labor, and expense billing types, but you can set up additional expense and material billing types following the procedure described in Setting Up Additional Service Billing Types. You must use the predefined Labor billing type for all labor.
-
You must classify any additional billing types you have created as material, or expense by associating them with Billing Categories. Charges does not support any additional labor billing categories. See Associating Billing Types with Billing Categories.
-
Set up the service activities as described in Setting Up Service Activities. You must:
-
Define the service activities and associate each service activity with all billing types used for that activity. This restricts agent choices of inventory items to those associated with the billing types you associate here.
-
Associate each service activity and billing type pair with at least one operating unit and specify the header and line type for the order. This ensures that the items entered are processed through Oracle Order Management.
-
For any activity that involves the shipment or receipt of items tracked by Oracle Installed Base, you must set up a corresponding Oracle Installed Base transaction subtype according to the procedure described in Setting Up Install Base Transaction Subtypes.
-
-
Set up the business processes that the agents use to classify work for the customer and associate them with appropriate activities. For more information, see:
Setting Up Additional Service Billing Types
Use this procedure to set up additional service billing types. You can create as many material or expense billing types as you need. Charges does not support additional labor billing types.
To set up additional service billing types
-
Under the Service responsibility, navigate to Others, and select Customer Support Lookups.
-
Using the Query By Example method, display the lookup type MTL_SERVICE_BILLABLE_FLAG.
-
Enter the additional billing types. The Meaning field is what appears in the lists of values.
-
Save your work.
-
You must now classify the billing types you have created as Material or Expense. See Associating Billing Types with Billing Categories.
Associating Billing Types with Billing Categories
Use this procedure to classify any billing types you have created as material or expense. Only billing types associated with these billing categories are available for use in service applications.
To associate billing types with billing categories
-
Under the Service responsibility, navigate to Setup, then Charges, and select Billing Type Attributes.
The Billing Type Attributes page appears.
-
Enter the billing type using the Billing Type list of values (LOV).
-
Classify the billing type as either a material or expense using the Billing Category LOV.
-
It is not necessary for you to enter dates in the Start Date and End Date fields as this controls the availability of the billing type to category mapping and not the billing type itself. The start date is populated for you automatically.
-
Using the Rollup Item LOV you can specify a single item to appear on customer invoices as a substitute for all items classified by the billing type. For example, substituting the general term "Overtime" for multiple overtime labor rates. For an explanation of roll-up items, see Modifying the Display of Charges on Customer Invoices.
Setting Up Service Activities
Use this procedure to set up service activities that field service, depot, and call center agents use to classify work performed on behalf of a customer.
Note: You must create separate activities of type order for Oracle Field Service (Debrief) and Oracle TeleService Charges module if a customer's install base is being updated. This is because Oracle Field Service and Oracle TeleService update the customer's install base separately.
To set up a service activity
-
Under the Service responsibility, navigate to Setup, then Charges, and select Service Activities and Billing Types.
The Service Activities and Billing Types page appears.
-
Click Add Another Row .
-
Enter a name and an optional description in the Service Activity and Description fields.
-
Specify if this activity is related to an order or a return by making a selection with the Line Category LOV. This setting prevents a single service activity from being used for an order in one operating unit and a return in another.
-
Use the Calculate Price list to recalculate the price for the associated service activity. You can select any of the following options:
-
Freeze - Select this option to freeze the price.
-
Calculate - Select this option to recalculate the price of the inventory item associated with the service activity. There is a risk of losing all contractual discounts if you select this option.
-
Partial - Select this option to add shipping and freight charges to the original price of the item.
-
-
If you plan to use this activity in Oracle Depot Repair, then select the Oracle Depot Repair Quantity Update check box.
-
If this activity does not incur any charges to the customer, then select the Zero Charge check box. The item still appears on the customer invoice but with no charge. You are setting up the default value only. The agent can change it when they enter a charge.
-
If this activity is not billed to customers but has to be entered as a charge line by agents for costing purposes (for example, for tracking travel expenditures), then deselect the OM Interface check box. If this check box is not selected, then charges for it do not appear on the customer invoice.
If the check box is selected (the default value), then the customer is billed for any charges for this activity.
The agent can change the status of this check box when they enter a charge.
-
Select the Travel Flag check box to create travel debrief lines for the service activity in the Field Service Technician portal.
-
Select the Create Cost check box to create a service cost for the cost line. You must select this check box if you want to post the service costs in Oracle Projects.
-
Specify the billing types that can be used with the service activity. You can have multiple billing types for a single service activity. For example, the replacement of a defective part may include material (the part itself), the labor required to install it, and expenses for shipping or travel. For each Billing type:
-
With the activity selected, place your cursor in the Billing Types region and click Add Another Row .
-
Select the billing type using the Name LOV.
-
Optionally, you can control the availability of the billing type by entering dates in the Start Date and End Date fields.
-
Select the expenditure type class. The Expenditure Type Class LOV lists all active expenditure classes defined in Oracle Projects.
It is recommended that the following expenditure type classes be used for the different service costs in Oracle TeleService. However, if you choose to use a different billing type-expenditure type class combination from the below table, you must post the Oracle Projects' interface table with the relevant data through the appropriate user hooks in the Interface Service Costs to Projects concurrent program.
Billing Type Expenditure Type Class Labor (internal employee) Straight Time Labor (3rd party) Miscellaneous Transaction or Supplier Invoices (if vendor id is known) Expense (internal employee) Miscellaneous Transaction Expense (3rd party) Miscellaneous Transaction or Supplier Invoices (if vendor id is known) Material Inventory -
Select the expenditure type. The expenditure type identifies the type of costs the interface line falls under. Each expenditure type is mapped to one or more expenditure type class.
The Expenditure Class is enabled only when you select the expenditure type class and displays all types belonging to the expenditure group. The expenditure category and UOM details are automatically displayed when the expenditure type is selected.
-
Select the transaction source for the billing type. Selecting a transaction source enables you to interface the relevant cost records and data into the Projects interface table. Since the interface table may contain transaction data from many different sources, for example, Oracle Payables or Oracle iExpense, each row in the interface table must be mapped to a transaction source so that the Transaction Import process can import only data from a particular transaction source at a time.
The transaction sources are defined in Oracle Projects. Each definition identifies whether the costs associated with the transaction source must be treated as accounted in GL. It also defines whether reversals or adjustments are allowed in Oracle Projects and whether the costs are posted in the PA transaction import interface table. All costs in Oracle Service are defined to be unaccounted in GL.
The following three transaction sources are predefined for Oracle TeleService – Service Labor, Service Material, and Service Expense. But, you can select any transaction source apart from the above sources.
-
Select the Interface to Projects check box to enable the transaction source and expenditure related fields. If the check box is selected, then the corresponding cost records can be posted to Oracle Projects interface table when the concurrent program runs with the appropriate criteria. If the check box is not selected, then the corresponding cost records cannot be posted to the interface table.
-
Select the Save Project Information on Sales Order check box to save the project number and project task number on the charge line on the sales order.
-
Select the Use Projects Cost Rates check box to calculate costs after the import using the cost rate set up in Oracle Projects, multiplied by the quantity of the item. This check box is not selected if any of the predefined transaction sources – Service Labor, Service Material, or Service Expense is selected.
-
-
For each activity and billing type pair, enter all operating units together with the Oracle Order Management order and line types. You may have multiple operating units if, for example, you have a central support center that is dispatching repair crews or parts from different locations (operating units):
Note: The operating unit is an entity used by financial applications to create, process, and report on financial data. It is not the same as an inventory organization, an organization for which you track inventory transactions and balances, and/or an organization that manufactures or distributes products.
-
Select the activity and one of the billing types you have associated to the activity in the previous step.
-
In the Order Management Header and Line types region, enter the operating unit, order type, and line type that is used by Oracle Order Management to process the order. Repeat this step for each possible operating unit.
-
Repeat this procedure for each of the billing types associated with the activity.
-
-
If agents are going to be using the activity you have set up to enter items tracked by the Oracle Installed Base, then you must set up the activity as an Oracle Installed Base transaction type. See Setting Up Install Base Transaction Subtypes.
-
Associate the activities to business processes. See Associating Service Activities to Business Processes.
Business processes are required both for Charges and for defining Oracle Service Contracts' coverage templates and the default service level agreement. Coverage templates specify your organization's contractual obligations to customers including response times, resolution times, and discounts.
Associating Service Activities to Business Processes
Use this procedure to associate service activities to business processes.
Prerequisites:
You must first set up:
-
Business processes (See Setting Up Business Processes.)
-
Service activities. (See Setting Up Service Activities.)
To associate service activities to business processes
-
Under the Service responsibility, navigate to Setup, then Charges, and select Service Business Process.
The Service Business Process page appears.
-
Use the query by example method (View, Query by Example) to display the business process you want to set up.
-
Associate the service activities to the business process in the Service Activities region.
Setting Up Items in Oracle Inventory
Use this procedure as a guideline for:
-
Verifying that existing items are set up correctly for Service applications. For example, you must classify items by billing type on the Service tab of the Item Master window.
-
Setting up new inventory items used for billing customers for services, for example, different labor overtime rates.
Prerequisites:
-
You must know the inventory organization for setting up your items. This is the organization selected in the system profile option Service: Validation Inventory Organization.
-
The billing type must be set up if you are not using one of the seeded billing types.
To set up inventory items
-
Under the Inventory responsibility, navigate to Items, then Master Items.
The Organizations list of values window appears.
-
Select the Inventory organization in profile option ASO: Product Organization.
The Master Items window appears.
-
Follow the steps described in Oracle Inventory User's Guide to set up your items or verify that existing items have been set up correctly. The following entries and settings are important for service applications:
-
Main Tab
-
Enter item name and description in the Item and Description fields.
-
Entries in the Unit of Measure region are used as the default units of measure in Charges.
-
-
Inventory Tab
-
Inventory Item check box: Select for all items.
-
Stockable check box: Select for tangible inventory items only. Do not select for labor and expense items.
-
Transactable check box: Select for tangible inventory items only. Do not select for labor and expense items.
-
-
Order Management Tab
-
Customer Orders Enabled check box: select for all items.
-
Shippable check box: Select for physical items. Do not select for labor and expense items.
-
-
-
Select the Service Tab.
-
In the Service region, make one or more of the following optional entries:
-
To make it possible for agents to create service requests for this item, select Enabled from the Service Request list.
-
To make it possible to apply service contracts for this item, select the Enable Contract Coverage check box. You must also select Track in Installed Base check box before you can apply service contracts to it.
-
Select Enable Defect Tracking only if your organization uses Oracle Quality Online.
-
Select Enable Provisioning if this item can be delivered through electronic fulfillment by the Oracle Service Fulfillment Manger (SFM).
-
-
In the Installed Base region, make one or more of the following optional entries:
-
Select the Track in Installed Base check box to track this item via Oracle Installed Base.
-
If you select the Track in Installed Base check box, then you can select the Create Fixed Asset check box to create a depreciable inventory asset used in Oracle Asset Tracking. See Oracle Asset Tracking documentation for more information.
-
-
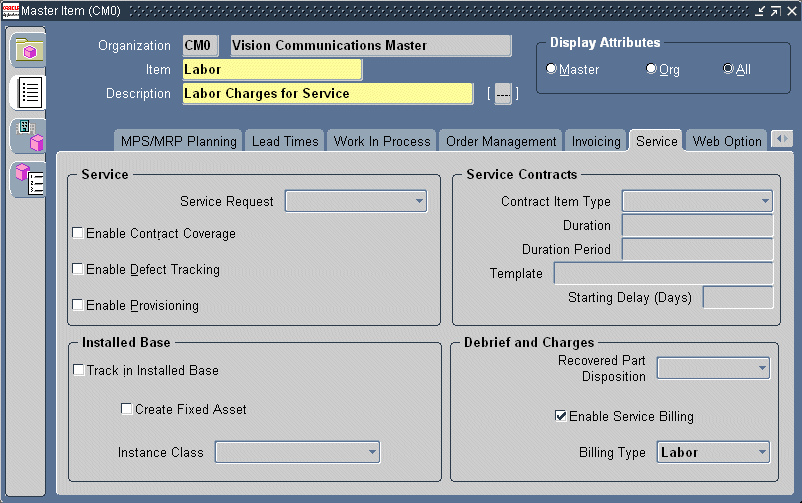
In the Debrief and Charges region:
-
Select the Enable Service Billing check box.
-
Use the Billing Type list to select a billing type for the item.
Select a billing type so that agents can enter the item in the Task Debrief (Oracle Field Service) and the Charges tab (Oracle TeleService). Then, you can also define discounts for the item in Oracle Service Contracts.
Note: The Recovered Part Disposition list is reserved for future use by Oracle Spares Management.
-
-
Do not enter any value in the Service Contracts Region. This region is used for creating contracts as inventory items. Specifying a Billing Type for an inventory item means that the item can be covered by a contract.
Guidelines for Setting Up Items in Inventory
The tables given below provide you with the guidelines for setting up the Item Master for the three possible types of inventory items: parts, labor, and expenses.
Main Tab
The following table describes the setups on the Main tab of the Item Master window:
| Type of Inventory Item | Name | Unit of Measure |
|---|---|---|
| Part | Entry Required | Entry Required |
| Labor | Entry Required | Entry Required |
| Expense | Entry Required | Entry Required |
Inventory Tab
The following table describes the setups on the Inventory tab of the Item Master window:
| Type of Inventory Item | Inventory Item check box | Stockable check box | Transactable check box |
|---|---|---|---|
| Part | Selected | Selected | Selected |
| Labor | Selected | Deselected | Deselected |
| Expense | Selected | Deselected | Deselected |
Order Management Tab
The following table describes the setups on the Order Management tab of the Item Master window:
| Type of Inventory Item | Customer Orders Enabled check box | Shippable check box |
|---|---|---|
| Part | Selected | Selected |
| Labor | Selected | Deselected |
| Expense | Selected | Deselected |
Service Tab (Service Region)
The following table describes the setups in the Service region on the Service tab of the Item Master window:
| Type of Inventory Item | Service Request drop-down list selection | Enable Contract Coverage check box | Enable Defect Tracking check box |
|---|---|---|---|
| Part | Enabled | Selected | Select only if your organization uses Oracle Quality Online. |
| Labor | Enabled | Deselected | Deselected |
| Expense | Enabled | Deselected | Deselected |
Service Tab (Installed Base region)
The following table describes the setups in the Installed Base region of the Service tab on the Item Master window:
| Type of Inventory Item | Track in Installed Base check box | Create Fixed Asset check box |
|---|---|---|
| Part | Enable this check box if the item is to be tracked by Oracle Installed Base. | Select only if you selected the Installed Base Tracking check box and the item is a depreciable asset in Oracle Asset Tracking. |
| Labor | Deselected | Deselected |
| Expenses | Deselected | Deselected |
Service Tab (Debrief and Charges region)
The following table describes the setups in the Debrief and Charges region of the Service tab on the Item Master window:
| Type of Inventory Item | Enable Service Billing check box | Billing Type drop-down list |
|---|---|---|
| Part | Selected | Select a billing type |
| Labor | Selected | Select a billing type |
| Expense | Selected | Select a billing type |
References:
Oracle Inventory User's Guide
About Setting Up Labor Schedules for Pricing Labor
Labor schedules determine what your organization charges for labor at different times. There are two places where you can define labor schedules: in Oracle Service Contracts (optional) and in Charges (required).
You must set up the default labor schedule in Charges for each business process as described in this procedure only if your organization is charging customers for labor using the Debrief window in Oracle Field Service or Oracle Depot Repair.
This setup is required because Debrief does not require agents to select the applicable labor item (the labor rate for the work performed).
This section covers:
How Charges Determines Labor Charges
The application charges for Oracle Field Service labor in three steps:
-
Agents debrief labor in the Debrief window. Entry of the labor item (containing the applicable labor rate) is optional.
-
If the labor item is not specified, the application determines it based on:
-
The labor schedule from the selected service contract for the charge line. This schedule is entered in the Oracle Service Contracts' Billing Rates window. See Setting Up the Labor Schedule in Contracts.
-
The default labor schedule you create using the procedure described in Setting Up the Default Labor Schedule.
If the agent has worked across multiple time periods specified in a labor schedule, then the application creates multiple charge lines.
For example, you create a labor schedule with regular time between 8 a.m. and 4:59 p.m.; overtime to be between 5 p.m. and 7:59 p.m.; and double time after 8 p.m. If an agent reports they have worked between 4 p.m. and 9 p.m., then the application creates three charge lines for the customer: one hour of regular time, three hours of overtime, and one hour of double time.
-
-
The application determines the price.
The price can be based on the price list alone or, if a contract is specified, in combination with a labor rate. A labor rate modifies or overrides the price list price: you can either specify a percent over or under the price list price or a flat currency amount which overrides the price list price. The labor rate pricing is available only when there is a contract specified for the charge line.
The concurrent program CSF: Update Debrief Lines creates the charge lines from debrief lines when a task assignment status is changed to Completed, Closed, Cancelled, Rejected, or On Hold.
For charge lines entered directly in the service request and in Oracle Depot Repair, the application looks up the price directly as described in step 3 above.
Setting Up the Contract Labor Schedule
If your organization uses Oracle Service Contracts together with Charges, then you can set up a labor schedule in each contract.
The steps below provide a guideline for entries important to Charges only. Refer to Oracle Service Contracts Implementation Guide for more details about this and other contracts related setups.
Guidelines for setting up the labor schedule
-
Under the Contracts Manager Responsibility, navigate to Launch Contracts.
-
To set up the labor schedule in a single contract:
-
Select the contract you want to set up and display it in the Service Contracts Authoring window.
-
Select the Lines Tab.
-
Select the Effectivities subtab.
-
Select the service coverage item and click Edit Coverage in the Coverage Region.
The Service Contracts Coverage window appears.
-
Select the Billing Types subtab.
-
Select the Business Process and the Service Activity Billing Type pair you wish to set up. The Billing Type must have the Billing Category of Labor.
-
Click Billing Rates to display the Billing Rates window.
-
-
If you are setting up the labor schedule for a contract template, then navigate to the Billing Rates window following the instructions in Oracle Service Contracts Implementation Guide.
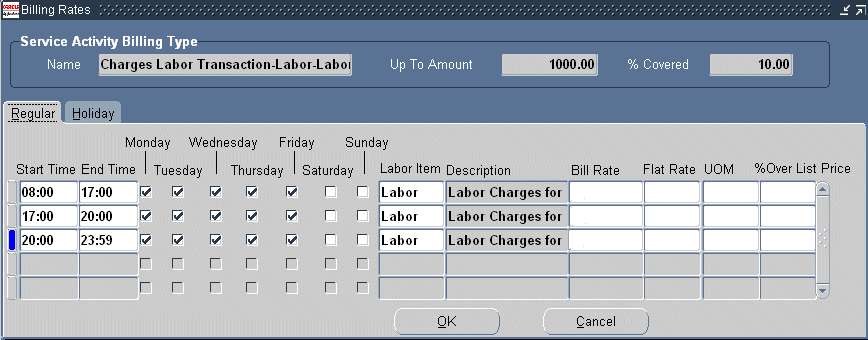
-
If you are pricing labor based on labor inventory items, then, on the Regular tab, set up the labor charges for different days and times as follows:
Note: Make sure the start and end times do not overlap.
-
Enter the start and end time for the rate.
-
Select the days this rate is applicable using the check boxes for the days of the week.
-
Select the labor item to be applied for this time period using the Labor Item LOV.
-
Leave the rest of the fields blank.
-
-
To use the labor rates in the contract to override or modify the price, set up the labor charges for different days and times on the Regular tab as follows:
Note: Make sure the start and end times do not overlap.
-
Enter the start and end time for each rate.
-
Select the days this rate is applicable using the check boxes for the days of the week.
-
Select the labor Inventory item using the Labor Item LOV.
-
Use the Bill Rate LOV to enter the bill rate. The list of values is based on a lookup.
-
To specify a price for this rate, enter the currency amount in the Flat Rate field and select a unit using the UOM LOV. Do not make any entries in the %Over List Price field. This price you enter here overrides the price list price for this contract.
-
To specify a discount or a surcharge for this rate, enter a positive or a negative percentage in the %Over List Price field. A positive number increases the rate an agent enters. A negative number decreases the amount. Do not make any entries in the Flat Rate or UOM fields.
-
-
Repeat the entries you made on the Regular tab on the Holiday tab to set up the holiday rates.
-
Click OK to save and close the window when you are done.
Setting Up the Default Labor Schedule
Use this procedure to set up the labor schedule that is used by charges to supply a missing labor item when none is found in the customer contract or when there is no contract specified for the charge line. You must set up one default labor schedule for each business process.
To set up the time and material labor schedule for a business process
-
Under the Service responsibility, navigate to Setup, then Charges, and select T&M Labor Schedule.
The Time & Material Labor Schedule page appears.
-
Use the Business Process LOV to select the service business process.
-
Specify the different labor times and their pricing. For each, line:
-
Enter the start and end times.
Note: Make sure that the start and end times of your entries do not overlap.
-
Select the days the line is applicable using the check boxes for the days of the week.
-
Select the labor item to be applied for this time period using the Labor Item LOV.
-
If you are using labor rates in your contracts, then select a billing rate using the Labor Rate LOV.
Note: Labor Rate in this window is the same field as the Bill Rate field in the Contracts' Billing Rates window.
Note: Do not enter a currency rate (Flat Rate) or discount (% Over List Price) for the rate. The application looks these up in a customer contract instead. Please see Oracle Service Contracts documentation for details.
-
-
Click Save .
-
Click Validate Setup to validate your entries.
If your entries do not overlap and the coverage is complete, then a check mark appears in the Validation Completed check box.
Restricting Agent Use of Operating Units for Charge Lines
By default, agents can submit charges against any operating unit to Oracle Order Management. (The charge line displays a default operating unit according to the rules you specify in Setting Up Rules for Defaulting the Operating Unit, but the agent can select a different operating unit using the list of values.)
You can restrict the ability of agents to submit charges against operating units by setting up a security profile and entering that security profile in the system profile MO: Security Profile.
Charges enforces the chosen security profile and provides an error message whenever agents attempt to submit to Oracle Order Management a charge for an operating unit that is not permitted by the security profile.
See Oracle E-Business Suite Multiple Organizations Implementation Guide for information on setting up security profiles.
Setting Up Rules for Specifying the Default Operating Unit
When agents enter a charge line, the application automatically supplies a default operating unit based on the rules you set up in this procedure. The operating unit is the financial entity used for billing and receiving payments from the customer.
To set up rules for specifying the default operating unit
-
Navigate to Setup, then Charges, and select Multi Org Setup.
The Service Request Multi Org Set Up page appears.
-
Enter the sequence in which you want Charges to look for the value of the defaulted operating unit.
Rule Name Description Operating Unit of the Contract If a contract is associated with the service request, then charges uses the operating unit of the contract. Operating Unit of the Installed Base Product If the service request concerns an Oracle Installed Base item, then charges picks up the default operating unit of the item. Profile Option: Service Default Operating Unit Charges uses the operating unit selected in system profile Service: Default Operating Unit. Operating Unit Stamped on the Service Request Charges uses the operating unit associated with the service request. Operating Unit of the Account Site The application derives the site operating unit from the bill to party site and the account number. If there are multiple account sites, then the operating unit of the primary bill to account site is selected. Otherwise, the operating unit of the first bill to account site is selected as the operating unit. Profile Option: MO Default Operating Unit The operating unit is derived from the profile MO: Default Operating Unit. This rule is considered only if the Service: Restrict Operating Unit by MOAC profile option is set to Yes. The application defaults the first operating unit it finds. For example, if you enter the sequence of 1, 2, 3, 4, 5 and 6, then the application first looks for the operating unit in a valid contract. If there is no contract available, then it checks to see if the service request is for an Oracle Installed Base item, and so on until it finds the operating unit.
-
Click Applyto save your entries.
Modifying the Display of Charges on Customer Invoices
Normally the customer receives an invoice detailing all individual items agents have entered as charges.
You can use this procedure to create an inventory item with a generic name, called a Roll up Item, to appear on customer invoices instead of the individual inventory items in a billing type. The roll up item does not change what customers are charged, it affects only the name of the item printed on the invoice.
For example, if you have three different overtime labor items, Labor 1, Labor 2, Labor 3, all associated with the Labor billing type. Normally, if the agent specifies the engineer worked for two hours at Labor 1 rate, three hours at the Labor 2 rate, and one hour at the Labor 3 rate, then the customer sees three items on the bill:
-
Labor 1: 2 hours
-
Labor 2: 3 hours
-
Labor 3: 1 hour
By setting up a new inventory item Overtime Labor with the Labor billing type, and creating a roll up item using the procedure below, the customer bill substitutes Overtime Labor for each of the lines:
-
Overtime Labor: 2 hours
-
Overtime Labor: 3 hours
-
Overtime Labor: 1 hour
Note: The roll up item you create does not summarize line items on an invoice. It only substitutes the generic roll up item name for the item names for that billing type.
Note: You can use roll up items for physical items but not for items that are shipped to or received from customers through Oracle Order Management.
Prerequisites:
You must know the correct inventory organization
To set up an inventory item to modify the display of charges in customer invoices
-
Under the Inventory, Vision Operations responsibility, navigate to Items, then Master Items and set up the replacement items you wish to appear on the customer invoice. See Setting Up Inventory Items.
-
Switch to the Service responsibility, and navigate to Setup, then Charges, and select Billing Type Attributes.
The Billing Type Attributes window appears.
-
Use the Billing Type LOV to select the billing type for the inventory items you want to summarize.
-
Select the inventory item you want to use as the roll-up item using the Roll up Item LOV.
-
Save your work.
Setting Up Charges System Profiles
Use this general procedure to set up any of the Charges profiles.
To set up system profiles
-
Under the Service responsibility, navigate to Others, then Profile System Values.
The Find System Profile Values window appears.
-
In the Profile field, enter the search criteria. For example: "
Service%charges%". -
Click Find.
The profiles matching your search criteria appear in the System Profile Values window.
About Setting Up Remaining Charges System Profiles
Setting up the remaining Charges system profiles to control Charges behavior includes:
Setting Up the Default Sort Order on the Charges Tab
Agents can decide how to sort the charges displayed in the tab by making a selection from the Sort By list. You can set up the default value by setting the system profile Service: Charges Default Sort Order to any one of the following:
-
Billing Type
-
Charge Line Source
-
Charge Line Status
-
Charge Line Type
-
Creation Date
-
Order Number
-
Service Activity Code
By default, this system profile is set to Creation Date.
Setting Up the Default Service Request Business Process
Charges automatically displays the business process on the service request as the default business process in the charge lines, when the system profile Service: Charges - Default Service Business Process from SR is set to Yes, the default value. If you set this profile to No, the agent must always enter the business process manually.
Specifying the LOV Type for Price List
If your organization uses a large number of price lists, you can select to use the long list of values format by setting the system profile Service: Charges - Use Long List LOV for Price List to Yes. This forces agents to enter search criteria before displaying the list of values and thus improves performance. A setting of No, the default value, displays the short list of values format.
Preventing Errors from Recalculating Prices in Oracle Order Management
You can prevent agents receiving application errors when they attempt to use the Sales Order window in Oracle Order Management to recalculate prices of charge lines submitted from Oracle TeleService.
Agents using Oracle Order Management's Sales Order window have the option of recalculating the price of line items by choosing either Partial Price or Calculate Price in the Calculate Price Flag field of the Line Items tab and Pricing Subtab.
The Calculate Price Flag field is highlighted in the following image.

The recalculation may result in an error because the contractual discounts to the prices data may not have passed from Oracle TeleService to Oracle Order Management.
To prevent the recalculation error, use this procedure to create a dummy price modifier to be passed by Oracle Charges if the agent requests a recalculation.
To prevent pricing recalculation errors in Oracle Order Management
-
Under the Order Management, Super User responsibility, navigate to Pricing, then Modifiers, and select Modifier Setup.
-
In the Main tab header, enter Discount List as the Type.
-
Enter any name.
-
Enter an easy to remember string in to the Number field. You will need this later to identify the modifier.
-
Enter a start date.
-
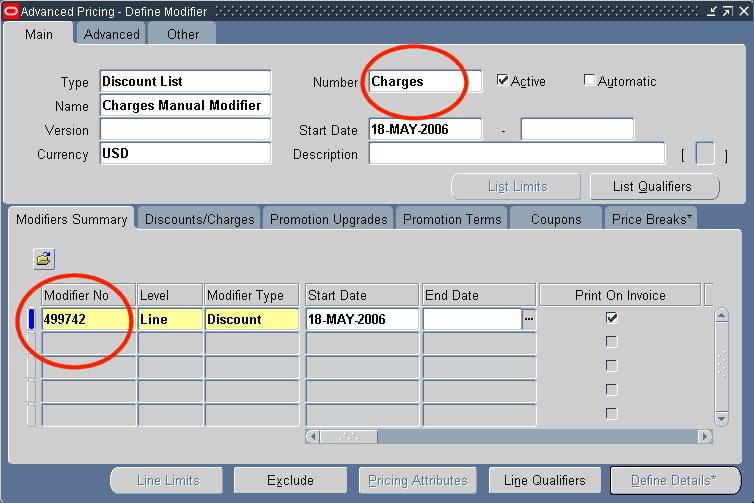
On the Modifiers Summary subtab, the number in the Modifier No field is generated automatically. Make a note of this number because you will need it to identify the modifier later.
The two modifier number fields you need to remember are highlighted in the image below.
-
For Line, choose Line.
-
For Modifier Type, choose Discount.
-
Enter a start date.
-
For the Pricing Phase, choose List Line Adjustment.
-
Select the Discounts/Charges tab.
-
For Application Method, choose Percent.
-
Enter 10 or any other number in Value.
-
Switch responsibility to Service.
-
Navigate to Others, and select Profile System Values.
-
Set the system profile Service: Default Manual Modifier to a modifier you have set up. You can search the list of values by the automatically generated modifier number and the string you enter in the Number field.
Setting Up Charges User Hooks
Oracle TeleService provides a user hook that enables you to execute custom logic for the retrieval of prices for Charge line items.
Pricing API User Hook
The Pricing API user hook enables you to embed custom logic for the retrieval of prices for Charge line items. You can calculate the price of an item based on pricing rules such as modifiers, qualifiers, and price breaks defined in Advanced Pricing.
To execute the user hook:
-
Define a PL/SQL package
CS_CHARGE_DETAILS_CUHKfor the procedure that is invoked by the user hook. The package may already exist if you have used other Charges user hooks. -
Define procedure
Call_Item_Pricing_Preto be invoked by the user hook. This is the user hook for the Charges Pricing API. It must be defined with the following parameters in theCS_CHARGE_DETAILS_CUHKpackage.PROCEDURE Call_Pricing_Item_Pre ( p_inventory_item_id IN NUMBER, p_price_list_id IN NUMBER, p_uom_code IN VARCHAR2, p_currency_code IN VARCHAR2, p_quantity IN NUMBER, p_org_id IN NUMBER, x_list_price OUT NUMBER, p_in_price_attr_tbl IN ASO_QUOTE_PUB.Price_Attributes_Tbl_Type, x_return_status OUT NOCOPY VARCHAR2, x_msg_count OUT NOCOPY NUMBER, x_msg_data OUT NOCOPY VARCHAR2);
Note: You must implement the logic in this procedure to calculate the price of an item on the charge line.
-
Verify user hook registration. All user hooks need to be registered in the JTF User Hooks Framework. Your System Administrator must execute a query on the database command line to verify, as no UI is available to do this.
Select count(*) from jtf_user_hooks where api_name = 'Call_Pricing_Item';

The value returned should be 1.
-
Enable the user hook. You need to enable the user hook so that it is executed in the Charges module.
The System Administrator must execute a statement on the database command line to enable to user hook, as no UI is available to do this.
UPDATE jtf_user_hooks SET execute_flag = 'Y'
WHERE pkg_name = 'CS_CHARGE_DETAILS_PVT'
AND api_name = 'CALL_PRICING_ITEM'
AND processing_type = 'B'
AND user_hook_type = 'C'
Note: To disable the user hook, replace the execute_flag='Y' with execute_flag='N' in the SQL statement.
Setting Up Charges Submission
When charges are submitted in Oracle TeleService, this data is sent to Oracle Order Management (OM) to process these charges. Oracle CRM uses the party or the party site level details whereas Oracle Order Management uses the account or account site details. You must set up profile options to create an account or account site in Oracle Order Management.
Sold To Account Validation
| If... | Then... |
|---|---|
| Sold to Party has at least one account but Sold to Account is null | An error is displayed and the charges submission process is aborted. |
| Sold to Party does not have any account | Charges are submitted based on the value specified in the Service: Action for Missing Account/Account Site in Charges profile. If the profile is set to Abort Submission of Charges, then an error is displayed and the process is aborted. If the profile is set to Allow Automatic Creation of Account/Account Site, then an account is automatically created. |
Bill To/Ship to Validation
| If... | Then... |
|---|---|
| Party Site and Account values exist | If there is at least one active account site or account site usage for the party site, account, and operating unit, charges are submitted to Order Capture. If an account site or account site usage doesn't exist for the party site, then data is submitted to Order Capture based on the value specified in the Service: Action for Missing Account/Account Site in Charges profile. If the profile is set to Abort Submission of Charges, then an error is displayed and the process is aborted. If the profile is set to Allow Automatic Creation of Account/Account Site, then an account or account site usage is automatically created. |
| Account value exists | The Sold To Party account data is sent to Order Capture and an order is created without an account site. |
| Only Party Site value exists | Charges passes the first account that satisfies the criteria, along with the operating unit and party site to Order Capture. If an account is not found, then the Service: Action for Missing Account/Account Site in Charges profile is referenced. If it is set to Abort Submission of Charges, the process is aborted with an error. Else, an account or account site is automatically created. |