Creating Activities
This chapter covers the following topics:
- Understanding Campaign Activities
- Understanding Activity Purposes
- Understanding Activity Templates
- Using Marketing Collateral
- Creating a Campaign Activity
- Setting Up Activities
- Associating a Product or Offer
- Using Collaboration with Campaign Activities
- Understanding Target, Control, and Contact Groups
- Understanding and Using Fatigue Rules
- Using Target Groups
- Defining Control Groups
- Control Group Analysis Report
- Costs, Revenues, and Metrics for Activities
- Associating Costs, Revenues, and Metrics for Tracking
- Associating Partners with Campaign Activities
- Understanding and Using Activity Operational Reports
Understanding Campaign Activities
A Campaign Activity is the delivery tool for a marketing campaign. After precampaign analysis and planning, marketers create campaign activities, each with a specific purpose and using a specific channel. The following figure shows a typical campaign activity flow.
The Campaign Activity Process

A campaign ativity's tasks flow logically as follows:
-
Performing precampaign analysis and activity planning.
-
Creating a campaign activity, that includes:
-
Selecting a template for a specific marketing execution channel
-
Selecting a purpose
-
Selecting the parent campaign
-
Associating products and/or offers to the activity
-
Associating a target group
-
Associating outbound collateral
-
Associating collaboration content
-
Updating tracking setup
-
Adding notes, if desired
-
-
Submitting the activity for approval.
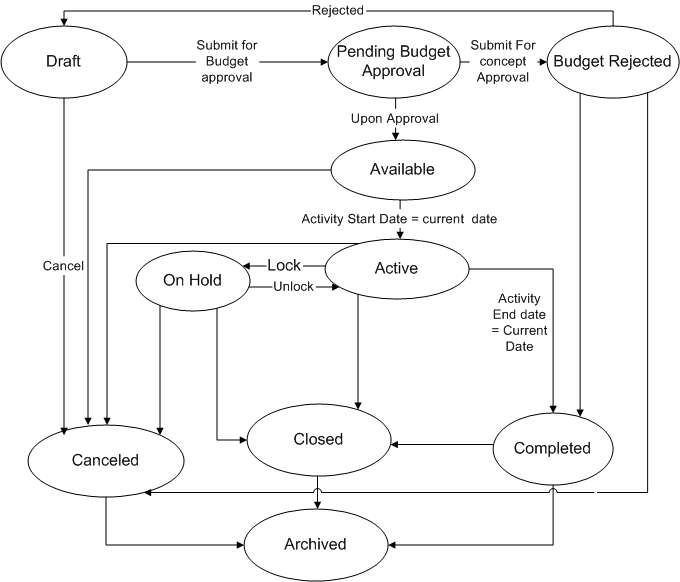
In the process of creation and execution, a campaign activity can be in different transition states as depicted in the following figure.
A Campaign Activity's Status Transitions

When approval is needed, the transition states for a campaign activity include:
-
New - Upon creation
-
Pending approval - When the marketer has manually submitted the activity for approval. A notification is sent to the approving authority requesting the approval
-
Rejected - When the approving authority rejects the activity. The activity can then go back to the New status and be considered for approval again
-
Active - After approval, from the Launch on Date and thereafter, until End on Date
-
Completed - You may set the activity status to Completed when the End on Date is reached
-
Closed - You can set the status as Closed on the End on Date specified or after
When approval is not needed, the transition states for an activity include:
-
New - When first created
-
Available - A New activity passes to the Available status
-
Active - From the Launch on Date and thereafter
-
Completed - You may set the activity status to Completed when the End on Date is reached
-
Closed - You can set the status as Closed on the End on Date specified or after
When you create a campaign activity, you must specify the basic attributes, such as Activity Name, Activity Template, Parent Campaign, and Launch on Date.
Optionally, you may specify the Source Code, End on Date, Objective, and Marketing Medium when applicable. If you do not specify the Source Code, the system will generate one as it is a unique index into marketing channels.
Based on the channel of execution of a campaign activity, you must define additional attributes as needed. For example, for an e-mail or direct mail print activity, you must specify a target group, while for advertising or Web schedules, a target group is not necessary.
The following diagram shows the flow of statuses for an activity.
Activity Statuses
Understanding Activity Purposes
For activity planning purposes, you can align channels (and associated activity purposes) with the overall marketing objectives. For example, if the goal is to increase marketing effectiveness, and cross sell is the primary way to achieve this, then the activity purpose would be "Cross Sell".
Marketers have the option of choosing from the following seeded purposes:
-
Cross Sell - When you want to direct marketing activities at existing customers
-
Up Sell - When you want to target customers who have bought a related product
-
Customer Acquisition - When you want to spread your customer base
-
Customer Retention - When you want to build customer loyalty
-
Lead Maturation - When you want to initiate activities to improve lead quality
To help you create suitable target groups for your activities, administrators can create list templates and include segmentation rules to support these purposes. When you select a purpose for a campaign activity, the associated list template becomes available.
Administrators can also create custom purposes to meet your specific needs. For example, advertisements or Web activities may be set up to build brand awareness or surveys can be created to measure customer satisfaction. Because advertisement activities do not target specific target groups, no list template is required. However, to target customers for customer satisfaction surveys, the list template needs to extract a list of customers based on their service and support history. Refer Oracle Marketing Implementation Guide for details on creating custom purposes.
Understanding Activity Templates
Activity setup can be quickly and easily performed as each activity is based on an Activity Template. An Activity Template provides a prebuilt framework that includes predefined values and specification for commonly used activity attributes. These include:
-
Channel - Each Activity Template is created for one marketing execution channel such as email, print, fax, or Web.
-
Activity Purpose - Each Activity Template is associated with one or more activity purposes. For a Campaign Activity, you may choose one of these purposes. Seeded purposes include: cross sell, up sell, customer retention, customer acquisition, and lead maturation. For more information, see Understanding Activity Purposes.
-
List Template - Each purpose associated with an Activity Template can be tied with a default List Template. Based on the purpose selected for activity setup, this default List Template can be used to create the target group for the activity, or you may choose some other List Template for target group specification.
-
Outbound Collateral - The Activity Template defaults the marketing execution channel for a activity, and each marketing execution channel is associated with specific cover letter types to facilitate outbound collateral creation.
-
Approval Needs - The Activity Template also dictates whether the activity needs approval. Campaign activities created based on seeded activity templates do need approval.
Administrators can create custom activity templates based on Channel Category and channel to suit specific business needs. Refer to the Oracle Marketing Implementation Guide for information on creating custom activity templates.
Using Marketing Collateral
When you create E-mail, Fax, Print, or Advertisement campaign activities, you may want to include electronic marketing collateral, such as product data sheets, white papers, promotional flyers, newsletters, cover letters, invitations, and so on. Such collateral are outbound and must reach the customer. For example, if you are organizing a press conference to launch a product, you may want to send out invitations. Alternatively, you may include the product datasheet to go out as an attachment in the e-mail.
Cover letters for the different direct marketing channels (e-mail, fax, and print) and other outbound collateral are stored and managed in Oracle Content Manager (OCM). To maintain security for content, you need to have access to the OCM folders to be able to create content items. Refer the Oracle Content Manager Implementation and Administration Guide for more information on folder security.
While many versions of a collateral may exist in the OCM repository, only one version can be live. When the content associated with an activity is fulfilled, the live version of the content is used.
For Direct Marketing Print campaign activities, cover letters can be either in Portable Document Format (PDF) or Rich Text Format (RTF) formats. Refer the Oracle Content Manager Implementation and Administration Guide for more information on collateral creation and maintenance.
For Web activities, the execution content is the content for Web Ads, Web Offers, or Product Recommendations.
Creating a Campaign Activity
To speed up campaign activity creation, your new activity is based either on an activity template or on an existing activity (which also uses a template).
Notes for Copying an Existing Activity
-
You can access the Create Activity for Activity Copy from the Campaign dashboard, from the Campaign Activities views, or from the Activities tab of Campaign Details. There is also a Copy icon in each activity row in the Activities list.
-
Create Method: Select Copy.
-
Copy From: You can only select an activity to which you have ownership or team access and that has an active template.
-
Copy Task: Select this check box to copy the activity as well as the tasks associated with the activity.
-
Template: By default, the template of the existing activity is used by the new activity and cannot be changed.
-
Channel Category: By default, the channel category of the existing activity is used by the new activity and cannot be changed.
-
Channel: By default, the channel of the existing activity is used by the new activity and cannot be changed.
-
Name: Provide a unique name for the activity. By default, the name of the existing activity is displayed.
-
Source Code: The source code is a unique identifier used to track all transactions against the activity. If you do not enter a source code, then the system generates it.
-
Parent Campaign: The parent campaign is required for activities. You can select a campaign that you have ownership, team, or read only access to and that is not expired and does not have a status of canceled, completed, closed, or archived. The parent campaign defaults from the copied activity unless the campaign is expired or has a status of canceled, completed, closed, or archived. The activity team and visibility restrictions (confidential flag) are inherited from the parent campaign.
-
Purpose: Select a purpose. See Understanding Activity Purposes.
-
Launch On and End On Dates: The launch date is required and defaults to the current date. The end date defaults to the end date of the parent campaign. If the parent campaign from the copied activity was not valid to be defaulted, then the end date is based on the duration of the copied activity and the current date as the launch date. The dates must fall within the date range of the parent campaign.
-
Marketing Medium: By default, the marketing media of the existing activity is used by the new activity. You can select any of the active marketing media defined in the system.
-
Coordinator: By default you are the coordinator.
-
Objective: Each activity needs its own unique objective description. Enter an objective.
-
Components to copy: All activity associations are listed and selected to be copied to the new activity: additional information, offering (products only), target group and control group definitions, collateral, partners, and event setup for event type activities. You can change the selections for all except additional information and event setup.
Notes for Creating a New Activity
-
You can access Create Activity from the Marketing dashboard, from the Campaign Activities views, or from the Activities tab of Campaign Details.
-
Create Method: Select New.
-
Template: The template dictates the associations that must be defined to complete the activity setup. The template must have an active status.
-
Channel Category: The channel category is dictated by the template.
-
Channel: If the template defines a channel, then it is read only. If the template does not define the channel, then you can select a channel from those associated to the channel category.
-
Name: Provide a unique name for the activity.
-
Source Code: The source code is a unique identifier used to track all transactions against the activity. If you do not enter a source code, then the system generates it.
-
Parent Campaign: The parent campaign is required for activities. If you clicked Create Activity from the Activities tab in the Campaign Details page, then that campaign becomes the parent and you cannot change it. You can select a campaign that you have ownership, team, or read only access to and that is not expired and does not have a status of canceled, completed, closed, or archived. The activity team and visibility restrictions (confidential flag) are inherited from the parent campaign.
-
Purpose: Select a purpose. See Understanding Activity Purposes.
-
Launch On and End On Dates: The launch date is required, the end date is not required. The end date defaults to the end date of the parent campaign. The dates must fall within the date range of the parent campaign.
-
Marketing Medium: All active marketing media defined in the system is available for selection.
-
Coordinator: The person who is responsible for managing the activity. Your name is the default. You can select any marketing resource from the resource LOV.
-
Objective: Enter descriptive information about the objective for this activity.
When your copy or create completes, the Activity is created with a New status. The Details page appears and you can view and update all the details and associations.
Setting Up Activities
Campaign activities are the main execution vehicles for marketing. Activity setup includes setting up products to promote, offers, a target group to contact, and the collateral content to deliver. Setting up event activities includes an agenda, registration requirements, and roster management. Web content needs to be set up for identified web placements for web activities.
Notes
-
Select an existing activity to view and update the details of the activity and all of its associations dictated by the activity template.
-
Summary View: View all the related information on one page and print it.
-
The header information for the campaign can or cannot be updated based on the rules set up by your administrator.
-
When all changes are complete, click Submit for Approval if the activity requires approval, or click Activate if no approval is required.
If you are the approver for the activity, or no approval is needed, then the status immediately becomes Available/Active. If you are not the approver but approval is required, then you can review the approvers and submit for approval. Click View Approval to check the approval status.
-
Triggered by: The name of the monitor that triggered the activity, if it was triggered by a monitor. The name is a link to monitor details if you have access to financial information. The monitor overrides the launch date.
-
Event Setup tab: Set up event activities.
-
Web Planner tab: See Associating a We Ad or Web Offer Activity to a Placement.
-
Target Group tab: You can define target groups (audience) for your campaign activities and preview the list entries generated. See Using Target Groups.
-
Offering tab: You can choose a product or product category from an LOV of all products or from the Promoted Products LOV, which lists only products and categories associated with the parent campaign and their children. The product category set as primary (or the product category for the product set as primary) is used for reporting purposes. Only valid (not expired) products and categories can be associated to a campaign.
You can add any offer that is associated to the parent campaign. Select one offer as the primary.
You cannot make changes in this tab after the activity is in an active status. See Associating a Product or Offer.
-
Partners tab: Marketers may assign partners, such as Value Added Distributors (VADs), Value Added Resellers (VARs), agents, and so on, to campaign activities. See Associating Partners with Campaign Activities.
-
Budget tab: Team members with access to financial data can enter an estimate for the budget requirements for the activity. The default is the total forecast cost. This amount can be updated until the activity becomes active. Click Manage Budget to open the Budget Cue Card page and review budget activity, create a request or transfer, or access the activity budget checkbook.
-
Collaboration tab: Collaboration content is material associated to campaign activities and is usually not outbound (that is, not sent out to customers). It can be content items, such as a product data sheet or pricing information, proposal templates for Sales activities, or scripts.
Any content stored in Oracle Content Management that is in progress or approved and to which you have access, can be added to the activity so that all team members can see the same documents. You can add and delete content after the activity is activated. Select a content type and click Go to create a new content item.
You can also add notes, such as directions, special instructions, or reminders, and tasks for the activity on this tab.
In the Sales Kit section you can select a proposal template and script for the activity.
-
Tracking tab: Use this tab to review the performance of the activity using various metrics and monitors. You can also associate metrics and costs to the activity, and post costs to the budget. You can also create a monitor.
-
Additional Information tab: Select Notify on Activation to receive a workflow notification each time a repeating activity is launched.
Please refer to the procedure for the type of activity you want to create. The procedure includes the common creation steps in the correct sequence.
Associating a Product or Offer
Use the Offering subtab to associate a product or offer with a campaign activity.
Notes
-
Only products, product categories, and offers that have been associated to the parent campaign may be associated with the campaign activity
-
For sales activities, products, and product categories associated with them are recorded as Lead Lines.
Understanding and Using Offering
The Offering functionality enables you to associate Products, Product Categories, or Offers that you want to promote with a campaign activity. Product categories available to campaign activities are those defined in the Single Product Catalog. You can either associate the products that are associated at the campaign level or any other product in the single product catalog. You can also associate offers that have been associated to the parent campaign. The offers associated at the activity level should either be associated with the product categories, with the products associated at the activity level, or should be independent of any product (for example, 10% off invoice). Additionally, you can associate offers of type Request Offers to a campaign activity. Request Offers are those that are requested by a customer. For example, customers may request a telesales executive for discounts based on coupons they hold.
The selected product or offer may also play a role in defining the segmentation parameters. For example, if a campaign activity is being planned for marketing electronic toys, the segmentation condition may be high-income parents with kids.
For sales activities, products, and product categories associated with them are recorded as Lead Lines.
Using Collaboration with Campaign Activities
Collaboration content is material associated to a campaign activity. Collaboration content is not outbound - that is, not sent out to customers. It includes content, scripts, or proposal templates, and is meant to be used by sales and external teams involved in the activity. For example, you may need to associate sales kits containing proposal templates, competition analysis, scripts, and so on. Additional collaboration content like competitive information, sales plans, and so on can also be included. Refer the Oracle Proposals User Guide for more information.
Collaboration content is governed by the same security considerations that are defined for the campaign activity. Once content is associated to a marketing object, all users who have access to the marketing object have access to the associated content.
Oracle Scripting integrates with Oracle Marketing to help you interact with customers and track such interactions. Topics in this section include:
Scripting Overview
The goal of the integration between Oracle Marketing and Oracle Scripting is to provide marketing managers with the ability to follow-up on the campaigns they design with a scripted flow of interactions (either through the Web or a call-center).
One of the resulting benefits is to enable marketers to automate and streamline some marketing-specific activities like event registration or lead creation.
As another benefit, the branching functionality of Oracle Scripting enables marketing organizations to react differently to the input of different customers based on their profile or on the answers they provide to questions, and thus to develop a personalized relationship with customers.
Scripting Integration Process Flow
The following figure illustrates the Oracle Marketing/Oracle Scripting integration flow.
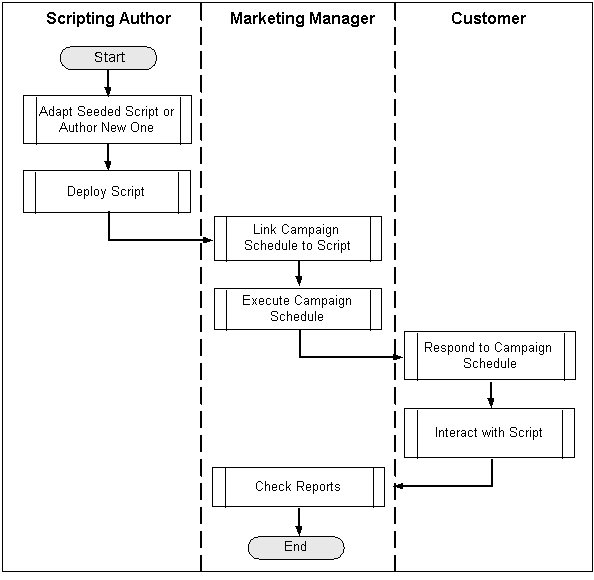
The high-level process flow is as follows:
-
A script is created in Oracle Scripting.
-
The Script is deployed in Oracle Scripting.
-
The marketer links a campaign activity to the script (using click-through destinations for Web scripts).
-
Customers responding to the activity are taken through the script, the customers' answers are collected, and the potential action (event registration, lead creation) is executed.
-
Marketer can check the activity dashboard for a report on the results of the activity.
Sample Scripts
Oracle Marketing comes with sample scripts for the following marketing-specific activities:
-
Event Registration
-
Event Registration Cancellation
-
Lead Creation
-
Customer Data Acquisition
These sample scripts are intended to be usable with minimum configuration and to be deployed as either call center scripts or Web scripts. Some components or building blocks are also seeded to allow customer identification and customer authentication. Refer to the Oracle Marketing Implementation Guide for more information.
Associating Scripts to a Campaign Activity
Scripting is integrated in Marketing through the use of click-through destinations (CTDs) that can be enabled behind a banner on store, via an e-mail, or even associated in direct marketing collateral. You can invite a list of customers to participate in a survey campaign or direct them to specific Web sites by visiting a defined URL. The return data from surveys can be used to evaluate customer satisfaction, improve product lines, target new or improved services, or otherwise improve responsiveness.
Navigation: Campaign > Campaigns > Collaboration mid-tab > Add Script
To view the responses to the deployed scripts view ,the operational reports for activities that deploy scripts through Click Through Destinations.
Understanding Target, Control, and Contact Groups
A target group for a campaign activity specifies the list or lists associated with the campaign activity. You can generate a target group using any combination of the following:
-
List - a group of customers who match a set of conditions. A list is static, that is, once generated, a list has an unchanged number of entries.
-
Segment - a set of conditions that will be executed dynamically when a target group is created. For example, a segment could be defined as residents living in the state of California. If this segment is associated with a target group, then the number of records satisfying the segment criteria at the time of generating the target group will be considered as part of the target list.
-
Oracle Discoverer Workbook
Additional Information: See also My Oracle Support Knowledge Document 2277369.1, Oracle E-Business Suite Support Implications for Discoverer 11gR1.
-
Imported list
-
Custom SQL
A Control Group is a set of list entries who do not receive campaign information. While generating a Target Group, you can specify the number of records to be included in the Control Group. For example, based on your marketing criteria, you could have 5000 prospects being targeted for a direct marketing activity. You could then create a Control Group of 250 (5%) prospects who will not be contacted for this direct marketing activity. The responses from the Control Group can be compared with the responses from target records that receive the campaign information to determine the benefits of marketing to customers and prospects who meet the list criteria.
A Contact Group is a group of list entries who are actually contacted through a marketing activity. The Contact Group is obtained by taking the count of the associated lists (or segments) for the Target Group, subtracting the Control Group records, and adjusting for any suppression and duplicate records. For example, based on your marketing criteria, you could have 5000 prospects being targeted for a direct marketing activity. You could then create a Control Group of 250 (5%) prospects who will not be contacted for this direct marketing activity. You will then have 4750 prospects who will automatically become part of the Contact Group (assuming no suppression and duplicate records). The responses from the Contact Group can be compared with the Control Group responses to measure the effectiveness of the marketing campaign.
Understanding and Using Fatigue Rules
Fatigue rules prevent marketing teams from over contacting their customer/prospect base. These rules enable them to carefully target customers so that they have a receptive group of customers even as they work towards meeting their marketing goals. For example, a fatigue rule could be created so that a customer is contacted four times (or less) per month. Fatigue rules are specified for a time period - weekly, monthly, quarterly, or yearly and are applied during campaign activity execution.
Use the following sections to understand the various concepts associated with fatigue rules and to perform related procedures.
Overview of Fatigue Rules
Fatigue rules prevent marketers from over contacting their customer or prospects base. These rules enable you to carefully target customers so that they are more receptive to the marketing promotions and messages.
The business benefits derived from using fatigue rules include:
Promote Brand Awareness - If promotions are strategically timed, customers are not overexposed to noise. Therefore, when they are contacted they are likely to be more receptive.
Support marketing strategy decisions - Helps enforce marketing rules dictating customer contact limits.
Maximize Marketing Dollar Effectiveness - By strategically contacting customers, every marketing dollar spent receives (in theory) a better response rate, therefore improving effectivity.
Improve collaboration for the enterprise - Enables you to setup enterprise wide rules. For example, telesales, direct mail, and e-mail (all communication channels having the potential to fatigue the consumer) - by centralizing the rules, you can prevent all channels from over-contacting the consumer.
Understanding Fatigue Rules and Time Periods
A fatigue rule defines maximum permissible contacts within a specified time period. For example, "Do not contact customers more than two times per month by any channel." The defined time period adheres to a rolling period.
Rolling Period Example
An e-mail activity is set to execute on February 13th -- Amy is on the target list of customers to be contacted. The fatigue rule specifies, "Do not contact customers more than two times per month by any channel."
On 13th February (when the activity executes) it determines how many times Amy has been contacted in the last one month.
-
Contact count for Amy in the last 30 days:
-
E-mail was sent to Amy on Jan 15 - one contact was counted.
-
Another e-mail was sent to Amy on Jan 21 - the count became two.
-
-
As of Feb 13, Amy had already reached her threshold of "two contacts per month." Therefore, she is fatigued and cannot be contacted.
However, if the activity executed on Feb 14th, the total number of contacts within the last 30 days would have been 1. The contact on Jan 15th would have been rolled out from the past 30-day period starting Feb 14th.
Fatigue rule time periods are defined as follows:
Week = 7 days
Month = 30 days
Quarter = 90 days
Year = 365 days
Fatigue rules can be global or channel specific.
Global Fatigue Rules
Using this type of rule (threshold) you can set an absolute limit on the number of contacts by any channel for a given time period. For example, do not contact any customer more than 4 times per month by any channel. If exclusively setting channel-specific limits, global rules can be null.
Marketing Channel-Specific Fatigue Rules
Within the limits set globally, you can also establish specific rules (thresholds) for each outbound channel - direct mail (print), email, fax, and telemarketing (phone) For example, of the 4 total contacts allowed per month, do not contact customer by phone more than 2 times per month.
Depending on how the rules are setup, both global and channel rules can be applicable. For example, a global rule may be 'Do not contact customer more than once a week' and an e-mail channel rule may be 'Do not contact customers more than 2 times a month by e-mail'.
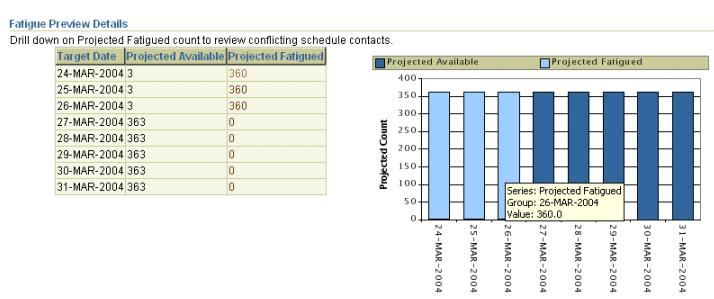
Activity Level Previews
You can use preview fatigue to determine whether an optimum number of customers are available for targeting. In a given target group, preview provides information about the total number of customers available to market and the total number of fatigued customer for a date range.
Customers can belong to the target groups of multiple activities and may be contacted too often. Therefore, they could be fatigued on a particular date. You can use the projected counts to adjust your activity start date to optimize your targeting need.
Activity level previews contain the following information:
-
Total Size - The number of people in the target group eligible for targeting
-
Target Date - The date for which fatigue status is being previewed
-
Projected Available to Market - The total members in a target group not fatigued and available to be contacted on the target date
-
Projected Fatigued - The total number of members in a target group who are fatigued and will not be contacted on the target date
The Preview functionality uses the historical fatigue counts tracked to date for each member of the target group against each date in a given date range. The set of currently queued activities are looked up, assuming that all approved, available, or active activities planned between the time of Preview and the previewed date will be executed.
The fatigue projection is done for 28days.
You can drill down on Projected Fatigued Count to view the list of activities that are fatiguing people and how many people each activity can potentially fatigue. Access to activities are controlled by team security settings at the schedule level. Confidential activities will be displayed only if you have access to them.
Example to Demonstrate How Preview Works
Activity A is set up and previewed on June 1, and is to be activated on June 5. The activity contains Irvin as a member. On June 1, by Irvin's rolling period, Irvin has a running count of three contacts. But by June 5, by Irvin's rolling period, Irvin will have a running count of two contacts. So, two contacts is the number Preview will leverage for the June 5 schedule activation preview.
Two additional activities are already approved and planned for execution on June 3, both of which include Irvin as a member. Therefore Irvin's fatigue count on June 5 is projected at four contacts. Since the global limit per week is three contacts by any channel, Irvin will be considered fatigued and removed from the Preview function for Schedule A.
The preview displayed in Figure A, Sample Fatigue Preview, shows that the Projected Fatigue figures for the dates between March 24 and March 26 are high. Using this information, as a marketer, you can decide to wait until Mar 27 to launch your schedule, when you will have more customers to target.
The Fatigue Rule Override Option
When launching a campaign activity, you can choose to override fatigue rules based on two key requirements:
-
Not all communication is fatiguing - such as purchase confirmation e-mail, Event registration e-mail, and communications by request of the customer, such as opted in subscriptions to newsletters, offers, product information should not count towards fatigue thresholds.
-
Not all communications are optional - For example, for communications that are part of a service contract or contract renewal notices, product recalls, important product launches, or churn risk, members should not be removed from the target group.
Note: For all sales activities, that is, for all campaign activities where the channel is Direct Sales, fatigue rules are automatically overridden.
Notes to Override Fatigue Rules
-
In the Options region of the Target Accounts subtab, deselect the Fatigue Rules Enabled check box and click Save.
-
The Fatigue Rule tool also tracks customer fatigue levels and reports on fatigued customers.
Tracking Fatigue for a Campaign Activity
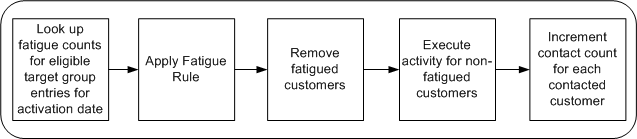
When the system executes a campaign activity, customers who have already been contacted the number of times specified by the fatigue rules are considered fatigued. These members are removed, and not contacted via the activity channel for that particular initiative.
To track the number of times each customer is contacted via the different channels in a given time period, the system will track each contact for a given customer.
Customers who have not exceeded their fatigue thresholds will be contacted as part of the activity's target group. Upon activity execution, the customer's contact count should be incremented, for the date of the activity, for the channel of the activity.
The following figure demonstrates how fatigue rules work when a campaign activity is executed. The system looks up the fatigue counts for all the target group entries, which are eligible to be contacted, for a given activation date, then applies the fatigue rules that have been set up, and removes the fatigued customers from the contact list. The campaign activity is executed for the non-fatigued customers, and the contact count is incremented and recorded.
Previewing Activity-Level Fatigue
Use the following procedure to preview fatigue.
Prerequisites
-
A direct marketing campaign activity must exist.
-
A target group, which has been generated and is in the 'Available' status, should have been associated with the campaign activity.
Using Target Groups
You can define target groups (audience) for your campaign activities and preview the list entries generated in the Target Group midtab.
You can create target groups in the following ways:
-
Use a List Template - You can either use the default list template or select a different one from the available list. Additionally, you can modify the selection filters and reorder them before generating the target group. For example, after specifying a product as a selection criterion, you may also want to specify additional conditions based on customer demographics.
-
Use an existing List or Segment from the Advanced option - When you use an existing list to create a target group, you can access the suppression, deduplication, selection, and chart options for the list and make required changes. Segments being dynamic, when you select one to base your target group on, it is generated when the activity executes and the resulting list contains the target group for the activity. You can change segment definitions in the Segment horizontal tab of the Audience tab. See Creating and Managing Segments for more information.
-
Select an imported list using the Advanced option
-
Select a custom SQL list using the Advanced option
-
Use a Discoverer workbook from the Advanced option
Additional Information: See also My Oracle Support Knowledge Document 2277369.1, Oracle E-Business Suite Support Implications for Discoverer 11gR1.
Target groups are generated in the Full Refresh mode - that is, using the selection criteria, deduplication rules, and suppression options, the list is recreated as if for the first time.
Indirect marketing activities, such as of type Advertising, are not targeted at a specific audience and therefore target group creation functionality is not applicable to them.
Use the following topics to create a target group for a campaign activity.
Creating a Target Group
A Target Group for a campaign schedule specifies the list or lists associated with the campaign schedule. Certain activity types require a generated list in order to make the campaign active. For example, any direct marketing activity type (direct mail, e-mail, fax, or telemarketing) requires a generated list. You can generate a target group using any combination of the following:
-
List
-
Segment
A segment is a dynamic criteria that will be executed when the target group is generated. For example, a segment could be defined as a condition to obtain residents living in the state of California. Now, if this segment is associated with a target group, then the number of records satisfying the segment criteria at the time of generating the target group will be considered as part of the target list entries.
However, for a List the number of entries is static. This implies that if a list or employee list is associated with a target group, then the static number of entries in these lists when the lists were generated will become part of the target group list entries.
Prerequisites
-
A generated list or segment
-
An existing campaign with a campaign activity
Navigation: Campaign Dashboard > Activities > Select an activity > Target Group tab
Notes
-
Generation Type: If you choose:
-
Full Refresh - when the list is regenerated all the entries from the list are removed and it will be generated afresh as if being generated for the first time.
-
Append New Records - all the list entries from the previous list generation activity will be retained. New entries that meet the specified selection criteria will be added to the existing list. However, if list criteria is modified, then the entries from the previous list generation will not be satisfying the list criteria.
-
Update Attributes Only - if any modifications are made to the customer attributes in the corresponding data source or Audience, those changes are updated within the list entry records.
-
-
A Control Group is a list of customers or prospects who will not receive the campaign information. Select No Control Group or Using Control Group as appropriate. If you choose to use a control group, enter the percentage of the target group or the count of records for the control group.
-
Purge List Entries After Grace Period: If this is selected, then the entries of the Target Group are purged based on the concurrent program AMS - Purge Target Group and the profile option AMS: Grace Period in Days. Refer Oracle Marketing Implementation Guide for additional information.
-
Selection region: Only the lists and segments with the Available status will be listed.
-
For a target group associated with a telemarketing campaign schedule, you can optionally enter a Group Code for each of the target group selections. The Group Code is used to logically group selections within a Target Group and assigned to telemarketing agents using Oracle Advanced Outbound.
-
Generate List: Suppression rules (based on suppression list entries with the "Available" status), control group entries, and deduplication rules (based on activity type) will be applied when the Target Group is generated. After the Target Group is generated, the suppression, deduplication, control group, and contact group information is displayed in the Summary region.
-
After a target group is generated, you can add entries manually to it. To do so, click the target group name. You will be navigated to the Entries subtab of the Audience Workbench. Select the Add Entries Action. Note that after adding manual entries, if you regenerate a target group in the Full Refresh mode, the manual entries will be lost. Additionally, for activities to which triggers are associated, adding manual entries will result in the target group for the first instance of the activity to be regenerated. See Adding Manual List Entries for more information on adding manual entries to lists.
Opt Out: If this field is selected in the search result page, it indicates that the customer (person or organization contact) has opted out from receiving marketing communications from all channels, and should not be selected to be contacted.
Target Group Options
Use the following information to create a target group using a list template. When you use list templates to create a target group, you are using the natural language query method for specifying the target group selection criteria.
Notes
-
Apply Suppression: The deduplication rule will not only eliminate duplicates within the list, but will also be used in suppressing the records from being targeted. Select Apply Suppression to use deduplication. You can either select a deduplication rule or the application will use the seeded rule according to the channel for the activity.
Deselect Apply Suppression, for example, if there is a product recall and all the affected customers must be contacted. When suppression is built into the base selection query, you also deselect Apply Suppression.
-
Preview Fatigue: If fatigue rules have been specified by the administrator, you can view the projected fatigued and projected available counts before deciding to override or retain the fatigue rules.
-
View entries: After a target group is generated, you can add entries manually to it. Note that because target groups are generated in the Full Refresh mode, if you regenerate a target group after adding manual entries, the manual entries will be lost. See Adding Manual List Entries for more information on adding manual entries to lists.
Target Group Locking
-
To prevent losing of tracking information about customers who are targeted in a campaign, the Target Group is automatically "Locked" when a campaign activity becomes Active and the Target Group selections cannot be modified. This ensures that measurements for the campaign, such as responses, orders, revenue, and so on are measured against a constant set of target customers.
-
You cannot change the status of the Target Group even if the status of the campaign activity is changed.
-
Although the status of a "Locked" Target Group cannot be changed from the Campaign Workbench (or using the Campaigns functionality), it can be changed from "Locked" to "Available" or "Archived" from within the Audience Workbench.
Creating a Target Group Using the Advanced Option
Use the Target Group subtab to create target groups based on other lists, segments, Discoverer workbooks, list imports, or SQL. You can also create your own SQL conditions.
Prerequisite: Fatigue rules and deduplication rules should have been specified by the System Administrator
When you select the list sources for the target group, the Action in the first row must be Include. The % Requested must be null for the Intersect and Exclude actions.
Defining Control Groups
A Control Group is defined so that a certain set (sample) of target group members are not contacted via a marketing activity. The behavioral difference (response, orders, and so on) between the contact group and the control group are studied to establish the effectiveness and usefulness of the marketing activity.
The control group size is generally a trade-off between the accuracy required for a test sample and the required confidence in the results. If more accuracy and confidence level are required, then a bigger control group size is needed. The target group size considered for control group calculation is based on the final contact-able target group size after all other conditions have been applied.
Control Group Business Scenario
ABC Company wants to promote a new Z-series laptop to young, high-income consumers. The target group members are identified and will be sent a special offer to purchase the Z-series laptop. ABC Corporation wants to hold back a subset of the target group and later study the effectiveness of the campaign by comparing orders from the contacted members and the control group members.
A subset of the target group is held back as control group members. This special offer is not sent to the control group members. After executing the campaign, the order rates of the Z-series laptop between the contact group and the control group members are measured to determine the effectiveness of the marketing activity.
The available methods of determining the control group size are:
-
Statistically valid sample size
It is important that the control group size selected is large enough to have significant results and not so large that the actual target group is reduced at the cost of testing. Therefore, for marketers who are not well versed with what should be the size of a control group, they can use the statistical formula for estimating the optimal sample size to ensure that the results attained are significant enough. The formula for calculating the control group size is a standard statistics formula that has been adjusted for finite populations.
For example, the marketer responsible for U.S. introduction of the Z-series laptop is not well versed with typical sizes for the control groups and would like to use the system calculated control group size based on a statistically valid sampling formula. The marketer can change the different parameters in the statistical formula and view the change in the control group size.
-
User entered by percentage
ABC Company wants to use a best practice of using 10% of the target group size as the control group.
-
User entered by count
In Europe, the marketers are more experienced in the control group testing and analysis and also have an estimate of the target group size for the campaign. Based on past experience and the estimated target group size, they want to directly specify a count for the control group and not use the system calculated values.
To create a control group for an existing target group
-
View the target group for the activity in the Target Group tab. The target group must be Draft, Available, or Failed status.
-
In the Options section, click Define and set the control group details.
The Define Control Group page displays the size and status of the target group for reference.
-
Click Save.
-
Generate the control group by clicking Regenerate or by generating again from the Target Group page. The actual target group enabled entries are utilized for the control group calculation.
-
Click Update Entries in the Target tab and view all entries. You can sort the Control Group column to view all entries flagged as control group members.
To define the control group while defining the target group
The marketer can define a new control group while defining a target group. For a new control group, the marketer defines the size of the control group and the system selects the control group members randomly from the target group. This ensures that the control group members are a representative sample of the target group.
-
Define the target group in the Target Group tab and save the target group definition.
-
In the Options section, click Define and set the control group details.
-
Save the control group definition.
-
Generate the target group.
The control group is applied automatically. Control group members are selected after successful completion of target group generation. If the target group generation fails, then the control group members are not selected and the control group status remains in Draft status. If the target group generation is successful, then the control group status is Available.
-
Click Update Entries and view all entries. You can sort the Control Group column to view all entries flagged as control group members.
Notes for Statistically Significant Sample Size
You are a marketer for ABC Company and are responsible for planning and executing a campaign to cross-sell an accessory to the Z-Series laptop. You target the customers who already bought the Z-Series laptop and you want to send them a special offer for taking 10% off an accessory. You decide to hold back a certain set of random target people as a Control Group and not send the offer to these.
Your assumption is that sending the special offer to a certain set of people has an affect on them and that they will buy the accessory more than the control group people. What should be the size of your control group? The size of the control group should be significant enough that assuming you had not sent the offer to the entire target group, the results of the control group study would be representative of the entire target group. Your target group size = 1000. Your control group size as n.
-
Confidence Level: The confidence level measures the degree of certainty associated with the test. The larger the sample, the surer you can be that the responses truly reflect the population. Available confidence values are 80%, 90%, 95%, and 99%. The default is 95%.
After the campaign, assume that none of the n Control Group members bought the accessory. Then, how confidently can you state that if you had not given the offer to (1000-n) people, they also would not have bought any accessory? If you want to be 100% confident in stating the above, then obviously your sample size, the number of people you don't send the offer to, should be the entire population of 1000. If you want to be 95% confident, then the sample size is calculated using a constant Z that is statistically derived from the 95% number. The value of Z is found in statistical tables.
-
Required Response Rate: The response rate is the approximate result expected from the total population or the estimated proportion of an attribute that is present in the population. If there is no idea about the proportion of the attribute, then generally a 50% response rate is used, as that will provide the largest sample size.
In the example, if the marketer knows that generally cross sell campaigns with offers like these generate a 2% response: 2 out of every 100 targeted will buy the accessory. Then the 2% response rate is used to determine the sample size. The response rate is also known as Expected Proportion or percentage picking a choice. In our scenario, the choice they have is whether they avail of the offer or not.
-
Error Limit: This is the percentage limit of error. The Error Limit (also called Confidence Interval) is the range in which the true value of the target group is estimated to be.
Adding on the previous example, if the limit of error was 0.3%, then you can be 95% confident that the response rate from the total target group will be between (2%-0.3%) and (2%+0.3%).
The following formula is a standard statistics formula for calculating the Sample Size for an infinite population when the population size is not known.
Sample Size (SS) = (Z2 x R x (100-R)) / E2
Where Z = Confidence Level (a constant)
R = Response Rate needed from the Target Group
E = Required Limit of Error
The statistical formula with a correction for finite population is:
Control Group Size = SS / (1 + ((SS-1)/ target population))
If the Target Group size is 1000, then:
Z= confidence level required 90% = 1.645
R = Response Rate = 10%
E = Error Limit = 2%
SS = 1.645 * 1.645 * 2 * (100-2) / .3 * .3 = 530.38 5893.1211
Control Group Size = 530.38 / (1 + (530.38 –1)/1000) = 346
This means that in order to be 90% confident that you will get a response rate of 10%, you need to have a control group of 346 entries.
You can regenerate the control group itself or both the target group and control group.
-
If the target group is in Available status, the marketer can choose to generate the control group by itself. Click the Regenerate button. Regenerate will deselect all previously selected control group members and select new control group members.
-
If the Target Group is regenerated in Full Refresh mode then the Control Group members are re-identified (using the same control group definition).
-
If the target group is regenerated in Update Attributes mode, then the control group members are not re-identified and the attributes of the control group entries are not updated as these are disabled entries.
-
If the target group is regenerated in the Append New Records mode, then the control group members are not reselected.
Notes on Repeating Activities and Control Groups
Assuming the base activity has a control group defined, the subsequent copies of the activity for repeating purposes copy the target group definition and the control group definition of the original activity. There are two options you can set for how repeating activities use the target and control groups:
-
Repeat to All Target Group Members: When a copy of the original activity is created, both the target group and the control group definitions are copied.
-
Repeat to New Target Group Members: When the new activity is created, the target group definition of the original activity is copied and the previously executed target group members are excluded from the new target group members. The control group definition is carried over so that new control group members can be selected from the new target group at each execution.
Control Group Analysis Report
Use the Control Group Analysis Report to compare metrics between the control group and the contact group for an activity in a graphical and tabular format. Your administrator defines the metrics available for comparison in this report.
Notes
-
Navigate to the report using the Reports Dashboard.
-
Search by a specific activity or campaign. Use the LOV to select the activity or campaign.
-
Only campaigns or activities with the status Active, Completed, Closed, or Archived can be used in this report.
-
You must be on the team with financial access to the activity or campaign. You can also run reports on non-confidential campaigns.
-
The campaign search results lists the activities corresponding to the campaign. Click View Report to display the report for the activity.
-
Select the compare metric to be used in the comparison between the control group and the contact group.
-
Lift: The difference in metric value between the contact group and the control group is the positive or negative lift associated with a particular campaign. The lift is stated as a percentage.
-
Chart: The chart displays the comparative percentage for the contact group and control group based on the selected metric.
-
Size: The count for the target group, contact group and control group are in the Size column.
-
Metric Value: This is the value for the selected metric for each of the groups.
-
Metric Rate: This is the percentage for the selected metric value divided by the group size.
Related Topics
See the Oracle Marketing Implementation Guide for information about setting up the metrics for this report.
Costs, Revenues, and Metrics for Activities
To analyze the effectiveness of marketing activities, marketing managers need metrics tracked at individual campaign activity levels and across campaigns. Costs and revenue details are captured and tracked for return on investment (ROI) calculations. Other seeded metrics are also tracked and reported for the different campaign activities. For specific business needs, the marketing administrator can define additional metrics.
Metrics Overview
Metrics are measurements for tracking the effectiveness of marketing activities. Metrics can be associated with each of the following marketing objects:
-
Programs
-
Campaigns
-
Campaign Activities
-
Events
-
Event activities
-
One-Off Events
-
Deliverables
Metrics include both forecast and actual values. These values are either manually input or automatically calculated by the Oracle Marketing application.
Metrics can also be used to initiate Campaign Monitors. For example, a Responses Count metric that attains a desired value could be used to start a follow-up campaign activity to a larger audience.
Three categories of metrics are available for the Campaign Workbench: general metrics, costs, and revenues. General metrics include the number of responses to a campaign and the number of registrants for an event. Cost metrics are used to track expenses and revenue metrics are used to track the income associated with marketing activities.
A number of commonly used marketing metrics are included with the deployment of the Oracle Marketing application. If new metrics need to be defined for your organization, the Marketing Administrator must create and set up these additional metrics. For more information on creating and setting up metrics, see the Oracle Marketing Implementation Guide.
Metric Categories
Metrics can be grouped into logical categories. For example, all metrics used to track expenses for marketing activities are grouped into the Cost category. Several metric categories, including Cost, Revenue, Response, and Other are included with the deployment of the Oracle Marketing application. Your Marketing Administrator can create additional metric categories as you increase number of metrics you are tracking. Refer to the Oracle Marketing Implementation Guide for more information about metric categories.
Metric Hierarchies
Metrics are organized into two hierarchies:
-
A Summary Hierarchy within a marketing object
Within a single marketing object, metrics of similar categories (Cost, Revenue, Response, and so on) are organized into Summary Hierarchies.
-
A Rollup Hierarchy between marketing objects
The Rollup Hierarchy enables metrics from lower level marketing objects (such as Campaign Activities and Event Activities) to be rolled up to parent objects (Campaigns and Events) and grandparent objects (Programs).
Figure Example to Demonstrate Summary and Rollup Metrics shows the typical structure for a Summary and Rollup Metric hierarchy. Various individual costs are summarized at the activity level and also roll up to the campaign level.
Example to Demonstrate Summary and Rollup Metrics
Metric Calculation Types
The metric calculation type determines the way in which forecast and actual values for a metric are entered into the system. For different business requirements, marketers need different calculation types:
-
These receive their actual values from a custom PL/SQL function or stored procedure. This function or procedure contains logic for calculating the actual value based on information within the Oracle E-Business Suite. Function metrics are associated with the marketing objects at the lowest level in the hierarchy, such as campaign activities and event activities. You can enter them as values directly or they can be calculated by the system. For example, number of responses to the activity may be input manually and the actual total postage cost for a activity may be calculated by multiplying the actual unit cost with the target group number. The forecast values for function metrics are entered manually into the system.
-
Formula
To calculate the effectiveness of marketing objects based on composite values, administrators can define formulas using relevant metrics and operators. For example, you can set up a formula as Response Rate = Number of Responses/Target Group Size. If the Number of Responses is 10 and the Target Group size is 100, then Response Rate = 10/100 or .1. Seeded formula metrics are available to measure effectiveness of each stage of the marketing cycle.
-
Summary
Summary metrics receive both forecast and actual values from lower level metrics in the summary hierarchy. Summary metrics may have subordinate metrics of any type (summary, manual, rollup, or function) within the same metric category (Cost, Revenue, Response, and so on).
Summary metrics are automatically associated with a marketing object when any subordinate metric is associated. For example, a Total Direct Cost summary metric is available for Campaign Activities. If you associate Postage Cost with a particular campaign activity, Total Direct Cost will also be associated with the object, since Postage Cost is a subordinate metric of Total Direct Cost.
-
Roll up
These metrics receive both forecast and actual values from lower levels in the marketing object hierarchy and provide comprehensive metrics to evaluate marketing effectiveness. Manual, function, and formula metrics within a lower level object (example, Campaign activity) can be linked to a rollup metric in a higher level object (example, Campaign). In addition, all child metrics of a rollup metric must be in the same metric category (Cost, Revenue, Response, and so on).
In contrast to summary metric values, which are calculated within the same marketing object, rollup metric values are calculated across marketing objects.
-
Manual
For these, both forecast and actual metric values are entered manually.
Metric Templates
Metric templates help marketing administrators to standardize the metrics to be associated with a campaign activity. For example, an administrator may define a metric template that automatically associates costs that are specific to the telemarketing activities of a call center. Each type of campaign activity and marketing object has an associated metric template.
When a campaign activity is created, for ease of use, all the metrics associated with the activity type are enabled via the associated template. You only need to enter the metric values. If necessary, you can also create and associate additional cost, revenue, or other metrics with a activity.
Metric templates can be associated with a marketing object (campaign, campaign activity, event, and so on) or a custom set up. When you create a marketing object with a particular custom set up, the metrics available for that particular object will include the metrics included in the metric templates associated with that custom set up and those included in the metric templates associated with that particular marketing object type.
For example, let us assume that you are creating a campaign 'live it up' with the custom setup 'ABC'. Prior to creating this campaign, you created a metric template 'AA' with metrics A1, A2, and A3, and associated it with the custom setup 'ABC'. You had also created another template 'BB' with metrics B1, B2, and B3, and associated it with the marketing object of type 'Campaign'. The campaign 'live it up' will include the metrics A1, A2, and A3 from metrics template 'AA', which is associated with the custom setup 'ABC', and B1, B2, and B3 from the metrics template 'BB', which is associated with the marketing object of type 'Campaign'.
Metrics Refresh Process
The metrics refresh process runs on a periodic basis defined by the Marketing Administrator. For example, the process could be set up to run each night at midnight.
During the metrics refresh process, the following actions occur:
-
Actual values for all function metrics are refreshed based on information from the Oracle E-Business Suite. For example, the actual value of the seeded function metric for Responses Count is refreshed based on the total number of campaign response records within the Interaction History table for each campaign source code.
-
Forecast and actual values for all summary metrics are refreshed based on their subordinate metrics in the summary hierarchies.
-
Forecast and actual values for all rollup metrics are refreshed based on their child metrics in the rollup hierarchies.
-
If the optional “Update History“ parameter is enabled, the previous period's metric values are copied to the Metrics History table to allow for historical analysis.
To set up or change the frequency of the metrics refresh process, refer to the Oracle Marketing Implementation Guide.
Seeded Metrics
A number of commonly used marketing metrics, such as Total Cost, Total Revenue, Responses Count, and Event Registrants are included with the deployment of the Oracle Marketing application. Refer to the Oracle Marketing Implementation Guide for a complete list of seeded metrics.
User-Defined Metrics
In addition to the seeded metrics, user-defined metrics can be used for measuring marketing objects. Refer to the Oracle Marketing Implementation Guide for details on defining user-defined Metrics.
Metrics Example
The following scenario demonstrates the various metrics concepts in Oracle Marketing.
Your organization, 'Just For You', plans to introduce a new line in clothing for the coming fall season. Its marketing team wants to run a campaign (Fall In Place) and send an information brochure by a direct mail campaign activity (Fall Lines Print Campaign activity) to all the customers who bought clothing from 'Just For You' last fall.
As the marketing manager, you want the overall costs and individual cost components for the campaign tracked. To do so, you need to track costs at the Campaign level and the campaign activity level.
Your Administrator will create:
-
Rolled Up Direct Cost and Rolled Up Indirect Cost as roll up metrics and Fall In Place Campaign Total Cost as the summary metric
-
Fall Lines Print activity Cost as a summary metric at the campaign activity level
-
Fall Lines Print activity Postage Costs as a manual metric (this will be summarized to Fall Lines Print activity Cost at the campaign activity level and will roll up to the Rolled Up Direct Cost at the campaign level)
-
Fall Lines Print activity Envelope Costs as a manual metric (this will be summarized to Fall Lines Print activity Cost at the campaign activity level and will roll up to the Rolled Up Direct Cost at the campaign level)
You need to perform the following activities:
-
Create the Fall In Place Campaign
-
Create the Fall Lines Print Campaign activity
-
Associate Fall In Place Campaign Total Cost as a summary metric with the campaign
-
Associate the manual metric, Fall Lines Print activity Postage Costs to the Fall Lines Print Campaign activity
-
Associate the manual metric, Fall Lines Print activity Envelope Costs to the Fall Lines Print Campaign activity
The costs are then captured as follows:
-
The summarized Fall Lines Print activity Postage Costs will be rolled up to Fall In Place Campaign Total Cost
-
The summarized Fall Lines Print activity Envelope Costs will be rolled up to Fall In Place Campaign Total Cost
Associating Costs, Revenues, and Metrics for Tracking
Use the Tracking tab to view, enter, and associate costs, revenues, and metrics. The Views available to you for associating tracking metrics to a campaign activity include Costs, Revenues, Metrics, or All. For each of these, you have the Details view that shows a table or the Hierarchy view. You can see the history for any metric and post actual costs to the budgets.
Prerequisite: The costs, revenues, and metrics that you want to add were set up by your administrator
Navigation: View an Activity in the Campaign Dashboard and select the Tracking tab.
Notes for Adding Metrics
-
Variance: For costs the variance is forecast minus actual. For revenue and all other metrics the variance is actual minus forecast.
-
Variance %: The costs variance percentage is forecast minus actual divided by the forecast. Revenue and other metrics are actual minus forecast divided by forecast.
-
Click the History icon next to a metric to view a history of actual values for the metric, both in a table and in a trend graph. Enter search criteria to specify the time period and increments to show in the history. You can choose to see the history information in a cumulative or incremental view.
-
Click Add to view all available metrics of the type currently viewed (cost, revenue, metric, or all). Click Apply to add the new metric. It appears at the top of the table in Details view.
-
After an activity is activated, the metrics concurrent program must complete before various metrics are updated and displayed. This may take some time.
-
Metrics can only be removed before the activity becomes active.
-
Only manual, function, and formula metrics can be removed. Rollup and summary metrics cannot be removed. Summary metrics are automatically removed when all metrics included in the summary are removed.
Notes for Posting Costs
-
You can post actual costs for the displayed metrics that are of the cost type.
-
You can only post costs to an active activity.
-
You can only post costs for manual and function costs.
-
Actual cost can be entered once and not updated.
-
Posted costs are proportioned across all budgets that the activity is sourcing from.
Associating Partners with Campaign Activities
Marketers may assign partners, such as Value Added Distributors (VADs), Value Added Resellers (VARs), agents, and so on, to campaign activities. When the leads generated are converted to opportunities, they may be distributed to the associated partners. Vendors can do this assignment either manually or by invoking the partner-matching engine. Refer Oracle Partner Relationship Management (PRM) documentation for information on how partners may work with the opportunities assigned to them.
Navigation: View details for either an activity or a campaign > Partners mid-tab
Notes
-
Partner Name: If you have the necessary permissions to access the PRM module of the application, clicking this link will navigate you to the Partner Details page. Otherwise, Partner Name will be available as read-only information. Permissions are based on PRM security mechanisms. Refer Oracle Partner Relationship Management (PRM) documentation for more information.
Understanding and Using Activity Operational Reports
The Operational Reports available in the Campaign Workbench help you track marketing activities, analyze their effectiveness, and plan future campaigns.
Tracking Across Campaigns
For tracking across campaigns, the Campaign Dashboard contains reports that help you assess campaign performance and perform precampaign analysis when planning new marketing initiatives.
Tracking Individual Campaign Activities
Campaign activity specific reports help you analyze the effectiveness of each campaign activity. The sections displayed in a report depend on the activity's channel of execution. For example, for an e-mail activity, Click Through Destination Analysis information is displayed. The reports contain the following information:
-
Performance Metrics: This section displays metrics from across the enterprise, including information about responses, leads, quotes, orders, and revenue
-
Target Tracking History: This section displays target group tracking and fatigue rule information, including Target Size and Target Group Contacted
-
Channel Specific Details: This section displays information specific to the campaign activity channel, including details of the outbound content sent
-
Repeating Details: For repeating activities, this section displays information on repeat execution
-
Click Through Destination Analysis: This section also contains Web script related information, when relevant.
-
Website Response Handler Response Statistics: This section includes information on the pretty URL , the responses generated by its deployment, and Web script usage information. All interactions are tracked as anonymous interactions.
Additional Information: For Web ads and Web offers that are deployed on third party Web sites, pretty URL usage is not tracked or reported.
Channel Specific Tracking and Reporting
For reviewing channel effectiveness, you can view channel specific reports that display the following:
-
For e-mail, print, and fax campaign activities, outbound collateral sent to customers, including version sent. You can drill down and view individual content items or preview a specific version
-
For non-direct marketing activities, such as advertising, the collateral content items such as billboard ads and images for ads that were live when the activity was aproved. You can preview the versions of the content items.
-
E-mail details for e-mail schedules, including click-through destination analysis - destination and click-through details, such as number of clicks and number of unique clicks - fulfillment statistics, response statistics, and scripting reports
-
All the leads generated from Sales activities
-
For direct marketing print and fax activities, and advertising and other indirect channel activities, information about the Landing Page URL, Additional URL parameters, Click Through Action, Click Through Association, Total Responses, Total Anonymous Responses, and Total Unique Responses. Both identified and anonymous customer interactions via the Landing Page URL are tracked and recorded in Interaction History
-
For the Web channel, see Understanding Web Reports.
Tracking Repeating Activities
For repeating activities, details of target groups and fatigue rules applications are tracked and reported for each iteration of the activity. You can drill down to view channel-based information.
Target History Reports
You can use the Activity Targeting History and Channel Targeting History reports to view fatigue history. These reports will help you examine targeting performance by direct marketing channels.
Activity Targeting History
This report displays fatigue details by campaign activities executed for all direct marketing channels. For the activities in a date range or for a campaign, you can compare the target group sizes with the number of members contacted, fatigued, and suppressed. You can sort the report to view the activities with the largest contact rates and largest removal rates. You can restrict the search criteria to view activities for one particular channel only. You can drill down to view fatigue details for each activity. For repeating activities, the Repeating icon is enabled and you can drill down by date, week, or month to view fatigue details for each activity iteration.
The Fatigue Rate displayed is calculated as follows:
(Total Contacted/Total Fatigued + Total Contacted)*100
When you drill down using the Total Fatigued link for an activity, details of the activities that took away contacts from this activity are displayed
The total displayed for each column in the report is the grand total for all activities or all channels. The totals provide a global view of all fatigue data for the specified criteria.
Access to activities is controlled by team security. The report will display schedules that you have read access to. Confidential activities will not be displayed unless you have access to them.
Channel Targeting History
This report displays fatigue history by channels. For a specified date range or campaign, activity fatigue details are summarized and displayed by channels. You can drill down to view fatigue details for each channel by date, week, or month.
Using the View History icon, you can view fatigue details for a specific channel, for a specified date range as displayed in the following figure.
A Sample Channel Execution History Report
Use the following procedures to view the different operational reports.
Viewing an Activity or Channel Specific Fatigue Report
Viewing Campaign Activity Specific Reports
Viewing an Activity or Channel Specific Fatigue Report
You can choose to view the fatigue history for a specific period and/or for a specific campaign. You can also choose to view fatigue information across activities or for a specific channel. You must enter at least one search criteria to view the report.
Navigation: Campaign Workbench > Reports Dashboard > Target History
Viewing Campaign Activity Specific Reports
You can view campaign activity specific reports using different navigation:
-
Click the Activities List shortcut link on the Campaign Dashboard and click the Reports icon
-
Click the Campaign Hierarchy shortcut link on the Campaign Dashboard and click the Reports icon
-
Select the activity from the My Recent Schedules bin on the Campaign Dashboard and click the Reports button
Prerequisite: Campaign activity must exist and tracking metrics should have been defined
Notes
-
To view a Web Script report, click the Web Script Report icon in the Click-Through Destination Analysis region.
-
For e-mail, fax, and print activities, click the Current Live Version link in the Outbound Content Sent region to view the version history of the outbound collateral.