Managing Searches
This chapter covers the following topics:
- Overview
- Item Instance and System Search Overview
- Performing Simple Searches
- Performing Advanced Searches
- Creating and Personalizing Views
- Using Views
Overview
When searching for item instances or systems, (which are constructs used for grouping item instances) you can perform simple or advanced searches, and then save your searches for reuse.
For both item instances and systems, the methods for searching and saving searches are similar. In both cases, the saved searches are known as views.
Note: In this chapter, the terms “saved search” and "view" are used interchangeably.
Item instance views can only be used in item instance searches; system views can only be used for system searches.
Item Instance and System Search Overview
The diagram shows an overview of the features available when you search for item instances or systems.
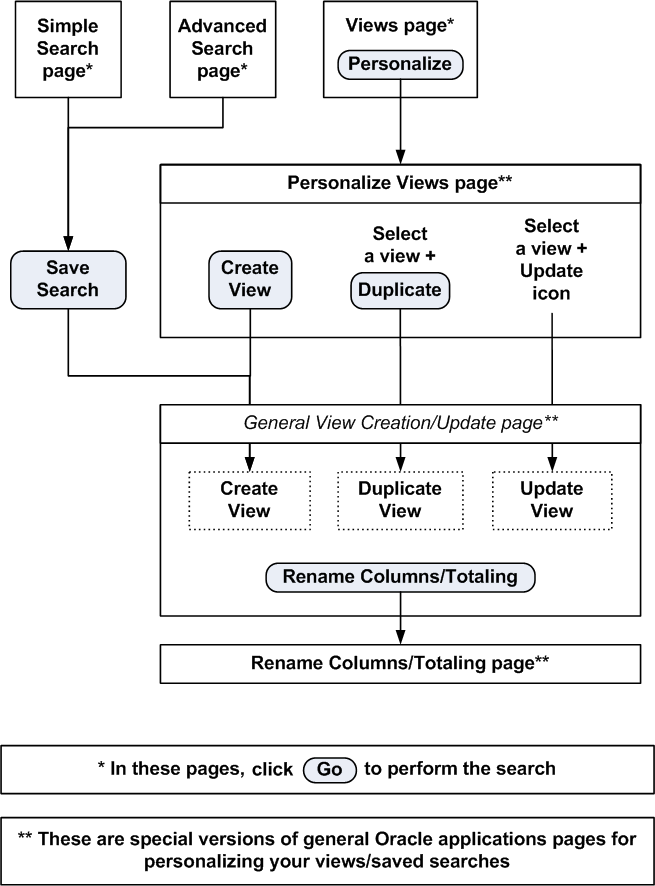
Both the initial Item Instance page and the initial System page appear as a Simple Search page with two regions:
-
Search region
-
Results region
You can search for item instances or systems using three search pages: Simple Search, Advanced Search, or Views. You can switch between the search pages by clicking Simple Search, Advanced Search, or Views.
A view is a saved search. For simple or advanced searches, save them as views, and reuse them as needed.
The basic search process is as follows:
-
Select the search page that you want to use.
-
Perform the search as follows:
-
For simple searches, enter the search parameters.
-
For advanced searches, optionally add in extra search parameters from an extensive list, then enter your search parameters.
-
To use views, invoke a previously saved search or view.
-
-
Click Go.
-
The results appear in the results region.
For details regarding the operations that can be performed for the results, see Managing Item Instances in Oracle Installed Base and Managing Systems.
Note: If Oracle Endeca is installed and licensed in your environment, then refer to the Oracle E-Business Suite Extensions for Oracle Endeca Integration and System Administration Guide for detailed information about the Endeca enhancements to your product.
Related Topics
Creating and Personalizing Views
Performing Simple Searches
The Simple Search page enables you to use a standard set of the most common search parameters:
To perform a simple search
-
Navigate to the Item Instance page.
The Item Instance Search page appears.
-
Enter a complete or partial value in any of the appropriate fields: Item Instance, Serial Number, Owner Party Name, Owner Account Number, Sales Order Number, Purchase Order Number, Contract Number, Agreement Name, System, and Asset Number.
-
Select the Show Expired Item Instances check box to specify the search include expired and active instances.
-
Select Show Item Instances Only to search for only parent/root item instances based on the search fields provided.
-
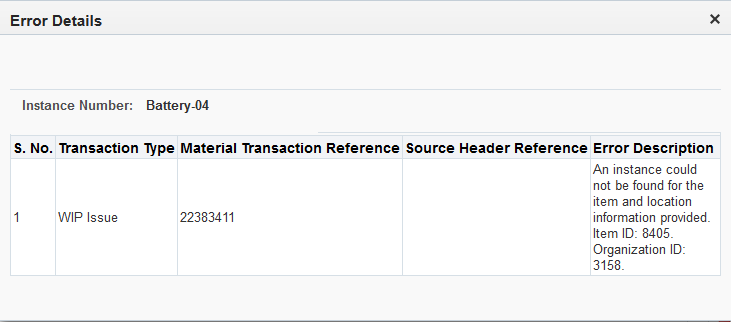
Select Show Errored Item Instances Only to search for only those serialized item instances that have existing errors.
-
Hover over the Alert icon for the item instance to view error details for the item instance.

-
Click Go to perform the search.
The results appear in the results region of the page.
-
Click Save Search to save your search as a view, so that you can reuse it later. For details, see Creating and Personalizing Views.
Related Topics
Performing Advanced Searches
The Advanced Search page enables you to use a more extensive set of search parameters.
Adding Extra Search Parameters
The Advanced Search page contains a set of standard search parameters. You can select additional columns from an extensive list of search parameters.
To add search parameters:
-
Click in the Add Another field, and select a column name from the list.
To perform an advanced search, click Advanced Search. You can select parameters such as:
-
Currently in Country
-
Installed in Location
-
FA Location (available only if Oracle Fixed Assets is installed)
-
-
Click the Add button.
The page will be filtered with the new search parameters.
Entering Search Conditions and Performing the Search
-
Select a condition operator.
The condition operators "is" and "is not" are available for all columns. In addition, for some key fields, you can select "contains", "starts with", or "ends with".
-
Select or enter a value to complete the condition.
-
Click Go to perform the search.
The results appear in the results region of the page.
Viewing and Entering Descriptive Flexfields and Extended Attributes
You have the option to update the descriptive flexfield and extended attributes from Item Instance Search page.
-
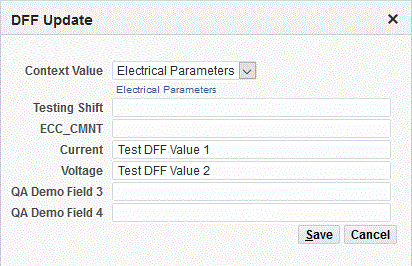
For the selected item, choose DFF Update to view or update the descriptive flexfield information.
The DFF Update dialog box appears.
-
You can view the information in the Context Value field and any other custom fields created for this flexfield.
-
Enter any new values, and save your work to return to the Item Instance Search page.
-
Click Apply to save the changes and add the new DFF values.
-
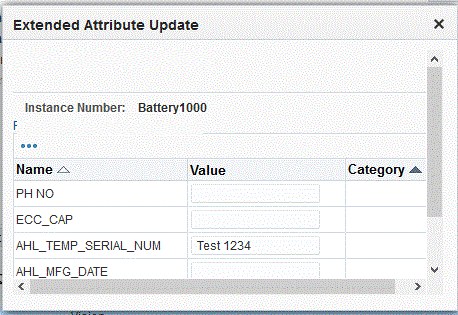
For the selected item, choose Extended Attribute Update to view or update the attribute information.
The Extended Attribute Update dialog box appears.
-
You can view the information in the Name, Value, and Category fields for this attribute.
-
Select Table Diagnostics to view a set of system table expressions to obtain diagnostic information.
-
Click OK to return to the Extended Attribute Update.
-
Enter any new values, and save your work.
-
Click Apply to commit the changes made to extended attributes.
Creating and Personalizing Views
Generally, you create a view when you save the search parameters for a simple or advanced search. You can also create a view with no previously entered search parameters.
The general view creation/update page is used to create a new view, duplicate a view, or update a view.
Prerequisites
When creating a view:
-
In the Simple Search or Advanced Search page, click Saved Search, (or in the Views page, Personalize) and then click Create View.
When duplicating a view:
-
In the Personalize Views page, select a view, and then click the Duplicate button.
When updating a view:
-
In the Personalize Views page, select a view, and then click the Update button.
Entering View Information
The general view of the Create View or Update View page is an Oracle Applications Framework page, which enables you to customize your item instance or system searches and the layout of the search results as follows:
-
Name the view, if you are creating or duplicating a view.
If you are updating a view, you can change the View name.
-
Optionally change the default value of 10 rows to indicate the number of rows to display in the results region.
-
If you want the current view to be used as the default view each time you log on, select the Set as Default option.
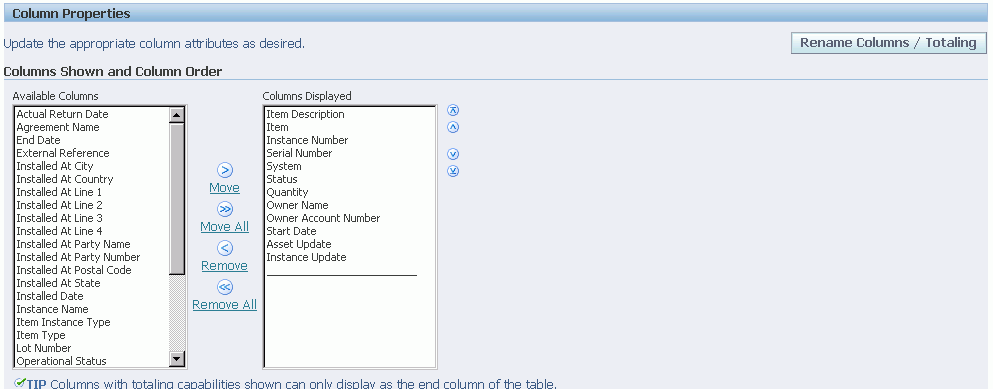
The Column Properties page appears.
-
Select the columns which you want to appear in the search results.
The values in the Columns Displayed list show the default selection of columns.
Use the Move and Remove links and arrows to move selected columns between the Available Columns list and the Columns Displayed list.
Use the Up and Down arrows to arrange the sequence of the columns in the Columns Displayed list. The columns as arranged from top to bottom will be displayed from left to right in your search results.
-
If you want to change the headings for a selected column, or if you want to a total on numeric columns, click Rename Columns/Totaling and perform those changes in the page that appears.
Note that you can only select Totalling for the end columns of the list.
-
You can select whether you want the results sorted or not.
If you have chosen to sort the results, you can choose up to three columns to sort.
Search Query to Filter Data in your Table

-
If you accessed this page from a simple or advanced search page, this region displays the simple or advanced search parameters.
-
You can change the entries here, and add search parameters.
For each additional search parameter, select a column name from the Add Another drop-down list, and click the Add button.
-
For item instance views, indicate whether you want the view to show all item instances, expired and active, or only the active item instances .
Saving the View and Optionally Performing the Search
After entering all the view information, click either Apply or Apply and View Results. The latter option applies the changes, then performs the saved search and displays the results of the search.
Using Views
Use this procedure to invoke a previously saved search:
-
In the Views page, select a View.
-
Click the Go button.
The results appear in the results region of the page.