Managing Item Instances in Oracle Installed Base
This chapter covers the following topics:
- Overview
- Searching for Item Instances
- Creating Item Instances
- Creating a Service Request from an Item Instance
- Viewing and Updating Item Instance Details
- Viewing Item Instance Details
- Updating Item Instance Details
- Tracking Serial Tagged Items in Oracle Installed Base
- Item Instance Details Processing Overview
- Item Instance Details Header - Processing Options
- Item Instance Tabs - Processing Options
- Shortcuts Panel - Processing Options
- Other Item Instance Details Panel - Processing Options
- Miscellaneous Item Instance Processing Options
- Managing General Attributes
- Managing Location Attributes
- Managing Associations
- Managing Configurations
- Layout and Usage of the Configuration Tab
- Oracle Installed Base Configuration Support
- Understanding Relationship Types
- Adding Child Item Instances
- Creating Child Item Instances
- Managing Counters
- Managing Notes
- Managing Maintenance Attributes
- Viewing Transactional History
- Viewing Item Instance History
- Viewing Item Instance and Asset Network Relationships
- Viewing Error Details for Serialized Item Instances
- Managing Operating Units
- Viewing Contracts
- Managing Orders and Pricing Attributes
- Viewing Service Requests
- Viewing Service Orders
- Managing Work Orders and Work Requests
- Splitting Quantities
- Transferring Ownership
- Viewing Impacted Contracts
- Copying Item Instances
- Generating the Customer Products Summary Report
Overview
Oracle Installed Base provides lifecycle tracking of item instances. It provides the unique ability to query the inventory of available item instances, services, and assets tracked through Oracle Installed Base. If an item is set up as trackable, then an instance is created when the item is first received into inventory. Its ownership, status, and location are tracked for inventory movements, project issues, WIP issues, sales transaction, and return RMA. In addition, in Oracle Installed Base many properties can be tied to the instance to facilitate its usability in other applications. An example is tracking the party relationships for an item instance. An item instance can be owned by one party but serviced by another. For each party, many accounts and contacts can be defined and stored. In addition, multiple configurations can he set up for an instance to track the relationships that are possible. This is especially useful in the telecommunication environment where, for example, a part can be a component of a switch and connected to a circuit at the same time.
Item instances can be used to track non-tangible items such as telephone service. For example, a telephone number can have different services such as call waiting and conference call. These can all be defined as components of the telephone service. As such, contracts and warranty terms can be applied using CRM contracts, just as they can be applied to tangible items.
Oracle Installed Base supports various types of relationships through configuration constructed across the item instances. In the Graphical View - Instance Relationship page, you can view the graphical representation of item instance relationships, contacts, and accounts. Counters can be tied to item instances so that usage can be captured. For example, if an item instance is an electrical meter, then counters can be used to store the meter reading, thus recording the usage that in turn generates revenue.
Service requests and service orders can be viewed for item instances recorded in Oracle Installed Base, which provides a repository of information of their location, bill-to address, ship-to address, service contacts, and relationship to other items. You can view multiple products on a single Service Request page including the primary product and any newly added products.
Serial Tagging and Oracle Installed Base Item Instances
Serial tagging is a method of assigning and tracking serial numbers for items which are not usually serial controlled and need serial tracking only for certain transactions. For example many items are not tracked when they are received or transferred within the organization. Such items are tracked only when they are actually put into use, such as being issued to a WIP job. Serial tagging helps in such cases so that users do not have to maintain serials at all times, and serials can only be generated when they are required. Serial tagging is used in the following Oracle Applications:
-
Oracle Inventory
-
Used for items that have the serial control option of No Serial Control or At Sales Order Issue in the Master Items page.
You can assign serial numbers during pick confirmation for sales orders and internal orders. This expedites the downstream shipment process by reducing the number of tasks for the shipping operator.
-
Used during return to vendor (RTV) transactions: Inventory completes the return transaction when the return order is shipped and confirmed.
If the item is tagged for serials at RTV, then Oracle Installed Base will create new serialized instances when serials are created in the Return form.
See Oracle Inventory User's Guide.
-
-
Oracle Work in Process: Used during WIP component issues and returns. See Oracle Work in Process User's Guide.
When the serial number has been assigned to component, the information is passed to Oracle Installed Base. If an item instance was created prior to the serial number tagging (assignment), then the item instance is expired, and a new item instance is created. The new item instance will include the appropriate serial number assigned to the component or item.
-
Oracle Field Service: Used during task debriefing.
If serial tagging is used, Oracle Installed Base captures the serial for installed item by creating a new instance (with serial) and updates the configuration to show the installed instance. During item returns (recovery), Oracle Installed Base would expire the serialized instance and update the quantity of an existing instance upon receipt into inventory. If no serialized instance exists, Oracle Installed Base would create a new instance.
See Oracle Field Service User Guide.
Related Topics
See Tracking Serial Tagged Items in Oracle Installed Base
Searching for Item Instances
You can search for item instances in several ways. For more information on item instance search options and processes, see Item Instance and System Search Overview.
From the Search page, you can create, expire, export item instances, and update extended attributes and associated flexfields, and view errors associated with serialized item instances.

Processing the Search Results
From the search results, you can perform the following operations:
-
View item instance details by either of the following methods:
-
Select an item instance, select an Action from the list of values, and click Go.
-
Click the Item Description link.
-
-
You have the option to update item instance details by selecting the following icons:
-
To update details for an item instance, click Instance Update.
-
To update descriptive flexfields, click DFF Update.
-
To update extended attributes, click Extended Attribute Update.
-
-
Save and Apply your work.
Note: In the Extended Attribute box, values are not saved and committed unless you click Apply. If you reopen the window without committing the changes, only the old existing values display. The window will not show the previously saved values until the Apply button is clicked.
If the Extended Attribute box is reopened and saved again, any previously saved values are ignored and only the last saved values appear.
See Also
Creating Item Instances
In the Create Item Instance page, you can create an item instance. The page has regions for general item information, instance specific attributes, owner information, current and install locations, item flags, and flexfields. If you are aware of another item instance in Oracle Installed Base that has many of the same values for this information, then use the copy item instance procedure instead.
Prerequisites
The item and item number for an item instance must already be defined in the Oracle Inventory Master Item window by selecting the field Track in Installed Base.
General Information
Red asterisk fields are mandatory. An instance created online can belong to a party (external, such as a customer), an employee, or a vendor.
The Version Label and Status fields, if they are not populated, default to the values of the profile option CSI: Default Version Label and CSI: Default Instance Status respectively. Accounting classification defaults to Customer Product if it is not populated.
Note: In Oracle Installed Base, you cannot create a new item instance for network configurable instances.
Item Region
Organization Name
The Organization Name field defaults to the Service validation organization profile setup. You can select another organization from the list of values.
The inventory rules of the selected organization will be used to verify the item being created. The BOM from the organization will be used in the case of warranty creation.
Item
You must select an Item from the list of values, that displays all the items in the current organization.
The Item Description and Item Revision appear after you select the item.
UOM and Quantity
The options available to you for UOM and Quantity depend on whether the item you selected is serialized or not.
If the item is non-serialized:
-
You must select a UOM from the list of values.
-
The Quantity defaults to 1; you can change this to any value.
If the item is serialized:
-
The value Each appears in the UOM field, which is set to read-only.
-
You must enter a Quantity.
If you enter 1, you must create a single serial item instance in the single-record Instance Specific Attributes region; if you enter more than 1, a table appears in the Instance Specific Attributes region, where you must create the multiple serial item instances.
System
You can optionally associate a system with an item instance.
For more information, see Working with Systems.
Create Contract check box
The Create Contract check box is selected by default. When selected, this triggers the following processing:
-
A warranty contract will be created with the current item instance, or with each of the item instances, where you are creating more than one, if the item bill of material includes an item of contract type Warranty.
Instance Specific Attributes Region
This region becomes a multi-record region if you select a quantity that is greater than 1 for a serialized item instance in the Item region.
The following considerations refer to each item instance that you are creating:
-
Instance Number
You can enter the Instance Number, or Oracle Installed Base will create one for you. The Instance Number is a unique value.
-
Instance Description
You can optionally enter an Instance Description.
-
External Reference is a free-form field, which you can use to search for item instances.
-
Operational Status
You can select from one of the seeded values, In Service, Out of Service, Not Used, and Installed.
-
Serial Number
This field appears if the item is serialized. You can enter a value or select from the list of values.
For serialized items, Oracle Installed Base checks for the uniqueness of the serial number based on the setup of a serial control uniqueness parameter in the inventory organization.
Owner Region
Each item instance must have an owner. The owner can be a party, an employee, or a vendor.
The amount of information that you must provide depends on the value you select for Party Type, as shown in the following table.
| Party Type | Fields | Required? |
|---|---|---|
| Party | Party Name | Yes |
| Party Number | Yes | |
| Account Number | Yes | |
| Account Name | No | |
| Employee | Employee Name | Yes |
| Employee Number | No | |
| Vendor | Vendor Name | Yes |
| Vendor Number | No |
Note: For owner, current location, and install location fields, the Party Number and Party Name lists of values are controlled by the option All Parties in the Oracle Installed Base Parameter setup:
-
If All Parties is checked then list of values will show all parties.
-
If All Parties is not checked then list of values will show owner party and related parties only.
Current Location Region
You must specify a current location when you create an item instance. Oracle Installed Base provides separate Current and Install location attributes. These accommodate situations where both are required.
The amount of information that you must provide depends on the value you select for Party Type, as shown in the following table:
| Type | Fields | Required? |
|---|---|---|
| HZ Location | Address | Yes |
| Party | Party Name | Yes, if Party Number not specified |
| Party Number | Yes, if Party Name not specified | |
| Location Number | Yes, if Address not specified | |
| Address | Yes, if Location Number not specified | |
| Internal Site | Address | Yes |
| Vendor Site | Address | Yes |
Install Location Region
For the install location, you can either select the check box Same as Current Location (except if you selected Internal Location for the Current Location Type), or you can select a Type and other fields, similar to the Current Location options.
Note: Internal Site is not an option for install locations.
Installation date defaults to the current date, if not populated. This field can be populated with past, current, or future date. This date is tied to the warranty start date in a service contract if a warranty is associated with the item BOM.
Other Regions
Item Instance Type
This represents the type of the instance. You can set up your own instance types. The values are populated from the lookup type CSI_INST_TYPE_CODES. For more information, see the Oracle Installed Base Implementation Guide.
Version Label
Version Label is a free-form field, except when you create an item instance and leave the field blank - in this case, the value specified in the profile option CSI: Default Version Label is used.
The main use of a version label is to give a descriptive name for a timestamp. Each time you change a version label, and commit the change, the item instance details are timestamped, and you can query and view the information taken at that point in time.
Install Date
The Install Date defaults to the current date and time, if not populated. This field can be populated with a past, current, or future date. The install date becomes the warranty start date in a service contract if a warranty is associated with the item BOM.
Creation and Expiration Dates
You can enter any dates in these fields.
Flexfields Region
Descriptive flexfields are used to store extra information. They must first be set up on the DFF setup. You can define up to 15 fields.
Maintenance Attributes Region
This region is shown if the selected item is an Oracle Enterprise Asset Management item type, that is, Asset Group, Rebuildable.
The maintenance attributes you can enter are Department, WIP Account Class, Area, Criticality, Category, Parent Asset Number. These attributes are for use by Oracle Enterprise Asset Management.
For more information about these attributes, see Managing Maintenance Attributes.
Guidelines
After an instance is created with an item instance number, a Item Instance Details page appears for you to enter any additional information such as party and contact. For more information, see Item Instance Details Processing Overview.
Creating a Service Request from an Item Instance
In the Create Service Request page, you can create a service request for the current item instance. The item instance information appears as the page opens. You must enter a Summary of the problem in the Problem Description region.
To create a service request from an item instance
-
Navigate to the Item Instance Search page (Oracle Installed Base Agent User, Item Instances).
-
Search for a specific item instance, and click the Instance Update icon.
-
Click Go, and the Update: Item Instance page appears.
-
Click the Create Service Request link under Shortcuts.
The Create Service Request page appears.
-
Enter or select information such as:
Contact Information
-
Contact Type: Classifies the customer problem. Selecting a value in the Type list affects the assignment of this service request to other agents for resolution, and determines who can view and update the service request.
-
Status: Specifies where the service request is in its progress towards resolution. Selecting the correct status is important because some statuses can lock the service request so it cannot be updated, or launch an approval process.
-
Severity: Indicates the importance of this service request. The Severity of a service request can determine its priority in automatic work assignments.
Product Information
-
Category Desc (description):
-
Item
-
Item Instance
Problem Description
-
Summary: Describes that reason for the service request. This is a required field.
-
-
Click Apply. A confirmation message appears
-
You can also update the service request from within the item instance.
Select the Update Service Request link in the confirmation window. Make any edits as necessary.
-
After updating the details, click one of the following options:
-
Apply
-
Cancel
-
Navigate back using the breadcrumbs on the page
-
Viewing and Updating Item Instance Details
This section consists of the following topics:
Viewing Item Instance Details
In the Item Instance details page, you can view, but not update, details of the item instance and related objects. You can view errors associated with serialized items. For more information, see Item Instance Details Processing Overview.
Updating Item Instance Details
In the Item Instance details page, you can update many of the item instance attributes. For more information, see Item Instance Details Processing Overview.
Important: Standard Oracle functionality does not allow user updates through Installed Base when the item instance resides in Inventory. This prevents data corruption between Inventory and Installed Base. When an item instance resides in Inventory, any change to the record should be done with an Inventory transaction.
Tracking Serial Tagged Items in Oracle Installed Base
Serial tagged items can be tracked using Oracle Installed Base. Serial tagging occurs at the organization level. You can automatically generate the serial numbers or enter them manually.
Before you can use serial tagging, you must perform some setup tasks.
Prerequisites
- To ensure that items can be serial tagged:
-
Define the item using the Master Item page in Oracle Inventory.
-
Set the Serial control option to No Control or At Sales Order Issue.
Important: An instance is created at the time of shipping for either option. The shipment of the picked item is used as the basis for the IB instance creation.
-
Select the At Sales Order Issue option if you want to assign serial tagging based on material issues and picking.
Navigate to the Transaction Types page to assign serial tagging (Tools > Serial Tagging Enhancements). You can select one of more of the following:
-
WIP Issue
-
Return to Vendor
-
Sales Order Pick
-
Internal Order Pick
-
Field Service Usage
-
-
Assign the item to the appropriate organization.
-
Process the picking process for a sales order or internal sales order. See Oracle Order Management User's Guide for more information.
-
Process a task debrief in Oracle Field Service. See Oracle Field Service User Guide.
-
Process a WIP component issue or return. See Oracle Work in Process User's Guide.
-
Return an item to a vendor.
You can serial tag items which are not serial controlled when owned by the organization, but are serial tagged when they are returned to the vendor.
After you have defined and assigned the item, you can perform one of these transactions and tag the item with a specific serial number at the organization level:
Oracle Installed Base will perform the following actions:
-
Sales Order Pick
For items that are serial tagged for the Sales Order Pick transaction, Installed Base will start serial instantiation for the corresponding item instances only at the time of Sales Order Issue transactions. The reason for this approach is as follows:
The serial number is entered while performing the pick transaction in Inventory to eliminate an additional data entry step during the picking process. When the Pick Release process is run for such items, the allocation would occur only at the quantity level and users will be asked to indicate the serial numbers during the picking process. This action enables you to enter a new serial number or select a serial number from the previously generated set of serial numbers.
The serial tagged items are also available for the Sales Order Issue transaction. Serial numbers are available for update, can be corrected or disassociated because some serial numbers may not be required for shipment. In these cases, the serials in the Sales Order Issue transaction are the correct serials to be captured and instantiated in Installed Base.
-
Return Material Authorization (RMA)
Items that are serial tagged at Sales Order Pick should be returned with the serial number references during the RMA process. When these serials are honored in RMA, the corresponding customer owned serial instance should be considered for further impacts. The impacted serial instances will be marked as RETURNED, and the quantity is incremented on the Inventory instance in Installed Base.
-
ISO Pick
For items that are serial-tagged for the Internal Order Pick transaction, Installed Base will start serial instantiation for the corresponding item instances only at the time of Internal Sales Order Issue transactions. The reason for this approach is as follows:
The serial number is entered while performing the pick transaction in Inventory to eliminate an additional data entry step during the picking process. When the Pick Release process is run for such items, the allocation would occur only at the quantity level and users will be asked to indicate the serial numbers during the picking process. This action enables you to enter a new serial number or select a serial number from the previously generated set of serial numbers.
-
ISO Receipt
Items that serial tagged at Internal Sales Order Pick should be received with the serial number references during the ISO Receipt process. When these serials are honored in the ISO Receipt process, the corresponding serialized instance should be considered for further impacts. The impacted serial instances will be marked as RETURNED, and the quantity incremented on the Inventory instance as per the serial control definition in the receiving organization.
-
Task Debriefing in Oracle Field Service
If the item is serial-tagged and Oracle Field Service is enabled, users will select the item from the list of values or enter a serial number. If you enter a serial number, the debrief posting program updates the Installed Base instance accordingly. You will enter the serial if it is already generated or the enter a value into the serial field which will be accepted, if no serial number exists.
Item Returns During Task Debriefing
If the instance was issued during task debrief and has a serial number, Oracle Installed Base would expire the serialized instance and update the quantity of an existing instance upon receipt into inventory. The instance information would be matched based on a combination of organization, owner, subinventory, and so on. If no serialized instance exists, Oracle Installed Base would create a new instance.
See Oracle Field Service User Guide for more information regarding task debriefing.
-
WIP Component Issues and Returns:
If assemblies have been defined for serial tagging, you must enter serial numbers during the following transactions:
-
Move and Complete or Complete assembly (backflush for Assembly Pull)
-
Move Assembly (backflush for Operation Pull items)
-
WIP Component issue (for Push items)
-
Assembly Scrap
-
Reject
-
Component returns
Oracle Installed Base addresses item instances differently based on the component transaction.
-
WIP Component Issues
Installed Base will build the configuration through both standard and nonstandard WIP jobs (if both the parent and child instances are serialized). Issued components would have accounting classification as Customer Product and an operational status of Not Used.
-
WIP Component Returns
If the items are serial tagged for WIP Issue, you must enter serial numbers for WIP Component Return transactions. The system verifies that the instances were issued and are being returned, that is, the serials are validated when returned to inventory. If the serial tagged items are the ones which are being returned, then system will not track the serials after receipt into inventory.
Installed Base will expire such instances and increase the quantity of available instance which has the same combination of organization, subinventory, owner, and so forth.
For example, if there was a component quantity of 1 when it was issued to a job, then Installed Base with expire that instance, create a new instance for serial tagging, and issue it to WIP (accounting classification is WIP and operational status Not Used). If the component is returned with same serial, Installed Base will expire the serialized instance and reuse the expired instance (which is without a serial) and update the quantity.
When the assembly is returned due to Reject Assembly or Scrap Assembly transactions, the issued components (which were tagged during issue) are returned. Installed Base would expire the instances with serials and update the received quantity to the active instances that have the same combination of organization, subinventory, owner, and so forth.
-
-
Component Returns to Vendor (RTV)
For the item being returned to a vendor, the quantity of the existing serial would be split, and Installed Base will create new instances for each of the serials generated. Users must enter serial numbers for the items which are serial tagged as RTV. Serials can be auto-generated or entered directly. If the instances are not serial tracked, then the system reduces the quantity of the instance with the return quantity. Users would then be able to use the shipping integration or create a debit memo or open and receive the return quantity later.
If the shipping integration is used, when Oracle Inventory completes the return transaction, Oracle Installed Base will expire the instance. The transactions history would reflect the returned item as Inventory and a Source Transaction Type as Return To Vendor.
Item Instance Details Processing Overview
The Item Instance details page shows all the details for an item instance, and acts as a general item instance "workbench".
The Item Instance details page has four general areas, each of which has a particular set of processing options:
There are also miscellaneous item instance processing options that apply in certain circumstances only:
Item Instance Details Header - Processing Options
You can update the system for an item instance. For more information about systems, see the chapter Working with Systems.
Serial Number
You can change the Serial Number of a serialized item instance if all of the following conditions are true:
-
The item instance must not be in inventory, in transit, or in a project.
-
There must be no Oracle Installed Base transactions for the current serial number that require processing.
-
There must be no Oracle Enterprise Asset Management work orders created for the serialized item instance.
-
Serial genealogy must not exist for the serial number.
In addition, the new serial number you select must not yet be transacted, that is, it may be a new serial number, or it may have been defined but not yet used in a transaction.
Item Instance Tabs - Processing Options
Both when viewing and updating item instance details, the attributes most closely associated with the item instance are available in the tabs spread across the Item Instance details page.
Some tabs only appear if the item instance is of a particular type, such as the Maintenance Attributes tab, which only appears for asset group item instances.
The tabs enable the following item instance related operations:
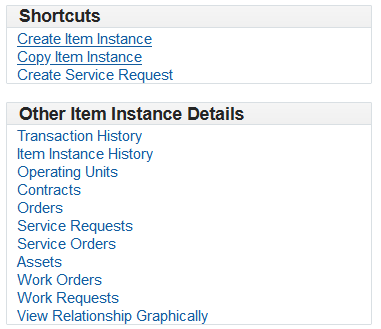
Shortcuts Panel - Processing Options
The Shortcuts panel, available only if you are updating an item instance, contains links that enable the following item instance related operations:

Other Item Instance Details Panel - Processing Options
The Other Item Instance Details panel contains options that enable you to view, and in some cases to update, objects related to item instances, such as orders, service contracts, service orders. You can also view historical information about item instances and transactions affecting item instances. In addition, you can view error details for serialized item instances.
The options in the Other Item Instance Details panel enable the following item instance related operations:
Miscellaneous Item Instance Processing Options
Splitting a Quantity
A Split Quantity button is displayed for customer instances with quantity greater than 1, strictly for non-serialized items.
Transferring Ownership
If the owner of the item instance is a customer, the Change Owner button is available for you to transfer ownership.
Viewing Impacted Contracts
When you perform certain updates on an item instance, they may have an impact on associated contracts. You can view the impacted contracts to decide whether or not to proceed with the item instance updates.
Managing General Attributes
In the General tab, you can view and modify general information about an item instance.
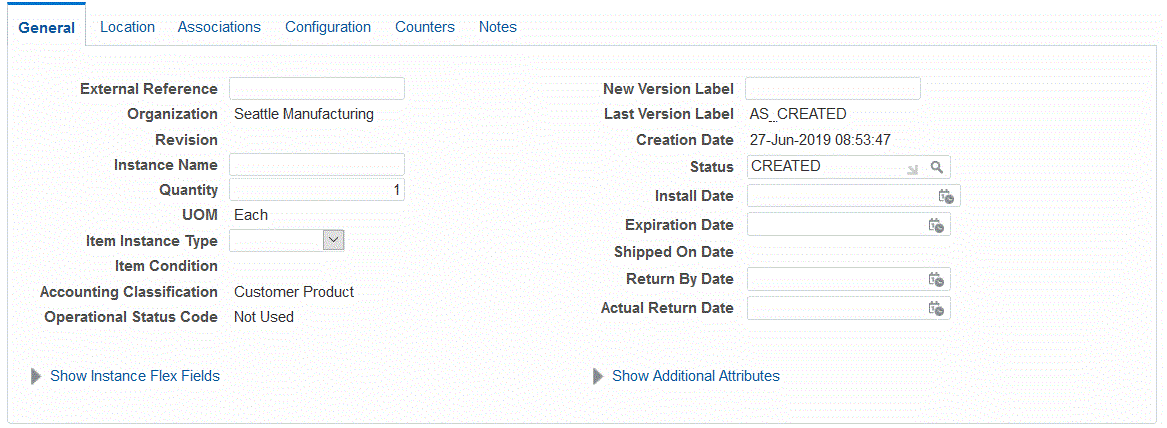
General Information
An instance is available for modification only when it is a customer item instance. An instance in inventory, in WIP, or in a project cannot be updated in Oracle Installed Base. All changes for these instances should originate from associated Oracle application modules.
If the item instance is a network-configurable item instance, you will be able to view and update the network configuration through the Additional Attributes.
Notes
External Reference
You can modify this free-form field to any value.
New Version Label
New Version Label is a free-form field, except when you create an item instance and leave the field blank - in this case, the value specified in the profile option CSI: Default Version Label is used.
The main use of a version label is to give a descriptive name for a timestamp. Each time you change a version label, and commit the change, the item instance details are time-stamped, and you can query and view the information taken at that point in time.
Instance Name
An instance name is a method for referring to a specific instance or a group of item instances, and applies to the network configuration item instances in Oracle TSO. For example, to refer to the specific instance of a network router located at 100 Main Street, you can give it an instance name such as "Router-100 Main Street, Bos, Ma". Advanced Search functionality allows querying by Instance Name.Quantity and UOM
These fields are read-only for serialized items. For non-serialized items, you can change Quantity.
Item Instance Type
Item Instance Type is a tag attribute for item instances, which you can use in advanced item instance searches.
Condition
The read-only Condition field is populated from the material status code from Oracle Inventory, such as New, Old, and Used. It indicates the condition of an item instance in the Oracle Warehouse Management application.
Accounting Classification
Operational Status
Select Install, In Service, Out of Service, or Not Used.
Status
This field is derived from a user-extendible instance statuses list of values table required during the setup of Oracle Installed Base. It indicates the current status of the instance, for example, Created, Repaired, and Returned for Repair. The instance Status field is automatically updated for Oracle Order Management shipment transactions or RMAs. For these transactions, the Status field is derived from the corresponding Oracle Installed Base transaction subtypes selected in the Installation Details window for Oracle Order Management transactions.
This field is also updated when the asset is deployed, retired or installed. For more information on asset deployment, see Oracle Asset Tracking User's Guide.
Item Instance Date Fields
Often, the Install Date for an item instance is not known when the item is being shipped. It may be updated later.
For item instances related to service contracts, Oracle Installed Base coordinates a change of Install Date with Oracle Service Contracts to affect the warranty start date based on the specific setup in Oracle Service Contracts. Please refer to the Oracle Service Contracts documentation for further details.
To expire an instance, enter the Expiration Date. If you do not enter a status, then the default termination status is used.
Shipped On Date and time are populated from shipment transactions.
Return By Date and time are populated from transaction details and subsequently removed upon RMA receipt.
Actual Return Date and time are defaulted from Oracle Inventory receiving transactions and subsequently removed upon shipment.
Instance Flexfields
You must click the Show Instance Flexfields link to view these fields.
Descriptive flexfields are available on this page. However, they must be set up as Item Instance Flexfields before they can used for update on this page.
Additional Attributes
You must click the Show Additional Attributes link to view these fields.
Additional attributes are user-definable attributes, which can be set up for an item, an item category, an instance, or for a global install base. Refer to the Oracle Installed Base Implementation Guide for the setup of additional attributes.
In the General tab, click the Show Additional Attributes link to view and modify the additional attributes. If you are in update mode, you can change the values of the additional attributes.
If the item instance is a network-configurable item instance, you can click the Update in Configurator button to update the network configuration.
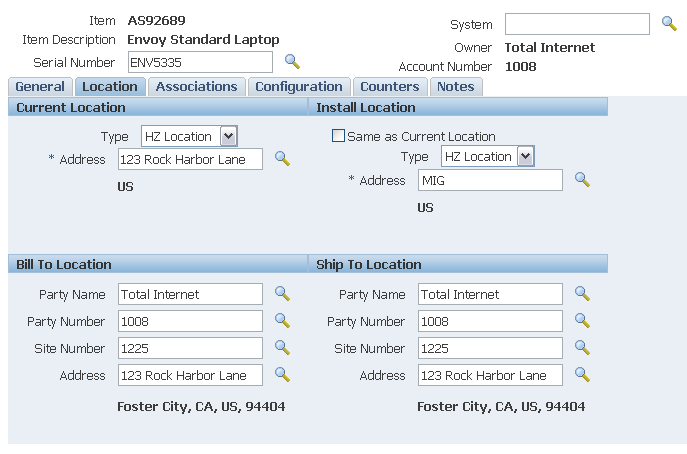
Managing Location Attributes
In the Location tab, you can view and modify location information about an item instance.
If the item instance is a network-configurable item instance you will be able to view and update the network configuration through the Additional Attributes.
For details of the Current Location and Install Location fields and what values you can select for these fields, see the sections Current Location Region and Install Location Region of the topic Creating Item Instances.
Bill To and Ship To Location Regions
If the item instance is sold or leased, the Bill To and Ship To locations appear in their respective page regions. The data is derived from the Owner and the Account Number field values.
Managing Associations
The Associations tab shows the current associations for an item instance, and for each association, the contacts and accounts. Each item instance must have an owner - the Associations tab shows this as an Owner association.
You can add more associations, and add contacts and accounts to the owner and other associations. In order to do so, the party types, accounts types, contacts types, and relationship types to be used must have been defined as part of the Oracle Installed Base setup. Refer to the Oracle Installed Base Implementation Guide for setup details.
In the Associations tab, you can also update and remove associations, contacts, and accounts.
Notes
-
As an example, you can define relationship types such as Distributor, Meter Reader, and End User for party, account, and contact relationship types. For each party defined in the party relationship, multiple accounts/account types and contact/contact types can be defined.
-
A party can be of type Party, Employee, Vendor, Group, or Team. Team and Group party types can be marked as Primary or Preferred.
-
Contacts can be from the party contact list or from employees. Each contact can be set up as Preferred or Primary. Preferred contacts are used when you select service personnel for task assignment.

Steps (to add an Association)
-
In the Associations tab, click Add Association.
-
In the Add Association page, select the Party Type, Party Name, and Party Number.
-
Select the Relationship Type.
-
Optionally enter Start and End dates.
Start Date defaults to the current date. Specify End Date - current or future date - if you want the association to end on that date.
-
Click Apply.
Steps (to add a Contact)
You can define multiple contacts for a single party.
-
In the Associations tab, select an Association, and click Add Contact.
-
In the Add Contact page, select the Contact Type, Party Name, and Party Number.
-
Select the Relationship Type.
-
Select a Classification.
-
Optionally enter Start and End dates.
Start Date defaults to the current date. Specify End Date - current or future date - if you want the contact relationship to end on that date.
-
Click Apply.
Steps (to add an Account)
You can define multiple accounts for a single party.
-
In the Associations tab, select an Association, and click Add Account.
-
In the Add Account page, select the Account Name, and Account Number.
-
Select the Relationship Type.
-
Optionally enter Start and End dates.
Start Date defaults to the current date. Specify End Date - current or future date - if you want the account relationship to end on that date.
-
Click Apply.
Managing Configurations
In the Configuration tab, you can view item instance configurations by relationship type and version, expire relationships, and add and create child items.
In addition, if the item instance is a network-configurable item instance, you can click the Update in Configurator button to update the network configuration.
The ability to track item instances down to the component level is especially important in field service environments, where components are often exchanged or repaired as part of maintenance agreements. As-built and as-shipped item instance configurations can also be tracked.
Online configuration support is restricted to Component-Of and Connected-To instance-to-instance relationships.
The topics in this section are as follows:
Layout and Usage of the Configuration Tab
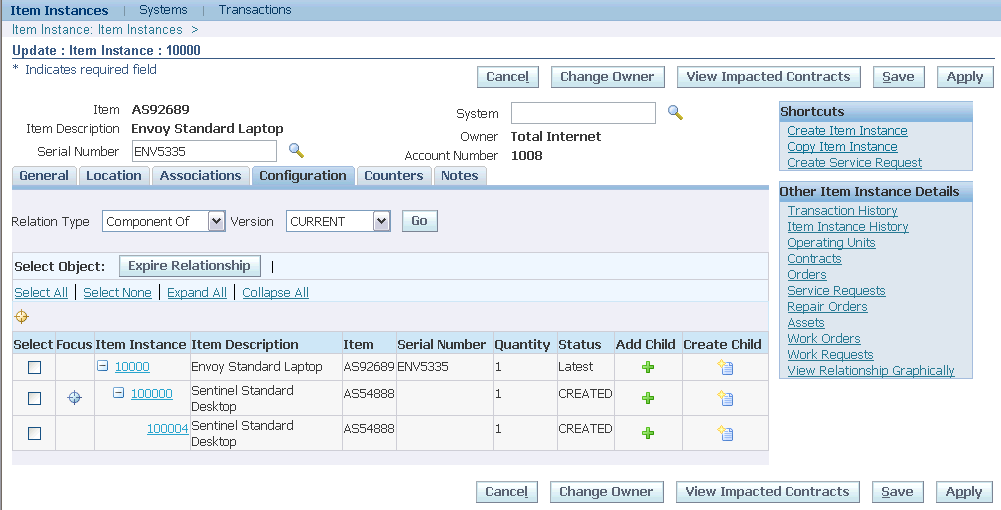
The Configuration tab displays the item instances in a configuration for a relationship type and a version. For details of relationship types, see Understanding Relationship Types.
You can also view configurations based on version label.
Note: The Update in Configurator button appears only if the main item instance is a network configurable instance.
In this section, the following terminology applies:
-
Parent denotes an item instance in a configuration level above the currently- described item instance.
-
Child denotes an item instance in a configuration level below the currently- described item instance.
How the Configuration Hierarchy Appears in the Configuration tab
The function of the tabular grid in the main part of the page is to display the current item instance and its child instances. Initially, only the child instances that are one level below the current instance are shown.
You can expand or collapse parts or all of the configuration hierarchy in the grid.
Above the grid is an untitled parent line that displays all the parent item instances, if any, above the current item instance in the configuration. The parent instances appear as a sequence of links.
For example, if the configuration consists of a 5-level hierarchy of item instances A>B>C>D>E, and the current item instance is C, the Configuration tab initially displays the following:
-
The "parent line" displays the instance links A>B.
-
The grid displays C and D, with an Expand icon (+) beside D to enable you to view its lower level instances.
Item instances in the grid that have children appear with either an Expand (+) or a Collapse (-) icon to enable you to view or hide the children.
The entries for item instances in the grid, other than the top entry, that have child instances, appear with a Focus icon.
Expanding and Collapsing the Hierarchy
Within the grid, you can click the Expand (+) or Collapse (-) icon on an item instance to enable you to view or hide the children.
Click Expand All to show all the instances from the current top entry downwards.
Click Collapse All to reduce the grid to the current top entry only.
Focusing
The object of focusing is to rearrange the hierarchy by moving an item instance to the top of the grid.
You can focus on any item instance of the configuration hierarchy:
-
For an instance in the grid, click the Focus icon for that instance.
-
For an instance in the parent line, click the link of the item instance that you want to focus on.
The "parent line" automatically adjusts to display the instances above the new top entry.
Expiring Relationships
You can expire relationships for one or more item instances, as follows:
-
Select each of the individual instances, or click Select All.
-
Click Expire Relationship.
Oracle Installed Base Configuration Support
Oracle Installed Base provides the ability to create and manage configurations based on relationships between item instances. When an item is a component of an assembly, two instances are related in a Component-Of relationship. The resulting configuration can be viewed, changed, and terminated using Oracle Installed Base.
Abbreviations used in this section are as follows:
-
Bill of materials (BOM)
-
Assemble to order (ASO)
-
Pick to order (PTO)
-
Work in process (WIP)
Oracle Installed Base creates and supports Component-Of configurations in several ways:
-
BOM-based configuration at sales order shipment
-
ATO configuration at sales order shipment
-
PTO and kit configurations at sales order shipment
-
WIP assembly completion (including post-completion transactions)
-
Oracle Installed Base Open Interface transactions
You can also add child instances and create child item instances to add to a configuration.
BOM-Based Configuration at Sales Order Shipment
Configurations are created based on the profile option CSI: Explode BOM = Yes.
BOM explosion creates a multi-level configuration, or indented BOM, based on the profile option CSI: BOM Explosion Level. For example, if this profile value equals 5, then BOM is exploded up to five levels during the configuration build. The components must be marked Oracle Installed Base trackable.
Rules and notes:
-
BOM explosion is only created for Item instance Qty = 1.
-
In the case of serialized components, item instances are created without serial numbers.
The serial number field is available to a user for update. In this case, for future transactions such as RMA of item instances, the user must provide the serial number.
ATO Configuration at Sales Order Shipment
A configuration is created for an ATO model, configured item, ATO option class, and components.
Rules and notes:
-
An ATO model, configured item, ATO options, and components must be marked Oracle Installed Base trackable.
-
Non-shippable items, such as model and option classes, must be fulfilled in order to be represented in a configuration.
PTO Configuration at Sales Order Shipment
A configuration is created for a PTO model, included items, PTO option class, and components.
Rules and notes:
-
A PTO model, included items, PTO option class, and components must be marked Oracle Installed Base trackable.
-
Non-shippable items, such as model and option classes, must be fulfilled in order to be represented in a configuration.
Kit Configuration at Sales Order Shipment
A configuration is created for a kit and components items.
Rules and notes:
A kit and component items must be marked as Oracle Installed Base trackable.
Configuration at WIP Assembly Completion and Allocation
For discrete jobs, configurations are created at WIP assembly completion based on two key parameters, Auto Allocate = Y and Genealogy enabled.
Configurations are created at assembly completion using work order-less WIP completions transactions.
Rules and notes:
-
Configurations are only built for assemblies serialized at receipt.
There is one exception to this rule: In a repair/upgrade scenario, if serial number A is issued to a job that upgrades the same item or serial number to a new serial number B, then the original serial number, A, is not created as a component of itself, the new serial number B.
-
For Auto Allocate = Y and Genealogy not enabled, configurations are built based on job requirements.
-
If Genealogy is enabled, configurations are built based on parent-child genealogy.
-
Configuration support includes post-completion transactions.
Components are added or removed from existing configurations following post-completion transactions. An example is WIP component issue or return and WIP negative component issue or return.
Oracle Installed Base Open Interface Transactions
Oracle Installed Base supports the creation and maintenance of Component-Of item instance relationships using Open Interface.
Integration with Oracle Order Management
Oracle Installed Base is integrated with Oracle Order Management and facilitates replacement of item instances using Replaced-By and Replacement-For relationship types in the Installation Details page available in Sales Order pages. These relationship types are view-only.
Understanding Relationship Types
With Oracle Installed Base, you have a flexible way of maintaining six different types of instance-to-instance relationships. These relationship types are seeded in the relationship type table, which you cannot extend.
Oracle Installed Base support the following relationship types:
-
Component-Of
-
Connected-To
-
Upgraded-From
-
Member-Of
-
Installed-On
-
Provided-By
-
Replacement-For
-
Replaced-By
Component-Of
This relationship type is used to maintain the configuration or structure of an item instance. You will use this for most of your needs in the management of item configuration. This is the only configuration type that can be created from Oracle applications from the bill of materials (BOM), assemble-to-order (ATO) model, pick-to-order (PTO) model, Kit model, and work-in-process (WIP) integration.
The Component-Of relationship type is the only one that flows down the current location and install location from parent to child. From Oracle applications, only the creation of serialized top-assembly is supported, with the exception of ATO and PTO models. Online creation of Component-Of relationships is supported for non-serialized top assembly as well. All configuration creation is allowed for customer item instances only. Another constraint is that the type does not support many-to-many and cyclic relationships.
For example, the following items are parts of a personal computer:
-
Motherboard
-
CPU
-
I-O Boards
-
RAM
-
Monitor
-
Keyboard
-
Mouse
Connected-To
This relationship type can be used to maintain the connection scheme of a group of item instances. In other words, it can be used to represent a network of connected items. No rule controls this relationship type, unlike the case of the Component-Of relationship type.
An example of this type of relationship is the representation of a computer network in which different computers and network equipment are connected to each other through Connected-To relationships, as in the following:
-
The john-pc-01 computer has Connected-To relationships with vivek-sun and jenny-pc.
-
The jenny-pc computer has Connected-To relationships with print-server-05.2 and ST-Tool-Server network equipment.
Currently this relationship type is utilized in the Oracle TSO solution for the telecommunications industry. The type is used to support network service configuration and reconfiguration and is integrated with Oracle Configurator in the context of the Oracle TSO solution. This is the only situation in which Oracle Installed Base supports cyclical relationships.
Adding Child Item Instances
Use this procedure to add one or more child item instances to an item instance in a configuration.
In the Add Child page, search for the item instances that you want to add, select them, and click Apply to add them to the selected item instance in the Configuration tab grid row.
Creating Child Item Instances
Creating a child item instance involves both creating an item instance and defining it as a child in a relationship. In the Create Item Instance page, you can create an instance as a child to the one selected from the configuration page. This page is the same as the Create Item Instance page. The page has regions for general item information, owner information, current location, item flags, and item views.
Prerequisites
The item and item number for an item instance must already be defined in the Oracle Inventory Item Master with Track in Installed Base selected.
Steps
-
In the Item Instance Configuration page, click the Create Child icon for the item instance to which you want to create a child item instance.
-
Enter the fields for the child item instance.
For more information, see Creating an Item Instance.
-
After you have entered the fields and clicked Apply, the child item instance is added to your configuration.
Managing Counters
The Counters tab shows the existing counter instances for the item instance.
You can enter a counter reading directly in each counter row, or click Show to view and update extra information about the counter reading.
You can also add one or more counter instances to the current item instance.
For more information, see the following topics:
Managing Notes
In the Notes tab, you can view and update notes.
When you add a note, you must select a Note Type, and the note Visibility (Public, Private, or Publish). Enter free-form text in the Note field.
Managing Maintenance Attributes
In the Maintenance tab, you can view and update the maintenance attributes of trackable item instances that are set up in inventory as asset groups, and as Capital Assets or Rebuildable Inventory in Oracle Enterprise Asset Management User's Guide.
For more information, see the topics Defining Asset Numbers, Defining Asset Groups, Defining Rebuildable Serial Numbers, and Defining Rebuildable Items in Oracle Enterprise Asset Management User's Guide.

Maintenance Organization
This is the maintenance organization - the Enterprise Asset Management enabled organization.
For more information, see Organization Setup in the Oracle Enterprise Asset Management User's Guide.
Department
A department represents a crew within your organization. A crew may include people, machines, or suppliers. Departments are also used to collect costs, apply overhead, and compare load to capacity. Assign a department to each operation of a routing and assign resources that are available for that department. The department assigned to each operation of a routing also becomes the assigned department of the corresponding operation within the Work Order, assuming the Work Order is using the routing.
For more information, see the topic Defining Departments and Resources, in the Oracle Enterprise Asset Management User's Guide.
WIP Account Class
The WIP Accounting Class ensures that Work Orders generated within Oracle Enterprise Asset Management have an established account code structure assigned, to accept charges incurred by that Work Order. The WIP accounting class codes available are of type, Maintenance. If a Maintenance type WIP accounting class does not exist, you can define a new on.
For more information, see the topics Defining WIP Accounting Classes, Oracle Work in Process User's Guide.
Area
Areas are used to logically sort assets by the zones in which they reside. Areas divide the maintenance plant or facility into zones, which help to track and account for assets. Areas are associated with assets.
For more information, see the topic Setting Up Areas in the Oracle Enterprise Asset Management User's Guide.
Parent Asset Group
This is the parent Capital Asset Group or parent Rebuildable Item; it is established asset hierarchy information. Work Order costs roll up through the Parent/Child hierarchies defined, and can roll up to any level within an asset hierarchy. This enables you to review all cost associated with an asset or asset hierarchal view.
Supply Warranty Expiry Date
This specifies the expiry date of the warranty, if it exists, provided by the supplier of the item. There is no processing associated with this field; it is for information only.
Maintainable check box
Indicates whether this asset is maintainable. If the Maintainable check box is selected, you can create Work Requests and Work Orders for this asset. For example, you can create an asset for cost-tracking purposes. We may want to see the cost for all top level assets in an asset hierarchy, but we do not want to maintain those assets. In this situation, do not select this check box.
For more information, see the topic Defining Asset Numbers in the Oracle Enterprise Asset Management User's Guide.
Note: After Work Orders are created for this asset, you cannot clear this check box unless those Work Orders are at Complete, Canceled, or Closed statuses.
Category
The Category indicates the Cost Category that is used as the default for departments that do not have a cost category defined. Department costs are then posted to the appropriate cost elements. Valid values are Maintenance, Operations, Contract, and any other values that you might have added within the extensible lookup table.
For more information, see Overview of eAM Cost Management in the Oracle Enterprise Asset Management User's Guide.
Criticality
Criticality Codes suggest the importance of an asset to an organization. For example, High and Low. An asset that has a direct impact on production or that is difficult to replace may be considered a critical asset. Asset criticality helps you to determine the urgency of requested work. Asset Criticality Codes are referenced when defining an asset.
For more information, see the topics Defining Asset Numbers, Defining Lookups, and Criticality Codes in the Oracle Enterprise Asset Management User's Guide.
Parent Asset Number
Optionally select a parent Asset Number to establish asset hierarchy information. Work Order costs roll up through the Parent/Child hierarchies defined, and can roll up to any level within an asset hierarchy. This enables you to review all cost associated with an asset or asset hierarchal view.
Asset Route check box
If this check box is selected, the current asset (item instance) has an associated asset route. You might need to perform an Activity on multiple Asset Numbers. To eliminate the possibility of creating multiple Work Orders for the same Activity, you can define Asset Routes. You can define a Preventive Maintenance schedule for your Asset Route to specify when an Activity should be scheduled for the Asset Route.
For more information, see: the topics Defining Asset Routes in the Oracle Enterprise Asset Management User's Guide.
Viewing Transactional History
In the Transactional History page, you can see recent transactions for the current item instance.
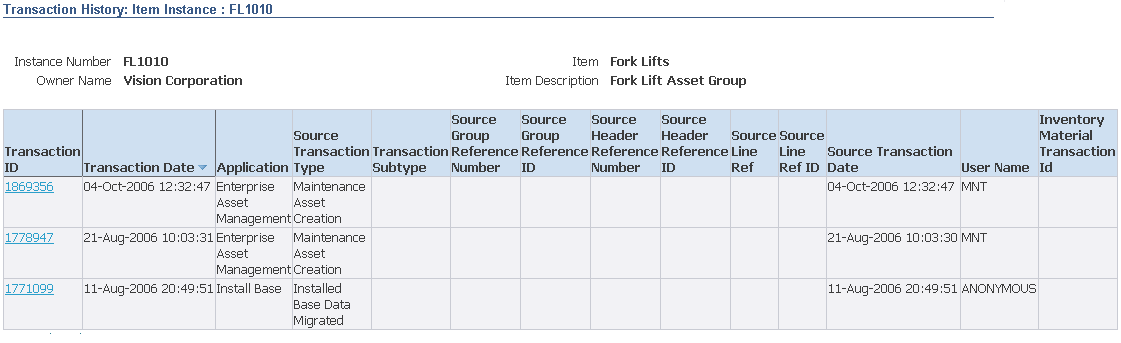
Technical Note: Each time a change is made to the instance, it is stored in history by Transaction ID. The number of transactions made available for immediate view is determined by the dump frequency parameter in the Install parameter.
Definitions of selected columns on this page are listed in the following table.
| Column | Definition |
|---|---|
| Application | The source application of the transaction. |
| Source Group Ref | A grouping of source headers such as a purchase order group. |
| Source Header Ref | The document number of the source such as a sales order number or purchase order number. |
| Source Line Ref | The line number of the source document such as a sales order line number for a sales order. |
| Source Distribution Ref | A free-form source reference for the source application. |
Prerequisites
You must have selected an item instance and navigated to an Item Instance Details page.
Notes
-
The Transactional History page shows a summary list of the transactions for the current item instance.
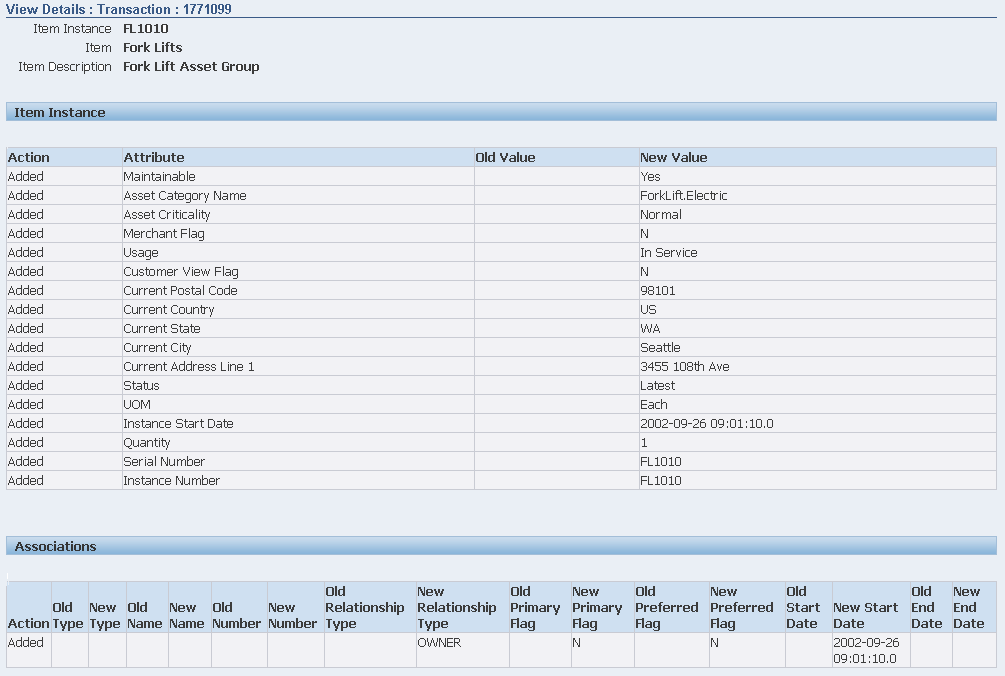
-
Click the Transaction ID link to see detailed information about the transaction, such as item instance attribute changes and associations.
Viewing Item Instance History
In the Item Instance History page, you can view the state of the attributes of an instance by specifying a date/time stamp or a version label. Whenever a new version label is entered and saved, the application takes a snapshot of the existing instance and make it available for viewing on this page. This page is different from the Transactions page, which shows the changes made to an instance transaction by transaction.
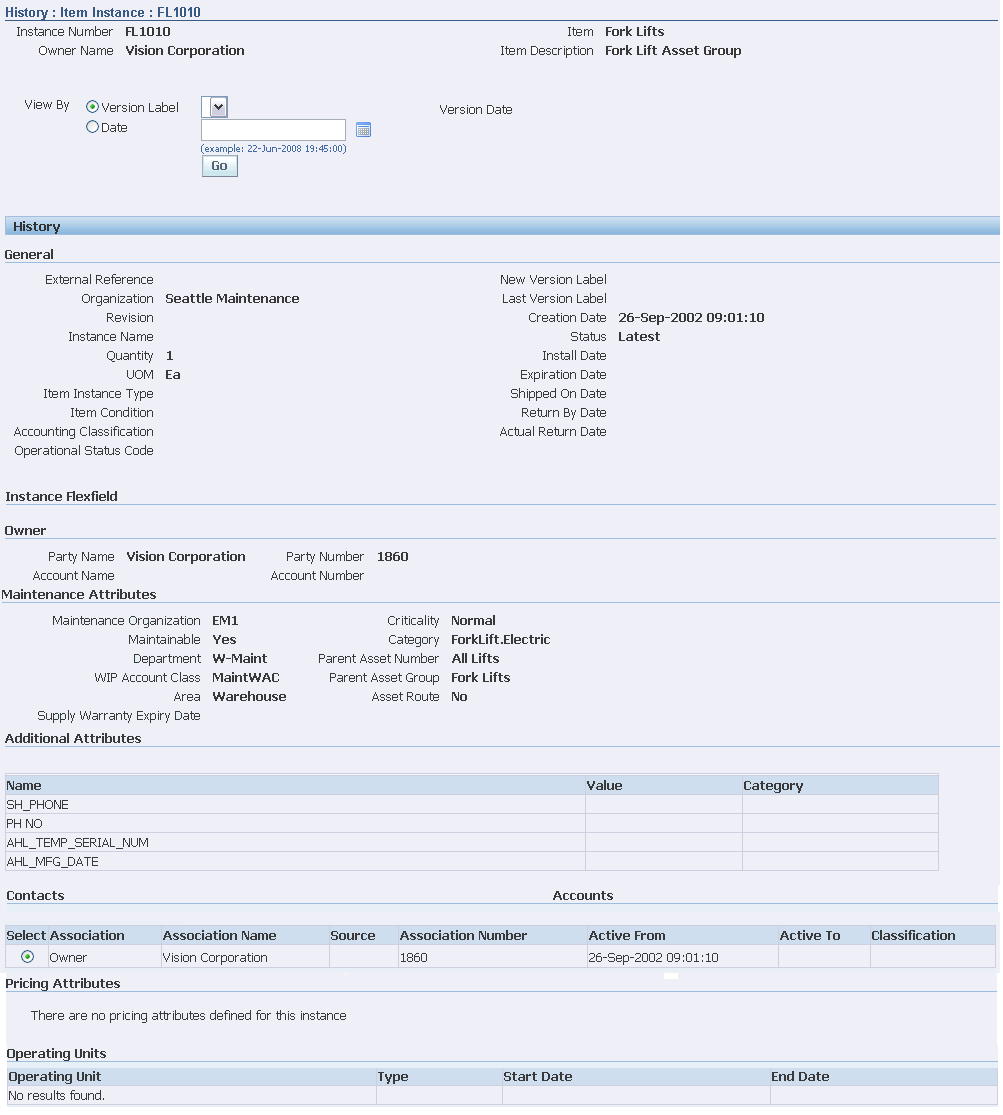
Prerequisites
You must have selected an item instance and navigated to an Item Instance Details page.
Notes
-
To start the process, select one of the radio buttons, Label or Date.
-
Either select a Label Version or enter a Date as appropriate, and click Go.
Selection of an entry from the Version list also provides the entry's associated date and time.
The available history entries appear with the times of changes.
Viewing Item Instance and Asset Network Relationships
In the Graphical View - Instance Relationship page, you can view the graphical representation of item instance relationships, contacts, and accounts. Oracle Installed Base supports various types of relationships through configuration constructed across the item instances. These configurations are displayed in a table, which is filtered based on relationship types. Use the Graphical View - Instance Relationship page to:
-
View asset network relationship for all type of configurations.
-
Graphically add existing child instances to the configuration.
-
Create new child instance and add to the configuration graphically.
-
Graphically expire selected item instance relationship in existing configuration.
-
Graphically set focus on any selected item instances to view its relationships in the configuration.
-
Graphically view parent instances of any selected item instances and view its relationships in the configuration.
-
Provide multiple options to view item instance configurations.
You can navigate to Graphical View - Instance Relationship page from the following pages:
-
Item Instance Search page
-
Item Instance Details page
Prerequisites
-
Create or add child items to an item instance with a relationship type.
-
Select an item instance and navigate to an Item Instance Details page.
-
Operating unit relationship types are user-definable and must have been set up in Oracle Installed Base administration.
Viewing item instance configurations and asset network relationships:
-
From Oracle Installed Base Agent User responsibility, navigate to Item Instance page and query for an item instance.
-
Click the link for the item. The View: Item Instance - General page appears.
-
Select the View Relationship Graphically link. The Graphical View - Instance Relationship page appears.
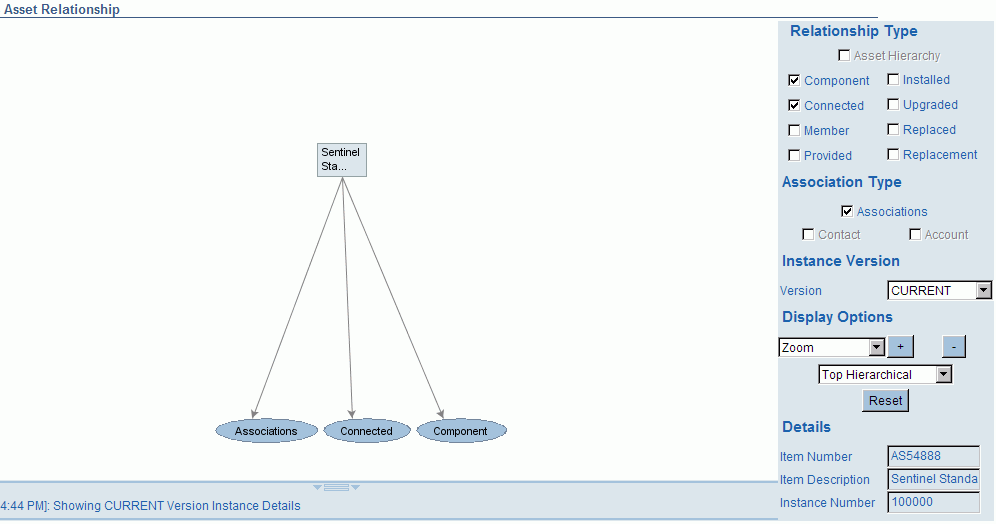
-
In the Relationship Type region, you can select the Relationship Type options that you want to include in the graphics pane. The default is all relationships selected and visible. The following Relationship Type options are available:
-
Component Of
-
Connected To
-
Member Of
-
Provided By
-
Installed On
-
Upgraded From
-
Replaced By
-
Replacement For
-
-
In the Association Type region, you can select the Association Type options that you want to include in the graphics pane. The default is all relationships selected and visible. The following Association Type options are available:
-
Associations
-
Contact
-
Account
-
-
In the Instance Version region, you can select the version of the Item Instance Relationship.
-
In the Display Options region:
-
From the Display list, select the display options such as Zoom, Draw Rings, Node Truncate, and Text Size to change the graphics view as selected.
-
Click the + (plus) or – (minus) sign to increase or decrease the size of the graphics.
-
Select the topologies such as Radial, Hierarchical and Flow. The Hierarchical layouts are displayed as a top-down, bottom-up, left-right, or right-left tree.
-
-
In the Details region, you can view the following information:
-
Item Number is the item number of the selected item.
-
Item Description is the description of the item entered at the time of creation.
-
Instance Number is the number of the item instance.
-
-
Expand the Relationship Type node. Select and right click an Item Instance node in the graphics pane.
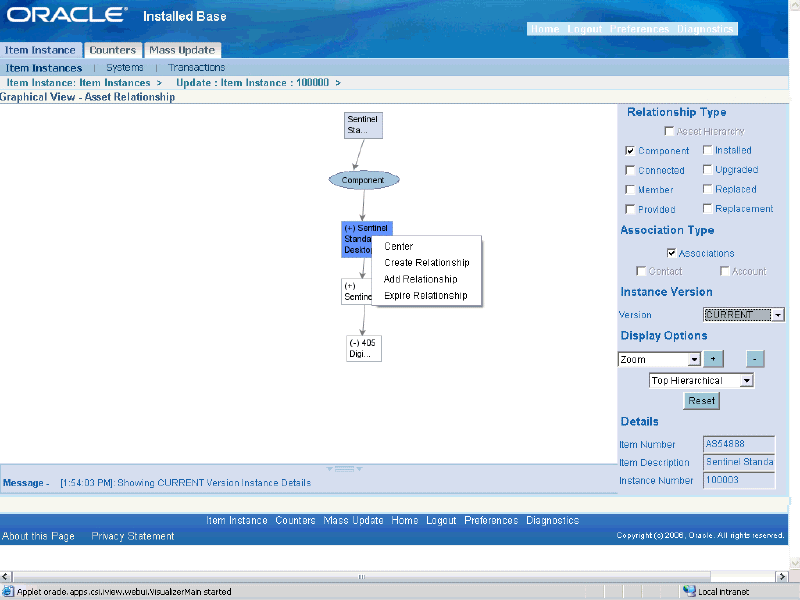
Note: The right-click menu displays menu options that are available based on the Relationship Type.
-
Create Center on the selected node.
Note: When you create center, the relationships associated with the node are automatically refreshed.
-
Show Parent to view the parent nodes of the selected node.
Note: When you show parent, the relationships associated with the node are automatically refreshed.
-
Create Child to navigate to the Create Child page to create a child instance and add to the existing instance in the current configuration.
-
Add Child to navigate to the Add Child page to selectively add to the existing Instances to the current configuration.
-
Instance Details to navigate to the Item Instance Details page.
-
-
Right-click the Item Instance Relationship arrow and select Expire Relationship to delete the relationship between the selected item instances from the current configuration.
Viewing Error Details for Serialized Item Instances
You can view errors relating to the serialized item instance by clicking the Error Details link on the Update Item Instance page.
-
Navigate to Installed Base Agent User, Item Instance, and the Item Instance Search page appears.
-
Select the item instance, item, or other field on the page.
-
Select the Show Errored Item Instances Only check box.
-
Click Go.
-
Click the Instance Update icon or select the link for the item instance.
-
Click Error Details in the Other Item Instance Details panel on the page.
-
View the associated details for the errors.

Managing Operating Units
An operating unit is an organization with which the instance can be associated. When an instance is sold from one organization, a unit is assigned to the Sold From relationship for the instance. Service can be provided by yet another organization unit such as one in Field Service. The Service Bill From unit is an organization that collects the receivable and can be used by Service Request. The Instance-Operating Unit association is for information only.
The Operating Units page displays any operating units currently associated with the selected instance. In the Operating Units page, you can view, add, and remove the association of operating units with a particular item instance.
Prerequisites
You must have selected an item instance and navigated to an Item Instance Details page. Operating Unit relationship types are user-definable and must have been set up in Oracle Installed Base administration.
Notes
-
You can modify the type and end date of an association.
-
To remove the association with an operating unit, select the operating unit and click Remove.
To remove all associations, first click Select All, and then click Remove.
The removal of associations takes effect after you click Update.
-
To associate operating units to the current item instance, click Add.
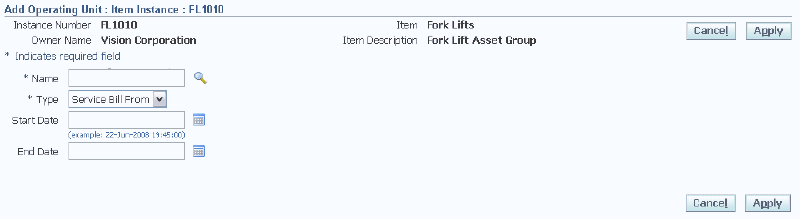
In the Add Operating Unit page, you must select the Name and Type of an operating unit.
You can optionally select the start and end dates for the association.
Viewing Contracts
In the Contracts page, you can view service contracts and warranties associated with an item instance.
Prerequisites
You must have selected an item instance and navigated to an Item Instance Details page. Service contracts must have been created for the instance.
Notes
For more detailed contract information, drill down on the Contract Number, Line, and Service Name links.
Managing Orders and Pricing Attributes
In the Orders page, you can view orders associated with an item instance. You can update the Agreement Name of an order.
If the item has pricing attributes associated with it, you can view and edit the pricing attributes from this page.
Prerequisites
You must have selected an item instance and navigated to the Item Instance Details page. To view or edit pricing attributes, they must have been populated from the sales order from which this item instance was sold.
Steps (to view and edit pricing attributes)
-
In the Orders page, click Pricing Attributes.
The Pricing Attributes page appears.
The contexts are part of the setup for extended pricing attributes in Oracle Order Management and Oracle Advanced Pricing.
-
Use the context filter to select a particular set of pricing attributes.
-
Click Go. A list of pricing attributes and associated values appears.
-
Edit the values as necessary.
-
Click Restore to return values to those saved last, and re-enter values or click Update to save changed values.
Viewing Service Requests
In the Service Requests page, you can view the service requests that have been logged for the instance. You can click the Service Request Number link to get more details about a particular service request.
You can view multiple products on a single Service Request page including the primary product and any newly added products entered on the Item Instances Service Request page.
Prerequisites
You must have selected an item instance and navigated to an Item Instance Details page.
Viewing Service Orders
Using the Service Orders page, you can view Open, Closed, and On Hold Depot Repair orders associated with an item instance.
Prerequisites
You must have selected an item instance and navigated to an Item Instance Details page.
Managing Work Orders and Work Requests
These pages enable you to view and export work orders and work requests.
Prerequisites
You must have selected an item instance and navigated to an Item Instance Details page.
Splitting Quantities
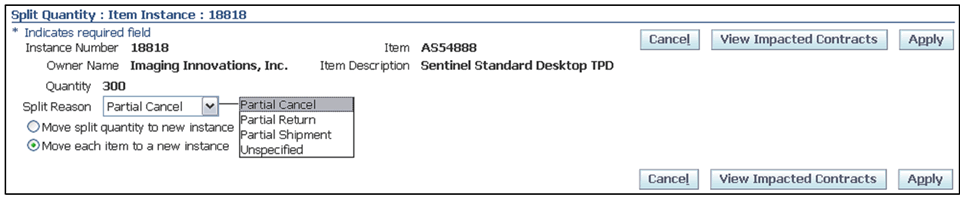
In the Split Quantity page you can subdivide an item instance with quantity greater than one into parts whose total quantities equal the original quantity. You can split the original quantity into two or n parts. Oracle Installed Base automatically creates serviceable items under serial control with a quantity of one. Only nonserialized items are created with a quantity greater than one. When an instance is split, Oracle Installed Base retrieves from Oracle Contracts the appropriate coverage for the newly created instances.
Some reasons for splitting quantities are as follows:
-
Isolate a quantity for transfer to an end customer
-
Set apart a quantity to be terminated
-
Set aside a quantity for installation elsewhere
-
Set apart a quantity to apply or order a new service program
-
Set apart a quantity for upgrade or repair
Prerequisites
You must have selected an item instance with a quantity greater than 1, navigated to an Item Instance Details page, then clicked Split Quantity.
Notes
-
You can select a Split Reason.
-
You can select the following types of split:
-
Split the quantity into two parts; in this case, you must also select the quantity for the new instance.
-
Move each item to a new instance.
-
-
After you click Apply, the application displays information for the newly created instances.
Transferring Ownership
In the Change Owner page, you can transfer ownership of an item instance from one active party to another.
The account field is mandatory only if the party is external. Other owner types can be Employee and Vendor. Ship-to and Bill-to location can be modified on this page.
The ownership transfer date can be set as a past or current date. If ownership transfer is backdated, then the application verifies that no Oracle Installed Base transactions exist between past and current dates. If transactions exist, then the application raises an error, otherwise the transaction is saved and the transfer date is passed to Oracle Service Contracts for further processing.
If Install Parameter: Override Ownership is turned on, Oracle Installed Base supports RMA receipt, shipment, and miscellaneous receipt transactions of Oracle Installed Base instances regardless of ownership.
Oracle Installed Base processes the RMA and transfers ownership if the RMA customer is different from existing instance ownership. Similarly, Oracle Installed Base allows shipment of an instance to any party from inventory regardless of current external ownership of the item instance, that is, the party or owner responsible for returning the item. The application changes ownership to Internal for Miscellaneous receipt of a customer-owned item. This is applicable to serialized-at-receipt or predefined serialized items.
Prerequisites
-
You must have selected an item instance and navigated to an Item Instance Details page, and clicked Change Owner.
-
A transfer must have two valid parties to occur.
-
The two valid parties must have been set up in the Oracle Accounts Receivable as related customers if All Party Locations is not selected.
If this parameter is selected, then all parties are available for selection.
-
Valid parties must have been set up.
The LOV for the transferred-to party is controlled by the All Party parameter setup in the Oracle Installed Base Parameters setup. If All Parties is selected, then the LOV displays all available parties to be selected. If this parameter is not selected, then only parties set up as related in Accounts Receivable will be displayed.
-
Locations must have been set up.
For the ship-to and bill-to locations LOV, only locations set up as ship-to and bill-to for the selected party and its related parties will be displayed.
-
The transfer date defaults to sysdate.
However an earlier transfer date is also accepted.
Notes
-
In the top part of the page, select the new party type, account number, and either party name or party number.
-
You can optionally change Current, Install, Bill To, and Ship To location information.
After an instance is transferred, Oracle Installed Base supplies Oracle Contracts with information about the change of ownership and the transfer date.
Viewing Impacted Contracts
Many item instances are associated with contracts. When you update item instances, some types of update may have potential contractual impacts. You may want to see which contracts are impacted before you decide to finalize your changes.
Prerequisites
You must have selected an item instance, and clicked Update.
Conditions for Automatic Display of Impacted Contracts Page
When you are updating an item instance, the Impacted Contracts page is displayed automatically, as a warning page, if all of the following conditions are true:
-
The profile option CSI: Display Impacted Contracts has been set to Yes.
-
You have made one or more of the following types of item instance update:
-
Change Owner
-
Split Quantity
-
Quantity Increase
-
Expire
-
Re-install (remove Expiration Date)
-
Change Installation Date
-
-
You have clicked Apply or Save.
-
Contracts exist that are impacted by your updates.
Notes
-
For manual generation of the Impacted Contracts report, click View Impacted Contracts.
-
In the Impacted Contracts page, you can get further details of each affected contract, by selecting the radio button for the contract; this shows the contact details at the foot of the page.
-
You can then decide whether or not to finalize your item instance changes or to discard them.
If you proceed to finalize the item instance changes, they are cascaded to all of the contracts that appeared on the Impacted Contracts page.
Copying Item Instances
The Copy Item Instance page is essentially the same page as the Create Item Instance page, with the option to copy various types of attributes and associations from the original item instance. In the Copy Item Instance page you can create an item instance by copying another and making changes to it.
Prerequisites
You have performed an item instance search, selected an item instance for update, and clicked Copy Item Instance.
Notes
Copy functions are available only for instances that are customer item instances.
For details of the main fields that you can enter, see Creating Item Instances.
Also Copy Region
When you copy an item instance, you have the option to copy one or more of the following attributes and elements from the original item instance:
-
Child Item Instances
-
Parties, Contacts, and Accounts
-
Assets
-
Additional Attributes
-
Pricing Attributes
-
Operating Units
Generating the Customer Products Summary Report
Use the Customer Products Summary Report to view a summary of customer products.
To generate the Customer Products Summary Report
-
Navigate to the Installed Base Reports page (Install Base Administrator > Others > Reports > Submit a New Request).
-
Select CSI: Customer Products Summary Report in the Names field.
-
Enter values in the following fields:
-
From Customer Number and To Customer Number
-
From Item and To Item
-
Installed At
-
Status
-
-
Click the OK button.
-
Click the Submit button.