Implementation and Setup for New Users
This chapter covers the following topics:
- Product Dependencies and Requirements
- Setup Checklist for New Users
- Related Setup Steps within Other Oracle Applications
- Related Setup Steps within Oracle Asset Tracking
- Setup Steps within Oracle Installed Base
Product Dependencies and Requirements
The following modules must be installed and set up for Oracle Installed Base. Refer to the appropriate guides to install and set up these applications:
-
Oracle Inventory
-
Oracle Asset Tracking
-
Oracle Order Management
-
Oracle Purchasing (optional)
-
Oracle Accounts Receivable
-
Oracle Work in Process (optional)
-
Oracle Bills of Material
Setup Checklist for New Users
The following provides a checklist of setup steps for new users of Oracle Installed Base.
Related Setup Steps within Other Oracle Applications
Synchronize On-Hand Balance with Oracle Inventory
Oracle Installed Base maintains a mirror image of what is in Oracle Inventory to maintain lifecycle tracking for all items that are to be tracked in Oracle Installed Base. For new implementations of Oracle Installed Base, all on-hand quantities of Oracle Installed Base trackable items must be issued out of Oracle Inventory. Oracle recommends that you use the miscellaneous issue transaction in Inventory to perform this step.
You receive these items back into Inventory as referenced in the checklist. Refer to Setup Checklist for New Users.
Set Up Inventory Serial Control at the Master Level
Oracle Installed Base requires that the serial control of Oracle Installed Base trackable items is set up in the master organization for Oracle Installed Base to support the continuous tracking through all organizations.
For instructions on how to do this, consult the Oracle Inventory User's Guide.
Set Up Oracle Installed Base Items in the Item Master
All items that need to be tracked in Oracle Installed Base and Asset Tracking are set up as Oracle Installed Base trackable, whether they are tangible, inventory-transactable, shippable items such as a computer or intangible, noninventory-transactable, non-shippable items such as a license. An item can be either Oracle Installed Base trackable or a service item such as a contract. It cannot be both.
For an item to be set up as trackable in Oracle Installed Base, the Installed Base Tracking check box must be selected on the Service tabbed page of the Master Item page (Inventory > Items > Master Items).
You can additionally set the tracking level of Install Base. The Install Base tracking can be left as set up in the Install parameter by setting "Default from install Parameter" or its tracking can be individually changed to Customer Tracking or Enterprise and Customer Tracking. See Setting Up Installation Parameters, Oracle Installed Base Implementation Guide for more information.
Note: This feature is used at the master item level only. You cannot change this attribute control at an inventory organization level.
To create a warranty for a item instance, the service item of the contract must be part of the BOM of the top assembly item.
Instances can be created online and through interfaces such as Inventory receipt and WIP assembly completion.
Refer to Integration with the Oracle E-Business Suite for information about instance creation through integration.
For more information about how to set up items in Item Master, see the Oracle Inventory User's Guide.
Set Up Parties
The parties associated with item instances in Oracle Installed Base must be defined in HZ_PARTIES first.
For more information about how to set up parties, see the Oracle Accounts Receivable Implementation Guide.
Set Up Vendors
The vendor parties associated with item instances in Oracle Installed Base must be defined in PO_VENDORS first. For more information about how to set up vendors, see the Oracle Purchasing implementation guides.
Set Up Employees
Employees can be associated with Oracle Installed Base item instances as parties. To do so, employees must be defined in the HR tables first.
For more information about how to set up employees, consult Oracle Human Capital Management Implementation Guides.
Set Up Party Accounts
The parties associated with item instances in Oracle Installed Base can have a number of accounts associated with them. These accounts need to be defined in the HZ_CUST_ACCOUNTS table before referencing them in Oracle Installed Base.
For more information about how to set up party accounts, consult the Oracle Accounts Receivable Implementation Guide.
Set Up Party Contacts
Oracle Installed Base can maintain the contacts to parties associated with item instances. These contacts to parties must be defined in the HZ_PARTIES table using the Contact Center window before referencing them in Oracle Installed Base.
For more information about how to set up party contacts, consult the Oracle Accounts Receivable Implementation Guide.
Set Up the Action Menu in Oracle Order Management
This menu setup is required so that Transaction Details and Maintain Systems windows are set up as part of the Action menu.
Steps
-
Log on to Oracle Applications with the System Administrator responsibility.
-
Choose Applications > Menu.
-
Choose View > Query By Example > Enter.
-
In the Menu field, enter the string ONT_SALES_ORDERS.
-
Choose View > Query By Example > Run.
-
Go to the last record in the multi-record details block.
-
Choose File > New to create new records with the following Field Values:
-
Seq: Choose the next sequence.
-
Function: Select Install Base Transaction Details from the list of values.
-
Seq: Choose the next sequence.
-
Function: Select IB Maintain Systems from the list of values.
-
-
Save the record.
Set Up the Order Management Workflow for Non-Shippable Items
Oracle Installed Base creates instances when tangible items are received into inventory. It tracks tangible items, for example, as they move between locations in inventory, when they are shipped to customers, and when they are returned to an enterprise. Inventory is a key driver enabling Oracle Installed Base tracking of tangible items.
Tracking intangible items, which are non-shippable and non-stockable, requires a separate procedure because Oracle Installed Base has no direct interaction with inventory.
Generally, intangible or fulfillable items are created and tracked commencing with sales order fulfillment. This requires integration with Oracle Order Management. The integration provides Oracle Installed Base with information regarding fulfilled sales order lines. The integration is achieved by modifying Oracle Order Management order line workflows. The information below provides detailed steps to accomplish the modification.
The following two main steps are required to modify order line workflows to enable Oracle Installed Base tracking for non-shippable items:
-
Set up Oracle Workflow Builder.
-
Set up Oracle Order Management transaction types.
Set Up Oracle Workflow Builder
The Workflow Builder setup is done in Oracle Workflow Builder. Use this procedure.
Steps
-
Log on to Oracle Workflow Builder on your client PC.
-
Double-click the Workflow Builder icon.
-
Select File > Open > Database.
-
Enter username apps, your apps password, and the connect string for your database instance.
-
Click OK.
-
Select OM Order Line from the Show Item Types window.
-
Click the << button to move to the Visible list, and click OK. The Navigator window opens.
-
Expand the list in the Navigator window by clicking the + sign.
-
Click OEOL / OM Order Line to select it.
Now you are ready to add a new function.
-
Choose Edit > New > Function from the menu. The Function Properties window appears.
-
Enter the following details in the Activity tabbed page:
-
Internal Name: INSTALL_BASE_INTERFACE
-
Display Name: Install Base Interface
-
Description: Oracle Install Base interface for fulfillable order lines
-
Function Name: CSI_ORDER_FULFILL_PUB.FULFILL_WF
-
Function Type: PL/SQL
-
Result Type: <None>
-
-
In the Details tabbed page, ensure that values are set as follows:
-
Error Item Type: WFERROR
-
Error Process: RETRY_ONLY
-
On Revisit: Reset
-
-
Click OK.
Now you are ready to create a new process and assign the new function to the process.
-
Select Processes.
-
Right-click the order line flow that you want to customize and choose Copy.
-
Right-click again and choose Paste. This opens the Processes Properties window.
-
Enter a different Internal Name and Display Name for the newly created process, and click OK.
-
Double-click the newly created process to open it.
-
Click the New Function icon on the top icon bar.
-
Click the Internal Name LOV, and choose INSTALL BASE INTERFACE.
-
Delete the line after the Fulfill function. This line is the one going from Fulfill to the node after Fulfill.
-
Insert Install Base Interface after the Fulfill function.
-
Right-click Fulfill, and drag it to Install Base Interface.
-
Right-click Install Base Interface, and drag it to the node after Fulfill. For option results, choose Any.
-
Save your work and exit.
Note: This customization must be done for fulfill-only order line workflows. They are those without shipping activity as, for example, a Bill Only or Line Flow - ATO Model.
Note: The same process must be followed for return lines, which are those without a receipt activity in the order line workflow. The process is required for a non-shippable RMA interface to Oracle Installed Base as, for example, the seeded process Line Flow - Return for Credit Only.
Set Up Oracle Order Management Transaction Types
Use this procedure to set up the required transactions types in Oracle Order Management.
Steps
-
Using the Order Management Super User responsibility, navigate to Setups > Transaction Types.
-
Query the desired transaction types that you plan to use on the sales orders.
-
Click Assign Work Flows.
-
End date appropriate seeded line types using seeded workflows.
-
Create another record with the same line type (expired record).
-
Assign Modified Workflow process, for example, CSI Line Flow-Generic, created in Oracle Workflow Builder, to this line type.
-
Save your work and exit.
Process Sales Orders for Non-Shippable Items
After the two main setup steps are complete, sales order lines using newly customized workflows have an interface to Oracle Installed Base. Use this procedure to process sales orders for non-shippable items.
Steps
-
Place an order for a non-shippable item through Oracle Order Management using the customized line type created in the previous section.
-
Book the sales order.
-
Schedule or run the Oracle Order Management Workflow background process.
-
View the instance created in Oracle Installed Base.
Related Setup Steps within Oracle Asset Tracking
Run the License Manager Program
Run this program to license Oracle Asset Tracking only if you have not installed Oracle Asset Tracking. It enables Oracle Asset Tracking functionality for inventory receipts and other processing required for Oracle Installed Base.
Verify the Setup of Profile Options for Oracle Asset Tracking
This is required only if you have not installed Oracle Asset Tracking. Confirm that the following profile options were set up:
-
MO: Operating Unit (default operating unit)
-
CSE: Debug Option (Y or N)
-
CSE Debug Log Directory (path name)
Verify Location IDs in HZ_LOCATIONS
The following table lists the locations that must be defined in the HZ_LOCATIONS table before using them in Oracle Installed Base:
| Location | Description |
|---|---|
| Project | A fixed location ID defined for Projects in the HZ_LOCATIONS table. |
| WIP | A fixed location ID defined for WIP in the HZ_LOCATIONS table. |
| IN_TRANSIT | A fixed location ID defined for In-transit in the HZ_LOCATIONS table. |
| PO | A fixed location ID defined for PO in the HZ_LOCATIONS table. |
These fixed location IDs must be defined in HZ_LOCATIONS first before setting up the Installation Parameters in a later step. To set up locations, do the following:
-
Using the Oracle Installed Base Administrator responsibility, navigate to Setups > Maintain Locations. The HZ Locations window appears.
-
Set up locations in this window.
Verify Codes for Asset Update Statuses
Lookup Type: CSI_ASSET_UPDATE_STATUS
Access Level: System (non-extensible)
Verify that the following values that are shown in the following table are already seeded for CSI_ASSET_UPDATE_STATUS.
| Lookup Code | Meaning | Description |
|---|---|---|
| IN-SERVICE | In-Service | In-Service |
| RETIRED | Retired | Retired |
Refer to the Oracle Asset Tracking Implementation Guide for details.
Setup Steps within Oracle Installed Base
Navigate to the Oracle Installed Base Administrator responsibility to access the Setups and Lookups menus to perform most of the setup steps.
Verify the Profile Options for Installed Base
You must verify or define profile options to be used by Installed Base. For more information about the IB profile options, see Oracle Installed Base System Profile Options and Debug Information.
Set Up Codes for Party-Account and Party-Contact Relationship Types
The instance party account relationship codes define the types of relationships that can be set up for parties, accounts, and contacts. The six seeded relationship types are defined in the following table:
| Name | Party Selected? | Account Selected? | Contact Selected? |
|---|---|---|---|
| OWNER | Y | Y | N |
| BILL-TO | Y | Y | Y |
| SHIP-TO | Y | Y | Y |
| SOLD-TO | Y | Y | N |
| TECHNICAL | N | N | Y |
| SERVICE-ADMINISTRATION | N | N | Y |
You can set up additional relationship type codes for party, account, and contact and define them by selecting the appropriate Party, Account, and Contact check boxes in the Instance Party Account Relationship Types page.
For more information about setting up these codes, see the Oracle TeleService Implementation and User Guide.
Verify Codes for Instance Relationship Types
Oracle Installed Base supports the eight types of instance-to-instance relationships shown in the following table:
| RELATIONSHIP TYPE CODE | NAME | RELATIONSHIP DIRECTION |
|---|---|---|
| COMPONENT-OF | Component Of | Subject-to-Object |
| MEMBER-OF | Member Of | Subject-to-Object |
| PROVIDED-BY | Provided By | Subject-to-Object |
| INSTALLED-ON | Installed On | Subject-to-Object |
| CONNECTED-TO | Connected To | Bi-directional |
| UPGRADED-FROM | Upgraded From | Subject-to-Object |
| REPLACEMENT-FOR [for transaction only] | Replacement For | Subject-to-Object |
| REPLACED-BY [for transaction only] | Replaced By | Subject-to-Object |
Component-of is the only relationship type that supports the flow-down of the current location and the installation location from parent to child.
From the Oracle Order Management-Oracle Installed Base shipment/fulfillment integration, component-of configuration can be created through the BOM explosion, PTO model, and ATO model. For details, see Oracle Order Management Integration.
From the WIP-Oracle Installed Base integration, component-of configuration can be created through the WIP assembly completion into inventory. For details, see the topic WIP Integration, Oracle Installed Base Implementation Guide.
Replaced-by and replacement-for relationship types are created only by the Oracle Order Management-Oracle Installed Base integration using the Transaction Details window. They are set up as transaction only. For further information, refer to Using the Order Management Transaction Details Window, Oracle Installed Base User's Guide.
All other relationship types can be used in setting up multiple relationship types for the same instance. No location flow-down rules apply.
Verify that the standard instance statuses are seeded by checking the content of the Instance-Instance Relation Type Codes window.
Verify Extended Attribute-Level Codes
Type: CSI Lookup
Lookup Type: CSI_IEA_LEVEL_CODE
Access Level: System (non-extensible)
Use the following table to verify that the indicated values are already seeded for CSI_IEA_LEVEL_CODE. The table describes the four levels of extended attributes that you can define for Oracle Installed Base items. These are the extended attributes that are used in the Extended Attribute page of the application.
| Lookup Code | Meaning | Description |
|---|---|---|
| GLOBAL | Global | Applicable to all item instances in Oracle Installed Base |
| CATEGORY | Category | Applicable to the items of the category for which the extended attributes are defined |
| ITEM | Item | Applicable to all instances of the item type for which the extended attribute is defined. |
| INSTANCE | Instance | Applicable only to the instance for which the extended attribute is defined. |
Use the Installed Base Lookups window to verify that these codes are seeded for type CSI_IEA_LEVEL_CODE.
Set Up Extended Attribute Pools
Type: CSI Lookup
Lookup Type: CSI_EXTEND_ATTRIB_POOL
Access Level: Extensible
Values are not seeded for this code.
Optionally define extended attribute pools with code values such as color and grade.
To set up extended attributes, the name and code of the attribute have to be set up in the pool of attributes. This is where users can define an attribute's name, code, and description to be used in the LOV when the extended attribute is set up.
Set Up Extended Attribute Classifications
Type: CSI Lookup
Lookup Type: CSI_IEA_CATEGORY
Access Level: Extensible
Values are not seeded for this code.
Optionally define extended attribute classifications such as chemical and physical.
To set up extended attribute classifications, the name and code of the attribute have to be set up in the pool of attributes (see Set Up Extended Attribute Pools). Then each attribute can be classified into category. This is the table to define the categories by which an attribute can be classified from a LOV in the extended attribute setup.
Set Up Extended Attributes
The extended attributes used for Oracle Installed Base item instances must be defined in the Extended Attributes window.
Four levels of extended attributes can be defined for Oracle Installed Base items:
-
Global: Global Level Extended Attributes are applicable to all the item instances in Oracle Installed Base.
-
Item Category: Category level extended attributes are applicable to the items of the category for which the extended attributes are defined.
-
Inventory Item: Item level extended attributes are applicable to all the instances of the item type for which the extended attribute is defined.
-
Instance: Instance level extended attributes are applicable only to the instance for which the extended attribute is defined.
Use the Oracle Installed Base Extended Attributes window to define these attributes.
Verify Accounting Classification Codes
Type: CSI Lookup
Lookup Type: CSI_ACCOUNTING_CLASS_CODE
Access Level: System (non-extensible)
Verify that the following values shown in the following table are already seeded for CSI_ACCOUNTING_CLASS_CODE.
| Lookup Code | Meaning | Description |
|---|---|---|
| INV | Inventory | Inventory |
| ASSET | Asset | Asset |
| WIP | Work In Process | Work In Process |
| PROJECT | Project | Project |
| CUST_PROD | Customer Product | Customer Product |
Set Up Instance Type Codes
Type: CSI Lookup
Lookup Type: CSI_INST_TYPE_CODE
Access Level: Extensible
No values are seeded for CSI_INST_TYPE_CODE.
Define the instance type codes used by your organization. You can enter any value. Examples of instance types are Hardware, Software, and Service. This code is an optional classification for an instance and is used in the general attributes page in the application.
Verify Codes for Instance Location Sources
Type: CSI Lookup
Lookup Type: CSI_INST_LOCATION_SOURCE_CODE
Access Level: System (non-extensible)
Verify that the values in the following table are already seeded for CSI_INST_LOCATION_SOURCE_CODE.
| Lookup Code | Meaning | Description |
|---|---|---|
| HZ_LOCATIONS | HZ Location | The Location is defined in the HZ_LOCATIONS table. |
| HZ_PARTY_SITES | HZ Party Site | Item is at an external party site. The location is defined in the HZ_PARTY_SITES table. |
| INTERNAL_SITE | Internal Site | Item is at an internal site. The location is defined in HR_LOCATIONS table. |
| INVENTORY | Inventory | Item is in inventory. |
| IN_TRANSIT | In-Transit | Item is in Transit. Location is defined by in-transit order line ID. |
| PO | PO | Location is defined in PO_LINES_ALL table. |
| WIP | Work in Process | Item is in WIP. |
| PROJECT | Project | Item is in Project. |
| VENDOR_SITE | Vendor Site | Item is at a vendor site. Location is defined in PO_VENDOR_SITES_ALL table. |
These are the types of product locations that are supported in Oracle Installed Base.
Verify Party Sources
Lookup Type: CSI_PARTY_SOURCE_TABLE
Access Level: System (non-extensible)
Verify that the values in the following table are already seeded for CSI_PARTY_SOURCE_TABLE.
| Lookup Code | Meaning | Description |
|---|---|---|
| HZ_PARTIES | HZ_PARTIES | Party is defined in HZ_PARTIES table. |
| PO_VENDORS | PO_VENDORS | Party is defined in PO_VENDORS table. |
| EMPLOYEE | HR Employee | Party is defined in PER_ALL_PEOPLE_F table. |
This table is not extensible. It defines the types of parties that are supported in Oracle Installed Base for an instance. For example, an owner can be a party (such as a customer), an employee, or a vendor. A party that provides support can be a team or a group.
Set Up Codes for Instance-Operating Unit Relationship Types
Type: CSI Lookup
Lookup Type: CSI_IO_RELATIONSHIP_TYPE_CODE
Access Level: Extensible
Verify that the values in the following table are already seeded for CSI_IO_RELATIONSHIP_TYPE_CODE.
| Lookup Code | Meaning | Description |
|---|---|---|
| SOLD_FROM | Sold from | The item is sold from this operating unit. |
| SERVICE_BILL_FROM | Service billed from | The operating unit that gets the credit from Billing. |
Define new instance-to-operating units codes specific to your organization. Oracle Installed Base has limited functionality behind this instance-operating unit association. It is for information only. The SOLD-FROM relationship is created each time an instance is sold from an operating unit.
Set Up Version Labels
Type: CSI Lookup
Lookup Type: CSI_INSTANCE_VERSION_LABELS
Access Level: Extensible
Verify that the values in the following table are already seeded for CSI_INSTANCE_VERSION_LABELS.
| Lookup Code | Meaning | Description |
|---|---|---|
| AS-CREATED | As-Created | As-Created |
| AS-MAINTAINED | As-Maintained | As-Maintained |
| AS-ORDERED | As-Ordered | As-Ordered |
Define new version label codes to be used in your organization. This table of codes is used as a source of the LOV for the profile option setup in Default Version Label. It is used as a default when an instance is created.
Set Up System Type Codes
Lookup Type: CSI_SYSTEM_TYPE
Access Level: Extensible
When a system is created, a type can be selected from an LOV.
Use the setup window to define system types for your organization. They are used in the Systems page of the application to define systems.
For more information on systems, refer to the Oracle Installed Base User's Guide.
Set Up Split Process Reasons
Type: CSI Lookup
Lookup Type: CSI_SPLIT_REASON_CODE
Access Level: User (Extensible)
No values are seeded for CSI_SPLIT_REASON_CODE
Define split reasons to be used in your organization.
When an instance with a quantity greater than 1 is split, a reason code can be selected for the reason for the split. This is the window where the reason codes can be set up for use in an LOV.
Verify Oracle Configurator Enabled Values
Type: CSI Lookup
Lookup Type: CSI_CONFIG_ENABLED_VALUES
Access Level: System (Non-Extensible)
This setup maintains the LOV for the profile option CSI: Configurator Enabled and is used for integration with the Oracle Telecommunications Service Ordering solution and the Oracle Configurator product. Values are system defined and seeded.
Verify that the values in the following table are already seeded for CSI_CONFIG_ENABLED_VALUES.
| Lookup Code | Meaning | Description |
|---|---|---|
| NETWORK | Network Models Only | Network Models Only |
| NEVER | Never | Never |
Verify Instance Class Values
Type: CSI Lookup
Lookup Type: CSI_ITEM_CLASS
Access Level: System (Non-Extensible)
This setup maintains the LOV for the Instance Class field in the Service tab in the Inventory Item setup. It is used for integration with the Oracle Telecommunications Service Ordering solution and Oracle Configurator.
Confirm that the values in the following table are seeded for CSI_ITEM_CLASS.
| Lookup Code | Meaning | Description |
|---|---|---|
| LINK | Link | Items of this class are used to connect two other item instances in Oracle Installed Base. |
Verify Values for the Resubmit Interface Process
Type: CSI Lookup
Lookup Type: CSI_RESUBMIT_OPTIONS
Access Level: System (Non-Extensible)
This setup maintains the LOV for the Oracle Installed Base concurrent request Resubmit Interface process.
Confirm that the values in the following table are seeded for CSI_RESUBMIT_OPTIONS.
| Lookup Code | Meaning | Description |
|---|---|---|
| ALL | All | All transactions |
| SELECTED | Selected | Selected transactions from the Error Re-Processing window. |
Verify Values for CSI: Propagate Systems Changes
Type: CSI Lookup
Lookup Type: CSI_SYSTEM_WINDOW_DISPLAY
Access Level: System (non-extensible)
This setup maintains the LOV for the profile option CSI: Propagate Systems Changes - Window Display. The Maintain System window uses these values when displaying a confirmation window.
Confirm that the values in the following table are seeded for CSI_SYSTEM_WINDOW_DISPLAY.
| Lookup Code | Meaning | Description |
|---|---|---|
| DISPLAY | Always display | Always display |
| NO_DISPLAY-ALWAYS_CHANGE | Do not display and always change | Do not display and always change |
| NO_DISPLAY_NEVER_CHANGE | Do not display and do not change. | Do not display and do not change. |
Set Up Regions for the Advanced Search Page
Type: CSI Lookup
Lookup Type: CSI_ADV_SEARCH_DEF_SHOW
Access Level: System (Non-Extensible)
Navigation: Unlike the case for most other CSI lookups, you must use the Application Developer responsibility to navigate to Application Lookups > Application Object Library. The Application Object Library Lookups window appears.
This setup lists regions that are shown by default in the Advanced Search page. At the site level, customize the display of that page by removing or collapsing regions as required.
Steps
-
Use the following table to confirm the seeded values for CSI_ADV_SEARCH_DEF_SHOW.
Codes for the Advanced Search Page Lookup Code Meaning Description 00100 CSI_GEN_ATTR CSI_SHOW 00200 CSI_PARTY CSI_SHOW 00300 CSI_PARTY_ACCOUNTS CSI_HIDE 00400 CSI_CURRENT_LOCATION CSI_SHOW 00500 CSI_INSTALLED_AT CSI_HIDE 00600 CSI_PARTY_CONTACT CSI_HIDE 00700 CSI_ORDERS CSI_HIDE 00800 CSI_ASSETS CSI_HIDE 00900 CSI_CONTRACT CSI_HIDE 01000 CSI_OTHER_INFO CSI_HIDE -
Use the To column in the Effective Dates region to exclude a section from being displayed in the Advanced Search page.
-
Indicate whether a remaining section appears in expanded mode by default by entering
CSI_SHOW(all uppercase) in its Description column. Otherwise the section is collapsed on the Advanced Search page.
Set Up the Results of the Search Item Instances Page
Type: CSI Lookup
Lookup Type: CSI_PRODUCTS_TABLE_DEF_COLS
Access Level: System (Non-Extensible)
Navigation: Unlike the case for most other CSI lookups, here you must use the Application Developer responsibility to navigate to Application Lookups > Application Object Library. The Application Object Library Lookups window appears.
This setup customizes the display of the search results of the Search Products page by indicating the display and order of viewable columns. (The result is stored internally in the Product Search Results table.) The setup window shows the enabled columns of the corresponding search results with their left-to-right order indicated by their Description value.
Here are some definitions that explain how to use the window:
-
The Meaning column lists the prompt IDs of all column titles of the search results.
-
Use the To column in the Effective Dates region to exclude a column from being displayed by default in the search results. For example, if by default you do not want to display Usage in the search results, then end date the corresponding row in the lookup to exclude that column.
-
The Description column contains a numeric value that indicates the relative order of a column in the search results. A column with a smaller number appears to the left of a column with a bigger number. For example, if you set the Description value for the Status column to 50 compared to 70 for the Quantity column, then Status appears to the left of Quantity in the search results.
-
The To date, an end date, is of primary importance. Thus, if a row is end dated, then the Description value is disregarded.
-
The lookup does not affect the Item Description column, which always appears as the leftmost column.
The following table lists the codes that are available to set up the results of the Search Products page.
| Lookup Code | Meaning | Description |
|---|---|---|
| 0010 | CSI_ITEMNUM | 10 |
| 0015 | CSI_ITEMTYPE | 15 |
| 0020 | CSI_INSTANCE_NUMBER | 20 |
| 0030 | CSI_SERIALNUM | 30 |
| 0040 | CSI_LOTNUM | 40 |
| 0050 | CSI_SYSTEM | 50 |
| 0060 | CSI_SYS_OP_UNIT | 60 |
| 0070 | CSI_TAG_NUMBER | 70 |
| 0080 | CSI_STATUS | 80 |
| 0090 | CSI_QUANTITY | 90 |
| 0100 | CSI_PRODUCT_TYPE | 100 |
| 0110 | CSI_RETURN_BY_DATE | 110 |
| 0120 | CSI_ACTUAL_RETURN_DATE | 120 |
| 0125 | CSI_SHIPPED_DATE | 125 |
| 0130 | CSI_USAGE | 130 |
| 0140 | CSI_SALES_ORDER_NUM | 140 |
| 0150 | CSI_SALES_ORDER_LINE | 150 |
| 0160 | CSI_SALES_ORDER_DATE | 160 |
| 0170 | CSI_PURCHASE_ORDER_NUM | 170 |
| 0180 | CSI_AGREEMENT_NAME | 180 |
| 0190 | CSI_INSTANCE_START_DATE | 190 |
| 0200 | CSI_INSTANCE_END_DATE | 200 |
| 0210 | CSI_OWNER_PARTY_NAME | 210 |
| 0220 | CSI_OWNER_PARTY_NUMBER | 220 |
| 0230 | CSI_OWNER_ACCT_NAME | 230 |
| 0240 | CSI_OWNER_ACCT_NUMBER | 240 |
| 0250 | CSI_INSTALLED_AT_LINE1 | 250 |
| 0260 | CSI_INSTALLED_AT_LINE2 | 260 |
| 0270 | CSI_INSTALLED_AT_LINE3 | 270 |
| 0280 | CSI_INSTALLED_AT_LINE4 | 280 |
| 0290 | CSI_INSTALLED_AT_CITY | 290 |
| 0300 | CSI_INSTALLED_AT_STATE | 300 |
| 0310 | CSI_INSTALLED_AT_POSTALCODE | 310 |
| 0320 | CSI_INSTALLED_AT_COUNTRY | 320 |
| 0330 | CSI_VIEW_DETAILS | 330 |
| 0340 | CSI_VIEW_CONFIG | 340 |
| 0350 | CSI_ALL_DETAILS | 350 |
| 0360 | CSI_COPY_PRODUCT | 360 |
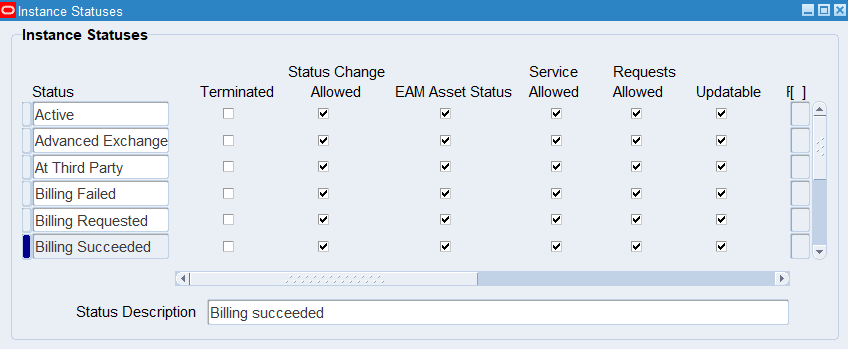
Set Up Instance Statuses
Instance statuses are user-extensible and are defined using a combination of options. The following table lists the seeded statuses.
| Name | Terminated | Status Change Allowed | Service Allowed | Requests Allowed | Pre-Defined | Updatable | EAM Asset Status |
|---|---|---|---|---|---|---|---|
| Created | N | Y | Y | Y | Y | N | Y |
| Expired | Y | Y | N | N | Y | N | Y |
| Latest | N | Y | Y | Y | Y | N | Y |
| Loaner | N | Y | N | Y | Y | N | Y |
| Repaired | N | Y | Y | Y | Y | N | Y |
| Replaced | N | N | N | N | Y | N | Y |
| Replaced - No Return | Y | Y | N | N | Y | N | Y |
| Replacement | N | Y | Y | Y | Y | N | Y |
| Return for Replacement | Y | Y | N | N | Y | N | Y |
| Returned for Credit | N | Y | N | N | Y | N | Y |
| Returned for Repair | N | Y | Y | N | Y | N | Y |
| Returned for Upgrade | N | Y | Y | N | Y | N | Y |
| Returned Loaner | N | Y | N | N | Y | N | Y |
| Spare Part | N | Y | Y | Y | Y | N | Y |
| Updated | N | Y | Y | Y | Y | N | Y |
| Upgraded | N | Y | Y | Y | Y | N | Y |
The meaning of the check boxes is as follows:
-
Terminated: If set to Y, then the instance will be terminated and no further service contracts will be created.
-
Status Change Allowed: The status can be changed for an instance currently bearing this status.
-
EAM Asset Status: If set to Yes (default), the Installed Base Instance Status is applicable to EAM Asset statuses. This provides the ability to make EAM asset statuses a subset of Installed Base instance statuses to differentiate maintainable assets from other types of assets. This option is available only during asset creation.
You can filter assets using this feature in several EAM pages such as: Create and Update Asset, Asset Setups Simple Search, Advanced Asset Search, and Linear Asset pages.
-
Service Allowed: Service contract can be active for the instance with this status. If set to No, then no further service contracts can be created for an item instance with this status.
-
Requests Allowed: Service request can be created for an instance with this status.
-
Pre-Defined: Seeded
-
Updatable: The check boxes on this status can be updated.
When you define your own instance statuses, you must set Pre-Defined to N and Updatable to Y.
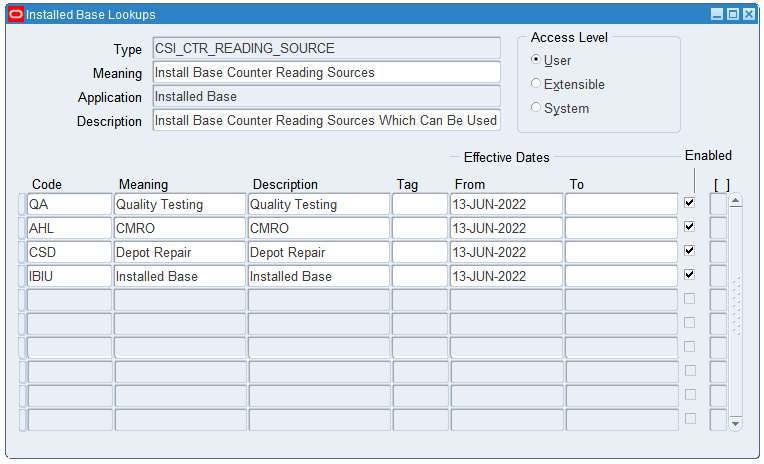
Set Up Source Lookup Codes for Counters
Set up lookup codes for the source of counter readings.
Type: CSI Lookup
Lookup Name: CSI_CTR_READING_SOURCE
This setup is found in the Oracle Installed Base Administrator/Lookup/CSI_CTR_READING_SOURCE table. These values are available in the Source LOV using the Enter Meter Readings and Capture Counter Readings pages. The values are read-only when viewing counter history.
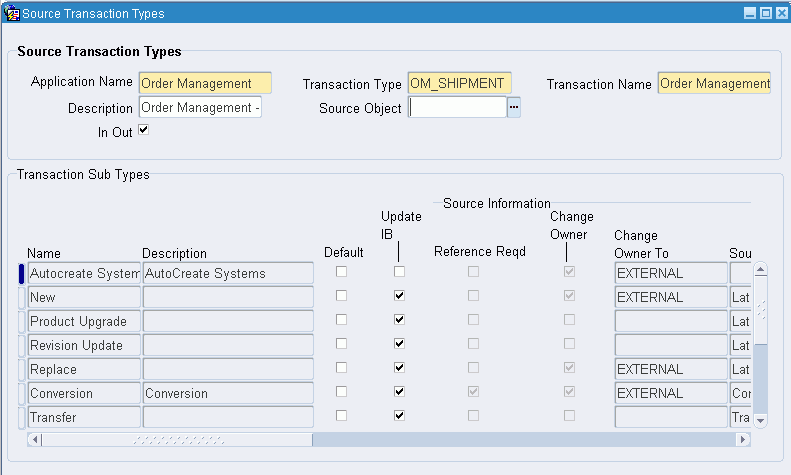
Set Up Source Transaction Types
Before any source transaction can be used in the LOV for a transaction subtype, it must be defined in this setup in the Source Transaction Types window. All integration sources and transaction types must be defined here before they can be used to update Oracle Installed Base. Values can be seeded or user-defined. See Set Up Transaction Subtypes for the setup of the transaction subtypes displayed in this window.
Window Fields in the Source Transaction Types Region
Application Name: An LOV of Oracle Applications that can be set up to integrate into Oracle Installed Base.
Transaction Type: The user-defined name of the kind of transaction that integrates with Oracle Installed Base from the application named.
Transaction Name: The user-defined name of the transaction.
Description: The user-defined description of the transaction.
Source Object: Reserved for future use.
In Out: Reserved for future use.
Set Up Transaction Subtypes
Transaction types and subtypes are used to specify the kinds of transactions that the interface program can use. The main purpose of the Source Transactions Subtypes window is to specify what kind of update can be done to an Oracle Installed Base instance when transactions come from other applications. In Oracle Order Management, you can go into the transaction details to pick one of the transactions being defined here. Here you define these transactions and the kind of actions they can perform on the source instance and the non-source instance.

Transaction Subtypes Region
This region is used to define the name of the transaction subtype. The name can come form two sources, depending whether the Service Type check box is selected:
-
If the Service Type is selected, then the LOV comes from the Service Transaction Billing Types setup.
-
If the Service Type is not selected, then the LOV comes from the Oracle Installed Base Transaction Type code setup. Refer to Set Up the Transaction Subtypes LOV from Non-Service Processes.
The Name field provides the LOV from which you can select the name of the transaction subtype.
Source Info Region
This region is used to define the specific actions to take for the instance being transacted. In the case of the sales order line, it can the part being sold on the sales order line.
Reference Required: Specifies whether an Oracle Installed Base item instance number or reference number is mandated for this transaction type. In the case of a return of a non-serialized item, this Oracle Installed Base item instance number is always required for the Oracle Installed Base interface to know which instance to update. If the part is a serialized item, then this item instance number is not mandated because the interface program can pick up the serial number from the receipt transaction.
Change Owner: Indicates whether a change of ownership is to take place for this transaction type. If checked, then a change of ownership is to take place.
Change Owner To: Selects the ownership change to be Internal or External. For example, when returning an item for repair, the ownership need not be changed. For a sales order of a shipped item, the ownership can be changed to External.
Status: Defines the status to be updated for this instance. For example, when an instance is returned for repair, its status is changed to Returned for Repair.
Return Reqd: Requires a return date to be entered on the Installation detail for this transaction. Not mandatory.
Revision Reqd: Requires a revision to be entered on the Installation detail for a revision controlled instance. Not mandatory.
Non Source Info Region
This region is to define the specific actions to make for the instance being related to the instance being transacted.
The action to be taken for the non-source instance comes from this region. For example, in order to use this subtype for a to-be-replaced instance in the non-source installation detail, Reference Reqd must be selected, and a status specified.
Reference Reqd: Specifies whether an Oracle Installed Base item instance number or reference number is mandated for this transaction type.
Change Owner: Indicates whether a change of ownership is to occur for this transaction type. If checked, then change of ownership is to occur.
Change Owner To: Selects the ownership change to be Internal or External.
Status: Defines the status to be updated for this instance. For example, the status of a replaced instance can be Replaced.
Return Required: Requires a return date to be input on the transaction detail for this transaction.
Parent Info Region
This region is for future use. Thus, the Reference Reqd, Status, and Revision Reqd fields are not currently used.
Transaction Subtypes Region
The tab ordering of the fields in the window now returns to this region to the Freeze and Seeded check boxes.
Source Transaction Types Region
This region is to define the source application from which the transaction being defined comes.
This is a LOV of transaction types defined first in the Source Transaction Type setup. For example, the Sell transaction subtype comes from the Oracle Order Management application OM_SHIPMENT. Return for Credit comes from the Oracle Order Management application RMA_RECEIPT type.
Other examples of application sources are Oracle Field Service and Oracle Order Capture.
The In Out field is not being used for this release.
Default: Indicates whether this transaction subtype is to be used as the default subtype for that source transaction type and application being defined. For example, Sell is the default subtype for OM_SHIPMENT/ Order Management Ship/Fulfill sales order lines. Return for Repair is the default subtype for the RMA_RECEIPT/ Order Management Return line.
Update IB: Indicates whether this subtype/source transaction type combination is used to update Oracle Installed Base. For example, some subtypes set up for the Oracle Field Service application updates Oracle Installed Base only from Oracle Field Service.
Set Up the Transaction Subtypes LOV from Non-Service Processes
Type: CSI Lookup
Lookup Type: CSI_IB_TXN_TYPE_CODE
If the Service Type check box of the Source Transactions Subtypes window is not selected, then the LOV comes from the Oracle Installed Base Transaction Type Codes setup.
This setup is found in the Oracle Installed Base Administrator /Lookup/ CSI_IB_TXN_TYPE_CODE table. Six seeded values are used in the transaction subtype setup, and more can be user-defined.
Use the following table to confirm the seeded values for CSI_IB_TXN_TYPE_CODE.
| Lookup Code | Meaning | Description |
|---|---|---|
| ADD | Add | Add |
| FULFILL | Fulfill | Fulfill |
| ISSUE | Issue | Issue |
| MOVE | Move | Move |
| RECEIVE | Receive | Receive |
| SELL | Sell | Sell |
Verify Transaction Status Codes
Type: CSI Lookup
Lookup Type: CSI_TRANSACTION_STATUS_CODE
Access Level: System
Values are seeded for this code.
Use the following table to confirm the seeded values for CSI_IB_TXN_TYPE_CODE.
| Lookup Code | Meaning | Description |
|---|---|---|
| COMPLETE | Complete | No further FA/PA processing |
| INTERFACED | Interfaced to PA | PA transaction interfaced |
| PENDING | Pending | Need further FA/PA processing |
Verify Transaction Error Source Types
Type: CSI Lookup
Lookup Type: CSI_TXN_ERRORS_SOURCE_TYPES
Access Level: System
Values are seeded for this code.
When an integration transaction is processed with an error, it is posted to the error table with one of the these error source types, which indicate where an error comes from.
Use the following table to confirm the seeded values for CSI_TXN_ERRORS_SOURCE_TYPES.
| Lookup Code | Meaning | Description |
|---|---|---|
| AP_INVOICE_DISTRIBUTIONS_ALL | AP Invoice Distribution All | For the AP invoice distribution events. |
| EIB_NOTIFICATIONS | EIB Notifications | Indicates that the message is a notification generated by Oracle Asset Tracking during transaction processing. |
| FA_RETIREMENTS | FA Retirements | For the asset retirement and asset reinstatement events. |
| MIL_MATERIAL_TRANSACTIONS | MIL Material Transactions | For all inventory-related events. |
| RCV_TRANSACTIONS | RCV Transactions | For the purchase order received into project event. |
| WFM_TRANSACTIONS | WFM Transactions | For all workforce management related events including equipment installed, equipment in service, asset in service, asset out of service, and item move. |
Create Business Users
Create business users as needed for Oracle Installed Base. To do so, you must create business users and assign them the responsibility of an Oracle Installed Base customer and the predefined role of CSI_END_USER, CSI_READ_ONLY_USER, or CSI_CUSTOMER_USER. A role is a combination of permissions, which enable specific access and update privileges. For descriptions of the roles and permissions that Oracle Installed Base supports, see Roles and Permissions.
For details on creating users and assigning associated accounts, roles, and responsibilities, refer to the user management sections of the Oracle Common Application Components User's Guide.
To confirm your user management work, log in to the Oracle E-Business Suite login (jtflogin) with the user name and password that you established, and everything should be set. The accounts that you assigned should be what appear as the list of accounts associated with this user in the customer UI. It may be a subset because JTF shows all accounts regardless of active or inactive status whereas the Oracle Installed Base window shows only the active accounts that are associated with a user.
Create Agent Users
Create agent users as needed for Oracle Installed Base. To do so, you must create internal users and assign them the predefined CSI_NORMAL_USER role and the responsibility of an Oracle Installed Base user. A role is a combination of permissions, which enable specific access and update privileges. For more information, see Roles and Permissions. For details on creating users and assigning associated accounts, roles, and responsibilities, refer to the user management sections of the Oracle Common Application Components User's Guide.
To confirm your user management work, log in to the Oracle E-Business Suite login (jtflogin) with the user name and password that you established.
Schedule the Expire End Dated Instances Program
This program goes through the end dates set up for instances to be expired. If the end date is past due, then the instances are set to expire. Schedule this program to run at least once a day:
Steps
-
Login as Oracle Install Base Administrator in the Forms mode.
The Navigator window appears.
-
Choose Others > Requests.
The Submit a New Request window appears.
-
Select Single Request, and click OK.
The Installed Base Requests window appears.
-
From the Name LOV, select Expire End Dated Instances.
-
Click OK.
-
In the At these Times region, click Schedule.
The Schedule window appears.
-
Select the desired running schedule.
-
Click OK.
The Installed Base Requests window appears.
-
Click Submit.
Schedule the Install Base Open Interface Program
This program imports significant volumes of data into Oracle Installed Base application tables through its mass load feature. Through its incremental load feature, it synchronizes Oracle Installed Base with subsystems by importing item instances from different feeder systems on a frequent, ongoing basis. Through its change functionality, it automates the process of adding as well as updating changes to the attributes of item instances. It also validates imported data to ensure data integrity with Oracle applications.
Steps
-
Login as Oracle Install Base Administrator in the Forms mode.
The Navigator window appears.
-
Choose Others > Requests.
The Submit a New Request window appears.
-
Select Single Request, and click OK.
The Installed Base Requests window appears.
-
From the Name LOV, select either Install Base Open Interface or Install Base Open Interface - Parallel Concurrent Workers.
-
Click OK.
-
In the At these Times region, click Schedule.
The Schedule window appears.
-
Select the desired running schedule.
-
Click OK.
The Installed Base Requests window appears.
-
Click Submit.
Run the Initiate Mass Edit Program
This is the program that is called automatically to run the mass edit sessions. Schedule it to run at a regular interval to pick up mass update and edit sessions due to be processed.
Steps
-
Login as Oracle Install Base Administrator in the Forms mode.
The Navigator window appears.
-
Choose Others > Requests.
The Submit a New Request window appears.
-
Select Single Request, and click OK.
The Installed Base Requests window appears.
-
From the Name LOV, select the Initiate Mass Edit value.
-
If you want to run a single batch only, enter the Batch Name as a parameter; if you leave the Batch Name blank, the concurrent request will run all waiting batches.
-
Click OK.
-
In the At these Times region, click Schedule.
The Schedule window appears.
-
Select the desired running schedule.
-
Click OK.
The Installed Base Requests window appears.
-
Click Submit.
Schedule the Process Old Order Lines-Fulfillable Only Program
This program processes the old fulfillable order lines migrated from previous versions of Oracle Installed Base. Run it once or twice a day for the month after you migrate. To schedule the program:
Steps
-
Login as Oracle Install Base Administrator in the forms mode.
The Navigator window appears.
-
Select Others > Requests.
The Submit a New Request window appears.
-
Select Single Request, and click OK.
The Installed Base Requests window appears.
-
From the Name LOV, select Process Old Order Lines-Fulfillable Only.
-
Click OK.
-
In the At these Times region, click Schedule.
The Schedule window appears.
-
Select the desired running schedule.
-
Click OK.
The Installed Base Requests window appears.
-
Click Submit.
Schedule the Resubmit Interface Process
This program processes the transactions in the Error processing table. It can be set up to process selected lines or all lines in the table. This program can be called to run by user request or can set up to run at a regular interval. To schedule the program:
Steps
-
Login as Oracle Install Base Administrator in the forms mode.
The Navigator window appears.
-
Choose Others > Requests.
The Submit a New Request window appears.
-
Select Single Request, and click OK.
The Installed Base Requests window appears.
-
From the Name LOV, select Resubmit Interface Process.
-
Click OK.
-
In the At these Times region, click Schedule.
The Schedule window appears.
-
Select the desired running schedule.
-
Click OK.
The Installed Base Requests window appears.
-
Click Submit.
Schedule the Resubmit Waiting Transactions Program
This program processes the transactions that are set as waiting status in the Oracle Installed Base update process. The program can be scheduled to run at a regular interval. To schedule the program:
Steps
-
Login as Oracle Install Base Administrator in the forms mode.
The Navigator window appears.
-
Choose Others, Requests.
The Submit a New Request window appears.
-
Select Single Request, and click OK.
The Installed Base Requests window appears.
-
From the Name LOV, select Resubmit Waiting Transactions.
-
Click OK.
-
In the At these Times region, click Schedule.
The Schedule window appears.
-
Select the desired running schedule.
-
Click OK.
The Installed Base Requests window appears.
-
Click Submit.
Schedule the Install Base and Inventory Data Discrepancies Program
The Install Base and Inventory Data Discrepancies program picks up the discrepancy data from the tables of Oracle Installed Base and Oracle Inventory and displays it on a report. The program can be scheduled to run at a regular interval. To schedule the program:
Steps
-
Login as Oracle Install Base Administrator in the Forms mode.
The Navigator window appears.
-
Choose Others > Requests.
The Submit a New Request window appears.
-
Select Single Request, and click OK.
The Installed Base Requests window appears.
-
From the Name LOV, select Install Base and Inventory Data Discrepancies.
-
Click OK.
-
In the At these Times region, click Schedule.
The Schedule window appears.
-
Select the desired running schedule.
-
Click OK.
The Installed Base Requests window appears.
-
Click Submit.
Final Synchronize On-Hand Balance with Oracle Inventory
To maintain lifecycle tracking for all items that are to be tracked in Oracle Installed Base, it maintains a mirror image of what is in Inventory. For new implementations of Oracle Installed Base, all on-hand quantities of the Oracle Installed Base trackable items were issued out of Oracle Inventory in the first step of the implementation checklist. Now you must receive them back into Oracle Inventory. Oracle suggests that you use the miscellaneous receipt transaction in Inventory to perform this step.
See Performing Miscellaneous Transactions, Transactions, Oracle Inventory User's Guide for more information on miscellaneous receipts.
Schedule the Interface Install Base Lines Concurrent Program
Inventory material and fulfillment transactions are posted to the IB interface table, and can be picked up for further processing into Oracle Installed Base.
The Interface Install Base Lines concurrent program can be scheduled to run at a regular interval.
Note: If the Install Base Lines concurrent program is run manually, the User ID will represent the resource who created or modified the transaction. If the concurrent program is run automatically, then the User ID represents the resource who generated the process.
-
Login as Oracle Installed Base Administrator responsibility.
-
Choose Others > Requests.
The Submit a New Request window appears.
-
Select Single Request, and click OK.
The Installed Base Requests window appears.
-
Select Interface Install Base in the Name LOV.
-
Select the appropriate option in the Validation Organization window.
You can run the concurrent program for all organizations or for a specific organization. The specific organization value is associated with the user and comes from the Service: Inventory Validation Organization profile option.
Important: See MOS Note 2914259.1 for information regarding the changes to be made to the Interface Install Base Lines concurrent program.

-
Click OK for your selection.
-
Click OK to return to the Request window.
-
In the At these Times region, click Schedule.
The Schedule window appears.
-
Select the desired running schedule.
-
Click OK.
The Installed Base Requests window appears.
-
Click Submit.
The results can be viewed in the Transaction Interface Search page. See Using the Transaction Interface Search, Oracle Installed Base User's Guide for more information.