Managing Planning
This chapter covers the following topics:
- Overview
- Finding Scheduled and Unscheduled Visits
- Scheduling a Visit
- Assigning Spaces to a Visit
- Material Demand Planning and Scheduling
- Reliability Planning
- Supply Chain Planning
- Checking the Material Schedule
- Checking Material Availability
- Serial Number Reservation
- Managing Simulation Plans
- Creating a New Simulation Plan
- Adding Visits to a Simulation Plan
- Setting a Simulation Plan as a Primary Plan
- Copying a Visit to a New Simulation Plan
- Running Resource Leveling Plans
Overview
The Oracle CMRO Planning module maximizes maintenance scheduling by balancing maintenance requirements with available maintenance capacity. It enables you to simulate a visit or sequence of visit combinations to find the optimal maintenance visit schedule.
Key functions supported by the Planning module provide essential tasks for planning the long term maintenance needs of fleet units. See:
Planning Module
The Planning module is used by a maintenance planner to schedule maintenance visits based on the optimal use of capable maintenance facilities, available resources and material constraints. The maintenance planner using the Planning module can make a complete assessment of the maintenance resources available at all maintenance locations. The maintenance planner makes an assessment by balancing visits created for forecasted maintenance requirement information from the unit maintenance plan against projected maintenance capacity. The maintenance planner schedules maintenance visits, assesses capacity and reserves required materials.
Key Business Processes
A visit is created in the Visit Work Package module and is a group of events created by the maintenance planner comprised of selected maintenance requirements and associated routes, with projected compliance times based the unit's forecasted operational times defined in the Unit Maintenance Plan module or directly from the Fleet Maintenance Program. This visit is used to group events together for long and short term capacity planning, and to facilitate scheduling to a maintenance base. Visits are used for production through the Visit Work Package and Production Planning. Creation of a maintenance visit consists of selecting and creating tasks for maintenance requirements and associated routes, and projecting compliance times based on the unit's forecasted operational times.
Define a Visit's Resource Requirements
Maintenance visit resource requirements must be defined to enable accurate scheduling and capacity planning. Visit resource requirements are based on the maintenance requirement's associated routes - which are created in Route Management - and the man hour requirements by skill, skill level and certification, required tooling, required materials, duration and required completion times as defined by the unit maintenance plan.
Schedule a Visit
After a visit has been created, it must be scheduled at a maintenance facility. Availability to perform the visit is based on currently scheduled visits, material constraints, and the forecast resources of the maintenance facility. The visit start time is set by considering due dates calculated for maintenance requirements by the unit maintenance plan. Required materials are reserved and the maintenance planner can determine if capacity is exceeded or does not fulfill requirements.
Schedule Required Materials
After a visit has been created and scheduled to a capable maintenance facility, the associated material requirements are factored into the supply chain plan through Oracle's Advanced Supply Chain Planning. The visit's required materials, defined through the routes associated to each task, are scheduled based on the start date and time of each task for the applicable organization. The Planning tab provides the planner with the functionality to identify any schedule conflicts, and if the required materials will not be available by the start date of the applicable visit task. Alternate items for these requirements may be selected and scheduled, or the planner may make scheduling changes to ensure that the materials will be available by the start of the associated work order.
Capacity Versus Work Load Requirements
You can compare resource capacity versus resources required for the projected workload, which is an essential tool for accurate scheduling and planning and ensures that available resources are used as efficiently as possible. This is accomplished through the Resource Leveling feature of the Planning module. To derive the optimal schedule, you must have the ability to adjust visit schedules, change maintenance locations, and remove and add visit requirements.
Simulations
The simulation function works with both the scheduling and resource leveling functions of the Planning module. This enables the user to test different scheduling scenarios without changing the original visits. Visits can be copied into a simulation plan and their schedule or structure changed. After evaluating these visits, and considering schedule and resource consumption, the changes can be implemented for the entire simulation plan, or for individual visits within the plan.
Finding Scheduled and Unscheduled Visits
The Search Visit page enables you to search and view all maintenance visits regardless of their status.
To find a visit
-
Navigate to the Search Visits page (Planning > Visit Work Package > Visits).
You can view all primary visits, scheduled and unscheduled. This includes visits that need to be associated to an item (model) or serial number, all visits of a certain visit type, all visits due during a defined period, or all visits associated to an organization and department.
-
Select values in the applicable fields:
-
Organization
-
Department
-
Item
-
Due From, Due To: These two attributes enable the user to filter the displayed visits based on when a visit is due.
-
Start From, Start To: The date of the first day of effectivity of an operation.
-
Display Only: Used to filter displayed visits by Scheduled, Unscheduled, or Visits with conflicting end dates. This field is empty by default. A visit is considered scheduled if its start date is defined and it is associated with a department and organization. Visits not assigned to any organization and/or department and with no Start Date are Unscheduled Visits. Conflicting visits are visits whose Derived End Date is greater than it's Planned End Date.
-
Visit Type: Defines what kind of maintenance visit is required, such as C-Check, D-Check, Preflight. The types are user defined. This allows maintenance to be classified into categories. Larger visits can include many different maintenance requirements, but can still be grouped together under one visit type.
-
Visit Number
-
-
Click the Go button to view the results.
-
Choose Visits with Confliction End Dates from the Display Only drop-down menu to search for a visit, in production or in planning stage, whose derived end date has exceeded the manually defined planned end date.
-
Click the Go button.
-
Manually adjust the planned end date in the Schedule Visit page, if necessary. See Scheduling a Visit.
Assessing a work schedule
CMRO Planning enables quick identification of the workload for a maintenance base. This assessment identifies the current scheduled visits at an organization's capable department and spaces for a given maintenance visit.
To assess a work schedule
-
Retrieve the visit that you want to view.
-
Select Schedule and then click Go to navigate to the Maintenance Schedule page.
-
Enter the schedule information in the applicable fields.
-
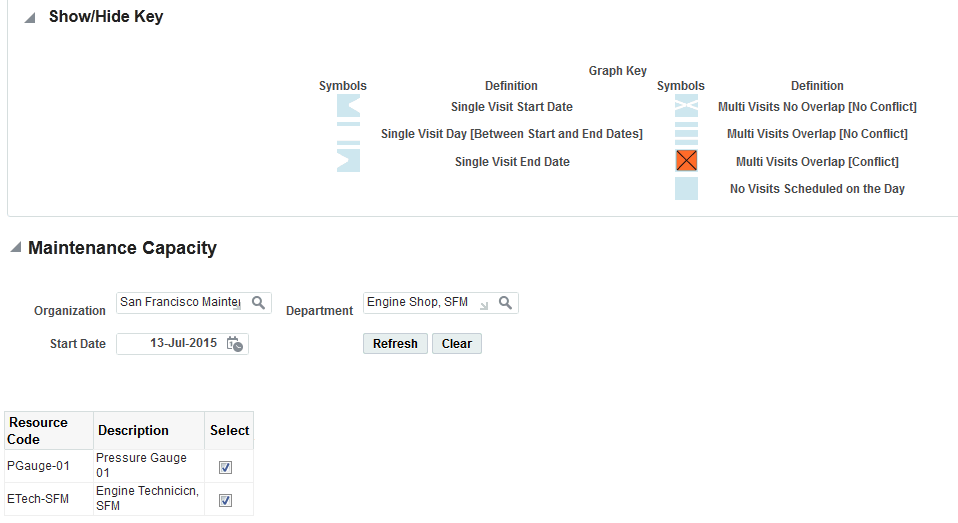
Click the Go button to view the results based on your selection criteria. The schedule is indicated by icons.
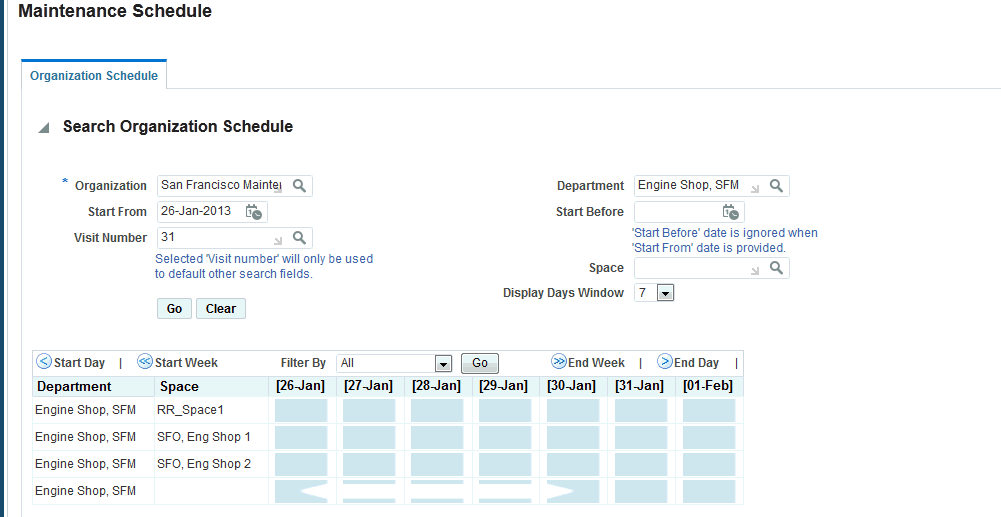
Maintenance Schedule Icons and Maintenance Capacity
Scheduling a Visit
The Planning module enables maintenance organizations to schedule visits, which can be created specifically for a maintenance requirement. An empty visit can be created and associated to requirements at a later time.
Note: You can also schedule a maintenance requirement more than once to the same instance in a single maintenance visit.
Prerequisites
- The visit to be scheduled must exist in the database.
To schedule a visit
-
Navigate to the Search Visits page (Planning > Visit Work Package > Visits).
-
Select the visit that you want to schedule. The visit cannot have a status of Draft to be scheduled.
If the status is Draft, you must first select Plan Visit and then click Go. The status is changed to Planning, and it can then be scheduled.
-
Select Schedule in the Select Visit action list; click Go.
-
Select information in the following fields.
This page enables you to assign a visit to an organization and department. You also must define its start date. All three of these attributes must be assigned to define a visit as scheduled. After a visit has been scheduled, spaces can be assigned and Planning's resource leveling functionality can be used. You can also reschedule a visit from this page if it is in the Planning status.
-
Visit Number: All maintenance visits are assigned a unique visit number. All visit numbers for all visits that have been created are available for selection.
-
Duration: The total length of the visit in days. The duration is the sum total of the durations of the associated visit tasks. Maintenance visits can be any length, from an hour to an unlimited number of days.
-
Visit Type: Type that enables maintenance to be classified into categories. Some of the larger visits, like a D-Check, will often include many different maintenance requirements, but can still be grouped together under one visit type.
-
Due By: The due date of a visit defined by the associated maintenance requirements from the unit maintenance plan. The maintenance requirements are associated to the visit's tasks.
-
Item: Item to which the visit is associated. All visits must be associated with an item.
-
Unit: Serial number of a specific item.
-
Simulation Plan: The visit in the simulation plan or a visit in the primary plan. When using the Search Visits page, the visit will always be part if the primary plan. When using the View Simulation Plan page, the value is defined by the retrieved plan.
-
Organization
-
Department
-
Start Date
-
Planned End Date
-
Planned End Time
-
Service Category
You can also adjust the planned end date for a visit with conflicting planned and derived end dates.
You can schedule and reschedule a visit while viewing current visit details in the Scheduled Visits page. You can search for availability periods using various search criteria.
-
-
Click the Apply button to save your work.
To schedule and reschedule visits
-
Navigate to the Scheduled Visits page to view details for a currently scheduled visit number.
-
Enter information in the applicable fields and click the Go button. The schedule details appear.
-
Click the intersecting icon, between the start date and corresponding department or space, to schedule the visit to the applicable organization, department and space. The Schedule Visit page appears.
-
Enter the schedule details, and click the Apply button to save your work.
-
To reschedule a visit, select the icon for the visit in the results table. Make the necessary changes, and click Apply.
-
Optionally, assign spaces. See: Assigning Spaces to a Visit. The space information is carried over to the Schedule Visit page for assignment.
-
Click the View icon for the row to view the visit details assigned to a department or space. The View Details page displays the department and all scheduled visits starting during the previously defined period.
The Additional Spaces Assigned column indicates whether or not additional spaces are assigned to the visits.
-
To return to the Scheduled Visits page, select the visit and click the Schedule button.
To unschedule a maintenance visit
-
Retrieve the visit that you want to remove from the schedule.
-
Select Unschedule.
The visit is removed from the schedule and no longer appears in the Visits results. The organization, department, start date and any associated spaces are removed from the visit.
To view scheduled visit details
-
Retrieve the visit that you want to view.
-
Click the Plan Visit link. The Schedule Visit page appears, displaying the currently scheduled visits for the relevant visit number.
Assigning Spaces to a Visit
Planning uses spaces to assign locations to the maintenance work required during a visit. One or more spaces may be assigned to a visit.
Prerequisites
- A visit must be exist in the database, and it must be scheduled.
- A space must exist in the database.
To assign spaces to a visit
-
Use the Schedule Visit page to retrieve that visit to which you want to assign a space. Click the Plan Visit link.
The Schedule Visit page appears. The Assigned Spaces information is displayed in the lower half of the page.
-
Click the Add More Rows button, and add information in the provided fields.
-
Select a value in the Space field.
-
Select Apply to save your work.
Material Demand Planning and Scheduling
The integration between Oracle CMRO and Oracle Advanced Supply Chain Planning (ASCP) provides comprehensive material planning, scheduling and rescheduling capabilities. Planners have complete visibility into forecasted, planned, and unplanned material requirements. You can plan materials well in advance to accommodate fluctuations in demand and supply for both planned and unplanned material requirements. You can also maintain optimum stock to meet specific service levels under the defined inventory budget constraints. The ASCP integration includes the following:
-
Material Demand Planning - Material demand arises out of the planned maintenance requirements forecasted by the Unit Maintenance Plan (UMP), which defines when they must be accomplished.
This forecast is based on the utilization of the applicable units. The material demand for all planned maintenance requirements in UMP is automatically stored each time the utilization forecast is updated or the build unit effectivities process is run. The replace and rework percentages defined in the disposition lists and the material requirements defined for the routes are factors influencing material demand. Material demand associated to unplanned, non-routine maintenance requirements is discovered during the production phase. Additionally, unplanned demand can be predicted based on the historical demand for each organization. This unplanned demand can be refined based on the historical relationship between the planned maintenance requirements, associated units and the unplanned material requirements.
Demand Planning collects these material requirements, factors them into the global demand, and feeds the global demand to Inventory Planning and SCP.
The forecast or demand variability along with the supply variability (such as supplier capacity and lead-times) is then used to specify time phased safety stock recommendations for the supply chain.
-
Supply Chain Planning - After the planned maintenance requirements have been associated with a visit work package and scheduled to capable maintenance facilities, the required materials are scheduled through Oracle Advanced Supply Chain Planning.
The APS will first net the existing supplies, and then generate planned orders to procure the required materials.
Material Demand Planning
The three primary material streams into the ASCP engine are:
-
Global material demand from forecasted maintenance requirements.
-
Scheduled maintenance requirements.
-
Historical non-routine material requirements.
Demand Planning factors the required materials into global material demand, and pushes it into Inventory Planning where the supply and demand variability is considered to compute safety stocks at all locations. Demand plans created in the process, provide visibility into the upcoming material requirements long before the applicable maintenance is scheduled to a facility.
Demand Planning includes the following procedures.
Create demand plans
-
Navigate to the Demand Plans window in Oracle Demantra.
-
Create a demand plan. See: Procedure to Define a Demand Plan, Oracle Demand Planning User's and Implementation Guide
You must define the following Input Parameters:
-
Material Requirements - Scheduled
-
Material Usage History - Unplanned
-
Material Usage History - Planned
-
Material Requirements - Planned
These streams consider global demand from UMP, scheduled requirements in Planning and historical requirements from non-routine maintenance defined during the production process.
-
Run data collections
-
Navigate to the Custom Stream Collection window in Oracle Demantra.
-
Select the CMRO streams, and run collections.
See: Procedure for Collecting Data, Oracle Demand Planning User's and Implementation Guide. This process collects the material requirements from CMRO and includes the information in the demand plans.
Build demand plans
Once a demand plan has been defined in the Demantra server, you build the demand plan in the Demantra Engine. This process builds the Demantra databases, and downloads data from the Demantra server to these databases.
-
Navigate to Demand Plan Administration in Oracle Demantra, and a list of demand plans appears.
-
Select the demand plan that you want to work with, and build it. See: Building a New Demand Plan, Oracle Demand Planning User's and Implementation Guide.
Reliability Planning
Reliability Planning enables you to reduce inventory levels at maintenance facilities and transient stations. This functionality provides forecast capabilities for non-routine items, based on identified failure probabilities, using the Supply Chain Planning engine. You can avoid costly interruptions to flight schedules if the correct parts are available, and also avoid situations of overstocking inventory by providing a query to analyze the reliability of rotable parts.
Reliability Planning functionality uses historic part change reports and identifies failure probabilities. Earlier inspections and possible item replacements at more opportune times can reduce unplanned maintenance and associated costs. Historic calculations use standards such as part and age. For example, if a standard engine requires an overhaul every 8000 hours under certain operational conditions, but historical data shows it is actually closer to every 7500 hours, the future performance is compared to the standard. You can then determine if the proposed action should be used for the overall maintenance. Reliability Planning includes the following features:
-
Calculation of historical information used for predicted failure rate of installed components. Anticipated failure rates of installed components are identified in configuration positions within a unit.
-
Manual calculation of predicted failure rate of components when historical data is not available. You can manually identify the Mean Time Between Failure (MTBF) for applicable items.
-
Creation of material demand for anticipated part changes based on a utilization schedule. Based on identified failure rates and the projected flight schedule of units, material demand is identified at locations. This demand is factored into planning with the associated probability failure rates.
Reliability Planning is set up in Oracle Inventory, Oracle Planning, and in Complex Maintenance Repair and Overhaul's Administration mode. The Reliability tabbed region in the Administration mode is used to:
-
Define conditions for data included, and codes for removing the data for analysis and reporting.
-
Define counters for tracking the usage of installed parts.
-
Associate the applicable forecast sets and define associated planning probabilities.
-
Define manual reliability definitions.
-
Generate the Submit Request function for the Reliability Analyzer Process.
-
View the history of transactions for items and configurations, and export the data for reporting.
Prerequisites
- Create planning forecasts for each organization for the applicable probability range.
To view and define conditions and removal codes for Reliability Planning
-
Navigate to the Reliability Setup page.
The Setup Summary region displays the conditions and removal codes, and the number of records associated with each attribute.
The Setup Details region is used to add or delete condition and removal codes.
-
In the Setup Details region, click the Conditions tab to view the conditions set for reliability analysis.
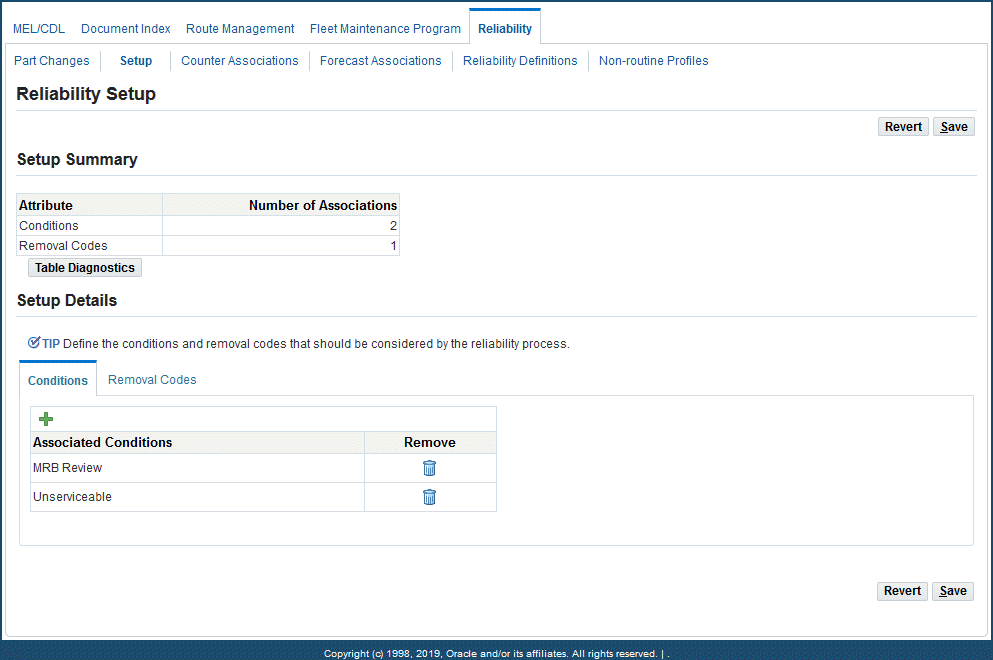
-
Click the Add Another Row button to add a condition.
-
Select a value and click the Select button to refresh the Reliability Setup page with the new record.
-
Click the Removal Codes tab to view the codes to remove the condition in the reliability analysis.
-
Click the Add Another Row button to add a removal code.
-
Select a value and click the Select button to refresh the Reliability Setup page with the new record.
-
Save your work.
To view and define base and override counter associations
-
Navigate to the Counter Associations page to display base and override counters.
-
Click the Add Another Row button to add records. Select a value in the Base Counter field.
Counters track usage, for example, each time an engine is started counts as one cycle. Base counters represent the total hours or cycles on a part, usually represented by Time Since New (TSN) or Cycles Since New (CSN).

-
Click the Search icon next to the Override Counter field, and select a value from the Search and Select page.
Override counters are used to factor in a more accurate time component in the reliability analysis. For example, when a part is overhauled, time is more accurately represented by the Time Since Overhaul (TSO), but for accountability purposes, the TSN counter is tracked.
-
Enter a counter description for the override counter, for example, hours, cycles or formula.
-
Save your work.
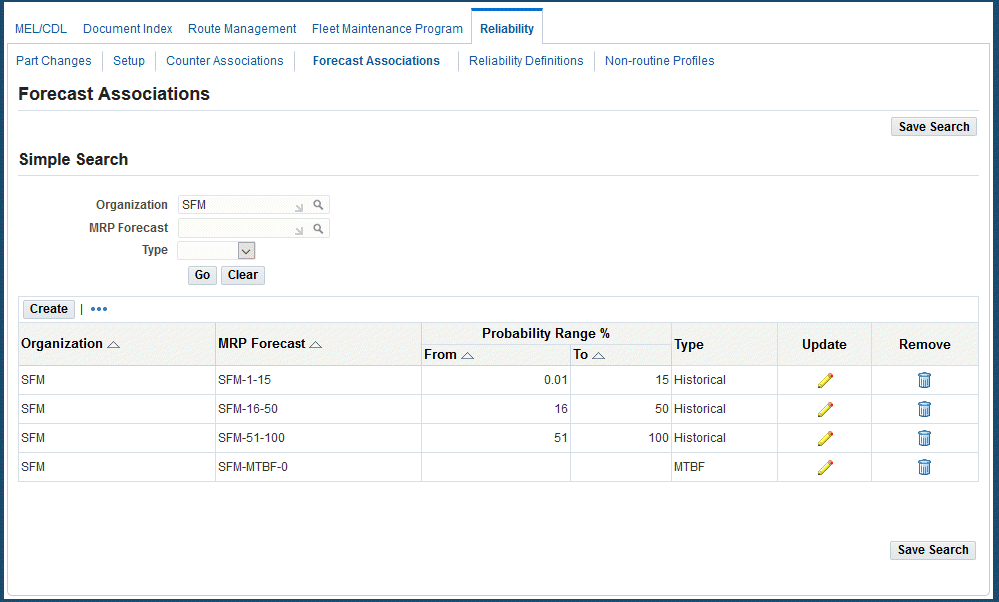
To view planning forecasts associated with probability rates
-
Navigate to the Forecast Associations page.
-
You can search for forecasts associated with predicted failure rates by entering information in these fields:
-
Organization
-
MRP Forecast
-
Type:
-
Historical: Uses historical data for calculation
-
MTBF (Mean Time Between Failure): Uses a manual figure for calculation
-
-
-
Click the Go button to display the results of your search.
To associate forecasts with reliability data
-
Navigate to the Forecast Associations page, click the Create button, and the Create Forecast Associations page appears.
-
Select values in the Organization and Forecast Designator fields.
The forecast designator is the planning forecast name.
-
Select a reliability planning type to be used for the calculation. Options are:
-
Historical: Calculation of anticipated component failure using historical information.
-
MTBF (Mean Time Between Failure): A manual calculation of predicted component failure.
-
-
Enter a percentage value in the Probability Failure Rate From and To fields.
These fields are used to determine which forecast is used to populate a material requirement. Reliability planning calculates the average life of an item, and predicts the probability of failure as the larger unit arrives at each service station. The requirements are added to the applicable forecast, identified by these two fields.
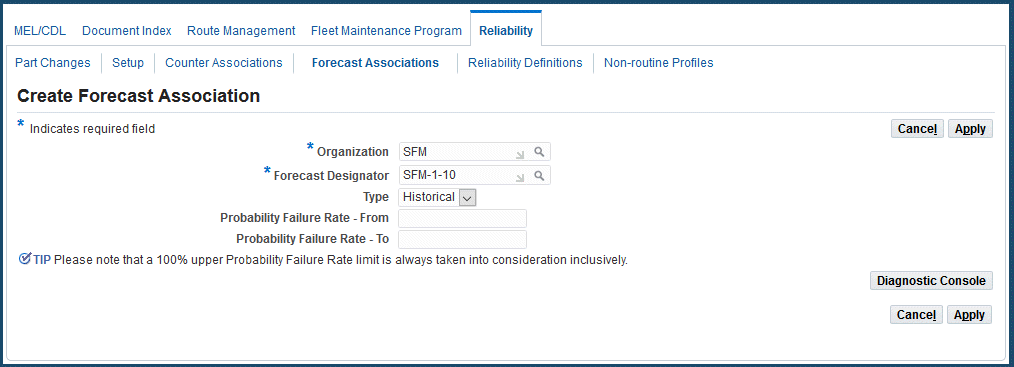
-
Click the Apply button to save your work.
Some failure rates are manually defined when an item is new and has no historical data attached it. Once there is historical data, you can delete this information. For the MTBF flow, you define known average failure rates for items in a specific position within a configuration.
To view or define manual reliability definitions
-
Navigate to the Reliability Definitions page.
-
Enter values in the following fields to retrieve master configuration details:
-
Master Configuration
-
Position
-
Revision
-
Item Number
The results of your search appear in the Master Configuration Details region.
-
-
Select the Remove check box to delete the records that have accumulated historical data and that longer require manual definition.
-
Click the Create button to create new definitions.
he Create Reliability Definition page appears.

-
Select a value in the Master Configuration field.
-
Click the Go button next to the Position field. See: Select Position Page
-
Select a position and click the Associate button to add this record to the reliability definition.
The Edit Reliability Definition page appears.
-
In the MTBF Details region, choose Add Another Row to enter counter and MTBF definitions.
-
Click the Search icon next to the Counters field, and select a counter value.
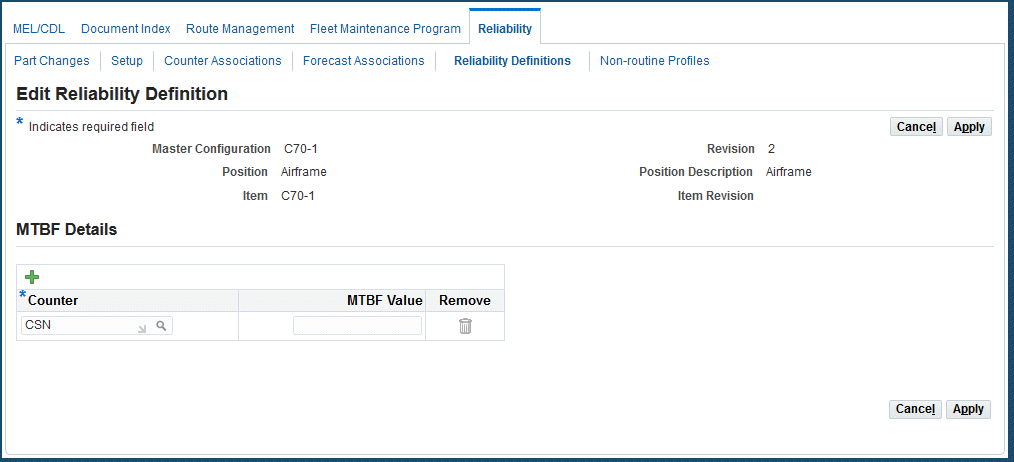
-
Enter a value in the MTBF field.
This is the average failure rate for the item in this specific position, within a configuration.
-
Click the Apply button to save your work.
The last step in the Reliability Planning analysis is running the Reliability Analyzer Process. The reliability process identifies the probability of component failures. This information is used for material requirements in applicable planning forecasts.
To run the Reliability Analyzer Process for a defined period
-
Navigate to the Submit Requests window.
-
Select the Reliability Analyzer Process value in the program Name field.
-
Select a date range in the Parameters field.
-
Select the other information needed run this process.
See: Submitting a Request, Oracle E-Business Suite User's Guide
-
Click the Submit button to generate this concurrent request.
Viewing Historic Part Changes
Part change transactions can be viewed and used in planning calculations. A summary of the part change transactions appears on the Part Changes page. This information can be exported to other reporting programs.
To view historic part changes
-
Navigate to the Part Changes page.
-
Enter values in these search fields:
-
Serial Number
-
Unit Configuration
-
Item
-
Lot Number
-
Visit Number
-
Organization Code
-
Transaction Type
-
-
Click the Go button to display the results of your search.
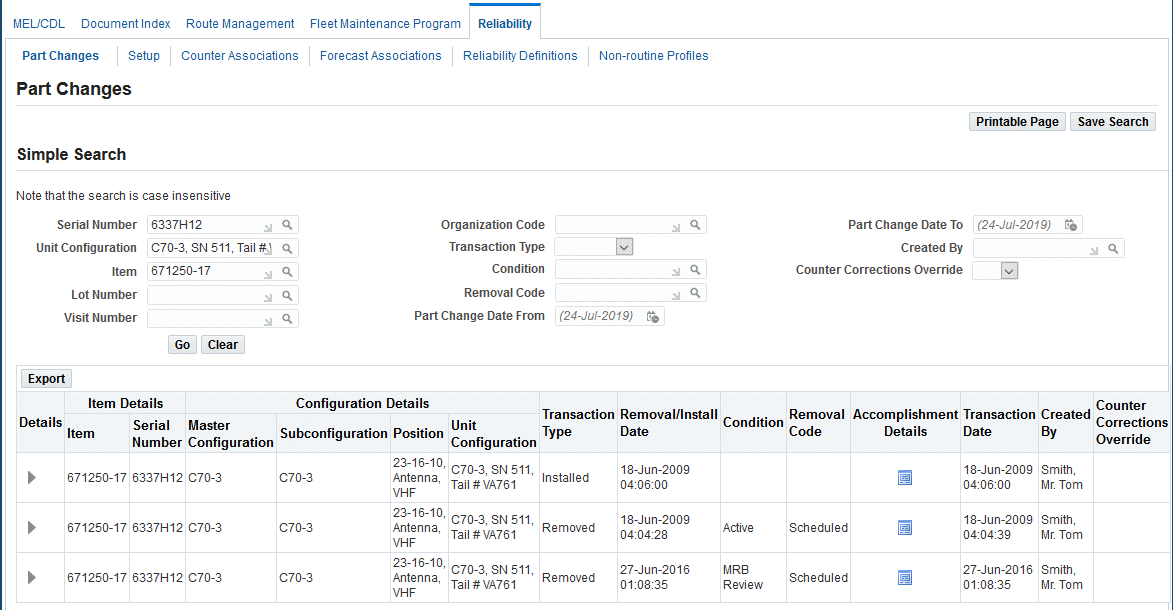
The Part Changes page appears where you can view the information such as the serial number, lot number, master configuration, sub-configuration, position, unit configuration, transaction type, date, visit number and name, work order, organization, condition, and removal code.
-
Click the Export button to export the results to another document program.
Supply Chain Planning
When forecasted, routine, or non-routine maintenance requirements are scheduled to an organization through a visit, the associated material requirements are automatically picked up through the Oracle Advanced Supply Chain Planning (ASCP) collection process. The required materials are pegged against the applicable visit and task. Material requirements associated with the scheduled visits then appear in the Scheduled Materials page as scheduled. Scheduled materials are then removed from the global demand defined for planned MRs to ensure that the requirements are not counted twice by the planning engine.
The scheduled dates and quantities appear on the Scheduled Materials page. The collection process also returns exception dates, that is, the dates on which the material is required but will not be available. If the scheduled date or the scheduled quantity for a particular material requirement is unsatisfactory, the maintenance planner can select alternate items, and schedule the items using the same process.
The planner then creates an ASCP Plan to process the net existing supplies and generate planned orders. Material demand is reflected as a sales order in ASCP. The sales order number is displayed as a concatenated visit number, task number and Complex MRO, (such as 100.2.Complex MRO). When the sales order is released, the scheduled date and scheduled quantity are automatically updated.
Supply Chain Planning involves the following processes:
Create a supply chain plan
-
Navigate to the Supply Chain Plans window in Oracle Advanced Supply Chain Planning.
-
Create a supply chain plan and set it to ATP enabled. See: Creating a Supply Chain Plan, Oracle Advanced Supply Chain Planning Implementation and User's Guide
Run data collections
-
Navigate to the Planning Data Collection concurrent program in Oracle Advanced Supply Chain Planning.
-
In the Parameters field for the Planning Data process, the following two parameters must be set up to collect data from Oracle CMRO:
-
Select the applicable CMRO instance from the Instance list of values.
-
Select Yes for Sales Orders.
This ensures that the material requirements from CMRO are collected as sales orders for the correct organization and instance. See: Running Standard Collections, Oracle Advanced Supply Chain Planning Implementation and User's Guide
-
-
Generate the plan.
Checking the Material Schedule
The CMRO Planning module provides the ability to check the material schedule to assess available material resources. When a visit is planned, materials are automatically scheduled. The scheduled materials appear on the Scheduled Materials page. The ASCP collections process can run on a regular basis to collect the requirements and provide exception dates if the material will not be available by the required date. When a conflict exists between a maintenance visit and the associated material schedule, the planner can select alternate items or reschedule the applicable visit, tasks within a visit, or maintenance requirements.
Prerequisites
- Disposition lists must be defined in Route Management and tasks must be associated with the routes.
To check the material schedule
-
Navigate to the Schedule Visit page, and click the Scheduled Materials link.
The Scheduled Materials page appears displaying information about the materials scheduled for the visit. The scheduled date and quantity appears for each scheduled material requirement. The Item Description column enables the planner to identify the correct material requirement when the item number is not sufficient.
Items defined with a 100% replacement percentage in the associated disposition list are automatically planned and scheduled by ASCP. Items defined as material requirements in Route Management are assumed to be 100 % replacement items. Planners must manually specify the quantity to be scheduled for replacement items with a quantity less than 100%. Only scheduled items will be defined as material requirements in the work orders.
-
To manually check for exception dates when collections have not run, select Schedule Conflicts from the Display Only drop-down menu.
-
Click the Go button.
The exception dates appear in the Materials table.
-
Optionally, you can retrieve and plan materials using the following search criteria:
-
Enter a task and an item to search for material requirements for a specific task or item.
-
Enter a value in the Replace % or Rework % fields to search for materials by a disposition percentage.
These percentages indicate the probability of the materials being required when executing the task.
-
-
Click the Go button to display results matching the search criteria.
-
Select an Item value to replace the item that appears in the Materials list.
For a sub-configuration or position, the installed item is automatically selected to be planned. When no item is installed, the planning engine picks up the alternates defined based on priority.
-
Enter a value in the Scheduled Quantity field.
-
Click the Apply button to save your work.
Click the Cancel button to return to the previous page.
Checking Material Availability
The CMRO Planning module provides the ability to check the availability of materials for task starting time and location through Oracle Available to Promise. The ASCP collection runs periodically to automatically schedule materials, when visits are assigned to organizations. Alternatively, maintenance planners can also manually schedule materials using the Material Availability page.
Prerequisites
- The material requirements must be defined in Route Management and tasks must be associated to the routes.
To check material availability
-
Navigate to the Schedule Visit page, and click the Material Availability link.
The Material Availability page appears.
You can also use the filter to search material requirements by the department that is associated to the route or operation's associated task.
-
Select the appropriate material requirement and click the Schedule Materials button to schedule materials, based on the current material supply for the organization.
The applicable requirements are passed through ATP and scheduled into the correct ASCP plan. Optionally, you can click the Schedule Materials for All button to schedule all the materials in the visit.
Note: This feature enables the maintenance planner to manually initiate the scheduling process, and determine any conflicts between the available quantities and the required quantities. This may be required for visits that have been recently scheduled or rescheduled, or when additional maintenance requirements have been associated with a visit.
-
To check availability for all the materials, click Check Availability For All.
Optionally, to check material availability for one material requirement at a time, select an item, and click the Availability button. A warning message appears if the material will not be available by the required date.
-
Select Cancel to return to the previous page.
Serial Number Reservation
Oracle CMRO integrated with the Oracle Inventory serial number reservation functionality, enabling you to select a serialized item and reserve it for a specific task in a visit. Only serial controlled items can be reserved. You can select items to reserve using associated conditions and counter values. This is used to reduce aircraft down times and increase the life expectancy of subcomponents by providing a method to track the usage of installed parts.
This integration provides a global view of material requirements across maintenance visits. You can identify material availability at the required location and for a specific date. You can search for requirements by exception dates to identify material shortages. This integration also enables you to identify when materials are not available at the required location and date.
After you have reserved serialized items, the last step in the process is to issue the items to the production work orders.
Prerequisites
- The serial number reservation functionality is set up in Oracle Inventory.
To search for material requirement information
-
Navigate to the Material Requirements page.
-
You can search for records using the following fields:
-
Organization
-
Visit Number
-
Required Item
-
Required From and To Dates
-
Maximum Rework %
-
Maximum Replace %
-
Visit Status
-
Visit Type
-
Task Number
-
Work Order Number
-
-
You can also specify if you want filter your search for reservations and exception dates by selecting the following check boxes:
-
View only requirements with reservations
-
View only requirements with exception dates
-
-
Click the Go button to display the results of your search in the Select Material Requirement region.
The Material Requirement region provides a global view of all requirements. The Exception Date field enables you to easily identify material requirement shortages.
To view reserved items
-
Navigate to the Material Requirements page and select a record.
-
Click the View Reserved Items button to display the Reserved Items page.
The list of reserved items is displayed for each visit number. The visit number quantities are shown for required, scheduled, reserved, and completed items. Reserved items are displayed in table rows by item, serial number, organization, and subinventory.
To reserve items
-
Select Reserve Items - either in the Material Requirements or Reserve Items page - to display the Reserve Items page.
-
In the Search region, you can query items to reserve by counter values and condition. Results of your query display in the details table rows.
-
Select the items that you want to reserve, and click the Apply button to save your work.
To issue reserved serialized items to applicable work orders
-
Navigate to the Material Issue page, and search for the work order to issue serialized items.
-
In the Select Material region select your work order record, and the details for the issue transaction including Issue Quantity, Recipient, Serial Number, and Disposition.
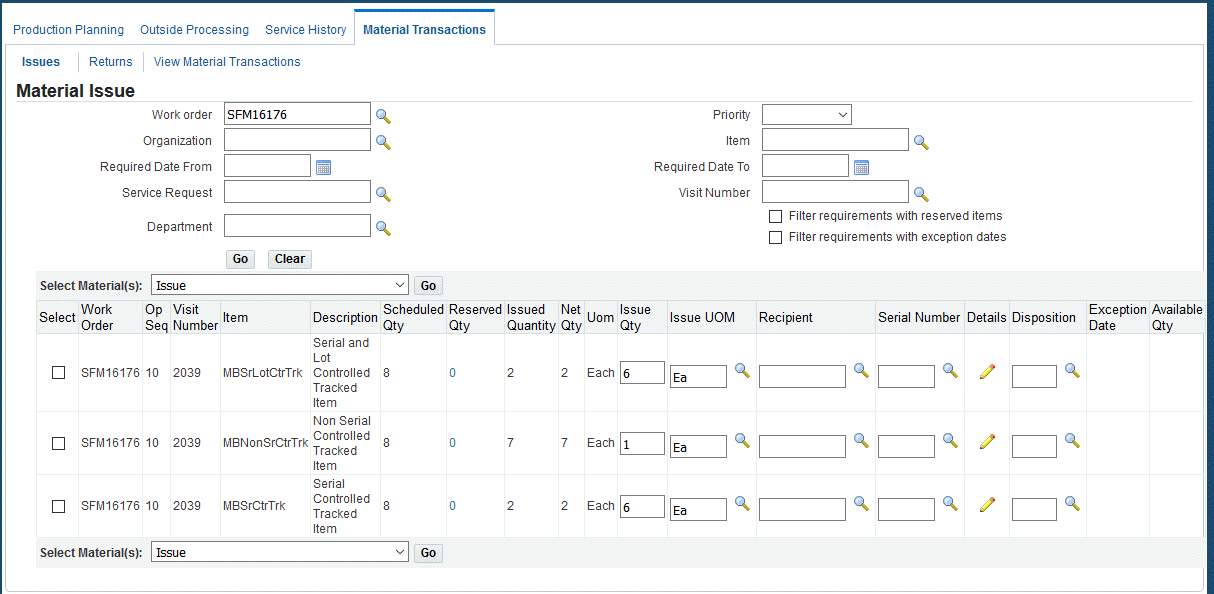
-
Select Issue and then click the Go button.
Related Topics
Item Reservations, Oracle Inventory User's Guide
Setting Up Serial Number Control, Oracle Inventory User's Guide
Generating Serial Numbers, Oracle Inventory User's Guide
Assigning Serial Numbers, Oracle Inventory User's Guide
Managing Simulation Plans
An important function of CMRO Planning is to balance the resources of workload requirements versus maintenance base resource capacity. This is important for scheduling purposes, to assure that the available resources are used as efficiently as possible. Simulation plans enable you to compare various plans before implementing them to enable selection of the most efficient maintenance plan.
Related Topics
Creating a New Simulation Plan
Adding Visits to a Simulation Plan
Setting a Simulation Plan as Primary
Creating a New Simulation Plan
- There must be a primary plan in the database. At least one visit associated to the primary plan must exist in the database.
To create a new simulation plan
-
Navigate to the Simulations Plan page.
-
Use the information in the following table to define a simulation plan.
Field Description Plan Name All visits are associated with a simulation plan. Primary Plan Indicates whether or not the plan is set as the primary plan. When visits are created in the Visit Work Package, they are automatically included in the primary plan. Copies of these visits can then be added to other simulation plans. See: Setting a Simulation Plan as Primary Number of Visits in Plan Visits included in the specified plan. -
Click the Add More Rows button to enter information in the provided fields.
-
Click the Delete button to delete a simulation plan.
If the simulation plan is not the primary plan, it is deleted.
-
Click the Apply button to save your work.
Adding Visits to a Simulation Plan
- A primary plan, a non-primary plan with a visit, and at least one visit associated to the primary plan must exist in the database.
To add a visit to a simulation plan
-
Navigate to the Simulations Plan page.
-
Select the simulation plan that you want to add a visit. Click the View Plan to display the View Simulation Plan page.
-
Click the Add More Rows button to add several rows to the table.
-
Select values in the Visit Number and Item fields.
The item refers to a model name - such as Boeing 747-200B - to which visit is associated. All visits must be associated to an item.
-
Select the type of maintenance visit is required. This enables maintenance to be classified into categories.
-
Select the serial number for the specific item.
-
Select the organization and department.
-
Select the Start Date for effectivity of this operation.
-
Click the Go button to save your work.
-
To delete a record, select the record and choose the Delete icon.
To view simulation plans
-
Navigate to the Simulations Plan page.
All simulation plans appear, showing the number of visits in the plan, and if the plan is set to primary. Plan names may be changed, but must remain unique.
-
Select the plan and click the View Plan button. The View Simulation Plan page appears, displaying the visit list.
Setting a Simulation Plan as a Primary Plan
To calculate maintenance requirement due dates
-
Navigate to the Simulations Plan page.
-
Select the simulation plan you want to set as the primary plan.
-
Select Set Plan as Primary.
Copying a Visit to a New Simulation Plan
- A primary plan with at least one visit and a simulated plan must exist in the database. Visits may only be added to non-primary plans.
To copy a visit to a new simulation plan
-
Navigate to the Simulations Plan page.
-
Select a simulation plan and the View Simulation Plan page appears.
-
Click the button next to the visit that you want to copy, and click the Copy to a New Plan button. The Copy to a New Plan page appears.
When a primary visit is copied to a simulation plan, the new visit inherits all the unit effectivity information association with the parent visit. You can view the applicable visit's due by date, derived from the associated unit effectivity.
-
Click the Apply button to save your work.
Running Resource Leveling Plans
CMRO Planning enables you to assess resources associated with the maintenance requirements of scheduled visits against the capacity of maintenance locations. Ideally, a certain percentage of maintenance capacity remains available for non routine maintenance needs. Resource leveling identifies shortages in your plan so that you can reschedule a visit or adjust it in the Visit Work Package to better manage the available resources. Running resource leveling on different simulation plans enables you to identify the best plan regarding resource capacity.
Resource leveling takes task level department assignments into consideration. Resource leveling enables you to filter and display only those required resources that exceed a defined level of capacity.
Note: Resource leveling requires that the full set of procedures must now be run at the beginning of the process, as opposed to the previous function that drilled into each resource requirement before making these calculations. Enter a value in the Required Capacity field to set the reserve level.
The resource leveling process enables you to identify where a potential problem exists regarding conflicts or shortages in available resources. When planning visits, a scheduler must be able to leave a certain percentage of resources available in anticipation of non-routine maintenance. If the planned requirements consume too much of these resources, the over plan must be changed by rescheduling entire visits, tasks within a visit or maintenance requirements associated with a visit. Setting a reserve with the Required Capacity field resolves this requirement. A resource's unused capacity is defined by summing the required units, subtracting these from the total number of applicable persons or machines defined for the appropriate department, and dividing that by the number of available units. Available units are the total number of persons or machines minus those that are not available due to existing work order assignments.
The results in resource leveling can be filtered to display only those required resources that exceed a defined level of capacity.
Note: Resource leveling can only be done for one organization and simulation plan at a time.
To run resource leveling
-
Navigate to the Resource Leveling page.
-
Enter values in the fields to search for resources:
-
Organization
-
Department
-
Start and End Dates
-
Simulation Plan
-
Required Capacity %
This field sets the percentage of capacity that you want to hold in reserve. All resources required for each period for all visits in the selected simulation plan are balanced against the total available resources.
-
-
Click the Go button to view the results of your search.
-
Select your record and click the View Resources button, and the Resource Availability page appears.
-
Select View Details and the Resource Consumption Details page appears. Select the Visit or Task column to edit the respective visit or task in the Visit Work Package.