Managing Field Service Task Schedules
This chapter covers the following topics:
- Introducing the Dispatch Center
- Populating the Dispatch Center Tasks List Table
- Working with Tasks
- Working with Resources
- Working with the Map View
- Committing Schedules
- Rescheduling Tasks
- Using Analytics
Introducing the Dispatch Center
Using the Dispatch Center for scheduling tasks involves:
-
Populating the Dispatch Center with information for the appropriate subset of technicians. See How the Dispatch Center Populates With Information.
-
Selecting tasks to be scheduled.
-
Completing one of the following task scheduling methods:
Opening a Different View of the Dispatch Center
To switch between Dispatch Center views, click the appropriate Tasks, Plan Board, Gantt, or Map icons located near the top right of the window.
Using the Dispatch Center Navigate Menu
You can access many other features and functions from the Dispatch Center tool bar Navigate menu:
-
Schedule Management
-
Access Hours
-
Task Dependencies
-
Parent/Child
-
Skills Assignment
-
Parts Requirement
-
Source Document
-
Customer Confirmation
-
Select Territories and Task Owners
-
Resource Addresses and Subinventories
-
Resource Skills Management
-
Service History
-
Spares Management
Populating the Dispatch Center Tasks List Table
Populating the Dispatch Center Task List Table in OJET: This UI lets you open the Search window by clicking the Search icon. From here, you can define your search criteria and decide how your query results appear.
Search in OJET
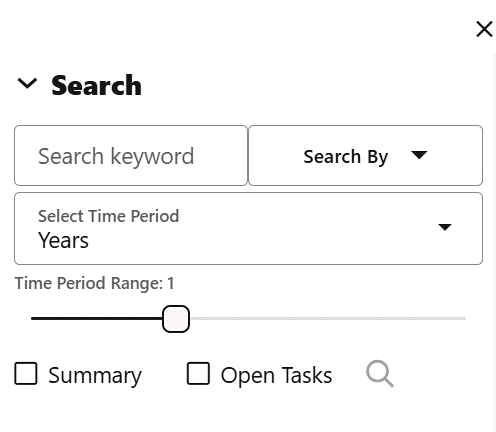
You can:
-
Enter a keyword.
-
Use the Search By filter to narrow your search to customer name, service request number, or task number, or search all.
-
Use the Select Time Period filter to choose days, months, or years.
-
Slide the Time Period Range to define your search range.
-
Select checkboxes to control the information that appears, after you click the Search icon.
-
Summary checkbox: Shows a count of the tasks based on your search criteria within the Search window.
-
Open Tasks checkbox: Shows the open tasks in the Field Service Dispatcher window.
-
Click the Search icon to start your search. Results appear in the Dispatch Center task table.
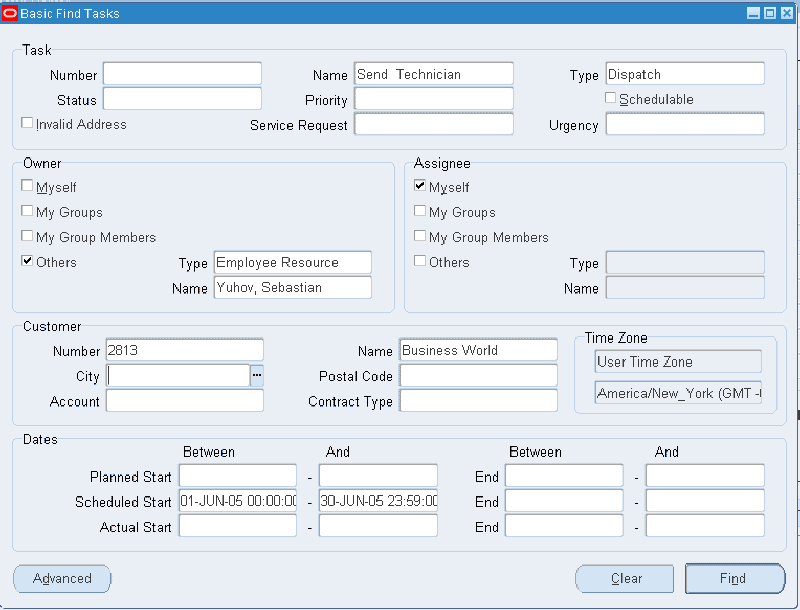
Populating the Dispatch Center Task List Table in Forms: This UI provides two methods to search for tasks: Basic search and Advanced search. Basic search criteria includes task details, customer details, task owner, dates, and whether the task can be scheduled.
Basic Search in Forms
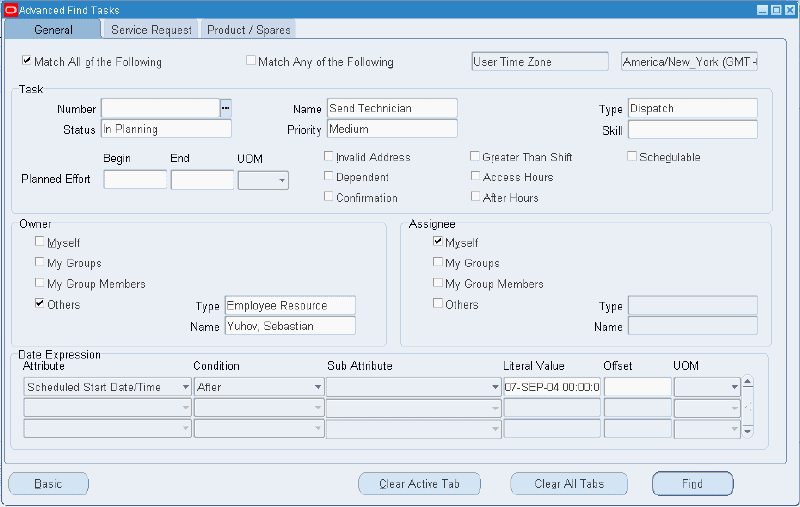
The Advanced search feature enables searching by constraints, such as Access Hours, whether there is a dependency relationship, whether the task is longer than a shift, or whether the task requires customer confirmation. Further, you can search by date range, specific date, after (greater than) a specific date, and prior to (less than) a specific date.
Advanced Search in Forms
| Query Name | Description |
|---|---|
| All Open | All tasks that are available for planning and can be scheduled. |
| Assigned | All tasks that are already assigned to a resource. These tasks have an assigned schedule start date and the 'Assigned' attribute is set to 'Yes.' |
| Auto Rejected | All tasks that are rejected by the Autonomous Advanced Scheduler (status: Auto Rejected). |
| Auto Scheduling | All tasks that can be scheduled by the Autonomous Advanced Scheduler. |
| Closed | All Closed tasks. These Tasks have Closed status set to Yes |
| Commit Candidates | All tasks that are scheduled and have a planned status and that have to be executed in the next four hours from now. |
| Escalated | All tasks that are marked as Escalated and are not Closed. |
| Inbox | All tasks created today (current date) that have task type and status that allow scheduling, and the schedule start date is NULL. |
| Invalid Address | All tasks with an address marked as Invalid. These tasks have the VALIDATED_FLAG set to 'No.' |
| My Inbox | All tasks owned by this dispatcher. These tasks are owned by the current application USER ID and Resource Type 'Employee'. |
| Non Schedulable | All tasks that cannot be scheduled. |
Monitoring and Managing Tasks Belonging to Other Dispatchers (Task Owners)
Dispatchers sometimes oversee tasks owned by other dispatchers (schedule technicians, manage exceptions, and so on) to assume the responsibilities of dispatchers who are on leave. The Dispatch Center window enables dispatchers to select the task owners dynamically, and then view and manage tasks owned by other dispatchers. Dispatchers can interactively select multiple task owners.
For more information, see Setting Up Query Selection for Task Owner Enforcement, Oracle Field Service Implementation Guide.
Steps
Use this procedure to populate the Tasks List Table in the Dispatch Center.
Using a Predefined Query to Populate the Tasks List Table
-
Navigate to the Field Service Dispatch Center window.
The Dispatch Center window appears to the Tasks view.
-
To use a predefined query to search for tasks, make a selection from the 'View By' list of values located near the top of the Tasks region. Seeded queries are described in the previous table.
The Task List Table populates with tasks matching the predefined query.
Using Basic Search to Define a Query
-
To use basic search functionality to find tasks that do not conform to one of the predefined queries, click the flashlight icon on the tool bar.
The Advanced Find Tasks window appears.
-
Click Basic at the bottom of the window to open the Basic Find Tasks window.
The Basic Find Tasks window appears.
In the Basic Find Tasks window, you can create queries based on combinations of the following search criteria:
-
Task or service request number
-
Task or service request name
-
Tasks that you own
-
Tasks that are assigned to you
-
Tasks for a specific customer
-
Tasks that need to be scheduled
-
Tasks that have been scheduled
-
Tasks that have been started for a selected date or date range
-
-
Enter search criteria in the available fields, and then click Find.
The tasks list table of the Dispatch Center populates with tasks matching the basic query definition you specified.
Using Advanced Search to Define a Query
-
To use advanced search functionality to find tasks that do not conform to one of the predefined queries:
-
From the Field Service Dispatch Center window, click the flashlight icon on the tool bar, or
-
From the Basic Find Tasks window, click Advanced.
The Advanced Find Tasks window appears.
-
-
On the General tab of the Advanced Find Tasks window, select a checkbox to indicate whether you want the search to return tasks that match any of the specified criteria, or retrieve only those tasks that match all of the specified criteria.
-
Next, on the General tab specify any combination of search criteria. For example, you can enter task search criteria followed by constraints, such as access hours, the existence of task dependencies, effort of task, and need for customer confirmation. You can also add owner and assignee criteria to search for scheduled tasks. You can also search by one or more of the date attributes given below.
-
Attribute (such as Actual End Date)
-
Condition (such as Before or Equal to)
-
Sub Attribute (such as Scheduled End Date)
-
Literal Value (calendar date)
-
Offset (number)
-
UOM (such as days, or weeks)
-
-
Select the Service Request tab and select any combination of service request information.
-
Service Request region
-
Number
-
Urgency
-
Type
-
Project Number
-
Project Task Number
-
Preferred Resource - Installed Base or Contract
-
-
Customer region
-
Type
-
Name
-
Number
-
Site Name
-
Site Number
-
Postal Code
-
City
-
Account
-
Contract Type
-
-
-
Select the Product/Spares tab and select a combination of product and spares information.
-
Product region
-
Item
-
Item Description
-
Item Instance
-
Serial Number
-
Lot
-
Revision
-
-
Spares region
-
Required Item
-
Required Item Description
-
Internal Order Status
-
-
-
Click Find.
The tasks list table of the Dispatch Center populates with tasks matching the advanced query definition you specified.
Saving and Editing Query Definitions
-
To add this query definition to the View By list of values for the tasks list table, select Save Query As from the Tools menu on the tool bar.
The Save Query As window appears.
-
Enter a Name and Description for the query. Select the Public checkbox if you want this query to be accessible to all. Click OK.
The query is added to the list of values that appears when View By is selected from the Tasks region.
-
To edit a query, select Edit Query from the Tools menu on the tool bar.
The Edit Query window appears.
You cannot modify the query information, but you can enter an End Date for an obsolete query. When the Active End date is reached, the query disappears from the list of view by query values at the top of the Dispatch Center window. Repeat steps 3 through 11 or define a new query, and then add it to the View By list of values.
-
You can use the tasks list table sort functionality from the right click menu to organize the list of retrieved tasks into ascending or descending order for up to three ranks of criteria. For ease of sorting, each of the three sort criteria display the entire list of task attributes that are available in the tasks list table.
For example, set the primary sort to be by planned effort in descending order. The longest task appears first in the list. Then set the secondary sort to be by planned start date in ascending order. Tasks of equal effort are additional sorted with the task having the earliest planned start date appearing first. Finally set the tertiary sort to be by actual end date in descending order. Tasks having the same effort and planned start date are additional sorted so that the task with the latest completion date appears first.
From the right click menu of the tasks list table, click Sort.
The Sort window appears.
-
In the Sort By section, select the primary sort criterion from the list of values, and then click the radio button to indicate whether to sort in ascending or descending order.
-
(Optional) Specify the secondary and tertiary sort criteria and sort order.
-
Click Sort.
The Task List Table sorts according to the specification.
-
To view the source document associated with a task, right-click the task in the tasks list table.
The right-click menu appears.
-
Select 'Source Document' from the right-click menu.
Note: It is not necessary to also select the task by checking the checkbox.
The source document, for example, the Service Request window appears. See Viewing Service Request Details.
-
To display the window listing the required parts for a task, select Parts Requirement from the right-click menu.
The Parts Requirement window appears. It is possible to add parts requirements at this time. See Viewing and Creating Parts Requirements
-
To assign the task, select Schedule from the right-click menu.
The Schedule Task window appears. Open the Advice tab. See Scheduling Tasks
When the task cannot be scheduled, this option is not available.
Working with Tasks
The following sections describe the tabs associated with tasks in OJET and Forms.
Tabs in OJET
Dispatch Center displays the Task Table view consistently in the upper half of the UI and is visible in Plan Board, Gantt (scheduling) Chart, and Map Views. The application queries the tasks based on the task query that you select in the View By drop-down list and populates the table view. After the Dispatch Center populates the table with tasks, you can review, sort based on any displayed task attribute, or schedule them.
You can view the task details in the lower half of the Dispatch Center screen in the Task Details View. The tabbed area provides detailed information. The following describes the information available on each tab. Most of the information displayed in these tabs is view only and cannot be updated.
Task Overview Tab
The Task Overview tab shows the task description, customer information, task urgency, date details, and contract details.
| Field | Description |
|---|---|
| Number | The number for the selected task. You can click the number to open the Service Request window. |
| Priority | The priority of the selected task. |
| Subject | The subject for the selected task. |
| Description | The description for the selected task. |
| Type | The type for the selected task. For tasks that can be scheduled, the task type definition must be Dispatch. This setting is defined during implementation. |
| Owner | The owner of the selected task. |
| Task Confirmation Status | Indicates if a task confirmation is required. |
| Status | The status of the selected task. |
| Access checkbox | Indicates if the selected task has assigned hours. |
| After Hours checkbox | Indicates if the selected task can be worked on after hours. |
| Attachments checkbox | Indicates if the selected task has attachments. |
| Child checkbox | Indicates if the selected task is a child task. |
| Dependency checkbox | Indicates if the selected task has a task dependency. |
| Parent checkbox | Indicates if the selected task is a parent task. |
| Parts checkbox | Indicates if the selected task has associated parts. When Advanced Scheduler is installed this is done at task assignment. |
| Skills checkbox | Indicates if the selected task requires specific skills. |
| Task Notes checkbox | Indicates if the selected task has notes. |
| Escalated checkbox | Indicates if the selected task is escalated. |
| All Notes button | Displays all notes for the selected task in the Notes page. |
| Planned Start Date | The planned start date for the selected task. |
| Planned End Date | The planned end date for the selected task. |
| Effort | The planned time for the selected task. |
| Scheduled Start Date | The scheduled start date for the selected task. |
| Scheduled End Date | The scheduled end date for the selected task. |
| Actual Start Date | The actual start date for the selected task. |
| Actual End Date | The actual end date for the selected task. |
| Effort | The actual time used to complete the selected task. |
| Incident Timestamps | |
| Timezone | The timezone for the customer of the task. |
| Planned Start Date | The timestamp for planned start date of the selected task. |
| Planned End Date | The timestamp for planned end date of the selected task. |
| Scheduled Start Date | The timestamp for scheduled start date of the selected task. |
| Scheduled End Date | The timestamp for scheduled end date of the selected task. |
| Actual Start Date | The timestamp for actual start date of the selected task. |
| Actual End Date | The timestamp for actual end date of the selected task. |
| Contract Information | |
| Contract Information | Indicates the contract information, such as a contract number. |
| Status | The status of the contract associated with the task. |
| Start Date | The start date of the contract associated with the task. |
| Service | The service of the contract associated with the task. |
| Coverage | The coverage of the contract associated with the task. |
| End Date | The end date of the contract associated with the task. |
| Description | The description of the contract associated with the task. |
| Warranty | Indicates if the selected task is covered by warranty. |
Assignments Tab
The Assignments tab shows task-related assignments.
| Field | Description |
|---|---|
| Resource Type | The resource type of the assignment for the selected task. |
| Resource Name | The resource name of the assignment for the selected task. |
| Status | The status of the assignment for the selected task. |
| Scheduled Distance | The resource type of the assignment for the selected task. |
| Scheduled Duration | The scheduled distance of the assignment for the selected task. |
| Scheduled Duration UOM | The scheduled duration unit of measure of the assignment for the selected task. |
| Actual Duration | The actual duration of the assignment for the selected task. |
| Actual Duration UOM | The actual duration unit of measure of the assignment for the selected task. |
| Actual Distance | The actual distance of the assignment for the selected task. |
Incident Address Tab
The Incident Address tab shows key details of the task address.
| Field | Description |
|---|---|
| Site Name | The site name of the incident for the selected task. |
| Addressee | The addressee of the incident for the selected task. |
| Address Line 1 | The address of the incident for the selected task. |
| The address of the incident for the selected task. | |
| Address Line 3 | The address of the incident for the selected task. |
| Address Line 4 | The address of the incident for the selected task. |
| Province | The province of the incident for the selected task. |
| Country | The country of the incident for the selected task. |
| Site Number | The site number of the incident for the selected task. |
| City | The city of the incident for the selected task. |
| Zip Code | The zip code of the incident for the selected task. |
| Address Status | The address status of the incident for the selected task. |
| Site Phone | The site phone number of the incident for the selected task. |
| State | The state of the incident for the selected task. |
| County | The county of the incident for the selected task. |
| Latitude | The latitude of the incident for the selected task. If the latitude information is updated manually the address status will be updated as Good and the address is considered to have manual geometry. |
| Longitude | The longitude of the incident for the selected task. If the longitude information is updated manually the address status will be updated as Good and the address is considered to have manual geometry. |
| Show Address On Map icon | Opens the map page. |
Task Skills Tab
The Task Skills tab shows the skills required to complete the task.
| Field | Descriptions |
|---|---|
| Add icon | Used to add a task skill. |
| Edit icon | Used to edit a task skill. |
| Disable checkbox | Indicates that the skill has been disabled from the task skills for the selected task. |
| Skill Type | The skill type of the task skill for the selected task. |
| Skill Name | The skill name of the task skill for the selected task. |
| Skill Level | The skill level of the task skill for the selected task. |
Parent Child Tab
The Parent Child tab shows the parent node and all child tasks that form the child nodes.
| Field | Description |
|---|---|
| Task Number | The task number of the parent child task. |
| Task Status | The task status of the parent child task. |
| Assignment Status | The assignment status of the parent child task. |
| Planned Start Date | The planned start date of the parent child task. |
| Planned End Date | The planned end date of the parent child task. |
| Scheduled Start Date | The scheduled start date of the parent child task. |
| Scheduled End Date | The scheduled end date of the parent child task. |
| Effort | The planned duration of the parent child task. |
| Assignee | The assignee of the parent child task. |
| Cancel Parent button | Cancels parent task. |
| Unschedule Parent Task button | Unschedules the parent task. |
| Reschedule Parent Task button | Reschedules the parent tasks. |
| Cancel Selected Task button | Cancels the selected task. |
| Cancel Starting at Selected Task button | Cancels the starting time of the selected task. |
| Reschedule Selected Task button | Reschedules the selected task. |
| Reschedule Starting Selected Task button | Reschedules the starting selected task. |
Access Hours Tab
The Access Hours tab shows the access hours to complete the task.
| Field | Description |
|---|---|
| Slot 1 | Indicates the time slots for the access hours for each day of the week. |
| Slot 2 | Indicates the time slots for the access hours for each day of the week. |
| Access Hours checkbox | Indicates access hours for the selected task. |
| After Hours checkbox | Indicates after hours for the selected task. |
| General Instructions | The general instructions listed for the selected task. |
Dependent Task Tab
The Dependent Task tabs shows the task dependency information.
| Field | Description |
|---|---|
| Add icon | Used to add dependent tasks. |
| Edit icon | Used to edit a dependent task. |
| Delete icon | Used to delete a dependent task. |
| Dependency Code | The dependency code for the dependent task. |
| Related Task | The task number of the related task. |
| Type | The type of the dependent task. |
| Status | The status of the dependent task. |
| Name | The name of the dependent task. |
| Scheduled Start Date | The scheduled start date of the dependent task. |
| Scheduled End Date | The scheduled end date of the dependent task. |
| Actual Start Date | The actual start date of the dependent task. |
| Actual End Date | The actual end date of the dependent task. |
| Planned Start Date | The planned start date of the dependent task. |
| Planned End Date | The planned end date of the dependent task. |
Service Request Overview Tab
The Service Request Overview tab shows information about the service request associated with the task.
| Field | Description |
|---|---|
| Number | The service request number associated with the selected task. |
| Respond By | The respond by date of the service request associated with the selected task. |
| Problem Code | The problem code of the service request associated with the selected task. |
| Summary | The summary of the service request associated with the selected task. |
| Resolution Summary | The resolution summery of the service request associated with the selected task. |
| Severity | The severity of the service request associated with the selected task. |
| Resolve By | The date the service request associated with the selected task should be resolved by. |
| Resolution Code | The resolution code for the service request associated with the selected task. |
| Status | The status of the service request associated with the selected task. |
| Created On | The creation date for the service request associated with the selected task. |
| Creation Channel | The channel where the service request associated with the selected task was created. |
| View Other Tasks button | Opens other tasks for the service request associated with the selected task. |
| View Maintenance Plan button | Opens the maintenance plans for service request number associated with the selected task. |
| Service History button | Opens the service history for the service request associated with the task. |
Customer Information Tab
The Customer Information tab provides the contact information for the customer associated with the task.
| Field | Description |
|---|---|
| Account Number | The account number for the customer associated with the task. |
| Address | The address for the customer associated with the task. |
| Customer Number | The number for the customer associated with the task. |
| Email Address | The email address for the customer associated with the task. |
| Primary Contact Name | The name of the primary contact for the customer associated with the task. |
| Extension | The phone extension for the customer contact associated with the task. |
| Phone Number | The phone number for the customer contact associated with the task. |
| Email ID | The email ID for the customer contact associated with the task. |
| Customer ID | The customer ID for the customer associated with the task. |
| Customer Name | The name of the customer associated with the task. |
| Customer Type | The type of the customer associated with the task. |
| Phone Number | The general phone number for the customer associated with the task. |
| Task ID | The task ID assigned to the customer associated with the task. |
| Task Number | The task number assigned to the customer associated with the task. |
Tabs in Forms
Dispatch Center displays the Task Table view consistently in the upper half of the UI and is visible in Plan Board, Gantt (scheduling) Chart, and Map Views. The application queries the tasks based on the task query that you select in the View By drop-down list and populates the table view. After the Dispatch Center populates the table with tasks, you can review, sort based on any displayed task attribute, or schedule them.
You can view the task details in the lower half of the screen in the Task Details View. The tabbed area provides additional detailed information. The following describes the information available on each tab. Most of the information displayed in these tabs is view only and cannot be updated.
Overview Tab
The Overview tab displays the task description, customer information, task urgency, and date details as described in the following table.
| Field | Description |
|---|---|
| Subject | Descriptive name given to the task. |
| Task Number | Task number, generated at task creation. You can perform actions on this task by using the menu options on the right click menu. The right click menu options are the same as those available in the Tasks List table. |
| Task Type | Task type definition. For tasks that can be scheduled, the task type definition must be Dispatch. This setting is defined during implementation. |
| Task Status | Task status. This field indicates the stage of progress for the task. If required, dispatchers can update the task status from AutoReject to In Planning, Canceled to In Planning and In Planning to Canceled. |
| Priority | The degree of urgency assigned to the task. |
| Owner | The person or Dispatcher Group taking ownership for this task. |
| Assignee | Technician assigned to provide service. See also the Assignee field on the Resource tab. |
| Planned Start | The estimated start date given when creating this task from the service request. |
| Planned End | The estimated end date given when creating this task from the service request. Dispatchers can update planned start and end dates even after work has started on a task. |
| Scheduled Start | The time a service technician is scheduled to arrive at the customer site. |
| Scheduled End | Either the Start Date plus the Effort time, or when scheduled with Window to Promise, the End Date of the time window offered to the customer. Dispatchers can update scheduled start and end dates even after work has started on a task. |
| Planned Effort | This estimate made at the time a task is created indicates the planned amount of time needed to complete the task. Dispatchers can update this after the task is assigned to a technician, if required. |
| Actual Start and Actual End | These fields display the actual start and end times of the task work. |
| Actual Effort | This indicates the actual effort of the task. |
| Access Hours | Checkbox indicating the task has access hours assigned. |
| After Hours | Checkbox indicating the task is planned for after business hours. |
| Parent | Checkbox indicating the task is a parent task. |
| Child | Checkbox indicating the task is a child task. |
| Parts | Checkbox indicating spare parts need to be ordered. When Advanced Scheduler is installed this is done at task assignment. |
| Dependency | Checkbox indicating the task is part of a dependency relationship with another task. |
| Task Notes | Checkbox indicating that notes on the task exist. |
| SR Notes | Checkbox indicating that notes on the service request exist. |
| Customer Number | Customer number. |
| Customer Name | Customer name. |
| Account | Customer account number. |
| Incident Time Zone | The customer site time zone. |
| Scheduled Start and Scheduled End | The time range that technicians are planned to be present at the customer site, adjusted for the customer site time zone. |
| Actual Start and Actual End | The time range that technicians actually work at the customer site, adjusted for the customer site time zone. |
| Customer Confirmation | The dynamic button label indicates whether customer confirmation is required, not needed, or received. Click the Customer Confirmation button to open the Customer Confirmation window. |
| All Notes | Click on this button to view all existing notes for this service request in the Notes page. |
| Task Notes | Click on this button to view all existing notes for tasks in the Notes window, if any, and create notes, if required |
In addition, you can use and edit the descriptive flexfield provided to capture additional task information and use the flexfield provided to capture additional customer information. For more information on configuring these flexfields for use, see the Oracle E-Business Suite Flexfields Guide.
If you added attachments to this task when you created it, you can use the FND attachment icon at the top of the page to display the attachments in the Attachment HTML page.
Note: You can edit the task priority, task status, planned effort, and planned and scheduled start and end dates of tasks directly in the Overview tab for tasks irrespective of if they are scheduled, have received customer confirmation, have access hour restrictions, or have actual start and end dates.
When you edit scheduling dates and times, scheduling validations are automatically done such as overlap with existing tasks, tasks falling outside the trip, and one task spanning trips. If you have set the CSF: Display warning messages in Dispatch Center to Yes, you can view all warning messages resulting from these scheduling validations together, in the List of Warning Messages window.
For updates that you make to scheduled tasks to take effect, you must reschedule the task. For more information, see Overview: Rescheduling Tasks in this guide.
Service Request Tab
When the task originates from a service request, details for the service request are displayed in the Service Request tab, as described in the following table.
| Field | Description |
|---|---|
| Number | Service request number. Right-click the Number field to open a popup menu to access the source document (the Service Request window). |
| Type | Type of service request. |
| Unit | The service request belongs to this organization unit. |
| Created On | Date the service request was created. |
| Respond By | Date and time by which technician is obliged to visit customer site per service level agreement (SLA). |
| Resolve By | Date and time by which technician expects to close the service request per service level agreement (SLA). |
| Expenditure Organization | The expenditure organization specified in the service request. This field comes hidden and can be personalized to display. |
| Project Number | The project number specified in the service request. This field comes hidden and can be personalized to display. |
| Project Name | The project name specified in the service request. This field comes hidden and can be personalized to display. |
| Project Task Number | The project task number specified in the service request. This field comes hidden and can be personalized to display. |
| Project Task Name | The project task name specified in the service request. This field comes hidden and can be personalized to display. |
| Summary | Brief summary describing the service request. |
| Problem | A problem description for the service request. |
| Resolution | A resolution description for the service request. |
| Contract | Service contract ID. |
| Service | Name of the service. |
| Description | Description of the service to which the customer is entitled. |
| Status | Contract status if active or expired. |
| Coverage | Description of service coverage and customer entitlement, |
| Warranty | The warranty checkbox is enabled if warranty on the contract exists. If enabled, you can click the Warranty icon to see details of the service contract coverage in the Service Contracts Coverage window. |
| Start Date | Service start date. |
| End Date | Service end date. |
| SR Notes | Checkbox to indicate if notes exist on this service request. |
| Notes | Click this button to view existing notes and create notes on this service request in the Notes window. |
| Service History | Click this button to view the service history for a customer site or a product. For more details, see Viewing Service History. Double-click the service request number in the Results block to access the Service Request window. |
In addition, you can use and edit the descriptive flexfield provided to capture additional information on agents. For more information on configuring these flexfields for use, see the Oracle E-Business Suite Flexfields Guide.
Escalations Tab
This tab displays the escalations associated with the task.
Spares Tab
The Spares tab lists the spare parts necessary to resolve the task. If the task has already been scheduled or orders have been created, the Spares tab also provides status information.
To access the Spares Management application, select Spares Management from the Navigate menu on the tool bar. The Parts Search window appears enabling the search for specific parts. To view more details for the task selected, you can access the Parts Requirement window by clicking the Requirement Number link.
The Spares tab field displays the following fields:
| Field | Description |
|---|---|
| Order Number | Internal order number or reservation number corresponding to Parts Requirement |
| Arrival Date | Arrival date of the parts |
| Warehouse | Source location of the required parts |
| Shipment Method | Shipment method used to ship the part from source to destination |
| Distance | Distance between the source and destination addresses |
| Shipping Cost | Cost to ship the parts from source to destination |
| Status | Order line status for the corresponding order number |
For more information, see the Oracle Spares Management User Guide.
Product Tab
The Product tab displays details about the product stated in the service request as described on the following table. Additional information displays when the product is defined as an Install Base item. The Installed Base checkbox is selected, if Installed Base validation is selected on the service request.
| Field | Description |
|---|---|
| Item | Inventory Item identification number for the product. |
| Description | Product description. |
| Serial number | Serial number, if applicable. |
| Lot | Lot number, if applicable. |
| Revision | Item Revision number, if applicable. |
| Installed base | Indicates product is defined as an Install Base item. |
| Contract Type | The contract type for the product, if applicable. |
| Description | Description of the contract type. |
| View Maintenance Plan | Click this button to view maintenance plans, if any, associated with the product instance. This button is only enabled if the product has an associated maintenance plan. |
In addition, you can use the descriptive flexfield provided to capture additional information on item instance. You can also edit this flexfield if installed base item is present for a customer. For more information on configuring these flexfields for use, see the Oracle E-Business Suite Flexfields Guide.
Resources Tab
When the task is scheduled, the Resources tab Assignee field displays the service technician assigned to the task, and their assignment status for the task. It also displays technician travel information such as, the scheduled travel duration and distance, and the actual travel duration and distance. If spatial data is installed, then scheduled travel time and distance are calculated by Advanced Scheduler. Without spatial data, default information displays.
| Field | Description |
|---|---|
| Assignee | Name of the service technician to whom the task is assigned. |
| Type | Resource type such as, employee. |
| Scheduled Duration and Distance | The time and distance scheduled for travel to a service task site. |
| [Actual Duration and Distance | These fields reflect the actual time spent and distance traveled to a service task site. |
| Assignment Status | Displays the assignment status for the task. Dispatchers can update the task assignment status for a Field Service technician after the task is assigned (committed) to a technician. This field indicates the stage of progress for the task. Technicians can update this field when entering debrief information for the task using the Field Service Technician Dashboard. For more information, see Maintaining the Task Assignment Status for a Technician in this guide. |
Address Tab
The Addresses tab displays addresses for the customer and the site of the product that needs service. The latter is also known as the incident address.
Contacts Tab
The Contacts tab displays the title, first name, last name, telephone number and extension, and e-mail address of the contact person. This can be the contact person of the service request or the contact person of the task, because these can be different. The contact person for the service request appears by default.
Skills Tab
The Skills tab displays the required skills for the task: Skill Type, Skill Name and Skill Level. If a skill has been disabled in the Skill Assignment window for the task, the Disabled checkbox is selected.
Access Hours Tab
This tab displays the customer access hours that are available for a task. This information is useful when, for business reasons, a customer needs to restrict the hours of access to perform a task. These hours are decided during task setup. There are two checkboxes, one for Active Access Hours and one for After Hours. A task can be associated to either of these, but not both. A text box is present where any additional details can be entered. Hour fields are displayed for each day of the week.
Task Dependencies Tab
This tab displays whether a task is part of a dependency relationship.
For example, if a task requires the completion of a different task before it can begin, that relationship is noted. The information displayed includes, dependency type, related task, subject, task type, status, scheduled start, scheduled end, planned effort, assignee, actual start, actual end, and actual effort. The possible dependency options are Starts After, Finishes Before, Finishes Together With, and Starts Together With.
Parent/Child Tab
This tab displays the relationship of a set of tasks. When the effort of the task is longer than a regular work shift, Oracle Advanced Scheduler splits that task, called the Parent task, into multiple Child tasks, to accommodate and execute within the regular work shift of technicians. Parent task information is displayed on the top of the window and Child task information is displayed in a table below.
For example, a parent task effort is 12 hours. The parent task propagates two child tasks, one for an eight hour shift, and another for a four hour task.
Note: In the task list block of the Dispatch Center task view, if a task number appears in italics, it indicates that a task is a parent task.
To navigate to the Parent/Child window, and then either cancel or reschedule all or parts of the child tasks and the original parent task, see Rescheduling Tasks Longer Than a Standard Shift Duration.
Viewing Service Request Details
When the task originates from a service request, the Oracle TeleService Service Request window can be accessed to view details from the Dispatch Center.
For more information on Service Requests, see the Oracle TeleService User's Guide.
Use this procedure to access the Service Request window.
Steps
-
Navigate to the Service Request window from the Field Service Dispatch Center window.
Note: When you navigate to the Service Request window from the Dispatch Center, the Tasks tab appears by default.
The Service Request window displays information associated with the service request for which the task is assigned.
-
The user can make updates to the service request at this time, such as adding notes, and editing dates.
Viewing Service History
Service history is valuable when determining whether to increase or decrease a customer service agreement and to decide whether multiple calls are related. It can also be used to detect whether hardware or software failures are leading to multiple service requests.
Service history of technicians is also useful when assigning tasks to resources during interactive scheduling. For more information on viewing the work history of technicians using the Service History window, see Overview: Schedule Task Window.
You can access the Service History window from
-
the navigator
-
the Dispatch Center's Navigate menu
-
the Service Request tab of the Dispatch Center Task View
-
the Advice tab of the Schedule Task window when scheduling tasks interactively from the Dispatch Center
The list of technician resources displayed in this window depends on how you accessed the window. For example, if you access the window from the Dispatch Center's Navigate menu, the window displays all the resources for the dispatcher. If your access was from the Schedule Task window, the window displays only those resources advised by the Scheduler.
Oracle Field Service provides a search mechanism to view service history by any of the fields in the customer or subject regions such as customer, site, product, problem, resolution, or technician. Furthermore, you can perform text searches based on key words for both summaries and notes.
After you perform a search, the results display in the Results table. In this table, you can view request number, creation date, item, item description, customer name and number, item instance, problem and resolution codes, summary, request type, status, severity, urgency, contact name, and employee.
You can click the service request number for any of the service requests you want to view. The Service Request window appears.
Profile option CSF: Default Service History Display
From the Dispatch Center, you can query service history for a particular customer linked to an open task. The profile option CSF: Default Service History Display decides which query is executed.
For example, if you have the profile option set to Customer, all service requests associated with the particular customer appear. Other possible values include: Site, Item, or Instance.
Profile option CSF: Service History Time Frame Number and Profile Option CSF: Service History Time Frame UOM
Two other profile options, CSF: Service History Time Frame Number and CSF: Service History Time Frame UOM (unit of measure), decide the default amount of time for which you want to retrieve the service history.
For example, if you set 30 for the number, and Days for UOM, then your default service history search covers the past 30 days. UOM values include: days, weeks, months, and years.
Steps
Use this procedure to query and view service history:
-
Navigate to the Service History window.
-
Enter the search criteria. If you select more than one search criterion, for example, customer name and item, both criteria must be met to return a value.
-
Click Search.
The Results table populates with service requests that meet the search criteria.
-
To view a particular service request, click the Service Request number link.
-
To perform a search using different criteria, click Clear.
-
Enter the new criteria, and then click Search.
-
To change the time frame of the search, modify the Number and UOM fields.
Maintaining the Task Assignment Status for a Technician
Depending on how your Field Service environment is structured, you may want Field Service technicians to be able to call or notify the dispatcher (to whom they report) to update the task assignment status for a task on their behalf. Dispatchers can maintain the task assignment status for a task from the Resources tab of the Field Service Dispatch Center.
Technicians can also update task assignment statuses using the same window from the Field Service Technician Dashboard when performing debrief. The same rules apply for technicians and for dispatchers. For more information on maintaining task assignment status during debrief, see Updating Task Assignment Status.
Note: Dispatcher will not be able to update the task assignment status for a task that is part of a blocked trip.
Display of Assignment Status
The task Assignment Status field in the Resources tab of the Field Service Dispatch Center only becomes available to the dispatcher after the task has been initially committed (assigned) to the technician. The Assignment Status field will contain the statuses (list of values) that have transitions defined, from the current assignment status of the task, and have the Assignment checkbox selected. For more information on defining task and task assignment statuses, see the Oracle Field Service Implementation Guide.
Impact of the Update Schedulable Task Profile
The Assignment Status field behaves as follows:
-
When the profile option CSFW: Update Schedulable Task is set to No:
-
Changing the Assignment Status from a non-schedulable status to a schedulable status is not allowed.
-
Selecting and saving with a status that has the Cancel checkbox selected, cancels the task assignment.
-
-
When the profile option CSFW: Update Schedulable Task is set to Yes:
-
Changing the Assignment Status from a non-schedulable status to a schedulable status is allowed.
If the assignment status is changed from a non-schedulable status to a schedulable status, the task will remain scheduled to the technician, but the task status may be updated.
-
Changing the task assignment from a schedulable status to a non-schedulable status where customer confirmation is set to Required, is not allowed.
-
Selecting and saving with a status that has the Cancel checkbox selected, cancels the task assignment.
-
Selecting and saving the status value present in profile option CSF: Default Unscheduled task status, does not un-schedule the task.
-
Note: This profile has impact only on the Mobile Field Service wireless application.
If the profile option CSFW: Update Schedulable Task is set to Yes or No and you cancel a task assignment the following behavior occurs:
-
If canceling an assignment leads to the cancellation of the task, where a customer confirmation has been received, dispatcher will be prompted to proceed or cancel the current action performed. They will receive a message: The task has Customer Confirmation set to Received. Do you want to continue with the cancellation of assignment?
-
If canceling an assignment leads to the cancellation of dependency between or among tasks, dispatcher will be prompted to proceed or cancel the current action performed. They will receive a message: The task has dependency with other tasks. Do you want to continue with the cancellation of assignment?
-
If canceling an assignment leads to the cancellation of task, where customer confirmation is received and task dependency exists, dispatcher will be prompted to proceed or cancel the current action performed. They will receive a message: The task has dependency with other tasks and Customer Confirmation is set to Received. Do you want to continue with the cancellation of assignment?
Updating Task Assignment Status
Whenever a task assignment status is manually updated, the task status will also be automatically updated with the same status value, if the task has a single resource assignment and there is a transition defined from the current task status to the selected status. Updating the task assignment status always triggers the task status update to keep both the statuses synchronized.
Updating the task assignment status functionality was designed around a task having only one resource assigned to it. Oracle Field Service recommends that you do NOT have multiple assignees for a task but to actually create multiple tasks instead. In the case where a task has multiple assignees, task assignment status updates are enabled with the following validation:
-
If all the task assignment statuses have the same value after updating, the system will trigger the Task Status synchronization process.
-
If all the task assignment statuses have different values after updating, you will be able to save the records, but the system will not trigger the Task Status synchronization process.
Steps to Update Task Assignment Status from the Dispatch Center
Use the following steps to update the status for a technician.
-
Navigate to the Field Service Dispatch Center.
-
Query for tasks that have been assigned (committed) to a technician and then select the Resources tab.
The Resources tab appears displaying the current assignee and the current task assignment status for the service request and task.
-
Select a different Assignment Status.
-
Save your work.
Cross-task Validation for Task Assignment Status Updates
You can set up cross-task validation rules for specified task assignment statuses. These rules control task assignment status updates based on existing assignment statuses of other tasks assigned to the same technician.
For example, if you set up cross-task validation rules for the Traveling task assignment status, tasks for a technician in a trip to different customer sites cannot be in the same Traveling status.
For more information, see Setting Up Task Status, Transition Rules, and Cross-Task Validation, Oracle Field Service Implementation Guide.
Unscheduling Tasks
If a task assignment has not been worked upon, completed, or closed, it can be unscheduled from the Schedule Management window. Unscheduling a task cancels the task assignments and changes the task status back to In Planning.
Use this procedure to unschedule tasks.
Prerequisites
The task must be scheduled to a technician.
The task must have a status other than Working, Completed, or Closed.
Steps
-
Navigate to the Schedule Management window.
-
Select the checkboxes located next to resource names for those technicians that you want to unschedule tasks. You can select multiple checkboxes to unschedule tasks for multiple technicians. If you want to unschedule tasks for all technicians, select the Select All checkbox.
-
In the Trips section, select the Start and End dates and times for the tasks you want to unschedule.
The entirety of the task must fall within the start and end dates and times that you select.
-
In the Actions section, select Unschedule in the Tasks field.
Note: You can block trips and unschedule tasks for the same specified period at the same time by selecting Block and Unschedule in the respective Actions fields.
-
Click OK.
A popup window displays a message confirming that one or more tasks are to be unscheduled.
-
Click OK.
A second message confirms the number of tasks you successfully unscheduled.
-
Click OK.
The window closes. The tasks are unscheduled.
Tasks Rejected by Autonomous Scheduler
When the autonomous scheduler engine cannot schedule a task, the task status changes to the value set for the Auto Reject Status - Others parameter. If the Scheduler fails to identify any technician possessing spare parts (in cases where spare parts are mandatory), then the application assigns the task a status dictated by the Auto reject Status – Spares Unavailability parameter. The corresponding rejection status helps dispatchers find rejected tasks.
Dispatchers can view tasks that are rejected and their respective rejection reason in the Dispatch Center's Tasks List table. Dispatchers can also review the log and output file generated by the Search and Auto Schedule (Autonomous Scheduler) program to find problem description details for each rejected task. From the Dispatch Center, dispatchers can run a task query to identify all tasks with the Auto Reject status.
Prerequisites
Advanced Scheduler is installed.
Steps
-
Navigate to View Requests window.
The Find Requests window appears.
-
Find the relevant log entry for the Search and Schedule Task Automatically (Autonomous Scheduler) program to identify errors that require attention.
-
Navigate to the Field Service Dispatch Center.
The Field Service Dispatch Center window appears.
-
To find tasks rejected by the Autonomous Scheduler, in the Tasks section, select Auto Rejected from the View By list of values.
The Task section populates with the list of rejected tasks.
-
Make the appropriate changes to the rejected tasks to fix the errors.
-
Change the task status back to 'In Planning.'
-
Run the Autonomous Scheduler program again to process the tasks accordingly.
You can also schedule the rejected tasks interactively, if necessary.
Working with Resources
The Dispatch Center's Plan Board and Gantt views enable dispatchers to manage field service tasks from the perspective of resource availability and location.
Working with the Plan Board View
The Oracle Field Service Dispatch Center Plan Board contains a grid populated with service technician names as column headings and technician service trip information in the associated column cells. By default, information displays for the service technicians and the territories the user selected during the previous visit to the Dispatch Center.
If you configured the role and role type of Field Service Representative for internal technician resources while importing HR employee records or in the Resources window and set the CSF: Display only Technicians in Dispatch Center profile to the default Yes, the Plan Board displays only technician resources and excludes dispatchers and dispatch groups.
You can right click a resource in the Plan Board and perform eligible actions such as creating personal tasks, and trips. For more information, see the Technician Right-Click Menu. A trip consists of departure tasks, arrival tasks, and scheduled, as well as assigned service tasks.
Dispatchers use the Plan Board to monitor progress against the daily schedules of technicians. The primary methods for monitoring that are available to the dispatcher are the Field Service Plan Board cell color and letter codes.
To search for a particular task in the volume of tasks displayed in the Plan Board, enter the task number in the field at the end of the window and click the Find Task icon to find this task and bring it into focus.
You can use the Tools menu option of Hide/Shift Tasks to hide the display of regular and/or standby shift tasks of resources such as departure and arrival tasks. In this case, the Plan Board displays only assigned tasks and personal tasks. This makes it easier for the dispatcher to focus on his requirements. Note that your configuration applies to the current session of the Dispatch Center. To change the default display of shift tasks in the Dispatch Center, set the CSF: Display Shift Tasks profile option to the required setting. For more information on this profile, see the Oracle Field Service Implementation Guide.
Cell Color Codes
Task type, task status, task priority, whether the task has been escalated, and the resource's shift type drive color coding. For example, The Plan Board displays a service technicians' shift using different background color scheme for differentiating regular and stand by shifts Color code setup is performed during implementation. For more information on color setup, see the Oracle Field Service Implementation Guide.
Letter Codes
Within each Plan Board cell, Field Service letter codes identify whether a task has specific attributes. When these letters appear in a Plan Board cell, then the corresponding task attribute is in effect. Letter codes are positioned from left to right within a cell by priority. This list explains letter codes and cell positions:
-
In first position: A (Access Hours) or F (After Hours)
-
In second position: C (Customer Confirmation Required), or V (Customer Confirmation Received)
-
In third position: S (Spares)
-
In fourth position: M (Parent), D (Child)
-
In fifth position: R (Task Dependency)
-
In sixth position: N (Notes)
Use the following procedures to work with the Plan Board.
Prerequisites
Populate the Plan Board view.
The Plan Board view appears displaying information for the same technicians previously accessed by this user by default. You can use the Select Territories and Task Owners window to populate the Plan Board, Gantt, and Map views with territories of service technicians other than the ones currently displayed. See Associating Territories to a Dispatcher, Oracle Field Service Implementation Guide.
Monitoring Technician Trips
Dispatchers monitor trips of service technicians from the Dispatch Center Plan Board view.
-
Navigate to the Field Service Dispatch Center Plan Board view.
The Plan Board view appears.
-
The plan for the current date appears by default. You can also use the forward and backward buttons located on either side of the Date field to change the date displayed. To select a different date from the calendar, click the Date field.
The Calendar window appears.
-
Select a date from the Calendar, and then click OK.
The Calendar window closes.
-
To focus on a specific service technician, click Goto.
The Resources window appears.
-
Use the Find field to locate a resource name from the list of values. You can also use the scroll bar to find the service technician that you want to select. Click OK.
The selected service technicians name is highlighted on the Plan Board view.
-
To view other service technicians, select Select Territories and Task Owners from the Navigate menu on the tool bar. See Associating Territories to a Dispatcher, Oracle Field Service Implementation Guide.
Note: For more information on managing technician trips see Overview of Managing Field Service Technician Trips.
Tasks Right-Click Menu
Right-click the task name on the Plan Board or Gantt Chart to display the list of options available. Selecting an option opens a related popup window.
-
For tasks that can be scheduled, select Auto Schedule to automatically schedule tasks to resources using the criteria set up in Advanced Scheduler, if installed.
-
Select Commit Task to commit a task to a technician. See Releasing Work to the Field - Interactive Process.
-
Select Unschedule Task to unschedule a task. See Unscheduling Tasks.
-
Select Cancel selected Task to cancel a task. See Canceling a Scheduled Task.
-
Select Cancel starting at selected task if the task is part of a parent and child task relationship and you want to cancel all tasks beginning with a selected task. See Canceling a Scheduled Task.
-
Select Schedule to schedule a task. The Schedule Task window appears. See Overview: Schedule Tasks Window and the Oracle Advanced Scheduler User Guide.
-
Select Customer Confirmation to add the customer confirmation requirement or to indicate confirmation from the customer. The Customer Confirmation window appears. See Marking Tasks for Customer Confirmation.
-
Select Reschedule selected Task to reschedule a task. The Reschedule Task window appears. See Rescheduling a Scheduled Task from the Plan Board.
-
Select Reschedule starting at selected Task if the task is part of a parent and child task relationship and you want to reschedule all tasks beginning with a selected task. The Task Parent/Child window appears. See Rescheduling Tasks Longer Than a Standard Shift Duration.
-
Select Debrief to report on or view a report of a performed task. See Debriefing Work Completion.
-
Select Parts Requirement to view the required parts for the selected task.
The Parts Requirement window appears for the selected task. See Viewing and Creating Parts Requirements.
-
Select Access Hours to create access hours and after hours constraints for a particular task. The Access Hours page appears. See Defining Customer Access and After Hours Constraints.
-
Select Task Dependencies to view or create task dependencies. The Task Dependencies window appears. See Creating Task Dependencies.
-
Select Parent/Child to view the parent and child task relationships or to either cancel or reschedule all or parts of the child tasks and the original parent task. See Rescheduling Tasks Longer Than a Standard Shift Duration.
-
Select Change Invalid Address to change or correct the invalid address for a task. See Correcting and Validating Addresses and Geotesting and Reverse Geocoding.
-
Select Send Message to send a message to another user.
-
Select Source Document to have the window for the originating document associated with the task appear. See Viewing Service Request Details.
-
Select Task Related Information to view the details for the task. The Task Related Information window appears.
-
Select View Task on Maps to view the task with its incident address plotted on the Google or eLocation Map. You can view the location details of the task on the map and use, if required, the Plot Eligible Technicians button on the map to view the locations of technicians qualified for the task.
-
Select View Task and Technicians location on Map to view the task with its incident address plotted on the Google or eLocation Map and the locations of all technicians in the territories managed by the dispatcher. See Viewing Selected Tasks and All Technician Locations.
-
Select Charges and Service Logistics to create, update, or view charges on a service request. See, Creating and Submitting Charges.
Note: Third party administrators have the same task right-click menu options except for
-
Reschedule Starting at selected Task
-
Cancel Starting at selected Task
-
Rescheduling
-
Parent/Child
In addition, third party administrators cannot view service request details, or view or perform any activity related to maps or trips. For more information on functions of a third party administrator, see Managing Third Party Tasks in the Oracle Advanced Scheduler User Guide.
Right-Click Menu Options for Departure Tasks
Right-click the Departure Task on the Plan Board to display the list of options available. Selecting an option opens a related popup window.
-
Select Optimize to call Advanced Scheduler to evaluate all possible sequences of a trip. If Scheduler finds a new sequence for the existing tasks with a cheaper cost factor, it optimizes the trip. This affects the task sequence. This function is available only when Advanced Scheduler is installed.
-
Select Recalculate to rearrange the tasks of a trip without altering the sequence of tasks in the trip. This function is used whenever a new task is included in the trip, or an existing task is eliminated from the trip.
-
Select Block to cause the trip to not be available when scheduling tasks. If the trip is blocked, you can also select Unblock to remove the block.
-
Select Update Trip to update a technician's trip. See Updating Trips within the Dispatch Center.
-
Select Delete Trip to delete a trip. See Deleting a Trip within the Dispatch Center.
-
Select Commit to commit the tasks in a trip.
-
Select View Task on Map to view a map of the task location.
Right-Click Menu Options for Arrival Tasks
Right-click the Arrival Task on the Plan Board to display the list of options available. Selecting an option opens a related popup window.
-
Select Update Trip to update a technician's trip. See Updating Trips within the Dispatch Center.
-
Delete Trip to delete a trip. See Deleting a Trip within the Dispatch Center.
-
Select View Task on Map to view a map of the task location.
Working with the Gantt View
Dispatchers use the Gantt chart to view the schedules of several technicians across multiple days, and to schedule or reschedule tasks. For more information, see Rescheduling a Scheduled Task from the Gantt View.
The Gantt chart view is a graphical overview of the scheduled tasks mapped to a time line. To search for a particular task in the volume of tasks displayed in the Gantt chart, enter the task number in the field at the end of the window and click the Find Task icon to find this task and bring it into focus.
On the left is an alphabetical list of the resources in the territories of the dispatcher. The Goto… button helps you find and display a specified resource.
Note: If you configured the role and role type of Field Service Representative for technicians while importing HR employee records or in the Resources window and set the CSF: Display only Technicians in Dispatch Center profile to the default Yes, the Resource section only displays technicians and not dispatchers or dispatch groups.
When you move to the Gantt or Scheduling Chart view, the actual date displayed by default at the bottom is the current system date. You can enter a different actual date and click Refresh to update the view. The date range shown by default starts with the current system date and spans the number of days configured in the CSF: Data window in days for Gantt profile. You can use the buttons at the bottom of the window to adjust the date range and move the view forward or backward in blocks of a day, week, or month from the actual date.
The Gantt chart uses the same color coding scheme that is available in the Plan Board view. The Gantt chart displays a service technician's shift using different background color scheme for differentiating regular and stand by (After Hours) shifts, assigned tasks, and the travel time between tasks. The right-click menus in the Gantt Chart are identical to those that the user can access through the Plan Board. To configure the default display of shift tasks, set the CSF: Display Shift Tasks profile option to the required setting. You can also configure the current session of the Dispatch Center Gantt chart view using the Tools menu option of hiding shift tasks.
When you move from the Gantt chart to the Plan Board view, the Planboard refreshes data as per the start date of the last selected task in the Gantt View. To maintain the date context, set the CSF: Pass Scheduling Chart context date to Plan Board profile to the default value of Yes.
Note: For territory or district managers who may want to see the schedules and availability of technicians in their territories across the date range or period set by the CSF: Data Window in Days for Gantt profile, they can access the Read Only Scheduling Chart from the Navigator. This Scheduling Chart view is not interactive. Territory managers can only use the scroll buttons at the bottom to move the schedules forward or backward a day or a week at a time in context with the original period. For more information on the profile, see the Oracle Field Service Implementation Guide.
The Gantt chart features icons and task attributes for accessing additional task details, such as the task number, priority, customer name, and whether the task is in a parent and child relationship. Icons and attributes are ranked in importance during set up, and then appear on the task bar accordingly. For information about setting up Gantt chart icons (Field Service Setup > Scheduling Chart Setup), see the Oracle Field Service Implementation Guide.
Other key features of the Gantt chart are the ability to drag-and-drop to reschedule tasks to the same or a different technician and the ability to elongate/contract the effort of the scheduled tasks. While performing these actions appropriate validations are done and the user is informed if any violation occurs. The user can either accept the violation or cancel their current action
Use this procedure to explore the Gantt view tools and options available for task management.
Specify Viewed Information
-
Navigate to the Field Service Dispatch Center Gantt view.
The Gantt view appears displaying information about service technicians, their shifts, and assigned tasks.
-
Specify From and To dates to define the date range that you want to view, if different from the default display.
The Gantt view displays information for the specified date range.
-
Right-click the date or time on the Gantt chart column header to change the scale of the Gantt chart. You can select from one of these options: 15 Minutes, 30 Minutes, Hours, Three Hours, Six Hours or Days.
-
To focus on a specific service technicians schedule, click Goto
The service technicians name is highlighted and visible.
View Task Details
-
To view a task description using the tool tip feature, pause the mouse over a task.
-
To view task-related details, position the mouse over the task bar that you want to view, right-click, and then select Task Related Information from the right-click menu to view task details.
The Task Related Information window appears displaying information relating to the specific task, including product, task customer, and required skills. It also contains both planned and actual start and end dates and times. If a project is associated with the service request task, then you can also view the project related information, including expenditure organization, project number, project name, project task number, and project task name.
Technician Right-Click Menu
-
Right-click the Service Technicians Name on the Plan Board to display the list of options available. Selecting an option from the right-click menu opens a related popup window.
-
Select Create Personal Task to create personal tasks for this resource. See Steps to Create a Personal Task from the Dispatch Center.
-
Select Create Trip to manually create a trip if you have defined the shift pattern for this resource. See Creating Trips from Existing Shift Patterns within the Dispatch Center.
-
Select Receive Parts to receive expected shipments of spare parts on the behalf of technicians out in the field. See Receiving Parts from the Dispatch Center.
-
Select Commit Schedule to commit the resources schedule. See Releasing Work to the Field - Interactive Process
-
Select Schedule Management to view the resources current schedule. From the Schedule Management popup window, you can Unschedule tasks, Optimize, and Block or Unblock trips for specified days. See Manage Field Service Technician Availability.
-
Select Resource Information to view the resources details such as name, phone number, and e-mail address. See Viewing Resource Details.
-
Select Resource Addresses and Subinventories to view the resources addresses and subinventories. You can add an address for the resource at this time. See Maintaining Technician Addresses and Subinventories, Oracle Field Service Implementation Guide.
-
Select Resource Skills Management to view technician skills and skill levels. The Resources tab of the Skill Management window appears for the selected resource. You can also navigate to the Skills and Skill Levels tabs for related information. See Assigning Skills and Skill Levels to Technicians, Oracle Field Service Implementation Guide.
-
Select Calendar menu option to view the technicians calendar for the upcoming month. See Viewing Technicians' HTML Calendars.
-
Select View Technician Location on Map to view all tasks scheduled to the resource on Google or eLocation Map, including the technicians start and end location. See Viewing Technician Location and Trip.
-
Viewing Resource Details
Use the Resource Information window to view the details of the resource assigned to the task. Details include, name, telephone number, and e-mail information.
Steps
-
Navigate to the Resource Information window.
The Resource Information window appears.
-
View name, telephone, and e-mail information. Click Close.
Viewing Technicians HTML Calendars
A dispatcher has the ability to access the calendar of each technician in an HTML format that can viewed in a daily, weekly, or monthly format. This calendar also contains trip information that can be accessed, including arrival, departure, and task details. The calendar can be refreshed to update the current information and it can be printed as well.
Use this procedure to access a technicians calendar.
A dispatcher can launch multiple calendars at the same time.
Additional Information: After a calendar is launched in HTML format, it remains open until it is manually closed. If the Dispatch Center is closed, it does not effect the calendar.
Steps
-
Navigate to the technicians Calendar page.
The technicians calendar launches in HTML format in the monthly view.
-
To view a single day of the technicians calendar, click the Daily date link.
You can change the daily view by changing the parameters in the View fields.
-
To view task, arrival, or departure details for a particular trip, click the appropriate link.
-
To print the calendar, click Printable Page and then use standard print options on your browser.
-
To close the calendar, click the Close Window link.
Working with the Map View
The Dispatch Center provides a geographical representation of service areas for service technicians. You can use the Map for monitoring purposes. The Map provides a geographical view of a service technician's location when a task is in a status of working. The date shown for the Map is the actual date.
The Dispatch Center Map facility enables dispatchers to view a range of views that vary in detail. At the highest level, the Map displays countries and states outlined, major roads and waterways, and label names of state capitols and major cities. At the most detailed level, the Map displays roads with names, including on and off ramps, city boundaries, regional features, and major landmarks. You can zoom in and zoom out using the buttons on the map display area.
Prerequisites
Spatial multiple datasets must be loaded and the CSF: Enable Multi Dataset profile set to Yes at the site level
Data pertaining to the road network must be loaded into the spatial scheme.
Steps
-
Navigate to the Field Service Dispatch Center Map view.
The service technicians you are managing display on a service area Map of the country.
-
Profile Option - CSF: eLocation Map Last Used Spatial Dataset
The Map opens to the default view based on the value of this profile option. The first time that you access the map, it is blank, since there is no value set for the user in this profile option. When you select a dataset and dataset country and save this Map view, the view updates the profile and becomes the default view for the next time you access the Map view. For example, if you manage technicians in France, you must select the EU dataset for Europe.
-
Profile Option - CSF: eLocation Map last used service area number
The Map opens to the default view based on the value of this profile option. When you save a Map view, that view updates the profile option, and becomes the default view for the next time you access the Map view. The first time you access the Map, it is blank, since there is no value set for the user in this profile option.
-
To view a Map, select a dataset, dataset country, and service map from a list of values in the Service Area region of the window.
The selected tasks, along with their locations, are shown on the Map.
-
(Optional) To control the detail of the area of the Map display use the In and Out buttons in the Zoom section. You can also use the mouse to draw a box on the Map.
The Map level of detail changes as specified.
-
(Optional) To adjust the area displayed within the Map, use the left, right. up, and down arrows.
-
To show the Map in its entirety when a fragment of the selected service area is shown, click Reset.
-
To change the Map, select a new option from the list of values in the Service Area region.
-
To save your current Map settings, click Save.
Saved settings decide the default opening display the next time you use the Map.
Overview: Invalid Addresses
When the customer address in the system is invalid, Oracle Advanced Scheduler can not associate a technician with the task if the user decides to schedule invalid address tasks.
To address this issue, Field Service provides a background process (program) that identifies invalid addresses in the system for a date range, and then enables a dispatcher to correct the found invalid addresses. This option is only available if you have geo-spatial data loaded for your application.
If you set the CSF: Enable Multi Dataset profile to Yes at the site level, based on the country of the current task, then the appropriate spatial data is loaded into the instance. For example, if the current task's country is United States, the NA dataset chosen and all list values are set for this dataset.
Field Service then considers the following criteria to decide whether an address is invalid:
-
Address
-
City
-
State
-
Zip code
-
Country
Identifying and changing invalid addresses is a three-step process:
-
Identify invalid addresses in the Change Invalid Address window
If you do not have spatial data loaded, you can use Field Service's eLocation Map to verify addresses on the Geotester page. For more information, see Geotesting and Reverse Geocoding.
Correcting and Validating Addresses
To change or correct the invalid addresses, follow this procedure.
Prerequisites
You must run the Find Invalid Addresses program. See Submitting the Find Invalid Addresses Concurrent Program.
Steps
-
Navigate to the Change Invalid Address window.
The Change Invalid Address window appears.
-
If started from the Dispatch Center, the table displays the invalid address of the task currently in focus. If the Address is valid, then this option is disabled.
-
If started from the Navigator, the table contains all tasks with addresses marked as invalid by the Find Invalid Addresses program.
-
-
Select the task for which you want to change the address.
In the Address tab, the current invalid address is displayed.
-
Click the Logged Errors tab.
A detailed error message regarding the invalid address appears.
-
In the Addresses tab, make the appropriate corrections to the addresses.
-
After you have made changes, click Validate Address or save the entered data, to ensure that the new values you entered can be geo-coded.
After you have changed and validated the address, the task is removed from the table that displays invalid addresses.
Submitting the Find Invalid Addresses Concurrent Program
All Field Service tasks that are yet to be scheduled are candidates for the Find Invalid Addresses program.
To run the Find Invalid Addresses program, follow these steps.
Prerequisites
Task Status: Schedulable
Task Planned Start Date is within the date range specified.
Steps
-
Navigate to the Find Invalid Addresses window.
The Parameters window appears in the foreground of the Find Invalid Address window.
-
(Optional) Enter the start and end date range for the address records that you want the system to check. If no date range is specified, there is no validation based on start date.
-
Click OK.
The Parameters window closes. The date range, if entered will appear in the Parameters field.
-
In the 'At these times' region, you can schedule the program to run automatically, or on demand.
-
Click Submit.
For each candidate task selected, the Location Finder attempts to resolve addresses having no associated geo codes (latitude and longitude).
-
If resolved successfully, the HZ_LOCATIONS table updates with geo codes for the task incident or resource address.
-
If the Location Finder fails to resolve the address, then the erroneous geo code entries in the HZ_LOCATIONS table are cleared.
-
-
The Decision popup window appears to display the concurrent request number, and asks whether you want to submit another request.
-
Note the request number, and then click No.
-
Check the status of the program by navigating to View > Requests in the tool bar.
-
When the request is completed, click View Output to see the report of invalid addresses.
The program generates the output file with the list of tasks having invalid addresses, the error messages, and a detailed error log.
Geotesting and Reverse Geocoding
Before scheduling or plotting tasks and technician trips on a map, dispatchers can verify customer addresses using the Geotester. In addition, if only geographic coordinates of a task address are known, dispatchers can use Reverse Geocoding to find the actual street-level address.
Geotesting Steps
Use these steps to verify a pair of addresses.
-
Use the Field Service Manager responsibility to navigate to the Geotester page.
-
If you have uploaded spatial data, you can select the data set, country, state, city, postal code, and address for the From address and the To address in the Geotester tab.
If there is no spatial data installed, you must enter the From and To address fields.
-
Use the Verify From Address and the Verify To Address buttons. If the addresses are correct, the geographic coordinates for the addresses are populated.
-
Close the Geotester page.
You can use the eLocation Route Calculator to calculate and display the route and driving directions between this pair of addresses on the eLocation Map. For more information on route calculations, see Setting Up Advanced Scheduler and Time and Distance Calculations in the Field Service Implementation Guide.
Reverse Geocoding Steps
Use these steps to find a valid address using reverse geocoding.
-
Use the Field Service Manager responsibility to navigate to the Geotester page.
-
Go to the Reverse Geo Coder tab of this page.
-
If you have uploaded spatial data, select the appropriate data set for the coordinates that you entered.
If there is no spatial data installed, but you have registered with Google Map, select Google Maps as the data set. If you neither have spatial data nor Google Map registration, select eLocation as the data set.
-
Click Submit to populate the nearest valid address and display it on the eLocation map.
The distance populated is the distance from the given coordinates at which a valid customer address could be found.
-
Close the Geotester page.
Committing Schedules
When you commit the schedule it is communicated to the service technicians. You can also assign a task to a technician by selecting the task in the tasks list table of the Dispatch Center and using the task right-click menu option of Commit. For more information, see Working with the Planboard View.
Releasing Work to the Field - Interactive Process
Use this procedure to interactively commit a schedule and release the corresponding task assignments to the technician.
Steps
-
Navigate to the Commit Schedule window.
The Commit Schedule window appears displaying the default dates.
-
In the Time Frame section, indicate the date range of the schedule to be committed. The date can indicate schedules created in the past hour, but also can cover one or more days.
When the commit schedule function has been accessed by right-clicking a resource name in the Plan Board or Gantt view, the 'From' date field contains the active date of the Plan Board or Gantt. The default 'To' date is the 'From' date plus one entire day.
-
In the Resource section, the Resource Type and the Resource Name fields display the technician for whom you want to commit the schedule.
When starting the function by right-clicking a Resource Name in the Plan Board, the Resource Name is filled in automatically.
-
Click OK.
The schedule is committed. Once this procedure is completed, the task status is updated to 'Assigned'.
Releasing Work to the Field - Concurrent Program
For automatic schedule commitment, you can run a program called Auto Commit Tasks in the background. The Auto Commit Tasks program is set up at implementation or can be launched at any time. When you run this program, you can optionally enter the task query that you want the program to use in the Parameters popup window. For example, to auto commit all tasks in the Inbox, select the Inbox query from the list of values in the Task List Query parameters field.
Steps
-
Navigate to the Auto Commit Schedule window.
The Parameters window appears in the foreground of the Auto-Commit Schedule window.
-
In the Parameters window, select a Task List Query or Territories from the list of values. Click OK.
The Parameters window closes. The selected query appears in the Parameters field of the Auto-Commit Schedule window. If you select Territories, two more fields are displayed: Commit Horizon and UOM.
-
Click Submit.
Rescheduling Tasks
You may need to reschedule a scheduled task for a variety of reasons. For example, the technician to whom a task is assigned may fall ill or have to go on leave to attend to an emergency personal matter. The circumstances of a scheduled task may change, necessitating updates and subsequent rescheduling for these updates to take effect. For example, the customer may request a preferred resource on a field service task but due to non-availability of this resource and the contract or service agreement demanding an immediate turn around on the task, the task may have been scheduled to another available resource. However, after this other resource starts work on the task, the customer's preferred resource may become available. In such a case, the dispatcher may want to reschedule the task to the preferred resource without any additional delay.
Sometimes, after a task has been scheduled and the technician has started work on it, the dispatcher may update one or more of the following task attributes. The reasons for change may be varied. Below are some examples of when such updates may be necessary.
-
Customer access hours may change if a new access hours schedule is received from the customer
-
Planned effort which may have been based on the non-availability of skilled resources or parts may change once these resources or parts are available
-
Task priority which is based on the contract or service agreement may change if updates are made to the contract or agreement
-
Task status may change if parts ordered for the task do not arrive on time or if the assigned resource suddenly has an emergency personal task that he must attend
-
Planned start and end dates may change if there are updates to the contract or service agreement that adversely affects the response time
-
Scheduled start and end dates may change based on availability of resources, parts, or task dependencies of the scheduled resource.
Use one of these procedures to move an already assigned task from one service technicians schedule to another.
-
Rescheduling, Unscheduling, or Canceling a Task with Debriefed Timings, Oracle Field Service User Guide
Rescheduling a Scheduled Task from the Plan Board
Use this procedure to reschedule a task from the Plan Board.
Steps
-
Navigate to the Field Service Dispatch Center.
The Dispatch Center Task view appears (by default).
-
From the Task view, click the Plan Board icon to switch to the Plan Board view.
The Plan Board view appears.
-
Right-click the task you want to reschedule, and then select Reschedule selected Task from the right-click menu.
The Reschedule Task window appears. You can reschedule the task using all the available options and normal scheduling filters.
Rescheduling a Scheduled Task from the Gantt View
Dispatchers can reschedule tasks from the Gantt chart either by using the drag-and-drop functionality or the task right click menu for the tasks that they want to reschedule.
You can reschedule a task from one service technician to another by dragging and dropping the task or you can make adjustments to existing tasks for a technician by dragging to increase or decrease the length of the task bars. For information about scheduling a task, see Working with the Gantt View.
You can also drag and drop tasks not associated with a service request such as personal tasks across the same or different trips of the technician. When you move a personal task, the task status and task assignment status remain the same.
Drag-and-Drop Steps
This procedure documents how to use drag-and-drop functionality to reschedule a task from the Gantt view.
-
Navigate to the Field Service Dispatch Center.
The Dispatch Center Task view appears (by default).
-
From the Task view, click the Gantt icon to switch to the Gantt view.
-
Select the task to be moved by placing the cursor on the cell. You can move a planned, scheduled, or assigned task. Click and hold down the left mouse button while you drag the task to its new position in the Gantt view. The reschedule can call for a different time and effort or a different technician.
Note: For a planned task with task dependencies you can choose to recalculate the trip after moving the task or decreasing or increasing the task effort. To ensure trip optimization on scheduled and assigned tasks that you moved, the system flips the status of a task rescheduled to a different technician's trip back to the status governed by the CSF: Default Planned Task Status for Planned Task profile.
-
Release the left mouse button.
The task is rescheduled to the technician and the time slot is indicated on the Gantt.
-
You can also reschedule the task of a technician by adjusting the time and effort on it. To do this, select the task bar for the task, hold down the left mouse button, scroll to the end of the task bar, and drag in or out to adjust the length of the task bar.
-
Release the left mouse button.
The task is rescheduled to the technician with the required change in time and effort.
-
Save your work.
Right-Click Steps
This procedure documents how to use the right-click menu to reschedule a task from the Gantt view.
-
From the Task view, click the Gantt icon to switch to the Gantt view.
-
Select and right-click a task, and then select Reschedule selected Task from the right-click menu.
The Reschedule Task window appears. You can reschedule the task using all the available options and normal scheduling filters.
Rescheduling a Scheduled Task from the Tasks View
Use this procedure to reschedule scheduled tasks from the Task list region of the Dispatch Center:
Steps
To reschedule a task from this view, you must either be sure of the resource that you want to reassign this task to or depend on the Scheduler for advice.
-
Navigate to the Field Service Dispatch Center.
The Dispatch Center Task view appears (by default).
-
Query for tasks that are scheduled.
-
In the Task list table, right-click the task you want to reschedule, and then select Reschedule selected Task from the right-click menu.
The Reschedule Task window appears. You can reschedule the task using all the available options and normal scheduling filters.
Rescheduling Tasks Longer Than a Standard Shift Duration
When the effort for a task takes longer than a standard work shift, for scheduling purposes, Advanced Scheduler automatically splits this (parent) task and creates multiple child tasks with durations that are equal to, or shorter than a standard shift.
During initial scheduling of a task with a duration that is longer than a standard shift, Advanced Scheduler looks for a single technician who has availability in contiguous time slots. A parent task is created with planned effort that exceeds the standard work shift. After that task is scheduled, either through autonomous scheduling functionality or interactively, the parent task is split and related child tasks are created that fit into the standard shift, each with a unique task number. Each child task is then assigned a Planned Effort time, in hours, that adds up to the total task time of the parent task.
For example, if the planned effort for a task is 20 hours, and a standard work shift is eight hours, the parent task propagates three related child tasks; two with eight hour durations, and one a four hour duration.
This table describes whether attributes or functions are associated with the parent task or the child tasks. For example, the Assignee attribute is associated only with the Child tasks, and not the Parent task. Skills assigned to the Parent task are copied to the Child tasks, so all child tasks require the same set of skills as the Parent task. The Parent task cannot be debriefed. Only Child tasks are debriefed.
| Attribute or Function | Parent Task | Child Task |
| Assignee | No | Yes |
| Skills | Yes | Yes, copied from Parent |
| Parts | Yes | No |
| Owner | Yes | Yes, default value is from Parent |
| Debrief | No | Yes |
| Dispatch Center Task List | Appears in italic font | Appears in standard font |
| Dispatch Center Plan Board | No | Yes |
| Dispatch Center Plan Board Split Flag | No | D appears in the Plan Board cell, 4th position. |
| Dispatch Center Gantt view | No | Yes |
| Schedule Task Advice Tab | Yes | Yes, for reschedule only |
| Planned Dates | Yes, as created | Always set equal to Scheduled dates |
| Scheduled Dates | Always synchronized to Child dates:
|
Yes, as scheduled |
The Parent task displays in italic font in the task list, and the Parent checkbox is selected. Child tasks displays in standard font in the task list, and the Child checkbox is selected.
All technician recorded work, such as actual work time, and debrief, is executed against the child tasks. The relationships between the parent and child tasks are created and maintained automatically by the Field Service functionality.
When using assisted scheduling in the Dispatch Center, only the first possible position in the schedule displays. When using the Intelligent scheduling mode, multiple possible scheduling scenarios display, ranked by cost.
In the event that the parent task or one or more of the child tasks needs to be rescheduled or canceled, you can do this either by right clicking on tasks in the Dispatch Center and then selecting Reschedule starting at selected Task or Cancel starting at selected Task, or through the Parent/Child window, which is accessible from the Dispatch Center.
Use the following procedure to navigate to the Parent/Child window, and then either cancel or reschedule all or parts of the child tasks and the original parent task.
Prerequisites
The task must have a Planned Effort greater than or equal to the default shift duration.
Task must be scheduled.
Steps
-
To reschedule, navigate to the Task Parent/Child window by either selecting the parent or one of the child tasks.
The task details for the selected task display in the top region of the window. Below that parent task information displays in the Parent region and information relating to the child tasks appear in the Child region.
-
To make changes to the Parent task, click the Parent Number field of the Parent section.
This enables the following buttons: Cancel Parent Task, Unschedule Parent Task, and Reschedule Parent Task.
-
If you click Cancel Parent Task, all related Child tasks are canceled as well. If you click Unschedule Parent Task, all the child tasks are unplanned. If you click Reschedule Parent Task, all the child tasks are rescheduled to correspond to the new parent task schedule.
-
You can also perform similar functions against any one or all of the child tasks. To enable the child task buttons, click any of the child tasks in the Child section.
The available buttons for child tasks are: Cancel Selected Task, Cancel Starting Selected Task, Reschedule Selected Task, Reschedule Starting Selected Task.
-
To cancel a single task, select the task you want to cancel and click Cancel Selected Task.
The child task is removed.
-
You can also cancel all tasks that follow a selected task in the hierarchy. To cancel a set of tasks, select the task that you want to begin the cancellation process with and click Cancel Starting Selected Task.
This function is not available for the first or last task in the set. Canceling the initial task and all that follows requires that you perform this function at the Parent level. This button also is not available for the last task in the sequence because no tasks follow it.
-
To reschedule a selected task, select the child task you want to reschedule and click Reschedule Selected Task.
This function enables you to shift the task to another technician, for example, in the case of illness or some other unexpected development.
-
To reschedule a child task and all the subsequent child tasks, select the task you want to begin rescheduling and click Reschedule Starting Selected Task.
This functionality addresses a situation where a technician is not available for future work, but the parent task is not completed.
Unscheduling a Scheduled Task
After a task is scheduled, you can choose to unschedule it. Then at a later date you can schedule it again.
For more information on unscheduling a task from a trip, see Unscheduling Tasks.
Use this procedure to unschedule a scheduled task or task assignment.
Steps
-
Navigate to the Field Service Dispatch Center.
The Dispatch Center Task view appears (by default).
-
From the Task view, click the Gantt icon to switch to the Gantt view, or click the Plan Board icon to switch to the Plan Board view.
The Plan Board or Gantt view appears.
-
Select and right-click the task number for the task that you want to unschedule.
-
Select Unschedule Task from the right-click menu.
-
Click Continue.
The task is unscheduled.
-
Click Refresh.
The task status changes to the value in the profile option CSF: Default Unscheduled Task Status.
Canceling a Scheduled Task
To cancel a scheduled task you need to cancel all task assignments for the task. After a task is canceled, you can choose to schedule it again, or close it. If a task is part of a parent and child task relationship, you can also choose to cancel all tasks beginning with a selected task.
Use this procedure to cancel a scheduled task or task assignment.
Steps
-
Navigate to the Field Service Dispatch Center.
The Dispatch Center Task view appears (by default).
-
From the Task view, click the Gantt icon to switch to the Gantt view, or click the Plan Board icon to switch to the Plan Board view.
The Plan Board or Gantt view appears.
-
Select and right-click the task number for the task that you want to cancel.
-
Select Cancel selected Task from the right-click menu.
You can also select Cancel starting at selected Task. If a task is part of a parent and child relationship, this option cancels all tasks beginning with the task selected.
Warning messages, if any, appear in a popup window. For example, a warning message appears if the task you want to cancel is part of a parent and child relationship, and the scheduled start time has passed.
-
Click Continue.
The task is canceled.
-
Click Refresh. The task status changes accordingly.
Using Analytics
-
Navigate to the Field Service Dispatch Center in the OJET UI.
-
Select Analytics from the menu. This opens the Analytics UI where you can view the following:
-
Key Performance Indicators: Review task counts that are sorted into the following categories: Escalated, Missed SLAs, Nearing SLAs, Pending Acceptance, Technician Rejected, and Auto Rejected.
-
Count By Task Status: View tasks that are accepted, assigned, completed, or planned in table format or graphical format (bar chart or polar chart). You can also filter results by task owners and task status.
-
Resource Utilization: View resources by idle time, personal time, travel time, field service tasks in table format or graphical format (bar chart or polar chart). You can filter results by trip type.
-
Scheduled Metrics: Review counts for metrics. Metrics include Not Completed on Time, Finished on Time, Scheduled After SLA, Started before schedule start, In Overtime, In Standby Trips, Started after schedule start, Finished before Time, Scheduled Before SLA, and In Regular Trips.
-