Setting Up the Mobile Apps
Overview
This chapter describes the setup tasks that administrators must perform first to ensure that the 10.x apps are ready to use.
Depending on your app requirements, administrators may perform different tasks to set up your app before communicating the information to the app users. These setup tasks are described as follows:
Setup Tasks for Oracle Approvals for EBS, Oracle Learning for EBS, Oracle Self-Service HR for EBS, and Oracle Timecards for EBS
Oracle Approvals for EBS, Oracle Learning for EBS, Oracle Self-Service HR for EBS, and Oracle Timecards for EBS are developed using a similar approach with the Oracle JavaScript Extension Toolkit (JET) Framework. Therefore, the setup tasks of these apps are described in the same section.
Note: Oracle Approvals for EBS, Oracle Self-Service HR for EBS, and Oracle Timecards for EBS are developed using Oracle JET 14.0 or later Framework. Oracle Learning for EBS is available in Release 10.1 using Oracle JET 18.0 Framework.
These four browser-based EBS mobile apps are available through web page URLs, not through the Apple App Store or Google Play Store. Users can access these apps either through a common Mobile Home Page in Release 10.1 and later or an app-specific URL provided by the app's administrator.
Note: Beginning with Mobile Release 10.1, users can access multiple browser-based apps from a common Mobile Home Page by logging in to Oracle E-Business Suite on mobile devices using this URL (http(s)://<E-Business Suite Host Name>:<Port>/OA_HTML/RF.jsp?function_id=FND_MOBILE_HOME). A mobile user can launch and access an app by tapping the corresponding app icon, and then can return to the Mobile Home Page to select another app if needed. With this update, users are no longer required to navigate to each browser-based app at a different URL.
Mobile Home Page with App Icons
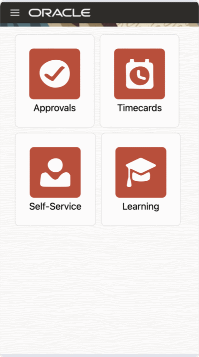
System administrators can configure which browser-based apps are displayed on the Mobile Home Page. See: Setting Up Mobile App Access to Responsibilities (for Oracle Learning for EBS, Oracle Self-Service HR for EBS, and Oracle Timecards for EBS).
Task 1: Applying Server-Side Patches for Oracle Approvals for EBS, Oracle Learning for EBS, Oracle Self-Service HR for EBS, and Oracle Timecards for EBS
Apply the corresponding consolidated product family patch and conditionally required patches if needed for your apps.
Note: In Oracle E-Business Suite Release 12.2, when you apply patches using the adop (AD Online Patching) utility, adop runs AutoConfig by default.
Perform the required tasks to apply prerequisite patches in the following sequence:
For more information on server-side prerequisite patches and patches for Oracle E-Business Suite Mobile Release 10.0 browser-based apps, refer to Product Family Patches for Earlier Oracle E-Business Suite Mobile Release 10.0.
Step 1: Applying the Product Family Level Patches for Oracle Release 10.x Apps
Apply the server-side patches for Release 12.2 using either the Oracle E-Business Suite level consolidated patch or the individual product family patches, depending on your needs.
-
Apply the Oracle E-Business Suite level patch for Release 12.2
To simplify the patching efforts, the server-side product family patches are consolidated into a single Oracle E-Business Suite level patch for Release 12.2. This consolidated patch includes each product family patch that is listed in the product family level patch table.
If you intend to uptake all the product family patches, simply apply the higher level consolidated patch, Patch 37922969:12.2.0.
Important: This Patch 37922969:12.2.0 requires the following prerequisites:
-
R12.AD.C.Delta.16
-
R12.TXK.C.Delta.16
-
R12.ATG_PF.C.Delta.7
-
R12.HR_PF.C.Delta.11
-
Oracle recommends that you apply the latest EBS CPU. See My Oracle Support Knowledge Document 2484000.1, Identifying the Latest Critical Patch Update for Oracle E-Business Suite Release 12.2 for details. At a minimum the October 2020 CPU (Patch 31643029:12.2.0) is required. See My Oracle Support Knowledge Document 2707309.1, Oracle E-Business Suite Release 12 Critical Patch Update Knowledge Document (October 2020).
-
-
Apply the relevant product family level patches for Release 12.2
If you only use certain product families, then apply the relevant individual product family level patches for your Oracle E-Business Suite mobile apps.
The following table lists the mobile apps covered by each product family and the corresponding product family level consolidated patches:
Oracle E-Business Suite Product Family Level Patches for Oracle Approvals for EBS, Oracle Learning for EBS, Oracle Self-Service HR for EBS, and Oracle Timecards for EBS Release 10.1 Product Family Mobile App Name Patch for Oracle E-Business Suite 12.2 Oracle E-Business Suite Applications Technology (atg_pf)
(See Footnote 1)-
Oracle Approvals for EBS
-
Patch 37922941:R12.ATG_PF.C- 12.2 Consolidated Patch For Mobile Applications Release 10.1
Prerequisites:
-
R12.AD.C.Delta.16
-
R12.TXK.C.Delta.16
-
R12.ATG_PF.C.Delta.7
-
Oracle recommends that you apply the latest EBS CPU. See My Oracle Support Knowledge Document 2484000.1, Identifying the Latest Critical Patch Update for Oracle E-Business Suite Release 12.2 for details. At a minimum the October 2020 CPU (Patch 31643029:12.2.0) is required. See My Oracle Support Knowledge Document 2707309.1, Oracle E-Business Suite Release 12 Critical Patch Update Knowledge Document (October 2020).
-
If you want to use all the seeded approval types, see Footnote 2.Oracle Financials (fin_pf) -
Oracle Approvals for EBS (for Expense approvals)
-
Oracle Approvals for EBS (for Supplier Invoices approvals)
-
Oracle Approvals for EBS (Lease and Finance Management approvals only)
-
For Expense approvals and Supplier Invoices approvals only
-
Patch 30107297:R12.FIN_PF.C: FIN - 12.2 Consolidated Patch For Mobile Applications Foundation V9
-
-
For Lease and Finance Management approvals only
Apply the following individual patches:
-
Patch 28969483:R12.OKL.C
-
Patch 29143795:R12.OKL.C
See My Oracle Support Knowledge Document 2610782.1 and each patch Readme for additional patch prerequisites.
-
Oracle Human Resources (hr_pf) -
Oracle Approvals for EBS (for Human Resources approvals)
-
Oracle Approvals for EBS (for Timecards approvals)
-
Oracle Learning for EBS
-
Oracle Self-Service HR for EBS
-
Oracle Timecards for EBS
-
Patch 37922951:R12.HR_PF.C: HRMS - 12.2 Consolidated Patch For Mobile Applications Release 10.1
Prerequisites:
-
R12.AD.C.Delta.16
-
R12.TXK.C.Delta.16
-
R12.ATG_PF.C.Delta.7
-
R12.HR_PF.C.Delta.11
-
Oracle recommends that you apply the latest EBS CPU. See My Oracle Support Knowledge Document 2484000.1, Identifying the Latest Critical Patch Update for Oracle E-Business Suite Release 12.2 for details. At a minimum the October 2020 CPU (Patch 31643029:12.2.0) is required. See My Oracle Support Knowledge Document 2707309.1, Oracle E-Business Suite Release 12 Critical Patch Update Knowledge Document (October 2020).
-
Oracle Interaction Center Family (cc_pf) -
Oracle Approvals for EBS (for Channel Revenue Management approvals)
-
Oracle Approvals for EBS (for Quoting approvals)
Patch 24383599:R12.CC_PF.C: CRM - 12.2 Consolidated Patch For Mobile Applications Foundation V7 if not already applied Oracle Procurement (prc_pf) -
Oracle Approvals for EBS (for Purchase Order approvals)
-
Oracle Approvals for EBS (for Requisition approvals)
Patch 24383558:R12.PRC_PF.C: PRC - 12.2 Consolidated Patch For Mobile Applications Foundation V7 if not already applied Oracle Projects (pj_pf) -
Oracle Approvals for EBS (for Projects approvals)
Patch 24383522:R12.PJ_PF.C:PROJ - 12.2 Consolidated Patch For Mobile Applications Foundation V7 if not already applied Oracle Supply Chain Management (scm_pf) -
Oracle Approvals for EBS (for Inventory approvals)
-
Oracle Approvals for EBS (for Product Information approvals)
-
Oracle Approvals for EBS (for Order Management approvals)
-
Oracle Approvals for EBS (for Maintenance approvals)
-
Oracle Approvals for EBS (for Service Contracts approvals)
Patch 30144036:R12. SCM_PF.C: SCM -12.2 Consolidated Patch For Mobile Applications Foundation V9 Footnote 1: This Oracle E-Business Suite Applications Technology (atg_pf) product family level patch for mobile Release 10.1 includes the previous atg_pf Patch 35481482:R12.ATG_PF.C for mobile Release 10 and Patch 30144032:R12.ATG_PF.C for Mobile Applications Foundation V9 and is specifically built for Oracle Approvals for EBS Release 10.1.
Footnote 2: If you plan to use all the seeded approval types for Oracle Approvals for EBS, to simplify the patching efforts, you can apply the Oracle E-Business Suite 12.2 level consolidated Patch 37922969:12.2.0, which includes all the product family patches listed in the table.
-
Step 2: Applying Conditional Post-Install Patches
Apply any additional conditionally required post-install patches from the following list for your apps:
| Oracle E-Business Suite Release or Mobile App Name | Requirement | Patch Information |
|---|---|---|
| Oracle E-Business Suite Release 12.2 Oracle E-Business Suite Mobile Release 10.1 Online Help |
Required for Oracle E-Business Suite mobile apps in release 10.1 and later, leveraging Oracle E-Business Suite Mobile Foundation Release 9.1, connected to Oracle E-Business Suite Release 12.2 | Release 12.2: Patch 38195234 |
| Oracle E-Business Suite Release 12.2 | Required only if your Oracle E-Business Suite environment has the following patches applied:
Note: If your environment has the following Data Removal Tool consolidated patches applied instead, then the post-install tasks specified in the next column are not required:
|
Perform the following steps in the specified order:
|
Oracle E-Business Suite Release 12.2
|
Required for Oracle Approvals for EBS, Oracle Learning for EBS, Oracle Self-Service HR for EBS, and Oracle Timecards for EBS after applying NLS language patches | Release 12.2: Patch 35742307:12.2.0 |
Task 2: Setting Up MIME Type Mappings
After applying required server-side patches, you need to set up MIME type mappings for web application manifest file using the following steps:
-
Add the following entry in the
$EBS_DOMAIN_HOME/config/mimemappings.propertiesfile:webmanifest=application/manifest+json -
Restart all services on the application tier.
Task 3: Setting Up Mobile App Access to Responsibilities (for Oracle Learning for EBS, Oracle Self-Service HR for EBS and Oracle Timecards for EBS)
Oracle Learning for EBS, Oracle Self-Service HR for EBS, and Oracle Timecards for EBS use role-based access control to protect the mobile app data from unauthorized access.
These three apps have app-specific access roles. Therefore, only users who are assigned those app-specific roles can access the corresponding mobile apps on their devices, either using app-specific URLs or tapping the desired app icons on the Mobile Home Page in Release 10.1 and later. In order for those users to be able to access Oracle E-Business Suite data in a mobile app that invokes REST services, all REST services that the mobile app uses are grouped into a permission set that is then granted to an app-specific access role. To provide the mobile app access capability to existing Oracle E-Business Suite users, you must assign each access role to the responsibilities that you want to associate with the corresponding mobile app. Users who have the predefined mobile app access roles through those responsibilities will have access to the corresponding mobile apps.
Note: Oracle Approvals for EBS is available through global grant to all Oracle E-Business Suite users. Therefore, this app icon is always visible to all Oracle E-Business Suite mobile users on the Mobile Home Page in Release 10.1 and later.
For Oracle E-Business Suite mobile apps, responsibility selection is based on the combination of user role and mobile app. If the mobile app access role is assigned to a single responsibility, then the responsibility is automatically set and selected for a user using that mobile app. If a user has more than one responsibility to which the mobile app access role is assigned, then those responsibilities will be displayed for selection.
Note that it is not required to create or assign any new responsibility to users to use mobile apps. For information on the app-specific access roles, see Mobile App Access Roles.
Assigning Mobile App Access Roles to Responsibilities
To secure mobile app data or display desired app's icons on the Mobile Home Page in Release 10.1 and later, perform the following steps to assign predefined app-specific mobile app access roles to responsibilities:
-
Log in to Oracle E-Business Suite as a user who has the User Management responsibility. For example, log in as
SYSADMIN.Note: The User Management responsibility is assigned to the Security Administrator role. This seeded role is assigned to the
SYSADMINuser by default. -
Select the User Management responsibility and navigate to the Roles and Role Inheritance page.
-
Search for the responsibility you want.
-
In the search results table, click the "View In Hierarchy" icon for your responsibility. Note that the codes for responsibilities start with FND_RESP, while the codes for roles start with
UMX. -
In the Role Inheritance Hierarchy, click the Add Node icon for your responsibility.
Oracle User Management displays the next role hierarchy page with a message informing you that the role you select will be inherited. In this page, either search or expand nodes until you find the app-specific access role that you want to add to the responsibility. Use the Quick Select icon to choose that role.
-
Oracle User Management then displays the initial page again, with a confirmation message at the top. On this page, verify that the custom UMX role appears underneath the responsibility. You may need to expand one or more nodes to display the UMX role under the responsibility. Any other inherited roles appear as well.
-
When you add the role to the responsibility, you must also update the associated grant for the app-specific access roles to reference the specific responsibility as the security context. You need a separate grant for each responsibility to which you are adding the role, so in some cases you should duplicate the shipped grant rather than updating it.
In the row of the role that you just added, click the Update icon for your role to navigate to the Update Role page.
-
In the Grants Table at the end of the page, if this is the first responsibility to which you are adding to the role, click the Update icon for the grant you want to update. If this is the second responsibility or more to which you are adding the role, click the Duplicate icon for the grant instead of the Update icon. In the duplicate grant, you must provide a unique name for the grant.
-
Apply your changes.
If you want to use the app-specific access role with more than one responsibility, you must have a separate grant with a security context corresponding to each responsibility. You can also add grants for a given role as a separate process, rather than while you are adding the role to the responsibility. To do so, perform the following steps:
-
In the User Management responsibility, navigate to the Roles and Role Inheritance page.
-
Search for the app-specific access role you want.
-
Click the Update icon for your role to navigate to the Update Role page.
-
In the Grants Table at the end of the page, click the Duplicate icon for the grant you want to duplicate.
-
Modify the grant name of the new grant to make it unique.
-
In the Security Context region, enter the name of the additional responsibility to which you are adding the app-specific access role. Enter the name of a shipped responsibility from the table above, or, if you are using a custom responsibility, enter the name of that custom responsibility.
-
Click Next, Next, Finish, and OK to complete your grant.
For more information, see the Oracle E-Business Suite Security Guide.
Task 4: Performing Additional App-Specific Setup
Perform any appropriate app-specific implementation steps described in each release note of the following mobile apps:
-
Oracle Approvals for EBS (see Document 1642423.1)
-
Oracle Learning for EBS (see Document 3087866.1)
-
Oracle Self-Service HR for EBS (see Document 2105189.1)
-
Oracle Timecards for EBS (see Document 1669224.1)
For the list of Oracle E-Business Suite mobile apps mentioned here, see the Oracle E-Business Suite Mobile Apps, Release 12.1 and 12.2 Documentation Index, My Oracle Support Knowledge Document 1641772.1.
Task 5: Communicating Mobile App Information to Users
After you have completed the setup tasks for your app, provide the following information to the users who access the app through a web page URL:
-
Name of the app
For the name of the mobile app to download or access through a URL, see the Oracle E-Business Suite Mobile Apps, Release 12.1 and 12.2 Documentation Index, My Oracle Support Knowledge Document 1641772.1.
-
Where to access the app
Browser-based Oracle E-Business Suite mobile apps available through a URL
-
Available through a common Mobile Home Page (Release 10.1 and later) - Oracle Approvals for EBS, Oracle Learning for EBS, Oracle Self-Service HR for EBS, and Oracle Timecards for EBS
Starting from Release 10.1 and later, users can access multiple browser-based mobile apps from a common Mobile Home Page by logging in to Oracle E-Business Suite on mobile devices using this URL (
http(s)://<E-Business Suite Host Name>:<Port>/OA_HTML/RF.jsp?function_id=FND_MOBILE_HOME). A mobile user can launch and access an app directly by tapping its corresponding app icon, and then can return to the Mobile Home Page to select another app if needed. With this update, users are no longer required to navigate to each browser-based app at a different URL.Mobile Home Page with App Icons
Note: Oracle Learning for EBS, Oracle Self-Service HR for EBS, and Oracle Timecards for EBS use role-based access control to determine the app access. Only users who are assigned app-specific roles through responsibilities can see the corresponding apps displayed on the Mobile Home Page. Note that Oracle Approvals for EBS is visible to all users on the devices as it is available through global grant to all Oracle E-Business Suite users.
For information on how to grant predefined app-specific mobile app access roles, see Task 3: Setting Up Mobile App Access to Responsibilities (for Oracle Learning for EBS, Oracle Self-Service HR for EBS, and Oracle Timecards for EBS).
-
Available through an app-specific URL (Release 10.0 and later) - Oracle Approvals for EBS, Oracle Learning for EBS (Release 10.1 and later), Oracle Self-Service HR for EBS, and Oracle Timecards for EBS
-
Provide the URL information in the following format to your app users:
-
For Oracle Approvals for EBS:
http(s)://<E-Business Suite Host Name>:<Port>/OA_HTML/RF.jsp?function_id=WF_APPROVALS_PWASee My Oracle Support Knowledge Document 1642423.1, Oracle Mobile Approvals for Oracle E-Business Suite Release Notes.
-
For Oracle Learning for EBS, available in Release 10.1 and later
http(s)://<E-Business Suite Host Name>:<Port>/OA_HTML/RF.jsp?function_id=OTA_MLEARNINGSee My Oracle Support Knowledge Document 3087866.1, Oracle Mobile Learning for Oracle E-Business Suite Release Notes.
-
For Oracle Self-Service HR for EBS:
http(s)://<E-Business Suite Host Name>:<Port>/OA_HTML/RF.jsp?function_id=PER_MSSHRSee My Oracle Support Knowledge Document 2105189.1, Oracle Mobile Self-Service Human Resources for Oracle E-Business Suite Release Notes.
-
For Oracle Timecards for EBS:
http(s)://<E-Business Suite Host Name>:<Port>/OA_HTML/RF.jsp?function_id=HXC_MTIME_ENTRYSee My Oracle Support Knowledge Document 1669224.1, Oracle Mobile Timecards for Oracle E-Business Suite Release Notes.
-
-
-
-
Oracle E-Business Suite user name and password
The mobile app user login information is the same user name and password used to log in to Oracle E-Business Suite.
-
Where to get custom or self-signed certificates if required
For information on using custom or self-signed certificates, see Using Custom or Self-signed Certificates with Oracle E-Business Suite Mobile Apps.
Task 6: Performing Advanced Configurations
This section describes the following advanced configuration tasks for Oracle Approvals for EBS, Oracle Learning for EBS, Oracle Timecards for EBS, and Oracle Self-Service HR for EBS:
-
Demilitarized Zone
Perform the following tasks if your mobile users need to access the Oracle Approvals for EBS, Oracle Learning for EBS, Oracle Timecards for EBS, and Oracle Self-Service HR for EBS apps over the Internet:
-
Setting Up Oracle E-Business Suite Environment in a DMZ Configuration
If your mobile users need to access any of the three apps over the Internet, your Oracle E-Business Suite environment must be set up in a demilitarized zone (DMZ) configuration.
-
Performing Mobile Apps Specific Setup Tasks for DMZ
Additionally, you need to perform app-specific tasks to complete the advanced configurations for DMZ.
For more information about DMZ, see Advanced Configurations for Demilitarized Zone.
-
-
Secure Communication with HTTPS
Oracle Approvals for EBS, Oracle Learning for EBS, Oracle Self-Service HR for EBS, and Oracle Timecards for EBS can connect to a TLS-enabled Oracle E-Business Suite environment. This section describes the tasks required for enabling TLS in these apps.
-
Setup Tasks for Enabling TLS in Oracle E-Business Suite
Perform this task to ensure that your Oracle E-Business Suite environment is TLS enabled.
-
Mobile Specific Setup Tasks for TLS Connections
Additionally, you need to perform app-specific tasks to support the connection to a TLS-enabled Oracle E-Business Suite environment.
For additional information about secure communication with HTTPS, see Advanced Configurations for Secure Communication with HTTPS.
-
-
Single Sign-On
If your Oracle E-Business Suite environment is configured with single sign-on (SSO), then SSO is available for the Oracle Approvals for EBS, Oracle Learning for EBS, Oracle Self-Service HR for EBS, and Oracle Timecards for EBS apps through the SSO configuration of your Oracle E-Business Suite instance.
Perform the following tasks to ensure that Oracle E-Business Suite is configured with SSO:
-
Performing Additional Configurations in Oracle Access Manager 12c
-
Accessing the Apps for Oracle E-Business Suite Configured with Oracle Access Manager
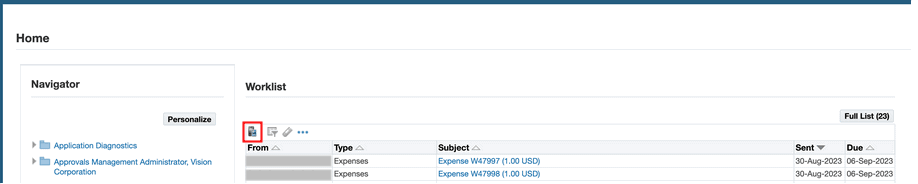
Oracle Approvals for EBS allows users with both local and SSO authentication types to access the app using a web page URL. Alternatively, the Approvals app users with either one of the authentication types can launch the app by clicking the Mobile icon above the Worklist table in the Oracle E-Business Suite Home page.
Oracle E-Business Suite Home Page with the Mobile Icon Highlighted
-
Enterprise Mobility Management Solutions
To support the integration with Enterprise Mobility Management (EMM) solutions, administrators need to configure these three apps as web link applications in EMM which allows the app users to access the app by tapping an icon on their devices. Note that EMM configuration has been tested on iOS devices for these three apps.
For information about integration with EMM solutions, see Integrating Oracle E-Business Suite Mobile Apps with Enterprise Mobility Management Solutions.
Task 7: Enabling the Server Logging and REST Service Auditing Features
This section describes the following logging and auditing features that is applicable for Oracle Approvals for EBS, Oracle Learning for EBS, Oracle Self-Service HR for EBS, and Oracle Timecards for EBS.
Note: Client logging and troubleshooting tips described later in the Diagnostics and Troubleshooting chapter of this guide are not applicable for these three apps.
For more information about logging and how to troubleshoot issues, see Diagnostics and Troubleshooting.
Setup Tasks for Oracle Maintenance for EBS
This section includes the following setup tasks for Oracle Maintenance for EBS:
Additionally, administrators can track the app usage and user installation through the Mobile Applications Manager UI page. See: Managing Usage Metrics for Oracle Maintenance for EBS.
Task 1: Applying Server-Side Patches for Oracle Maintenance for EBS
Perform the required tasks to apply prerequisite patches in the following sequence:
Step 1: Performing Conditional Pre-Install Tasks
For Oracle Maintenance for EBS Only
Apply the corresponding consolidated product family patch and conditionally required patches if needed.
Note: In Oracle E-Business Suite Release 12.2, when you apply patches using the adop (AD Online Patching) utility, adop runs AutoConfig by default.
To support the "Apps SSO Login" authentication in Mobile Release 10.x, you must also apply required patches and perform additional setup tasks to enable the feature. See: Setup Tasks to Enable the Apps SSO Login Authentication Security.
Perform any additional conditionally required pre-install tasks from the following list for Oracle Maintenance for EBS only:
| Oracle E-Business Suite Release or Mobile App Name | Requirement | Pre-Install Task |
|---|---|---|
Oracle E-Business Suite Release 12.2
|
Required only if you plan to implement Oracle Maintenance for EBS | Oracle Mobile Maintenance "Disconnected" feature uses the Oracle Mobile Field Service Multiplatform framework, which does not require Oracle Lite and consequently Oracle Lite should be uninstalled. If the "mobileadmin" schema exists, refer to My Oracle Support Knowledge Document 1564644.1, Oracle Mobile Field Service Store and Forward Multiple Platforms Support. |
Step 2: Applying the Product Family Level Patches for Oracle Release 10.x Apps
Apply the server-side patches for Release 12.2 using either the Oracle E-Business Suite level consolidated patch or the individual product family patches, depending on your needs.
-
Apply the Oracle E-Business Suite level patch for Release 12.2
To simplify the patching efforts, the server-side product family patches are consolidated into a single Oracle E-Business Suite level patch for Release 12.2. This consolidated patch includes each product family patch for the corresponding mobile apps.
For example if you plan to use Oracle Approvals for EBS and Oracle Maintenance for EBS, instead of applying each product family patch for the supported approval types described earlier for Oracle Approvals for EBS and the Oracle Supply Chain Management product family patch for Oracle Maintenance for EBS, you can simply apply the higher level consolidated patch, Patch 37922969:12.2.0 to meet your needs.
-
Apply the relevant product family level patches for Release 12.2
If you only use certain product families, then apply the relevant individual product family level patches for your Oracle E-Business Suite mobile apps.
For example, apply the Oracle Supply Chain Management product family patch listed in the following table for Oracle Maintenance for EBS:
Oracle Supply Chain Management Product Family Level Patch for Oracle Maintenance for EBS Release 10.x Product Family Mobile App Name Patch for Oracle E-Business Suite 12.2 Oracle Supply Chain Management (scm_pf) -
Oracle Maintenance for EBS
Patch 30144036:R12. SCM_PF.C: SCM -12.2 Consolidated Patch For Mobile Applications Foundation V9 -
Step 3: Applying Conditional Post-Install Patches
Apply additional conditionally required post-install patches from the following list for Oracle Maintenance for EBS:
| Oracle E-Business Suite Release or Mobile App Name | Requirement | Patch Information |
|---|---|---|
Oracle E-Business Suite Release 12.2
|
Required for Oracle E-Business Suite mobile apps, leveraging Oracle E-Business Suite Mobile Foundation Release 9.1, connected to Oracle E-Business Suite Release 12.2 |
|
| Oracle E-Business Suite Release 12.2 | Required only if your Oracle E-Business Suite environment has the following patches applied:
Note: If your environment has the following Data Removal Tool consolidated patches applied instead, then the post-install tasks specified in the next column are not required:
|
Perform the following steps in the specified order:
|
Oracle E-Business Suite Release 12.2
|
Required if you connect to an Oracle E-Business Suite 12.2 instance with Oracle Maintenance for EBS | For patch information, refer to My Oracle Support Knowledge Document 1923702.1, Oracle Mobile Maintenance for Oracle E-Business Suite Release Notes. |
Task 2: Configuring the Mobile Apps on the Oracle E-Business Suite Server
Note: Information described in this section applies to Oracle Maintenance for EBS only. It does not apply to all other Oracle E-Business Suite Mobile Release 10.x apps.
Before letting the mobile users download and use the app, you must first enable the mobile app that you want to configure, and then specify configuration parameter values for the app. Oracle E-Business Suite provides default values for the configuration parameters, which you can optionally override as needed.
Oracle E-Business Suite mobile apps use the configuration service to download the configuration file from the server to the mobile apps. The apps then use the parameters specified in the configuration files to connect securely from the mobile client to the Oracle E-Business Suite instance. You must validate the configuration service URL to ensure the mobile app is ready for the users.
This section includes the following topics:
Note: This setup is a one-time process for each app. You can enable and set up each app individually through the Mobile Applications Manager UI pages or set up multiple apps simultaneously using a script.
After the initial setup, you can update the configuration parameters if necessary. If the configuration is changed after the initial setup is complete and loaded to a user's app, the updated parameters will be automatically downloaded to the app every five logins. See Directing Users to Obtain Connection Details and Download Updates from the Server.
Enabling a Mobile App Individually and Specifying the Configuration Through the UI Pages
To access Oracle E-Business Suite Mobile Applications Manager UI pages, log in to Oracle E-Business Suite as a user who has the Mobile Applications Manager responsibility.
Note: The Mobile Applications Manager responsibility is assigned to the Mobile Applications Administrator role (UMX|FND_MBL_ROLE_ADMIN) and the Mobile Applications Developer role (UMX|FND_MBL_ROLE_DEV). A system administrator assigns these roles to users through Oracle User Management. See: Assigning Roles to or Revoking Roles from Users, Oracle E-Business Suite Security Guide.
Users granted different roles can perform various tasks as described in the following table:
| Privileges | Mobile Applications Administrator | Mobile Applications Developer |
|---|---|---|
| Search enterprise apps | Yes | Yes |
| Register enterprise apps | Yes | Yes |
| Configure enterprise apps | Yes | Yes |
| Update application definitions | Yes | Yes |
| Delete application definitions | Yes | Yes |
| View configuration files | Yes | Yes |
| View mobile app installation details | Yes | No |
| View mobile app usage metrics | Yes | No |
To configure mobile apps, users can obtain the responsibility through the Mobile Applications Administrator role. The SYSADMIN user is granted the Mobile Applications Administrator role by default.
Select the Mobile Applications Manager responsibility and choose the Applications link from the navigator. The Search Mobile Applications page appears.
The Search Mobile Applications Page
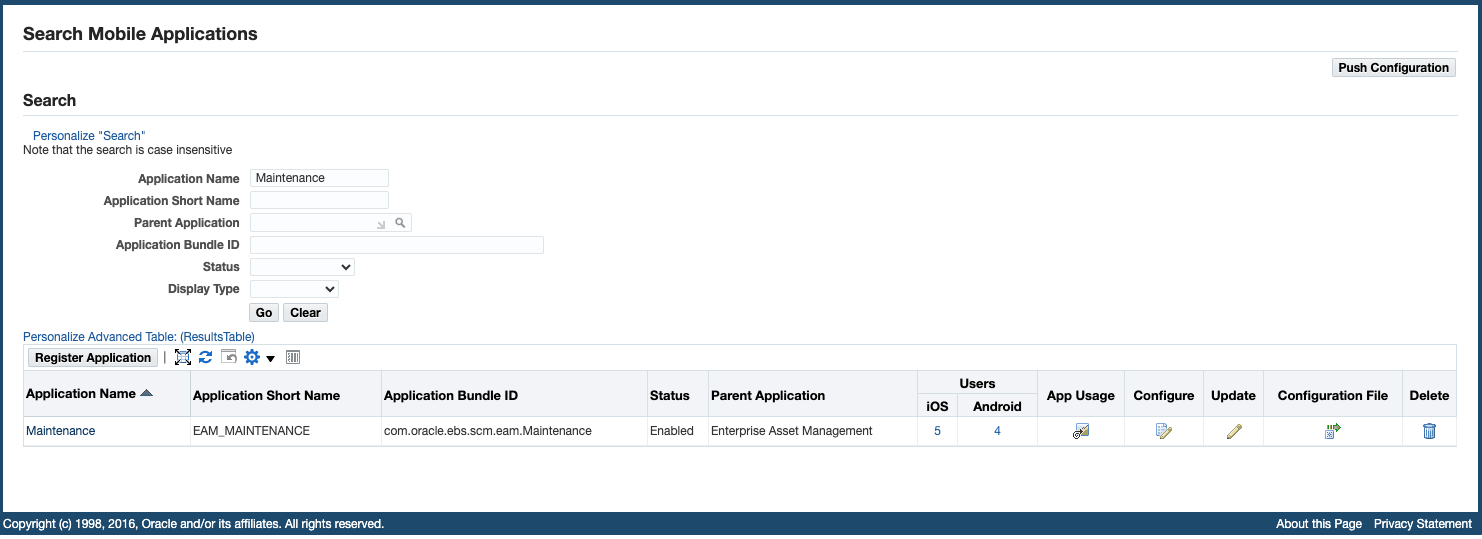
This Search Mobile Applications page is the entry point to access the application definition details for each Oracle E-Business Suite mobile app. After performing a search, a user who has the Mobile Applications Administrator role can perform the following tasks from the search result table:
Important: For Oracle E-Business Suite Mobile Release 10.x, push notifications is currently not available, although Push Configuration is present in the Search Mobile Applications page.
-
Enable and configure an app by clicking the Configure icon.
-
View and validate the configuration for an app by clicking the Configuration File icon.
-
View overall application definition details displayed in read-only mode by clicking a desired app's Application Name link.
Enabling and Configuring a Mobile App Individually
Perform the following steps to configure your mobile app on the Oracle E-Business Suite server:
-
Log in to Oracle E-Business Suite as a user who has the Mobile Applications Administrator role. For example, log in as
SYSADMIN. -
Select the Mobile Applications Manager responsibility and choose the Applications link from the navigator.
-
In the Search Mobile Applications page, enter desired search criteria and click the Search button. The page displays the mobile apps that match the search criteria in the search result table.
For metadata information that you can enter in the search criteria to locate your desired app, see Appendix C: Application Definition Metadata.
-
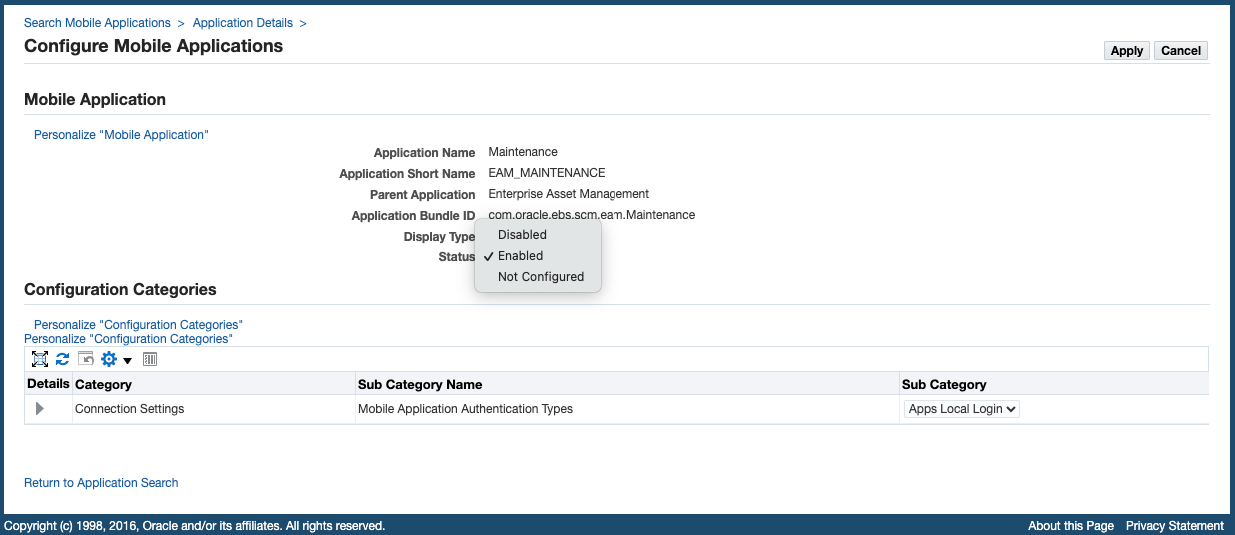
Click the Configure icon for the mobile app that you want to configure from the search result table.
-
Review the app details in the Configure Mobile Applications page. If the selected app is not configured, change the status to "Enabled".
-
Enabled: This allows you to configure the app against Oracle E-Business Suite.
-
Disabled: The app was configured previously but is currently disabled. This prevents any further configuration on the app against Oracle E-Business Suite. If an app was configured successfully prior to setting its status to "Disabled", the app will continue to work.
-
Not Configured (default): The app's definition was just installed on the server and it is not configured yet.
Note that after an app is configured, although it is possible to change its status to "Not Configured", it is recommended that you change it to "Disabled" only.
Configure Mobile Applications Page to Enable a Mobile App
-
-
In the Configuration Categories region, optionally choose the Show link next to the "Connection Settings" category to display the parameters corresponding to the selected authentication type.
You can modify these parameter values for the configuration. See: Configurations for Local and SSO Login Types.
If you want to proceed with the default parameter values, skip the next step 7, and go to step 8.
-
Update the configuration parameter values in the Configuration Parameters region to appropriate values for your Oracle E-Business Suite instance, if the configuration parameter settings for your instance are different from the default settings. For example, for the authentication type, if the location of a web entry point specific to a mobile app is stored in a custom profile option, then update the Service Endpoint (APPS_MOBILE_AGENT) parameter with the custom profile option name. For information on configuring parameters in the Configuration Parameters region, see:
-
Configuring Parameters for the Apps Local Login Authentication Type
-
Configuring Parameters for the Apps SSO Login Authentication Type
Configuration parameters to be included in the configuration file depends on the selected authentication type in the Sub Category field. For example, if "Apps SSO Login" is selected for an app, the corresponding parameters of the "Apps SSO Login" authentication type are included in the configuration file.
When the configuration file is loaded to a mobile app, the app uses these parameters to connect to the intended instance.
Note: The service version for the app is also included as a parameter in the configuration file in Oracle E-Business Suite Mobile Foundation Release 2.1 and onwards, but the parameter value is set by Oracle and it cannot be modified. Therefore, it is not listed in the Configuration Parameters region.
-
-
Click the Apply button. This action saves the selected authentication type and relevant configuration parameters you specified to the database to be used to generate the configuration file
ebs-mobile-config.xmlduring the initial launch of the app. When an app is launched for the first time, the selected authentication type along with the configuration parameters will be loaded to the app to connect to an Oracle E-Business Suite instance, invoke configuration service to download configuration data, and invoke Oracle E-Business Suite services with the selected authentication type.
To validate the configuration, click the Configuration File icon from the search result table. See: Viewing and Validating Your Mobile App Configuration.
On the client side, once the configuration file is downloaded from the server to the mobile app during the initial login, it will be parsed to retrieve the configuration parameters. The app user can view the downloaded parameters and connection details from the mobile app in the device.
Mobile apps may have configuration updates after the initial launch. For example, an administrator changes the timeout values or the service endpoint for an app, or an app's server-side patch provides additional features that require the user to check for updates as described in the patch readme. In the Oracle E-Business Suite Mobile Release 10.x, app users can manually check if any new updates from the server are required in the app if necessary. See Directing Users to Obtain Connection Details and Initiate Server Updates.
Configurations for Local and SSO Login Types
Oracle E-Business Suite mobile apps support "Apps Local Login" and "Apps SSO Login" authentication types that are displayed under the "Connection Settings" category in the Configuration Categories region.
Authentication type is preselected or defined for an app during the app registration. Each authentication type is associated with a set of configuration parameters required to set for an app. When you enable or configure an app, the preselected type (either "Apps Local Login" or "Apps SSO Login") is displayed in the Sub Category field in the Configuration Categories region. You can override the selected type if needed by selecting a different value from the Sub Category drop-down list. After the change, the parameters corresponding to the selected authentication type will be loaded and displayed in the Configuration Parameters region.
Important: Make sure Oracle E-Business Suite mobile apps work with "Apps Local Login" before you change it to the "Apps SSO Login" authentication type. If an app initially connects to Oracle E-Business Suite through "Apps Local Login", and later its authentication type is changed to "Apps SSO Login", the app users should initiate the manual update to refresh the configuration. This is performed by tapping Settings from the mobile app navigation menu, then tapping Connection Details, and then tapping the Sync icon.
Oracle E-Business Suite mobile apps support the following authentication scenarios:
-
Apps Local Login (default) - for local authentication
Apps Local Login is the default type for a mobile app to authenticate mobile users locally against the Oracle E-Business Suite server. When this type is selected for a mobile app, the user passwords must be stored in Oracle E-Business Suite.
Note: If user passwords are externally stored and are not accessible which indicates that your instance is single sign-on enabled, configure your app with the "Apps SSO Login" authentication type instead.
When "Apps Local Login" is selected as the type, three associated parameters, that is, Session Timeout, Idle Timeout, and Service Endpoint, are displayed in the Configuration Parameters region. You can override the default Apps Local Login type if needed by selecting a desired authentication type, such as "Apps SSO Login", in the Sub Category field. After the change, the parameters associated with the new type "Apps SSO Login" are displayed in the Configuration Parameters region.
For information on setting configuration parameters for the Apps Local Login authentication type, see Configuring Parameters for the Apps Local Login Authentication Type.
-
Apps SSO Login - for remote authentication
When the "Apps SSO Login" type is selected for a mobile app, the mobile app users are not authenticated against Oracle E-Business Suite, but against an external Oracle Access Manager (OAM) server.
Use this authentication type if you want to delegate authentication to Oracle Access Manager based on a protected Login URL.
To use "Apps SSO Login" as the authentication type, ensure the following:
-
Your Oracle E-Business Suite instance must be integrated with Oracle Access Manager.
Refer to My Oracle Support Knowledge Document 1388152.1, Overview of Single Sign-On Integration Options for Oracle E-Business Suite.
-
You must apply required patches and perform additional setup tasks to enable this feature.
For information on setting configuration parameters for the Apps SSO Login authentication type, see Configuring Parameters for the Apps SSO Login Authentication Type.
For troubleshooting information, see: Troubleshooting Tips on Configuring Apps with Apps SSO Login Authentication Type.
-
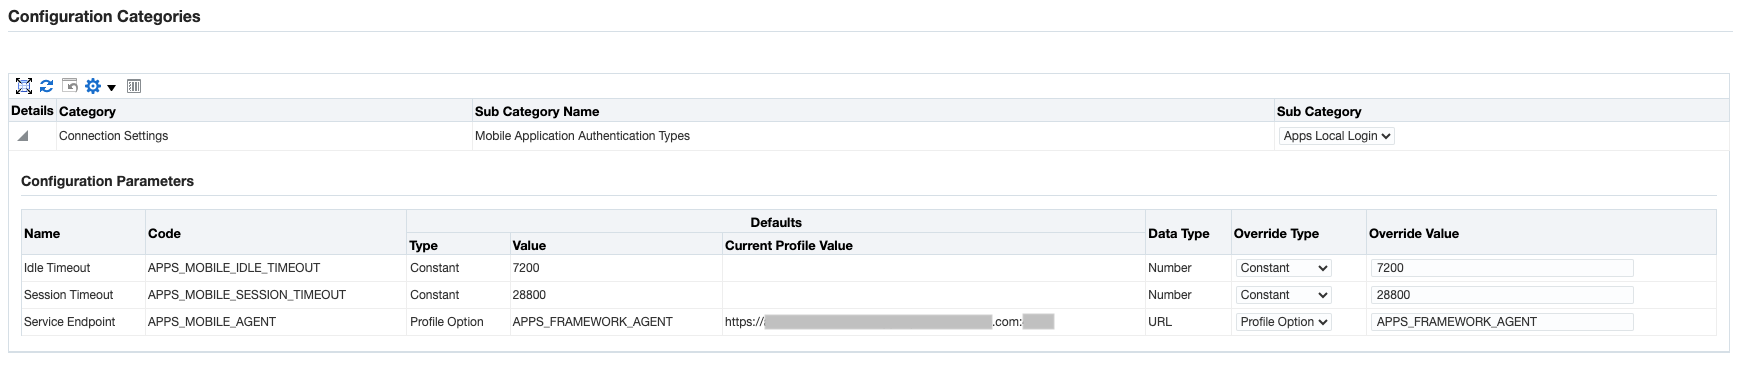
Configuring Parameters for the Apps Local Login Authentication Type
If the default "Apps Local Login" type is used as the authentication type to authenticate users locally, update the following parameter values:
Configuration Categories Region with the "Apps Local Login" Parameters
-
Session Timeout (APPS_MOBILE_SESSION_TIMEOUT): The number of seconds that a user can remain logged in to an app.
This parameter is specified in seconds, and the minimum value is 300 seconds. The default value is 28800 seconds. After the session expires, the user will be prompted with the standard login page if the idle timeout period has not expired.
Note: Always set the Session Timeout parameter to a value greater than the Idle Timeout value.
-
Idle Timeout (APPS_MOBILE_IDLE_TIMEOUT): The number of seconds that an app can remain idle after the system no longer detects the activation of the app.
Similar to session timeout, the minimum value of this parameter is 300 seconds. The default value is 7200 seconds. After the Idle Timeout period expires, the user is timed out of all the app features that are secured by the login connection. In this situation, the user will be prompted with the standard login page.
Note: The Session Timeout and Idle Timeout parameter values can be set independently of the ICX_SESSION_TIMEOUT profile option on the server. If the Oracle E-Business Suite server session timed out based on the ICX_SESSION_TIMEOUT profile value, when a REST request is made from a mobile app, the request fails authentication and thus triggers the mobile app to display the standard login page.
-
Service Endpoint (APPS_MOBILE_AGENT)
This is the web entry point that the app uses to invoke Oracle E-Business Suite web services. If your Oracle E-Business Suite environment is configured with multiple web entry points, you can assign a dedicated web entry point for a specific mobile app to connect to the instance.
Note that this parameter value may be different from the server URL entered by the app users to configure the app for the first time. Compared to the service endpoint, the server URL is a common web entry point to configure the app, whereas the service endpoint URL may not be known by the mobile users. These users would simply use the usual Oracle E-Business Suite web applications URL as the server URL in the configuration flow. The app-specific configuration settings including the Service Endpoint parameter value are downloaded from the server through this server URL. Downloaded parameter values are configured into the app and stored in the local database of the mobile device. The app then connects to the dedicated server defined by the value of the Service Endpoint
This parameter value can be obtained in the following ways:
-
The default value for this parameter is the current value of the APPS_FRAMEWORK_AGENT profile option, as shown in the parameter table.
-
You can optionally override the default value by selecting an override type and entering a corresponding override value.
-
Constant: Enter a constant URL for your Oracle E-Business Suite instance in the Override Value field.
-
Profile Option: If you are storing the URL for your Oracle E-Business Suite instance in a profile option, then you can enter the internal name of that profile option in the Override Value field. In this case the current value of the specified profile option will be used as the server host URL.
Note: To allow access from mobile apps to Oracle E-Business Suite over the Internet, you must set the Service Endpoint parameter value to the external web entry point of your DMZ configuration.
Additionally, if you are accessing the Configure Mobile Applications page from your intranet, then the current value of the APPS_FRAMEWORK_AGENT profile option, which is the default value for the Service Endpoint parameter, will be your internal web entry point. In this case, to allow access over the Internet, you must manually specify an override value for the parameter to set it to the external web entry point.
Consequently, ensure that the Server URL entered by users to configure the app during the initial login matches the Oracle E-Business Suite web entry URL. Otherwise, Oracle E-Business Suite server might reject the REST requests from the mobile app which will result in redirecting the user to the login screen.
-
-
Configuring Parameters for the Apps SSO Login Authentication Type
Important: Before configuring apps with "Apps SSO Login", make sure your apps work with "Apps Local Login" first. If an app initially connects to Oracle E-Business Suite through "Apps Local Login", and later its authentication type is changed to "Apps SSO Login", the app users should initiate the manual update to refresh the configuration. This is performed by tapping Settings from the mobile app navigation menu, then tapping Connection Details, and then tapping the Sync icon.
-
Select "Apps SSO Login" as the authentication type if you want to delegate authentication to Oracle Access Manager based on a protected Login URL.
-
You must apply required patches and perform additional setup tasks including common tasks and mobile specific setup tasks to enable this feature.
Configuration Categories Region with the "Apps SSO Login" Parameters
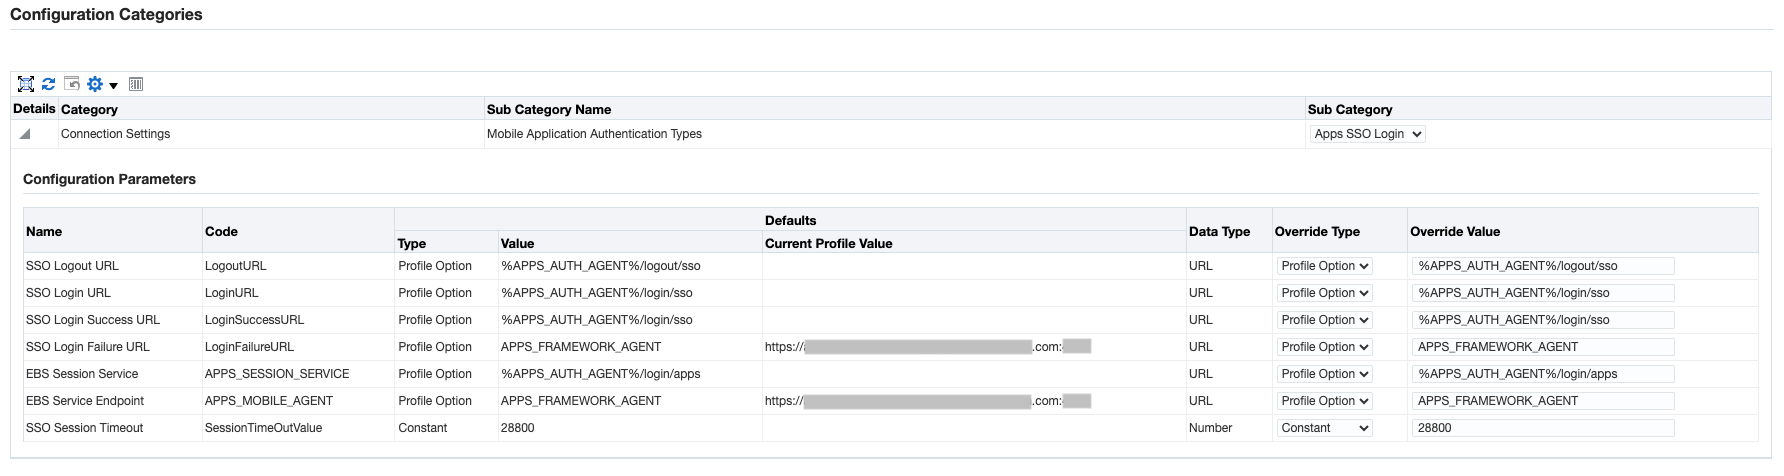
If "Apps SSO Login" is selected as the authentication type to authenticate users remotely, update the following parameter values:
-
SSO Session Timeout (SessionTimeOutValue): The number of seconds that a user can remain logged in to an app.
This parameter is specified in seconds, and the minimum value is 300 seconds. The default value is 28800 seconds. After the SSO session expires, the user will be prompted with the SSO login page.
It is recommended that you set this parameter to a value that is less than the Oracle E-Business Suite session timeout value set in the ICX_SESSION_TIMEOUT profile option. This setting helps avoid issues with REST call failures after the ICX session timeout.
For example, if the ICX_SESSION_TIMEOUT value is set to 30 minutes, you can set the SSO Session Timeout value to 1740 seconds (29 minutes). After the SSO session expires, the user will be prompted with the SSO login page.
-
SSO Login URL (LoginURL): This is the login server URL that challenges the user to authenticate with Oracle Access Manager (OAM).
If the URL is valid, a mobile app displays the login screen where a user enters the credentials for user validation through Oracle Access Manager (OAM).
This parameter value can be obtained in the following ways:
-
The default value for this parameter is the current value of "%APPS_AUTH_AGENT%/login/sso".
Note: The convention
%<string>%is used specifically for parameter values of type "Profile Option" and the value of which contains content that is in addition to the profile value. For example, the runtime value of this SSO Login URL parameter would be "<profile-value-of-the-APPS_AUTH_AGENT>/login/sso", where "/login/sso" is a constant. -
You can optionally override the default value by selecting an override type and entering a corresponding override value.
-
Constant: Enter a constant URL for your Oracle E-Business Suite instance in the Override Value field.
-
Profile Option: If you are storing the URL for your Oracle E-Business Suite instance in a profile option, then you can enter the internal name of that profile option in the Override Value field. In this case the current value of the specified profile option will be used as the SSO Login URL.
-
-
-
SSO Logout URL (LogoutURL): This is the server-side URL that logs out a mobile user by terminating the server session from Oracle Access Manager.
The default value for this parameter is the current value of "%APPS_AUTH_AGENT%/logout/sso". You can optionally override the default value by selecting an override type, Constant or Profile Option, and entering a corresponding override value.
-
SSO Login Success URL (LoginSuccessURL): This is the URL that indicates the user has logged in successfully.
To determine the correct value for this parameter, navigate to the configured SSO Login URL in a web browser session and then submit valid login credentials. The URL that you are re-directed to after successful login is your SSO Login Success URL.
Please note that this URL can be the same as the SSO Login URL. In this release, the same URL is used for this SSO Login Success parameter and the SSO Login URL parameter, and it is the current value of "%APPS_AUTH_AGENT%/login/sso".
-
SSO Login Failure URL (LoginFailureURL): This is the URL to redirect a user to a login failure page after the authentication fails from the login page. This parameter is reserved for future use.
-
EBS Session Service (APPS_SESSION_SERVICE): This is the URL to create a session in Oracle E-Business Suite after the mobile user is successfully authenticated against the OAM server.
The default value for this parameter is the current value of "%APPS_AUTH_AGENT%/login/apps", which is "
<profile-value-of-the-APPS_AUTH_AGENT>/login/apps", where "/login/apps" is a constant.You can optionally override the default value by selecting an override type, Constant or Profile Option, and entering a corresponding override value.
-
EBS Service Endpoint (APPS_MOBILE_AGENT): This is the web entry point that the app uses to invoke Oracle E-Business Suite web services.
The usage of this parameter is the same as the Service Endpoint parameter described earlier for the HTTP Basic authentication type. See: Service Endpoint (APPS_MOBILE_AGENT).
Viewing and Validating Your Mobile App Configuration
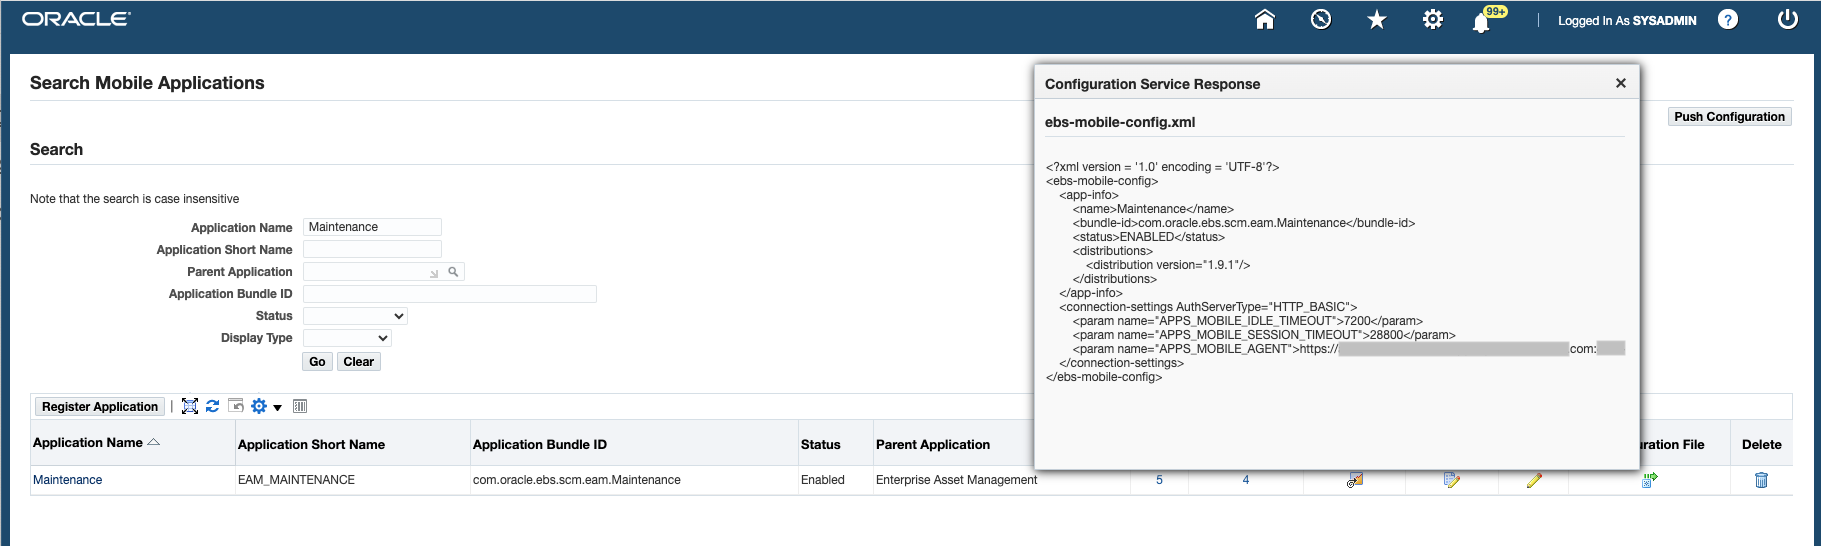
After configuring a mobile app and applying the changes, you can view and validate the updated configuration file ebs-mobile-config.xml for the app.
To validate the configuration, click the Configuration File icon from the search result table in the Search Mobile Applications page. This displays the content of the configuration file in the Configuration Service Response pop-up window.
Configuration Service Response Pop-up Window with Configuration File Content
Additionally, you can validate the configuration by accessing the configuration service URL through a web browser. See Validating the Configuration.
Reviewing Your Mobile App Details
You can review existing application definition metadata and configuration details for your app if needed before or after configuring your app.
To view the app details, click a desired mobile app's Application Name link from the search result table. The Application Details page displays the existing definition information in read-only mode for your selected app.
For example, click the "Maintenance" link to view the Application, Distributions, and Configuration regions in the Application Details page for Oracle Maintenance for EBS.
-
Application Region
This region includes the selected app status and application metadata information, such as application short name, application name, application type, parent application name, application bundle Id, and display type.
The Status field indicates the current app condition whether if it is enabled, disabled, or not configured. Note that by default "Not Configured" is selected. To enable the app, you must update the status from "Not Configured" to "Enabled" and configure your app. For information on configuring your app, see Enabling and Configuring a Mobile App Individually.
-
Distributions Region
This region describes the information about service version and distribution platform, such as Android, iOS, or both, for the selected app.
-
Configuration Region
If the selected mobile app is enabled and configured, this region displays the configuration details for the selected app. It includes the desired authentication type and the associated configuration parameters for the app.
To update the selected mobile app details, click the Update button.
Enabling and Setting Up Multiple Mobile Apps Using a Script
Instead of enabling and specifying the configuration information for each app one at a time through the Mobile Applications Manager UI pages, you can complete the setup tasks for multiple apps simultaneously by using an ant script called EBSMblConfigApps.xml. For example, use the script to easily copy the configuration details for your apps on different Oracle E-Business Suite instances, or use the script to reconfigure the mobile apps on the target environment after cloning.
Perform the following steps to configure multiple apps at the same time by using the script:
-
Copy the template file
Applications.xmland the scriptEBSMblConfigApps.xmlfrom the$JAVA_TOP/oracle/apps/fnd/mobile/ant/directory to a temporary directory in the Oracle E-Business Suite instance. Working with a copy helps you avoid changes to the seeded template fileApplications.xml.The template file
Applications.xmlcontains metadata for all the Oracle E-Business Suite mobile apps. The following example shows a sample templateApplications.xmlfile:Note: The script supports the selection of the Sub Category (
<sub-category>) attribute that indicates either of the following authentication types to be used by a mobile app.-
HTTP_BASIC: The type corresponds to "Apps Local Login" (display name) from the Mobile Applications Manager UI pages.
-
WEB_SSO: The type corresponds to "Apps SSO Login" (display name) from the Mobile Applications Manager UI pages.
<applications configureAll="N"> <application configure="N"> <app-info> <name>Maintenance</name> <app-short-name>EAM_MAINTENANCE</app-short-name> <bundle-id>com.oracle.ebs.scm.eam.Maintenance</bundle-id> <status>NOT_CONFIGURED</status> </app-info> <connection-settings> <sub-category name="HTTP_BASIC" select="Y"> <param name="APPS_MOBILE_IDLE_TIMEOUT" type="SERVER_DEFAULT"/> <param name="APPS_MOBILE_SESSION_TIMEOUT" type="SERVER_DEFAULT"/> <param name="APPS_MOBILE_AGENT" type="SERVER_DEFAULT"/> </sub-category> <sub-category name="WEB_SSO" select="N"> <param name="APPS_MOBILE_AGENT" type="SERVER_DEFAULT"/> <param name="APPS_SESSION_SERVICE" type="SERVER_DEFAULT"/> <param name="LoginFailureURL" type="SERVER_DEFAULT"/> <param name="LoginSuccessURL" type="SERVER_DEFAULT"/> <param name="LoginURL" type="SERVER_DEFAULT"/> <param name="LogoutURL" type="SERVER_DEFAULT"/> <param name="SessionTimeOutValue" type="SERVER_DEFAULT"/> </sub-category> </connection-settings> </application> ... </applications> -
-
To configure all the Oracle E-Business Suite mobile apps at the same time, set the attribute
ConfigureAllin theApplications.xmlfile toYat the root element (applications) level. Otherwise, leave theConfigureAllattribute toNand set theConfigureattribute toYat the applications level for each particular app that you want to configure.-
If you set the
ConfigureAllattribute toY, and set the "Configure" attribute toNfor an app at the application level, theConfigureAllattribute set toYat the root element will override the value set at theConfigureattribute and will configure all the Oracle E-Business Suite mobile apps.Note that the
ConfigureAllattribute with its value set toYat the root element level only configures all the apps whose definitions exist in the instance. If the definition of an app, (for example, the Timecards app) does not exist in that instance, even thought you set theConfigureAllattribute toY, only those apps that are defined in the instance will be configured, and the Timecards app will not be configured. An appropriate message would be shown as the output of the script indicating the result. -
If the
ConfigureAllattribute is set toN, then the attribute of each individual app determines if the app will be configured or not depending on whether you set theConfigureattribute toYorNfor each app at the application level. In this situation, only the specified apps will be configured.
-
-
For each app you want to configure, change the status from the default "NOT_CONFIGURED" to "ENABLED".
-
For each app you want to configure, set the
selectattribute for the desired authentication type. By default, theselectattribute for the "HTTP_BASIC" type (Apps Local Login) is set toY.Note: If the
selectattribute for the "WEB_SSO" type (Apps SSO Login) is set toY, you must set theselectattribute for the "HTTP_BASIC" type toN. If both types are set toY, then the following errors may occur:[java] There are two Authentication types selected for the Application, <name> (such as Maintenance). [java] There can be only one type of authentication selected while configuring <name>.
-
Set each parameter
typeattribute to one of the following values only.-
SERVER_DEFAULT: The default value of the parameter is used to configure the app. For example, 28800 is the server default for Session Timeout parameter.
-
CONSTANT: A constant override value is used to replace the default value for the parameter. In this situation, provide a value for that parameter, such as a constant URL for your Oracle E-Business Suite instance as a constant value for the APPS_MOBILE_AGENT parameter.
-
PROFILE_OPTION: A profile option is used to override the default value for the parameter. For example, provide the internal name of a profile option for the APPS_MOBILE_AGENT parameter.
The options listed above are the same as those are shown in the Configuration Parameters region if you configure the app from the Mobile Applications Manager UI pages.
Configuration Categories Region with the "Apps Local Login" Parameters
The following example shows a sample custom template
Applications.xmlfile after setting the parameters with the Apps Local Login (HTTP Basic) authentication type:<?xml version="1.0" encoding="UTF-8" standalone="yes"?> <applications configureAll="N"> <application configure="Y"> <app-info> <name>Maintenance</name> <app-short-name>EAM_MAINTENANCE</app-short-name> <bundle-id>com.oracle.ebs.scm.eam.Maintenance</bundle-id> <status>ENABLED</status> </app-info> <connection-settings> <sub-category name="HTTP_BASIC" select="Y"> <param type="SERVER_DEFAULT" name="APPS_MOBILE_IDLE_TIMEOUT"/> <param type="CONSTANT" name="APPS_MOBILE_SESSION_TIMEOUT">28800</param> <param type="PROFILE_OPTION" name="APPS_MOBILE_AGENT">APPS_FRAMEWORK_AGENT</param> </sub-category> </connection-settings> </application> -
-
After completing the changes in the template file
Applications.xml, run the following command from the folder where the template file is placed to initiate the configuration process.ant -f EBSMblConfigApps.xmlIf any validation error occurs during the configuration process, the error information will be reported in the command line. Additionally, an error log file
EBSMblConfigError.logis created in the same directory to capture other types of errors. You can use the generated log file to trace and troubleshoot the errors if needed.When the process is completed successfully, you can verify the configuration details as described in Validating the Configuration or validate the configuration from the Mobile Applications Manager UI pages.
Validating the Configuration
Once the app-specific configuration parameters are specified, these values are stored on the server and the associated configuration file of the app is not generated at this time. When a user logs in to the app for the first time, the configuration file ebs-mobile-config.xml is then generated when requested and downloaded to the mobile app using the configuration service.
To validate the configuration for your app, construct the configuration service URL and verify if the URL is accessible through a web browser.
Note: You can also validate the configuration through the Search Mobile Applications UI pages by clicking the Configuration File icon from the search result table, as described in Enabling a Mobile App Individually and Specifying the Configuration through the UI.
-
Verify if the configuration service URL is accessible through a web browser by performing the following steps:
-
Construct the configuration service URL in the following format:
http(s)://<hostname>:<port>/OA_HTML/RF.jsp?function_id=mConfig&bundleId=<application bundle id>&file=ebs-mobile-config.xmlPlease note that this step is only for you to validate the configuration service URL for the app, and you should not provide this URL information to the mobile app users.
For the Application Bundle Id for each app, see Appendix C: Application Definition Metadata.
-
Copy the configuration service URL you just constructed and paste it into a browser window. The configuration file is uploaded and displayed in the browser window.
The following example shows a sample
ebs-mobile-config.xmlfile returned as the response payload for the configuration service:<?xml version="1.0" encoding="UTF-8" standalone="yes"?> <ebs-mobile-config> <app-info> <name>Maintenance</name> <bundle-id>com.oracle.ebs.scm.eam.Maintenance</bundle-id> <status>ENABLED</status> <distributions> <distribution version="1.1.0" platform="IOS"/> </distributions> </app-info> <connection-settings> <param name="APPS_MOBILE_IDLE_TIMEOUT">7200</param> <param name="APPS_MOBILE_SESSION_TIMEOUT">28800</param> <param name="APPS_MOBILE_AGENT">example.com:1234</param> </connection-settings> </ebs-mobile-config>Please note that a version value used to identify a given app's server level is retrieved from the app's definition metadata and is included in the
ebs-mobile-config.xmlfile (as shown above), along with the configuration parameters specified either through the Mobile Applications Manager UI pages or through the script. -
Verify the content to ensure that the configuration file for your mobile app is valid, well-formed XML, and validate that the configuration parameter values are the same values as configured from the Mobile Applications Manager UI pages or using the script.
-
-
Install an app on a mobile device and verify if the server URL is accessible through the configuration screen in the mobile app by performing the following configuration steps:
-
Enter the server URL in the following format:
http(s)://<hostname>:<port> -
Check whether the configuration on the device was successful by logging into the app and verifying that you can access the app content.
Please note the difference between the full configuration service URL used for validation in step 1 in this section and the server URL shared with the app users.
-
-
Make sure the setup is valid at this point and ensure that your app works with the "Apps Local Login" authentication type before proceeding to any advanced configurations.
-
In the Mobile Applications Manager UI pages, configure the mobile app with authentication type as "Apps Local Login".
See: Configuring Parameters for the Apps Local Login Authentication Type.
-
Log in to the mobile app as a user whose password is stored in Oracle E-Business Suite, such as
sysadmin.You should be able to successfully log in and view the mobile app pages.
-
Task 3: Setting Up Mobile App Access to Responsibilities
Oracle Maintenance for EBS uses role-based access control to protect mobile app data from unauthorized access.
Most mobile apps have app-specific access roles. Only users who are assigned those app-specific roles can access the corresponding mobile apps. In order for those users to be able to access Oracle E-Business Suite data in a mobile app that invokes REST services, all REST services that the mobile app uses are grouped into a permission set that is then granted to an app-specific access role. To provide the mobile app access capability to existing Oracle E-Business Suite users, you must assign each access role to the responsibilities that you want to associate with the corresponding mobile app. Users who have the predefined mobile app access roles through those responsibilities will have access to the corresponding mobile apps.
For Oracle E-Business Suite mobile apps, responsibility selection is based on the combination of user role and mobile app. If the mobile app access role is assigned to a single responsibility, then the responsibility is automatically set and selected for a user using that mobile app. If a user has more than one responsibility to which the mobile app access role is assigned, then those responsibilities will be displayed for selection.
Note that it is not required to create or assign any new responsibility to users to use mobile apps. For information on the app-specific access roles, see Mobile App Access Roles.
Assigning Mobile App Access Roles to Responsibilities
To secure mobile app data, perform the following steps to assign predefined app-specific mobile app access roles to responsibilities:
-
Log in to Oracle E-Business Suite as a user who has the User Management responsibility. For example, log in as
SYSADMIN.Note: The User Management responsibility is assigned to the Security Administrator role. This seeded role is assigned to the
SYSADMINuser by default. -
Select the User Management responsibility and navigate to the Roles and Role Inheritance page.
-
Search for the responsibility you want.
-
In the search results table, click the "View In Hierarchy" icon for your responsibility. Note that the codes for responsibilities start with FND_RESP, while the codes for roles start with
UMX. -
In the Role Inheritance Hierarchy, click the Add Node icon for your responsibility.
Oracle User Management displays the next role hierarchy page with a message informing you that the role you select will be inherited. In this page, either search or expand nodes until you find the app-specific access role that you want to add to the responsibility. Use the Quick Select icon to choose that role.
-
Oracle User Management then displays the initial page again, with a confirmation message at the top. On this page, verify that the custom UMX role appears underneath the responsibility. You may need to expand one or more nodes to display the UMX role under the responsibility. Any other inherited roles appear as well.
-
When you add the role to the responsibility, you must also update the associated grant for the app-specific access roles to reference the specific responsibility as the security context. You need a separate grant for each responsibility to which you are adding the role, so in some cases you should duplicate the shipped grant rather than updating it.
In the row of the role that you just added, click the Update icon for your role to navigate to the Update Role page.
-
In the Grants Table at the end of the page, if this is the first responsibility to which you are adding to the role, click the Update icon for the grant you want to update. If this is the second responsibility or more to which you are adding the role, click the Duplicate icon for the grant instead of the Update icon. In the duplicate grant, you must provide a unique name for the grant.
-
Apply your changes.
If you want to use the app-specific access role with more than one responsibility, you must have a separate grant with a security context corresponding to each responsibility. You can also add grants for a given role as a separate process, rather than while you are adding the role to the responsibility. To do so, perform the following steps:
-
In the User Management responsibility, navigate to the Roles and Role Inheritance page.
-
Search for the app-specific access role you want.
-
Click the Update icon for your role to navigate to the Update Role page.
-
In the Grants Table at the end of the page, click the Duplicate icon for the grant you want to duplicate.
-
Modify the grant name of the new grant to make it unique.
-
In the Security Context region, enter the name of the additional responsibility to which you are adding the app-specific access role. Enter the name of a shipped responsibility from the table above, or, if you are using a custom responsibility, enter the name of that custom responsibility.
-
Click Next, Next, Finish, and OK to complete your grant.
For more information, see the Oracle E-Business Suite Security Guide.
Task 4: Performing Additional Setup for Device Integration
This section describes additional setup steps for Oracle Maintenance for EBS when it integrates with maps on the mobile devices and barcodes. It includes the following topics:
Setting Up Maps
Oracle Maintenance for EBS integrates with maps through Oracle Maps.
Note: The Oracle Maps feature is enabled by default; therefore, there is no additional setup required for integrating with Oracle Maps.
For example, Oracle Maintenance for EBS presents the asset information and its geographical location in an Oracle map.
Support for Barcodes
Some Oracle E-Business Suite mobile apps provide support through the Cordova plug-in for scanning barcodes to capture data or scanning an item or work order.
Note: There is no additional setup task required to integrate Oracle E-Business Suite mobile apps with barcodes.
For example, Oracle Maintenance for EBS uses barcode scanning to capture data for assets, work orders, and work requests.
Data Captured and Shown in the Mobile Page Using Barcode Scanning

Supported Barcode Types
For mobile apps that include barcode scanning, the following barcode types are supported:
-
QR Code
-
Data Matrix
-
UPC E
-
UPC A
-
EAN 8
-
EAN 13
-
Code 128
-
Code 39
Task 5: Performing Additional App-Specific Setup
Perform the additional app-specific implementation steps described in the My Oracle Support Knowledge Document 1923702.1, Oracle Mobile Maintenance for Oracle E-Business Suite Release Notes.
Task 6: Communicating Mobile App Information to Users
After you have completed the setup tasks for your app, provide the following information to the users who will install the app from the Apple App Store or Google Play Store:
-
Name of the app
For the name of the mobile app to download or access through a URL, see the Oracle E-Business Suite Mobile Apps, Release 12.1 and 12.2 Documentation Index, My Oracle Support Knowledge Document 1641772.1.
-
Where to download the app
For the download information, refer to the Oracle E-Business Suite Mobile Apps, Release 12.1 and 12.2 Documentation Index, My Oracle Support Knowledge Document 1641772.1.
-
Oracle E-Business Suite user name and password
The mobile app user login information is the same user name and password used to log in to Oracle E-Business Suite.
-
Oracle E-Business Suite server URL in the following format:
http(s)://<hostname>:<port>Be aware of the difference between the server URL shared with the app users and the full configuration service URL used for validation as described in step 1, Validating the Configuration.
Important: If your Oracle E-Business Suite is deployed in a multinode and load-balanced environment, make sure that the Oracle E-Business Suite server URL represents the web entry point of your environment as specified in your $CONTEXT_FILE. By default, the web entry point is set to the host name of the application server where Oracle E-Business Suite is installed. If a load-balancer is used, the web entry point becomes the load-balancer's host name. Refer to:
-
Using Load-Balancers with Oracle E-Business Suite Release 12.2, My Oracle Support Knowledge Document 1375686.1
-
Using Load-Balancers with Oracle E-Business Suite Release 12.0 and 12.1, My Oracle Support Knowledge Document 380489.1
If you modify the topology of your Oracle E-Business Suite server in a way that changes the server URL, then you must inform the app users of the new URL. The users must update the server URL in the device settings from the mobile home page to trigger the reconfiguration process for the app.
Additional Information: The latest server-side patches must be applied to enable new features and fixes that require those patches. Oracle recommends that you define a plan to maintain the mobile server side on a regular basis that is aligned with the Oracle E-Business Suite mobile releases, if you are using the standard apps installed from public app stores.
-
Task 7: Performing Advanced Configurations
This section describes the following advanced configuration tasks for Oracle Maintenance for EBS:
-
Demilitarized Zone
Perform the following tasks if your mobile users need to access the Oracle Maintenance for EBS app over the Internet:
For more information about DMZ, see Advanced Configurations for Demilitarized Zone.
-
Secure Communication with HTTPS
Oracle Maintenance for EBS supports the connection to a TLS-enabled Oracle E-Business Suite environment as long as the server uses public or commercial-CA issued TLS certificates. Self-signed or custom certificates are currently not supported.
For additional information about secure communication with HTTPS, see Advanced Configurations for Secure Communication with HTTPS.
-
Single Sign-On
Oracle Maintenance for EBS is not configured for SSO by default even if you have integrated Oracle E-Business Suite with Oracle Access Manager for single sign-on. However, you can configure SSO for this app using the setup tasks described in this section.
-
Setup Tasks to Enable the Apps SSO Login Authentication Security
-
Testing the Setup for the Apps SSO Login Authentication Security
For additional information about single sign-on, see Advanced Configurations for Single Sign-On.
-
Enterprise Mobility Management Solutions
To support the integration with Enterprise Mobility Management (EMM) solutions, administrators need to perform required setup tasks to preconfigure the Server URL that Oracle Maintenance for EBS will use to connect to Oracle E-Business Suite. Once the setup tasks are complete, the app users no longer need to enter this URL manually after launching an app installed from an EMM's app catalog. Note that this EMM configuration has been tested on iOS devices for Oracle Maintenance for EBS.
For information about integration with EMM solutions and the setup tasks to preconfigure the Server URL for mobile apps, see Integrating Oracle E-Business Suite Mobile Apps with Enterprise Mobility Management Solutions.
Task 8: Enabling the Logging and Diagnostics Features
Oracle Maintenance for EBS uses the logging and diagnostics features described later in the Diagnostics and Troubleshooting chapter. Specifically, it includes the following logging and diagnostics features for Oracle Maintenance for EBS.
For more information about logging and diagnostics, see Diagnostics and Troubleshooting.
Managing Usage Metrics for Oracle Maintenance for EBS
Administrators of the Oracle Maintenance for EBS app can track the app usage and user installation through the Mobile Applications Manager UI page. This section describes how to perform various administrative tasks to understand how Oracle Maintenance for EBS is installed and used.
Viewing Mobile App Installation and Usage Metrics
Once users start using the Oracle Maintenance for EBS app, it is highly beneficial for administrators to gather statistics on the app. These statistics include platform-specific user installations and usage frequencies over a period of time for this app. Users who have the Mobile Applications Administrator role can obtain this essential information through the Mobile Applications Manager UI pages and provide needed support for their users more efficiently.
Note: These features are available only for users who have the Mobile Applications Administrator role. Users who have the Mobile Applications Developer role cannot find the Users and App Usage columns from the search result table.
To view user installations and usage metrics for Oracle Maintenance for EBS app, select the Mobile Applications Manager responsibility and choose the Applications link from the navigator. The Search Mobile Applications page appears.
Search Mobile Applications Page with Mobile App Installation and Usage Information Highlighted
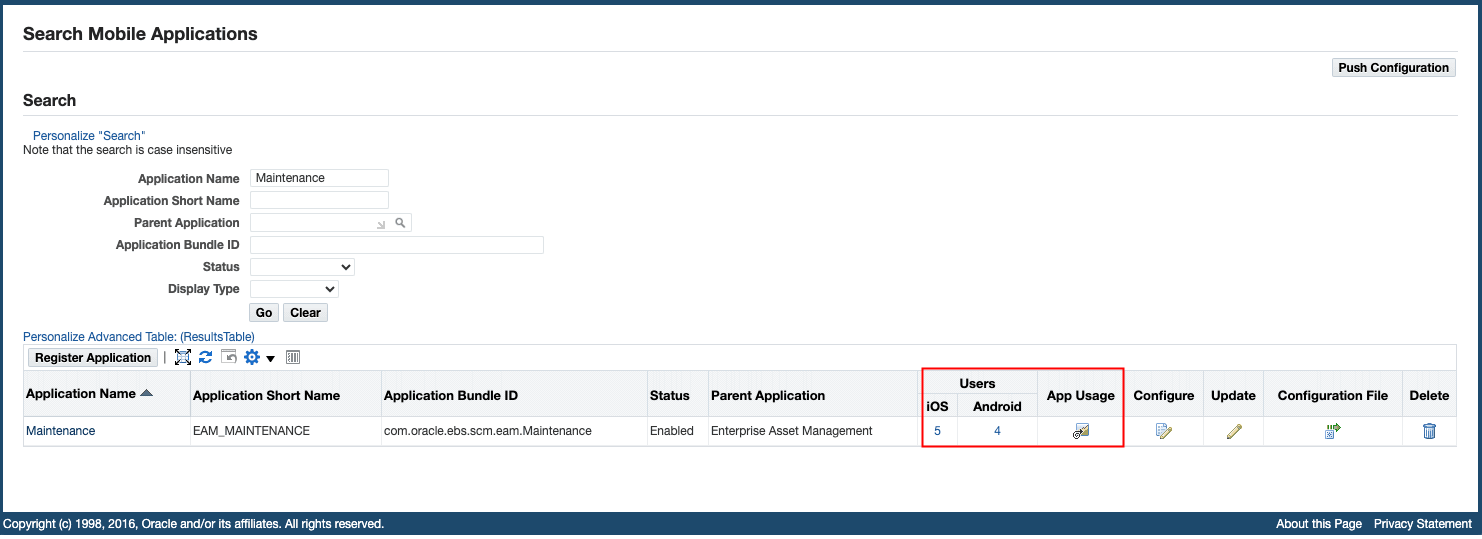
Perform the following tasks to view user installation and app usage information:
-
Click the number of users link for iOS or Android to view the installation information for a desired app.
-
Click the App Usage icon to view the mobile usage information.
Viewing Your Mobile App Installation Details
To view user installation information for a specific app (such as "Maintenance), after locating the app in the Search Mobile Applications page, click the number of users link for iOS or Android in the Users column from the search result table. The Mobile App Installations page appears with the installation details for your selected app, such as "Maintenance".
Mobile App Installations Page
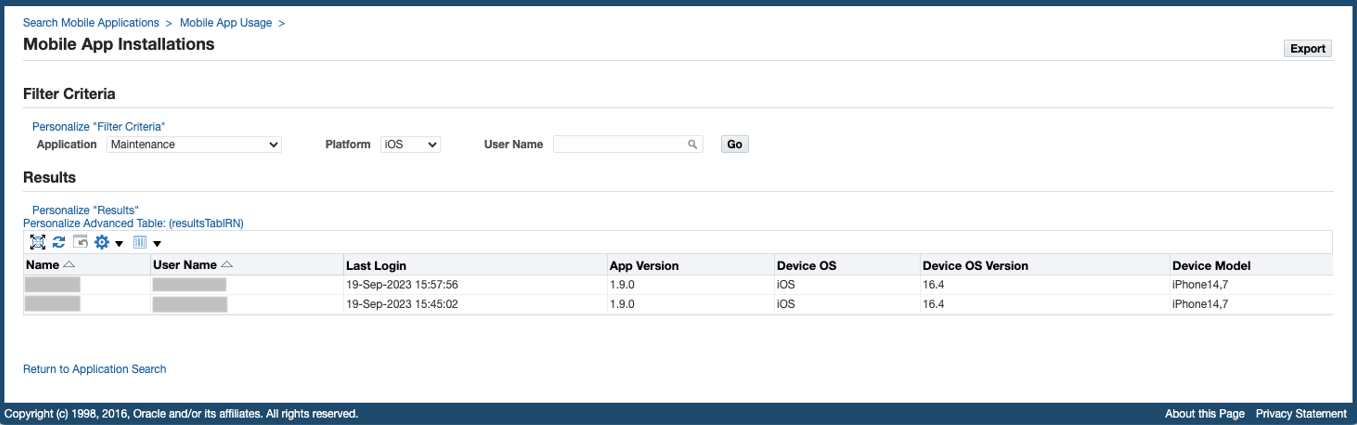
The installation details include the name of the users who have installed the app (such as "Maintenance"), last login date and time, app version, device or platform information (either iOS or Android, depending on your selection from the Users column in the search result table), device OS version, and device model information (such as iPhone or Android).
In the Filter Criteria region, you can further refine the result by modifying the following fields for the same app or obtain the information for a different app.
-
Application: This field is automatically displayed with your selected app name from the search result table.
If you want to view the user installations for a different app, select a desired app from the Application drop-down menu.
-
Platform: Either iOS or Android is selected automatically based on your selection from the search result table in the Search Mobile Applications page.
You can select a different value, including "iOS", "Android", or "All", to view the platform-specific user installations for the selected app.
If "All" is selected, then the user installation information for both iOS and Android are displayed.
-
User Name: Specify a desired user name if you want to view the installation for that user.
You can click Export to export all the data to an Excel spreadsheet if desired.
Click the Return to Application Search link to return back to the Search Mobile Applications page.
For information on viewing app usage information, see Viewing Your Mobile App Usage.
Viewing Your Mobile App Usage
To view the usage pattern for an app in terms of number of logins in the last few days or hours, click the App Usage icon from the search result table in the Search Mobile Applications page. The Mobile App Usage page appears for your desired app.
Mobile App Usage Page
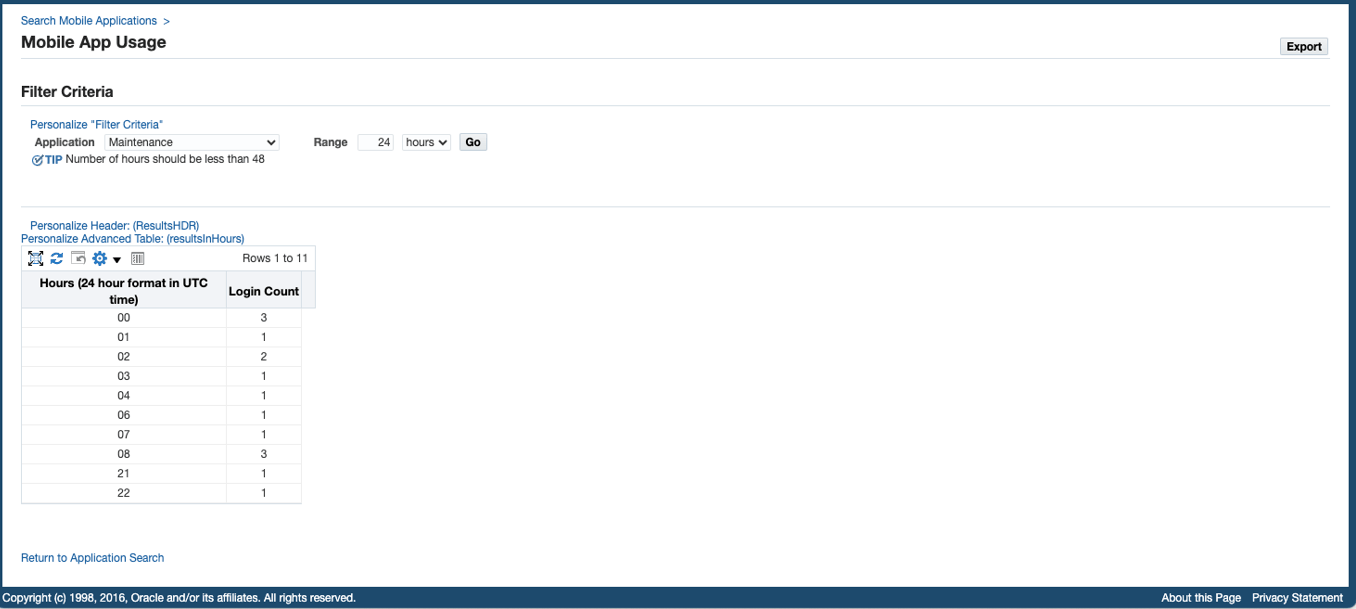
In the Filter Criteria region, enter the following information to view the app usage information:
-
Application: This field is automatically displayed with your desired app name.
Select a different name if you want to view the usage information for another app.
-
Range: Enter a numeric number in the text box as the time range, and select a desired range unit, such as "hours" or "days". For example, obtain the number of logins for an app within the last 47 hours or the last 24 days.
Note that if "hours" is selected as the range unit, the number you specify in the text box should be less than "48" hours. Otherwise, an error message appears.
After you modify the filter criteria and click Go, the app usage information is displayed in a table with the app login date and login count.
To export the data to an Excel spreadsheet, click Export.
Click the Return to Application Search link to return back to the Search Mobile Applications page.
You can purge the app usage data if needed, see Purging Mobile App Usage Information.
For information on viewing user installations for an app, see Viewing Your Mobile App Installation Details.
Purging Mobile App Usage Information
You can purge app usage data stored in the database that has been collected for a period of time by running a concurrent program called "Mobile Metrics Purge Program".
Important: The "Mobile Metrics Purge Program" only purges the mobile app usage data. The data for user installations will not be purged.
To access this concurrent program, log in to Oracle E-Business Suite as a user who has the System Administrator responsibility. Select Concurrent, and then Requests from the navigation menu.
In the Submit Request window, select "Mobile Metrics Purge Program" as the Name from the drop-down list.
Submit Request Window with "Mobile Metrics Purge Program" Concurrent Program Selected
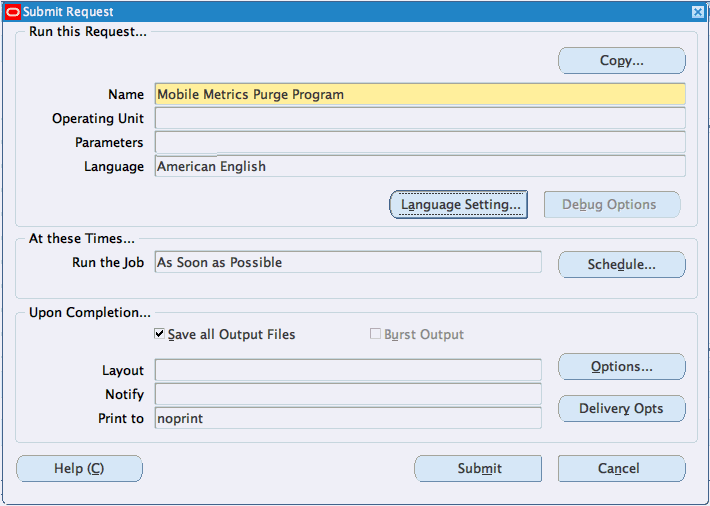
After you select "Mobile Metrics Purge Program" as the concurrent program name, the Parameters window appears. Specify a number of days in the Retention Age in Days field to indicate the desired days that you intend to retain the data. All the app usage data that is older than the specified days will be purged.
Parameters Window
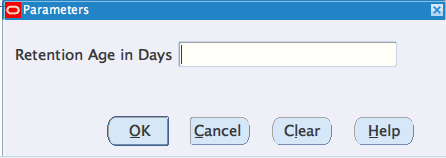
For example, if you desire to keep the data within the last 30 days, then enter "30" in the Retention Age in Days field. The app usage data stored in the database older than the last 30 days will be removed, but the data for user installations remains intact and will not be purged.
After you specify the information in the Parameters window and click OK, the specified number of days, such as "30", is automatically displayed in the Parameters field.
Submit Request Window with Required Parameters

Click Submit to submit your concurrent request and start the process of purging the app usage data based on the specified parameter.
Setup Tasks for Oracle Field Service for EBS and Oracle Mobile SCM for EBS (MSCA)
This section includes the following setup tasks for Oracle Field Service for EBS and Oracle Mobile SCM for EBS (MSCA):
Task 1: Applying Server-Side Patches for Oracle Field Service for EBS and Oracle Mobile SCM for EBS (MSCA)
Oracle Field Service for EBS and Oracle Mobile SCM for EBS (MSCA) are the only Release 10.x apps available for both Oracle E-Business Suite Release 12.1.3 and Release 12.2. If your Oracle E-Business Suite instance is on Release 12.1.3, apply the patches relevant to Release 12.1.3.
For Oracle Field Service for EBS and Oracle Mobile SCM for EBS (MSCA) Release 10.x
Note: Oracle Field Service for EBS and Oracle Mobile SCM for EBS do not require any product family patches.
Apply any additional conditionally required patches from the following list for the Oracle Field Service for EBS and Oracle Mobile SCM for EBS apps:
| Oracle E-Business Suite Release or Mobile App Name | Requirement | Patch Information |
|---|---|---|
| Oracle E-Business Suite Release 12.2 and 12.1.3 | Required only if your Oracle E-Business Suite environment has the following patches applied:
Note: If your environment has the following Data Removal Tool consolidated patches applied instead, then the post-install tasks specified in the next column are not required:
|
Perform the following steps in the specified order:
|
Oracle E-Business Suite Release 12.2 and Release 12.1.3
|
Required if you connect to an Oracle E-Business Suite 12.2 or 12.1.3 instance with Oracle Field Service for EBS | For patch information, refer to My Oracle Support Knowledge Document 2188514.1, Oracle Mobile Field Service for Oracle E-Business Suite Release Notes. |
Oracle E-Business Suite Release 12.2 and Release 12.1.3
|
Required if you connect to an Oracle E-Business Suite 12.2 or 12.1.3 instance with Oracle Mobile SCM for EBS (MSCA) | For patch information, refer to My Oracle Support Knowledge Document 2108155.1, Oracle Mobile Supply Chain Applications for Oracle E-Business Suite Release Notes. |
Task 2: Support for Barcodes
Some Oracle E-Business Suite mobile apps provide support through the Cordova plug-in for scanning barcodes to capture data or scanning an item or work order.
Note: There is no additional setup task required to integrate Oracle E-Business Suite mobile apps with barcodes.
Supported Barcode Types
Oracle Mobile SCM for EBS (MSCA) supports the following barcode types:
-
QR Code
-
Data Matrix
-
UPC E
-
UPC A
-
EAN 8
-
EAN 13
-
Code 128
-
Code 39
Task 3: Performing Additional App-Specific Setup
Perform any appropriate app-specific implementation steps described in each release note of the following mobile apps:
-
Oracle Field Service for EBS (see Document 2188514.1)
-
Oracle Mobile SCM for EBS (MSCA) (see Document 2108155.1)
For the list of Oracle E-Business Suite mobile apps mentioned here, see the Oracle E-Business Suite Mobile Apps, Release 12.1 and 12.2 Documentation Index, My Oracle Support Knowledge Document 1641772.1.
Task 4: Communicating Mobile App Information to Users
After you have completed the setup tasks for your app, provide the following information to the users who will install the app from the Apple App Store or Google Play Store:
-
Name of the app
For the name of the mobile app to download or access through a URL, see the Oracle E-Business Suite Mobile Apps, Release 12.1 and 12.2 Documentation Index, My Oracle Support Knowledge Document 1641772.1.
-
Where to locate the app
For the download information, refer to the Oracle E-Business Suite Mobile Apps, Release 12.1 and 12.2 Documentation Index, My Oracle Support Knowledge Document 1641772.1.
-
Oracle E-Business Suite user name and password
The mobile app user login information is the same user name and password used to log in to Oracle E-Business Suite.
-
(Oracle Field Service for EBS only) Oracle E-Business Suite server URL in the following format:
http(s)://<hostname>:<port>Note: User can select the Lock icon next to the server URL if it is
https.If at any point the server URL is changed, then you must inform the app users of the new URL. The app users must log out and synchronize the app again with the new server URL.
Additional Information: The latest server-side patches must be applied to enable new features and fixes that require those patches. Oracle recommends that you define a plan to maintain the mobile server side on a regular basis that is aligned with the Oracle E-Business Suite mobile releases, if you are using the standard apps installed from public app stores.
Task 5: Performing Advanced Configurations
This section describes the following advanced configuration tasks for Oracle Field Service for EBS and Oracle Mobile SCM for EBS (MSCA):
-
Demilitarized Zone
Oracle Field Service for EBS and Oracle Mobile SCM for EBS currently do not support for accessing these two apps over the Internet.
The information about advanced configurations for demilitarized zone described later in this book does not apply to these two apps.
-
Secure Communication with HTTPS
For information on configuring TLS port and adding custom certificates to this app, see Document 2108155.1, Oracle Mobile Supply Chain Applications for Oracle E-Business Suite Release Notes.
The information about advanced configurations for secure communication with HTTPS described later in this book does not apply to these two apps.
-
Single Sign-On
Oracle Field Service for EBS and Oracle Mobile SCM for EBS support single sign-on with their own app-specific configuration processes.
The information about advanced configurations for SSO described later in this book does not apply to these two apps.
-
Enterprise Mobility Management Solutions
Oracle Field Service for EBS and Oracle Mobile SCM for EBS currently do not support this feature.
The information about integrating mobile apps with Enterprise Mobility Management solutions described later in this book does not apply to these two apps.