Oracle iProcurement Information Discovery Plus
This chapter covers the following topics:
- Overview
- Oracle iProcurement Information Discovery Plus User Interface
- Oracle iProcurement Information Discovery Plus Product Configuration
- Setting Up Oracle iProcurement Information Discovery Plus Product Configuration
- Populating Endeca Metadata for Oracle iProcurement Information Discovery Plus
- Running the Full Load Configuration Graph
- Setting Up the Scheduler to Load Incremental Graphs
Overview
Oracle iProcurement Information Discovery Plus integration lets you search and filter information. You can search all catalogs in a particular store, and view recent requisitions and notifications.
Oracle iProcurement Information Discovery Plus helps requesters to view or perform their regular activities from the home page itself without excessive navigation.
The Feedback tab enables requesters to provide feedback or suggestions to buyers. The feedback or suggestions can be about an item or a supplier or anything which the requester wants to communicate with the buyer. The buyer can access the feedback or suggestions given by requester and provide comments. It helps buyers refine the catalogs based on the requester's suggestions. Buyers also take necessary steps to address the requester's feedback or suggestions. Requesters can track the status on each suggestions. This improves the communication between requesters and buyers. Requesters can communicate the plan for the item or service to buyer well in advance to start sourcing negotiations. Feedback can be accessed by the buyer through the Procurement Command Center.
You can search using Oracle iProcurement Information Discovery Plus pages and Endeca Information Discovery (EID) design tools. These pages are hosted in an EID environment, and called from container pages in EBS. In Oracle iProcurement Information Discovery Plus, the Shopping Stores Home page enables search functions using Endeca Information Discovery integration. This region in the Home page lets you search for all catalogs in a particular store or browse through the hierarchy of categories within the catalog to locate items and services.
Oracle iProcurement Information Discovery User Plus Interface and Integration
Oracle iProcurement Information Discovery Plus User Interface
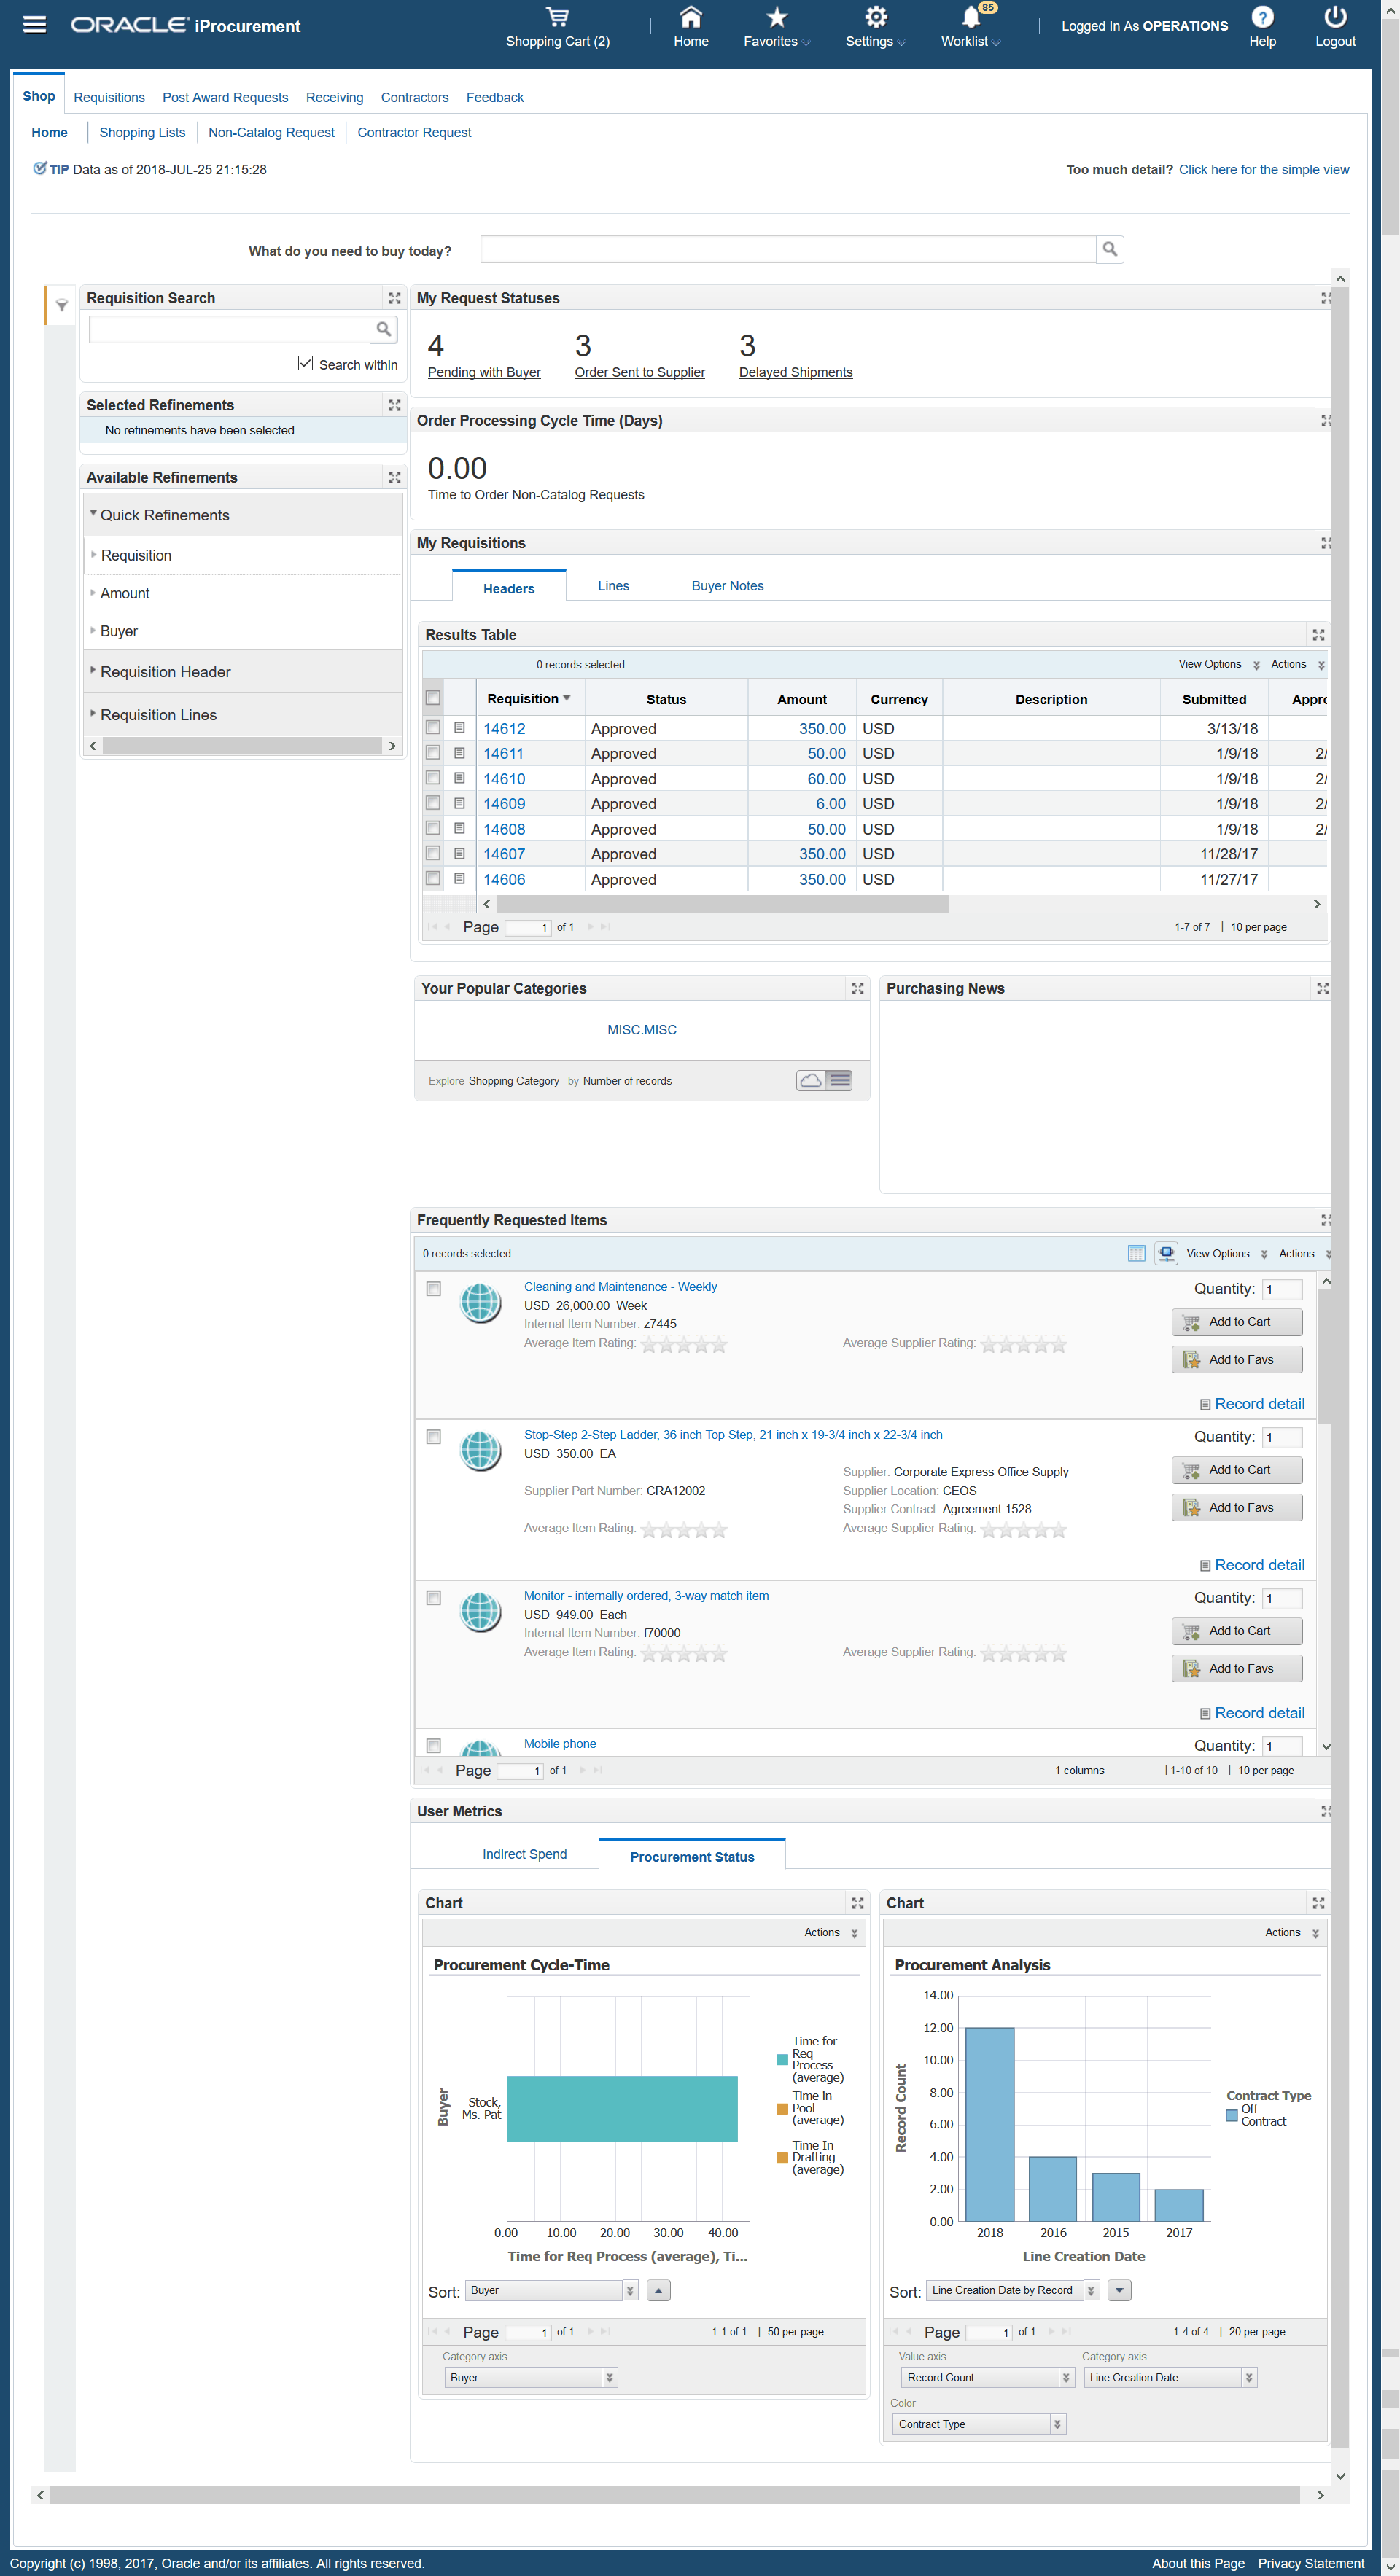
The Shop Home page enables you to search for all catalogs in a particular store or browse through the hierarchy of categories within the catalog to locate items and services. The page displays information and data graphically and in tabular format.
The Shop Home page contains filtering components that you can use to search, navigate and filter the data displayed in other components:
In the casual user home page, the search box, My Requisition table, Progress Metrics, Purchasing News and Frequently Requested Items are shown. For power users, a more robust home page is displayed where the key features include a clickable metric panel for user requisition status, progress metric, My Requisition table, and a tag cloud for top categories requested. In addition, metrics and charts such as Order Processing Time provide insight related to employee driven procurement.
The Shopping Lists tab enables you to view information on frequently requested items, including personal and public favorites. You can use this page to add items to favorites, add items to the cart, view the shopping cart, and compare selected items.
The Non-Catalog Request tab enables you to purchase goods and services not available in the catalog. When you create a non-catalog request, you automatically receive suggestions of matching catalog items based on the details you enter in the non-catalog request. Click the Check Catalog for Similar Items button to navigate to the Non-Catalog Request: Check Catalog for Similar Items page, which has two regions, one containing the non-catalog request details and the other displaying the suggested catalog information. This helps to reduce the volume of non catalog requests for which a catalog item selection is more appropriate, and provides preferred items or services from recommended suppliers to requesters, increasing service levels. Click the Please add this Non-Catalog Request to a catalog for future orders check box to send a message to the buyer to make the non-catalog request item to the catalog. You can use the Feedback tab to check progress of this request. Administrators can choose to show or hide the Check Catalog for Similar Items using function security, depending on your organization's requirements. By default, this button is enabled. By default, the Add to Cart button is also displayed, however, administrators can choose to disable this button and insist that users click the Check catalog for Similar Items button before adding items to the cart.
The Contract Requestor tab enables you to request to hire temporary labor, including contractors and temporary personnel.
| Region | Components |
|---|---|
| Tip | Displays the date on which data was last refreshed. |
| What do you need to buy today? | The search box enables you to enter multi-word keyword search without hiding any text. When you click the search icon without entering a keyword, the application shows the contents of the last searched results. This homepage has a broad search-box. It is a Universal Search box which is used to search items. Universal Search shows local catalog items, smartforms, information templates and punchout items. Users do not need to know which store to visit. Universal Search allows employees to immediately search for their desired item without having to first choose the appropriate catalog. All catalog content is queried including catalogs hosted by punch-out suppliers. The search displays results from every eligible source regardless of where data is hosted, and search results are displayed with remarkable speed. It is a single comprehensive search to quickly find items while retaining content restrictions, which means that the employees can only see relevant content. |
| Need more details? Click here for the advanced view Too much detail? Click here for simple view |
Click this link to navigate to the power user homepage, which displays comprehensive information. This option is secured by function security so you control who can use this option. This is a toggle and if you are in the power user view, then you can click on the Too much detail? Click here for simple view to navigate windows. |
| Available Refinements | You can further refine your search results based on the following:
|
| My Request Statuses | As a power user, you can view the following metrics:
Click any metric to refresh the page per the selected refinement. The My Requisitions Region – Result Lists displays the following details:
|
| Progress | This metric, available in the simple view, displays details of the progress and also alerts the requester where the requester needs to initiate or follow up or do some activity on the requisitions. It shows the following details:
|
| Order Processing Cycle Time (Days) | This metric, available only to power users, displays the following details:
Note: If the value of a metric is zero, then the application automatically hides it. |
| My Requisitions My Items (Status for Each Item) |
The My Requisitions region, available in the simple search, displays all your requisitions, including the Requisition number, Description (up to 60 characters), Total (USD), Status, and Express Receive. It also enables you to copy or change your requisition.
The details you can view are:
Note: If you create a new requisition, the confirmation messaage displays the average time taken for a requisition to be approved in the last one month, the average time taken for a requisition containing at leaast one non catalog request to be approved in last one month, the average time taken for a requisition to order approval in the last one month, and the average time taken for a requisition to order approval where atleast one of the line is not referenced to agreement in last one month. |
| Purchasing News | This region, available in the simple view, can have organizations purchasing polices or any documentation related to purchasing, or any alerts which your organization wants to convey to requesters. Buying organizations can use this region to enter information in rich text format and use the flexibility to configure this region based on your business needs. |
| Frequently Requested Items | You can view the top 10 Frequently Requested Items in Carousel View or Table view. The Carousel View displays in descending order, which means that the ten items most frequently requested by you will be displayed first. The frequently requested items are shown for a specific user. The details you can view are:
You can use this to quickly select items and specify the quantity required, add items to cart, and add items to favorites. You can view these items in a Grid/List View or a Carousel View using the toggle. You can also print and export these results. You can also compare items by selecting two or more items and click Compare. Click the link on any of the items to select it and view the item details. You can view the Item Details tab and click on Ratings or Review to view the Reviews and Ratings tab. Click on Item Description to view the Item Details page that displays the following information and relevant icon descriptors:
Click on Ratings and Reviews tab. The Ratings and Reviews tab enables requesters to get recommendations on the best products / services to buy that match requester's need. Organizations greatly value feedback and rating others provide on the products which they have already bought. This enables the user community to provide feedback about item/services to the procurement department (Buyer) to tell them that they have negotiated pricing for the goods & services. Buyers can access the review comments and ratings via the Procurement Command Center to know the review trends are positive or negative. The Ratings and Reviews tab displays the following information:
|
| Your Popular Categories | This tag cloud region for seeing the top categories requested is available only to power users and shows the top 3 categories requested by requester. |
| User Metrics | Indirect Spend Tab - displays the following charts:
Procurement Status Tab - displays the following charts:
|
Search Results Page
The search results page displays the following details:
| Region | Components |
|---|---|
| Tip | Displays the date on which data was last refreshed. |
| Search | The Search component allows you to submit keyword searches and provides type-ahead suggestions displaying attribute values that match the typed text. This type ahead search can be configured to display only the relevant content to users. You can see search results while typing. The application suggests matching search criteria from all contents. When you perform a search, the search term is added to the Selected Refinements component. As you type, you may be prompted to select a matching attribute value, or simply search for the entered text. For example, when a user searches for 'Tablet', all relevant matching options are displayed up front where it matches. You can select the choices directly from the suggested options. |
| Selected Refinements | The Selected Refinements component displays all values that you have selected to filter data, and allows you to quickly make adjustments to the current refinement by removing items or clearing all filters from the list. You can configure the filters and refinements. You can add and remove filters in any sequence. The filters display the total count. |
| Bookmarks icon | The Bookmarks component enables you to save your multi criteria search, allowing you to save a given navigation and component state and return to it at a later time. |
| Available Refinements | The Available Refinements component allows you to filter data based on the currently available values or value ranges for selected attributes that are displayed within attribute groups. Expand the following attribute groups to view and select attribute names:
|
| Results | This region displays the results of your search. You can view the results in a carousel view if you prefer that. You can select items and specify the quantity required, add items to cart, add items to favorites, and add items to compare. If a Punchout is Mandatory or Optional, it is specified in the Record Type. You can also print and export these search results. Additionally, you can select two or more items and click Compare from the Action list of values. You can also print or export these results. For more details see: EBS Results Grid |
| Supplier Hosted Catalogs and Smart Forms | Use this to view details such as Content Name, Content Type, Supplier, Description, Supplier Site, Unit of Measure, Price, Currency, Supplier Part Name, Manufacturer, Manufacturer Part Number, and Keywords. You can also print these details. |
| Shopping Cart | You can save an unlimited number of shopping carts in progress. This enables you to save selected items and return later to add more items and check out. |
| Compare View | You use this popup to compare items. |
Oracle iProcurement Information Discovery Plus Product Configuration
Oracle iProcurement Information Discovery Plus Product Configuration
Once you have completed installation and common configurations as described in Installing Oracle E-Business Suite Information Discovery, Release 12.2 V8 document (Doc ID: 2214431.1), you must complete the Oracle iProcurement Information Discovery Plus product configuration setup as detailed in this section.
Setting Up Oracle iProcurement Information Discovery Plus Product Configuration
To set up Oracle iProcurement Information Discovery Plus Product Configuration, complete the following steps:
-
Grant the ICX_ENDECA_ACCESS_ROLE ((ICX Endeca Access Role) to the predefined iProcurement responsibility (FND_RESP|ICX|SELF_SERVICE_PURCHASING_5|STANDARD).
See: Oracle E-Business Suite System Administrator's Guide - Security for more information on how to assign roles.
See: Installing Oracle E-Business Suite Information Discovery, Release 12.2 V8 document (Doc ID: 2214431.1) for more information on roles in Oracle E-Business Suite Information Discovery.
-
Run the Populate Endeca Metadata for iProcurement concurrent program.
-
Run the Full Load Configuration Graph.
-
Schedule the set up for Incremental Endeca Refresh.
-
Additionally, if your organization uses descriptors to provide more information about an item or services, you define icon based descriptors. Icon Descriptor will be defined as like any other descriptor. The icon indicator flag is used to differentiate an icon descriptor with normal descriptors. Few icon descriptors are predefined in the application, however, you can define your own names and the number of icon descriptors.
Organizations use descriptors to provide more information about an item or services. Apart from text based descriptors to define the more information about an item or services, you can also use icon based descriptors. This helps the requesters to easily search and identity the desired item with the help of icon descriptors. Also requesters can view the items in the order of Promotion Factor. For each of the icon descriptors, a promotion factor is entered. Based on ranking of promotion factor, items in search results are displayed. Icon descriptor and Promotion factor are dependent. You can define a Promotion Factor only when the Icon indicator is set to Yes.
You can also enter the Promotion Factor. You can enter a promotion factor for each of the icon descriptors. As an administrator, you can add the descriptors as part of available refinements. For example, a user can filter the items with Icon Descriptors such Preferred Suppliers, Green Supplier etc. Available refinements is configurable. You add the Icon descriptor and Promotion factor in the Base Descriptor tab of the Schema window using the Catalog Administrator in iProcurement Catalog Administration Responsibility. By default, the Icon Indicator is set to Yes, and the Promotion Factor is predefined as 0.1. Configuring the Icon Descriptor helps the requesters to easily search and identity the desired item with the help of icon descriptors. The application, then, displays items in search results based on the ranking of the promotion factor. When multiple icon descriptors are tied to same item, the application computes the total promotion factor (cumulative of all icon descriptor's Promotion Factors tied to an item) and shows the search results accordingly.
Populating Endeca Metadata for Oracle iProcurement Information Discovery Plus
Use the Populate Endeca Metadata for iProcurement concurrent program, available under purchasing responsibility, to synchronize the available Endeca metadata. Run this concurrent program before running the full load graph. Whenever you make setup changes such as descriptor setup changes and/or content zone setup changes, you must run the full load again. If your setup changes occur daily, it is recommended that you schedule this concurrent program to run every day (1 hour before the full load graph run). After you successfully run this concurrent program, you can schedule to run the full load graph. For example, you can schedule the concurrent program to run every night at 1:00AM and then schedule the full load graph to run daily at 2:00AM.
-
Program Name: Populate Endeca Metadata for iProcurement
-
Executable: ICXENDECA
-
Method: PL/SQL
-
Stored Procedure Execution file name: ICX_ENDECA_UTIL_PKG.populate_metadata_SRS
You run this concurrent process from the Submit Requests window.
To run the Populate Endeca Metadata for iProcurement process
-
Select Populate Endeca Metadata for iProcurement in the Name field.
-
Ensure the Save all Output Files check box is selected.
-
Click Submit.
Running the Full Load Configuration Graph
As a catalog administrator, if you need to make any changes to the descriptor setup or content zone setup, the changes will not be synchronized to the endeca server by running the incremental graph. For these changes to get reflected in the endeca server, you need to run the FullLoadConfig graph. Before you run the full load complete the following steps:
-
Run the Populate Endeca Metadata for iProcurement concurrent program. This ensures that the FND metadata table is populated with the latest setup details.
-
Run the FullLoadConfig graph from the Integrator. You can also submit the ETL using the concurrent program Run Clover ETL Graphs and schedule it for regular intervals. Once you complete the above two steps, the data in endeca server will be up-to-date.
Note: If you have not made any changes to the configuration like descriptor setup or content zone setup, then you do not need to run the FullLoad Config graph, and running incremental load suffices.
To run the Full Load Configuration Graph
-
Login to Integrator server using your Clover login.
-
Click the Scheduling tab.
-
Select the New Schedule link.
-
Enter a Description for the scheduler, for example, iProcurement Incremental Load Scheduler.
-
Select Periodic as the Type.
-
Select by interval as the Periodicity.
-
Enter a start date and time in the Not active before date/time field.
-
Enter an end date and time in the Not active after date/time field.
-
Enter a value in the Interval (minutes) field.
-
Ensure you select the Fire misfired event as soon as possible check box.
-
Select Execute graph from the Task Type list.
-
Select icx-iproc from the Sandbox list.
-
Select graph/FullLoadConfig.grf from the Graph list.
-
Click Create to set the scheduler.
Setting Up the Scheduler to Load Incremental Graphs
Once the Full graph is run in accordance with the Installing Oracle E-Business Suite Information Discovery, Release 12.2 V8 document (Doc ID: 2214431.1), initial data load for Oracle iProcurement Information Discovery Plus is complete. For incremental refresh, you must determine how often the Endeca data should be refreshed from EBS depending upon your organizational requirements. Oracle recommends that you keep this near real time. As the data is updated in the EBS, you need to ensure it is updated in the Endeca MDEX server. You set up the Scheduler to load incremental graphs depending on when you update catalog information. For example, if you update catalog information frequently, you might choose to set the scheduler to load the incremental graph once in every 3 hours, or, if you do not update catalog information too frequently, you can set the scheduler to run once in a day. To keep the data in the Endeca server up-to-date, do one of the following:
-
Run the IncrementalLoadConfig.grf from the icx-iproc sandbox whenever catalog information in EBS is updated.
-
Alternatively, set up the scheduler in the Integrator server to run at periodic intervals.
To Schedule ETL on Integrator Server
-
Login to Integrator server using your Clover login.
-
Click the Scheduling tab.
-
Select the New Schedule link.
-
Enter a Description for the scheduler, for example, iProcurement Incremental Load Scheduler.
-
Select Periodic as the Type.
-
Select by interval as the Periodicity.
-
Enter a start date and time in the Not active before date/time field.
-
Enter an end date and time in the Not active after date/time field.
-
Enter a value in the Interval (minutes) field.
-
Ensure you select the Fire misfired event as soon as possible check box.
-
Select Start a graph from the Task Type list.
-
Select icx-iproc from the Sandbox list.
-
Select graph/IncrementalLoadConfig.grf from the Graph list.
-
Click Create to set the scheduler.