2 Configuring an Oracle Database Firewall
This chapter contains:
-
Step 3: Enable Secure Log Access in the Standalone Database Firewall
-
Step 4: Configure the Standalone Database Firewall Syslog Destinations
-
Step 5: Configure the Standalone Database Firewall Enforcement Points
-
Step 7: Test the Standalone Database Firewall System Operation
About Configuring an Oracle Database Firewall
This chapter explains how to configure a standalone Oracle Database Firewall. Where indicated, a procedure also applies to a managed Oracle Database Firewall. For more information on which tasks can be done on which type of Database Firewall, see these topics:
"Tasks Performed in a Standalone Database Firewall Administration Console"
"Tasks Performed in a Managed Database Firewall Administration Console"
If you want to configure a standalone Database Firewall to be managed by a Management Server, see Chapter 3, "Configuring a Database Firewall Management Server."
Before you start, ensure that the Database Firewall has been installed, as described in the Oracle Database Firewall Installation Guide.
Step 1: Set the Database Firewall Date and Time
It is important to ensure that the Database Firewall uses the correct date and time so that log event times are accurate and scheduled tasks, such as archiving and reports, function correctly. Correct time settings are also needed so that Database Firewall Analyzer uses the correct time ranges when training on log data.
To set the Database Firewall date and time:
-
In the Database Firewall Administration Console, select the System tab.
-
Click Date and Time under the System menu on the left, and then scroll down and click the Change button.

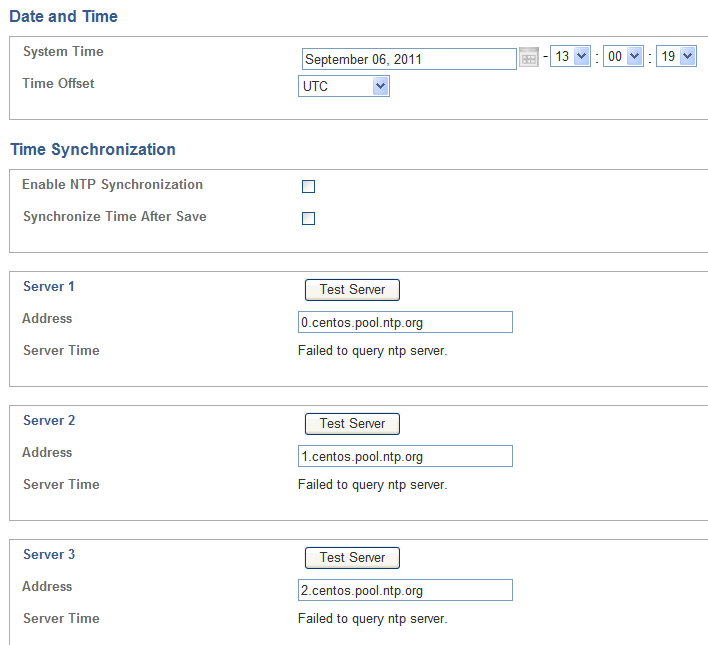
Description of the illustration date_time.gif
-
Enter the correct date and time.
If a managed Database Firewall and Management Server are in different time zones, then the audit reports and summary reports will use the time zone of the Database Firewall that created the log file.
-
Use the Time Offset menu to select your local time with respect to Coordinated Universal Time (UTC).
For example, UTC-5 is five hours behind UTC. It is essential to select the correct setting to ensure that the time is set accurately during synchronization.
If you do not select the correct setting, the time will be set incorrectly when time synchronization occurs.
-
(Optional) Select Enable NTP Synchronization.
Selecting Enable NTP Synchronization keeps the time synchronized with the average of the time recovered from the time servers specified in the Server 1/2/3 fields, which can contain an IP address or name. If a name is specified, the DNS server specified in the System Settings page is used for name resolution.
-
Use the default server addresses, or enter the addresses of your preferred time servers.
Note:
If using names instead of IP addresses, you must have DNS already configured, otherwise name resolution will not work.Test Server displays the time from the server, but does not update the time at the Oracle Database Firewall Management Server or Oracle Database Firewall.
Selecting Synchronize Time After Save causes the time to be synchronized when you click Save.
-
Click Save.
To enable time synchronization, you also must specify the IP address of the default gateway and a DNS server, as described in "Step 2: Specify the Database Firewall System Settings".
Step 2: Specify the Database Firewall System Settings
You specify system settings from each Database Firewall's administration console. System settings consist of network and services configuration as shown in the following procedures.
To configure the Database Firewall network settings:
-
In the System tab, select Network from the System menu on the left.
-
In the Network Configuration page, click the Change button.
-
Complete the fields as necessary, then click Save.
-
IP Address: The IP address of the currently accessed Database Firewall. This IP address connects to the Administration Console, or accesses the unit from Oracle Database Firewall applications such as the Analyzer. An IP address was set during installation. If you want to use a different address, then you can change it now. The IP address is static and must be obtained from the network administrator.
-
Gateway: (optional) The IP address of the default gateway (for example, for internet access). The default gateway must be on the same subnet as the host.
-
Name: Enter a descriptive name for this Database Firewall, such as
Database Firewall to monitor Oracle Database. -
Link properties: Leave the setting at the default, unless your network has been configured not to use autonegotiation.
-
To configure the Database Firewall services:
-
In the System tab, under the System menu, click Services.
-
Click the Change button.

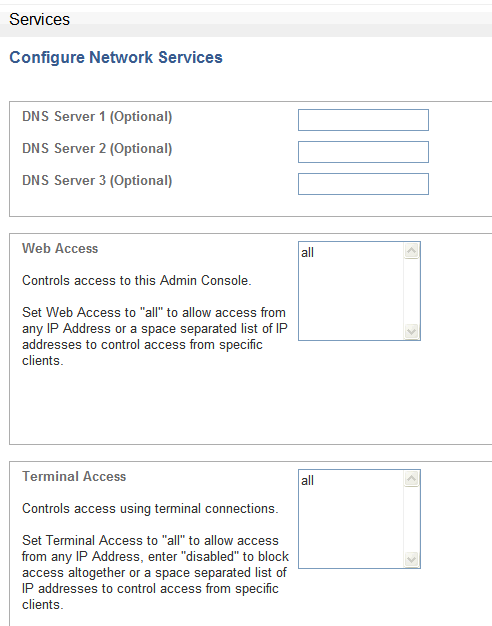
Description of the illustration services_edit.gif
-
Complete the following fields as necessary, then click Save.
Caution:
When allowing access to the Database Firewall you must be careful to take proper precautions to maintain security. See the Security Guidelines chapter in Oracle Database Firewall Security Guide for a list of recommendations before completing this step.-
DNS Servers: (optional) The IP addresses of up to three DNS servers on the network. These are used to resolve any network names that may be used by Oracle Database Firewall. Keep the fields blank if there is no DNS server, otherwise system performance may be impaired.
-
Web Access: If you want to allow only selected computers to access the Administration Console, enter their IP addresses in the box. Using the default of all allows access from any computer in your site.
-
Terminal Access: You can specify a list of IP addresses that are allowed to access Oracle Database Firewall from a remote console. Entering all allows access from any computer in your site. The default of disabled prevents console access from any computer.
-
SNMP Access: Specifies a list of IP addresses that are allowed to access the network configuration of Oracle Database Firewall through SNMP (settings as per Terminal Access). The SNMP community string is
gT8@fq+E. -
Secure Log Access (Reporting): Specifies a list of IP addresses that are allowed to access the log data held on the Oracle Database Firewall Management Server, for example, to report using external reporting systems (settings as per Terminal Access). If you complete this setting, then ensure that you complete "Step 3: Enable Secure Log Access in the Standalone Database Firewall".
-
Traffic Log Access (Analyzer): Specifies a list of IP addresses of computers running the Analyzer software that are allowed to access the traffic log on the Oracle Database Firewall Management Server (settings as per Terminal Access).
-
Step 3: Enable Secure Log Access in the Standalone Database Firewall
If you changed the default settings in the Secure Log Access (Reporting) field in "Step 2: Specify the Database Firewall System Settings", then you must enable the access in the Database Firewall server.
-
Log in to the Database Firewall server as user
root. -
Change to the oracle user.
su - oracle
-
Execute the following command:
. oraenv
-
When prompted, enter
dbfwdbfor the Oracle SID. -
The following message is displayed:
The Oracle base has been set to /var/lib/oracle
-
Log in to the database on this server using SQL*Plus.
sqlplus / as sysdba
-
Enable the
dbfw_reportaccount and grant this user a password.ALTER USER dbfw_report ACCOUNT UNLOCK IDENTIFIED BY password; -
Exit SQL*Plus.
Step 4: Configure the Standalone Database Firewall Syslog Destinations
Use the following procedure to configure the types of syslog messages to send from this Database Firewall (for example, to signal blocked statements).
-
In the standalone Database Firewall Administration Console, click the System tab.
-
Click Syslog in the Connectors menu.
The following page appears.

Description of the illustration image017.gif
-
Complete the fields, as necessary:
-
Syslog Destinations (UDP): Use this box if you are using User Datagram Protocol (UDP) to communicate syslog messages. Enter the IP address of each computer that is permitted to receive the syslog messages.
-
Syslog Destinations (TCP): Use this box if you are using Transmission Control Protocol (TCP) to communicate syslog messages. TCP guarantees that the packets are sent and received correctly. Enter the IP address and port number of each machine that is permitted to receive the syslog messages.
-
Syslog Categories: You can select the types of syslog messages to generate. The syslog messages are in the following categories:
-
System: System messages generated by Oracle Database Firewall or other software, which have a syslog priority level of at least "INFO".
-
Alerts: Oracle Database Firewall and F5 alerts (Oracle Database Firewall syslog message IDs 9, 10, 11 and 12).
-
Info: General Oracle Database Firewall messages and property changes (Oracle Database Firewall syslog message IDs 1, 4 and 8).
-
Debug: Engineering debug messages (for Oracle support use only).
-
Heartbeat: Oracle Database Firewall heartbeat message and current statistics (Oracle Database Firewall syslog message ID 3). Oracle Database Firewall sends a heartbeat every second for each Enforcement Point that you have configured for this system. (If you select this check box, be aware of the potential volume issues when you enable the Heartbeat feature.)
-
-
-
Click Apply.
Step 5: Configure the Standalone Database Firewall Enforcement Points
You must configure each enforcement point that the standalone Database Firewall will use. (For a managed Database Firewall, you use the Management Server.)
To configure the enforcement points:
-
In the standalone Database Firewall Administration Console, select the Monitoring tab.
-
In the Enforcement Points menu, select Create.
The Enforcement Point Wizard: Step 1 page appears.

Description of the illustration image019.gif
-
Enter the following information:
-
Name: Enter a name for the enforcement point.
-
Use a builtin enforcement point (Monitor locally): The number of currently available enforcement points you can create, up to 80, is displayed.
-
-
Click Next.
The Enforcement Point Wizard: Step 2 page appears.

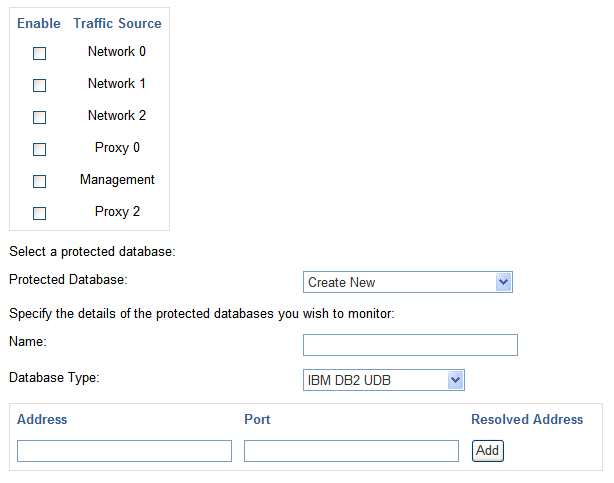
Description of the illustration ep-wizard-step2.gif
-
Select one or more traffic sources you want this enforcement point to monitor. If you select a proxy traffic source, you cannot select any other traffic sources. If Management appears in the list, then the Management Interface can be configured and used as a proxy.
-
Enter the following information:
-
Protected Database: Select Create New or choose from the list of available databases.
-
Name: If creating a new protected database, enter a name for the database to be monitored.
-
Database Type: If creating a new protected database, select the database type.
-
Address and Port: If creating a new protected database, specify the IP address and port number of the database management system (i.e. the IP settings used by database clients to send traffic to the database), then click Add. If the protected database has more than one interface and/or port, enter the additional Address and Port details, then click Add again. If you are using a Domain Name Server (DNS), you can enter a hostname instead of an IP address.
-
-
Click Next.
The Enforcement Point Wizard: Step 3 page appears.
-
Enter the following settings:
-
Monitoring Mode: Select Database Activity Monitoring (DAM) if the enforcement point is to be used only to log statements and provide warnings of potential attacks. Select Database Policy Enforcement (DPE) if the enforcement point is also required to block potential attacks. Database Policy Enforcement is available only if you upload a policy (as described next).
If you have selected a traffic proxy as a traffic source for this Enforcement Point, then DPE mode is required and you cannot select DAM mode.
-
Policy: Select a baseline policy. To upload a custom policy developed using the Analyzer software, click Browse to select the file, then Upload. Use the text box to add a description. If this is the first time you are creating a baseline policy, then Oracle recommends that you select the unique.dna policy.
-
-
Click Next.
The Enforcement Point Wizard: Step 4 page appears.
-
Check your settings, and if you are satisfied, then click the Finish button.
Step 6: Configure the Database Firewall Bridge IP Address
If you want Oracle Database Firewall to block potential attacks, and Database Firewall is not in proxy mode, then you must allocate an additional IP address that is unique to the database network. This is used as a bridge IP address to redirect traffic within the Database Firewall. When Database Firewall is used as a proxy (proxy mode) you do not need to allocate this additional IP address. See "Configuring Database Firewall as a Traffic Proxy" for details.
Note 1:
The IP address of the bridge must be on the same subnet as all protected databases deployed in DPE mode on that bridge. This restriction does not apply to protected databases deployed in DAM mode.To configure the standalone Database Firewall bridge IP address:
-
In the Database Firewall Administration Console, click the System tab, then click Network under the System menu on the left.
-
Click the Change button.
-
In the Traffic Sources section, find the network that you want to configure.
-
Select Bridge Enabled for this network.
-
Specify an IP address and subnet mask if either of the following is true:
-
The pair of network interface ports connect the Oracle Database Firewall in-line between the database and clients (whether Database Policy Enforcement or Database Activity Monitoring mode is used).
-
The network interface ports are used to monitor traffic with the Oracle Database Firewall Local Monitoring software.
The IP address must be unique to the network, and is used as a bridge IP address to redirect traffic within the Database Firewall.
Enabled is automatically selected if the network interface ports are currently used to monitor traffic for enforcement points that have the Local Monitoring or DPE (Database Policy Enforcement) mode selected.
-
-
Click Save.
Step 7: Test the Standalone Database Firewall System Operation
You should verify that the standalone Database Firewall configuration is fully operational before you begin monitoring your protected database SQL traffic.
To test the system operation:
-
In the standalone Database Firewall Administration Console, click the Monitoring tab, and then from the Enforcement Points menu, select List to display the list of configured enforcement points. Check the status as follows:
-
Click the Status button for the appropriate enforcement point.
-
In the Appliances area, ensure that you see a green check-mark indicator in the Status column against the device that is performing the monitoring.
-
-
Click the Dashboard tab, and check that Number of statements increases every minute. This setting indicates that statements are being recognized.
-
Click the System tab, then in the Logs menu, click Traffic Log Files.
Check that the log files exist. If you want to see the statements, create Log Search Results (in the Reporting tab, under the Traffic Log menu).
-
Verify that data can be obtained from the traffic log.
See Oracle Database Firewall Security Guide for information about accessing and viewing the traffic log.
What's Next?
The tasks in chapter complete the initial configuration of a Database Firewall. Your next step is to configure the Management Server, described in Chapter 3, "Configuring a Database Firewall Management Server." Depending on site requirements, you may need to configure other features, such as stored procedure auditing, user role auditing and local monitoring. These features are explained in later chapters of this guide.
After you have configured the standalone Database Firewall, users will be able to begin analyzing data. Once a policy has been developed, you must upload it. The Oracle Database Firewall Security Guide covers these tasks in detail.
Chapter 13, "System Administration," explains system administration tasks, including how to set up new users, monitor the system and produce reports.