13 System Administration
This chapter describes routine tasks that may need to be carried out from time to time. It does not attempt to explain all options available from the Administration Console.
This chapter contains:
Security Guidelines
System administration tasks should take into account Oracle's security recommendations. Consult the Oracle Database Firewall Security Guide for information on protecting your data and general recommendations about deploying Database Firewall in a network and in special configurations.
Using the Dashboard
The Dashboard page of the Administration Console provides a high-level view of important information about the databases being protected, such as the threat status, throughput and top ten threats. Key indicators are shown in charts, which are intended to be used by IT and security managers who are responsible for the day-to-day monitoring of the system.
See the Oracle Database Firewall Security Guide for more information on using the Dashboard.
Figure 13-1 shows an example of the Dashboard page of the Administration Console for a Management Server.
Figure 13-1 Dashboard Page of the Management Server Administration Console
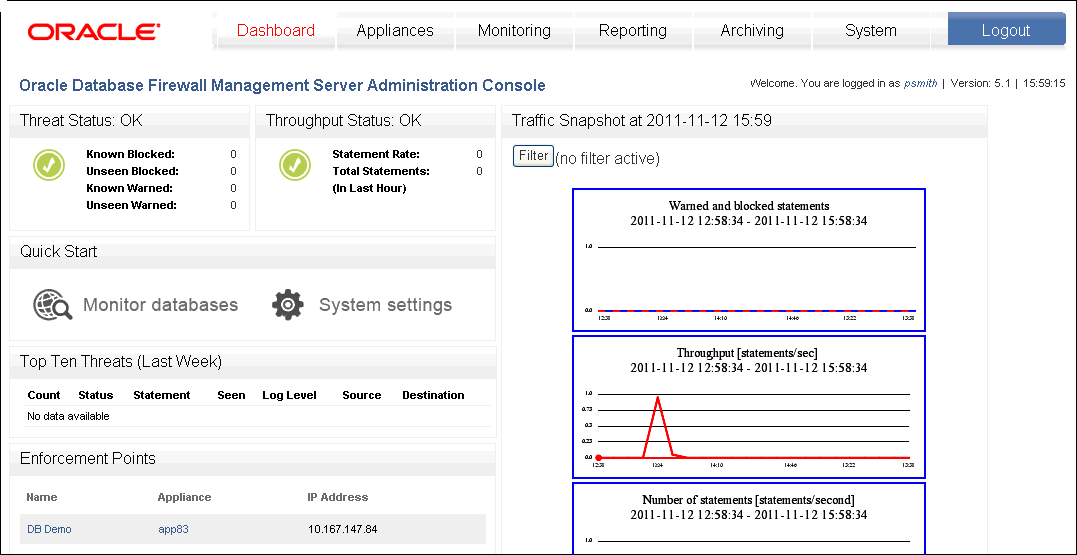
Description of "Figure 13-1 Dashboard Page of the Management Server Administration Console"
Note 1:
The Dashboard can include statistics from BIG-IP Application Security Manager, a Web application firewall product from F5 Networks, Inc. See Chapter 11 for more information.Configuring Oracle Database Firewalls
You can configure the Oracle Database Firewalls managed by a Database Firewall Management Server by using the Appliances tab. The Appliances tab is available only in the Oracle Database Firewall Management Server Administration Console.
Figure 13-2 shows the Appliances tab of the Management Server Administration Console.
Figure 13-2 Appliances Tab for Configuring Oracle Database Firewalls
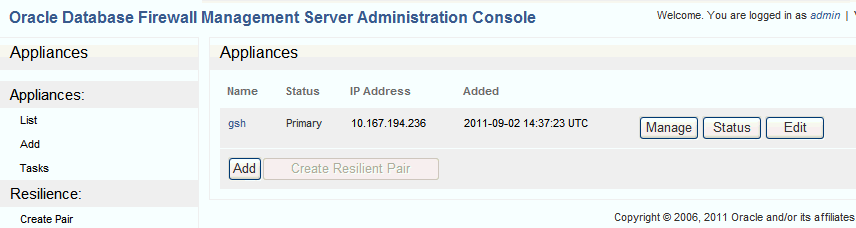
Description of "Figure 13-2 Appliances Tab for Configuring Oracle Database Firewalls"
Use the Add button to add an Oracle Database Firewall. See "Step 3B: Add Each Oracle Database Firewall to the Management Server".
Use the Create Resilient Pair button to create a resilient pair of Oracle Database Firewalls. See "Step 3C: Define Resilient Pairs of Oracle Database Firewalls". After creating a resilient pair, Unpair and Swap buttons are displayed. You can use Swap to force the primary to become the secondary, and vice versa.
The following buttons are provided for each Oracle Database Firewall:
-
Manage: Allows you to perform operations such as to reboot or power off the Oracle Database Firewall, install software updates, remove the Database Firewall device from the appliances list, backup/restore configuration data to or from the Oracle Database Firewall Management Server, and perform file system checks. See Chapter 4, "Configuring Oracle Database Firewall for High Availability," if you must update a resilient pair of Oracle Database Firewalls.
-
Status: To view detailed status information for the standalone or managed Oracle Database Firewall.
-
Edit: To edit the name or IP address you have entered for the Oracle Database Firewall at the Oracle Database Firewall Management Server. This edits your entry for the appliance on this page, but does not change the actual IP address of the Oracle Database Firewall, which can only be set from the Database Firewall's Administration Console.
Configuring Protected Databases
About Configuring Protected Databases
You can set up the details of the protected databases using the options in the Protected Databases menu of the Monitoring tab.
Figure 13-3 shows the Protected Databases page in the Administration Console.
Figure 13-3 Configuring a Protected Database
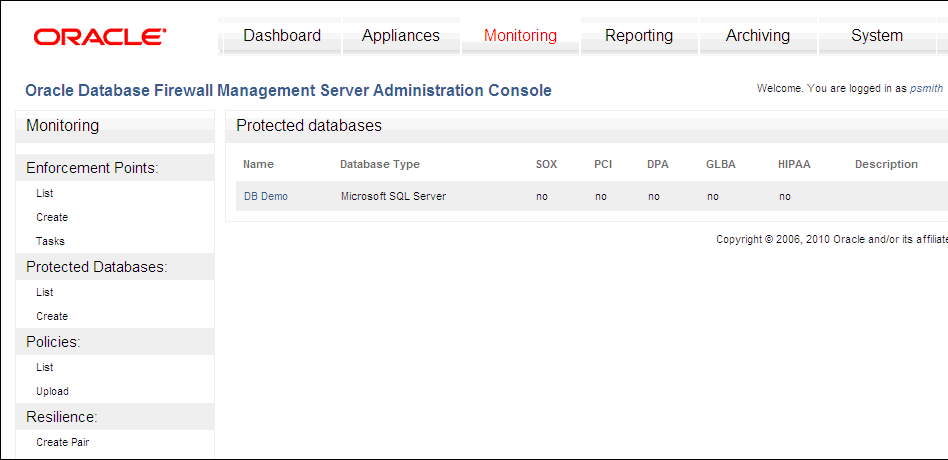
Description of "Figure 13-3 Configuring a Protected Database"
Clicking List in the Protected Databases menu lists all the protected databases that have already been configured. The picture shown above shows an example.
Clicking Create in the Protected Databases menu lets you create a new protected database.
Clicking a database name enables you to change the protected database settings. Figure 13-4 shows the settings that are available.
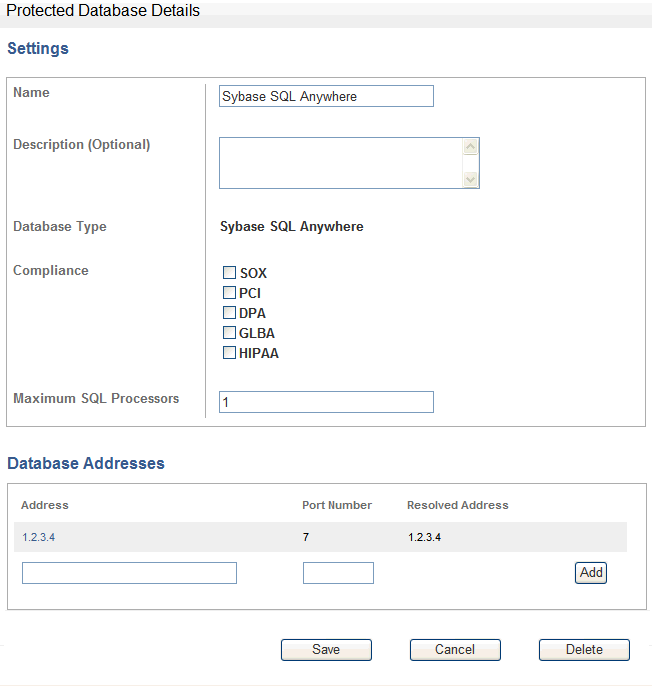
Checkboxes let you select the types of compliance reports that can be produced. (Oracle Database Firewall Security Guide provides more information about these report types.) If you need to produce Sarbanes-Oxley (SOX), Payment Card Industry (PCI), Data Protection Act (DPA), Gramm-Leach-Bliley Act (GLBA) or Health Insurance Portability and Accountability Act (HIPAA) reports for the database, then select the appropriate checkboxes. The compliance reports will contain data relevant to the standard you select here.
The Maximum SQL Processors field lets you define the number of Database Firewall processes that may be used for an Enforcement Point associated with this protected database. This setting is used for load balancing purposes for high throughput protected databases. Each process uses an associated amount of available RAM on the Database Firewall, therefore, when defining this setting you must take into account the total number of processes allocated across all protected databases currently being monitored, as well as the total amount of available memory.
At the bottom of the page, enter the address and port number of the protected database and click Add.
Note:
Do not create two or more protected databases containing the same database details (IP address and port number). This can cause problems with report generation.Click Save when finished.
Configuring User Settings for Protected Databases
To configure user settings for a protected database:
-
Select the Monitoring tab.
-
Under Protected Databases, select List.
-
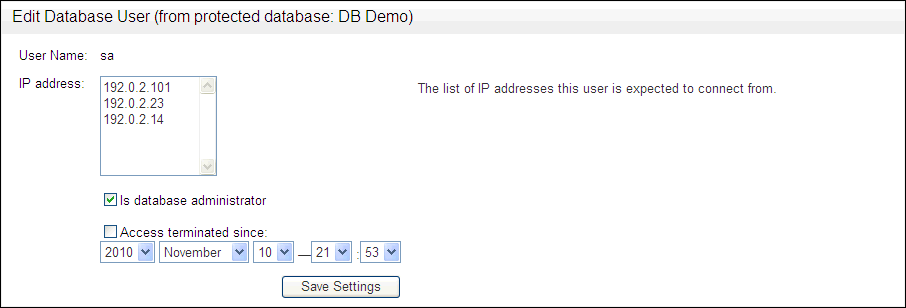
In the Protected Databases page, select the users link.
Clicking users in the protected database list allows you to view the names of the users who have accessed the database (this is determined from database traffic). You can click the name of a user to configure the user's "profile", such as the IP addresses that the user is expected to connect from; and whether the user should no longer be accessing the database (Access terminated since).
-
In the Users for protected database page, select the user name that you want to configure.
-
In the Edit Database User page, enter the appropriate user settings.
Description of the illustration image107.gif
-
Click the Save Settings button.
These settings are used in reports to show deviations from expected database usage.
Listing, Creating, and Configuring Enforcement Points
About Working with Enforcement Points
An Enforcement Point is lets you associate a policy with a specific protected database and network traffic sources.
The Enforcement Points menu in the Monitoring page enables you to list existing enforcement points, create new enforcement points (using the Enforcement Point Wizard), and view outstanding tasks for enforcement points. You can configure settings that are not available in the Enforcement Point Wizard. See "Step 5: Configure the Standalone Database Firewall Enforcement Points" for more information.
Figure 13-5 shows the Enforcement Points page of the Administration Console.
Figure 13-5 Finding Existing Enforcement Points
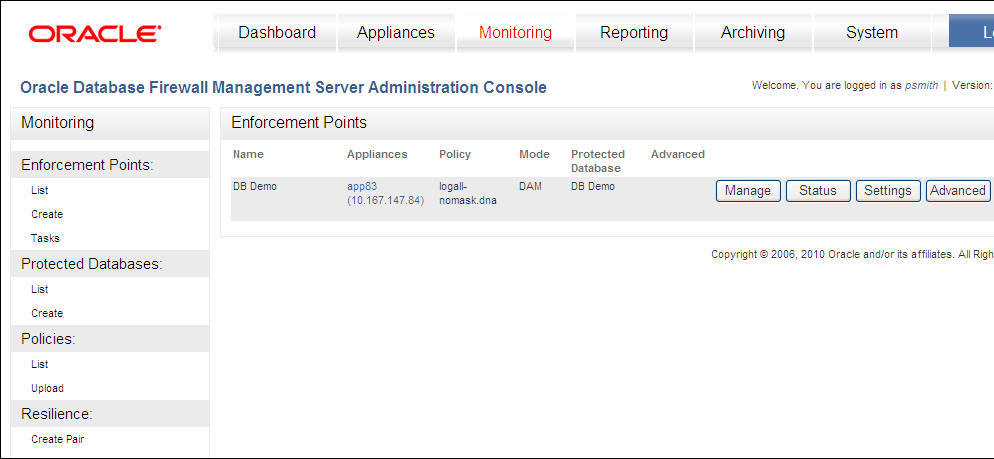
Description of "Figure 13-5 Finding Existing Enforcement Points"
Clicking List displays all existing enforcement points, as shown in the picture above. Four buttons are provided for each enforcement point listed: Manage, Status, Settings and Advanced, as described in the following sections.
Managing Enforcement Points
The Manage button enables you to:
-
Suspend, resume, or delete the enforcement point.
-
Run, suspend, or resume a stored procedure audit or user role audit for the selected enforcement point.
Finding the Status of an Enforcement Point
Click the Monitoring tab, then select List from the Enforcement Points menu. The Status button displays the details for an enforcement point, its status and the database it protects. If the enforcement point is in a managed Database Firewall, the Appliances tab in the Management Server shows the Oracle Database Firewall device that contains the enforcement point.
Changing the Settings of an Enforcement Point
The Settings button enables you to change the settings of the enforcement point, such as the database it protects, the policy that is used, and the protection mode.
Figure 13-6 shows an example of changing the settings of an enforcement point.
Figure 13-6 Changing Settings of an Enforcement Point
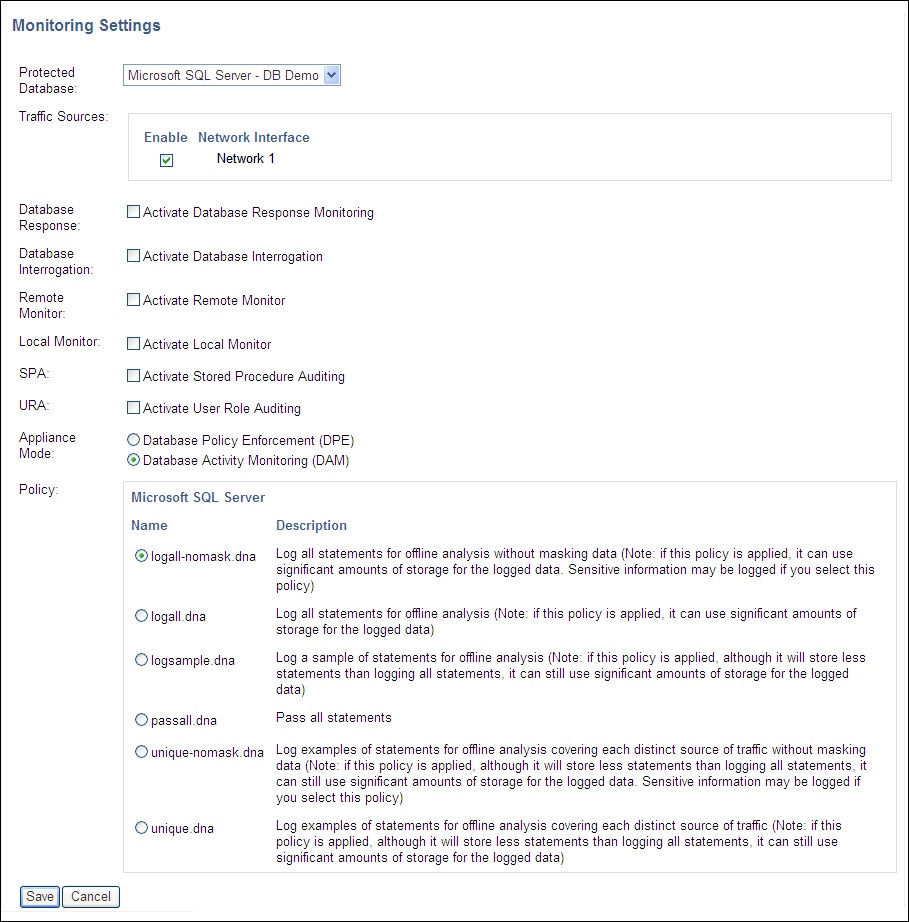
Description of "Figure 13-6 Changing Settings of an Enforcement Point"
The following options are available:
-
Protected Database: This can be used to change the database that is protected.
-
Traffic Sources: Enables you to specify the network port(s) being used for the enforcement point.
-
Database Response: Select the check box to enable database response monitoring (see Chapter 10, "Configuring and Using Database Response Monitoring").
-
Database Interrogation: Select this option to give Oracle Database Firewall the ability to interrogate the monitored database to obtain the name of the database user, operating system, and client program that originated an SQL statement, if this information is not available from the statement itself. See "Enabling DDI".
-
Remote Monitor: Selecting Activate Remote Monitor enables the enforcement point to accept and process SQL traffic detected by the remote monitoring software. See "Installing and Enabling Remote Monitoring".
-
Local Monitor: Selecting Activate Local Monitor enables the enforcement point to monitor SQL traffic detected by the local monitoring software. See "Enabling Local Monitoring".
-
SPA: Select this option to enable stored procedure auditing. See Appendix 5, "Configuring Stored Procedure Auditing".
-
URA: Select this option to enable user role auditing. See Appendix 6, "Configuring and Using Role Auditing".
-
Appliance Mode: Select one of these modes:
Select Database Policy Enforcement (DPE) if the enforcement point is required to block potential attacks. You must also use DPE mode, even if you are not currently blocking statements, if you have selected a proxy as the network interface in the Traffic Sources section of this page.
Note 1:
When you use a Database Firewall in DPE mode, you must configure any IP or MAC address spoofing detection rules so that they ignore database IP or MAC address changes made by that Database Firewall.Select Database Activity Monitoring (DAM) if the enforcement point is to be used only to log statements and provide warnings of potential attacks. DPE is not available if the Oracle Database Firewall is in a resilient pair.
-
Policy: You can choose the baseline that the enforcement point uses.
Configuring BIG-IP Application Security Manager Settings
Click the Advanced button to configure settings for BIG-IP Application Security Manager. See Chapter 11 for more information.
Configuring a Resilient Pair of Enforcement Points
The Resilience menu is available when you are using the Oracle Database Firewall Management Server Administration Console. You can use the Create Pair option to set up a pair of enforcement points. See "Pairing Enforcement Points" for more information.
Configuring Traffic Sources
You can set up Traffic Sources using the Administration Console for an Oracle Database Firewall. See the following two sections for more information:
Configuring Database Firewall as a Traffic Proxy
Depending on your network configuration, when using Oracle Database Firewall in DPE mode, you may prefer to configure a traffic proxy in Oracle Database Firewall instead of a bridge inline with network traffic. You can then associate the proxy with an Enforcement Point. You can also specify multiple ports for a proxy in order to use them for different Enforcement Points.
The following procedure must be done directly on the Database Firewall that is acting as a proxy.
To configure a traffic proxy:
-
In the Administration Console of the Oracle Database Firewall that will act as a proxy, click System.
-
Click Network, then click the Change button.
-
In the Unallocated Network Interfaces area of the page, find an available network interface, and select Traffic Proxy in Traffic Source drop-down list.
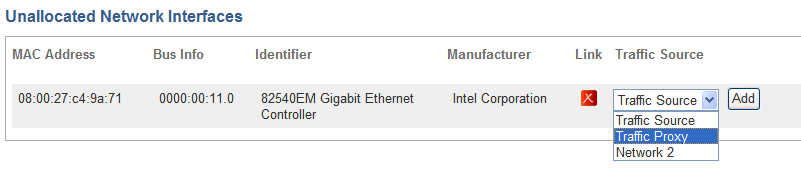
Description of the illustration traffi-proxy-add.gif
To free up additional network interfaces, you must first remove them either from an existing traffic source or traffic proxy by clicking the Remove button for the appropriate interface.
-
Click Add.
The new traffic proxy appears under the Traffic Proxies area of the page.
Note: To add a traffic proxy to the management interface, click Add Traffic Proxy in the Management Interface area, and enter the port number for the proxy.
-
In the new proxy area, check Enabled, enter the Port number, and then click Add.
Check Enabled next to the port number also. See the Oracle Database Firewall Installation Guide for information on ports used by the Database Firewall.
You can specify more than one port per proxy by entering another port number and clicking Add.
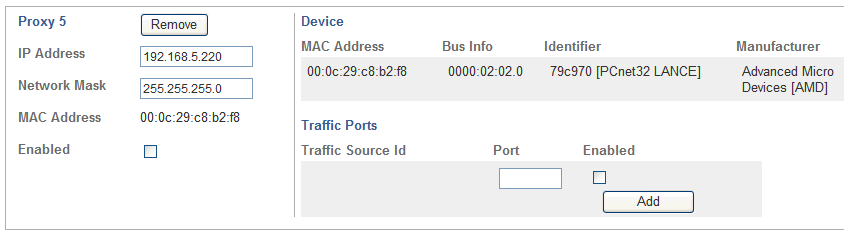
Description of the illustration traffic-proxy-enable.gif
-
Click the Save button.
The traffic proxy is now available to assign to an Enforcement Point. See "Step 5: Configure the Standalone Database Firewall Enforcement Points", and "Step 4: Configure the Management Server Enforcement Points".
Changing the Network Configuration
You can change network settings from the Network page in the System menu. You must make these changes on each individual server, whether it is a Management Server, Standalone Database Firewall, or Managed Database Firewall.
To change network settings:
-
In the Administration Console of the Oracle Database Firewall or Management Server, click System, then click Network under the System menu on the left.
-
Click the Change button.
-
Edit the settings in the following sections of the page as needed:
-
Management Interface:
-
To change the IP address, network mask, gateway, name, or add or change a proxy port for the Management Interface, edit the appropriate field(s).
-
-
Traffic Sources:
-
To change the IP address or network mask of the traffic source, edit the appropriate field.
-
To enable or disable a bridge in a traffic source, check or uncheck the Bridge Enabled box (this is possible only if the traffic source has two network interfaces associated with it).
-
To remove the traffic source, click the Remove button on the left.
-
To remove a network interface (i.e., network card) from the traffic source, click the Remove button on the right next to the specific device.
-
-
Traffic Proxies:
-
To change the IP address, port, or network mask of the traffic proxy, edit the appropriate field.
-
To add and enable a port, enter the port number in the field provided, click Enabled, and then click Add. Repeat for additional ports.
-
To enable or disable the traffic proxy, check or uncheck the Enabled box on the left.
-
To remove the traffic proxy, click the Remove button for that proxy.
See also "Configuring Database Firewall as a Traffic Proxy".
-
-
Unallocated Network Interfaces:
This section appears only if you have unallocated network cards. A green icon appears in the Link column if the card is currently physically connected to a network (this indicator appears if the network card supports this feature).
-
To assign a network interface to a traffic source or proxy, select the traffic source or proxy from the drop-down menu, then click Add.
-
To assign a network interface to a new traffic source, select New in the dropdown menu and click Add. The network interface is assigned to the new traffic source, and the new traffic source is shown in the Traffic Sources section.
-
-
Link Properties:
-
If for some reason your network is not using auto-negotiation, to set link properties for your network, choose one of the available radio buttons.
-
-
-
Click the Save button.
Configuring the System
You can configure the Oracle Database Firewall system settings using the options in the System menu of the System page. These options are used during initial deployment of Oracle Database Firewall.
Except where noted, the following options are available from the System menu of a Management Server or Standalone Database Firewall. The options Manage and Email Configuration are not available on a managed Database Firewall.
-
Manage: Provides options to:
-
Suspend and resume system operation.
-
Change the system to operate in test mode (not recommended in production systems).
-
Perform a diagnostic file system check.
-
Delete logged traffic.
-
Reboot or power off the system.
-
-
Network: Allows you to change network settings such as IP address, network mask, and default gateway, configure traffic sources, and allocate network interfaces (network cards), and link properties.
-
Services: Allows you to optionally set DNS server addresses, and control web, terminal, SNMP, secure log and traffic log access.
-
High Availability: (Management Server only) Lets you specify a partner Management Server to use in a high availability pair, and to select the primary server in the pair. (See "Step 3A: Specify Management Server Partner Settings (Resilient Pair Only)").
-
Status: Displays detailed status information, software license details, attribution notices and disclaimers.
-
Email Configuration: Used to configure the SMTP e-mail settings for scheduled reports (see Oracle Database Firewall Security Guide) and e-mail alerts (see "Configuring E-Mail Alerts").
-
Date and Time: Use to configure date, time, time offset, and time synchronization with an NTP server. See "Step 1: Set the Database Firewall Date and Time" for details.
-
Keyboard: This is used to specify the language to use for a keyboard connected to the Oracle Database Firewall Management Server or Oracle Database Firewall. The selection determines which characters appear on the screen when keys are pressed on the keyboard.
-
Public Key: Displays the public key, which may be necessary for archiving. for further information, see the notes on the page displayed.
-
Management Server: This is displayed only for an Oracle Database Firewall. The option allows you to make this a managed Database Firewall by entering the Management Server's IP address and certificate (see "Step 2B: Enter the Database Firewall Management Server Certificate and IP Address"). An Add Second Management Server option is available if a resilient pair of Oracle Database Firewall Management Servers is used.
-
Certificate: This is displayed only for a Management Server. The option allows you to display the Management Server certificate, which can be copied to Oracle Database Firewalls to make them managed Database Firewalls (see "Step 2: Perform Tasks for Each Oracle Database Firewall").
Archiving Data
This section contains:
About Archiving Data
The Archiving page of the Administration Console provides options that enable important data to be archived to prevent loss of data in the unlikely event of a disk or other system error. It is recommended that archiving is carried out regularly in accordance with your corporate policy. If required, you can create different archives for each protected database.
Figure 13-7 shows the Archiving Jobs page of the Administration Console.
Archive Data and Backup (accessed in the Appliances tab by clicking the Manage button for an appliance) archive the traffic logs or audit history for stored procedure auditing and user role auditing. Archive Configuration archives system configuration data, including the baseline policies.
Notes:
-
The amount of data in the traffic log depends on the logging settings specified in the policy in the Analyzer. Excessive logging leads to rapid use of large amounts of disk space.
To prevent problems that might occur by the accumulation of processed traffic log files on the Oracle Database Firewall or Oracle Database Firewall Management Server, the system ensures that a target of 25% of the disk space remains free. You must take this into account when calculating the amount of disk space required for storage of traffic log files.
Once the free disk space target is exceeded, logfiles may be deleted by the system and will no longer be available for archiving and ad-hoc searching. When logfiles are deleted, you will see this indicated in the
/var/www/log/backgroundrb.logfile. -
All files used by the Analyzer must be archived separately by your company's normal backup/archive systems. It is recommended that the following Analyzer files are archived:
Policy Files: File extension
.dnaModel Files: File extensions
.smdland.smdl_dataTraining Files: File extension
.train
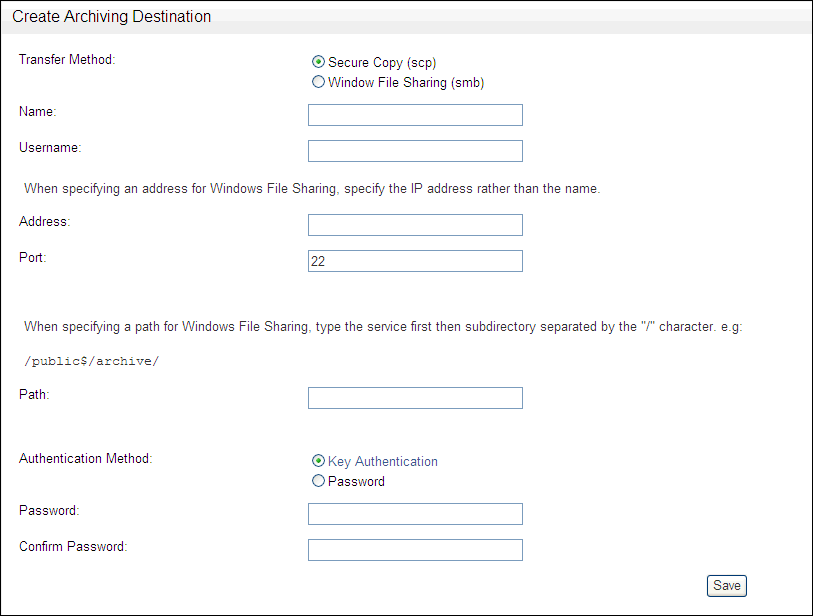
Defining Archiving Destinations
Before an archive can be started, you must define one or more archive destinations as follows. An archiving destination specifies the archive storage locations and other configuration settings.
-
Log in to the standalone Database Firewall or Management Server Administration Console.
See "Logging in to the Administration Console" for more information.
-
Click the Archiving tab.
-
Click Create in the Destinations menu. The following is displayed:
-
Complete the following fields:
-
Transfer Method: The method used to transfer data from the Oracle Database Firewall Management Server to the machine that archives the data. Normally, you should select Secure Copy (scp) if the data is archived by a Linux machine, and Windows File Sharing (smb) if the data is archived by a Windows machine.
-
Name: The name of the archiving destination. This name is used to select the archiving destination when starting an archive.
-
Username: The account name on the machine to which the archive data will be transferred.
-
Address: The name or IP address of the machine that archives the data. If Windows File Sharing is selected, specify an IP address.
-
Port: This is the port number used by the secure copy or Windows fileshare service on the machine that archives the data. You can normally use the default port number.
If you selected Windows File Sharing as the Transfer Method, it is recommended you use port 445.
-
Path: The path to the archive storage location. If Secure Copy (scp) is used to archive the data and there is no leading slash character; the path is relative to the user's home directory. If there is a leading slash, the path is relative to the root directory. For a Windows machine, enter the sharename, followed by a forward slash and the name of the folder (for example,
/sharename/myfolder). -
Authentication Method: If Window File Sharing (smb) is used to archive the data, select Password and enter the login password. If a Linux machine is used, you can select Key Authentication. Follow the instructions that appear after selecting Key Authentication.
-
Password and Confirm Password: The password to log into the machine that archives the data.
-
-
Click Save.
Creating an Archive Schedule
You can create a schedule to archive the traffic logs or audit files automatically at midnight on specified days. To do, this:
-
Log in to the standalone Database Firewall or Management Server Administration Console.
See "Logging in to the Administration Console" for more information.
-
Click the Archiving tab.
-
Under Jobs, select Schedule.
-
In the Archiving page, click the Add button.
-
Select Log Files to create a schedule to archive traffic logs, or Db Audit to create a schedule to archive the history for stored procedure auditing and user role auditing.
-
Select Recurring if you want the archive to occur automatically at a specified interval.
If the check box is not selected, the archive will occur only once.
-
Use Date, Month and Weekday to specify the interval.
For example, if you select only Mon, the archive will take place at midnight on every Monday. If you select 1 and Jan, the archive will take place only on the 1st January every year (not recommended; the archive should occur more frequently).
-
Use Host to select the archive destination.
-
Select the protected database, or All.
-
Click Save.
Starting an Archive Job Manually
If you do not want to set up an archive schedule, use the following procedure to archive the traffic logs or audit files manually:
-
Log in to the standalone Database Firewall or Management Server Administration Console.
See "Logging in to the Administration Console" for more information.
-
Click the Archiving tab.
Any existing archive or restore jobs are listed on the Archiving Jobs page.
-
Ensure that you have created an archiving destination first.
In the Destinations menu, select Create to create the archiving destination.
-
In the Jobs menu, select Archive Data.
The following screen is displayed:
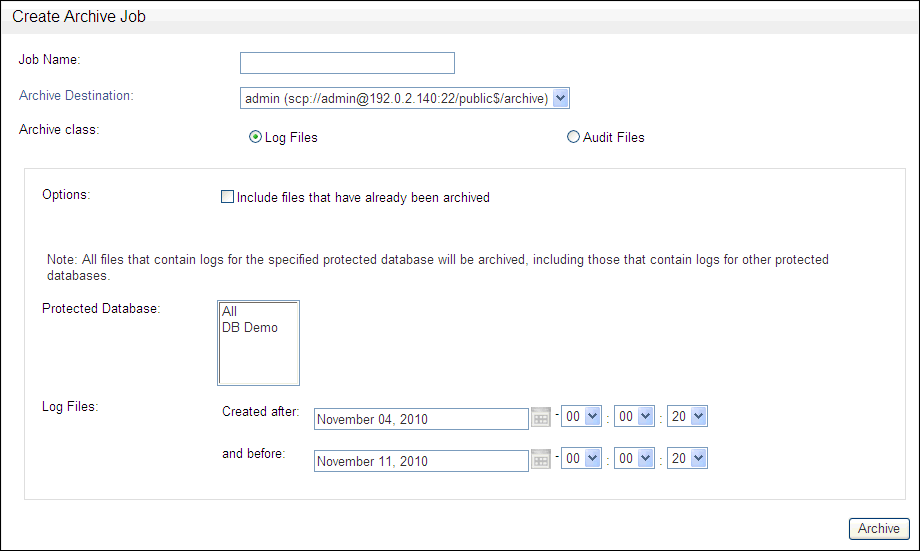
Description of the illustration image145.gif
-
Complete the following fields:
-
Job Name: Give each archive a name.
-
Archive Destination: Choose the archive destination.
-
Archive class: Choose whether to archive the Log Files (traffic logs), or the Audit Files (the archive history for stored procedure auditing and user role auditing. If you choose Log Files, the following options are also displayed:
-
Include files that have already been archived: Select this check box to re-archive files that have already been archived.
-
Protected Database: Choose All, or a specified database.
-
Log Files: Choose the period to archive.
-
-
Click Archive.
You can view the progress of an archive job from the Archiving Jobs page (click the Archiving tab).
Clicking the job number in the Archiving Jobs page displays a page in which you can choose to pause or delete the job.
Starting a Configuration Archive Job
Before archiving configuration data from the Oracle Database Firewall Management Server, backup the configuration on each managed Database Firewall:
-
In the Management Server console, click the Appliances tab.
-
For each listed Database Firewall, click the Manage button.
-
Click the Backup button.
-
(Optional) You can check the Backup with pass phrase checkbox. For security reasons, this is not recommended. See "Restoring a Configuration in which the Pass Phrase was not Archived".
Use the following procedure to archive configuration data, including Analyzer policies:
-
In the standalone Database Firewall or Management Server Administration Console.
See "Logging in to the Administration Console" for more information.
-
Click the Archiving tab.
-
In the Jobs menu, select Archive Configuration.
-
In the Create Archive Job page, under the Settings section, complete the Job Name and Archive Destination fields.
-
(Optional) Under the Security section, you can check the Archive With Pass Phrase checkbox. For security reasons, you should not archive the pass phrase. See "Restoring a Configuration in which the Pass Phrase was not Archived".
-
Click the Archive button.
After you click Archive, the archive job appears in the Configuration Archive Jobs list in the Archiving Jobs page.
Restoring an Archive
If you want to restore data from an archive, click Restore Data or Restore Configuration in the Jobs menu. The page that is displayed enables you to choose the archive destination to restore. All data stored at the archive destination will be restored.
The system overwrites the existing configuration when you restore a configuration. This can lead to traffic logs being removed. If you merge an old configuration with current traffic logs, first archive the data, then restore the configuration, and then restore the data.
When you restore previously archived traffic log data to a system using the Restore functionality, determine whether or not these log files must be associated with a monitoring point. You can do this from the Repair menu option in the System menu.
After restoring configuration data at an Oracle Database Firewall Management Server, display the Appliances page, click Manage for each Oracle Database Firewall device being controlled and select the Restore option.
Note:
Performing a Configuration Restore job will delete any Archive Jobs that have been made previously.Restoring a Configuration in which the Pass Phrase was not Archived
A pass phrase is used to decrypt obfuscated passwords used in a Database Firewall system. The pass phrase is randomly generated at installation time, and is unique to each Database Firewall installation. For security reasons, we recommend that you do not archive the pass phrase when you archive a configuration.
There are three possible scenarios if you are restoring a configuration with no pass phrase archived:
-
Restoring a configuration archive to the same Database Firewall installation:
When you are restoring from a configuration archive with no pass phrase to the same Database Firewall installation, the existing pass phrase will be used and no further steps are needed.
-
Restoring a configuration archive to a new Database Firewall installation:
If to create a new system you are restoring from a configuration archive from an existing system with no pass phrase, you need to retrieve the pass phrase file from the existing system from which the configuration archive was created. Copy the pass phrase file
dbfw_random_passfrom the archive installation at this directory:/usr/local/dbfw/etc/. Place this file in the same directory in the installation where you are restoring, overwriting the existing pass phrase file. In a managed Database Firewall environment, replace this file in the Management Server as well as all managed Database Firewalls. -
Restoring a configuration archive from a system that no longer exists:
If you have configuration archive with no pass phrase, and the system from which it the archive was created no longer exists, you need to re-enter all system passwords in the new system. The new system will use its own randomly generated pass phrase to decrypt passwords.
Viewing the Logs
The Database Firewall log files capture only SQL statements. You can view logged information using the options in the Logs menu of the System tab.
Figure 13-8 shows the Manage Logs page of the Administration Console.
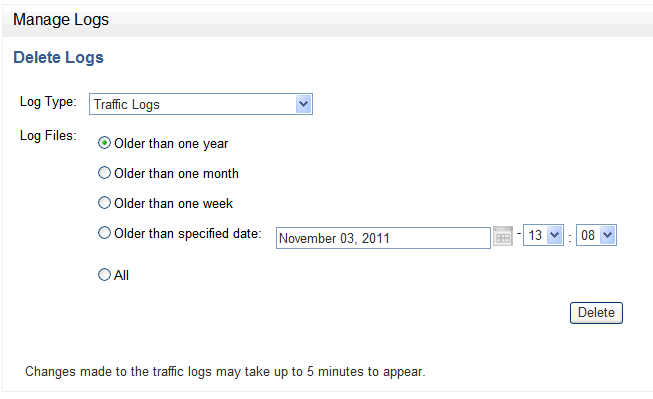
The Logs menu contains the following options:
-
Manage: Enables you to delete log files to free disk space. Always use this utility to delete files. You should never delete log files at the operating system level.
Note:
Before deleting log files, it is recommended that you archive the data and save it to long-term storage media to ensure that all logged data is available for possible future analysis. -
System Events: Displays the contents of the event log, which stores system events that are not directly related to the Oracle Database Firewall software, such as operating system warnings.
-
Traffic Log Files: Displays the traffic log files and enables you to download them.
Note:
If you want the most recent data to be made available for reporting purposes, click Summarize Now in Traffic Log Files page. Summarizing makes the data in the traffic log files available for reporting. Automatic summarizing takes place every hour.Note:
A more user friendly method of viewing the data in the traffic log is to use the Traffic Log options in the Reporting page (see Oracle Database Firewall Security Guide for more information about accessing the traffic log).
-
Administration Changes: Displays the contents of the administration log, which stores system actions such as logins, shutdowns, restarts, and baseline policy uploads.
-
Repair: Allows you to attach log files to a log source, such as an enforcement point. This may be necessary if log files have been restored from an archive and the original log source has been removed.
Configuring Connectors to Third-Party Systems
You can configure connections to third-party systems by selecting Syslog from the Connectors menu in the System tab.
Figure 13-9 shows the Syslog Settings page of the Administration Console.
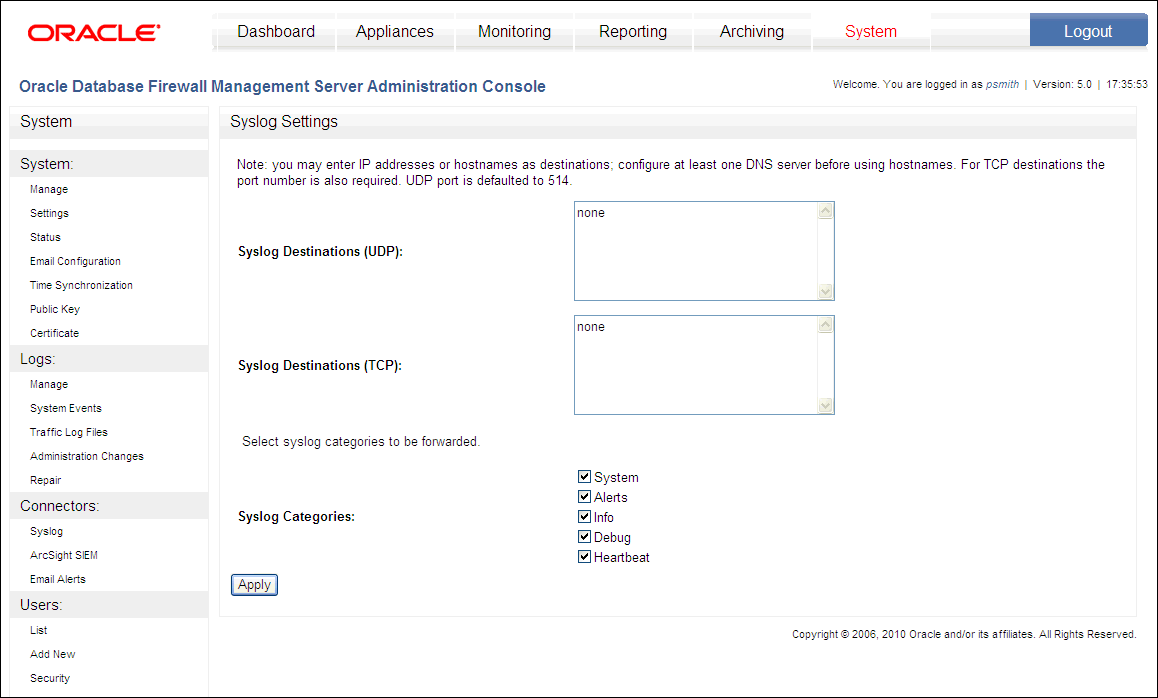
The Connectors menu contains the following options:
-
Syslog: Allows you to configure the types of syslog messages to send and to specify the syslog destinations. See "Step 1D: Configure the Management Server Syslog Destinations" (Oracle Database Firewall Management Server-based systems) or "Step 4: Configure the Standalone Database Firewall Syslog Destinations" (standalone systems).
-
ArcSight SIEM: Enables you to configure communications to the ArcSight Security Information Event Management (SIEM) system. For more information about ArcSight SIEM, including details of the syslog message mapping between Oracle Database Firewall and ArcSight SIEM, see Chapter 12, "Using Oracle Database Firewall with ArcSight SIEM."
-
Email alerts: Enables you to send e-mail alerts to one or more users, including e-mail aliases. Allows you to send alerts to specified e-mail addresses. Enabling email alerts forwards all syslog alert message types (DBFW:9, DBFW:10, DBFW:11 and DBFW:12) to the specified email addresses. See "Configuring E-Mail Alerts". See Appendix B, "Syslog Message Format," for the meanings of the syslog message types.
Configuring E-Mail Alerts
You can configure e-mail alert notification for users. This section contains:
Configuring the SMTP Server
The SMTP protocol is widely used and recognized by internet mail servers.
To configure the SMTP server:
-
From the System tab, in the System menu, select Email Configuration.
-
Enter the following settings:
-
SMTP Server Address: Enter the SMTP server address, using either an IP address or the host name. Examples are as follows:
auth.smtp.example.com
mail.example.com
192.0.2.20
-
Port: Enter the port number, which is typically
25. -
Username: (Optional) Enter the user name.
-
Password and Password Confirmation: (Optional) Enter the password.
-
From Address: Enter the appropriate e-mail address, which will be displayed as the sender in e-mails.
-
Reply-to Address: Enter the appropriate e-mail address, which will be used as the reply address.
-
-
Click the Save button.
-
To test the email configuration, enter a valid e-mail address in the Email Address field and then click Test. In a moment, an e-mail should appear in the e-mail tool used by the e-mail address.
Configuring E-Mail Recipients
After you have configured an SMTP server, you can configure one or more e-mail addresses of users who want to receive e-mail alerts.
To configure e-mail alert forwarding:
-
From the System tab, in the Connectors menu, select Email Alerts.
The Email Alerts page appears.
-
Select the Enable email alert forwarding check box.
-
Enter one or more e-mail recipient addresses, separated by a space, or new line.
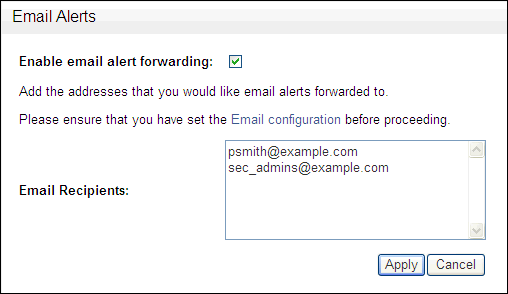
Description of the illustration email_alerts.gif
-
Click the Apply button.
Example E-Mail Alert Notification
Example 13-1 shows an example of a an e-mail notification. The subject header is Oracle Database Firewall: Alert from device 192.0.2.82 for database 192.0.2.81 - Statement Alert.
Example 13-1 Contents of an E-Mail Alert Notification
Details of the alert:
     Alert name:                Statement Alert
     Device:                    192.0.2.82
     Alert severity:            Undefined
     Action:                    Warn
     Action Type:               Unknown Alerted
     Message timestamp:         2010-11-12 13:45:05.746
     Cluster ID:                2362095612
     Logging level:             Always
     Client address:            192.0.2.237:4743
     Server address:            192.0.2.81:1433
     Database username:         unknown_username
     SQL statement ID:          4cdd44e129500000
     Database response:         Not collected
         Response code          0
         Response text
         Response detail
     SQL:                       select * from creditcard where 0=0
Configuring Users
This section contains:
About Configuring Users
You can use the Users menu of the System page to create, list, and edit Administration Console user accounts. A valid user name and password must be provided when the Administration Console is started, or when a user of the Analyzer software connects using Train on Log Data or Test with Log Data.
You can create users in both standalone and managed Database Firewalls, and in the Management Server. These user accounts are local to each system, even after you have configured a Database Firewall to connect to a Management Server. For a standalone Database Firewall, in which both the Database Firewall and the Management Server are on the same Linux server, the system administrator user can perform all functions. However, if the Database Firewall is on a separate server from the Management Server, after you connect the Management Server to this Database Firewall, the system administrator functions change. For example:
-
Database Firewall administrator: Can now only change network settings, view network traffic, remove the Database Firewall from the Management Server, and similar tasks specific to the current Database Firewall.
-
Management Server administrator: Can create and manage enforcement points, configure policies, run reports, archive, and so on.
See "Which Administration Console Should I Use?" for a full list of the privileges associated with these two accounts.
The default administrator user name is admin (lower case only). For better security and separation of duty, Oracle recommends that you reserve the admin user account as a back-up user account, and then create a separate administrative account for each existing user for day-to-day operations. These accounts should never be shared. This allows better auditing of administrator activity, and if the administrative user is unavailable or leaves the company, you have a back-up administrative user account to take this user's place. For all of the user account options, you can create as many users as your site requires.
To ensure full traceability of system changes, the administration log stores the login ID of any person who makes a change from the Administration Console. Another reason for having separate Administration Console accounts is that this log enables you to easily track users who make changes to the Database Firewall system. See "Viewing the Logs".
Figure 13-10 shows the Users page of the Administration Console.

Creating a New User Account
-
Log in to the Administration Console.
You can log in to a standalone or managed Database Firewall, or a Management Server. See "Logging in to the Administration Console" for more information about logging in.
-
Select the System tab.
The System Settings page appears.
-
In the Users menu, select Add New.
The Add User page appears.
-
Complete the following information:
-
User name: Enter the login user name for the account (for example,
psmithorlbernstein). Remember that this name is case sensitive. For example, if you createlbernstein, trying to log in asLBERNSTEINwill fail. -
First Name: Enter the user's first name.
-
Last Name: Enter the user's last name.
-
Email: Enter the user's e-mail address.
-
Role: Select from the following roles:
-
System Administrator: Gives the user full access to all options in the Administration Console, and to connect from the Analyzer.
-
View-only User: Enables the user to view log data, change his or her password, and connect from the Analyzer. This role enables the user to see statement details in the Analyzer. This user can create a policy file, but cannot upload it.
-
Log Administrator: Enables a user of the Administration Console to view log data, change his or her password, configure logging, run archive or restore jobs, and connect from the Analyzer.
-
-
Suspended: Select this check box to suspend the user account.
-
Force Password Change on Next Login: Select this check box to enable the user to create a private password the first time that the user logs in. By default, this check box is selected.
-
Password: Enter a secure password. Follow these guidelines:
-
Make the password between 8 and 30 characters and numbers.
-
Include in the password at least one digit, one upper-case character, and one lower-case character.
-
Do not use an actual word for the entire password.
-
Combine two weaker passwords, such as welcome and
binky1intoWelBinky1Come.
-
-
Confirm Password: Re-enter the password.
-
-
Click the Signup button.
Later on, if you must change the user account, select List from the Users menu, and then click the name of the user account that you want to change. The Edit User page appears.
Creating Password Policies
For better security, you can create password policies to force users to use strong passwords. The password policy applies to all users managed by the Database Firewall.
To create a password policy:
-
Log in to the Administration Console.
You can log in to a standalone or managed Database Firewall, or a Management Server. See "Logging in to the Administration Console" for more information about logging in.
-
Select the System tab.
The System Settings page appears.
-
In the Users menu, select Security.
The User Security Settings page appears.
-
Specify the following settings:
-
Enforce Strong Passwords: Select this check box to enforce the following criteria:
-
Must contain lowercase and uppercase characters
-
Must contain at least one non alphabetical character
-
Must not be systematic or simple (for example,
abcdeor12345) -
Must not be made up of mostly the same characters (for example,
aaaaaa11111)
If you disable this option, Oracle Database Firewall will give users advice about the strength of their passwords but will not enforce these guidelines.
-
-
Minimum Password Length: Enter a numeric value. The default is 6.
-
Enforce Novel Passwords: Select this check box to prevent users from specifying a password that they have used in the past.
-
Expire Passwords: Enter a numeric value to force users to change their passwords after a specified number of days. To disable password expiration, enter
0.
-
-
Click the Save button.
Viewing and Capturing Network Traffic in an Individual Database Firewall
This section contains:
Viewing Network Traffic
You may wish to view network traffic for debugging purposes. You can view network traffic for standalone or managed Database Firewalls. You can display network traffic in real time on the screen by clicking Show in the Network Traffic menu of the System tab. This option is not available for the Management Server.
Figure 13-11 shows the Network Traffic page of the Administration Console of a Database Firewall.
Figure 13-11 Viewing Network Traffic from a Database Firewall
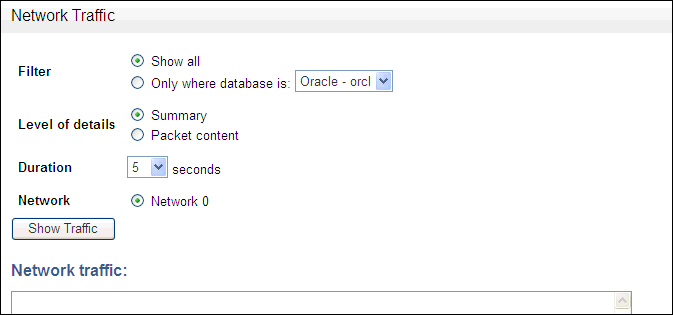
Description of "Figure 13-11 Viewing Network Traffic from a Database Firewall"
Capturing Network Traffic
You can capture the network traffic to a file (.pcap file type) that you can later download and analyze.
To capture the network traffic to a file:
-
Log in to the standalone or managed Database Firewall Administration Console.
See "Logging in to the Administration Console" for more information about logging in.
-
Select the System tab.
-
Under the Network Traffic menu, select Capture to File.
In a moment, the Network Traffic page lists the traffic file:
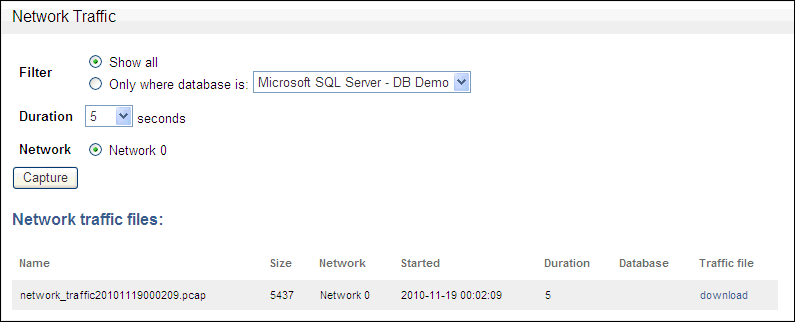
Description of the illustration network_traffic.gif
-
In the Network traffic files area, click the download button.
-
In the File Download dialog box, click Save.
-
In the Save As dialog box, navigate to the directory where you want to save the file, and then click the Save button.
Monitoring the Database Firewall's Embedded Oracle Database
You can use the Oracle Enterprise Manager Database Control to monitor the Oracle database embedded in the Database Firewall. Use the configuration steps in this section to set up monitoring of the Oracle embedded database in a Standalone Database Firewall or Management Server.
To configure monitoring of the embedded Oracle database:
-
On the computer running the Database Firewall or Management Server, log in as
supportand switch to userroot. -
Run the command:
/usr/local/dbfw/bin/dbfwdbctrl-cfg configure -
When prompted for a password, enter the Oracle database
syspassword you specified when installing the Database Firewall or Management Server. -
Run these two commands to start monitoring:
/etc/init.d/dbfwdbctrl autostart on/etc/init.d/dbfwdbctrl startAfter the next reboot, the Oracle Enterprise Manager Database Control will start automatically.
-
To access the Enterprise Manager Database Control in a browser, use the following URL:
https://Database_Firewall_or_Management_Server_IP_address:1158/emThe Oracle Enterprise Manager Database Control console appears.
-
Use the following access credentials:
-
User Name: enter
sys -
Password: enter the
syspassword -
Connect As: select
sysdba
For information on managing Oracle Enterprise Manager Database Control, see the Oracle Database Administrator's Guide:
http://docs.oracle.com/cd/E11882_01/server.112/e25494/toc.htm#BEGIN -
To stop and restart monitoring of the embedded Oracle database:
-
Run the following commands to stop monitoring and to disable autostart:
To stop monitoring, run:
/etc/init.d/dbfwdbctrl stopTo disable autostart, run:
/etc/init.d/dbfwdbctrl autostart off -
Run the following commands to restart monitoring and enable autostart:
/etc/init.d/dbfwdbctrl autostart on/etc/init.d/dbfwdbctrl startAfter the next reboot, the Oracle Enterprise Manager Database Control will start automatically.
To check the status of the Enterprise Manager 11g Database Control (monitoring the embedded Oracle database):
-
On the computer running the Database Firewall or Management server, log in as
root. -
Run the command:
/etc/init.d/dbfwdbctrl statusHere is a sample output:

Description of the illustration em_dbcontrol_output.gif