3 Installing Oracle Database Firewall
About the Installation Process
You will follow these general steps to install Oracle Database Firewall:
-
Install Oracle Database Firewall on an x86 server that you plan to use exclusively for Database Firewall. Be aware that this installation process re-images this server, automatically installing the Oracle Linux operating system.
The Database Firewall installation process also creates an Oracle Database Firewall Management Server on that server. If you are using only one server for both the Database Firewall and the Management Server, then you are ready to install the Analyzer.
-
If you want to install the Management Server onto a separate computer, then rerun the installer onto a second server using the Oracle Database Firewall Management Server 5.1 installer disc 1 as the first disc. This server must be exclusively used for the Management Server.
As with the Database Firewall, the installation process re-images this x86 server to use Oracle Linux.
After you run the installer for the Management Server on a separate x86 server, then you will need to configure the Management Server to manage the Database Firewall(s). See the Oracle Database Firewall Administration Guide for configuration details.
-
If needed, install additional Database Firewalls onto their own individual x86 servers, and then configure each to connect to a central Management Server.
-
For both the Database Firewall and Management Server installations, you must change the password for the
adminuser account the first time that you log in. -
After you have installed the Database Firewalls and Management Servers, you can install the Analyzer onto a Windows computer.
Installing Securely
See the Security Guidelines chapter of the Oracle Database Firewall Security Guide for important considerations for installing securely and protecting your data.
Installing Database Firewall and Database Firewall Management Server
This section contains:
-
Step 1: Run the Oracle Database Firewall Installation Software
-
Step 2: Start the Administration Console and Change the admin Password
Step 1: Run the Oracle Database Firewall Installation Software
To install Database Firewall and Database Firewall Management Server:
-
In the x86 system, insert the first disc of the component that you want to install:
-
Database Firewall: Insert the disc entitled
Oracle Database Firewall 5.1 - Disc 1. Insert this disc to install the Oracle Database Firewall on a dedicated server, or to install both the Oracle Database Firewall and Oracle Database Firewall Management Server on the same server. -
Management Server: Insert the disc entitled
Oracle Database Firewall Management Server 5.1. Insert this disc to install the Oracle Database Firewall Management Server onto a separate server from the Oracle Database Firewall.
-
-
With the disc in the disc drive, restart the computer so it restarts from the CD/DVD ROM drive.
Be aware that to start the installation process requires restarting the computer from the appropriate disc.
-
When prompted, insert the Oracle Linux DVD.
-
Press Tab to select the OK button, and then press Return.
The Root Password screen appears.
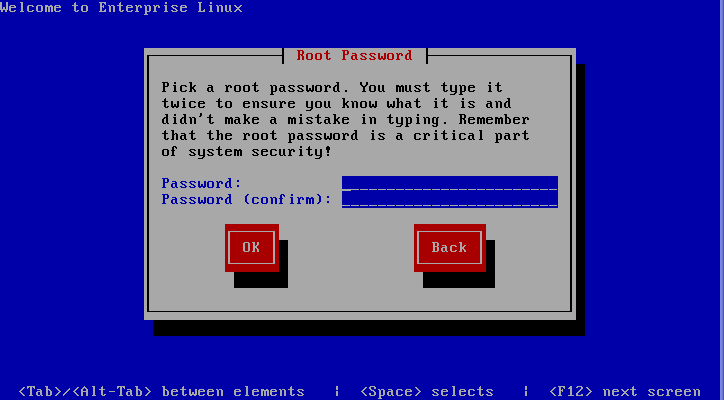
Description of the illustration root_password.gif
-
In the Password field, create a root password, and then press the Tab key to move to the Password (confirm) field. Enter the password again, and then press Enter.
Use the
rootaccount when you are requested to do so by Oracle Support. Create a password that is secure. Ways to create secure passwords are as follows:-
Make the password between 8 and 30 characters and numbers.
-
Include in the password at least one digit, one upper-case character, and one lower-case character.
-
Do not use an actual word for the entire password.
-
Combine two weaker passwords, such as
welcomeandbinky1intoWelBinky1Come.
The installer displays messages indicating that it is formatting and that the installation process is beginning.
-
-
When you are prompted for disc 2, remove the Oracle Linux DVD and then insert disc 2. Press Enter.
-
When you are prompted, remove disc 2 and then insert disc 3.
-
When you are prompted, remove disc 3 and then insert disc 1 (or
Oracle Database Firewall Management Server 5.1if you had inserted it in Step 1). -
When you are prompted, create a password for user
support, and then press Enter.Use the
supportaccount when you are requested to do so by Oracle Support. As you enter the password, be aware that no text, such as asterisks used to indicate the password that you are entering, appears.To create a password that is secure, see the guidelines listed in Step 5.
In a moment, a message saying
Successfully configured system user "support"appears. Press Enter to continue. -
When you are prompted, confirm the password that you just created for user
support, and then press Enter. -
When prompted, create a password for the
sysuser.In a moment, a message saying
Successfully configured system user "sys"appears. Press Enter to continue.The Select Management Interface screen appears, similar to the following:
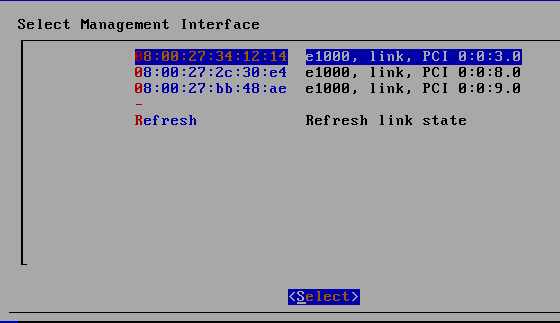
Description of the illustration select_management_interface.gif
-
Select the network device connection that you want to use for the management interface on your Oracle Database Firewall or Management Server.
Use the arrow keys to move through the list. To make the selection, press Enter. A confirmation screen appears. For example:
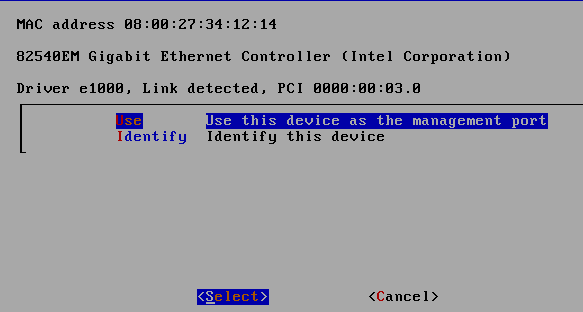
Description of the illustration manage_interface_conf.gif
The selected interface will be used for the Management Server. If you reboot the system and this interface is no longer available, you will be prompted to select another one, in a console display at boot time.
-
Press Enter to use the selected device, or Cancel to go back to the previous step and select another device.
The Identify option identifies the device for 10 seconds, usually with blinking lights.
-
When the Installation Complete screen appears, remove any media that you used during the installation process and then press Enter to restart your system. (This configuration step may take a while because an Oracle database is silently installed.)
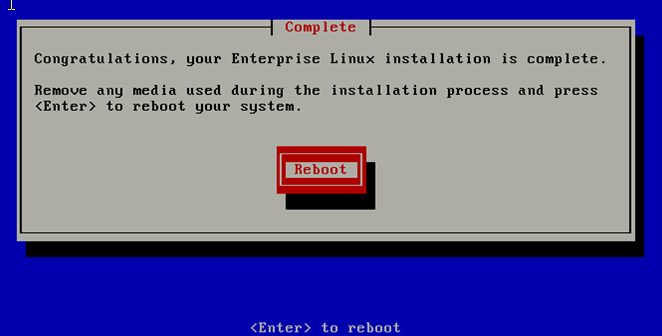
Description of the illustration complete.gif
-
After the Database Firewall has rebooted successfully, you will be placed at this screen.
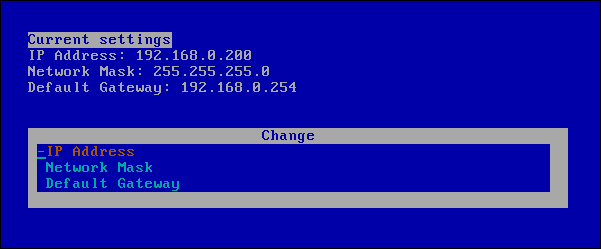
Description of the illustration network_settings.gif
The Database Firewall has completed installation. There are seven other terminal screens that can be accessed by pressing Alt-F2 through Alt-F8. From these screens you can log in as root and/or support to view logs on the Database Firewall. You should not access any files directly on Database Firewall unless directed by Oracle Support. The Alt-F9 terminal can be used to view any startup messages.
When you see this screen, continue to the next step to configure network settings.
-
Select an option (IP Address, Network Mask, or Default Gateway) by pressing the Up arrow or the Down arrow, followed by Enter.
The dash sign (-) shows the currently selected option. Press Esc if you want to return to the previous screen.
-
Select the required value in each field by pressing the Up arrow or the Down arrow, followed by Enter.
Note the following:
-
IP Address is the address that you will use in the URL for the Database Firewall Administration Console. Make a note of this IP address for any user who wants to use the Administration Console.
-
Ask your system administrator for Network Mask settings.
-
Set Default Gateway to
0.0.0.0if you are not using a gateway.
-
-
When prompted, select Accept to accept the setting or click Back to return to the previous screen and reenter the IP address.
This step completes the configuration process, and your computer is ready to use. You do not need to perform any additional steps, such as restarting your computer.
Step 2: Start the Administration Console and Change the admin Password
The installation process creates an Administration Console on each Database Firewall and Management Server server. After you complete the installation, you should log in to the console and change the password for the default administrative user, admin.
The first time that you start the Administration Console for either a Database Firewall or for a Management Server, you will be prompted to change the default password.
-
Enter the following URL:
https://ip_address/user/loginIn this specification:
-
ip_address: Enter the IP address setting that you created in Step 17 under "Step 1: Run the Oracle Database Firewall Installation Software".
-
-
In the Web browser, add this URL to your Favorites to make it easy to access.
-
In the Login page, enter the following credentials:
-
Login ID:
admin -
Password:
admin
When prompted, enter a new password. Create a password that is secure. See the guidelines that are listed in Step 5 under "Step 1: Run the Oracle Database Firewall Installation Software".
The Administration Console appears. The following window shows how the Administration Console typically appears for a Management Server system.

Description of the illustration image018.gif
-
Ports That Oracle Database Firewall Uses
This section lists ports that Oracle Database Firewall uses.
Table 3-1 shows ports for services provided by the Database Firewall or Management Server used by outside users of the system. Access to all these services can be controlled within the Database Firewall system. If external network firewalls are used, these ports must be open to allow connections from the users (clients) of these services to the Database Firewall system(s).
Table 3-1 Ports for Services Provided by Database Firewall or Management Server
| Port | Protocol Family | Protocol | Purpose | Notes |
|---|---|---|---|---|
|
22 |
TCP |
SSH |
Command line access to system |
|
|
161 |
UDP |
SNMP |
SNMP access |
|
|
443 |
TCP |
HTTPS |
Administration Console (web interface) |
This port can be changed in the administration console |
|
1514 |
TCP |
TCP syslog over SSL |
Incoming syslog messages from external web application firewall |
|
|
1521 |
TCP |
Oracle Database |
Secure log access for external reporting (disabled by default) |
|
|
4560 |
TCP |
DBFW internal protocol |
Analyzer access to traffic log |
|
|
4600 - 4680 |
TCP |
DBFW internal protocol |
Incoming traffic captures from Remote Monitor |
When setting up these Enforcement Points in the Administration Console, use the port numbers indicated in the Enforcement Point setup page. |
|
5514 - 5593 |
TCP |
Syslog |
Incoming WAF (F5) violation alerts |
When setting up these Enforcement Points in the Administration Console, use the port numbers indicated in the Enforcement Point setup page. |
Table 3-2 shows ports for external services that may be used by the Database Firewall. If external network firewalls are used, the relevant ports must be open so that the Database Firewall can use these services as a client.
Table 3-2 Ports for External Network Access by Database Firewall or Management Server
| Port | Protocol Family | Protocol | Purpose | Notes |
|---|---|---|---|---|
|
25 |
TCP |
SMTP |
Email delivery |
|
|
123 |
UDP and TCP |
NTP |
Time synchronization |
|
|
514 |
UDP, or configured as TCP |
Syslog |
Syslog alerts |
For TCP-transport connections to syslog server(s) the port must be configured in the Administration Console |
|
514 |
UDP, or configured as TCP |
Proprietary ArcSight protocol over syslog transport |
DBFW alerts |
For TCP-transport connections to ArcSight server(s) the port must be configured in the Administration Console. |
|
514 |
TCP |
Syslog |
WAF (F5) alerts |
The port can be changed from the Administration Console. |
Table 3-3 shows ports for services that are used between the Database Firewall and any Database Firewall Management Server. If an external network firewall is placed between these systems, then the relevant ports must be opened.
Table 3-3 Ports for Database Firewall Internal TCP Communication
| Port | Protocol Family | Protocol | Direction | Purpose |
|---|---|---|---|---|
|
443 |
TCP |
HTTPS |
Database Firewall accepts connections from Management Server |
Command interface |
|
1514 |
TCP |
SSL |
Management Server accepts connections from Database Firewall |
Event reporting and monitoring |
Installing the Analyzer
After you have installed the Database Firewall and Management Server, you are ready to install the Analyzer.
To install Oracle Database Firewall Analyzer:
-
Insert disc entitled
Oracle Database Firewall Utilities 5.1into your Windows disc drive and then locate theOracleDatabaseFirewallAnalyzerInstaller.exefile.This executable is located at the root level of the disc.
-
Double-click the
OracleDatabaseFirewallAnalyzerInstaller.exefile to install the Oracle Database Firewall Analyzer.The Welcome to the Oracle Database Firewall Analyzer Setup Wizard page appears.
-
Click Next.
The Choose Install Location page appears. By default, the destination folder is within the Oracle folder in the Program Files folder.
-
Click Browse if you want to install the Oracle Database Firewall Analyzer Installer in a different location. Click Next.
The Choose Start Menu Folder page appears.
-
Click Install.
The Completing the Oracle Database Firewall Analyzer Setup Wizard page appears.
-
Click Finish.
The Oracle Database Firewall Analyzer is installed.
Increasing the Oracle Database Firewall Default Disk Space
The Oracle Database Firewall (standalone or managed) will expand to use 100 GB of disk space. The Management Server will expand to use 500 GB of disk space. To use more space for either server requires manual changes. This section explains how to extend their partition sizes. Ideally, you should perform these steps after the Database Firewall installation and before you configure any enforcement points.
To increase the standalone Database Firewall and the Management Server disk space:
-
If your Database Firewall system is already in use (for example, you have configured enforcement points), then archive the configuration, traffic log files and audit files.
-
Log in to the computer as user
root. -
Run the
vgscommand to find the amount of free disk space.For example:
vgs

VG       #PV   #LV   #SN Attr     VSize     VFree
new_vg     3     1     1 wz--n-   120.03G   238.25G
Next, decide how you want to allocate space for the Oracle partition and the log file partition.
-
Managed Database Firewall: Add 100 percent for the extra space. For example, if the managed Database Firewall uses 100 GB of disk space, you should add 100 GB of space.
-
Standalone Database Firewall or a Management Server: For a standalone Database Firewall or a Management Server, Oracle recommends that you allocate a third of the extra space to the Oracle partition, and two thirds of the space to the log file partition. You should leave some extra space in case you want to change the partition layout in the future.
The following examples allocate 66 GB for the Oracle partition and 132 GB for the log file partition, leaving 40.25 GB free.
-
-
For the Oracle partition, run the following command to change the size of the logical volume group for the
/var/lib/oracledirectory.lvextend -L+space_amountG /dev/vg_root/lv_oracleThis directory is where the Oracle database resides. Replace
space_amountwith a value for the amount of space that you want to add. For example:lvextend -L+66G /dev/vg_root/lv_oracle
-
For the log file partition, run the following command to extend the partition where the compressed log files are stored.
lvextend -L+space_amountG /dev/vg_root/lv_var_dbfw
Replace
space_amountwith a value for the amount of space that you want to add. For example:lvextend -L+132G /dev/vg_root/lv_var_dbfw
-
Run the following commands to ensure that each partition uses all the space that is now available to it.
resize2fs /dev/vg_root/lv_oracle

resize2fs /dev/vg_root/lv_var_dbfw
-
Increase the size of the
USERStablespace by following the instructions in article 1332492.1 on the Oracle support site:https://support.oracle.com.
What's Next?
At this stage, Oracle Database Firewall, Management Server, and the Analyzer are installed in your system. The next step is for the Database Firewall administrator to configure the following connections:
-
The connections between each Database Firewall and the Management Server. Oracle strongly recommends that you perform this step right after you complete the installation. Chapter 2 and Chapter 3 in Oracle Database Firewall Administration Guide cover this topic.
-
The connections required for a high availability environment. Chapter 4 in Oracle Database Firewall Administration Guide covers this topic.
-
User accounts for your site. See Oracle Database Firewall Administration Guide for detailed information about configuring users.
-
The ability of the Database Firewall to track stored procedure and user account information in the protected database. Chapter 5 and Chapter 6 in Oracle Database Firewall Administration Guide cover this topic.
-
The connections between each Database Firewall and the protected database that it monitors. Chapters 7 through 10 in Oracle Database Firewall Administration Guide cover this topic.
After this configuration is complete, users who are responsible for using the Analyzer can begin to create policies and monitor SQL traffic, as described in Oracle Database Firewall Security Guide.