6 Configuring and Using Role Auditing
About User Role Auditing (URA)
User role auditing (URA) enables users to audit and approve changes to user roles in the databases on a specified database server. The Oracle Database Firewall connects to the database server at scheduled intervals and discovers any changes or additions that have been made to user roles. User role auditing is supported for Oracle, Microsoft SQL Server, My SQL, Sybase ASE, Sybase SQL Anywhere, and IBM DB2 (Microsoft Windows, UNIX, and Linux) databases.
This chapter explains how to configure a database protected by Database Firewall so that Database Firewall users can audit changes to user roles. Instructions for auditing the user roles are in Oracle Database Firewall Security Guide.
Setting User Permissions for URA
This section contains:
Setting URA User Permissions for Oracle Databases
To set up the user account for Oracle databases (all releases later than Oracle Database 8i):
-
From the Oracle Database Firewall Product CD (
Oracle Database Firewall Utilities 5.1), copy thedatabasedirectory to the server where you plan to run the scripts. -
On this server, go to the
database/uradirectory and uncompress theoraclecompressed file, preferably into a directory calledoracle. -
Go to this
oracledirectory and review the uncompressed file (ura_setup.sql) so you will understand its settings.The
ura_setup.sqlscript contains settings for the following information:-
$(username)refers to the user account that will be responsible for user role auditing. Ideally, this user account should be different from the user accounts specified for user role auditing and direct database interrogation (DDI) (for example,ura_auditor). -
$(password)refers to the password for this user account.
-
-
Log in to Oracle Database as a user who has privileges to create users and set user permissions.
For example:
sqlplus sys/as sysdba
Enter password: password
Connected.
SQL>
If the database has been enabled with Oracle Database Vault, then log in as a user who has been granted the
DV_ACCTMGRrole. -
Run the
ura_setupscript and answer the prompts as needed.For example:
SQL> @database/ura/oracle/ura_setup.sql
username: as parameter 1:
Enter value for 1: user_name
password: as parameter 2:
Enter value for 2: password
The
ura_setup.sqlscript grants the user role auditing user account the following privileges:-
CREATE SESSION -
SELECTon these system tables:sys.dba_users sys.dba_role_privs sys.dba_sys_privs sys.proxy_users v$pwfile_users
-
-
(Optional) If you need to remove this user account, run the
ura_dropscript.For example:
SQL> @database/ura/oracle/ura_setup.sql
username: as parameter 1:
Enter value for 1: user_name
Setting URA User Permissions for SQL Server Databases
To set up the user account for Microsoft SQL Server (2000, 2005, or 2008) databases:
-
From the Oracle Database Firewall Product CD (
Oracle Database Firewall Utilities 5.1), copy thedatabasedirectory to the server where you plan to run the scripts. -
Ensure that the computer where you will run the scripts has the
sqlcmd.exeutility installed. -
On this server, go to the
database/uradirectory and uncompress thesqlservercompressed file, preferably into a directory calledsqlserver. -
Go to this
sqlserverdirectory and review the uncompressed files so you will understand their settings.The scripts contain settings for the following information:
-
$(username)refers to the user account that will be responsible for user role auditing. Ideally, this user account should be different from the user accounts specified for user role auditing and direct database interrogation (DDI) (for example,ura_auditor). -
$(password)refers to the password for this user account. -
$(database)refers to the database that you want to audit.
-
-
As a user who has privileges to create users and set user permissions, run the
ura_add_userscript on the SQL Server database.The syntax is as follows:
sqlcmd -S server_name -U sa -P sa_password -i ura_add_user.sql
-v username="username" password="password"
In this specification:
-
server_name: Enter the name or the IP address of the database server where the protected database resides. Only use this argument if you are running the script from a remote server. You can omit it if you are running the script locally. -
sa: Enter the system administrator user name. -
sa_password: Enter the system administrator password. -
username: Enter the user account that you plan to create for user role auditing, specified by$(username)in the scripts. Enclose this user name in double quotation marks. -
password: Enter the password for the user role auditing user account, specified by$(password)in the scripts. Enclose this password in double quotation marks.
Following are two command examples. (The lines wrap below, but you may see them on one line.):
sqlcmd -U sa -P sa_password -i ura_add_user.sql  -v username="ura_auditor" password="abcd1234"

sqlcmd -S my_server -U sa -P sa_password -i ura_add_user.sql
-v username="ura_auditor" password="abcd1234"
-
-
Grant the user permissions by running the
ura_add_db_permissionsorura_add_all_db_permissionsscript.The following examples show how to run the scripts remotely, but if you are running the scripts locally, then omit the
-S server_nameargument.For permissions to a specific database, use the following syntax:
sqlcmd -S server_name -U sa -P sa_password -i ura_add_db_permissions.sql
-v username="username" database="protected_database"
For the
database="protected_database"setting:-
Enter the name of the database within this server that you want to audit, specified by
$(database)in the scripts. -
Enclose this database name in double quotation marks.
For permissions to all databases, use this syntax:
sqlcmd -S server_name -U sa -P sa_password -i ura_add_all_db_permissions.sql
-v username="username"
Below are two command examples. (The lines wrap below, but you may see each command on one line.)
sqlcmd -S my_server -U sa -P sa_password -i ura_add_db_permissions.sql
-v username="jsmith" database="my_database"

sqlcmd -S server_name -U sa -P sa_password -i ura_add_all_db_permissions.sql
-v username="jsmith"
The scripts grant the user role auditing user account the following privileges:
-
VIEW ANY DEFINITIONfor SQL Server 2005 and later -
SELECTon these tables:master.dbo.sysdatabases master.dbo.syslogins specific_database.dbo.sysmembers specific_database.dbo.sysusers
-
-
(Optional) If you need to remove the above user permissions run the
ura_drop_db_permissionsorura_drop_all_db_permissionsscript.Use the following syntax for a specific database:
sqlcmd -S server_name -U sa -P sa_password -i ura_drop_db_permissions.sql
-v username="username" database="protected_database"
Use the following syntax for all databases:
sqlcmd -S server_name -U sa -P sa_password -i ura_drop_all_db_permissions.sql
-v username="username"
Below are two command examples. (The lines wrap below, but you may see each command on one line.)
sqlcmd -S my_server -U sa -P sa_password -i ura_drop_db_permissions.sql
-v username="jsmith" database="my_database"

sqlcmd -S server_name -U sa -P sa_password -i ura_drop_all_db_permissions.sql
-v username="jsmith"
-
(Optional) If you need to remove the user role auditing user from the SQL Server database, run the
ura_drop_userscript.The syntax is as follows:
sqlcmd -S server_name -U sa -P sa_password -i ura_drop_user.sql
-v username="username" password="password"
For example:
sqlcmd -U sa -P sa_password -i ura_drop_user.sql -v username="ura_auditor"
Setting URA User Permissions for MySQL Databases
To set up the user account for MySQL databases:
-
Log in to the database as a user who has privileges to create users and set user permissions, and run the following command on the MySQL database:
create user 'username'@'hostname' identified by 'password'
For
username, use the name of the User Role Auditing account, and forhostnameuse the hostname of the Database Firewall. For example:create user 'ura_auditor'@'10.155.56.2' identified by 'jj_1234'
-
Grant required permissions to the user you just created by running the following command:
grant select on mysql.user TO 'username'@'hostname'
For example:
grant select on mysql.user TO 'ura_auditor'@'10.155.56.2'
The above command grants the stored procedure auditing user account the following privilege: SELECT on the
mysql.usersystem table. -
(Optional) If you need to remove the stored procedure auditing user from the MySQL database, run the following command:
drop user 'username'@'hostname'
For example:
drop user 'spa_auditor'@'10.155.56.2'
Setting URA User Permissions for Sybase ASE Databases
To set up the Sybase Adaptive Server Enterprise user accounts:
-
From the Oracle Database Firewall Product CD (
Oracle Database Firewall Utilities 5.1), copy thedatabasedirectory to the server where you plan to run the scripts. -
On this server, go to the
database/uradirectory and uncompress thesybasecompressed file, preferably into a directory calledsybase. -
As a user who has privileges to create users and set user permissions, run the
ura_add_user.sqlscript on the Sybase ASE database.The syntax is as follows:
isql -S server_name -U sa -P sa_password -i ura_add_user.sql
In this specification:
-
server_name: Only use this argument if the database is remote. You can enter the name of the server or its IP address. If you are running the script locally, then you can omit the-S server_nameargument. -
sa: Enter the system administrator user name. -
sa_password: Enter the system administrator password.
Examples:
isql -U sa -P sa_password -i ura_add_user.sql

isql -S my_server -U sa -P sa_password -i ura_add_user.sql
-
-
Grant this user permissions by running the
ura_add_db_permissions.sqlscript.The syntax is as follows:
isql -S server_name -U sa -P password -i ura_add_db_permissions.sql
In this specification:
-
server_name: Only use this argument if the database is remote. You can enter the name of the server or its IP address. If you are running the script locally, then you can omit the-S server_nameargument. -
sa: Enter the system administrator user name. -
sa_password: Enter the system administrator password.
The scripts grant the user role auditing user account the following privileges:
-
SELECTon these tables:master.dbo.sysdatabases master.dbo.syslogins master.dbo.sysloginroles master.dbo.syssrvroles master.dbo.sysattributes specific_database.sysusers specific_database.sysalternates specific_database.sysroles
-
-
(Optional) If you need to remove the above permissions, run the
ura_drop_db_permissionsscript.The syntax is as follows:
isql -S server_name -U sa -P sa_password -i ura_drop_db_permissions.sql
-
(Optional) If you need to remove the user role auditing user, run the
ura_drop_userscript on the Sybase ASE database.The syntax is as follows:
isql -S server_name -U sa -P sa_password -i ura_add_user.sql
Setting URA User Permissions for Sybase SQL Anywhere Databases
This section contains:
Installing the Sybase SQL Anywhere ODBC Driver for Linux
Before you can use Sybase SQL Anywhere, you must install the SQL Anywhere ODBC driver for Linux.
To install the ODBC driver for Linux:
-
Log in to the Database Firewall server as user
root. -
From the Sybase SQL Anywhere installation media, copy the
linux_x86_GA_sa1101_2044_l10n.tar.gzto a secure location on the Database Firewall server. -
Expand this archive file.
tar zxvf linux_x86_GA_sa1101_2044_l10n.tar.gz
-
Run the
setuputility to begin the installation of the client../setup
-
When prompted, select to install only
3. Administration Tools. -
When prompted, install the client to the
/var/sqlanywhere11directory. -
From the Sybase SQL Anywhere installation media, copy sa11_full_linux_x86+x64.1101_2420_ebf.tar.gz to the Database Firewall server.
-
Expand this archive file.
tar zxvf sa11_full_linux_x86+x64.1101_2420_ebf.tar.gz
-
Run the
setuputility to begin the installation of the client../setup
-
When prompted, select to install to the
/var/sqlanywhere11directory.
Setting URA User Permissions
To set up the Sybase SQL Anywhere user accounts:
-
From the Oracle Database Firewall Product CD (
Oracle Database Firewall Utilities 5.1), copy thedatabasedirectory to the server where you plan to run the scripts. -
On this server, go to the
database/uradirectory and uncompress thesqlanywherecompressed file, preferably into a directory calledsqlanywhere. -
Go to this
sqlanywheredirectory and review the uncompressed file (ura_setup.sql) so you will understand the privileges that the users in these scripts will have.The
ura_setupscript contains settings for the following information:-
$(username)refers to the user account that will be responsible for user role auditing. Ideally, this user account should be different from the user accounts specified for user role auditing and direct database interrogation (DDI) (for example,ura_auditor). -
$(password)refers to the password for this user account.
-
-
As a user who has privileges to create users and set user permissions, run the
ura_setupscript on the SQL Anywhere database.The syntax is as follows:
isql -S server_name -U sa -P password -i ura_setup.sql
-v username="username" password="password" database="protected_database"
In this specification:
-
server_name: Only use this argument if the database is remote. You can enter the name of the server or its IP address. If you are running the script locally, then you can omit the-S server_nameargument. -
username: Enter the user account that you plan to create for user role auditing, specified by$(username)in the scripts. Enclose this user name in double quotation marks. -
password: Enter the password for the user role auditing user account, specified by$(password)in the scripts. Enclose this password in double quotation marks. -
database="protected_database": Enter the name of the database within this server that you want to protect, specified by$(database)in the scripts. Enclose this database name in double quotation marks.
For example:
isql -S my_server -U sa -P password -i ura_setup.sql
-v username="ura_auditor" password="$(password)_password" database="sales_db"
The
ura_setupscript grants the user role auditing user account the following privileges:-
CONNECT -
SELECTon these system tables:sys.sysuser sys.sysuserauthority sys.sysremoteuser sys.sysloginmap sys.sysgroup
-
-
(Optional) If you need to remove the above permissions, run the
ura_dropscript on the SQL Anywhere database.The syntax is as follows:
isql -S server_name -U sa -P password -i ura_drop.sql
-v username="username" password="password" database="protected_database"
Setting URA User Permissions for IBM DB2 SQL Databases
To set up an IBM DB2 user account, you do not need to run any scripts. Instead, you create a new user account or designate an existing user account to be used for the user role auditing.
To set up the IBM DB2 user account:
-
Log in to the IBM DB2 Windows, UNIX, or Linux database that you want to audit.
-
Create a new user account or designate an existing user account to be used for the user role auditing.
-
Grant the following privileges to this user:
grant select on sysibmadm.authorizationids to user
grant select on syscat.dbauth to user
-
(Optional) If you need to remove the above permissions, either revoke the granted permissions, or remove the user account from the IBM DB2 database.
Enabling URA on the Database Firewall
-
Log in to the standalone Database Firewall or Management Server Administration Console.
See "Logging in to the Administration Console" for more information.
-
Click List in the Enforcement Points menu of the Monitoring page.
-
Choose an enforcement point to monitor user roles, and click the Settings button.
All enforcement points also monitor SQL traffic to a nominated database server. If required, the enforcement point can monitor user roles in databases located on a different server.
-
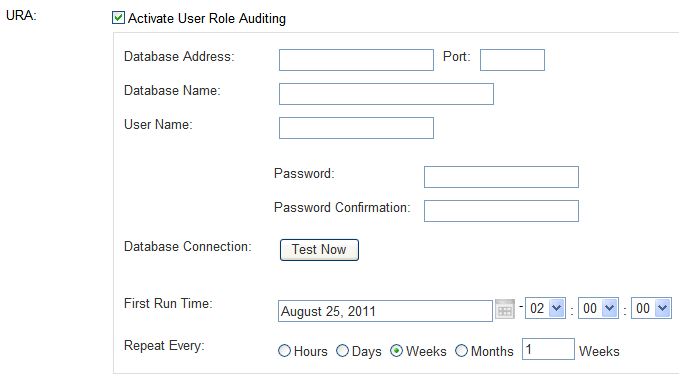
Select the URA check box:
Description of the illustration image059.gif
-
Complete the URA fields and options:
-
Database Address and Port: Specify the IP address of the server that holds the databases to be audited. For the port number, enter the port number used by the database. (For example, the default port number for Oracle databases is 1521. For Oracle databases, you can find this information in the
tnsnames.orafile.) All databases on the server will be included in the audit. If you are using a Domain Name Server (DNS), you can enter a hostname instead of an IP address.The IP address of the protected database specified in the enforcement point is not automatically included in the audit.
-
Database Name: Name of the database. For Oracle databases, enter the service name, as defined in the
tnsnames.orafile. -
User Name: Enter the user name of the user who was created by the scripts described in "Setting User Permissions for URA".
-
Change Password: If you want to change the password of the user, click the Change Password button and then enter a new password. (This field appears only if you are editing an existing configuration. The first time that you configure user role auditing, the Password and Confirm Password fields appear.)
-
Database Connection (Test Now): Clicking Test Now checks that the specified user can log into the databases and has the required permissions.
-
First Run Time and Repeat Every: Specify the date and time to run the first audit and the frequency to repeat the audits. Select a time when the database is not busy, such as 2 a.m."
If you want to run an audit immediately, click List in the Enforcement Points menu, then the Manage button for the appropriate enforcement point, followed by Run Now.
-
Disabling URA
You can disable user role auditing. If you want to completely remove user role auditing, see Oracle Database Firewall Installation Guide.
To disable user role auditing:
-
Log in to the standalone Database Firewall or Management Server Administration Console.
See "Logging in to the Administration Console" for more information.
-
Select the Monitoring tab.
By default, the Enforcement Points page appears. If it does not, then click the List button in the Enforcement Points menu on the left side of the page.
-
Find the enforcement point for the user role auditing that you want to disable.
-
Click the Settings button.
The Monitoring Settings page appears.
-
In the URA area, clear the Activate User Role Auditing check box.
-
Scroll to the bottom of the Monitoring Settings page and click the Save button.