| Oracle® Fusion Middleware Interaction Management Guide for Oracle WebLogic Portal 10g Release 3 (10.3.4) Part Number E14238-03 |
|
|
View PDF |
| Oracle® Fusion Middleware Interaction Management Guide for Oracle WebLogic Portal 10g Release 3 (10.3.4) Part Number E14238-03 |
|
|
View PDF |
WebLogic Portal's Campaigns help you accurately target visitors and trigger multiple actions—or even simultaneous actions—in a browsing session. Campaigns deliver the right content to the right user at the right time.
You can use Campaigns to personalize your portal in the following ways:
Display personalized web content – When you use a Campaign to display personalized content, the content (for example, an image) is retrieved from the WLP Virtual Content Repository through a query and displayed in a Placeholder on a JSP. The JSP can exist in a portlet or in a desktop header region.
Send predefined e-mails automatically – The Campaign service reads User Profile properties to obtain a user's e-mail address, and then sends a predefined e-mail to that user.
Marketing goals generally drive the content of a Campaign. For example, you might want people who log in with a certain browser type at lunch time to view content related to lunch specials. A bank might determine which portfolio to recommend, or a travel site would recommend a specific hotel chain.
Campaigns are flexible, because they let you create business logic without requiring code changes. For example, Campaigns show web content using a JSP tag called a Placeholder that is similar to the following: <ph:placeholder name="myPlaceholder1"/>. Add JSP Placeholder tags (uniquely identified by the name attribute) anywhere in your portal's JSPs. Then define your Campaigns to use the existing Placeholders, each of which can display content unique to the Campaign and to the individual users. You can change and add new Campaigns, but you never have to change your JSP code. The Placeholders you need stay the same.
In addition to providing flexibility and Personalization, Campaigns begin at a specific time and end when their purpose has been fulfilled (when specific goals are achieved or a time deadline is reached). Campaigns can even be set up to run only once for each visitor.
Note:
A Campaign can also work for tracked anonymous users. See Section 8.2.6, "Targeting a Campaign to Tracked Anonymous Users."Structurally, a Campaign contains at least one scenario. Each scenario contains one or more actions that show personalized content, send an automatic e-mail, or provide a personalized discount. The advantage of scenarios as containers for actions is that you can use User Segments to determine which users are eligible to be targeted with the actions in a scenario (but you are not required to assign User Segments to scenarios). For example, you could create a Campaign with two scenarios: one that targets its actions only to males and the other that targets its actions to females. Table 8-2 shows how the logic works in a scenario for females.
Table 8-1 A Campaign Scenario that Targets Females Who Recently Visited the Web Site
| Query/Response | Action |
|---|---|
|
Question: |
Are You a Member of the Female User Segment and Have Not Visited the Site in the Last 30 Days? |
|
Yes: |
Your User Profile indicates that you are female and have visited the site in the last 30 days. If this Campaign is triggered, you are targeted with any of the actions in this scenario that apply to you. |
|
No: |
Your User Profile indicates that you are a male. If this Campaign is triggered, you are not targeted with any of the actions in this scenario. |
The chapter includes the following sections:
Complete the following tasks before you create a Campaign:
Read the Section 2.3, "Checklist for Planning Your Campaign Strategy."
If you decided to use Session or Request properties to trigger Campaign actions, verify that you performed the following tasks:
In the JSP containing the event to be fired, get the request attribute through a variable or set it directly in the JSP
In the JSP containing the event to be fired, get or set any event properties you want to use
If you want to use session properties to trigger Campaign actions, verify that the firing event is in the same session containing the session properties you want to use
For more information on Session or Request properties, see Section 4.1.3, "Creating a Session Property Set" or Section 4.1.4, "Creating a Request Property Set."
Determine if you plan to use goal setting to end your Campaign. Goal Setting can end a Campaign based on the number of content items displayed or clicked. See Section 8.2.2.1, "Setting Goal Definitions" and Section 8.2.2.2, "Adjusting Goal Definitions" for instructions.
Developers create Campaigns and administrators use those Campaigns as templates to modify Campaign characteristics and create new Campaigns with similar characteristics.
Building a Campaign requires that you plan your Campaign logic for scenarios and actions, create a Campaign file, add then add the scenarios and actions.
This section contains the following topics:
A Campaign uses units called actions to perform specific Personalization tasks. Actions are triggered by specific conditions you set, and the actions are grouped into scenarios.
For example, a Campaign Action can be triggered by the following conditions: When a user logs in between January 1 and January 31, and that user is a member of the non-manager User Segment, trigger the Campaign to do something. The action could then do the following: When the Campaign is triggered, send an automatic e-mail reminding the user to complete an annual performance review.
A Campaign can contain multiple scenarios, each of which can contain multiple actions. An action is triggered when all of the following items are true:
An event is fired and the Campaign service is listening for it. See Section 9.11.1, "Registering Events for Campaigns" for more information.
The conditions of the action are met, or a user belonging to a specific User Segment logs in, which triggers a scenario to fire all of its actions.
The Campaign is set to active and has not expired (through a date deadline or if its goals were met).
Table 8-2 shows Campaign Action rules that are created in Oracle Enterprise Pack for Eclipse.
Table 8-2 Campaign Action Rules
| Rule | Action |
|---|---|
|
When all of the following conditions apply: |
An HTTP request has the following properties: RequestPropertyOne is equal to |
|
Any of the following events has occurred: |
SessionLoginEvent |
|
Do the following: |
Content Action, E-mail Action, or Discount Action |
This rule is evaluated only if an event occurs for which the Campaign service is listening. (This event does not need to be used directly in the Campaign rule.) For example, if the Campaign service is configured to listen for the Oracle-provided UserRegistrationEvent (which it is by default), then when a UserRegistrationEvent occurs, the event takes a snapshot of the Request object and the Campaign rules are evaluated.
The following list is the order in which the previous Campaign action rules are evaluated:
Is there a request property called RequestPropertyOne with a value of success?
Is this a SessionLoginEvent?
Are all of these conditions true?
Because a UserRegistrationEvent woke up the Campaign service and took a snapshot of the request object, the Campaign Action is not triggered, because the rule requires that all of its conditions evaluate to true. The SessionLoginEvent rule is false (because it was the UserRegistrationEvent that woke up the Campaign service).
If the rule was defined differently so that any of the conditions evaluating to true would trigger the action (rather than all conditions), the Campaign action fires if the request property evaluates to true.
The steps in this chapter refer to the data\src folder in the Package Explorer View. Your data and src directories might be named differently.
Perform the following steps to create a Campaign file and set Campaign properties:
Start the WebLogic Server in Oracle Enterprise Pack for Eclipse by choosing Run As > Run on Server. For instructions on configuring the WebLogic Server, see the Oracle Fusion Middleware Portal Development Guide for Oracle WebLogic Portal.
In the Portal Perspective, right-click the <data>\src\campaigns folder in the Package Explorer View and choose New > Campaign.
Enter a name for the Campaign in the File name field, using the .cam file extension.
Click Finish. Select the Campaign in the Campaign Editor when it appears.
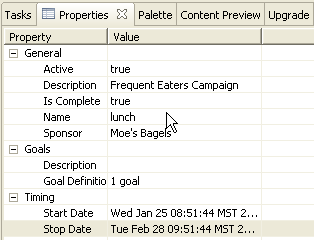
Select the Properties tab and set the following properties for the General property. These properties help determine if the Campaign will run. Use the following description to set each property:
Active – Set the value to true if you want the Campaign to be run. Set the value to false if you do not want the Campaign to run.
Description – Enter a detailed description of the Campaign. The description is appended to the text in the Description window.
Is Complete – Read-only value of true or false. If the conditions for the Campaign are all complete, the Is Complete property is set to true. If the field is false, you should check each action and scenario to determine which properties are missing.
Name – Read-only. The name of the Campaign (the Campaign filename).
Sponsor – Enter the name of the organization or person sponsoring the Campaign.
If you are displaying personalized content in a Campaign, expand the Goals property in the Properties tab and set the following properties:
Description – Enter a description about the goals that will end a Campaign prior to its stop date. Click OK in the Property Text Editor dialog box when you are done.
Goal Definitions – End a Campaign prior to the Campaign stop date when specific images are viewed or clicked in a portal. Goal Setting can end a Campaign based on the number of content items displayed or clicked. See Section 8.2.2.1, "Setting Goal Definitions" for instructions.
Expand the Timing property in the Properties tab and set the following properties:
Start Date – Click the ellipsis icon [...] and set the month, day, and time (in your time zone) you want the Campaign to start. Click OK.
Stop Date – Click the ellipsis icon [...] and set the month, day, and time (in your time zone) you want the Campaign to end. Click OK.
See Figure 8-1.
Choose File > Save to save your work.
Figure 8-1 Sample Properties for a New Campaign
Perform the following steps to define a Campaign goal:
In the Portal Perspective, select the Campaign you created in Section 8.2, "Building a Campaign."
In the Properties tab, expand the Goals property.
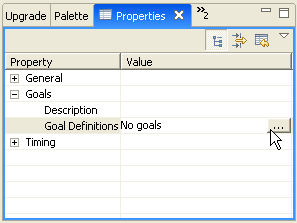
In the Goal Definitions field, click the ellipsis button [...], as shown in Figure 8-2.
Figure 8-2 Click the Ellipsis Button to Get to the Edit Campaign Goals Window
The Edit Campaign Goals window appears.
In the Edit Campaign Goals window, click New.
In the Campaign Goals section, enter a number in the Count field for the number of times the content item must be viewed or clicked to meet the goal.
Select an item from the drop-down list in the Count Type field that determines whether the content item must be viewed (Impressions) or clicked (Click-throughs).
Note:
For a content item to use clickthrough functionality, it must have one of the following properties set: adTargetUrl, adTargetContent, or adMapName. The property value for any of these properties is a URL that, when clicked, takes the user to the location you want. In a portal, URLs are relative to the portal Web project root directory. See Section 8.2.2.3, "Creating URLs to Portal Resources" for more information.Select an item from the drop-down list in the Type field. The type determines if the content impression or clickthroughs must be on content displayed by this Campaign (From this Campaign only) or on the content displayed by the Campaign or outside of the Campaign (From anywhere).
Select an item from the Logic field to determine if the count can be reached by adding the impressions or clickthroughs for all selected content items (Summing the path counts) or if it can be reached when any one content item in the list must reach the count number (Against any one path).
In the Goal Paths section, add content items to use in the goal. To populate the Goal Paths list, do one or both of the following:
In the Add Path to Goal field, enter the repository path to a content item in WLP's Virtual Content Repository, and click Add.
In the Retrieve Query Paths field, select a content action you have already defined in your Campaign. The content action has an associated query that will retrieve specific content items from the Virtual Content Repository. Click Get to retrieve a list of content items that the query will retrieve. Select the content items you want and click Add.
Create additional goals as required. Each goal you add in the Campaign Goals section has associated content items in the Goal Paths section. For example, you can add a goal that states, If a piece of content is viewed (Impressions) three times (the Count), the goal is met.
If you create more than one goal, select the appropriate End the campaign option below the Campaign Goals section.
Click OK in the Edit Campaign Goals window.
Save the Campaign by choosing File > Save.
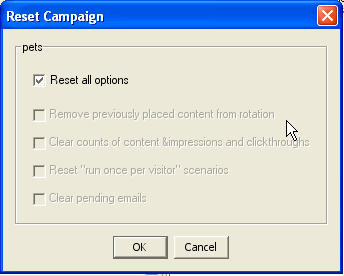
After you save the Campaign, you are prompted to reset the Campaign by selecting options in the Reset Campaign dialog box and clicking OK, as shown in Figure 8-3.
Figure 8-3 You Can Reset a Campaign by Selecting the Reset All Options Check Box
The following examples goals show how you can modify Goal Setting and the consequences:
Determine how frequently the Campaign service checks to see if goals have been met by performing the following steps:
In the Administration Console, choose Configuration & Monitoring > Service Administration.
In the Resource Tree, expand the Interaction Management folder and then select Campaign Service.
In the Configure tab, click Configuration Settings for Campaign Service.
Set the Goal Check Time to the frequency you want. The default is 300000 milliseconds (five minutes). Less-frequent goal checks improve performance, but the Campaign service takes longer to determine if goals were met. For testing, set the value to 0 so that there are no delays in checking for goals.
Click Update.
Determine how many impressions or clickthroughs occur before that number is written to the database. In the database, the Campaign service compares the current count to the impressions or clickthrough goal you set in the Campaign. Perform the following steps:
In the Administration Console, choose Configuration & Monitoring > Service Administration.
In the Resource Tree, expand the Interaction Management folder and then select Ad Service.
In the Configure tab, click Configuration Settings for: Ad Service.
Set the Display Flush Size to the number you want. The default is 10. A larger flush size improves performance, but the Campaign service takes longer to determine if goals were met. For testing, set the flush size to a small number to ensure Campaigns end immediately after your goals are met.
Click Update.
WebLogic Portal provides an extensible mechanism to create URLs to your portal resources in a portal web project that can transfer from domain to domain without breaking, especially when server names and port numbers change. This URL-creation mechanism also lets you switch between secure and non-secure URLs (HTTP and HTTPS).
Use the following two items to create portable URLs:
The <render:*Url> JSP tags in the Portal Skeleton Rendering JSP tag library (see the JSP Design Palette)
A portal web project's WEB-INF/beehive-url-template-config.xml file
The beehive-url-template-config.xml file contains multiple URL templates, each with a unique name. These template URLs contain variables such as url:domain and url:port that are read from the active server. The <render:*Url> JSP tags have a template attribute in which you can specify the name of a URL template in the beehive-url-template-config.xml file.
The following examples show how the JSP tags use the templates to create URLs:
A sample URL template exists in the beehive-url-template-config.xml file:
<pz:contentSelector rule="classic" id="nodes"/>
<utility:notNull item="<%=nodes%>">
<ul>
<utility:forEachInArray array="<%=nodes%>" id="node" type="com.bea.content.Node">
<img src="<%=request.getContextPath() + "/ShowProperty" + node.getPath()%>">
</utility:forEachInArray>
</ul>
</utility:notNull>
You can use any of the URL templates in the beehive-url-template-config.xml file provided by WebLogic Portal, and you can add as many templates as you want to the file.
You can use any of the following variables when you build a URL template:
The {url:domain} variable – Reads the name of the server from the current request.
The {url:port} variable – Reads the listen port number of the server from the current request. See Section 8.2.2.3.1, "Troubleshooting the URLs."
The {url:securePort} variable – Reads the SSL port number of the server from the current request. See Section 8.2.2.3.1, "Troubleshooting the URLs."
The {url:path} variable – Reads the name of the web application. The URLs to all resources in a web application are relative to the web application directory.
The {url:queryString} variable – Reads a queryString variable for the URL.
If you are using a proxy server or you are switching between non-secure and secure ports, you may find that URLs do not resolve if you use the {url:port} or {url:securePort} variables. The URLs do not resolve because the variables for those values are read from the request. For example, if a user in a non-secure port (port number 80) clicks a secure HTTPS link that was created with a URL template that uses the {url:securePort} variable, the port number of the request (80) is used for the {url:securePort} variable, which creates a secure request (HTTPS) on an non-secure port. The same result could occur if a user on a proxy server (port 80) clicks a link to a resource outside the proxy server (port 443).
In both cases, you should hard code port numbers in the URL templates to get URLs to resolve correctly.
The beehive-url-template-config.xml file automatically created in a portal web project also contains URL templates and variables for Web Service for Remote Portlets (WSRP). These templates must remain in the file if you plan to be a WSRP producer. See the Oracle Fusion Middleware Federated Portals Guide for Oracle WebLogic Portal for more information.
Campaigns contain actions that perform specific Personalization tasks and are triggered by specific conditions you set. Actions are grouped into scenarios. A Campaign can contain multiple scenarios; each scenario can contain multiple actions.
In the Portal Perspective in Oracle Enterprise Pack for Eclipse, select the Campaign you created in Section 8.2, "Building a Campaign."
Drag the New Scenario item from the Design Palette tab into the Campaign Editor. You can use four scenario templates that contain predefined actions and conditions. If you drag one of these scenarios into the Campaign Designer, see the Description window for details on each.
In the Properties tab, expand the General Property item and set the following properties:
Active – Set the value to true if you want the Campaign to run. Set the value to false if you do not want the Campaign to run.
Description – Click the ellipsis icon [...] and enter a detailed description of the scenario. Your description is appended to the text in the Description window.
Is Complete – This field displays a read-only value of true or false. If the conditions are all complete (the conditions for the Campaign, each scenario, and each action), the Is Complete property is set to true. If the field is false, you should check each action and scenario to determine which properties are missing.
Name – Enter a name for the scenario.
Segments – If you want all actions in the scenario to run if the user is a member of one or more User Segments, click the ellipsis icon [...] and select the User Segments you want to use. For example, BirdLovers.
Figure 8-4 shows these three fields in a Campaign designed to offer a 25% discount to users who belong to the BirdLovers User Segment.
Add more scenarios as needed. For example, you could include an image of a parrot.
Save the Campaign by choosing File > Save.
You can add the following actions to the rule in your scenario:
Section 8.2.4.1, "Adding a New Object Instance" – Creates a new instance of an object and adds it to the object available in the rule set. This new object can then trigger other rule conditions that match and their actions that will be invoked.
Section 8.2.4.2, "Invoking a Static Method" – Calls any static method on any available class.
Section 8.2.4.3, "Invoking an Instance Method" – Calls a method on an available ruleset's object.
Section 8.2.4.4, "Placing Content in a Placeholder" – Retrieves web content from a content repository and displays the selected content in a predefined placeholder.
Section 8.2.4.5, "Sending an E-Mail in a Campaign" – Sends a predefined e-mail to a user in your Campaign.
You can add multiple actions to each rule in a scenario.
The Add a new object instance rule action creates a new instance of an object and adds it to the object available in the rule set. This new object can then trigger other rule conditions that match and the actions that will be invoked.
Perform the following steps to add a new object instance to your Campaign:
In the Portal Perspective, select the Campaign you created in Section 8.2, "Building a Campaign."
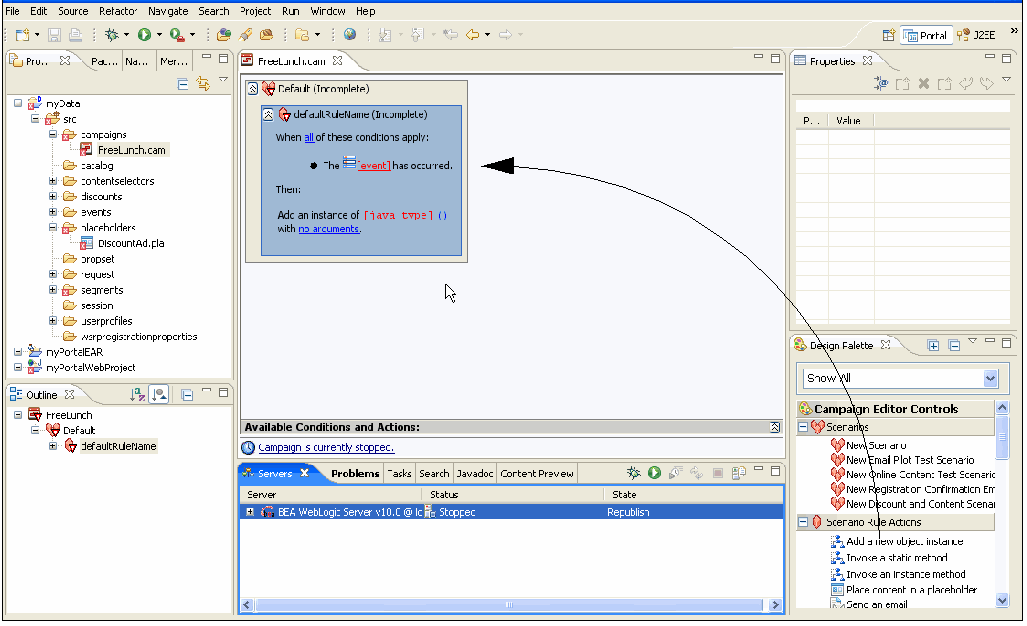
From the Design Palette tab, drag the Add a new object instance rule action onto the appropriate scenario in the Campaign Editor. See Figure 8-5.
Figure 8-5 Drag the Action to Your Scenario's Rule
Select the Properties tab and enter a name for the action.
In the action, click the all link to toggle back and forth between any and all to determine which conditions will trigger the action. The any choice means that only one of the conditions must be true for the action to occur.
Click the [event] link to choose an available event that will trigger the action. Events can include logging in, clicking a graphic, clicking a button, adding an item to a shopping cart, navigating to another page in a portal, and so on. Some events are predefined or you can define your own custom events (see Section 9.8, "Creating Custom Events"). After you select the event, click Add and then click OK.
Click the [java type] link. To see a list of all available Java types, enter **. Use these guidelines to view the Java types:
Enter * for any string and ? for any character. See Figure 8-6.
Figure 8-6 Enter ** to See all Available Java Types
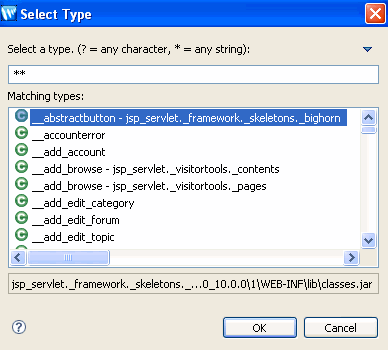
You can also enter TZ, for example, for types containing T and Z as uppercase letters in camel case notation. An example of this is java.util.TimeZone. You could enter NuPoEx for types containing Nu, Po, and Ex as parts in camel case notation (for example, java.lang.NullPointerException). The Matching types field displays matches for the expression you type in the Select a type field.
After you select the Java type, click OK.
Tip:
After you select a type, the bottom of the dialog box displays the type's package and JRE type.Click the [no arguments] link to choose an argument to the method call. Click Add and choose one of the following: String, Boolean, Integer, Long, Double, Float, Null Argument, Property Reference, or Variable Reference. Enter the new value and click OK. After you enter all the arguments, click Finish.
In the Available Conditions section in the Design Palette tab, select the conditions you want to trigger the action. When you select a condition, a corresponding link appears in the action area. Click the link to define the condition.
Save the Campaign file by choosing File > Save.
The Invoke from static method rule action executes any static method from an available object or class. This action also has the ability to use bound variables from the Conditions section of the rule set as an argument in the static method, in addition to property references, standard Java type (String, Boolean, and so on), and other types available in the project. The ability to call a Java method and have several available actions makes multiple actions in rules a useful feature.
Note:
Campaigns that invoke static or instance methods cannot be viewed or edited in the WLP Administration Console. Use Oracle Enterprise Pack for Eclipse to view or edit these types of Campaigns.The Java class must be application-scoped. See "Configuring Standard Project Dependencies" in the Oracle Enterprise Pack for Eclipse online help for instructions on creating an application-scoped Java or utility project.
Perform the following steps to invoke a static method in your Campaign:
In the Portal Perspective, select the Campaign you created in Section 8.2, "Building a Campaign."
From the Design Palette tab, drag the Invoke a static method rule action onto the appropriate scenario in the Campaign Editor.
Select the Properties tab and enter a name for the action.
In the action, click the all link to toggle back and forth between any and all to determine which conditions will trigger the action. The any choice means that only one of the conditions must be true for the action to occur. See Figure 8-7.
Figure 8-7 Click the All Link to Determine What Will Cause the Action to Occur
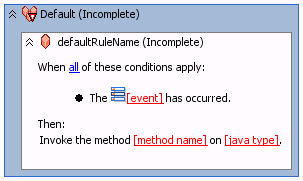
Click the [event] link to choose an available event that will trigger the action. Events can include logging in, clicking a graphic, clicking a button, adding an item to a shopping cart, navigating to another page in a portal, and so on. Some events are predefined or you can define your own custom events; see Section 9.8, "Creating Custom Events." After you select the event, click Add and then click OK.
Click the [java type] link. To see a list of all available Java types, enter **. Use these guidelines to view the Java types:
Enter * for any string and ? for any character. See Figure 8-8.
Figure 8-8 Enter ** to See all Available Java Types

You can also enter TZ, for example, for types containing T and Z as uppercase letters in camel case notation. An example of this is java.util.TimeZone. You could enter NuPoEx for types containing Nu, Po, and Ex as parts in camel case notation (for example, java.lang.NullPointerException). The Matching types field displays matches for the expression you type in the Select a type field.
After you select the Java type, click OK.
Tip:
After you select a type, the bottom of the dialog box displays the type's package and JRE type.Click the [method name] link and type the name of the method. For example, getAlias or getUserName. Do not use special characters; the method name can contain only letters, numbers, and underscores.
Click the [no arguments] link to choose an argument to the method call. Click Add, and choose one of the following: String, Boolean, Integer, Long, Double, Float, Null Argument, Property Reference, or Variable Reference. Enter the new value and click OK. After you enter all the arguments, click Finish.
In the Available Conditions section in the Design Palette tab, select the conditions you want to trigger the action. When you select a condition, a corresponding link appears in the action area. Click the link to define the condition.
Save the Campaign file by choosing File > Save.
The Invoke an instance method action calls a method from any available type that is bound to a variable. This variable may come from a condition, or it can be one that you define yourself in the action. This action also has the ability to use bound variables from the Conditions section of the rule set as an argument in the instance method, in addition to property references, standard java types (String, Boolean, and so on), and other types available in the project.
Note:
Campaigns that invoke static or instance methods cannot be viewed or edited in the WLP Administration Console. Use Oracle Enterprise Pack for Eclipse to view or edit these types of Campaigns.The Java class must be application-scoped. See "Configuring Standard Project Dependencies" in the Oracle Enterprise Pack for Eclipse online help for instructions on creating an application-scoped Java or utility project.
Perform the following steps to invoke an instance method in your Campaign:
In the Portal Perspective, select the Campaign you created in Section 8.2, "Building a Campaign."
From the Design Palette tab, drag the Invoke a static method rule action onto the appropriate scenario in the Campaign Editor.
Select the Properties tab and enter a name for the action.
In the action, click the all link to toggle back and forth between any and all to determine which conditions will trigger the action. The any choice means that only one of the conditions must be true for the action to occur.
Click the [event] link to choose an available event that will trigger the action. Events can include logging in, clicking a graphic, clicking a button, adding an item to a shopping cart, navigating to another page in a portal, and so on. Some events are predefined or you can define your own custom events; see Section 9.8, "Creating Custom Events." After you select the event, click Add and then click OK.
Click the [variable name] link and enter a variable name. Click the ellipses button next to Type, select a matching type, and click OK. Click OK on the Enter Variable dialog box.
Click the [java type] link. To see a list of all available Java types, enter **. Use these guidelines to view the Java types:
Enter * for any string and ? for any character.
You can also enter TZ, for example, for types containing T and Z as uppercase letters in camel case notation. An example of this is java.util.TimeZone. You could enter NuPoEx for types containing Nu, Po, and Ex as parts in camel case notation (for example, java.lang.NullPointerException). The Matching types field displays matches for the expression you type in the Select a type field.
After you select the Java type, click OK.
Tip:
After you select a type, the bottom of the dialog box displays the type's package and JRE type.Click the [method name] link and type the name of the method. For example, getAlias or getUserName. Do not use special characters; the method name can contain only letters, numbers, and underscores.
Click the [no arguments] link to choose an argument to the method call. Click Add, and choose one of the following: String, Boolean, Integer, Long, Double, Float, Null Argument, Property Reference, or Variable Reference. Enter the new value and click OK. After you enter all the arguments, click Finish.
In the Available Conditions section in the Design Palette tab, select the conditions you want to trigger the action. When you select a condition, a corresponding link appears in the action area. Click the link to define the condition.
Save the Campaign file by choosing File > Save.
The Place content in a placeholder action retrieves web content from a content repository and displays the selected piece of content in a predefined Placeholder on a JSP.
Perform the following steps to add content to a placeholder in your Campaign:
In the Portal Perspective, select the Campaign you created in Section 8.2, "Building a Campaign."
From the Design Palette tab, drag the Place content in a placeholder rule action onto the appropriate scenario in the Campaign Editor.
Select the Properties tab and enter a name for the action.
In the action, click the all link to toggle back and forth between any and all to determine which conditions will trigger the action. See Figure 8-9.
Figure 8-9 Click the All Link to Determine What Will Cause the Action to Occur
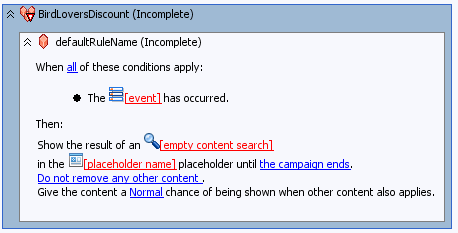
Click the [eventl] link to choose an available event that will trigger the action. Events can include logging in, clicking a graphic, clicking a button, adding an item to a shopping cart, navigating to another page in a portal, and so on. Some events are predefined or you can define your own custom events; see Section 9.8, "Creating Custom Events." After you select the event, click Add and then click OK.
To define the query, click the empty content search link. You can define the query in Advanced mode using WebLogic Portal's expression syntax (on the Advanced tab) or in Graphical mode (on the Query tab).
Advanced mode – In the Content Search window, select the Advanced tab and build a query using the instructions in Section 6.2.1.1, "Building a Content Query with Expressions."
Graphical mode – Use the following steps to build a content query by selecting content properties, comparators, and values to retrieve content items.
In the Content Search window, select the Query tab.
Click the drop-down list to select a property set and then select a property and click Add. (The properties you select are content properties (types) rather than property set properties such as User Profile or session properties.)
In the Content Search Values window that appears, select one of the following tabs:
Values – To define the query based on a comparison to a value you enter. For example, the query could be set to retrieve content with an investorRiskLevel property that is marked as high.
Properties – To define the content query based on the property value that is dynamically fed in from another type of property, such as a User Profile property. For example, instead of creating a query based on static content properties, you can create a query that reads in the value of the current user's investorRiskLevel to populate the query. The query would be different for each user.
Click Add. The query descriptor is added in the Content Search window, as shown in Figure 8-10.
Figure 8-10 Base the Content Query on a Comparison to a Value You Enter
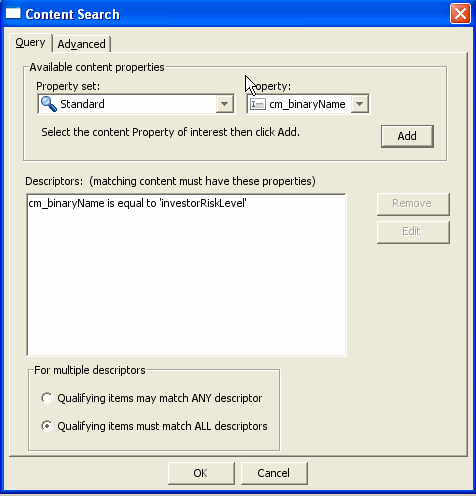
You can add more value phrases to the query, then set the appropriate option in the For multiple descriptors section.
Click OK in the Content Search window.
Click the [placeholder name] link in the action, and select the Placeholders that will display content when the scenario is triggered.
Click Add to move the Placeholders to the Selected Placeholders section, enter text to describe the Placeholder in the Description field, and click OK.
You can preview the content that will be retrieved by the query in the Content Preview window below the Editor. If you defined the query to use values from a User Profile property, the retrieved content will be different for each user, so you must enter the user name of an existing user in the Preview User field to see which content will be retrieved for that user.
Note:
The Content Preview window shows content that the query will retrieve. However, since a Placeholder can show only one piece of content at a time, the single piece of content that is displayed varies depending on which query is run (determined by the priority you set for a query and the settings for Campaign queries) and the adWeight property setting on content.You must add the adWeight property to a content type as a single-value Integer. Content with a higher adWeight number has a higher likelihood of being selected to display in a Placeholder.
If you want the content to stop being displayed prior to the end of the Campaign, click the campaign ends link to determine when the content will stop being displayed.
To increase the chances that content from the query will be displayed, click the Do not remove any other content link and determine the existing content that will be removed from the designated Placeholders when the action runs.
To set the priority that the query will be run compared to other queries that may exist in the Placeholders, click the Normal link and select a priority. Higher priorities give the query a greater chance of being run.
In the Available Conditions section, select the conditions you want to trigger the action. When you select a condition, a corresponding link appears in the action area. Click the link to define the condition.
Save the Campaign by choosing File > Save.
The Send an email rule action sends a predefined e-mail to a user in your Campaign. You might use an e-mail to alert users to specials that are customized to a specific User Segment.
Perform the following steps to add an E-Mail Action to your Campaign:
In the Portal Perspective in Oracle Enterprise Pack for Eclipse, select the Campaign you created in Section 8.2, "Building a Campaign."
From the Design Palette tab, drag the Send an email rule action onto the appropriate scenario in the Campaign Editor.
In the Properties tab, enter a name for the action.
In the action, click the all link to toggle back and forth between any and all to determine which conditions will trigger the action. The any choice means that only one of the conditions must be true for the action to occur.
Click the [server url] link to select the e-mail message to send. Choose URL, enter a Subject, and an optional default e-mail address. Click Preview if you want to view the e-mail now.
Click OK.
In the Available Conditions section in the Design Palette tab, select the conditions you want to trigger the action. When you select a condition, a corresponding link appears in the action area. Click the link to define the condition.
Save the Campaign file by choosing File > Save.
Note:
If you are using e-mails in your Campaign, you can choose to send the e-mails in batch mode or real-time (batch mode is the default). In batch mode, when you run or test your Campaign, e-mails are not sent. See Section 8.2.5.1, "Setting Up Bulk E-Mail Messages" to learn how to change the mailing behavior to real-time.Perform the following steps to send automatic e-mails as part of a Campaign:
Define an e-mail address property by create a property in a User Profile property set to store the user e-mail address. For example, the default CustomerProperties.usr property set contains an Email property that can contain a single, unrestricted string value for an e-mail address.
Set up the Campaign Service. You must tell the Campaign service where to get the e-mail address when sending automatic e-mails to users.
In the Administration Console, choose Configuration & Monitoring > Service Administration.
In the Resource Tree, expand the Interaction Management folder and select Campaign Service.
Click Configuration Settings for: Campaign Service. Figure 8-11 shows you where to enter the property set name and the name of the e-mail property you set up in the previous step.
Figure 8-11 You Can Set Up Where to Get E-Mail Addresses for Automatic E-Mails
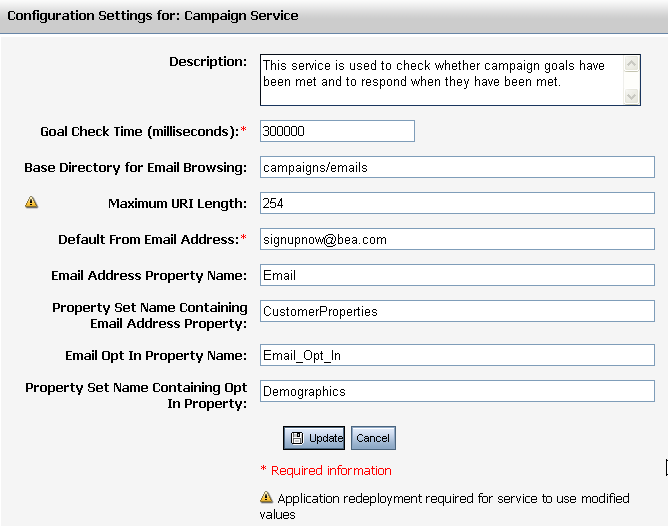
Goal Check Time – The default is 300,000 milliseconds (five minutes). If you set the Goal Check Time to 0, there is no time delay in the amount of time the Campaign service checks to see if goals have been met. See Section 8.2.2.1, "Setting Goal Definitions" for more information.
Base Directory for Email Browsing – The default directory for storing e-mail files is campaigns/emails. You must also change the <url-pattern> path in the web.xml file to secure the files in the new directory and redeploy the application after you make these changes. See Section 8.2.5.5.1, "Storing E-Mail Files in a Different Directory."
Maximum URI Length – The maximum length of a deployable Campaign Uniform Resource Identifier (URI).
Default From Email Address – The default address that receives any replies from email that the Campaign sends. In a standard mail header, this is the From address. Each Campaign scenario can specify its own From address that overrides this default property.
Email Address Property Name – The name of the property that contains customer email addresses.
Property Set Name Containing Email Address Property – The name of the property set that contains customer email properties.
Email Opt In Property Name – The name of the property that specifies whether customers want to receive Campaign-related email. You should define a User Profile property with the single, restricted values of true and false.
Property Set Name Containing Opt In Property – The name of the property set that contains the customer's opt-in property. Emails will not be sent to users who have their property value set to false.
Click Update.
Set SMTP for outgoing mail by configuring the Simple Mail Transfer Protocol (SMTP) hostname for the Mail Service. Perform the following steps:
In the Resource Tree, select Interaction Management and then Mail Service.
Click Configuration Settings for Mail Service and use the SMTP Host Name field to enter the hostname for your e-mail server's outgoing mail.
If you use a Sybase database, select the Enable ORDER BY Workaround for Clobs check box. This setting enables the Mail Service to work with Sybase since Sybase does not support using a TEXT data type in an ORDER BY clause.
Create e-mail messages using a predefined e-mail message. E-mail messages can be in any of the following formats: TXT, HTML, JSP, or XML (with style sheets). Store the e-mails in the <PortalWebProject>/campaigns/emails directory. If you want to use a different directory for storing e-mail files, see Section 8.2.5.5.1, "Storing E-Mail Files in a Different Directory." If you want to send bulk e-mails, see Section 8.2.5.1, "Setting Up Bulk E-Mail Messages."
Set e-mail security. Prevent unauthorized access to e-mail messages by following the steps in Section 8.2.5.5, "Setting Up E-Mail Security."
You must use a command to periodically send the batch e-mails that the JSPs store in the WebLogic Portal data repository. You can also use the cron command or any other scheduler that your operating system supports to issue the send-mail command.
For Windows, the send-mail command is located in a .bat file wrapper script. For UNIX, the send-mail command is located in a .sh file. The following sections refer to the .bat file. UNIX users should substitute .sh for .bat.
The send-mail wrapper script specifies the name and listen port of the WebLogic Portal host that processes the send-mail request. By default, the wrapper script specifies localhost:7501 for the hostname and listen port. However, localhost:7501 is valid only when you run the script while logged in to a WebLogic Portal host in a single-node environment (and only if you did not modify the default listen port). If you use the send-mail script from any other configuration, you must modify the script.
Perform the following steps to run the send-mail script from a remote host (a computer that is not a WebLogic Portal host):
Open the following file in a text editor:
<WLPORTAL_HOME>\info-mgmt\bin\mailmanager.bat (Windows)
or
<WLPORTAL_HOME>/info-mgmt/bin/mailmanager.sh (UNIX)
In the mailmanager script, locate the SET HOST= line. Replace localhost with the name of a WebLogic Portal host.
If the host uses a listen port other than 7501, replace 7501 in the SET PORT= line with the correct listen port.
Save the mailmanager script.
If you work in a clustered environment, you must modify the send-mail wrapper script to specify the name of a host in the cluster. The default localhost value is not valid for the Mail Service in a clustered environment.
Note:
The following steps must be performed on each host that will run the script.Perform the following steps on each host to use the send-mail script in a clustered environment:
Open the following file in a text editor:
<WLPORTAL_HOME>\info-mgmt\bin\mailmanager.bat (Windows)
<WLPORTAL_HOME>/info-mgmt/bin/mailmanager.sh (UNIX)
In the mailmanager script, replace localhost in the SET HOST= line with the name of a WebLogic Portal host. Because each host in a cluster can access the data repository that stores the e-mail messages, you can specify the name of any host in the cluster.
If the host uses a listen port other than 7501, replace 7501 in the SET PORT= line with the correct listen port.
Save the mailmanager script.
The mailmanager command is a wrapper script that uses the jav.com.bea.p13n.mail. MailManager class. The mailmanager commands help you send and manage bulk e-mails.
Use the following command syntax:
mailmanager.bat [ appName ] [ list | send | send-delete | delete ]
batch-name ] (mailmanager.sh on UNIX)
If you specify only the appName arguments, the mailmanager command prints to standard output the names all e-mail batches in the application and the number of e-mails in each batch.
Table 8-2 contains a list of the command arguments.
Table 8-3 Mailmanager Command Arguments
| Command Argument | Description |
|---|---|
|
appName |
The name of the enterprise application that generated the e-mail batch. |
|
list |
Prints to standard output the names of all e-mail batches in the data repository and the number of e-mails in each batch. |
|
list batch-name |
Prints to standard output the subject and recipients of all e-mails in the batch that you specify. |
|
send batch-name |
Sends all e-mails in the batch that you specify. |
|
send-delete batch-name |
Sends all e-mails in the batch that you specify and then deletes the batch from the data repository. |
|
delete batch-name |
Deletes e-mails in the batch that you specify. |
|
batch-name |
The name of a batch that |
Table 8-2 contains examples of mailmanager commands.
Table 8-4 Examples of Mailmanager Commands
| Command Example | Description |
|---|---|
|
|
Lists all available batches |
|
|
Lists the contents of a batch named |
|
|
Sends the |
|
|
Deletes the |
Perform the following steps to send bulk e-mail from a shell that is logged into a WebLogic Portal host:
Start the WebLogic Server by choosing Run As > Run on Server.
To determine the names and contents of the e-mail batches in the data repository, enter the following command:
mailmanager.bat appName list (Windows)
The appName is the name of the enterprise application that generated the e-mail batch. The command prints to standard output. You can use shell commands to direct the output to files.
To send a batch and remove it from the data repository, enter the following command:
mailmanager.bat appName send-delete batch-name
Note:
If you are using e-mails in your Campaign, you can choose to send the e-mails in batch mode or real-time (batch mode is the default). In batch mode, when you run or test your Campaign, no e-mails will be sent. See Section 8.2.5.1, "Setting Up Bulk E-Mail Messages" to learn how to send batch mode emails and how to change the mailing behavior to real-time.You can use a scheduling utility to send the e-mail batches in the data repository. Because you must specify the name of a batch when you use the mailmanager command to send mail, you must schedule sending mail for each Campaign scenario separately. The name of a batch corresponds to the scenario's containerId. The containerId specifies the ID of the Campaign to which the scenario belongs.
For information in using a scheduling utility, refer to your operating system's documentation.
You can delete e-mail batches as you send them (See Section 8.2.5.2, "Sending Bulk E-Mail Messages").
You can also perform the following steps to delete e-mail batches:
To determine the names and contents of the e-mail batches in the data repository, enter the following command:
mailmanager.bat appName list
The appName is the name of the enterprise application that generated the e-mail batch. The command prints to standard output. You can use shell commands to direct the output to files.
To delete a batch, enter the following command:
mailmanager.bat appName delete batch-name
When a Campaign sends an automatic e-mail, it uses a predefined e-mail message stored on the file system within your portal web project. By default, WebLogic Portal prevents unauthorized access to those e-mail files when the files are stored in the <PortalWebProject>/campaigns/ emails directory.
The following deployment descriptors secure your e-mail files:
The <PortalApplication>/wps.jar/META-INF/weblogic-ejb-jar.xml descriptor file – The following line in this file provides the name of a user who is in the global PortalSystemAdministrator role:
<run-as-principal-name> username </run-as-principal-name>
Membership in the global PortalSystemAdministrator security role is defined in the WebLogic Portal Administration Console at the server level. In a portal domain created with the Configuration Wizard, the Administrators and PortalSystemAdministrators groups that are provided by default are configured to be members of the global PortalSystemAdministrator role.
The <PortalWebProject>/WEB-INF/web.xml file – The following line in this file secures the e-mail files in <PortalWebProject>/campaigns/emails, allowing only the Campaign service (through the PortalSystemAdministrator user defined in the previous section) to access and send the e-mails:
<url-pattern>/campaigns/emails/*</url-pattern>
Perform the following steps to use a different user for e-mail security:
Back up the wps.jar file.
Un-jar the wps.jar file and change the name of the user in the weblogic-ejb-jar.xml file.
Verify that the user exists.
Verify that the user is a member of the global PortalSystemAdministrator security role; and
Re-jar and replace the old wps.jar and redeploy the application. If you enter the name of a user in <run-as-principal-name> that does not exist, or if you delete the user specified by <run-as-principal-name> without changing the <run-as-principal-name> entry, you will receive deployment errors on the wps.jar file.
Perform the following steps if you need to use a different directory to store e-mail files:
Change the <url-pattern> path in the web.xml file to secure the files in the new directory.
In the Administration Console, choose Configuration & Monitoring > Service Administration.
In the Resource Tree, expand the Interaction Management folder and select Campaign Service.
Click Configuration Settings for Campaign Service and change the directory in the Base Directory for Email Browsing field. For example, campaigns/emails/q1, as shown in Figure 8-12.
Redeploy the application or restart the server during development in Oracle Enterprise Pack for Eclipse.
Note:
Using a wildcard character (*) in the URL pattern does not provide recursive directory protection. The wildcard protects only the files in the last directory listed. For example, if you want to store e-mail files in the /campaigns/emails/q1 directory, the url-pattern information in the /campaigns/emails/* directory does not protect the e-mail files in the /q1 directory. To protect those e-mail files, the url-pattern information must be in the /campaigns/emails/q1/* directory.You can set Campaigns up to work with tracked anonymous users. A Campaign will not work with completely anonymous users.
Perform the following steps to target a Campaign to tracked anonymous users:
Create a Campaign file and add goals, scenarios, and actions to it. Follow the instructions in Section 8.2.2, "Creating a Campaign File."
Locate the web.xml file in the /WEB-INF directory of your portal web project.
Double-click the web.xml file so you can edit it in Oracle Enterprise Pack for Eclipse.
To override the settings from the shared library, add the following lines from Example 8-1 to the web.xml file. Adding this PortalServletFilter component turns on anonymous user tracking in your Campaign.
Example 8-1 Add this Section to the Web.xml File
<filter>
     <filter-name>PortalServletFilter</filter-name>
     <filter-class>com.bea.p13n.servlets.PortalServletFilter
          </filter-class>
     <init-param>
          <description>Option to track anonymous users, defaults to false
               if not set. 'createAnonymousProfile' is ignored if this is
               true</description>
          <param-name>enableTrackedAnonymous</param-name>
          <param-value>true</param-value>
     </init-param>
     <init-param>
          <description>Length in seconds visitor must be on site before we
          start tracking them. Defaults to 60 seconds if not set
               </description>
          <param-name>trackedAnonymousVisitDuration</param-name>
          <param-value>60</param-value>
     </init-param>
</filter>
Change the trackedAnonymousVisitDuration parameter value to the number of seconds before tracking begins. During testing, set the trackedAnonymousVisitDuration in Example 8-1 to a small number (for example, 5) so that your sessions quickly switch to tracked sessions.
Create an event trigger for the Campaign. For the registered user, a login event triggers the Campaign. For a tracked anonymous user, you must add code to generate the event on behalf of the tracked anonymous user. The example below shows a ClickContentEvent that triggers a Campaign.
try
{
     profile = SessionHelper.getProfile(session);
     if (profile != null && !profile.getType().equals
          (ProfileType.REGISTERED))
     {
          TrackingEventHelper.getEventService().dispatchEvent(new
               ClickContentEvent(session, httpReq, null, null));
     }
}
catch (Exception ex)
{
     //handle any exceptions dipatching the event
}
Save the changes to the web.xml file.
You can see more detail on the PortalServletFilter setting in Oracle Enterprise Pack for Eclipse by right-clicking the web.xml file, choosing Compare With > J2EE Library Version, and double-clicking p13n-web-lib in the Compare editor. The editor shows the p13n-web-lib version in one of the panes.
Use the following guidelines to test Campaigns on your development server in your development environment:
Verify that the Campaign is complete. The entire Campaign, each scenario, and each action have specific conditions for being complete. When you select each, the Is Complete property in the Property Editor window displays a read-only value of true or false. If the Is Complete property is false for any part of a Campaign, select the property in the Property Editor window and read the Description to find out which properties are required.
Verify that the Campaign is active. With the Campaign selected (not a scenario or action), set the Active property in the Property Editor window to true.
If you see the text Campaign is currently stopped just below the Campaign Editor window, you must change the Start Date or Stop Date properties so that the current date falls between the two. When the current date is within the Campaign date range, the Campaign is currently stopped text disappears.
If your Campaign uses Goal Setting to end a Campaign based on content impressions or clickthroughs, perform the following steps to modify the settings:
In the Administration Console, choose Configuration & Monitoring > Service Administration.
In the Resource Tree, expand the Interaction Management folder and select Campaign Service.
Click the Configuration Settings for Campaign Service link and set the Goal Check Time to 0. This creates no time delay in the amount of time the Campaign service checks to see if goals have been met. Click Update.
In the Resource Tree, select Ad Service and click the Configuration Settings for: Ad Service link
Set the Display Flush Size field to 1, as shown in Figure 8-13.
Figure 8-13 Change the Display Flush Size to 1
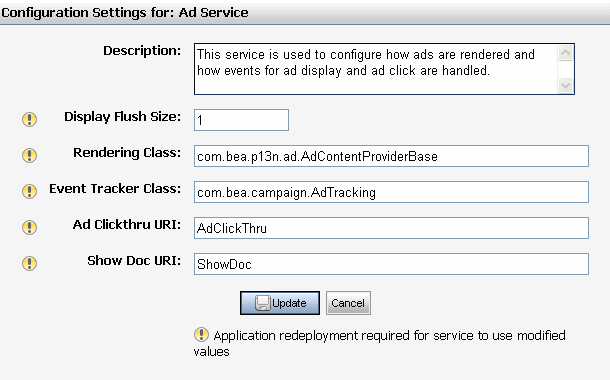
This setting writes each impression or clickthrough to the database each time it occurs and ends the Campaign on the exact number of impression or clickthrough counts you have established. For example, if you want to end a Campaign on five impressions, but your Display Flush Size was set to 10, you would need to see 10 impressions before the that number is written to the database. At that point, the Campaign service would detect that the five impressions had already been met, effectively ending the Campaign after 10 impressions rather than five.
You must restart the server for this change to take effect.
Note:
Do not deploy your application into a production environment with these settings. Performance will be adversely affected.You can reset many aspects of Campaigns during testing, such as impression and clickthrough counts that can end a Campaign and scenarios that run only once for each user. With a Campaign file open in Oracle Enterprise Pack for Eclipse, choose Portal > Reset Campaign and reset any aspect of the Campaign.
Test run once Content Actions by performing the following steps to test Content Actions that you want to run only once per user:
With the Campaign open in Oracle Enterprise Pack for Eclipse, right-click in the Campaign Editor.
Choose Reset Campaign.
In the Reset Campaign dialog box, select the Reset all options check box, and click OK.
View the portal and run the Content Action by starting an event for which the Campaign service is listening (such as logging in). Verify that the Campaign content is displayed.
Log out or click Back in the browser to return to where you can launch the event again.
Return to the Campaign in Oracle Enterprise Pack for Eclipse and select the Campaign.
Right-click the Campaign Editor space and choose Reset Campaign, as shown in Figure 8-14.
Figure 8-14 Right-Click in the Campaign Editor to Reset the Campaign
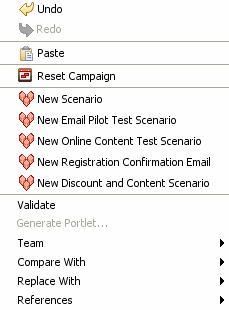
Select the Remove previously placed content from rotation check box and click OK. See Figure 8-15.
To troubleshoot Campaign content in Placeholders, you should understand how Placeholders handle default and Campaign queries. For example, default and Campaign queries have priorities that help determine which query runs. Also, you can set default queries so that they do not run when Campaign queries are present. For more information, see Chapter 7.
Improve performance by disabling, enabling, and flushing content caches that are used for web content. With a Campaign open in Oracle Enterprise Pack for Eclipse, the Edit > Portal Content Caches menu provides those options:
Flush Content Caches
Disable Content Caches
Enable Content Caches
For more information on managing your caches, use the Run > Portal Cache Manager menu and consult the Oracle Fusion Middleware Portal Development Guide for Oracle WebLogic Portal for instructions.
The following caches are affected (you can view the caches in the Administration Console by choosing Configuration & Monitoring > Service Administration and selecting Personalization and then Cache Manager in the Resource Tree).
The adBucketServiceCache – Reserved for future use.
The searchCache – Caches the results of content searches for the virtual content repository.
The documentMetadataCache – Caches the results of document searches for the DocumentManager. This setting is not used by the content repositories.
The binaryCache.WLP Repository – Caches binary property values for the WLP Repository.
The documentContentCache – Caches the document bytes for the DocumentManager. This setting is not used by the content repositories.
The nodeCache.WLP Repository – Caches content for the WLP Repository.
The documentIdCache – Caches the results of document searches (ids only) for the DocumentManager. This setting is not used by the content repositories.
The adServiceCache – Used by the ad service to cache the results of searches for content rendering.
Tip:
For optimal performance, enable these caches in your production environment. See Section 8.6.2.1, "Setting Campaign Content Caches" for instructions.You must use a Regular or Behavior Tracking event to begin your campaign or trigger a campaign action based on events and their values. A commonly used event is SessionLoginEvent; see Section 9.3.1, "Using the SessionLoginEvent" for instructions.
Campaign scenario rules are evaluated only when a single event occurs for which the Campaign service is listening.
Note:
By default, the only events that cannot be used to trigger Campaigns are DisplayContentEvent, DisplayProductEvent, BuyEvent, SessionBeginEvent, and SessionEndEvent, as listed in the <PortalApplication>/wps.jar/com/bea/campaign/internal/ listeners.properties file.)If your Campaign conditions use request, session, or event properties, those properties are captured when a listened-for event is triggered. The event takes a snapshot of the current session properties, the single request property (contained in the session), and the event properties (contained in the request). The snapshot taken by the event is in the form of a request object, which the event passes to the Campaign service for evaluation. If the values in that snapshot evaluate to true against any Campaign action rules, those Campaign actions are triggered.
Tip:
If you trigger a Campaign to test e-mails, the e-mails are not sent real-time if the batch flag default is still set to true. See Section 8.2.5.1, "Setting Up Bulk E-Mail Messages" for instructions on changing the mailing behavior to real-time.This section contains the following topic:
When Campaign Actions are not triggered as expected using Session, Request, and Event properties, one of the following items might be the problem:
The Campaign service was listening for events, but no event occurred
The session, request, or event properties contained in the Campaign rule were not part of the request object snapshot taken when the event occurred
In Campaign rules that are defined so that all conditions must apply for the Campaign action to be triggered, one or more of the conditions evaluated to false
You can remove the CampaignEventListener in order to turn off all Campaigns so that they do not fire Campaign events.
Tip:
The following steps in the Administration Console work for a portal that is deployed as an exploded EAR file. If your portal is a compressed EAR file, you will need to do these steps manually and then re-build and deploy the EAR file.Perform the following steps to turn off Campaign events:
Start the Administration Console and choose Configuration & Monitoring > Service Administration.
In the Resource Tree, expand the Personalization folder and select Event Service.
In the Browse tab, select the com.bea.campaign.internal.CampaignEventListener check box and click Delete. Campaign events will not longer be fired, but if you set up other Behavior Tracking or other event listeners, those events will continue to fire.
Note:
If you want to turn on the Campaign later, add the CampaignEventListener as a Synchronous Listener in the Browse tab.You can reset different parts of your Campaigns. For example, you may want to do one or all of the following:
Clear content from a Placeholder that had been previously put in the Placeholder. Doing this ensures that the users who were supposed to see personalized content only once see it only one time.
Clear from the database the number of times an image has been viewed or clicked so that your Campaign does not reach its goals.
Give users a second chance on run once Campaign Actions that they have already triggered.
Clear any e-mail messages waiting to be sent.
You can reset Campaigns in the development environment (for testing) or in the production environment.
This section contains the following topics:
Section 8.6.1, "Resetting a Campaign in the Development Environment"
Section 8.6.2, "Resetting a Campaign in the Production Environment"
Perform the following steps to automatically reset a Campaign in your development environment after you make changes to it:
Open a Campaign file in the Portal Perspective in Oracle Enterprise Pack for Eclipse.
Choose Window > Preferences.
In the Preferences window, select WebLogic Portal.
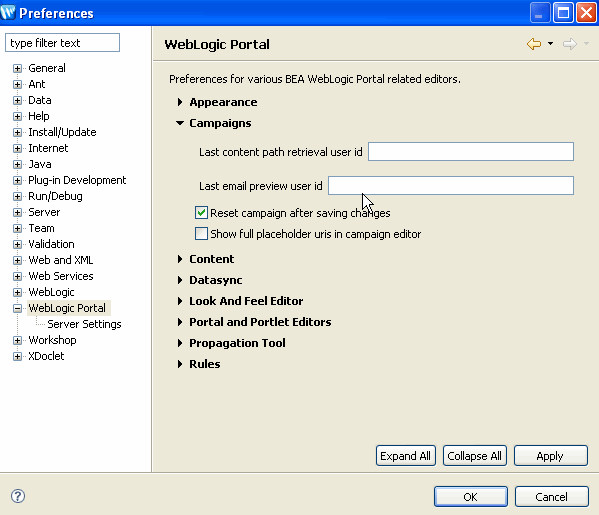
Click Campaigns and select the Reset campaign after saving changes check box, as shown in Figure 8-16.
Figure 8-16 You Can Automatically Reset a Campaign After You Edit It
Click OK.
For more information on using this feature for testing, see Section 8.3, "Testing a Campaign."
Perform the following steps to reset a Campaign in your production environment:
In Oracle Enterprise Pack for Eclipse, start the Administration Console by choosing Run > Open Administration Console.
In the Administration Console, select Interaction > Campaigns.
In the Resource Tree, select the Campaign that you want to reset.
In the Campaign Details tab, click Reset Campaign.
Click OK.
For optimal performance, enable content caches in your production environment. From Oracle Enterprise Pack for Eclipse, you can disable, enable, and flush caches that are used for web content.
Perform the following steps to enable content caches:
In the Portal Perspective in Oracle Enterprise Pack for Eclipse, open a Campaign.
Choose Edit > Portal Content Caches > Flush Content Caches to clear each of the caches. Select Edit > Portal Content Caches > Disable Content Caches to stop caching for all caches. Select Edit > Portal Content Caches > Enable Content Caches to get the best performance for your Campaign. See Section 8.3, "Testing a Campaign" for a list of content caches.
You can view the affected caches in the WebLogic Portal Administration Console by choosing Configuration & Monitoring > Service Administration.
In the Resource Tree, expand the Cache Manager folder.
Click a specific cache name to view its settings. You can click Flush to clear this cache item.
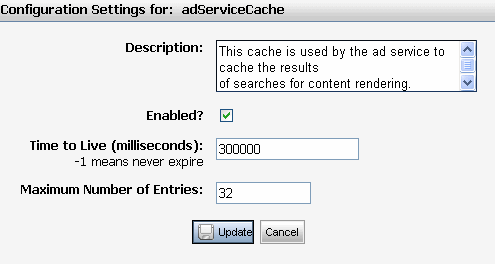
Click Configuration Settings for <cache name> and select the Enabled or Disabled check box, as shown in Figure 8-17.
Figure 8-17 You Can Enable or Disable a Cache Setting
Click Update.
Tip:
You can adjust your Campaign and caches to run faster in a production environment.See Section 15.3, "Managing a Campaign for Optimal Performance" for information on changing Campaigns to improve performance.