| Oracle® Fusion Middleware Interaction Management Guide for Oracle WebLogic Portal 10g Release 3 (10.3.4) Part Number E14238-03 |
|
|
View PDF |
| Oracle® Fusion Middleware Interaction Management Guide for Oracle WebLogic Portal 10g Release 3 (10.3.4) Part Number E14238-03 |
|
|
View PDF |
Developers can use Oracle Enterprise Pack for Eclipse to create a Campaign and display it in a JSP. Portal administrators use the WebLogic Portal Administration Console to make changes to the Campaign, including the rules, start or stop date, the sponsor, and so on.
Developer time is not required to modify a Campaign. A Portal administrator can also duplicate an existing Campaign and then modify the new Campaign.
This chapter contains the following sections:
Portal administrators can avoid creating new Campaigns by modifying existing Campaigns in the following ways:
You can change the text describing a Campaign; however, you cannot change the Campaign's name. You can also edit the Sponsor field, which describes the purpose of the Campaign or who it affects.
Perform the following steps to update a Campaign's description or sponsor:
Start the Administration Console.
Choose Interaction > Campaigns.
In the Resource Tree, select the Campaign whose description or sponsor you want to modify.
In the Campaign Details tab, click Name & Description.
Enter the new Description or Sponsor. The Sponsor field describe the purpose of the Campaign or who it affects.
Click Save.
Perform the following steps to change a Campaign start or stop date:
Start the Administration Console.
Choose Interaction > Campaigns.
In the Resource Tree, select the Campaign you want to modify.
In the Campaign Details tab, click Campaign Properties, as shown in Figure 15-1.
Click the calendar icon next to the Start Date or Stop Date fields. Use the month and year drop-down menus to select the month and year. You can also use the left and right arrows at the top of the Calendar window to select the month and year. Select a number in the Date section to select a day. Use the up and down arrows in the Time section to select a specific time of day. You must click each field in the Time section before you can modify it and click Done.
Click Save in the Edit Campaign Properties dialog to save the Campaign's new start or stop dates.
Click Reset Campaign for the new dates to take effect.
Perform the following steps to start a Campaign:
Start the Administration Console.
Choose Interaction > Campaigns.
In the Resource Tree, select the Campaign you want to activate.
In the Campaign Details tab, click Campaign Properties.
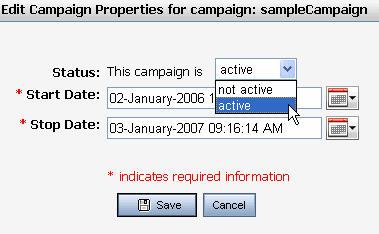
In the Edit Campaign Properties window, click the Status drop-down list, select Active, and click Save, as shown in Figure 15-2.
Figure 15-2 Select Active to Start a Campaign

In the Campaign Details tab, click Reset Campaign for the new dates to take effect.
The Campaign is now active.
Perform the following steps to stop a Campaign:
Start the Administration Console.
Choose Interaction > Campaigns
In the Resource Tree, select the Campaign you want to deactivate.
In the Campaign Details tab, click Campaign Properties.
In the Edit Campaign Properties dialog, click the Status drop-down list, select Not Active, and click Save.
In the Campaign Details tab, click Reset Campaign for the new dates to take effect.
The Campaign is no longer active. The targeted user will see default content rather than specific Campaign content in the Campaign's Placeholder.
To turn off a Campaign so that is does not fire Campaign events, you can remove the CampaignEventListener.
Tip:
The following steps in the WebLogic Portal Administration Console work for a portal that is deployed as an exploded EAR file. If your portal is a compressed EAR file, you will need to do these steps manually and then re-build and deploy the EAR file.Perform the following steps to turn off a Campaign:
Start the Administration Console.
Choose Configuration & Monitoring > Service Administration.
In the Resource Tree, expand the Personalization folder and select Event Service.
In the Browse tab, select the Delete check box next to the com.bea.campaign.internal.CampaignEventListener class and click Delete. Campaign events will no longer be fired, but if you set up other Behavior Tracking or other event listeners, those events will continue to fire.
Note:
If you want to activate the Campaign later, add the CampaignEventListener as a Synchronous Listener in the Browse tab.You can reset specific Campaign components.
Start the Administration Console.
Choose Interaction > Campaigns.
In the Resource Tree, select the Campaign you want to reset.
In the Campaign Details tab, click Reset Campaign.
In the dialog, click Reset Campaign to reset all of the Campaign components.
You can save time and reduce errors by creating a copy of a Campaign and then making changes to it.
Perform the following steps to duplicate a Campaign:
Start the Administration Console.
Choose Interaction > Campaigns
In the Resource Tree, select the Campaign you want to copy.
Right-click the Campaign, and choose Copy.
In the Copy Campaign dialog, enter the name and a description for the new Campaign and click OK.
The new Campaign appears in the Resource Tree.
As an administrator, you can modify a content action within a Campaign to change the content query, change the Placeholder, change the conditions, and so on.
Campaigns can include the following actions:
Perform the following steps to modify a Content Action in a Campaign:
Start the Administration Console.
Choose Interaction > Campaigns.
In the Resource Tree, select the Campaign, the scenario, and the rule you want to modify.
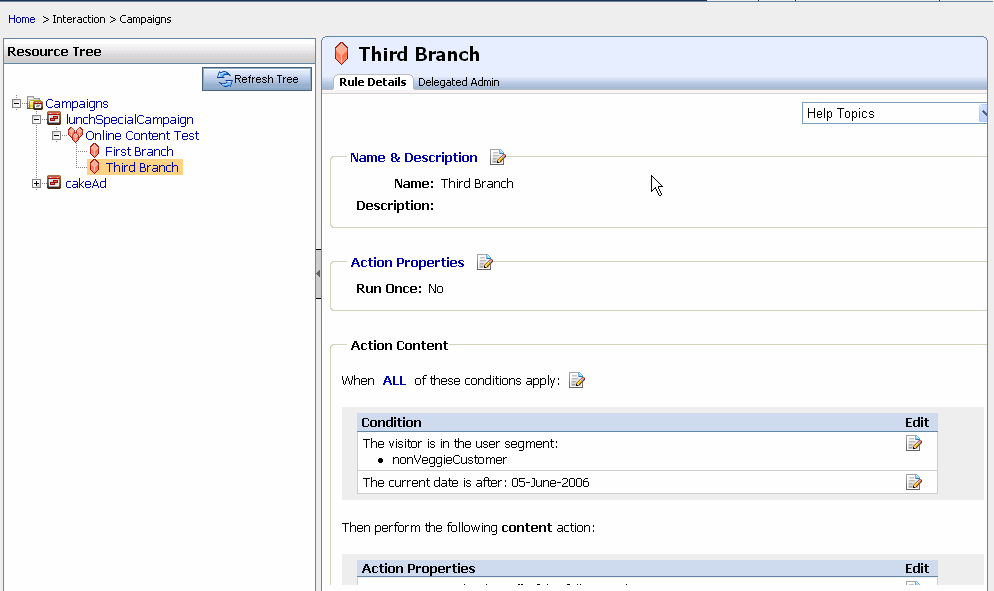
In the Rule Details tab, click the Edit icon next to the condition you want to change, as shown in Figure 15-3.
Figure 15-3 Click Edit to Change a Content Action

For example, you can change the following items:
Bind a variable
Invoke an instance method
If the visitor has specific characteristics
If the visitor is a member of a predefined User Segment
The visitor's HTTP session has specific properties
The visitor's HTTP request has specific properties
An application property has specific values
An event has specific characteristics
An event has occurred
The event characteristics
The current date
The current date is after a particular date
The current date and time is after a given date and time
The current time is between two particular times
The current date is between two particular dates
The current date and time are between two particular dates and times
A random number between one and 100 that falls between one and 100 (this defines 100 percent of the qualifying visitors)
Make the changes and click Save.
After you modify the Content Action characteristics, you can modify the Content Action further by specifying the specific content to retrieve for the visitor and the specific Placeholder for it. To modify the retrieved content, click Edit next to the property in the Action Properties section in the Rule Details tab.
Make the changes and click Save.
As an administrator, you can modify an E-mail Action within a Campaign to change the action conditions, descriptions, User Segments, and so on.
Perform the following steps to modify an e-mail action:
Start the Administration Console.
Choose Interaction > Campaigns.
In the Resource Tree, select the Campaign, scenario, and e-mail action rule you want to modify.
In the Rule Details tab, click ANY or ALL to determine if any or all conditions apply.
Click Edit next to a condition.
Make the changes and click Save.
Specify the e-mail action to perform by clicking Edit next to the action.
You can change the e-mail location, title, and sent by address and click Save.
Portal administrators can use the Administration Console to preview a modified Content Action, E-mail Action, or Discount Action in a Campaign.
You can modify any of these actions in the Administration Console by changing the conditions or content queries of these actions. After changing an action, you can preview it to verify the change is correct.
Perform the following steps to preview a modified Campaign Action:
Start the Administration Console.
Choose Interaction > Campaigns.
In the Resource Tree, select the Campaign, scenario and action rule that you want to modify.
Modify the conditions and actions for the Discount, E-mail, or Content Action and save your changes.
In the Resource Tree, select the modified rule to display in the Rule Details tab.
Click Show Previews. The modified content does not show in the preview until you refresh the tree.
Close the Resource Tree and then expand it to refresh it.
In the Resource Tree, select the Campaign and subsequent action you want to preview.
Click Show Previews to see the modified content.
Placeholders can become crowded with many queries, especially if more than one Campaign uses a Placeholder to display content. Campaign queries can remain in Placeholders indefinitely unless something specific occurs to remove them.
Perform the following steps to remove unwanted queries and control the content that is displayed in a Placeholder:
When you create default queries in a Placeholder, perform the following steps to designate that default queries do not run when a Placeholder contains Campaign queries:
In the Portal Perspective in Oracle Enterprise Pack for Eclipse, open the Placeholder file in the \<data>\src\placeholders folder in the Package Explorer View.
Select the default query by selecting the Placeholder Editor tab.
In the Properties tab, set the Mix Globals property to false. This setting suppresses default queries when Campaign queries are present.
When you create a Content Action in a Campaign in Oracle Enterprise Pack for Eclipse, use the Remove (all) existing content option to minimize the number of queries held in a Placeholder at a given time.
For Campaign content actions, set the Time to Live (duration) field to an appropriate time so that the content action stops putting queries in the Placeholder when you want it to stop. Locate the Time to Live field in the Administration Console by choosing Configuration & Monitoring > Service Administration. Select Cache Manager in the Resource Tree and click a specific cache name to edit the Time to Live field.
To control the Campaign content that is displayed in a Placeholder, create a Content Action for each event that occurs. Use the previous recommendations to display a fresh rotation of content in the Placeholder.
To clear any content that has been put in a Placeholder, reset the previously placed content using the reset feature as described in Section 15.1.5, "Resetting Campaign Settings."
Enable Campaign content caches by following the steps in Section 8.6.2.1, "Setting Campaign Content Caches."