16 Oracle VM Server for x86
The following information includes:
16.1 Introduction to Oracle VM Server for x86
Oracle VM Server for x86 is a platform that provides a fully equipped environment to leverage the benefits of x86 virtualization technology. Oracle VM Server enables you to deploy operating systems and application software within a supported virtualization environment.
Oracle VM Server for x86 is a Xen-based server virtualization technology which supports Linux, Oracle Solaris, and Windows guests, and provide features to manage guests lifecycle operations, allocate and monitor guest resource consumption. The components of Oracle VM are:
-
Oracle VM Manager: Provides the user interface to manage Oracle VM Servers, virtual machines, and resources.
-
Oracle VM Server: A self-contained environment that is designed to produce a lightweight, secure server-based platform for running virtual machines. The Oracle VM Server can perform one or more of the following functions:
-
Server Pool Master: The master is the core of the server pool operations and it acts as the contact point for the server pool to Oracle VM Manager, and also as the dispatcher to other Oracle VM Servers in the server pool.
-
Utility Server: Its function focuses on the creation and removal operations of virtual machines, Oracle VM Servers, and server pools.
-
Virtual Machine Server: The primary function of virtual machine server is to run virtual machines.
-
16.2 Roles for Oracle VM Server for x86 Management
Table 16-1 lists the tasks and the role required to complete the task. Contact your administrator if you do not have the necessary role or privilege to complete a task. See Oracle Enterprise Manager Ops Center Administration Guide for information about the different roles and the permissions they grant.
Table 16-1 Oracle VM Server for x86 Roles and Permissions
| Task | Role |
|---|---|
|
Discover Oracle VM Manager and Oracle VM Server |
Virtualization admin |
|
Provision Oracle VM Manager |
Ops Center admin |
|
Manage Oracle VM Manager |
Virtualization admin |
|
Create Link Aggregation |
Network admin |
|
Create, manage, update, and delete virtual machines |
Virtualization admin |
|
Set monitor threshold |
Asset admin |
|
Manage storage resources |
Storage admin |
|
Create and manage profiles and plans |
Profile and plan admin |
16.3 Integration of Oracle VM Server for x86 with Oracle Enterprise Manager Ops Center
The integration of Oracle VM Server for x86 with Oracle Enterprise Manager Ops Center provides the platform to manage Oracle VM Manager, Oracle VM Servers, server pools, and the virtual machines through Oracle Enterprise Manager Ops Center UI.
The following operations can be done through Oracle Enterprise Manager Ops Center to manage Oracle VM Server for x86 deployments:
-
Discover deployed Oracle VM Managers
-
Provision Oracle VM Servers
-
Discover existing Oracle VM Servers
-
Launch Oracle VM Manager UI
-
Create virtual machines
-
Provision OS on virtual machines
-
Create server pools
-
Connect to Oracle VM Manager console
-
Manage storage repositories of Oracle VM Server for x86
-
Perform management operations on Oracle VM Servers and virtual machines
16.4 Installing Oracle VM Manager
Installation of Oracle VM Manager is outside the scope of this document. For detailed instructions about how to install the Oracle VM Manager, see Oracle VM Installation and Upgrade Guide for x86.
Discover the Oracle VM Manager in Oracle Enterprise Manager Ops Center and launch the console to access it.
16.5 Discovering Oracle VM Manager
When you discover the Oracle VM Manager in Oracle Enterprise Manager Ops Center, the following Oracle VM resources are automatically discovered and populated in the UI:
-
Oracle VM Servers
-
Server pools
-
Virtual machines
-
Storage servers
-
Storage repositories
-
Networks
To discover an existing Oracle VM Manager, you must have the following information:
-
Discovery profile for Oracle VM Manager
-
Credentials for Oracle VM Manager access
You must create a discovery profile for discovering the installed Oracle VM Manager. The discovery profile provides options to create the discovery profiles for all the components related to Oracle VM Server for x86.
Figure 16-1 shows the different assets that are available under Oracle VM in the Discovery Profile Wizard.
To Create a Discovery Profile for Oracle VM Manager
The following procedure outlines the steps to create a discovery profile for Oracle VM Manager:
-
Click Create Profile in the Actions pane.
The Create Profile-Discovery Wizard is displayed.
-
Enter a name and description for the discovery profile.
-
Select the Asset Type as Oracle VM Manager from the list.
Click Next to define the tags.
-
(Optional) Define the tags for the asset to be discovered. Tags help to group the assets.
Click Next to enter the IP range.
-
(Optional) Enter the IP address of the Oracle VM Manager to be discovered. Enter the host name or IP Address when you execute the profile.
Click Next to select the credentials of the Oracle VM Manager.
-
When you have the credentials of the Oracle VM Manager, click Select and the list of saved credentials are displayed. Select the appropriate credential from the list.
Click New to display the Create Credentials window. Enter the following information:
-
Name and description for the credential.
-
Enter the username and password of the Oracle VM Manager. Re-enter the password to confirm.
-
Select the protocol and enter the port number.
Click Ok to create the credential and click Next to review the summary of the Oracle VM Manager discovery parameters.
-
-
Click Finish to create the profile.
After creating the profile, execute the profile to discover the Oracle VM Manager. The following procedure describes how to execute the profile:
-
Select the discovery profile created for Oracle VM Manager.
-
Click the Add Assets Using Profile icon to launch the Add Assets Wizard.
-
When you have not provided the details of the IP address or host name in the profile, you must enter the details of the IP address or host name of the Oracle VM Manager.
-
Click Add Now to initiate the discovery job.
The Oracle VM Manager is considered an independent entity with which Oracle Enterprise Manager Ops Center integrates. The Oracle VM Manager appears in the Administration section of the UI, not as an asset in the Assets tree.
Figure 16-2 shows the Oracle VM Managers displayed in the Administration section of the UI.
When you discover an Oracle VM Manager, all of the Oracle VM Servers managed in it are also discovered and displayed in the Assets section. Existing server pools in the Oracle VM Manager are also displayed in the Server Pools view of the UI.
16.6 Discover Oracle VM Servers
When you discover and manage an Oracle VM Manager, all of the known Oracle VM Servers to the manager are also discovered and displayed in the software UI. When you have manually installed Oracle VM Servers and not discovered in the Oracle VM Manager, you can still discover the Oracle VM Server in the Oracle Enterprise Manager Ops Center UI.
When you create a discovery profile for Oracle VM Server, you must define the Oracle VM Manager to which it can be associated. This makes the Oracle VM Server known to the Oracle VM Manager.
You must use SSH discovery of the Oracle VM Server when you want access to the serial console and perform advanced configuration in the Control Domain. For example, in Oracle Exalogic systems, you must use SSH discovery of the Oracle VM Server to support the use of InfiniBand switches.
16.6.1 Discovery Profile for Oracle VM Server
The creation of discovery profiles is similar to Oracle VM Manager except for selecting the Discovery Type as Oracle VM Server. When you provide the Oracle VM Server host name or IP address, select the Oracle VM Manager with which you want to associate the Oracle VM Server.
Figure 16-3 shows the IP Ranges step of the Discovery Profile Wizard in which the user must select the Oracle VM Manager to discover the Oracle VM Server.
Execute the profile and discover the Oracle VM Server. This is a very basic discovery of the server. The storage and network configuration of the server are not populated in the UI and only basic information is displayed in the UI.
16.6.2 Discovering Oracle VM Servers Using SSH
Use this method when you want to access the serial console of the Oracle VM Server and perform advanced configuration.
To use SSH for discovery, define the credentials for the Oracle VM Server as explained in this procedure:
-
Select Credentials from the Plan Management section.
-
Click Create Credentials in the Actions pane.
The Create Credentials window displays.
-
Select the protocol SSH from the list.
-
Provide a name and description for the credential.
-
Select Password for Authentication Type.
-
Enter the root user and the password.
-
Click Ok to save the credential.
Create a discovery profile for the Oracle VM Server and select the credential created for ssh discovery. Discover the Oracle VM Server using the profile. Since the discovery of the Oracle VM Server is through the SSH discovery, the network and storage configuration of the server is populated in the UI.
16.7 Installing Oracle VM Servers
You can provision Oracle VM Servers using Oracle Enterprise Manager Ops Center. You can download an Oracle VM Server image into the storage libraries, create OS provisioning profiles and then deploy a plan with the profile on the selected target. When you import an image into Oracle Enterprise Manager Ops Center, a default profile and plan are created automatically. See Uploading or Importing Images to upload or import image into the software library.
Hardware and Software Requirements
Oracle VM Server is a managed virtualization environment based upon the Xen hypervisor technology and includes a small Linux-based management operating system. For hardware and software requirements for installing Oracle VM Server, see Oracle VM Installation and Upgrade Guide for x86.
When you install Oracle VM Server through Oracle Enterprise Manager Ops Center, the Oracle VM Server is installed without Agent Controller. The Oracle VM Agent is installed automatically when you install Oracle VM Server. The Oracle VM Agent enables communication between the Oracle VM Manager and Oracle VM Server for all management tasks.
Oracle VM Server Password Management
The provisioning profile of installing Oracle VM Server is similar to installing a Linux OS profile with additional steps to provide the Oracle VM Server password and the management interface. The Oracle VM Server password is different from the root password. This password is used by the Oracle VM Manager to manage and monitor the Oracle VM Server and the virtual machines running in it. You must use this password while discovering the Oracle VM Server from Oracle VM Manager.
16.7.1 Creating OS Provisioning Profile for Oracle VM Server
You can create OS provisioning profile for provisioning Oracle VM Servers.
To Create a Provisioning Profile for Oracle VM Server
-
Select OS Provisioning profile in the Plan Management section.
-
Click Create Profile to create a new profile.
-
Provide a name and description for the profile.
-
Select Oracle VM Server for x86 in the subtype.
Click Next to specify the OSP parameters.
-
Select the Oracle VM Server from the list.
Oracle VM Server does not have any specific software groups. Click Next to specify the OS setup.
(Optional) Select Include Custom Scripts to add some scripts to the installation. Select the scripts in the subsequent steps to execute.
-
Specify the time zone, language, terminal type and the root password for the OS. Also, specify the console baud rate and the serial port.
Click Next to specify the installation parameters.
-
Specify the following parameters for the Linux OS:
-
Installation number: Enter the installation number that is used to allow installation of all of the software that is included in your subscription.
-
Partition action: Select whether you want to change the disk partition of the system.
-
Install protocol: Specify HTTP or NFS as the install protocol.
-
Kernel parameters: If necessary, enter kernel parameters for the GRUB menu of the target system.
-
Linux packages: Specify the Linux packages to include or exclude during provisioning. To include a package, enter the package name in a line. To exclude a package, enter the package name preceded by a dash (-).
The options MD5 Checksum, Reboot action, Initialize Disk label, Use Shadow passwords, and Clear master boot record are enabled by default.
Click Next to specify the volume groups when you are using Logical Volume Manager.
-
-
Select Use Logical Volume Manager when you want to specify the volume groups in the Logical Volume Manager for the hard disk drives.
Click Next to specify the disk partitions and file systems.
-
Specify the disk partitions and file systems that you want to create on the target system. For the file system device, you can also select the logical device name.
Click Next to specify the naming service.
-
Specify the name service, domain name and the corresponding name server. Select one of the following name services:
-
DNS: Enter the domain name of the DNS server. Provide the IP address of the DNS server in the Name Server field. You can enter up to three IP addresses as the value for the Name Server. Provide the additional domains to search for name service information in the Domain Name Search List. You can specify up to six domain names to search. The total length of each search entry cannot exceed 250 characters.
-
NIS or NIS+: Enter the domain name of the NIS or NIS+ server. When you know the NIS server details, choose the option Specify an NIS Server and provide the NIS server host name and the IP address.
-
LDAP: Enter the domain name of the LDAP server. Specify the name of the LDAP Profile you want to use to configure the system. Enter the IP address of the LDAP Profile Server. You can also optionally provide the Proxy Bind Distinguished Name and Password.
-
None: Select None when there is no naming service configured.
Click Next to specify the network.
-
-
Select None to continue to specify the networks.
You can bond the interfaces after provisioning the Oracle VM Server. Select the Linux OS and aggregate the links.
-
Click the Add icon to add multiple networks.
All of the networks that are defined in Oracle Enterprise Manager Ops Center are displayed in the Network list. Enter the following information for each selected network:
-
Select a NIC from the list of available logical interfaces for each network.
-
Select the Address Allocation Method for the selected networks except the boot interface.
When you have selected Use Static IP for Address Allocation Method, then you must provide the IP address when you apply a plan with this profile. The specific IP address is assigned to the target system after provisioning.
Click Next to specify the Oracle VM Server parameters.
-
-
Enter the password to be used by the Oracle VM Agent. This password is used by the Oracle VM Manager to manage and monitor the Oracle VM Server. Re-enter the password to confirm it.
Figure 16-4 shows the step to enter the Oracle VM Server password.
-
Specify the management interface, then click Next.
-
Review the information in the Summary, then click Finish to create the profile.
16.7.2 Applying Deployment Plan for Oracle VM Server
When you create a profile for provisioning Oracle VM Server, select the option to create a deployment plan with the profile. Either apply the created plan or create your own deployment plan.
To Apply a Deployment Plan for Oracle VM Server for x86
-
Select the plan created for provisioning Oracle VM Server in the Plan Management section.
-
Click Apply Deployment Plan in the Actions pane.
-
Specify the network resources defined in the profile. Provide the IP address for the boot interface.
-
(Optional) Provide a host name for the Oracle VM Server.
Click Next to select the Oracle VM Manager.
-
(Optional) Select an Oracle VM Manager from the list to discover and manage the Oracle VM Server. Select None when you do not want to associate with an Oracle VM Manager.
Place the Oracle VM Server in one of the server pools of the selected Oracle VM Manager. After provisioning, a separate job is initiated to add the Oracle VM Server to the server pool.
Click Next to schedule the job.
-
Schedule the provisioning job to run now or at a later time.
-
Review the summary and click Apply to launch the provisioning job.
16.8 Administration of Oracle VM Manager
The list of Oracle VM Managers discovered and managed in Oracle Enterprise Manager Ops Center are displayed in the Administration section.
Select an Oracle VM Manager and the following information is displayed as shown in Figure 16-5.
The Summary page displays information about the Oracle VM Manager, the list of server pools, the discovered Oracle VM Servers, and the virtual machines that are created in the corresponding Oracle VM Servers.
16.8.1 Manage Ownership of Oracle VM Servers
To use the Oracle VM Servers in the server pool and create virtual machines, it is required that you take ownership of the Oracle VM Server from the Oracle VM Manager.
Oracle VM Manager must take ownership of the Oracle VM Servers. Either assign ownership from the Oracle VM Server or take ownership through the Oracle VM Manager.
When you select an Oracle VM Server in the Assets section, the Assign Ownership and Release Ownership actions are available in the Actions pane.
Figure 16-6 shows the options Assign Ownership and Release Ownership displayed in the Actions pane.
Figure 16-6 Assign and Release Ownership From Oracle VM Server
Description of "Figure 16-6 Assign and Release Ownership From Oracle VM Server"
When you select the Oracle VM Manager from the Administration section, the Take Ownership and Release Ownership options are available in the Actions pane.
When you take ownership of the Oracle VM Servers, add them to server pools and create virtual machines in them.
16.8.2 Discover Storage Resources
When you discover an Oracle VM Manager, Oracle Enterprise Manager Ops Center provides the option to discover the storage servers attached to it.
The following discovery options are available from the Oracle VM Manager:
-
File system storage
-
iSCSI storage
-
SAN storage
Figure 16-7 shows the options to discover the storage resources from Oracle VM Manager.
Figure 16-7 Discover Storage Resources from Oracle VM Manager
Description of "Figure 16-7 Discover Storage Resources from Oracle VM Manager"
Create discovery profiles for the storage servers and save them.
When you select to discover a storage server, existing discovery profiles are searched for the selected storage type. You can select from an available profile. When there are no profiles available, then the wizard to discover the corresponding storage server appears.
When you discover a storage resource, existing resources such as virtual disks, templates, ISO images, and virtual machine metadata are also discovered and displayed.
See Chapter 6, "Storage Libraries" for more information about the storage servers and the discovering them in Oracle Enterprise Manager Ops Center.
16.8.3 Manage Storage Resources
The following type of libraries setup are supported for storage of Oracle VM resources:
-
Filesystem Storage Libraries
Oracle Enterprise Manager Ops Center provides an option to create Oracle VM Storage Repositories. A storage repository is a logical disk space made available through a file system on top of physical storage hardware. The supported types of file system are NFS and OCFS. When the storage repository is created on an NFS file server, it is a NFS based storage repository. The NFS file server consists of NFS file systems. When the storage repository is created on a LUN, it is a LUN-based repository. The OCFS file system is created on the storage server. Create storage repositories on these file servers to be used by Oracle VM Servers to store resources. The resources include virtual machine metadata, templates, assemblies, ISO images and virtual disks.
To create Oracle VM storage repositories, you must have an Oracle VM Server discovered. Only NFS-based repositories can be shared by multiple server pools.
-
Static Block Storage Libraries
The LUNs from the storage arrays that are not managed by Oracle Enterprise Manager Ops Center form the static storage libraries. The LUNs are addressed by iSCSI or Fibre Channel protocols. This forms the iSCSI and SAN static storage libraries. Also, add LUNs exported from managed storage arrays. The LUNs can belong to one library at a time.
-
Dynamic Block Storage Libraries
The storage servers that are discovered and managed in Oracle Enterprise Manager Ops Center are presented under dynamic block storage libraries. The dynamic block storage libraries contains the exported LUNs from the storage array servers.
See Chapter 6, "Storage Libraries" for more information about discovering your storage servers, storage connect plug-ins, creating storage libraries and managing the libraries.
16.8.4 Manage Networks
During the installation of Oracle VM Server, the network interface used for the management is configured as a bonded interface. The bond is created with one interface and named as bond0. You can create additional bonds to add redundancy and load balancing of your network environment.
Attach networks to the Oracle VM Server or to the server pool that consists of a group of Oracle VM Servers on an Oracle VM Manager. Configure the network interfaces or the bonds to the network to be attached. You can assign different roles or functions to the networks attached to the Oracle VM Server.
The following are the network roles available for an Oracle VM Server:
-
Server Management: Manages the Oracle VM Servers in a server pool. The Oracle VM Manager has one Server Management network.
-
Live Migrate: Migrates the virtual machines from one Oracle VM Server to another in the server pool, without changing the state of the virtual machine.
-
Cluster Heartbeat: Verifies that the Oracle VM Servers in the server pool are running.
-
Virtual Machine: Monitors the network traffic between the virtual machines in a server pool.
-
Storage: Transfers between virtual machines and virtual disks.
The management network created during the installation of Oracle VM Server has the following roles:
-
Server Management
-
Cluster Heartbeat
-
Live Migrate
You can add and remove the roles of this management network, except for the Server Management role.
Depending on the available network interfaces on the Oracle VM Server, you can attach networks to Oracle VM Server and assign different roles to the networks. For example, you can attach the network in which your storage servers are placed and assign the Storage role to that network. You can assign a network with Live Migrate to be used only for migration.
For more information about setting different roles for network, refer to the Oracle VM User's Guide.
16.8.5 Attaching Networks
You can attach networks to the Oracle VM Server using the option Attach Network. When the Oracle VM Server is placed in a server pool and the server pool is associated with an user-defined network domain, you must add the network to the network domain.
-
Select the Oracle VM Server or the server pool.
-
Select Attach Networks from the Actions pane.
The Attach Network Wizard is displayed. The list of available networks in the network domain are displayed with the current connection to the Oracle VM Server.
-
Select one or more networks that you want to attach to the Oracle VM Server or the server pool.
Note:
You cannot make multiple connections to the same network. You can connect to a network only once.Click Next to configure the networks.
-
You cannot make more than one connection to the network. Do not increment the number of connections.
Click Next to configure the interfaces to the network.
-
For each selected network, select the NIC and the IP address.
-
NIC: Select an available NIC from the list. When the networks have different VLAN IDs, then you can assign the same NIC to another network. Otherwise, you cannot assign the same NIC to different network connection. When supported by the network, you can also select System Allocated for the system to take care of the NIC allocation.
-
IP Address: Select Use Static IP to provide the IP address manually or select Use System Allocated IP Address for the system to take care of the IP address allocation.
Click Next to view the summary of the selected information.
-
-
Review the information provided and click Finish to attach the networks to the Oracle VM Server or the server pool.
16.9 Manage Oracle VM Servers
When you install or discover the Oracle VM Server through the Oracle Enterprise Manager Ops Center UI, take ownership of the server from the Oracle VM Manager. This helps to place the Oracle VM Servers in the server pool. The following are some functions available for managing Oracle VM Servers:
-
Edit Oracle VM Server information
-
Reboot the server
-
Shutdown the server
-
Update the server
-
Edit IPMI configuration
16.9.1 Edit Oracle VM Server Information
Select the Oracle VM Server and click Edit Attributes in the Actions pane. You can edit the following Oracle VM Server information:
-
Name
-
Description
-
Tags
16.9.2 Editing IPMI Configuration
Intelligent Platform Management Interface (IPMI) allows you to remotely power off an Oracle VM Server, and to send a Wake-on-LAN message to power on an Oracle VM Server without having to physically press the power button. You can edit the IPMI configuration in the following method:
-
Select the Oracle VM Server and click Edit IPMI Configuration in the Actions pane.
The Edit IPMI Configuration window is displayed as shown in Figure 16-8.
-
Enter the following information for IPMI configuration:
-
Username for the IPMI
-
Password for the IPMI
-
IP address of the IPMI
-
-
Click Ok to enter the IPMI configuration.
16.9.3 Placing Oracle VM Server in Maintenance Mode
To perform hardware or software maintenance, an Oracle VM Server can be placed in maintenance mode. When an Oracle VM Server is placed in maintenance mode, all of the virtual machines running on the Oracle VM Server are automatically migrated to other Oracle VM Servers in the server pool, if they are available, otherwise they are stopped. When the Oracle VM Server is the master Oracle VM Server in the server pool, this role is moved to another Oracle VM Server in the server pool, if available.
-
Select the Oracle VM Server and click Place in Maintenance Mode in the Actions pane.
-
Click Place to confirm the action.
The Oracle VM Server is placed in maintenance mode.
When you have finished with the maintenance on the Oracle VM Server and you are ready for it to rejoin the server pool, select the option Remove From Maintenance Mode.
16.9.4 Updating Oracle VM Server
Using a YUM repository, update or upgrade Oracle VM Servers. To access patch updates for Oracle VM, contact Oracle to purchase an Oracle VM Support contract and gain access to the Unbreakable Linux Network (ULN) which contains updates for Oracle VM. When you have access to ULN, you can use this to set up your own Yum repository to use when updating your Oracle VM Servers.
A YUM repository is required to update or upgrade Oracle VM Servers that are attached to an Oracle VM Manager. Set up a YUM repository and configure for automatic updates of the Oracle VM Servers managed by an Oracle VM Manager. Setting up a YUM repository is beyond the scope of this document.
After you set up a YUM repository, select the Oracle VM Manager and click Configure YUM Repository in the Actions pane. Enter the following details of the repository to configure it.
-
Yum Repository Name: A name for the Yum repository.
-
YUM Base URL: The URL to access the Yum repository, for example, the Oracle public YUM repository is at:
-
Enable GPG Key: Select whether to use the GPG Key for the Yum repository. The GPG key or GnuPG key is the GNU project's implementation of the OpenPGP key management standard.
-
Yum GPG Key: This field is enabled when you select Enable GPG Key. Enter the GPG key for the Yum repository, for example:
http://public-yum.oracle.com/RPM-GPG-KEY-oracle-e15
The GPG key must be available through HTTP, FTP, or HTTPS protocols. The GPG key for Oracle-signed updates from ULN is pre-installed on the Oracle VM Server at
/etc/pki/rpm-gpg/RPM-GPG-KEY-oracle. When you want to use this GPG key, enter as:file:///etc/pki/rpm-gpg/RPM-GPG-KEY-oracle
-
Configure the Yum repository.
-
Select the Oracle VM Server and click Update Oracle VM Server Host in the Actions pane.
When you update the Oracle VM Server, the server is placed into maintenance mode and then the update is performed. When there are virtual machines in the Oracle VM Server, they are migrated to other Oracle VM Servers in the server pool, if they are available, otherwise they are stopped. After the update, the Oracle VM Server remains in maintenance mode. Select the option Remove From Maintenance Mode.
16.10 Create Server Pool
You can group one or more Oracle VM Servers in an Oracle VM Manager and create server pools. You must create server pools before you start creating virtual machines. You can apply the virtual machines plans only on Oracle VM Servers that are in a server pool.
This section describes only how to create server pools using Oracle Enterprise Manager Ops Center. For more information about server pool policies, and managing server pools, see Chapter 17, "Server Pools".
When you create a server pool for Oracle VM Server for x86 systems, you must have the following information defined:
-
Cluster file system
-
Server pool master
-
Virtual IP address for the server pool master
Shared access to the server pool resources is a must for providing for high availability for the virtual machines running in the Oracle VM Servers of the server pool. This is achieved by cluster file system OCFS2 which allows multiple Oracle VM Servers to access the same disk at the same time. OCFS2 ensures that the Oracle VM Servers in a server pool can access and modify resources in the shared repositories in a controlled manner.
When you create a server pool, you must specify the server pool file system for the cluster heartbeat and other cluster information. The file system can be NFS shares or LUNs of iSCSI or SAN-based storage servers. Oracle VM formats the server pool file system as OCFS2 file system.
In Oracle Enterprise Manager Ops Center, the cluster is always enabled by default. The cluster configuration is pushed out to all the Oracle VM Servers in the server pool and the cluster heartbeat starts when the server pool is created. You can set a separate network for this cluster heartbeat. See Manage Networks for more information about setting up the networks and its role for an Oracle VM Server.
An Oracle VM Server is internally elected as Server Pool Master. You cannot set the role for an Oracle VM Server. When the elected Oracle VM Server fails, the role is set for another Oracle VM Server in the server pool. The virtual IP address provided while creating the server pool is assigned to the Oracle VM Server that has been elected as server pool master.
16.10.1 Server Pool Policies
The server pool policies that are applicable for Oracle VM Server for x86 are as follows:
-
Set the CPU utilization threshold. Places the virtual machines on the Oracle VM Server that has the lowest relative load.
-
Set the CPU utilization threshold. Places the virtual machines on minimum number of Oracle VM servers to minimize the power consumption.
-
You can select the automatic load balancing so that the virtual machines can be migrated automatically in the server pool whenever the thresholds are exceeded.
When you enable automatic load balancing for Oracle VM Server for x86 server pool, the server pool is checked continuously for the selected placement policy. When the threshold exceeds, the virtual machines are migrated from one Oracle VM Server to another.
When you have selected power minimization and automatic load balancing policy, and the servers in the server pool are not overloaded, some Oracle VM Server host servers are freed from the logical domains and powered off to minimize power consumption.
When the servers are overloaded and there are no other servers in the pool to host the virtual machines, then the policy decides to start a powered-off server using its Wake-on-LAN capability and live migrate the virtual machines to take up the load. The Wake-on-LAN capability must be enabled on the BIOS of the Oracle VM Server.
-
When an Oracle VM Server fails, the virtual machines are migrated to another Oracle VM Server in the server pool, when you have selected Enable High Availability while creating the virtual machine.
16.10.2 Creating Oracle VM Server for x86 Server Pools
The following procedure describes the steps in the wizard to create an Oracle VM Server for x86 server pool.
-
Select Server Pool in the Systems Group list on the Navigation pane.
-
Click Create Server Pool in the Actions pane.
The Create Server Pool Wizard is displayed.
-
In the Identify Server Pool step, enter the following information:
-
Name and description of the server pool.
-
Enter tags for categorizing your server pool.
-
Select Oracle VM Server for x86 from the Virtualization Technology.
Click Next to define the server pool configuration.
-
-
Define the following configuration details:
-
Select the Oracle VM Manager in which the Oracle VM Servers are discovered and owned.
-
Select the network domain.
-
Select a network from the list of networks available in the network domain.
-
Enter the virtual IP address that is assigned to the server pool master. When the server pool master changes, the IP address is assigned to the new Oracle VM Server.
-
Select the server pool file system to store cluster hearbeat and other cluster information. The file system can be either NFS shares on a NFS file servers or LUNs of SAN and iSCSI based storages. The NFS file servers and the storage servers are known and reachable to the selected Oracle VM Manager.
Click Next to select the members of the pool.
-
-
Select one or more Oracle VM Servers to add to the server pool.
The list of Oracle VM Servers displayed have the following characteristics:
-
Owned by the Oracle VM Manager. Refer to Manage Ownership of Oracle VM Servers to own an Oracle VM Server.
-
Not associated with server pool.
-
In a healthy state.
-
Not placed in maintenance mode.
-
Do not have virtual machines in running, shutdown or suspended state.
Select Oracle VM Servers that are compatible for migration of virtual machines. To migrate virtual machines within a server pool, the Oracle VM Servers systems must be identical in model.
Click Next to associate the network domain.
-
-
Select the network domain to associate with the server pool.
-
When you have selected default network domain, then go to Step 7.
-
For a user-defined network domain, select the physical interfaces of each selected servers to connect to each fabric in the network domain. You cannot bond the interfaces in Oracle VM Server for x86. Bonding can be done in only individual OS of the Oracle VM Server.
Click Next to select the networks and associate with the server pool.
-
-
For default network domain, all the networks that are declared and managed in Oracle Enterprise Manager Ops Center are listed. For an user-defined network domain, only the networks assigned to it are listed.
Select the networks that you want to associate with all the servers in the server pool. You cannot make multiple connections to a network. Limit the number of connections to 1.
Click Next to configure the interfaces of the servers.
-
For each network connection, specify the following details:
-
Specify the NIC and IP address for each network connection. When a selected server is connected to the network, then no rows are displayed for that server.
-
You can assign the same NIC to different network connection when the networks have different VLAN IDs.
-
When supported by the network, you can select System Allocated for the NIC and IP address to be automatically allocated by the system.
Click Next to associate the storage libraries.
-
-
The storage libraries that are reachable from the selected members of the pool are displayed. The storage libraries are required to store virtual machine metadata, ISO images, and for virtual disks of virtual machine.
You can select the following type of storage libraries:
-
Filesystem Storage Libraries: This includes the Oracle VM storage repositories. You must have at least one Oracle VM storage repository associated with the server pool.
-
Block Storage Libraries: This includes the Static Block Storage and Dynamic Block Storage. Static block storage libraries comprises the exported LUNs of storage arrays that are not managed by Oracle Enterprise Manager Ops Center. Dynamic block storage libraries comprises the exported LUNs of storage array servers that are discovered and managed in Oracle Enterprise Manager Ops Center.
Select the storage libraries from the list that you want to associate with all the virtualization hosts in the server pool.
Click Next to select the server pool policies.
-
-
You must select the following policies in the server pool to manage the under utilized and overutilized servers in the pool:
-
Placement Policy: This policy decides the preferred virtualization host in the server pool to place the logical domains.
-
Auto Balancing Policy: This policy performs load balancing of the server pool automatically at set intervals.
-
-
Select one of the following placement policies:
-
Lowest relative load: The recent lowest memory and CPU utilization for the Oracle VM Servers in the server pool are calculated. Based on this, the server with the lowest relative load is considered to place a virtual machine. Provide the threshold for CPU utilization above which the server is considered to be over-utilized and virtual machines are migrated to server with lowest relative load.
-
Minimize power consumption: The virtual machines running in a server pool are placed on the minimum number of Oracle VM Servers so that the unused Oracle VM Servers can be powered off. The threshold value set for the server over-utilization ensures that the servers are not over-loaded. Otherwise, the powered off Oracle VM Servers can be powered on to host the virtual machines.
-
-
Select the automatic load balancing policies:
-
Select automatic load balancing and set the interval in which the server pool must be checked for resource balancing. You can set the approval to migrate the virtual machines automatically. Or send notifications about the approval.
-
You cannot manually balance the resources.
Click Next to view the summary of the server pool details.
-
-
Review the information to create a server pool for Oracle VM Server for x86. Click Finish to create the server pool.
16.11 Create Virtual Machines
A virtual machine comprises configurable set of resources and its own operating system. The resources include virtual CPU, memory, network, and virtual disk. You can start, stop, and restart each virtual machine independently. You can create virtual machines using one of the following installation sources:
-
Templates
-
Existing virtual machines
-
ISO images in storage libraries
-
Mounted ISO images on NFS, HTTP or FTP server
-
Netboot
The operating system provisioned on the virtual machines can be hardware virtualized, paravirtualized and, hardware virtualized with paravirtualized drivers. Based on these virtualization types, you select the appropriate option to create the virtual machines.
Note:
You can create virtual machines only in an Oracle VM Server for x86 server pools.16.11.1 Virtualization Types
The following virtualization types are available for a virtual machine:
-
HVM
Hardware virtualization or fully virtualized. For HVM, select an ISO image from the storage library and create a virtual machine. You must activate the hardware virtualization in the BIOS of the Oracle VM Server in which you want to create the virtual machine. The OS might be completely unmodified.
-
PVM
Paravirtualized. You must use an ISO file mounted from an NFS share, HTTP, or FTP server. The OS is modified and recompiled to be made aware of the virtual environment. The paravirtualized guests run at near native speed, since most memory, disk and network accesses are optimized for maximum performance.
-
PVHVM or HVM with PV Drivers
Hardware assisted virtualization with a paravirtualized driver. Install paravirtualized drivers on the hardware virtualized machines for optimized performance. This is mainly used for running Microsoft Windows guest operating systems.
16.11.2 Creating Virtual Machine Profile
Capture the virtual machine requirements in the form of profile in Oracle Enterprise Manager Ops Center. Create a deployment plan with this profile and apply it on the selected targets. Use these profiles and plans to create more than one virtual machine at a time.
-
In the Plan Management section, expand Profiles and Policies and select Virtual Machine from the list.
-
Click Create Profile in the Actions pane.
The Create Profile - Virtual Machine Wizard is displayed.
-
Enter the name and description of the profile.
Select Create a deployment plan for this profile to automatically create a plan using this profile. Click Next to specify the installation source of the virtual machine.
-
Select an installation source for creating the virtual machine. You have the following options to select from:
-
Templates: Templates are pre-configured, pre-installed virtual machine. You must upload the templates into Oracle VM Storage Repositories. In the profile, the available storage repositories and the corresponding available templates are listed. Select a storage library and template.
-
Existing Virtual Machine: When there are existing virtual machines, select the storage repository and the virtual machine image stored in it.
-
Install from ISO image (HVM): You must have imported ISO images into the storage repository. Select the library and an ISO image from the list.
-
Install from mounted ISO image (PVM): Mount the required ISO files to a NFS share, HTTP or FTP server and it must be accessible from the Enterprise Controller. Provide the network path of the mounted ISO file. For example, an ISO image accessed through HTTP server is represented like this.
http://example.com/Enterprise-R5-U6-Server-x86_64-dvd.iso/
-
Install from Network (Netboot): Use this option only to create the virtual machine with Network as the boot order. You must provision the OS separately on it.
Select an option for the installation source and click Next to identify the virtual machines created.
-
-
Provide a name for the virtual machine and the number to be appended to the name. You can create one or more virtual machines simultaneously using this profile. To provide unique name for the virtual machines, enter the prefix name and the number to start the series.
For example, if the prefix name is VMachine, the number to start from is 10 and the number of virtual machines to be created is 3, then the virtual machines are created with the name VMachine10, VMachine11, and VMachine12.
-
Provide the description and tags for the virtual machine. All the virtual machines created with this profile carry the same description and tags. Use the tags to group the virtual machines based on the role.
Click Next to specify the configuration of the virtual machine.
-
When you have the installation source selected as templates or existing virtual machine, the values for all the parameters are set from the template. Otherwise, you must provide the following parameters:
-
VM Type: Based on the installation source, select the type as HVM, PVM or HVM with PV Drivers. For HVM, you must have the ISO image in the storage library. For PVM, you must use mounted ISO images.
-
OS: Select the OS from the list to be installed on the virtual machine.
-
Enable High Availability: High availability is to ensure the uninterrupted availability of a virtual machine. When an Oracle VM Server shuts down or fails in a server pool, all the virtual machines are migrated to other Oracle VM Servers in the server pool. High availability is implemented only in server pool.
-
CPU Threads: The number of CPU threads to be used by the virtual machine.
-
CPU Priority: The CPU priority of the virtual machine. You can select a high (100), intermediate (50), or low (1) priority for the virtual CPUs. The higher the priority more number of physical CPU cycles are allocated to the virtual machine.
-
CPU Cap: This parameter defines the maximum percentage to which the virtual CPUs can receive scheduled time. Set this option to keep the low priority virtual machines from using too many CPU cycles.
-
Memory: The size of the memory the virtual machine is allocated to use when starting it.
-
Boot Property: Select whether you want to start the virtual machine after creation.
Set these parameters and click Next to specify the boot configuration.
-
-
Select the boot media and order for the virtual machine. The boot options are set according to the installation source.
The default boot order for different installation source are:
-
Templates – Disk
-
Existing Virtual Machines – Disk
-
HVM using ISO image – CDROM and Disk
-
PVM using mounted ISO image – Network and Disk
-
Netboot – Network
Select the correct order when you want to modify the boot order. Click Next to select the storage resources for virtual machine.
-
-
Select the storage resources to store the virtual machine configuration, also known as virtual machine metadata, and the virtual disks.
Use the following libraries for the virtual machine:
-
Oracle VM Storage Repositories: The Oracle VM storage repositories are NFS file servers that are used to store virtual machine metadata, ISO images and virtual disk images. You can store the virtual machine metadata only in Oracle VM storage repositories. When you use the storage repository for virtual disk storage, you can either create a virtual disk or select existing virtual disks that are unshared and unused. You can also select ISO images to a virtual machine for HVM and PVHVM types.
-
Static Block Storage Libraries: These are the storage array servers that are not managed by Oracle Enterprise Manager Ops Center but reachable to the Oracle VM Servers in the Oracle VM Manager. Select the LUNs that are exported as iSCSI and SAN storage types.
-
Dynamic Block Storage Libraries: The exported LUNs that are available from the storage servers that are managed by Oracle Enterprise Manager Ops Center. Select the existing LUNs that are available from the storage servers. You can also create LUNs by specifying the volume group and the size of the LUN.
-
-
When you select to create virtual machines from existing virtual machines or templates, you are required to select the clone type for the virtual disks. You can select the following clone types:
-
Sparse type: This clone type is a disk image file of a physical disk, taking up only the amount of space actually in use; not the full specified disk size.
-
Non-sparse type: This clone type is a disk image file of a physical disk, taking up the space equivalent to the full specified disk size, including empty blocks.
Select the appropriate storage library, specify the virtual disks, disk size, and click Next to select the networks.
-
-
Select the network domain, and the networks that must be attached to the virtual machine.
You can connect to one or more networks. The number of connection to a network is limited to 1.
Click Next to view the summary.
-
Review the information provided to create a virtual machine profile. Click Finish to create the profile.
Create a deployment plan with this profile and apply the plan to create virtual machines. Except for the installation source Netboot, all the other source types results in creating a virtual machine with the OS installed. For virtual machine created with Netboot installation source, you must provision the OS on it separately using an OS provisioning plan.
The next section describes the different methods of deployment of virtual machine plans to create virtual machines.
16.11.3 Deploying Virtual Machine Plan
This section describes how to create virtual machines and provision OS in an Oracle VM Server using Oracle Enterprise Manager Ops Center.
The two new deployments plans for provisioning and creating multiple virtual machines are:
-
Single step deployment plan to create only virtual machines
-
Multi-step deployment plan to create virtual machine, provision OS, and install other applications.
In the single step deployment plan, the virtual machine can be created using Oracle VM templates or ISO images stored in Oracle VM repositories. Or only a virtual machine is created with ready to be booted using a separate OS provision plan.
In the complex deployment plan, you can configure and install the virtual machine, provision the OS, install software applications, apply monitoring profiles, and operational plans.
To Apply a Create Virtual Machine Plan
This is a single step virtual machine plan that creates a virtual machine and the OS is installed depending on the installation source selection. When you create HVM or PVHVM type virtual machines, select the ISO image to be used to create the virtual machine. You can select only one ISO image and multiple ISO files are not supported. While selecting the virtual disks, you have the option to select the ISO image. The following procedure describes how to apply the plan for creating a virtual machine:
-
Select the Virtual Machine plan in the Plan Management section.
-
Click Apply Deployment Plan in the Actions pane.
-
Select the targets on which you want to apply the plan. Click Add Targets to List.
You can apply the plan only on the Oracle VM Server for x86 server pools. You cannot create virtual machines on Oracle VM Servers that are not part of a server pool.
-
Select to apply the plan with minimal interaction when you do not want to modify the parameters in the profile.
Click Next.
-
You can modify the virtual machine identification, if required.
Click Next to specify the storage resource assignments.
-
The storage resources from the profile are populated. When the storage libraries are not available for a selected target, it is flagged in red. Modify the storage resources accordingly.
-
For the selected storage library, define the virtual disks.
-
For Oracle VM Storage repositories, you can create new virtual disks, select existing disks, or select ISO images. Select ISO image option is available only for HVM and PVHVM type virtual machines. Provide a disk name, select an existing disk or an ISO image.
-
For Static Block Storage, select an available LUN from the list.
-
For Dynamic Block Storage, either select an available LUN from the list or create a new LUN. When you create a new LUN, select the volume group and enter the size of the LUN.
Click Next to provide the network resources.
-
-
The network selected in the profile is populated. When the network is not available for a selected target, it is flagged in red. Modify the network resource.
-
Specify the network resource and the IP address for the virtual machine.
Click Next to view the summary.
-
Review the information provided and click Apply to apply the plan on the selected targets.
Except for the virtual machine created with Netboot as the installation source, all the other virtual machines are installed and provisioned with the OS.
Use the complex plan Configure and Install Virtual Machines to install the virtual machine and provision the OS on it. See Chapter 8, "Plans and Profiles" for more information about complex plans.
16.11.4 Provisioning OS on Virtual Machines
You can install an OS on virtual machines created on the Oracle VM Server. Use OS provisioning profiles to install the OS. See Chapter 12, "Operating Systems" for more information about creating provisioning profiles and plans to install an OS.
16.12 Manage Virtual Machines
Oracle Enterprise Manager Ops Center provides options to manage the lifecycle operations of virtual machines. You can start, suspend, resume, shut down, and delete virtual machines on the UI.
When you select the Oracle VM Server in the Assets section, the Summary tab in the center pane lists all the virtual machines that are currently running. All the options required to manage a virtual machine is available on the UI.
Figure 16-9 shows the actions available for a virtual machine from Oracle VM Server.
Figure 16-9 Action Icons for Virtual Machines
Description of "Figure 16-9 Action Icons for Virtual Machines"
Select the virtual machine and click the Start Selected Guest icon. The job is initiated to start the virtual machine.
Select the virtual machine and click the Suspend Selected Guest icon. When you suspend a virtual machine, you cannot use the virtual machine. Click Ok to confirm the suspend action.
Select the virtual machine in the running state and click the Reboot Selected Guest icon. Click Reboot Guest to confirm the action.
Shutting Down a Virtual Machine
Select the virtual machine and click the Shut Down Guest icon. When you shut down a virtual machine, it is disconnected from its network. Click Ok to shut down the virtual machine.
Select the virtual machine and click the Delete Selected Guest icon. Click Ok to confirm deleting the virtual machine. When you delete a virtual machine, all the references to the virtual machine such as the metadata and disk images are deleted from the system.
All these options are also available in the Actions pane when you select the virtual machine in the Assets section.
16.12.1 Edit Boot Order
The boot order that you have set during virtual machine installation is displayed. You can modify the boot order. You must specify the appropriate boot order depending on the installation source of the virtual machine. the following list shows the preferred boot options for different installation source:
-
Hardware Virtualized Machine (HVM) – CDROM and Disk
-
Paravirtualized Virtual Machine (PVM) – Network and Disk
-
Templates and existing virtual machines – Disk
-
Netboot – Network
If the virtual machine is in running state, then the modified boot order takes effect on the next reboot. Ensure to select the correct boot order for the virtual machine.
The Edit Boot Order option is available in the Actions pane of a selected virtual machine. Figure 16-10 shows the Edit Boot Order window that is displayed to edit the boot order of the virtual machine.
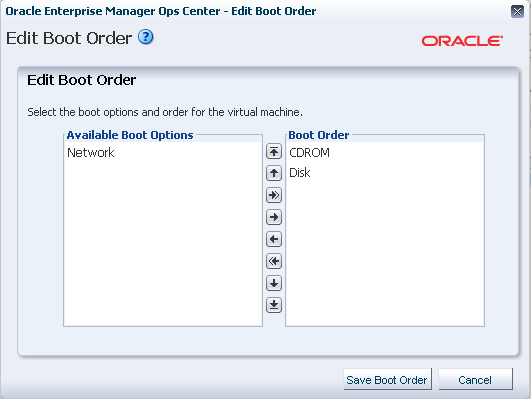
Modify the boot order and click Save Boot Order to save the changes.
16.12.2 Automatic Recovery
You can enable high availability for a virtual machine while creating a virtual machine profile. When the virtual machines are selected to be highly available and the Oracle VM Server shuts down or fails, the virtual machine is restarted on another available Oracle VM Server in the server pool.
You can also use the options Enable Automatic Discovery and Disable Automatic Discovery for a virtual machine to manage the high availability.
16.13 Related Resources
For instructions in performing actions or to learn more about the role of this feature, go to one of the following resources:
For end-to-end examples, see the How To library at http://docs.oracle.com/cd/E27363_01/nav/howto.htm