15 Oracle VM Server for SPARC
The following information includes:
15.1 Introduction to Oracle VM Server for SPARC
Oracle VM Server for SPARC technology enables server virtualization on SPARC platforms. You can create and manage multiple virtual machine instances simultaneously on a single SPARC machine. Each virtual machine, or guest, can run a different operating system.
Oracle VM Server for SPARC technology is virtualization of SPARC servers. This technology is part of a suite of methodologies for consolidation and resource management for SPARC Chip Multi Threading (CMT) systems. Using this technology, you can allocate the various resources of the system such as memory, CPU threads, and devices, into logical groupings and create multiple discrete systems. These discrete systems have their own operating system, resources, and identity within a single system. By careful architecture, an Oracle VM Server for SPARC environment can help you achieve greater resource usage, better scaling, and increased security and isolation.
When Oracle VM Server for SPARC software is installed, a domain called the control domain is created. From this control domain, you create virtual machines called logical domains that each run an independent OS. A logical domain is a virtual machine with resources, such as a boot environment, CPU threads, memory, I/O devices, and its own operating system. The control domain manages the logical domains. Each logical domain can be created, destroyed, reconfigured, and rebooted independently of other logical domains.
For more information about Oracle VM Server for SPARC, refer to http://www.oracle.com/technetwork/documentation/vm-sparc-194287.html.
15.2 Roles for Managing Oracle VM Server for SPARC
The following table lists the tasks and the role required to complete the task. Contact your administrator if you do not have the necessary role or privilege to complete a task. See Oracle Enterprise Manager Ops Center Administration Guide for information about the different roles and the permissions they grant.
Table 15-1 Oracle VM Server for SPARC Roles and Permissions
| Task | Role |
|---|---|
|
Provision and manage virtualization host |
Virtualization admin |
|
Create, manage, update, and delete guests |
Virtualization admin |
|
Discover and manage virtualization hosts |
Asset admin |
|
Create and manage profiles and plans |
Profile and plan admin |
|
Create and manage IPMP groups |
Network admin |
|
Create and manage Link Aggregation |
Network admin |
|
Set monitor threshold |
Asset admin |
|
Create credentials |
Security admin |
15.3 Available Management Features
Using Oracle Enterprise Manager Ops Center, you can perform the following tasks:
-
Provision Oracle VM Server for SPARC
-
Manage Oracle VM Server, including, rebooting, shutting down, changing name servers and NFS4 domains.
-
Monitor the performance of Oracle VM Server
-
Create and provision logical domains
-
Manage logical domains, including editing, migrating, starting, rebooting, and shutting down domains
-
Monitor the performance of logical domains
-
Discover and manage existing Oracle VM Server for SPARC systems and logical domains
-
Create server pools to maximize capacity and for automatic load balancing
-
Migrate logical domains
15.4 Prerequisites for Provisioning Oracle VM Server for SPARC
You can provision the following versions of Oracle VM Server for SPARC using Oracle Enterprise Manager Ops Center:
-
1.2
-
1.3
-
2.0
-
2.1
-
2.2
-
3.0
The specific hardware, OS, and firmware requirements that must be met for provisioning Oracle VM Server for SPARC are described in this section.
15.4.1 Operating System
You require Oracle Solaris 10 9/10 OS or later release to provision 1.2, 1.3, 2.0, and 2.1 version.
For 2.2 version, you require Oracle Solaris 10 8/11 OS or Oracle Solaris 11 OS. The minimum version of Oracle Solaris 11 OS for all domain type is Oracle Solaris 11 Support Repository Update 8 (SRU 8).
For 3.0 version, you require Oracle Solaris 10 8/11 OS or Oracle Solaris 11.1 OS. The minimum version of Oracle Solaris 11.1 OS for all domain types is Oracle Solaris 11.1 Support Repository Update 1 (SRU 1).
For Oracle Solaris 10 8/11 OS or later release, when you select to deploy 3.0 version, the installed version on the server is Oracle VM Server for SPARC 3.0.0.2 version. To get all the functionality of 3.0.0.2 version, use Oracle Solaris 10 1/13 OS.
When the Oracle Solaris 11 Software Update Library is synchronized with the parent repository for Oracle Solaris 11.1 Support Repository Update 3.5 (SRU 3.5), the list of Oracle VM Server for SPARC versions is populated with 3.0.0.2.
You must use Oracle Solaris 10 1/13 OS for provisioning Oracle VM Server for SPARC on a SPARC T5 server. For all other SPARC servers, you can use Oracle Solaris 10 8/11 OS.
Refer to the Oracle VM Server for SPARC 3.0 Release Notes at http://docs.oracle.com/cd/E37707_01/html/E29668/index.html for more information about system requirements.
15.4.2 Hardware and Firmware
Refer to the Oracle VM Server for SPARC Release Notes in http://www.oracle.com/technetwork/documentation/vm-sparc-194287.html for the supported platforms to install different versions of Oracle VM Server for SPARC.
Ensure that you install the correct system firmware. You can update the firmware using Oracle Enterprise Manager Ops Center. See Chapter 11, "Hardware" for downloading and updating the required firmware version.
When you use Oracle Enterprise Manager Ops Center to provision the Oracle VM Server for SPARC software, it installs the Oracle Solaris OS, the Control Domain, and an agent on the target system. This provisioning action removes existing virtualization software, including any previous logical domains installed on the service processor.
To install Oracle VM Server for SPARC software, apply a profile that specifies the values for resources such as CPU threads, crypto units, and memory as described in Creating an OS Provisioning Profile.
When you have existing Oracle VM Server for SPARC environment that you want to discover and manage in Oracle Enterprise Manager, refer to the section Manage Existing Oracle VM Server for SPARC Environments for more information.
15.5 Recommended Minimum Configuration
The recommended minimum configurations for the Control Domain are described in the following sections.
15.5.1 CPU Threads
The number of system CPUs determines the number of Control Domain CPU threads:
-
For less than 16 system CPUs, set the Control Domain CPU Threads to 2.
-
For between 16 and 64 system CPUs, set the Control Domain CPU Threads to 4.
-
For more than 64 system CPUs, set the Control Domain CPU Threads to 8.
15.5.2 Crypto Units
Crypto units are the resources on the supported platforms that provide high-performance, dedicated cryptographic engines. These can be used for tasks such as encrypting and decrypting network traffic between a Secure Socket Layer (SSL) web server and an application server.
Each CPU core has one crypto unit and four or eight CPU threads. Because the crypto unit is part of a core, the crypto unit is bound only to domains that contain at least one thread from the parent core. Crypto units cannot be split as CPU threads are split. For example, you have assigned the crypto unit for the first CPU core to the control domain. When a new logical domain is assigned a thread from the first CPU core and the crypto unit for that core is already assigned, the Control Domain cannot assign that crypto unit to the new logical domain. Allocation of crypto units might not succeed, especially when a core is split between domains. An Oracle VM Server might allocate fewer crypto units or none at all.
You must assign at least one crypto unit to the Control Domain because the crypto unit enables domain migration.
The use of Crypto Units is not mandatory although it might speed the logical domain migration. Allocation of Crypto Units might not be available in all the hardware supported. See the corresponding hardware data sheet and documentation for more information before planning for Crypto Units.
Example 15-1 Example of Crypto Unit Assignments
In UltraSPARC T1 based servers, one core is four CPU threads. Therefore, assign one crypto unit and four CPU threads to the Control Domain. These values are set in the OS profile for Oracle VM Server for SPARC.
In UltraSPARC T2 and T2 Plus based servers, one core is eight CPU threads. Therefore, assign one crypto unit and eight CPU threads to the Control Domain.
15.5.3 RAM
The amount of RAM for the Control Domain depends on the size of the system RAM:
-
For system RAM less than 8 GB, set the Control Domain's RAM to 1 GB.
-
For system RAM between 8 GB to 16 GB, set the Control Domain's RAM to 2 GB.
-
For system RAM greater than 64 GB, set the Control Domain's RAM to 8 GB.
Note:
See Oracle VM Server for SPARC 2.1 Administration Guide athttp://docs.oracle.com/cd/E23120_01/html/821-2854/index.html for more information about allocating memory size.15.6 Creating an OS Provisioning Profile
Create an OS provisioning profile to install the Oracle VM Server for SPARC software, the OS, and to set the parameters for the Control Domain. The profile collects details such as type of target, OS image, time zone and language setup, required JET modules, disk partitions, naming services and network details.
Automatic booting on a SPARC system uses the default boot device that is defined in the non-volatile RAM (NVRAM). User-defined commands that are executed during start-up are stored in the NVRAMRC file in the NVRAM. When you run an OS provisioning job on a SPARC machine, Oracle Enterprise Manager Ops Center resets the configuration to the factory default configuration and removes the information that is stored in the NVRAMRC file. The Control Domain OS provisioning profile gives you the option to preserve the information in the NVRAMRC file before resetting the server to the factory defaults, and then restore the information after the reset.
Upload the required Oracle Solaris OS image to the software library in Oracle Enterprise Manager Ops Center. See Chapter 5, "Software Libraries" for more information about uploading OS images.
15.6.1 Oracle VM Server for SPARC Parameters
You can select the following parameters while creating the profile:
-
Oracle VM Server for SPARC version: 1.2, 1.3, 2.0, 2.1, 2.2 and 3.0.
-
Software groups
-
CPU Threads
-
Memory
-
Crypto Units
-
Virtual Console Port Range
-
Enable Multiplexed I/O
Enabling multiplexed I/O results in enabling the Fibre Channel ports on the storage system.
-
Name service
-
NFS Domain value
-
Manual netboot option
15.6.2 To Create an Oracle VM Server for SPARC Provisioning Profile
-
Select the Plan Management section and expand Profiles and Policies.
-
Choose OS Provisioning and click Create Profile in the Actions pane.
-
Specify the profile as shown in Figure 15-1.
-
Enter the name and description of the profile.
-
Select the option Create a deployment plan for this profile.
-
Select Oracle VM Server for SPARC as the Subtype.
Click Next to select the OS image and distribution.
-
-
Select the following parameters in the Specify OSP Parameters step:
-
Oracle VM Server for SPARC Version
-
Software Group
The supported Oracle VM Server for SPARC versions to the available Oracle Solaris OS images are listed in Table 15-2:
Table 15-2 Supported Oracle VM Server for SPARC Versions
Oracle VM Server for SPARC Version Oracle Solaris 10 OS Oracle Solaris 11 OS 1.0, 1.2, 1.3, 2.0 and 2.1
Oracle Solaris 10 9/10 OS or later release
N/A
2.2
Oracle Solaris 10 8/11 OS or later release
Oracle Solaris 11 OS
Oracle Solaris 11 Software Update Library synchronized with Oracle Solaris 11 Support Repository Update 8 (SRU8)
3.0
Oracle Solaris 10 8/11 OS or later release
Oracle VM Server for SPARC 3.0.0.2 version is provisioned when Oracle Solaris 10 8/11 or later release of OS is used. To get all the functionality of 3.0.0.2 version, use Oracle Solaris 10 1/13 OS.
Oracle Solaris 11.1 OS
Oracle Solaris 11 Software Update Library synchronized with Oracle Solaris 11.1 Support Repository Update 1 (SRU 1)
When Oracle Solaris 11 Software Update Library is synchronized with Oracle Solaris 11.1 Support Repository Update 3.5 (SRU 3.5), Oracle VM Server for SPARC version list is populated with 3.0.0.2 version. Select 3.0.0.2 version from the list to provision.
Click Next to specify the OS setup.
-
-
Specify the following OS setup parameters:
-
Select a language from the list.
-
Specify the time zone.
-
Specify a terminal type.
-
To monitor the installation using a serial connection, select the console serial port device and the baud rate.
-
Enter the NFS4 domain name for the target system to use. A dynamic NFSv4 domain name enables the name to be derived at run time, based on the naming service configuration. You can also enter a static domain name.
-
Enter the root password for the root user on systems provisioned using this profile. Re-enter the password for confirmation.
-
Select the Manual Net Boot option to enable manual control of network boot operations for the target system. You must select this option for a target system that does not have a service processor because Oracle Enterprise Manager Ops Center cannot control the network boot process remotely on these systems.
-
-
Click Next.
If it is Oracle Solaris 11 OS, then you are directed to Step 7 to create a user account to log in.
Otherwise, to Step 8 for Oracle Solaris 10 OS.
-
For Oracle Solaris 11 OS, root login to the system is not enabled. Create a user account through which you can SSH to the OS after provisioning. Enter the username and password for the user account.
Click Next to go to Step 9 to specify the Control Domain parameters.
-
You can use JET modules to provision an OS. The base_config, custom, and flash JET modules are always installed. To specify additional JET modules that you have installed on the Proxy Controller to perform OS provisioning operations, enter a comma-separated list of the JET modules.
-
Click the Add icon to add JET name-value pairs. The JET parameters customize how this profile provisions the target systems.
-
Enter the name of the JET parameter that you want to add in the Name field.
-
Enter the value that you want to assign to the JET parameter in the Value field.
Click Next to specify the Oracle VM Server Control Domain parameters.
-
-
Specify the resources that you want to assign to the Control Domain. The remaining resources are available for the logical domains.
-
CPU Threads: Specify the number of CPU threads that you want to assign to the Control Domain.
-
Memory: Specify the amount of memory that you want to assign to the Control Domain.
-
Requested Crypto Units: Specify the number of crypto units that you want to assign to the Control Domain.
-
Virtual Console Port Range: Specify the minimum port and maximum port of the virtual console of the Control Domain. The default port range for virtual console is 5000 to 6000.
-
Enable Multiplexed I/O (MPxIO): Select this option to enable SAN library connectivity for the control domain. This action enables the Fibre Channel ports on the storage system.
-
Save NVRAMC values: Select this option to preserve your user-defined commands that are executed during start-up.
Note:
For Oracle VM Server for SPARC 1.2 version, you can select to install SUNWJass package to harden the system.Click Next to specify the file system layout.
-
-
Specify the disk partitions and file systems that you want to create on the target system. The root (/) and a swap file system are defined by default. Click the Add icon to define a new partition. For each partition that you define, provide the following information:
-
File System Type: Select a file system type: ufs, unnamed, zfs, or swap.
-
Mount Point: Enter a directory to use as a mount point for partitions.
-
Device: Enter the
rootdiskkeyword and a slice value to describe a partition on the target system's boot disk, for example,rootdisk.s0, or enter the logical device name, for example,c1t0d0s0, of the partition that you want to create. -
Size (MB): Enter the size that you want to assign to the partition, expressed in MB. Do not enter any value for the size when you want to allocate the remaining unused disk space to a file system.
Click Next to specify the name service.
-
-
Specify the name service, domain name and the corresponding name server. Select one of the following name services:
-
DNS: Enter the domain name of the DNS server and enter the IP address of the DNS server in the Name Server field. You can enter up to three IP addresses as the value for the Name Server. Provide the additional domains to search for name service information in the Domain Name Search List. You can specify up to six domain names to search. The maximum length of each search entry is 250 characters.
-
NIS or NIS+: Enter the domain name of the NIS or NIS+ server. When you know the NIS server details, choose the option Specify an NIS Server and enter the NIS server host name and the IP address.
-
LDAP: Enter the domain name of the LDAP server. Specify the name of the LDAP Profile you want to use to configure the system. Enter the IP address of the LDAP Profile Server. You can also provide the Proxy Bind Distinguished Name and Password.
-
None: Select None when there is no naming service configured.
Click Next to specify the network information.
-
-
Select one of the network options for the target system:
-
When you select Use Link Aggregation, refer to the section Create Link Aggregation in Oracle VM Server for SPARC to define the parameters for Link Aggregation.
-
When you select None, you are forwarded to the next step to define the network interfaces and IP address allocation for the selected networks.
Note:
You can create Link Aggregation only with Oracle Solaris 10 OS and it is not applicable for Oracle Solaris 11 OS.Select an option and click Next to continue.
-
-
Select a DHCP-enabled network interface for the boot interface from the list of all managed networks. Click the Add icon to add more networks.
Select the Address Allocation Method for each network except the boot interface.
-
When you select Use Static IP, you must provide the IP address when you apply the profile so that the IP address can be assigned to the target system after provisioning.
-
When you select Assign By DHCP, the IP address is automatically assigned from the designated DHCP server.
Click Next to go to the Summary step.
-
-
Review the Summary of your selections. Click Finish to create the profile.
15.6.3 Create Link Aggregation in Oracle VM Server for SPARC
While creating the profile for installing Oracle VM Server for SPARC, follow the procedure to create link aggregation:
-
Select Link Aggregation in the Specify Networks step of the profile.
-
Specify and configure the Link Aggregation details:
-
Link Aggregation Name: The name of the Link Aggregation is set to "aggr". Add an integer to make the name unique.
-
Network: Select a network from the list.
-
NICs: List the physical interfaces of the selected network that must be configured as a single unit. For example, GB_1, and GB_2.
Click Next to configure the IEEE 802.3ad Link Aggregation.
-
-
Define the following parameters for IEEE 802.3ad link aggregation standard:
-
Load Balancing Policy: Define the policy for outgoing traffic.
-
Aggregation Mode and Switches: When the aggregation topology connects through a switch, determine whether the switch supports the Link Aggregation Control Protocol (LACP). When the switch supports LACP, you must configure LACP for the switch and the aggregation. Define one of the modes in which LACP must operate.
-
MAC Address Policy: Define whether the MAC address of the NICs are fixed.
Click Next to continue.
-
-
Continue to complete the profile.
15.6.4 Create and Apply Deployment Plan for Oracle VM Server for SPARC
When you create a profile, you can select to create a deployment plan with the profile automatically. You can also create your own deployment plan. Oracle Enterprise Manager Ops Center provides two different types of deployment plan to provision Oracle VM Server for SPARC:
-
Single Step Deployment Plan
You have the Provision OS deployment plan to provision Oracle VM Server for SPARC. This requires the profile to install Oracle VM Server for SPARC.
-
Multi-Step Deployment Plan
-
Install Server
This multi-step deployment comprises the steps to provision Oracle VM Server for SPARC, install updates or software, apply monitoring profiles, and create logical domains.
-
Update Firmware and Install Oracle VM Server for SPARC
This multi-step deployment plan comprises the steps to update the firmware of the hardware and then install the required version of Oracle VM Server for SPARC.
-
Select the required method and create the plan. All the plans described here require the OS provisioning profile for Oracle VM Server for SPARC. See Chapter 8, "Plans and Profiles" for more information about creating and managing the profiles and plans.
Apply a Deployment Plan for Oracle VM Server for SPARC
When you apply a deployment plan to provision Oracle VM Server for SPARC, you must provide the IP address for the OS to be provisioned. As shown in Figure 15-2, you can also select the Oracle VM Server for SPARC to be placed in a server pool after provisioning. You have the option to create a new server pool or place the server in an existing server pool.
Figure 15-2 Placing Oracle VM Server for SPARC in Server Pool

Description of "Figure 15-2 Placing Oracle VM Server for SPARC in Server Pool"
Read through the following sections to provision Oracle VM Server for SPARC in your environment.
15.7 Installing Oracle VM Server for SPARC
You can install the software on bare-metal or on systems already configured with logical domains. When you provision Oracle VM Server through Oracle Enterprise Manager Ops Center, any previous configuration is removed and the service processor is reset to its factory defaults.
When you provision Oracle VM Server for SPARC, the instance of the Oracle Solaris OS becomes the Control Domain which is the first domain to be created. The virtualization host on which this instance of Oracle Solaris OS runs is called the Oracle VM Server Host or simply, Oracle VM Server. The Logical Domains Manager runs in the Control Domain to create and manage logical domains. You can have only one Control Domain per server. You cannot change the name or destroy the Control Domain.
To Install Oracle VM Server for SPARC
This section describes how to install the Oracle VM Server for SPARC software on a service processor:
-
The Oracle VM Server for SPARC software depends on particular Oracle Solaris OS versions, required software patches, and particular versions of system firmware. See Selection of Oracle VM Server Version.
-
Discover the target system on which you want to install Oracle VM Server for SPARC software.
-
Configure DHCP services on Proxy Controllers.
-
Create a profile for provisioning Oracle VM Server for SPARC. See Creating an OS Provisioning Profile.
-
Create a deployment plan with the profile created for provisioning Oracle VM Server for SPARC.
-
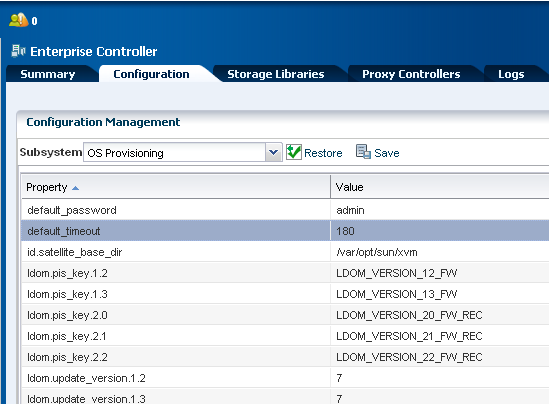
(Optional) Adjust the amount of time allowed for the provisioning job. The default time is three hours or 180 minutes. You can edit the
default_timeoutvalue for OS provisioning in the Enterprise Controller Configuration in the Administration section, as shown in Figure 15-3.
The Oracle VM Server for SPARC provisioning job performs the following major tasks:
-
Downloads the appropriate OS image.
-
Initiates a net boot action on the Service Processor.
-
Configures DHCP and installs the OS.
-
Installs the Oracle VM Server Host.
-
Configures Oracle VM Server Host according to the values set in the profile such as memory, CPU threads, Crypto units, and virtual console port range.
-
When selected, installs the SUNWJass package to harden the system. For example, you can install the SUNWJass package for version 1.2.
-
Enables the Fibre Channel ports on the storage system.
-
Installs and configures the Agent Controller. Do not install the Agent Controller manually on the Oracle VM Server host.
15.7.1 Selection of Oracle VM Server Version
Verify that the target system has the correct hardware and firmware configuration to support the installation of selected version of Oracle VM Server for SPARC.
When the supported hardware and firmware versions are not there, the provisioning job might fail. You cannot force set the version of the software to be installed. For the complete list of supported hardware, firmware version, and the supported Oracle VM Server for SPARC version, refer to the Release Notes in the library http://www.oracle.com/technetwork/documentation/vm-sparc-194287.html for more information.
15.7.2 Important Notes for Installation
Some important notes for installing Oracle VM Server for SPARC in Oracle Enterprise Manager Ops Center:
-
The OS in the Control Domain must have the default locale set to C. The Control Domain provisioning is supported on Oracle Solaris SPARC or x86 Proxy Controllers, but not on Linux Proxy Controllers.
-
To provision the Oracle VM Server for SPARC software, the proper system model name must be populated on the service processor. The model name is not available on the service processor of the Sun Blade T6320 hardware.
-
Oracle Enterprise Manager Ops Center does not support use of the LDoms configuration manager in LDoms 1.2.
-
Do not attempt to reconfigure the Control Domain and logical domains using the native CLI.
-
You must not unconfigure and reconfigure the agent installed on the Control Domain.
15.7.3 Manual Net Boot Initiation
A target system requires a manual net boot operation when Oracle Enterprise Manager Ops Center cannot perform a remote network boot process. Profiles that provision this type of system contain the Manual Net Boot option enabled. You must initiate the net boot operation when the Oracle VM Server provisioning job completes on the UI.
-
Log in to the service processor of the target system.
-
When the target system is running, enter
halt. -
Enter the following command
boot net:dhcp - install
15.7.4 Additional Configurations
The following configuration for the Control Domain is performed during installation of Oracle VM Server for SPARC and is not required to be included in the profile:
-
A virtual network switch for each subnet named subnet-address_prefix-length, for example, 10.17.7.0_24
-
A virtual disk server named primary-vds0
-
A virtual console concentrator is named primary-vcc0
15.8 Oracle VM Server for SPARC Management
After you have provisioned or discovered the Oracle VM Server for SPARC, you can dynamically manage the Oracle VM Server Control Domain resource configurations such as CPU Threads, Crypto Units, and memory. You can associate storage libraries and attach networks with Oracle VM Server for SPARC, create logical domains, and monitor the performance of logical domains.
You can also create server pools for Oracle VM Server for SPARC for an efficient management of your resources. For creating server pools, see Chapter 17, "Server Pools".
The following actions are available for managing the Oracle VM Server:
15.8.1 Edit Configuration and Tags
You can modify the Control Domain configuration that includes CPU Threads, Crypto Units, and memory. You can also modify the Name and Description of the Control Domain. Use the Edit Attributes option to modify the configuration.
The Oracle VM Server must have Oracle Solaris 10 10/09 OS or higher version to edit the attributes. When you modify the memory size, Oracle VM Server is rebooted unless it is running Oracle VM Server for SPARC 2.0 or higher version. Use Edit Tags to modify the existing tags and add new tags.
15.8.2 Associate Storage Libraries
Storage libraries are required for storing logical domain metadata, ISO images and to provide virtual disks for logical domain storage. You must first associate the storage library to the Oracle VM Server and then it is made available for all the logical domains under it.
You can associate the following libraries for Oracle VM Server:
-
Filesystem storage: This includes the NAS storage libraries.
-
Block storage: This includes the Static and Dynamic Storage libraries. The Static Storage library includes the exported LUNs of SAN and iSCSI storage servers that are not managed by Oracle Enterprise Manager Ops Center. The LUNs of storage servers managed in Oracle Enterprise Manager Ops Center are available through Dynamic Storage library. This library provide option to create new LUN when you add storage to the logical domains.
Select the option Associate Library to associate libraries with the selected Oracle VM Server for SPARC.
15.8.3 Attaching Networks
Attach networks to Oracle VM Server to provide networking facilities for the logical domains. You can make multiple connections to a network in the Oracle VM Server Control Domain. For each network connection, a virtual switch is created and the switch has a naming pattern. For an example network 1.1.1.0/24, the virtual switches take the name as 1.1.1.0_24, 1.1.1.0_24_1, 1.1.1.0_24_2 and 1.1.1.0_24_3. This ensures that the switches have a unique name. When a network connection is made to the server, the virtual switch created is incremented. When you create and start a logical domain, you define the virtual switch that connects to the logical domain. Each virtual switch must be connected to a NIC.
When you migrate logical domains, the switch name must be identical in the source and the target Oracle VM Server for SPARC.
See Migrate Logical Domains for more information about migrating the logical domains.
You can create IPMP groups and aggregate links in the Control Domain. Navigate to the Oracle Solaris OS of the Control Domain and create IPMP groups or Link Aggregation. Refer to Chapter 7, "Networks" for more information about creating IPMP groups and Link Aggregations in an Oracle Solaris OS.
To Attach Networks to Oracle VM Server
This procedure to attach networks is applicable for Oracle VM Server for SPARC in stand-alone mode.
-
Select the Oracle VM Server for SPARC in the Assets tree.
-
Click Attach Networks in the Actions pane.
The list of available networks in Oracle Enterprise Manager Ops Center are displayed. The list also displays the existing number of connections with the server.
-
Select one or more networks from the list. You can make multiple connections to a network.
Click Next.
-
Specify the number of connections for the selected networks. Increment the total number of connections.
Note:
The number of connections does not limit the number of logical domains that can be connected to this network. -
Specify the NIC and IP address for each network connection.
For each network connection, you must provide a NIC as a virtual switch is created for each connection. The virtual switch requires a physical interface to allow communication between the logical domains and external network. Follow these rules while assigning the NIC and IP address:
-
Specify the same NIC to different network when the network has different VLAN ID. Otherwise, you cannot assign the same NIC to different networks.
-
When supported by the network, select System Allocated to enable the system to allocate the NIC and IP address.
-
Select Do Not Allocate IP for IP address when you do not want to assign IP address to the selected network interface.
Click Next.
-
-
Review the summary and click Finish to attach the selected network to the Oracle VM Server.
To manage the attached networks, use the icons on the Network tab of the Oracle VM Server for SPARC, as shown in Figure 15-4.
-
Refresh DHCP connectivity – Reconnects to the DHCP server.
-
Unbind networks – Disconnects the selected network from Oracle VM Server.
-
Modify physical connectivity – Changes the connectivity attributes of the selected network, as shown in Figure 15-5.
Maximum Transmission Unit (MTU) Size
The default size of the network's MTU is 1500 bytes. A network can be created with MTU size that varies between 576 and 9216. Oracle Enterprise Manager Ops Center configures the IP configuration of Oracle VM Server for SPARC with the MTU value set at the network level. For a logical domain, the network to be attached must have minimum MTU size as 1500 bytes.
The network interface cards driver configuration must be updated to support MTU size greater than or equal to 9216 in the following scenario:
-
You have VLAN tagged networks created over the virtual switches with Link Aggregation as the uplink.
-
You are using Oracle Solaris 11 OS.
Otherwise, the tagged networks become unreachable, and Oracle VM Server and logical domains cannot connect to these networks.
15.8.4 Reboot Oracle VM Server
You can reboot the Control Domain regardless of the state of the logical domains in it. During the reboot, the logical domains might suspend temporarily but keep their current states.
15.8.5 Performance Management
You can view the following information about Oracle VM Server performance:
-
The Summary tab displays the Oracle VM Server for SPARC configuration information, and its health status.
-
The Dashboard displays the general information about the selected Oracle VM Server for SPARC. A graphical representation of the group members and its relationship are displayed. The unassigned incidents and the list of recent incidents are also displayed.
-
The Analytics tab displays the CPU, memory and network utilization by the logical domains in the Oracle VM Server. The consumption is represented in the form of charts.
-
The Incidents tab lists the incidents that are reported for the Oracle VM Server. The tab provides the list of unresolved incidents and a graphical representation of the problem composition.
To see the corresponding alerts for each incident, see Chapter 9, "Incidents" for more detailed information.
-
The Monitoring tab, as shown in Figure 15-6, shows the monitoring values and boundaries that are set for Oracle VM Server activity. You can review the rules, monitoring attributes, specific time period for monitoring, and the level of severity for monitoring the activity of Oracle VM Server. To change these values, see Chapter 4, "Monitoring Rules and Policies".
Figure 15-6 Oracle VM Server for SPARC Monitoring Options
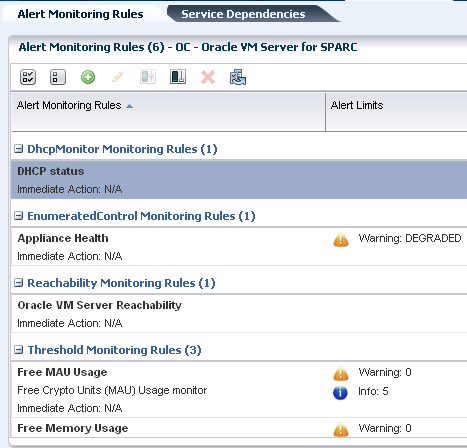
Description of "Figure 15-6 Oracle VM Server for SPARC Monitoring Options"
-
The Configuration tab displays information such as remote logging, routing, NFS domain name, and name service information for the Oracle VM Server.
-
The Charts tab displays the CPU, memory and network utilization of the Oracle VM Server. The data are collected in five-minute intervals and displayed graphically. The utilization data are provided for different time intervals. See Chapter 12, "Operating Systems" for more information about reading charts.
15.9 Server Pools
You can create server pools of your Oracle VM Server for SPARC systems in Oracle Enterprise Manager Ops Center. An Oracle VM Server must not have logical domains in running, shutdown, or suspended states when you want to add it to a server pool.
The detailed description and procedure for creating server pools are described in Chapter 17, "Server Pools".
15.10 About Logical Domains
A logical domain is a virtual machine that has its own operating system and identity within a single server. Each logical domain can be created, destroyed, reconfigured, and rebooted independently, without requiring the server to be powered off. You can run a variety of applications in different logical domains to keep them independent for performance and security purposes.
Using Oracle Enterprise Manager Ops Center, you can create logical domains and install Oracle Solaris OS on them. Using profiles and deployment plans, you can create more than one logical domain simultaneously and then save the configuration for future use.
You can use one of the following methods to create logical domains:
-
Create Logical Domain Profile and Plan
-
Create a profile which defines the configuration of the logical domain.
-
Using the profile, create a deployment plan.
-
Apply the plan on an Oracle VM Server to create logical domains.
-
The logical domains do not have the OS installed. You must select each logical domain and apply an OS provisioning plan to install the OS. See OS Provisioning on Logical Domains for provisioning OS on the logical domains.
-
-
Configure and Install Logical Domains
This is a complex plan which contains deployment plans that create logical domains and install Oracle Solaris OS on them. You must have the required profiles and deployment plans available to create the complex plan. The outline to create a plan is as follows:
-
Create a logical domain profile.
-
Create an OS provisioning profile to install the OS.
-
Create a deployment plan to install the OS and other updates if any.
-
Create the Configure and Install Logical Domains plan.
-
You can now manage logical domains that were created manually using the native CLI in Oracle Enterprise Manager Ops Center. See Manage Existing Oracle VM Server for SPARC Environments for more information.
15.11 Creating a Logical Domain Profile
A logical domain profile contains the requirements and configuration for an entire logical domain, including the CPU Threads, memory, storage, and network details. When a deployment plan applies the profile, you create a logical domain. You must provision Oracle Solaris OS on each domain separately. As an alternative, you can include the logical domain profile along with an OS provisioning profile in a complex plan.
Ensure that you have the following information before you create a profile:
-
CPU and memory requirements
The physical CPUs of the Oracle VM Server for SPARC are shared among the CPU threads of all the logical domains. Each logical domain requires:
-
At least one GB of memory.
-
At least one CPU thread.
Each CPU thread can be allocated independently to logical domain. The CPU threads are grouped into cores. For example, there are 4 Threads per core in the Oracle Sun Fire and SPARC Enterprise T1000 CMT processors. Some hardware resources are provided on a per-core basis and therefore, shared between the threads in the core. When the threads in a core are allocated to two or more separate logical domains, it can lead to suboptimal performance of those threads. To get the best performance, it is best to avoid allocating the threads of a core to many logical domains. The best approach would be create large logical domains first, the logical domains with complete cores, and then the smaller logical domains.
Crypto units are assigned based on CPU thread assignments. You can request the number of crypto units to be assigned to the logical domain. However, the number of crypto units assigned might be different than the amount requested because we can only allocate a crypto unit for every given number of CPU thread allocation, depending on the server hardware. After the creation of logical domain, view the job notification to see the actual number of Crypto Units assigned to the logical domain. You can also edit the logical domain configuration, storage, and network resource configuration later.
-
-
Storage resources
The libraries for virtual disk can be local, local device, NAS, SAN, or Dynamic Storage libraries.
-
Network resources and number of connections for a network
You can connect to a network multiple times to the logical domain. When you create a logical domain, the number of connections for a network translate to the number of virtual network devices created for the logical domain. The number of virtual network devices created depends on the number of virtual switches present in the Control Domain.
When you start a logical domain, you must define the virtual switches through which you connect the logical domain to the external network.
To Create a Logical Domain Profile
-
Expand Profiles and select Logical Domain from the list.
-
Click Create Profile from the Actions pane.
The Create Logical Domain Profile Wizard is displayed.
-
Provide a name and description to identify the profile.
-
Select Create a deployment plan for this profile to automatically create a plan using this profile.
-
Click Next and provide a name and the starting number for the logical domain.
Using this profile, you can create more than one logical domain. To identify each new logical domain, provide a prefix start name and starting number. For example, for a Start Name defined as TestDomain and a starting number of 10, three new logical domains have the name TestDomain10, TestDomain11, and TestDomain12.
-
Click Next to configure the CPU Threads and memory.
The physical CPUs of the Oracle VM Server for SPARC are shared among the CPU threads of all the logical domains. Each logical domain requires:
-
At least one Gigabyte of memory.
-
At least one CPU thread.
If required, enable the Automatic Recovery option and the enter the value for Priority of Recovery. The value must be between 0 and 100. A logical domain with a higher value is recovered first.
-
-
Click Next to specify the library for storing the domain metadata and storage disks for the logical domain.
-
Select a library to store the logical domain metadata.
Select only the local or NAS library to store the domain metadata.
-
Select one or more libraries that form the logical domain storage disks.
The libraries for virtual disk can be local, local device, NAS, SAN, or Dynamic Storage libraries. Click Next to specify the networks for the domains.
-
Select at least one network from the list of networks identified by Oracle Enterprise Manager Ops Center. You can associate a logical domain with more than one network.
-
Enter the number of connections for each network.
You can connect to a network multiple times to the logical domain. When you create a logical domain, the number of connections for a network translate to the number of virtual network devices created for the logical domain. The number of virtual network devices created depends on the number of virtual switches present in the Control Domain.
When you start a logical domain, you must define the virtual switches through which you connect the logical domain to the external network.
-
Click Next to view the summary of the details selected for creating a logical domain.
-
Review the information and click Finish to save the profile.
When you want to create a deployment plan with this profile in the first step, then a corresponding logical domain plan is also created.
15.12 Creating and Deploying a Logical Domain Plan
When you create a logical domain profile, you can select to create a deployment plan with that profile. You can also create logical domain plans. You can either create a simple plan to install only the logical domains or a complex plan to create the logical domains and provision OS on it. The following procedure describes how to create a simple plan to install the logical domains only. You require to have created a logical domain profile to select in the plan.
To Create a Logical Domain Plan
-
Expand Deployment Plans in the Plan Management section and select Create Logical Domains plan.
-
Click Create Plan from Template in the Actions pane.
The Create a Deployment Plan window is displayed.
-
Enter a name and description for the plan.
-
Select the failure policy.
-
Select the logical domain profile in the Create Logical Domain step.
This is a simple single step plan to select the logical domain profile. The logical domain profiles that are available are listed in the list of Associated Profile/Deployment Plan.
-
Enter the number of logical domains to be created.
-
Click Save to create the deployment plan.
The deployment plan is created with the associated profile. Now, apply the plan on a suitable target to create the logical domains.
15.12.1 Applying Logical Domain Deployment Plan
Apply the created logical domain deployment plan on the target server and create the logical domains.
-
Expand Deployment Plans in the Plan Management section and select the created logical domain deployment plan.
-
Click Apply Deployment Plan in the Actions pane.
The Select Target Assets window is displayed.
-
Select the target server from the list.
Select one or more targets to apply the plan.
-
Click Add to Target List option to add the selected targets on which you want to apply the plan.
-
Select whether you want to run the plan with minimal interaction or you want to override the profile values.
-
Click Next to specify the resource assignments in the profile.
-
If required, modify the name of the logical domains starting name and the number appended to it.
Click Next to configure the CPU Threads and memory.
-
Edit the CPU Threads, memory, and automatic recovery as required.
Click Next to specify the storage resource assignments.
-
When the storage resources from the profile are not available for the selected target, it is flagged in red color. Modify the storage resources accordingly.
Click Next to specify the network resource assignments.
-
When the network resource assignments from the profile are not available for the selected target, then it is flagged in red color. Modify the network resources accordingly.
Click Next to schedule the job.
-
Schedule the job to run now or at a later time. Click Next.
-
Review the summary and click Apply to execute the deployment plan on the selected targets.
15.12.2 OS Provisioning on Logical Domains
The Oracle OS version that is provisioned on the logical domains is independent of the OS version on the Oracle VM Server for SPARC Control Domain. You can provision Oracle Solaris 10 or Oracle Solaris 11 OS on the logical domains irrespective of the Oracle Solaris OS version of the Control Domain.
After you create a logical domain, you must provision an OS on it.
-
Ensure that you have imported the appropriate ISO image into the library. If it is Oracle Solaris 10, then it must be at least Oracle Solaris 10 8/07.
-
Create or identify an OS provisioning profile for SPARC. See Provisioning Operating Systems for more information.
-
Create or identify a deployment plan with the OS provisioning profile and apply the deployment plan.
Note:
When you want to monitor the OS provisioning on the logical domains, you must first enable the logical domain console. See Connect to Logical Domain Console for enabling the console.You can also use network interfaces other than the default GB_0 to boot the OS. You can specify GB_x as the alternate boot interface while selecting the networks during OS provisioning.
15.12.3 Complex Plan
You have the Configure and Install Logical Domains deployment plan that comprises the step to create logical domains and provision OS on them. This complex plan steps are:
-
Create Logical Domains Profile: See Creating a Logical Domain Profile for creating the logical domain profile.
-
Install and Update OS Plan: See About Multi-Step Deployment Plans for creating the plan.
Create the required profile and plan to create this complex plan.
You can use WANBoot to provision OS on logical domains in the following scenarios:
-
Using complex plans that creates logical domains and provisions OS on them
-
Provision OS on newly created logical domains
-
Provision OS on already provisioned logical domains
15.13 Management of Logical Domains
The following operations are available for managing the logical domains that were created using Oracle Enterprise Manager Ops Center:
-
Edit logical domain attributes
-
Start a logical domain
-
Shut down a logical domain
-
Reboot a logical domain
-
Migrate logical domains
-
Add storage to logical domains
-
Connect networks to logical domains
-
Automatic recovery of logical domains
15.13.1 Edit Logical Domain Configuration
Use the option Edit Attributes in the Actions pane of a selected logical domain. You can edit the name, description, CPU Threads, memory, Crypto Units and automatic recovery priority value.
Use the option Edit Tags to modify the tag values or to add new tags.
15.13.2 Shut Down a Logical Domain
When you shut down a logical domain, it is disconnected from its networks, disassociated from the Oracle VM Server Control Domain, and all the associated resources are released. You can restart the logical domain with the same configuration that is maintained in its storage library on the same Oracle VM Server or on a different target server.
15.13.3 Starting a Logical Domain
You can start a logical domain from a shut down state. When you start a logical domain, you can select to start the logical domain on the same target or on a different target server. Depending on the number of network connections to an Oracle VM Server for SPARC, you have that many virtual switches created for an Oracle VM Server for SPARC.
You must select the virtual switch that connects to the logical domain MAC address. A virtual switch can be connected to only one MAC address. You can also select not to connect to network for a virtual switch.
-
Select the shutdown logical domain.
-
Click Start in the Actions pane.
The Start Logical Domain Wizard is displayed.
-
Select the server pool in which you want to start the logical domain.
When you shutdown a logical domain, the logical domain is disassociated from the Control Domain and it can be started on a server.
When you have networks attached to a logical domain and is not available in the selected server pool, then that network is not available when the logical domain starts.
-
Select the Oracle VM Server for SPARC in which you want to start the logical domain. You can select the same Oracle VM Server in which the logical domain is running already. Otherwise, select an Oracle VM Server for SPARC from the list.
The current load for all the Oracle VM Server for SPARC are displayed. Use this information to place your logical domain.
Click Next to specify the network interfaces.
-
Select the virtual switch that must be associated with the logical domain MAC address.
The number of virtual switched displayed depends on the number of network connections for the server pool. For each network connection, you have a virtual switch created. You can associate a virtual switch with only one MAC address.
-
Select Do Not Connect when you do not want the virtual switch to connect to MAC address.
Click Next to schedule the job.
-
Schedule the job to run now or at a later time.
-
Review the properties and click Start to run the logical domain.
15.13.4 Add Storage to Logical Domain
You can add virtual disks to a logical domain. The associated libraries to the Oracle VM Server for SPARC are available to be added as additional storage to logical domains. Use the option Add Storage in the Actions pane to add virtual disks to the logical domain. The logical domain can be in running state for adding storage.
You can add virtual disks from the following type of storage libraries:
-
File system storage: These are NAS libraries. Specify a virtual disk name and size of the disk.
-
Static block storage: Select LUNs from SAN or iSCSI storage servers. The LUNs sizes are fixed.
-
Dynamic block storage: Add LUNs from SAN or iSCSI storage servers discovered and managed in Oracle Enterprise Manager Ops Center. You can also create LUNs by selecting a volume group and specifying the size of the LUN.
15.13.5 Managing Logical Domain Networks
You can connect or disconnect a network and a logical domain. The logical domain can be in running state.You can connect to a network multiple times. Use the Connect Network and Disconnect Network icons, shown in Figure 15-4, in the Networks tab.
Figure 15-7 Logical Domain Network Options
Description of "Figure 15-7 Logical Domain Network Options"
-
Click the Connect Network icon to display the Connect Guests to Network window. Select the network.
-
Select the virtual switch through which you want to connect the logical domain to the network. Depending on the number of network connections, the virtual switches are listed. The virtual switches can be reused. Therefore, you can attach multiple vnets on the same network on the same virtual switches.
-
You can create IPMP groups or aggregate the NICs allocated to the logical domain. See Chapter 7, "Networks" for more information about creating IPMP groups and link aggregation.
15.13.6 Migrate Logical Domains
You can migrate a logical domain from an Oracle VM Server to another Oracle VM Server. The type of migration is warm migration. The logical domain is shut down or suspended and then its static configuration is moved to the target host. The logical domain is then restarted on the target host using the same virtual image. Warm migration does not maintain the live run state of the operating system, that is, going through a save-to-disk cycle during the migration. To migrate domains, shared storage resources is required.
For Oracle VM Server for SPARC 1.2 version, you can migrate with only 1 MAU.
For Oracle VM Server for SPARC 1.3 and later versions, you can migrate with any number of MAUs.
From Oracle VM Server for SPARC 2.1 version onwards, live migration of the logical domains is supported.
Note:
For Oracle VM Server for SPARC 2.1 and 2.2, you can migrate the logical domains only when the source and target machines are running at least Oracle VM Server for SPARC 2.1 version.15.13.6.1 Setting User Accounts for Migration
Temporary user accounts are created dynamically when a logical domain migration is initiated. The user account is deleted after the migration. If your datacenter environment does not support dynamic creation of user accounts, then you can set the logical domain migration to use an existing user account instead of creating a temporary one. You must have the Security Admin role to create the credentials. If not, contact the Ops Center Administrator for creating a user account for logical domain migration.
To create a user account, follow the procedure:
-
Select the Administration section in the Navigation pane.
-
Select Credentials in the Administration section.
-
Click Create Credentials in the Actions pane.
The Create Credentials window is displayed.
-
Select the protocol as OVM For SPARC Migration and enter the following details:
-
Name of the credential
-
User name for the account
-
Password for the user account
-
-
Click Create to create the user account.
Set the following system property in the configuration management of the Enterprise Controller:
-
Select the Administration section in the Navigation pane.
-
Select the Configuration tab in the center pane.
-
Select Virtualization in the Subsystem.
The property Virtualization.Ldoms.Migration.Username is displayed.
-
Enter the user name of OVM For SPARC Migration user account created previously to be used for all logical domain migration.
-
Click Save.
The migration job proceeds to use the user account as defined in the system property. If the system property is set default to null, then the migration job dynamically creates a temporary user account. Ensure to set this property before initiating any logical domain migration, if required.
15.13.6.2 Migrating a Logical Domain
-
Select the logical domain to be migrated from the Assets section.
-
Click Migrate in the Actions pane.
The Migrate Logical Domain Wizard is displayed.
-
The eligible Oracle VM Servers are displayed in the decreasing order of preference. Select an Oracle VM Server from the list.
Click Next.
-
Review the information and click Finish to migrate the logical domain.
This migration is initiated from the logical domain and it results in migration of single logical domain. When the Oracle VM Server is placed in a server pool and there are more than one logical domain in the host, you can use Migrate Logical Domains to migrate more than one logical domain from the host.
15.13.6.3 Migrating Multiple Logical Domains
-
Click Migrate Logical Domains in the Actions pane.
The Migrate Logical Domains Wizard is displayed.
-
The list of logical domains running in the Oracle VM Server are listed. Select one or more logical domains from the list.
Click Next.
-
The eligible Oracle VM Servers in the same server pool that have the required resources to host all the logical domains are listed in the decreasing order of preference. Select an Oracle VM Server from the list.
Click Next.
-
Review the summary and click Finish to migrate logical domains.
15.13.7 Automatic Recovery of Logical Domains
You can enable automatic recovery of logical domains. This ensures that when the Oracle VM Server for SPARC placed in a server pool fails, the logical domains are recovered and restarted on another server in the server pool.
You can set the priority of recovery value for the logical domain that decides the order of recovery of the logical domains in the Oracle VM Server for SPARC. The priority of recovery value can be set between 0 to 100. For example, if the priority of recovery value set for logical domain A is 12 and logical domain B is 15, then the logical domain B is recovered first.
Use the Enable Automatic Recovery and Disable Automatic Recovery actions, shown in Figure 15-8, to set the automatic recovery for a logical domain. If you have disabled the automatic recovery of a logical domain, then it is not migrated to other servers in the pool when the underlying virtualization host fails. Instead, it is listed under Shutdown Guests in the Server Pool. You can restart them on other servers as required.
Figure 15-8 Enable and Disable Automatic Recovery
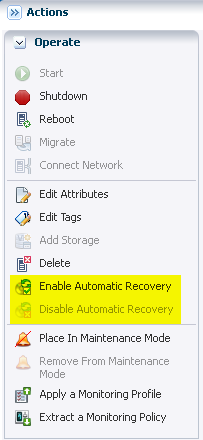
Description of "Figure 15-8 Enable and Disable Automatic Recovery"
When you edit the attributes of a logical domain, you can edit the priority of recovery value.
If there are no resources available to recover the logical domains in the server pool, Oracle Enterprise Manager Ops Center checks periodically for every minute for free resources to retry the automatic recovery mechanism.
You can also follow the procedure described in Recovering Logical Domains to recover the attached logical domains.
When a logical domain is configured for automatic recovery, the auto boot value for the logical domain is set to false. The auto boot value is controlled by Oracle Enterprise Manager Ops Center. This is because, when the failed server is repaired and restarted, the logical domains are not started automatically. Oracle Enterprise Manager Ops Center checks whether the logical domains are recovered and running on other servers. If the logical domains are not recovered, then the logical domains are started. If the logical domains are recovered on other servers, then Oracle Enterprise Manager Ops Center cleans up those logical domains on the server.
When you perform shut down and start operations using the UI for a logical domain that is configured to automatically recover, the operating system is also booted automatically by Oracle Enterprise Manager Ops Center.
When you perform the shut down and start operations using the CLI for a logical domain that is configured to automatically recover, you must boot the OS separately. This is not automatically done by Oracle Enterprise Manager Ops Center.
See Chapter 17, "Server Pools" and Automatic Recovery of Oracle VM Server for SPARC in a server pool for more information.
15.13.8 Recovering Logical Domains
The following procedure describes the actions that must be performed to recover the attached logical domains when an Oracle VM Server for SPARC server in a server pool has failed.
-
Isolate the failed server.
Log in to the ALOM or ILOM of the physical server and shut down the server.
-
Power-off the failed server.
-
In the Oracle Enterprise Manager Ops Center UI, select the server pool in which the failed server is the member. Check whether the server is flagged as unavailable. This status is updated within 5 minutes approximately.
-
Select the Control Domain of the server in the UI and click Delete Asset in the Actions pane.
-
Select the server pool in which the failed server was a member and expand the Shutdown Guests list.
-
The attached logical domains of the failed server are listed. Select the logical domains and click Start to start the logical domains in the desired server in the server pool.
-
To bring back the failed server to the server pool, the server must be repaired and provisioned again with Oracle VM Server for SPARC using Oracle Enterprise Manager Ops Center.
15.13.9 Delete a Logical Domain
When you delete a logical domain, it is disconnected from the associated networks and is disassociated from the Oracle VM Server. All the associated resources are released and the domain configuration is removed from the library. All the references to the logical domain, including its disk image and snapshots are removed from the system. However, the logical domain profile and plan remain unaffected.
When you delete a logical domain manually, that is using the native CLI, then the UI reflects the removal of the logical domain.
15.13.10 Connect to Logical Domain Console
You can attach to the logical domain console within the Oracle Enterprise Manager Ops Center UI. You enable the console connection and then you connect to the console.
Note:
When the logical domain is not in view in the Assets tree, the console is logged out automatically but the connection exists until the connection time expires. You must log in again.15.14 Manage Existing Oracle VM Server for SPARC Environments
You can manage existing Oracle VM Server for SPARC environments in Oracle Enterprise Manager Ops Center.
You can discover and manage Oracle VM Server for SPARC that has been provisioned manually. The underlying logical domains are automatically discovered and managed in Oracle Enterprise Manager Ops Center. In the Assets section, the discovered logical domains are displayed in order and grouped under the Control Domain.
Logical domains that are created manually for an Oracle VM Server for SPARC provisioned through the UI are also automatically discovered and managed on the UI.
You can also provision OS on the manually created logical domains using the OS provisioning profile and plans in Oracle Enterprise Manager Ops Center.
You can perform the following functions on the UI for an existing logical domains:
-
Start
-
Shut down
-
Reboot
-
Modify the attributes of Logical Domain
-
Delete Logical Domains
The following are the limitations for managing such logical domains in Oracle Enterprise Manager Ops Center:
-
Storage and network resources of the logical domains cannot be managed.
-
Cannot be part of server pools.
-
Cannot migrate the logical domains as it is not part of a server pool.
Table 15-3 shows the options for managing existing logical domains as compared to managing new logical domains.
Table 15-3 Management Options for Oracle VM Server
| Options | New Oracle VM Server for SPARC | New Logical Domain | Existing Oracle VM Server for SPARC | Existing Logical Domain |
|---|---|---|---|---|
|
Modify attributes for Oracle VM Server |
Yes |
N/A |
Yes |
N/A |
|
Reboot Oracle VM Server |
Yes |
N/A |
Yes |
N/A |
|
Manage Networks |
Yes (stand-alone) |
Yes |
No |
No |
|
Manage Storage |
Yes (stand-alone) |
Yes |
No |
No |
|
Start Logical Domain |
N/A |
Yes |
N/A |
Yes |
|
Shutdown Logical Domain |
N/A |
Yes |
N/A |
Yes |
|
Reboot Logical Domain |
N/A |
Yes |
N/A |
Yes |
|
Delete Logical Domain |
N/A |
Yes |
N/A |
Yes |
|
Install Server Deployment Plan |
Yes |
Yes |
No |
Yes |
|
Enable Console |
N/A |
Yes |
N/A |
Yes |
15.15 Related Resources
For instructions in performing actions or to learn more about the role of this feature, go to one of the following resources.
-
http://www.oracle.com/technetwork/documentation/vm-sparc-194287.html -
Oracle Enterprise Manager Ops Center Deploying and Configuring Oracle VM Server for SPARC
For end-to-end examples, see the How To library at http://docs.oracle.com/cd/E27363_01/nav/howto.htm