Oracle® Enterprise Manager Ops Center
Configuring and Deploying Oracle VM Server for SPARC
12c Release 1 (12.1.3.0.0)
E27349-03
March 2013
This guide provides an end-to-end example for how to use Oracle Enterprise Manager Ops Center.
Introduction
Using Oracle Enterprise Manager Ops Center, you can provision Oracle VM Server for SPARC. The requirements for provisioning are stored as profiles, wrapped in deployment plans, and applied on the target assets.
The version of Oracle VM Server for SPARC that you install depends on the type of server hardware and the firmware version installed. For a list of compatible hardware and software versions, see Related Articles and Resources for Oracle VM Server for SPARC documentation website.
This guide describes how to configure and deploy Oracle VM Server for SPARC 2.1 version.
What You Will Need
You require the following to configure and deploy Oracle VM Server for SPARC:
-
Compatible server hardware discovered in Oracle Enterprise Manager Ops Center
-
Compatible firmware version installed
-
Resource configuration for the Control Domain
Calculate your requirements based on the hardware used. Refer to Oracle Enterprise Manager Ops Center Feature Reference Guide for the recommended configuration for different configuration.
-
OS provisioning profile that captures the requirement of resource configuration of Oracle VM Server for SPARC
-
Deployment plan that wraps the provisioning profile of Oracle VM Server for SPARC
-
An IP address to assign to the operating system
Hardware and Software Configuration
This section defines the hardware and software details for installing Oracle VM Server for SPARC 2.1 version on Sun SPARC Enterprise T5120 Server. The configuration might change according to the hardware and firmware versions that you use.
-
Server Model – Sun SPARC Enterprise T5120 Server
-
Processor – SPARC-SUN4V, Sun, 1165 MHz, 64 Total CPU Threads, 8 Core(s)
-
Memory – 32 GB
-
System firmware – 7.4.0.b
Description of the illustration server_config.gif
-
Use Oracle Solaris 10 9/10 OS to install Oracle VM Server for SPARC 2.1 version. Upload or import the OS image to a storage library in Oracle Enterprise Manager Ops Center.
-
To take advantage of all features of Oracle VM Server for SPARC 2.1, after the installation, install the patch 147307-01 for the T5120 server.
Configuring and Deploying Oracle VM Server for SPARC
Discover the server Sun SPARC Enterprise T5120 server in Oracle Enterprise Manager Ops Center. Refer to the Oracle Enterprise Manager Ops Center Feature Reference Guide for the complete discovery procedure. A discovered server appears in the UI like this.
Description of the illustration server_display.gif
The following steps define the procedure to successfully install Oracle VM Server for SPARC 2.1 version:
Creating a Provisioning Profile for Oracle VM Server for SPARC
Create an OS provisioning profile that captures the configuration parameters for Oracle VM Server for SPARC.
-
Select the Plan Management section and expand Profiles and Policies.
-
Choose OS Provisioning and click Create Profile in the Actions pane.
-
Enter the following details to identify the profile:
-
Name and description of the profile.
-
Select Oracle VM Server for SPARC as the Subtype.
-
Select the option Create a deployment plan for this profile.
Description of the illustration ldom_iden_profile.gif
Click Next to select the OS image and distribution.
-
-
Select the following parameters in the Specify OSP Parameters step:
-
Select 2.1 as the Oracle VM Server version.
-
Select the OS image from the list. The Oracle Solaris 10 9/10 OS version.
-
Select Entire Distribution Plus OEM Support for the Software Group. Selecting this software group installs the Entire Solaris Software Group plus the additional hardware drivers.
Description of the illustration ldom_osp_param.gif
Click Next to specify the OS setup.
-
-
Retain the default values for the OS setup parameters. Enter the root password and confirm the password.
Enable Manual Net Boot option when the target system requires a manual net boot operation and the Oracle Enterprise Manager Ops Center cannot perform a remote network boot process. When you select this option, you must initiate the net boot operation when the provisioning job completes on the UI. For more information about this, refer to Oracle Enterprise Manager Ops Center Feature Reference Guide.
Description of the illustration ldom_ossetup_param.gif
Click Next.
-
You can skip the installation parameters specification to install any JET modules.
The JET modules base_config, custom, and flash are installed by default. If you want to install any additional JET modules, enter a comma-separated list of the modules.
Click Next to specify the Control Domain parameters.
-
Specify the resources that you want to assign to the Control Domain. The remaining resources are available for the logical domains.
The following is a minimum resource configuration for this system:
-
T5120 server is a 8 core service processor. One core is 8 CPU Threads. Therefore, there are total 64 CPU Threads. It is mandatory to allocate 1 Crypto Unit for Control Domain. Each CPU core has one Crypto Unit. Therefore, allocate 8 CPU Threads.
-
The recommended RAM is 2 GB for system RAM between 8 and 16 GB. The server has 32 GB system RAM. Therefore, allocate 4 GB RAM to the Control Domain.
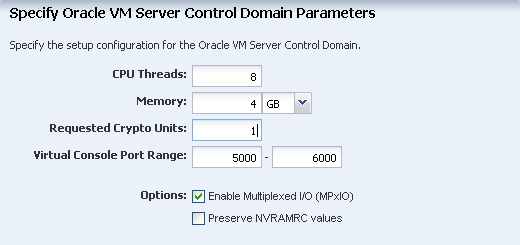
Description of the illustration ldm_ctrl_dm_param.png
Select the option Enable Multiplexed I/O so that you can associate block storage libraries such as SAN and iSCSI for storage.
In this example, do not select the option Preserve NVRAMRC values. You can select this option if you want to preserve the user-defined commands that are executed during start-up and that are stored in the NVRAMRC file in the non-volatile RAM (NVRAM). The provisioning job removes the NVRAMRC values.
Click Next to specify the file system layout.
-
-
The root (/) and a swap file system are defined by default. Click the Add icon to add more file systems. You can also change the file system type to UFS, or ZFS.
Description of the illustration ldom_filesys_setup.gif
Click Next to specify the name service.
-
If you have a naming service in place, select the appropriate one and provide the setup details. In this procedure, let us select None for the naming service.
If you have any naming service in your setup, refer to the help in the wizard or the Oracle Enterprise Manager Ops Center Feature Reference Guide for information about specifying the naming services.
Description of the illustration ldom_name_service.gif
Click Next to specify the network information.
-
Select None as the networking option for Oracle VM Server for SPARC. Click Next to specify the network interface.
-
Select a DHCP-enabled network interface for the boot interface from the list of all managed networks. You can add multiple networks. You must ensure that the control domain and the logical domains are in the same subnet.
-
Select the Address Allocation Method for each network except the boot interface.
Description of the illustration ldom_netwk_option.gif
-
If you select Use Static IP, you must provide the IP address when you apply a plan with this profile so that the IP address can be assigned to the target system after provisioning.
-
If you select Assign By DHCP, then the IP address is automatically assigned from the designated DHCP server.
Click Next.
-
-
Review the Summary of your selections. Click Finish to create the profile.
The job runs to create the profile. You can view the new profile under OS Provisioning in the Profiles and Policies tree.
Description of the illustration ldom_profile_display.gif
Deploying the Plan to Install Oracle VM Server for SPARC
In the above profile, we selected the option to create a deployment plan automatically using the profile. Expand Deployment Plans in the Navigation pane to view the plan. You can initiate the plan deployment by different ways from the UI. Refer to the Oracle Enterprise Manager Ops Center Feature Reference Guide to know about the different ways to initiate the deployment job.
-
Select the plan from the Deployment Plan list.
-
Right click the plan and select Apply Deployment Plan.
Description of the illustration apply_deploy_plan.gif
-
Select one or more assets and add to the target list.
Description of the illustration select_targets.gif
-
Select the plan to be applied with minimal interaction as we do not want to change the profile parameters.
-
Supply the network resources. Provide the IP address for Oracle VM Server for SPARC.
Description of the illustration spec_network_inter1.gif
Click Next.
-
In this example, the Oracle VM Server for SPARC is placed in stand-alone mode.

Description of the illustration assign_server_pool.gif
Click Next.
-
Schedule the provisioning job to run now.
-
Review the summary of the information for provisioning Oracle VM Server for SPARC.
-
Click Apply to start the OS provisioning job.
The provisioning job takes approximately 1 to 2 hours to complete depending on the network and storage capabilities. After the installation, you will see the Oracle VM Server for SPARC in the UI like this under the Assets section.
Description of the illustration ldom_display.gif
What's Next?
After provisioning Oracle VM Server for SPARC, the next step is to create and install logical domains on it. You can refer to Oracle Enterprise Manager Ops Center Feature Reference Guide for a detailed procedure for creating and installing logical domains.
Want to Modify Oracle VM Server Configuration?
You can change the Oracle VM Server for SPARC configuration after provisioning. You can change the following details of the server through the UI:
-
Identification parameters, such as name, description and tags.
-
Oracle VM Server for SPARC configuration parameters, such as CPU Threads, memory, and Crypto units.
-
Attach new networks and associate libraries for storage.
Actions Available
You have the following actions available for managing Oracle VM Server for SPARC on the UI:
-
Reboot the server
-
Change naming service
-
Change NFS4 domain
-
Change remote logging configuration
-
Create logical domains
-
Migrate logical domains
Refer to the Oracle Enterprise Manager Ops Center Feature Reference Guide for more information about managing Oracle VM Server for SPARC using Oracle Enterprise Manager Ops Center.
Related Articles and Resources
The Oracle Enterprise Manager Ops Center 12c documentation is located at http://www.oracle.com/pls/topic/lookup?ctx=oc121.
See the following documentation for more detailed information:
-
Oracle Enterprise Manager Ops Center Feature Reference Guide
-
Oracle VM Server for SPARC 2.1 version documentation at
http://docs.oracle.com/cd/E23120_01/index.html -
Oracle Enterprise Manager Ops Center Administration Guide for information about user roles and permissions.
Other examples are available at http://docs.oracle.com/cd/E27363_01/nav/howto.htm.
Documentation Accessibility
For information about Oracle's commitment to accessibility, visit the Oracle Accessibility Program website at http://www.oracle.com/pls/topic/lookup?ctx=acc&id=docacc.
Oracle customers have access to electronic support through My Oracle Support. For information, visit http://www.oracle.com/pls/topic/lookup?ctx=acc&id=info or visit http://www.oracle.com/pls/topic/lookup?ctx=acc&id=trs if you are hearing impaired.
Oracle Enterprise Manager Ops Center Configuring and Deploying Oracle VM Server for SPARC Guide, 12c Release 1 (12.1.3.0.0)
E27349-03
Copyright © 2007, 2013, Oracle and/or its affiliates. All rights reserved.
This software and related documentation are provided under a license agreement containing restrictions on use and disclosure and are protected by intellectual property laws. Except as expressly permitted in your license agreement or allowed by law, you may not use, copy, reproduce, translate, broadcast, modify, license, transmit, distribute, exhibit, perform, publish, or display any part, in any form, or by any means. Reverse engineering, disassembly, or decompilation of this software, unless required by law for interoperability, is prohibited.
The information contained herein is subject to change without notice and is not warranted to be error-free. If you find any errors, please report them to us in writing.
If this is software or related documentation that is delivered to the U.S. Government or anyone licensing it on behalf of the U.S. Government, the following notice is applicable:
U.S. GOVERNMENT END USERS: Oracle programs, including any operating system, integrated software, any programs installed on the hardware, and/or documentation, delivered to U.S. Government end users are "commercial computer software" pursuant to the applicable Federal Acquisition Regulation and agency-specific supplemental regulations. As such, use, duplication, disclosure, modification, and adaptation of the programs, including any operating system, integrated software, any programs installed on the hardware, and/or documentation, shall be subject to license terms and license restrictions applicable to the programs. No other rights are granted to the U.S. Government.
This software or hardware is developed for general use in a variety of information management applications. It is not developed or intended for use in any inherently dangerous applications, including applications that may create a risk of personal injury. If you use this software or hardware in dangerous applications, then you shall be responsible to take all appropriate fail-safe, backup, redundancy, and other measures to ensure its safe use. Oracle Corporation and its affiliates disclaim any liability for any damages caused by use of this software or hardware in dangerous applications.
Oracle and Java are registered trademarks of Oracle and/or its affiliates. Other names may be trademarks of their respective owners.
Intel and Intel Xeon are trademarks or registered trademarks of Intel Corporation. All SPARC trademarks are used under license and are trademarks or registered trademarks of SPARC International, Inc. AMD, Opteron, the AMD logo, and the AMD Opteron logo are trademarks or registered trademarks of Advanced Micro Devices. UNIX is a registered trademark of The Open Group.
This software or hardware and documentation may provide access to or information on content, products, and services from third parties. Oracle Corporation and its affiliates are not responsible for and expressly disclaim all warranties of any kind with respect to third-party content, products, and services. Oracle Corporation and its affiliates will not be responsible for any loss, costs, or damages incurred due to your access to or use of third-party content, products, or services.