 Understanding Pay Cycle Processing
This chapter provides an overview of pay cycle processing and discusses how to:
Create a pay cycle.
Define bank replacement rules.
Create, update, and reuse pay cycles.
Configure pay cycles for PeopleSoft Financial Gateway processing.
Understanding Pay Cycle Processing
The Pay Cycle process is a flexible tool. You can review payments after specific processing steps—such as after payment selection and before payment creation—and correct exceptions before proceeding to the next step. Or you can run the Payment Selection and Payment Creation processes together if you do not need to review the payments after selection. If you have a large payment run and only a very small percentage of exceptions, you do not have to delay payment processing—you can continue the current pay cycle, resolve exceptions, and then process the payments in a different pay cycle run.
The centerpiece of payment processing in PeopleSoft Payables is the Pay Cycle Application Engine process (AP_APY2015), which creates the payments. Various output processes then transform these payments to flat files that are sent to the financial institution for settlements.
Pay Cycle is also integrated with PeopleSoft Financial Gateway processing. PeopleSoft Financial Gateway handles electronic settlements between PeopleSoft Payables and financial institutions, formatting payments, and sending acknowledgement messages between the systems.
Setup for pay cycle processing comes in two stages:
Optionally, you tailor your Pay Cycle processing to your needs by defining processing steps that you can administer separately.
Although the delivered steps satisfy most users' needs, you can also configure and add your own user-defined steps to the Pay Cycle process.
You create reusable sets of payment selection criteria, called pay cycles.
Note. If you want the Pay Cycle process to process payment
information from sources other than PeopleSoft Payables, you perform an additional
setup step: configuring the PeopleSoft Payables payment interface to accept
those outside payment sources.
If you want the Pay Cycle process to replace bank accounts automatically
for payments that meet certain selection criteria, you must define bank replacement
rules.
Positive Payment is not supported by the Pay Cycle Job process.
See Also
Configuring the PeopleSoft Payables Payment Interface
 Payment Process Flow
To understand how to set up the Pay Cycle process to meet your organization's needs, you should see how the Pay Cycle process fits in the larger PeopleSoft Payables payment process flow:
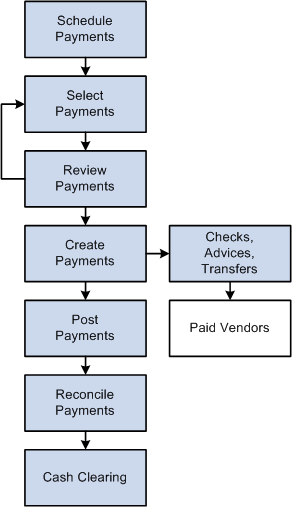
Payment process flow
To give you maximum control over which vouchers to pay and when, the payment process has several steps.
Scheduling payments.
You can configure the system to automatically select scheduled payments, or you can manually select them any time. You provide necessary information, such as vendor payment terms, due dates, and business calendar, as part of the control hierarchy or at voucher entry. If the voucher is to be paid in one payment, the system automatically schedules the payment. If you decide to pay the voucher in multiple payments, you can apply split payment terms to the voucher, and the system automatically creates multiple payment schedules. You can also schedule the payments manually using the Payments page.
Selecting payments.
You create, run, and update pay cycles that select vouchers for payment. Pay cycles are payment selection templates that store the criteria that the system uses to select vouchers for payment. These are some of the criteria:
Pay through date.
Vendor pay group.
Business unit.
Bank account.
Payment method.
Netting options.
Draft options.
If you want to schedule a pay cycle to run automatically, use the Payment Selection Criteria component (PYCYCL_DEFN) to set up the criteria and schedule the process. After you set up your standard pay cycles, you can run them repeatedly by manually or automatically updating the pay through and payment dates.
You can review payments online on the Pay Cycle Manager page after payment selection before you create the actual checks and payment advice. During this review process, you evaluate whether any payments should be put on hold, determine how to deal with payments that require special handling, and schedule multiple payments for each invoice. You also analyze potential vendor issues by monitoring the payment statuses. PeopleSoft Payables alerts you to potential lost discounts if you leave a voucher payment schedule unpaid until the next payment run.
After you define your pay cycle criteria, you run the Pay Cycle process from the Pay Cycle Manager to select eligible payments and generate the required payment records. This process enables you to flag vouchers as paid and then run the print job separately. In addition, if something does go wrong with your printer, you can elect to restart the check run at a specific number. If you are using preprinted check stock, void any numbered checks that were mangled and renumber the check run starting at the next available check. For system-numbered checks, select the Re-Print using the same reference radio button to reuse the check numbers.
You run the Payment Posting Application Engine process (AP_PSTPYMNT) on the Payment Posting Request page to create accounting entries based on your payments.
Bank account reconciliation supports both manual and electronic entry of bank reconciliation data. Transactions can be automatically matched and reconciled, or you can manually match and force them to reconcile. Online inquiries and reports are available to review the results of the reconciliation process. You initiate the Reconciliation Application Engine process (FSPRECON) from the Process Reconciliation page.
Use cash clearing to track cleared and uncleared amounts in the banking system. The more often you reconcile payment information from your bank, the more accurate your cash account balances are. To use this feature, define a cash clearing account and a cash account for each bank account. Payment posting creates accounting entries that credit the cash clearing account. You run the Cash Clearing Application Engine process (AP_APCSHCLR) from the Cash Clearing Request page.
See Also
Scheduling and Creating Voucher Payments for Online Vouchers
Creating, Updating, and Reusing Pay Cycles
Running Voucher and Payment Posting
Creating a Pay Cycle
Use the following components to set up your pay cycle:
Pay Cycle Step Definition (PYCYCL_STEP_DFN).
Pay Cycle Step Table (PYCYCL_STEP_TBL).
This section provides an overview of pay cycle configuration and discusses how to:
Define pay cycle steps.
Define step groups.
Add user-defined pay cycle steps.
Understanding Pay Cycle ConfigurationYou can create your Pay Cycle processing by:
Dividing the Pay Cycle process into functions, or steps, such as processing, approval, and exception processing, which can be administered separately.
The manner in which you arrange the steps determines which process is available for processing at any given time during the Pay Cycle process.
Adding user-defined steps to the Pay Cycle process.
Pages Used to Create a Pay Cycle|
Page Name |
Definition Name |
Navigation |
Usage |
|
PYCYCL_STEP_DFN |
Accounts Payable, Payments, Pay Cycle Definition, Step, Pay Cycle Step Definition |
Update or add process steps to a pay cycle. |
|
|
PYCYCL_STEP_TBL |
Accounts Payable, Payments, Pay Cycle Definition, Step Table, Pay Cycle Step Table |
Define step groups. A step group contains all the possible steps that might be run during Pay Cycle processing. Each step is associated with a pay cycle status that indicates the order in which the steps are run. |
Defining Pay Cycle Steps
Access the Pay Cycle Step Definition page (Accounts Payable, Payments, Pay Cycle Definition, Step, Pay Cycle Step Definition).
|
Step Name |
Describes what the process performs during this stage of the pay cycle. For example, the Payment Selection and Creation step runs both the Payment Selection and Payment Creation processes. When a process is eligible or required to run, the step name appears in the Pay Cycle Manager. Associate step names with pay cycle status on the Pay Cycle Step Table page to define the order in which each process runs. |
|
Job Type |
Select from the following options: Info (information): Defines the step as an informational type of process that links the Pay Cycle Manager to other pay cycle components for additional processing. For example, Payment Reference Confirmation is a required pay-cycle step, but not an actual Process Scheduler-defined process, that links the Pay Cycle Manager to the Payment Reference Confirmation component. Process: Defines the step as a Process Scheduler-defined process. |
|
Process Type |
Enter the type of process. The delivered pay cycle steps use PeopleSoft Application Engine, Structured Query Reports (SQR) processes, and Crystal check process types. You must define this information in the Process Scheduler Manager tables before creating a pay cycle step process. |
|
Process Name |
Enter a description of the process type. You must define this information in the Process Scheduler tables before creating a pay cycle step process. |
Defining Step Groups
Access the Pay Cycle Step Table page (Accounts Payable, Payments, Pay Cycle Definition, Step Table, Pay Cycle Step Table).
A step group contains all the possible steps that might occur during processing. Each step is associated with a pay cycle status that indicates the order in which the steps are run.
|
Copy Step Group |
Click to copy another step group. Copying step groups deletes the current step group and replaces all existing steps. |
|
Step Name |
Enter the step name defined on the Pay Cycle Step Definition page. |
|
Status |
Represents each possible state of the pay cycle. The statuses are provided with the system. A typical check-only pay cycle follows this sequence of statuses: Completed, New, Selected, Created, Confirmed, Completed. |
|
Run Level |
Determines whether the job affects the entire pay cycle or just an output process (specific bank, account, and payment method combination). For instance, Payment Creation affects the entire pay cycle, but Print Checks affects only one bank, account, and payment method combination at a time. These are the available options: Pay Cycle: Processes all transactions associated with the pay cycle, depending on the date selection criteria, payment source, business unit, bank account, and payment method. The Pay Cycle Manager processes the pay cycle-level processes until the payments are created and approved. Then the user can choose the output processes to create all files and documents for the pay cycle. If you select the pay cycle run level, the Document field does not apply and is unavailable. Bank: Processes the created payments for a specific bank account only. This process creates negotiable documents and payment files for bank processing. |
|
Document |
This option is applicable only for step names defined with a run level of Bank. This option identifies specifically what payment method and document type combination is processed. Available options are a combination of all the document types for all payment methods defined in the system, such as Check, EFT Advice (electronic funds transfer advice), Draft, ACH (automated clearing house), and Letter of Credit advices. |
See Also
Adding User-Defined Pay Cycle Steps
Pay Cycle Manager enables you to insert custom processes into the Pay Cycle process using the Pay Cycle Step Definition and Pay Cycle Step Table pages. Consider the following questions before configuring the process:
When does the process need to run?
Is the process required or optional?
Is the process applicable to a reusable pay cycle or only specific pay cycle processing instances?
Identify the pay cycle status at which your custom job is eligible to execute. The Pay Cycle process requires that the pay cycle status be set to specific values when processing specific steps. Because of this requirement, adding a new status—for example, between the Payment Selection and Payment Creation steps—requires that you modify the Application Engine program.
Important! If you add a custom process that is run at a pay cycle level, Oracle strongly recommends that you create a link or button on the Pay Cycle Manager page. A link can transfer you to a custom run control record, or you can create PeopleCode that enables the button to initiate the process. Use the PYCYCL_WORK.TRIAL_REGISTER_PB field as an example. Also, you should perform comprehensive testing to ensure that no data or processes are compromised.
Adding a custom process at the bank account level is a bit more involved, because the Pay Cycle Manager component is doing most of the status progression for the overall pay cycle. Processes are directly linked to a specific button in the Pay Cycle Manager component. Therefore, you can associate only one process with a bank account and payment method combination for each bank status. Because of the way that the processes are associated with a particular pay cycle status, the simplest way to create a new process in the payment cycle is to create a new status and associate your custom process with the new status.
To add a new status to the Pay Cycle process, review and modify the PeopleCode behind the Pay Cycle Manager component. You should consider the new status in relation to the overall progression of the pay cycle status.
To create a new pay cycle status:
Analyze your existing implementation and determine all affected PeopleCode and PeopleCode objects.
Modify all affected PeopleCode and PeopleCode objects.
Create a new translate value for the field PAY_RUN_AP_STATUS.
Create a new pay cycle step definition.
Add the new pay cycle step to a pay cycle step group.
Associate the step with a particular bank account status, payment method, and document type.
Review the Pay Cycle Manager page PeopleCode to determine whether modifications are required to advance the pay cycle bank account statuses in accordance with your new pay cycle status.
Perform comprehensive testing of the new pay cycle status working within the pay cycle process to ensure processing validity.
Important! These sorts of modifications should be made only by PeopleTools experts who are proficient in PeopleCode.
See Also
Defining Bank Replacement Rules
Use the Bank Replacement Rules component (BANK_RPL_RULE_DEFN) to define bank replacement rules.
This section provides an overview of bank replacement processing, lists prerequisites, and discusses how to define bank replacement rules.
Understanding Bank Replacement Processing
PeopleSoft Payables enables you to use alternate bank accounts to replace the original bank accounts defined for a pay cycle according to bank replacement rules that you define on the Bank Replacement Rules page and select for a pay cycle on the Payment Selection Criteria - Preferences page.
Note. If financial sanctions are enabled at the bank level, you could replace a bank that does not require financial sanctions validation with one that does require validation. Because bank replacement occurs after the Payment Selection process, the system could select payments for vendors that were not validated, even though the replacement bank does require financial sanctions validation. If you are using bank replacement processing, and you enable financial sanctions at the bank level, you should run the Financial Sanctions Validation Application Engine process (AP_SDN_VAL) prior to running the Pay Cycle process.
The replacement options that can make up a bank replacement rule are of five different types:
Replace All Payments: Replace the original bank accounts for all payments in a pay cycle with one alternate bank account.
This option also allows all payments to be reassigned to an alternate currency and payment method.
Replace Bank with Another Bank: Replace a particular original bank account or payment method with an alternate bank account or payment method.
Replace by Currency: Assign an alternate bank account, payment method, and currency to all payments scheduled to be made with a particular original currency.
Replace by Individual Payment Limit: Assign an alternate bank account to any individual payment that exceeds a monetary amount limit that is predefined for the original bank account.
Replace by Bank Maximum Limit: Assign an alternate bank account to any payments that remain after the monetary total of accumulated payments from a single bank account exceeds a defined monetary limit for that bank account. Note that the Pay Cycle process processes payments in order of amount, with the highest amount payments processed first.
For example, assume that you have ten payments in a pay cycle that are scheduled to be drawn from bank account A, as illustrated in the following table:
|
No. |
Payment Amount |
Bank Account |
|
1 |
30,000.00 EUR |
A |
|
2 |
20,000.00 EUR |
A |
|
3 |
20,000.00 EUR |
A |
|
4 |
20,000.00 EUR |
A |
|
5 |
20,000.00 EUR |
A |
|
6 |
20,000.00 EUR |
A |
|
7 |
20,000.00 EUR |
A |
|
8 |
20,000.00 EUR |
A |
|
9 |
20,000.00 EUR |
A |
|
10 |
20,000.00 EUR |
A |
Assume further that you have defined a limit for bank account A of 100,000.00 EUR. You define a bank replacement rule dictating that when the accumulated payments in a single pay cycle exceed that amount, then all remaining payments scheduled to be paid out of that account will now be paid by bank account B. Because the fifth payment would bring the payment total to 110,000.00 EUR—over that 100,000.00 EUR limit—only the first four payments will be paid out of bank account A and the remaining six will be paid out of bank account B, as illustrated in this table:
|
No. |
Payment Amount |
Bank Account |
|
1 |
30,000.00 EUR |
A |
|
2 |
20,000.00 EUR |
A |
|
3 |
20,000.00 EUR |
A |
|
4 |
20,000.00 EUR |
A |
|
5 |
20,000.00 EUR |
B |
|
6 |
20,000.00 EUR |
B |
|
7 |
20,000.00 EUR |
B |
|
8 |
20,000.00 EUR |
B |
|
9 |
20,000.00 EUR |
B |
|
10 |
20,000.00 EUR |
B |
You can indicate more than one alternate bank account to replace a bank account that reaches its maximum payment total for a pay cycle. You establish a priority for each alternate bank, such that when the first-priority replacement bank reaches its maximum payment total, the Pay Cycle process turns to the second priority replacement bank to pay the remaining payments, and so forth until all the payments have been made.
For example, assume that bank account B in the preceding scenario was the first priority replacement bank and had a maximum payment total of 80,000.00 EUR, and you also included a second priority replacement bank account C in your rule, with a maximum of 100,000.00 EUR. Your first four payments, totalling 90,000.00 EUR, would be made from the original bank, with its 100,000.00 EUR maximum, and the next four payments, totalling 80,000.00 EUR, would be made from bank account B, for which the maximum would then be reached exactly. The remaining two payments, totalling 40,000.00 EUR, would be paid from bank account C, as shown in this table:
|
No. |
Payment Amount |
Bank Account |
|
1 |
30,000.00 EUR |
A |
|
2 |
20,000.00 EUR |
A |
|
3 |
20,000.00 EUR |
A |
|
4 |
20,000.00 EUR |
A |
|
5 |
20,000.00 EUR |
B |
|
6 |
20,000.00 EUR |
B |
|
7 |
20,000.00 EUR |
B |
|
8 |
20,000.00 EUR |
B |
|
9 |
20,000.00 EUR |
C |
|
10 |
20,000.00 EUR |
C |
The fact that the Pay Cycle processes highest-amount payments first means that it sometimes uses a lower priority replacement bank account before it uses a first priority replacement bank account—or even before it uses the original bank account. For example, if we change the preceding scenario to add a payment in the amount of 10,000.00 EUR, then that eleventh payment would be processed last because it is least, but would be paid out of bank account B—the first priority replacement bank account—because bank account B still has 10,000.00 EUR available before it reaches its maximum.
Note. The maximum amount defined for a bank account decreases with each pay cycle run that creates payments from that bank account, but you can adjust the maximum amount definition for a bank account at any time.
Note. The Pay Cycle process does not split a payment among multiple banks when performing bank replacement.
Processing Order When a Bank Replacement Rule Includes Multiple Bank Replacement Options
You can define a bank replacement rule that combines more than one of these five bank replacement option types, subject to the following conditions.
If you select Replace All Payments to replace the original bank accounts for all payments in a pay cycle with one alternate bank account, you cannot select any of the other four bank replacement option types.
This replacement occurs during the Payment Selection subprocess.
The other four—options 2 through 5 in the preceding list—are processed in order (2 through 5).
This processing occurs during the Payment Creation subprocess.
Here's an example of processing if your bank replacement rule has definitions for options 2 through 5. Assume that you have the following bank replacement rule (the example is an unlikely one in actual practice, but it is designed to demonstrate the point simply):
|
Option type |
Condition |
|
Replace bank with another bank. |
Replace bank account A with bank account B. |
|
Replace by currency. |
Assign payments in Swedish kronor (SEK) to bank account C. |
|
Replace by individual payment limit. |
Assign any payment in bank account C over 10,000.00 SEK to bank account D. Assign any payment in bank account B over 5,000.00 EUR to bank account E. |
|
Replace by bank maximum limit. |
Assign any payment that causes bank account D to go over a 100,000.00 SEK threshold for the pay cycle to bank account F. |
Now assume that you have two vouchers with the following payment amount and bank account information:
7,000.00 EUR, Bank account A.
11,000.00 SEK, Bank account A.
The first voucher would be paid out of bank account E, because the replacement processing would happen in the following order:
Replace by bank account: bank account A replaced by bank account B.
Replace by currency: no action.
Replace by individual payment limit: 7,000.00 EUR is over the individual payment limit for bank account B, so bank account B is replaced by bank account E.
The second voucher would be paid out of bank account D, because the replacement processing would happen in the following order:
Replace by bank account: bank account A replaced by bank account B.
Replace by currency: because the payment is in SEK, bank account B is replaced by bank account C.
Replace by individual payment limit: 10,000.00 SEK is over the individual payment limit for bank account C, so bank account C is replaced by bank account D.
Now, if voucher 2 were one of ten vouchers in SEK in the pay cycle that together totalled over 100,000 SEK, and if it were processed by the pay cycle after the 100,000.00 SEK threshold was reached, then it would be paid out of bank account F.
Payment Method Replacement Considerations
When you replace the bank for all payments, replace a bank with another bank, or replace the bank for payments with a particular currency, you can specify the payment method for the payments drawn on the replacement bank account. If the original and replacement payment methods are one of the following, then Pay Cycle applies the replacement payment method to the payments:
System check.
Electronic funds transfer (EFT).
Giro electronic funds transfer (Giro EFT).
Automated Clearing House (ACH).
Wire.
Scheduled payments with a payment method other than these four will not be assigned a replacement payment method, but will keep the original payment method, regardless of the replacement payment method indicated in the bank replacement rule. For example, if the payment method for a voucher is Draft-Customer EFT and the bank rule specifies a replacement payment method of EFT, the pay cycle still generates a Draft-Customer EFT payment for that voucher, even if the bank account is slated for replacement. If the replacement bank does not support the original payment method in these cases, then the payment generates a bank replacement exception.
If the replacement payment method is EFT, ACH, or Giro EFT and the original payment method on a voucher is System Check, then the Payment Selection subprocess validates that a remit-to bank account exists and routing information is set up for the remit to vendor for the voucher. If not, the payment generates a bank replacement exception.
Note. The Pay Cycle process does not recalculate payment dates when payment methods are replaced. The original scheduled payment date remains the payment date, regardless of any new payment method.
If the default currency for an original bank account is different from that of the replacement bank account, then the Pay Cycle process converts the original currency into the replacement bank account's default currency when it is comparing payment amounts to bank account maximum amounts. The exchange rate is based on the payment date.
If a replacement bank does not have a valid payment currency, the Pay Cycle process drops the payment and generates a bank replacement exception.
Any voucher payments that fail bank replacement processing during pay cycle processing are logged on the Bank Replacement Exceptions page. These vouchers return to their original state, with their original bank account, payment methods, and payment currency intact, waiting to be run in the next pay cycle.
When processing pay cycles through the PeopleSoft Financial Gateway functionality, the system verifies that a payment's layout code is valid for the replacement bank. If the layout code is not valid, the system logs a bank replacement exception. You can resolve or avoid exceptions in the following way:
To resolve these exception types, add the appropriate layout code to the replacement bank external account definition (on the External Accounts – Payment Methods page). Then rerun the Pay Cycle process.
To avoid these exception types, confirm that the origin bank and the replacement bank are defined with the appropriate layouts before processing pay cycles.
See Also
Viewing Bank Replacement Exceptions
PrerequisitesTo use the Replace by Individual Payment Limit and Replace by Bank Maximum Limit options, you must define individual payment limits and bank account maximums in the PayCycle Amount Limits group box on the External Accounts - Account Information page when you set up bank accounts.
See Also
Page Used to Define Bank Replacement Rules|
Page Name |
Definition Name |
Navigation |
Usage |
|
BANK_RPL_RULE_DEFN |
Set Up Financials/Supply Chain, Product Related, Procurement Options, Payments, Define Bank Replacement Rules, Bank Replacement Rule |
Define bank replacement rules. |
Defining Bank Replacement Rules
Access the Bank Replacement Rule page (Set Up Financials/Supply Chain, Product Related, Procurement Options, Payments, Define Bank Replacement Rules, Bank Replacement Rule).
Use the Select check box to select the bank replacement options that you want to include in the bank replacement rule.
Replace All Payments
|
Bank SetID, Bank Code, and Bank Account |
Enter the identifying information for the bank account from which you want to pay all payments in the pay cycle. This bank account will replace all original bank accounts for the payments selected to run in the pay cycle. |
|
Pay Method |
(Optional) Select a replacement payment method. Available payment methods include:
This payment method will replace the original payment method on all payments selected for the pay cycle, as long as the original payment method is System Check, EFT, ACH, or Giro-EFT. Payments with any other original payment method specified will still be paid in that original payment method. If you do not specify a payment method, the payments will be made using the payment method specified on the voucher. Note. If the payment will be made using the original payment method, and that payment method is not available for the replacement bank, the system will generate a bank replacement exception and the payment will be dropped from the pay cycle. |
|
Currency |
(Optional) Specify a replacement currency. This currency will replace the original currencies specified on all payments selected for the pay cycle. The currency conversion uses the payment date to determine the exchange rate. If you do not specify a currency, the payments will be made in the currency specified on the voucher. Note. If you do not specify a replacement currency and the currency on the voucher is not valid for the replacement bank, the system will generate a bank replacement exception and the payment will be dropped from the pay cycle. |
Note. You cannot select any other replacement options when you select Replace All Payments.
Replace Bank with Another Bank
Select to have all payments from a specified bank account (and optionally, payment method) paid from a replacement bank account (and optionally, payment method).
In the Replace row, enter the identifying information for the original bank account that you want to replace. Do the same in the With row for the replacement bank account.
The bank setID, bank code, and bank account are required, but the payment method is optional. If you opt to replace the payment method, the same conditions apply as when you specify a replacement payment method for the Replace All Payments option.
Note. The replacement bank account must support the currencies supported by the original bank account. If the original currency on a voucher is not valid for the replacement bank, the system generates a bank replacement exception and the payment is dropped from the pay cycle.
Replace by Currency
Select to have all payments in a specified currency paid from a replacement bank account.
Enter the currency and the identifying information for the replacement bank account. Payment method is optional, and if you opt to replace the payment method, the same conditions apply as when you specify a replacement payment method for the Replace All Payments option.
Note. The currency must be valid for the replacement bank account.
Replace by Individual Payment Limit
Select to assign an alternate bank account to any individual payment that exceeds a monetary amount limit that is predefined for the original bank account.
Enter the identifying information for the original bank account in the Replace row, and enter the identifying information for the replacement bank account in the With row.
Note. You set up the maximum amount for an individual payment from a bank account on the External Accounts - Account Information page.
Replace by Bank Maximum Limit
Select to assign an alternate bank account to any payments that remain after the monetary total of accumulated payments from a single bank account exceeds a defined monetary limit for that bank account.
Enter the identifying information for the original bank account in the Replace row, and enter the identifying information for the replacement bank accounts in the With grid. You can enter multiple replacement bank accounts for each original bank account that you specify. The Pay Cycle process assigns payments to each replacement bank account in the order that you add them to the grid, moving on to the next replacement bank account when an earlier bank account in the order has reached its maximum payment limit.
When you save or refresh the page, the Priority field is populated with a number indicating the processing order. The first row has priority 1, the second has priority 2, and so forth.
See Also
Understanding Bank Replacement Processing
Creating, Updating, and Reusing Pay Cycles
Use the Payment Selection Criteria component (PYCYCL_DEFN) to define pay cycles.
This section provides an overview of pay cycle definition, lists prerequisites, and discusses how to:
Define pay cycle date criteria.
Set pay cycle preferences.
Specify source criteria.
Specify bank and payment methods criteria.
Specify pay group and netting criteria.
Set pay cycle draft options.
Understanding Pay Cycle Definition
This section provides an overview of pay cycle creation and discusses:
Other payment options.
Payment forecasting.
Netting.
Lost discount alert dates.
Pay Cycle Creation
In PeopleSoft Payables, a pay cycle is a set of payment selection criteria that you use to pay groups of vouchers that share certain characteristics. You can run the Pay Cycle process repeatedly, using the same pay cycle criteria to select payments, by updating the date information. Think of a pay cycle as a payment selection criteria template.
For example, you might want to create two types of pay cycles: one for regular vendors, the other for employees set up as vendors. Or you might want to create checks for each of your business units separately. In this case, you could set up a separate pay cycle for each business unit. PeopleSoft Payables creates payments only for the business unit or units specified in the pay cycle. You can also select payments based on bank information, vendor pay groups, or payment method.
Your pay cycle definition controls the scheduled payments that are eligible for payment in each cycle. Each individual voucher scheduled for payment within the cycle contains information that ultimately determines its selection. To create or update a pay cycle, you use the Payment Selection Criteria component. Each page of the Payment Selection Criteria component defines different aspects of the payment selection cycle.
Other Payment Options
After you have gone through the payment processing routine a few times, you will find that it runs easily. However, occasionally you might have payments that need to be paid outside of the regular payment processing routine. You can use the manual Payment Creation process or express payments to create manual payments, or you can create record-only payments on the Voucher - Payments page.
See Using Additional Payment Processing Options.
To see the expected cash requirements for upcoming payment cycles, go to the Forecast by Bank Account page. You can also see the different time intervals for payments on the Forecast Cycle page. You can run the Payment Forecast report (APY2040), which enables you to see your cash requirements by business unit, vendor, bank, or payment method.
See Forecasting Payments.
When you create a pay cycle, you can specify to use the netting process to offset accounts receivable and accounts payable transactions for a customer who is also a vendor. Netting decreases the number of transactions between you and your customer or vendor and, by reducing banking fees, saves you business costs. The Netting Bank is a virtual bank account, meaning that no funds are actually paid into or out of the netting account. It is debited and credited by the netted amount of the accounts payable and accounts receivable transactions.
For example, suppose that you are both a customer and vendor to company A and that you set up a contractual netting relationship. You agree on certain intervals to conduct netting and zero out your respective accounts. At netting closing time, you might have the following transactions:
|
Accounts Payable Transactions (in USD) |
Accounts Receivable Transactions (in USD) |
|
100.00 |
150.00 |
|
200.00 |
50.00 |
|
Total: 300.00 |
Total: 200.00 |
|
<200.00> |
None |
|
Net: 100.00 |
None |
Instead of performing three accounts payable transactions and two accounts receivable transactions after the netting closing process, you pay a single outstanding payment of 100.00 USD to balance your account. In this example, the books for both you and company A mirror each other.
Netting closing can be run manually from the Manual Select Netting component (NET_MANUAL_SELECT), or it can be run automatically during Pay Cycle. You specify the automatic netting parameters in the Automatic Netting Selection component (NET_AUTO_SELECTION).
Enter the netting reference ID to specify which vendor accounts to run the netting process on. The system creates the netting reference ID when you define your PeopleSoft Payables netting relationship with your vendor. The netting reference ID is a unique identifier that contains information such as the netting date, status, bank, and settlement information.
The Netting Closing Application Engine processes (TR_NET_CLOSE and TR_NET_ARCLS), which are launched by the Pay Cycle process, base the settlement on information contained in the netting contract, maintained in PeopleSoft Cash Management. All balanced payments go through the normal Payment Selection process and are consolidated as a single payment. The netting payment currency and rate are automatically set to match the transaction currency and rate type.
Important! You must have PeopleSoft Cash Management and Receivables installed to use the netting functionality. However, if your organization is not using the PeopleSoft Payables netting functionality, you generally do not need PeopleSoft Cash Management installed on your system. Confirm that your implementation does not need PeopleSoft Cash Management installed, and then disable it on the Installed Products page. Disabling products that you do not have installed on the system improves performance.
Note. You can exclude certain vouchers from netting by setting up netting exclusion rules on the Netting Exclusion Parameters page in PeopleSoft Cash Management. The parameters that can determine exclusion include vendor ID, vendor location, vendor classification, and ChartField value.
See Managing Bilateral Netting.
When you create a pay cycle, you can use the Include Lost Discounts option on the Payment Selection Criteria - Preferences page to elect to include in the current pay cycle any payments that would potentially lose discounts if paid in the next pay cycle. If you do not select the Include Lost Discounts option, the system alerts you to lost discounts using the Lost Discount Alert page when you run the pay cycle, after you run Payment Selection. You can use the Lost Discount Alert page only if you run Payment Selection and Payment Creation separately. Using the Lost Discount Alert page, you can manually include payments with potential lost discounts in the pay cycle before you run Payment Creation. Selecting the Include Lost Discounts option, however, is the only way to include payments with potential lost discounts in a pay cycle if you run Payment Selection and Payment Creation together.
The system calculates whether a discount was potentially lost by comparing the discount terms on the voucher to the next payment through date (the last scheduled payment date that will be included in the next pay cycle) and next payment date (the actual payment date that will be recorded for the payments made in the next pay cycle) that you enter on the Payment Selection Criteria - Dates page. If the following criteria are met for a voucher, then the system includes the payment in the current pay cycle (if you selected the Include Lost Discounts check box) or lists it on the Lost Discount Alerts page (if you didn't select Include Lost Discounts and you run Payment Selection separately from Payment Creation):
The payment due date on a voucher is greater than the pay through date for the current pay cycle, and indicates that it should be included in a later pay cycle.
The discount terms on the voucher are such that the discount due date is earlier than the next payment due date, and thus a payment made in the next pay cycle would cause a lost discount.
The potential lost discount outweighs the potential interest earned on the payment amount if the payment is paid on the due date rather than the discount due date.
You set up discount evaluation criteria, including interest percentage, when you set up bank accounts.
If you lose discounts by not selecting Include Lost Discounts and not manually including payments with potential lost discounts in the pay cycle after running Payment Selection separately, the lost discounts are reported on the Discounts Denied page.
Note. Rebate terms on a voucher are evaluated in the same way as discount terms. However, vouchers that would lose rebates if they aren't paid in the current pay cycle (and pass the interest amount versus rebate amount evaluation) are always automatically taken during Pay Cycle processing, irrespective of whether you select Include Lost Discounts. Rebates are not tracked and don't appear on the Lost Discount Alert page.
The following example illustrates how the system handles potential lost discounts:
Suppose that a voucher has a discount due date of March 21. The pay cycle has a pay through date of March 15 and a pay date of March 18. The following pay cycle has a pay through date of March 31 with a pay date of April 15.
If you selected the Include Lost Discount option, the system automatically includes the item for payment in the current pay cycle.
If you deselected the Include Lost Discount option, the system alerts you on the Lost Discount Alerts page that you have a potential lost discount.
See Also
Understanding Pay Cycle Alerts
Prerequisites
Before you can create pay cycles using the Payment Selection Criteria component, you must:
Set up banks and bank accounts.
(Optional) Define bank replacement rules.
(Optional) Set up vendor pay groups.
(Optional) Set up netting reference codes and exclusion parameters.
(Optional) Tailor your pay cycle definition.
Before you use a pay cycle, you must complete all PeopleSoft Payables setup and create vouchers with scheduled payments or define payment sources for the PeopleSoft Payables payment interface.
See Also
PeopleSoft Banks Setup and Processing 9.1 PeopleBook
Defining Bank Replacement Rules
Defining Vendor Pay Group Codes
Pages Used to Create, Update, and Reuse Pay Cycles|
Page Name |
Definition Name |
Navigation |
Usage |
|
PYCYCL_DEFN_DT |
Accounts Payable, Payments, Pay Cycle Processing, Payment Selection Criteria, Dates |
Define pay cycle dates. |
|
|
PYCYCL_DEFN_OPT |
Accounts Payable, Payments, Pay Cycle Processing, Payment Selection Criteria, Preferences |
Set pay cycle general options. |
|
|
PYCYCL_DEFN_SRC |
Accounts Payable, Payments, Pay Cycle Processing, Payment Selection Criteria, Source/BU |
Define the pay cycle by source transaction and business unit. |
|
|
PYCYCL_DEFN_BNK |
Accounts Payable, Payments, Pay Cycle Processing, Payment Selection Criteria, Bank/Method |
Specify bank information and payment methods. |
|
|
PYCYCL_DEFN_PYGRP |
Accounts Payable, Payments, Pay Cycle Processing, Payment Selection Criteria, Pay Group/Netting |
Specify pay groups to include in the pay cycle and netting reference codes to use in performing payables/receivables netting. Specifying pay groups restricts the selection of payments to the pay group specified. The fields on this page are available for entry only if you select Use Vendor Pay Groups or specify a netting option of S on the Preferences page. |
|
|
PYCYCL_DFT_OPT |
Accounts Payable, Payments, Pay Cycle Processing, Payment Selection Criteria, Draft Options |
Set Draft rounding and optimization options. |
Defining Pay Cycle Date Criteria
Access the Payment Selection Criteria - Dates page (Accounts Payable, Payments, Pay Cycle Processing, Payment Selection Criteria, Dates).
|
Pay Cycle |
Enter a description for the pay cycle. |
|
Go To Pay Cycle Manger |
Click to save the pay cycle and open the Pay Cycle Manager, where you initiate and control processing for the pay cycle. |
|
Pay From Date |
Enter the beginning date of the pay cycle. The system compares this date to the scheduled pay date for the voucher payment schedule. If the scheduled pay date is equal to or greater than the pay from date, the voucher payment schedule can be paid in the current pay cycle if the schedule meets the other payment selection criteria. |
|
Pay Through Date |
Enter the ending date of the pay cycle. The system compares this date to the scheduled pay date for the voucher payment schedule. If the scheduled pay date is on or before the pay through date, the voucher payment schedule can be paid in the current pay cycle if the schedule meets the other payment selection criteria. |
|
Payment Date |
Enter the payment date. The system tags all payments created in the pay cycle with this date and prints it on checks or shows it on other payment methods. It can differ from the pay through date. The scheduled pay date has to be between the pay from date and the pay through date so that it is included in the pay cycle. |
|
Next Pay Through Date |
Enter the estimated end date for the next pay cycle payment period. This estimate is used to help determine whether discounts will be lost if a payment is made in the next pay cycle. |
|
Next Payment Date |
Enter the estimated payment date for the next scheduled pay cycle. This estimate is used to help determine whether discounts will be lost if a payment is made in the next pay cycle. |
|
Change Selection Dates |
Change the specified payment dates by Day(s), Month(s) or Week(s). Click Increment to advance all dates by that amount, or click Decrement to decrease all dates by that amount. |
Accounting Date and Withholding Date
|
Accounting Date |
Determines the fiscal year and period to which the payment accounting entries are posted. Three options are available for the date that the system uses as the accounting date for the payments created in the pay cycle: Current: The current date. Payment: The value in the Payment Date field. Specific: The specific value that you enter. When you select this option, the date field next to the Accounting Date field is activated. Enter the specific date in the date field. |
|
Enter the date that determines the reporting period in which a withholding amount is reported for a vendor. Three options are available for the date that the system uses as the withholding date for withholdings associated with payments created in the pay cycle: Current: The current date. Payment: The value in the Payment Date field. Specific: The specific value that you enter. When you select this option, the date field next to the Withholding Date field is activated. Enter the specific date in the date field. For example, you could be running a pay cycle for December 31 but actually want the withholdings to be reported for the following year. To accomplish this, you would specify January 1 as the Withholding Date and the withholdings would be declared the following year. This date is also used on period-based withholdings to determine which period is going to be used to properly calculate withholdings. |
Business calendars enable you to verify that transaction processing dates are valid working days. The business calendar is used throughout PeopleSoft applications to define nonworking days and holidays.
Select from the following options:
|
No Validation |
Select when no holidays or weekends are considered when determining payment and discount due dates. |
|
Use Standard Week |
Select to use business days from Monday through Friday to determine valid payment dates. You can select Validate Pay Through Dates and Validate Payment Dates if you select this option. |
|
Use Holiday Calendar |
Select to use both business days and holidays to determine valid discount and payment dates. If you select this option, you must select an appropriate holiday business calendar from the Holiday List ID field. You can select Validate Pay Through Dates and Validate Payment Dates if you select this option. |
|
Validate Pay Through Dates |
Select to validate the pay through date that you enter, ensuring that the date falls on a valid business day. |
|
Validate Payment Dates |
Select to validate the payment date that you enter, ensuring that the date falls on a valid business day. |
See Also
Running and Managing Pay Cycles
Setting Pay Cycle Preferences
Access the Payment Selection Criteria - Preferences page (Accounts Payable, Payments, Pay Cycle Processing, Payment Selection Criteria, Preferences).
|
Use Vendor Pay Group |
Select to include vendor pay group information as part of your pay cycle selection criteria. Selecting this check box makes the vendor pay group information available for entry on the Pay Group/Netting page. The fields on the Pay Group/Netting page are not enabled unless you select this check box. Also, if you deselect this check box after specifying vendor pay groups, the system does not select the pay groups, even if you have pay groups defined for the pay cycle. Note. The Pay Cycle process uses vendor pay groups as selection criteria only for vouchers that were entered through PeopleSoft Payables. The Pay Cycle process ignores any vendor pay group selection criteria when selecting payments from non-PeopleSoft Payables sources that are integrated through the PeopleSoft Payables Payment Interface, such as PeopleSoft Expenses. |
|
Process EFT/ACH Pre-Note (process electronic funds transfer/automated clearing house prenote) |
Select to include any EFT or ACH prenotes in this pay cycle. Note. The system generates prenotes only if there is a payment selected in the pay cycle. To avoid generating prenotes for a bank that may not be set up for EFT or ACH and also does not have any EFT or ACH vouchers in that pay cycle, the system creates prenotes for all of the vendors from the first bank that the pay cycle processes that has an EFT or ACH payment created. If there are no EFT or ACH vouchers in the pay cycle, the prenotes will be created for the first bank that the pay cycle processes. In addition, the system generates a prenote only if the remit location for the vendor is the same as its main vendor location. |
|
Print LC Advice (print letter-of-credit advice) |
Select to enable a process that prints advices for letter-of-credit payments. |
|
Automatic Increment Dates |
Select to enable a process that automatically advances the Pay From Date, Pay Through Date, Payment Date, Next Pay Through Date, and Next Payment Date fields on the Dates page. The new dates are validated, based upon the calendar and validation options set on the Dates page. Pay through dates automatically advance, taking into account non-work days (holidays, weekends) when such days immediately follow the calculated pay through date. The next pay cycle run date advances to the next working day. The increment is controlled on the Dates page and may be any number of days, weeks, or months. |
|
Email Payment Advice |
Select to enable the system to send an email payment advice to vendors that have this option enabled. |
|
Financial Sanctions list edit |
Select to validate the vendors against financial sanctions lists (for example, the Specially Designated Nationals (SDN) list) during the Payment Selection process of the pay cycle. If financial sanctions validation is enabled at the installation level, all remit vendors selected for this pay cycle are validated. If financial sanctions validation is enabled at the bank level, only selected remit vendors whose banks are enabled for financial sanctions validation are validated. The system updates the vendor's financial sanctions status on the Vendor Information component (VNDR_ID). If you do not select this option, the system does not validate the vendors during the Payment Selection process, but uses the existing financial sanctions status to determine whether the vendor is selected for payment. The system does not select payments for a vendor with a financial sanctions status of Blocked. The system also does not select payments for a vendor with a financial sanctions status of Review unless financial sanctions validation is enabled at the bank level and that vendor's bank does not require financial sanctions validation. If the system validates the vendors during the Payment Selection process and the vendor's financial sanctions status changes to Review, the system creates payment validation errors for this vendor's payments. You can view these payment validation errors on the Pay Cycle Financial Sanction Warnings page. Note. Financial sanctions validation is performed only on remit vendors with a source transaction of VCHR (Accounts Payable transactions). |
|
(USF) Workflow Certification |
For U.S. federal agencies only. Select to enable workflow notification of payment schedules requiring certification. Select Certifier as the approval option and enter the user ID of the certifier. |
|
Include Lost Discount |
Select to process scheduled payments automatically if you will earn a discount for the payment in the current pay cycle but might lose it if the payment is processed in the next pay cycle, as indicated by the next pay through date and the next payment date specified on the Dates page. |
|
Process Bank Charges |
If this option is selected, the system calculates the actual payment amount by deducting the bank transfer charge from the payment amount when the charge is to be paid by the vendor. The operation takes place during the Pay Cycle process and only applies to EFT payments. |
|
Calculate Value Date |
Select to enable value dates. You can choose to select a date a few days before or after the actual transfer date to make funds available. The date on which funds are available (either as a deposit or a settlement) is known as the value date of a transaction. Banks negotiate the value date to be a specified number of days before or after the business date of a transaction. For payments or settlements, set the value date to a specified number of days before the business date. This means that the check must clear the bank prior to settling with the individual beneficiary. For deposits, set the value date to a specified number of days after the business date. This is similar to the concept of float used in the United States. The decisions that you make about value dates, coupled with holiday options, influence your cash flow. You set up value date calculation for bank accounts on the External Accounts - Payment Methods page. |
|
Use Recipient's Pref. Lang. |
Sends payments in the vendor's preferred language. If it is not selected, the payments are sent in the language selected in the Preferred Language field in this pay cycle. |
|
Suppress Zero Amount Check (use recipient's preferred language) |
Select to process zero-amount checks without attaching a payment reference ID (check number). Note. The payment will have a payment ID (system identifier) associated with it. |
|
Report Output |
Select the format you want to use when printing checks. Options are Crystal Check, Crystal and BI Publisher, or BI Publisher. Crystal Check is the default value. |
|
Preferred Language |
Select the language to use when printing checks. When printing checks from pay cycle, the system will use the language selected here even if the Use Recipient's Pref. Lang. field is selected. |
|
Approval |
Identify whether approvals are necessary and if so, by whom, the User or Certifier. Values are Certifier, None, or User. Selecting Certifier or User makes the pay cycle remain in unapproved status until the pay cycle is approved on the Pay Cycle Approval page. If you do not select this option, the pay cycle advances to Approved status without requiring approval. The Certifier option is for U.S. federal agencies only. Note. Payments for pay cycles with User as the approval option selected are not eligible for posting until the pay cycle has been approved. |
|
(USF) Certifier |
Designate a user to certify payment schedules. This field appears only if you enable federal payment schedules on the installment options. Note. The certifier cannot be the same user as the initiator of the pay cycle. |
|
Enables you to include the Payables and Receivables Netting Closing processes in this pay cycle. Values are: N: Not Applicable. The netting close processes don't run. A: Process All Netting IDs. The netting close processes run for all vendors and customers. S: Specify Netting ID. Runs the netting close processes based on the netting ID that you specify on the Pay Group/Netting page. Selecting this option activates the fields in the Netting Group group box on the Pay Group/Netting page. |
|
|
Step Group |
Select which group of steps to use for this pay cycle. You must define these groups beforehand on the Pay Cycle Step Table page. Note. Oracle supplies a standard step group, or you can create your own pay cycle step group. |
Credit Options
Define processing options for credit vouchers.
|
Select from the following values:
|
|
|
Date Limit |
Select from the following values: No Date Limit: The system applies all outstanding credit vouchers, regardless of date. Pay Cycle Selection Dates: Limits the search for credit vouchers to the pay cycle dates. |
|
Payment Error User ID |
Enter the user ID that the system uses to route PeopleSoft Financial Gateway payment errors email notification. This field is part of the PeopleSoft Financial Gateway integration functionality. If the PeopleSoft Financial Gateway encounters errors when processing payments, defined users receive an email containing payment error summary information and a link to the Pay Cycle Errors page. Note. To select a user ID here, you must first enter a valid email address on the User Preferences - PayCycle page. |
|
Payment Advice User ID |
When the user selects the Email Payment Advice option, the current user ID will be entered by default into this field; you can select a different user ID, if necessary. |
See Setting Up the PeopleSoft Financial Gateway Integration.
|
SetID |
Select a bank replacement setID for this pay cycle. |
|
Rule Name |
Select a bank replacement rule name for this pay cycle. Bank replacement rules identify alternate bank accounts to replace the bank account specified on the voucher. They also identify the criteria that must be met for bank replacement to occur. You define bank replacement rules on the Bank Replacement Rules page. Note. If financial sanctions are enabled at the bank level, you could replace a bank that does not require financial sanctions validation with one that does require it. Because bank replacement occurs after the Payment Selection process, the system could select payments for vendors that were not validated, even though the replacement bank does require financial sanctions validation. If you are using bank replacement processing, and you enable financial sanctions at the bank level, you should run the Financial Sanctions Validation process prior to running the Pay Cycle process. |
See Also
Defining Bank Replacement Rules
Setting Up Payment Formats and Payment Forms
Specifying Source Criteria
Access the Source / BU page (Accounts Payable, Payments, Pay Cycle Processing, Payment Selection Criteria, Source/BU).
The source transactions define the types of payments processed in a pay cycle. You set up new or review delivered source transaction definitions on the Payment Source and Payment Source Search Definition pages, and source transaction mapping detail on the Pay Cycle Mapping and Pay Cycle Mapping Detail pages. If you set up a new payment source, you must map it to the payables payment tables using the mapping pages.
Select or deselect each source transaction by selecting or deselecting the Process check box next to the appropriate source transaction. These are the delivered values:
|
EXAD |
Employee Advances Definition. |
|
EXPN |
Employee Expense Sheet Definition. |
|
TR |
Treasury Settlement Payments. |
|
TRET |
Treasury EFT Settlement Payments. |
|
VCHR |
Accounts Payable Vouchers. |
Note. You must select a least one source. At a minimum, you should select the Accounts Payable Vouchers source transaction.
Note. If you create a new payment source, you must map it in the Pay Cycle Mapping component.
You can select multiple business units. For example, your regular pay cycle can include all business units. Select the Process check box for each business unit that you want to include during the pay cycle to narrow the selection criteria. Only vouchers for the business units that you specify are included in the pay cycle. The system uses the vendor and voucher information at the business unit level unless you override that information. If you do not want to process a particular business unit during a specific run of the Pay Cycle process, deselect the Process check box for that business unit.
Note. You must select at least one business unit for the pay cycle to create any payments.
See Also
Configuring the PeopleSoft Payables Payment Interface
Specifying Bank and Payment Methods Criteria
Access the Bank / Method page (Accounts Payable, Payments, Pay Cycle Processing, Payment Selection Criteria, Bank/Method).
Enter banks and bank accounts from which to draw payments in the pay cycle. Every voucher that has a scheduled payment from a bank, bank account, and payment method that matches the ones you specify here becomes eligible for payment in this pay cycle. You can enter multiple banks and accounts.
Note. You can specify replacement bank accounts for a pay cycle if a voucher or set of vouchers meet certain criteria by selecting a bank replacement rule on the Payment Selection Criteria - Preferences page. You set up bank replacement rules on the Bank Replacement Rules page.
|
Process |
Selects vouchers with scheduled payments drawn on the specified bank account for pay cycle processing. |
|
Currency |
Shows the default currency for the bank account. |
If the payment method for a voucher's scheduled payments is the same as the pay cycle payment method, the voucher is a candidate for selection. For each bank account, you can specify multiple payment methods. Specify the payment methods to be processed during the pay cycle by selecting the Process check box next to the appropriate payment method. These are the available payment method values:
|
Automated Clearing House |
The Pay Cycle process creates an electronic file containing the required clearinghouse information. You send all applicable payments in one file to a clearinghouse. The clearinghouse then sends the payments to your vendor's bank. |
|
Draft-Customer EFT (draft-customer electronic funds transfer) |
The Pay Cycle process creates an EFT file instead of printed drafts. You send the file to your bank when the draft payment is due. |
|
Draft-Customer Initiated |
The Pay Cycle process creates customer-initiated draft payments before the draft due date that details the draft identification number, the draft amount, and the draft maturity date. You send the draft to your vendor. |
|
Electronic Funds Transfer |
The Pay Cycle process creates an electronic file containing the required bank and payment information. You send all applicable payments in one file to your bank for payment. The bank sends the payments to your vendor's bank. |
|
Giro-EFT |
The Pay Cycle process collects all EFT Giro transactions and creates an output data file containing the payment information. You send the output data file to the bank electronically or on taped media. This payment method is primarily used in Singapore. |
|
Letter of Credit |
The Pay Cycle process groups all vouchers that have the same letter of credit ID into a single payment. Only those payments for which you have selected the L/C Advice option on the Preference page have a printed letter of credit advice. |
|
System Check |
The system checks are scheduled payments that require a printed paper check and remittance advice. At voucher entry, indicate that the payment is a system check. When you run the Pay Cycle process, it creates system checks. |
|
Wire Transfer |
During the Pay Cycle process, the Wire Transfer payment method generates a remittance advice for paying by wire. |
See Also
Defining Bank Replacement Rules
Setting Up Payment Formats and Payment Forms
Setting Up External, Internal, and Netting Accounts
Specifying Pay Group and Netting Criteria
Access the Pay Group / Netting page (Accounts Payable, Payments, Pay Cycle Processing, Payment Selection Criteria, Pay Group/Netting).
You must select the Use Vendor Pay Group check box or enter a netting option on the Preferences page to enter values on this page.
Pay Group
Enter the setID and pay group code for each pay group that you want to process. Select or deselect the Process check box, depending on whether you want to include the pay group in the current cycle. If you have pay groups selected, only scheduled payments that contain one of the selected pay groups are paid. Use the row insert function to add more pay groups to the pay cycle.
Note. If you deselect the Use Vendor Pay Group option on the Preferences page for a pay cycle, any information that you enter in this grid will not apply as payment selection criteria for that pay cycle.
Note. The Pay Cycle process uses vendor pay groups as selection criteria only for vouchers that were input through PeopleSoft Payables. The Pay Cycle process ignores any vendor pay group selection criteria when selecting payments from non-PeopleSoft Payables sources that are integrated through the PeopleSoft Payables Payment Interface, such as PeopleSoft Expenses.
For each qualified netting reference ID, the Pay Cycle process processes netting closing for both accounts payable and accounts receivable transactions. Select the Process option to indicate that the Pay Cycle process needs to run the Netting Closing processes. During the Pay Cycle process, the Payables Netting Closing process starts and selects those vouchers that fall within the netting date range with a netting status of A (approved). The system then launches the Receivables Netting Closing process. After processing the PeopleSoft Receivables transactions, the process returns to the Payables netting process, which updates the netting status to C (closed).
See Also
Understanding Pay Cycle Definition
Defining Vendor Pay Group Codes
Setting Pay Cycle Draft Options
Access the Draft Options page (Accounts Payable, Payments, Pay Cycle Processing, Payment Selection Criteria, Draft Options).
Draft optimization, or stamp tax minimization, in PeopleSoft Payables is primarily applied to Japanese domestic drafts that are created during the customer-initiated Draft Staging Application Engine process (AP_DFT_PROC). Draft rounding enables you to control at what point a draft is issued for payment and what alternate payment method is used for those payments that do not meet your specifications.
|
Process Optimization |
Select to enable draft optimization processing for the pay cycle. |
|
Max # of Drafts |
If you selected Process Optimization, you can either leave this blank to have the system use the default specified at the vendor, or you can specify the maximum number of drafts that are created during the pay cycle by entering a value in this field. Note. At the vendor level, you can either specify a maximum number of drafts or select the Pay Cycle Default value. If you select Pay Cycle Default for a vendor, then Pay Cycle processing uses the value of the maximum number of drafts that you enter here. If you enter a maximum number of drafts for the vendor and leave the Max # of Drafts field blank on this page, then Pay Cycle processing uses the number for the vendor. |
|
Process Draft Rounding |
Select to enable draft rounding for the pay cycle. |
|
Rounding Position |
If you selected Process Draft Rounding, you can either leave this blank to have the system use the default specified at the vendor, or specify the rounding position used during the pay cycle by entering a value in this field. The rounding position rounds the draft payment amount down to the whole value that you set. For example, if you enter 4, then the draft payment must be equal to or greater than 1,000 before a draft is created. All amounts above 1,000 are rounded down to the nearest 1,000, and the remaining amount is handled according to the remaining amount action that you specify. Note. At the vendor level, you can either specify a rounding position or select the Pay Cycle Default value. If you select Pay Cycle Default for a vendor, then Pay Cycle processing uses the value of rounding position that you enter here. If you enter a rounding position value for the vendor and leave the Rounding Position field blank on this page, then Pay Cycle processing uses the rounding position value for the vendor. |
|
Remaining Amount Action |
Specifies the handling of the remaining draft amount after draft rounding is complete. These are the available values: Alternate Pay Mthd (alternate pay method): You use the Payment Method field to specify by what payment method the remaining draft amount is paid. Do not issue Draft: Holds the remaining draft amount and adds it to the next draft payment. A draft payment for the remaining amount is not issued. Because the remaining draft amount is not paid on this pay cycle, it is available for payment in the next pay cycle, provided that the selection criteria are met. |
|
Payment Method |
Select the payment methods by which the amount left after rounding calculation is paid. You can select a payment method only if you specify Alternate Pay Mthd in the Remaining Amount Action field. |
|
Preapprove |
Creates draft payments with a status of Approved. If this check box is deselected, draft payments are created with a status of Created. If the status is Created, then you must either manually approve drafts on the Draft Approval page or run the Draft Recon and Approval (draft reconciliation and approval) process. Depending on the Payables Definition setup, a status of Approved may be required before accounting entries can be generated in the Payment Posting process. |
See Also
Establishing Additional Payment Processing Options
Configuring Pay Cycles for PeopleSoft Financial Gateway Processing
Use the following components to set up your pay cycles for PeopleSoft Financial Gateway processing:
Pay Cycle Step Definition (PYCYCL_STEP_DFN).
Pay Cycle Map Definition (PYCYCL_MAP_DEFN).
This section provides an overview of pay cycle for PeopleSoft Financial Gateway processing and discusses how to define PeopleSoft Financial Gateway mapping details.
Understanding Pay Cycle and PeopleSoft Financial Gateway IntegrationDuring pay cycle processing, PeopleSoft Payables communicates with the PeopleSoft Financial Gateway to process the specific payments marked for PeopleSoft Financial Gateway processing. However, you must first configure the pay cycle functionality to enable this process.
To enable pay cycles for PeopleSoft Financial Gateway functionality, you:
Access the Source Registration page in the PeopleSoft Financial Gateway functionality.
Enter Payables (AP) as source system, and verify that the correct setup appears (such as dispatch status and last payment number). If you want the PeopleSoft Financial Gateway functionality to handle expense payments, you must also verify the Expense (EX) source system.
Access the External Bank Account page, and define the Settle By and Layout code for a bank account's electronic payment method.
(Optional) Set up the EFT vendor with the correct default EFT layout.
Enter a voucher with an EFT scheduled payment, and ensure that the PeopleSoft Financial Gateway functionality settles the scheduled payment.
(Optional) On the Payment Selection Criteria page, specify an user ID for payment error notification.
A valid email address is required in the User Preferences - PayCycle page.
Run the Pay Cycle process to verify that the configuration works properly.
See Also
Pay Cycle Processing Using the PeopleSoft Financial Gateway
Working with Payments in Financial Gateway
Pages Used to Configure Pay Cycles for PeopleSoft Financial Gateway
Processing|
Page Name |
Definition Name |
Navigation |
Usage |
|
PYCYCL_STEP_DFN |
Accounts Payable, Payments, Pay Cycle Definition, Step, Pay Cycle Step Definition |
Update or add process steps to a pay cycle. |
|
|
PYCYCL_MAP_DTL |
Accounts Payable, Payments, Pay Cycle Definition, Mapping, Mapping Detail |
Specify the mapping of the fields in the staging table to the corresponding fields in the Payables PS_PYCYCL_DATA table. |
Defining PeopleSoft Financial Gateway Mapping Details
Access the Mapping Detail page (Accounts Payable, Payments, Pay Cycle Definition, Mapping, Mapping Detail).
Oracle delivers the pay cycle data elements EFT_LAYOUT_CD and STL_THROUGH. Ensure that the following information appears for these elements on the Accounts Payable Vouchers (VCHR) map:
|
Pay Cycle Data Element |
Mapping Action |
Input Map Type |
Input Fieldname |
Constant Type |
|
EFT_LAYOUT_CD |
Input |
Field |
EFT_LAYOUT_CD |
Character |
|
STL_THROUGH |
Input |
Field |
STL_THROUGH |
Character |
See Also
Setting Up the PeopleSoft Payables Payment Interface