 Understanding Interim and Year End Closing
This chapter provides an overview of interim and year end closing and discusses how to:
Perform interim closing.
Perform year end closing.
Define closing rules.
Define closing process groups.
Run the Close Application Engine process (GLPCLOSE).
Process an undo close.
Produce interim and year end closing reports.
Understanding Interim and Year End Closing
This section discusses:
Interim versus year end closings.
Single versus multiple retained earnings accounts closings.
Closings that use book codes and balance sheet indicators.
Separate debit and credit options for opening and closing periods.
 Interim Versus Year End Closings
Although most companies must close profit and loss accounts to retained earnings only once a year, some companies may close as often as once a day. General Ledger enables you to run closing as frequently as need through interim (net income) closings. The system also provides year end closing on the Account and Alternate Account (statutory) ChartFields.
Interim and year end closings are similar in that they both close profit and loss (P/L) accounts to retained earnings. However, there are differences in the capabilities of each type of closing. This section identifies the differences and similarities of the two types of closings.
This table describes the differences between interim and year end closing:
|
Interim Close |
Year End Close |
|
Enables you to close periods within a fiscal year (for example, daily or monthly) on the Account ChartField. Because the intent of the interim close is to close P/L accounts, it is required that the Account ChartField be included in the CFV set. |
Enables year end close. Closes the year that you specify on the Account ChartField, the Alternate Account ChartField, or both. |
|
Define only one closing rule within a closing process group for processing. |
Enables you to define more than one closing rule within a closing process group for processing year end close. This allows you to create closing accounting entries to accounts besides the customary retained earnings accounts. |
|
Enables you to select some or all P/L accounts to be closed. Note. Because the intent of the interim close is to close P/L accounts, it is required that the Account ChartField be included in the ChartField value set (CFS). |
Unless the Set Default Retained Earnings option is set to Off, all P/L accounts are closed. Note. This option is not available when the Balance Sheet Indictor option is selected. |
|
Does not carry forward closing balances. |
Carries forward closing balances to beginning balances for balance sheet accounts. If closing is not performed for all book codes and balance sheets, closing balances carried forward to beginning balances are balanced for only the set of accounts defined by the closed book codes or the closed balance sheets. |
|
Creates journal entries that you post during or after the closing process. |
Directly updates the ledger. Optionally, creates journal entries for those companies that require journal entries for any transaction that affects ledger balances. |
|
Creates optional offsetting entries into alternative ChartField values. |
Creates offsetting entries into source P/L ChartField values in the ledger. If using interim close with offsetting entries, then you must select the offset to the retained earnings account as the target retained earnings for the year end close. |
|
Closes selected adjustment periods. |
Automatically closes all adjustment periods for the year. |
|
Includes Account in P/L ChartFields. |
Includes Account or Alternate Account in P/L ChartFields. |
Single Versus Multiple Retained Earnings Account Closings
In either interim or year end closings, General Ledger enables you to close P/L to a single retained earnings account or to multiple retained earnings accounts.
Closing to a Single Retained Earnings Account
When you close to a single retained earnings, you can close all P/L accounts to a single retained earnings account. You can also close the P/L accounts to a single retained earnings account and break the amount down by other ChartFields (for example, Project or Department). This flexibility enables you to track profit and loss more effectively.
All closing rules require the Account ChartField, the Alternate Account ChartField, or both. You can close only these ChartFields, or you can combine the Account ChartField with other ChartFields such as Department, Product, or Project ID. For example, if you want to track department-specific retained earnings, you combine the Account ChartField with the department ChartField. During the closing process, the department totals still close to a single retained earnings account, but the system generates separate ledger entries for each department.
Closing to Multiple Retained Earnings Accounts
When you close to multiple retained earnings, you distribute P/L to multiple retained earnings accounts based on appropriate criteria for the business. For example, you might distribute profit and loss based on specific P/L accounts or based on departments. You close a specific group of ChartField values to a single retained earnings account, but you close other specific groups of ChartField values to other single retained earnings accounts. ChartField value sets facilitate this process.
ChartField value sets enable you to define combined ChartField values that the system uses for source data during the General Ledger closing process. For example, you can create one ChartField value set for the income statement accounts used in interim closing and another set to use in year end closing. When you define closing rules for the interim close or the year end close, you select the appropriate ChartFields value sets.
Here is an example of closing to multiple retained earnings accounts. In this example, P/L accounts 41000 − 410010 and 410015 and 410016 close to retained earnings account 360100, and P/L accounts 410020 − 410029 close to retained earnings account 360200:
|
P/L Accounts |
ChartFields Value Set |
Retained Earnings Account |
|
41000 through 410010 |
CFVS 1 |
360100 |
|
410015 410016 |
CFVS 1a |
|
|
410020 through 410029 |
CFVS 2 |
360200 |
You can set up value sets that combine P/L account with the Department ChartField and the Product ChartField, or use whatever combination you need to track profit and loss.
See Also
Defining and Using ChartField Value Sets
Closings With Book Codes and Balance Sheet IndicatorsBook codes are both an account attribute and balancing ChartField. You can use book codes to group Account ChartField values for the recording of transactions under different accounting rules in the same business unit and ledger. For example, you can use book codes to record corporate versus local transactions when different accounting rules apply. In this case, you might create the book codes C, L, and B to classify accounts as corporate (C), local (L), or both (B).
For accounts with book code values that can be overridden, you must select a book code to avoid receiving a warning message. A book code is fixed for an account that cannot be overridden, and the system enters it automatically. If you retain a book code for the offset, you must also retain it for the retained earnings ChartFields, and it must be a book code that can be overridden. For the default retained earnings account, you can select only a book code that can be overridden.
In addition, the PeopleSoft system comes with standard balancing attributes for Account ChartField values to segregate and maintain separate transactions within a business unit and ledger for BS (balance sheet) and OB (off balance sheet) transactions.
Use book code and balance sheet indicators to create subsets or groups of accounts within a ledger that correspond to different accounting rules. When the closing edit is run, the system verifies the values of the book code and balance sheet indicator for the retained earnings account.
When a retained earnings book code is fixed, either the account cannot be overridden or a fixed book code is entered. Only the entries from the source with the same book code are closed. Similarly, only the entries with the same balance sheet indicator value as the retained earnings account are closed.
Consider the following example. To close subsets separately, you must create ChartField value sets that specify the accounts that the system closes together. You use a book code, a balance sheet indicator, or both:
|
ChartField Value Set |
Account |
Book Code |
Balance Sheet Indicator |
|
CFV1 |
Account Rollup INCSTMNT |
B |
BS |
|
CFV2 |
Account Rollup INCSTMNT |
B |
OB |
|
CFV3 |
Account Rollup INCSTMNT |
C |
BS |
|
CFV4 |
Account Rollup INCSTMNT |
C |
OB |
|
CFV5 |
Account Rollup INCSTMNT |
L |
BS |
|
CFV6 |
Account Rollup INCSTMNT |
L |
OB |
Note. Check balances by running a query on period 0 for the book codes used for year end close. Year end close carries forward all ending balances to beginning balances for balance sheet accounts, including balances for both closed and open book codes.
Separate Debit and Credit Options for Opening and Closing PeriodsOn the Year End Close Options page, are two options that you can use for year end close only when your database is configured for separate debit and credit:
Initialize DR/CR with Net Bal (initialize debit/credit with net balance): Select to populate account amounts in the opening period (0) for the year being opened with the net debit/credit balance from the year being closed.
Close DR/CR with Net Balance: Select to populate account amounts in the closing period 999 for the year being closed with the net debit/credit balance.
If you do not select these options, the debit balances and credit balances are treated separately—they are not netted for period 999 and period 0.
See Modifying Tables to Store Separate Debit and Credit Balances.
Setup for Opening and Closing Period Examples
In the following examples the headings are:
Total is the amount stored in POSTED_TOTAL_AMT.
DR is the amount stored in POSTED_TOTAL_DR.
CR is the amount stored in POSTED_TOTAL_CR.
Assume the following balances at the beginning of year 2006, which are rolled forward from the closing of year 2005:
|
Period |
Account |
Total |
DR |
CR |
|
0 |
100000 |
30000 |
40000 |
−10000 |
|
0 |
210000 |
−20000 |
10000 |
−30000 |
|
0 |
360000 |
−10000 |
5000 |
−15000 |
Assume the following transactions occurred during the year 2005:
|
Period |
Account |
Total |
DR |
CR |
|
7 |
403000 |
−80000 |
3000 |
−83000 |
|
7 |
500000 |
65000 |
71000 |
−6000 |
|
7 |
100000 |
15000 |
17000 |
−2000 |
Period 999 Amounts if the Close DR/CR with Net Balance Option is Checked
Assume the equity account is 360000.
The close uses the total net amount. If the net amount is positive, it is recognized by the system as a debit and a negative offset amount (credit) is generated for period 999.
If the net amount is negative it is recognized by the system as a credit and a positive offset amount (debit) is generated for period 999.
The closing entries generated for period 999 for year 2005 are net amounts:
|
Period |
Account |
Total |
DR |
CR |
|
999 |
403000 |
80000 |
80000 |
0 |
|
999 |
500000 |
−65000 |
0 |
−65000 |
|
999 |
360000 |
−15000 |
0 |
−15000 |
Period 999 Amounts If the Close DR/CR with Net Balance Option is Not Checked
If the Close DR/CR with Net Balance option is not checked, the system generates entries for the DR amount and CR amounts separately.
The system generates an amount with a numerical sign that results in the sum of the DR amounts for the P&L accounts from period 1 to 999 to equal 0, and also generates an amount so that the sum of CR amounts for the P&L accounts from period 1 to 999 also equal 0.
The closing entries generated with opposite numerical signs in period 999 for the year 2005 for the debit and credit columns are:
|
Period |
Account |
Total |
DR |
CR |
|
0 |
403000 |
−80000 |
−3000 |
83000 |
|
0 |
500000 |
−65000 |
−71000 |
6000 |
|
0 |
360000 |
−15000 |
74000 |
−89000 |
Period 0 Amounts When the Initialize Dr/CR with Net Bal Option is Checked
If the Initialize DR/CR with Net Bal option is checked, the opening entries in period 0 for year 2006 are:
|
Period |
Account |
Total |
DR |
CR |
|
0 |
100000 |
45000 |
45000 |
0 |
|
0 |
210000 |
−20000 |
0 |
−20000 |
|
0 |
360000 |
−25000 |
0 |
−25000 |
Period 0 Amounts When the Initialize Dr/CR with Net Bal Option is Not Checked
If Initialize DR/CR with Net Bal option is not checked, the opening entries in period 0 for year 2006 are:
|
Period |
Account |
Total |
DR |
CR |
|
0 |
100000 |
45000 |
57000 |
−12000 |
|
0 |
210000 |
−20000 |
10000 |
−30000 |
|
0 |
360000 |
−25000 |
79000 |
−104000 |
Performing Interim ClosingThis section provides an overview of interim closing and discusses how to:
Perform interim closing procedures.
Interpret the results of interim closing.
Understanding Interim Closing
The only source for interim closings is journals. Interim closing is similar to year end closing except that it does not create carryforward balances. Other differences are discussed earlier in this chapter.
See Interim Versus Year End Closings.
The interim closing process provides flexibility in tracking profit and loss by enabling you to:
Close frequently.
You can transfer net income to retained earnings as often as needed. For example, financial institutions may need to close P/L to retained earnings daily, but other companies may close to retained earnings monthly. You include only the transactions that have been posted to the specified period since the last interim close.
Maintain closing consistency.
The interim closing process depends on a consistent use of periods for interim closing throughout the year. You must maintain daily, monthly, or quarterly interim closings on a consistent basis, or you must perform a closing undo after any ad hoc interim close. You must also complete all interim closes for the year. The year end close uses the specified interim close offset account as the target retained earnings account. The offset is a contra-equity account that is zeroed-out against the P/L accounts to arrive at the correct year end retained earnings amount.
Integrate interim and year end close.
When you integrate the interim close into the year end close process, the offset account in interim close is similar to an income summary account (which is an intermediate account used to summarize revenue and expense accounts before posting net income to retained earnings). The interim close process is similar to posting net income to retained earnings. Use of the interim close offset account as the target account in year end close is similar to summarizing the revenue and expense accounts to the income summary account. The offset account must net to zero after the final interim close for the applicable period and the year end close processes are run. You verify the results when the year end close process results in a zero balance for the interim close offset account.
Identify specific P/L distribution accounts.
You can identify the specific accounts to close, as well as the retained earnings accounts to which they are distributed. These can be the same as the retained earnings accounts that you use for year end close. Furthermore, you can close only part of the chart of accounts (rather than the entire ledger) during an interim close.
Maintain an audit trail.
You maintain the audit trail by creating alternative offsets to the retained earnings entries. In addition, you identify the offset account values.
Create supporting journal entries.
The system creates journals from the results of the interim close. Create a journal ID mask for these transactions to easily identify the closing journals.
Select target currency for retained earnings.
If you manage financial information in multiple currencies, you can select the currency for the retained earnings amounts.
Note. If you must undo a close, the system uses the journal entries to back out the changes made by the interim close.
Important! If you use multiple currencies, perform a revaluation of the currency balances before you run the interim closing process.
Performing Interim Closing Procedures
Interim closing involves three major tasks.
To perform an interim close:
Define ChartField value sets.
You define the sets of values for the ChartFields that you want to use as the source for the interim closing. These can be the same value sets of ChartFields that you use for year end closing or different value sets. They can include some or all the values in your chart of accounts.
Note. Because the intent of the interim close is to close P/L accounts, it is required that the Account ChartField, be included in the ChartField value set (CVS).
Specifically, you create ChartField value sets for the ChartFields that are closed to retained earnings. (ChartField value sets are defined on the ChartField Value Set page.)
To enhance performance, use fewer ChartFields in the ChartField value set (CVS) whenever possible. Also, use fewer ChartField combinations. For example, if all other things are equal, it takes less time to close from five CVSs, all with ACCOUNT, DEPTID, and PRODUCT, than to close from three CVS with ACCOUNT, DEPTID, and PRODUCT and two CVSs with ACCOUNT, DEPTID, and OPERATING UNIT.
Define the rules for the interim close. You define closing rules using the Closing Rules component (CLOSE_DEFN).
Specifically, you must identify:
Which time frame to close (for example, beginning of year to current date).
Which P/L accounts to close to the various retained earnings accounts.
Which currency to use as the target currency.
Which adjustment periods to close (or whether to exclude them at all).
Which book codes and balance sheet indicators to close (or whether to close to an account that can be overridden and retain book codes).
Whether to edit, budget-check, and post journals.
Whether to create offset accounts.
You run interim close using the Close Request page. When you request that the interim close be processed, you identify:
Which ledger group or ledger (or both) to close.
Which closing rule to use.
Which date to use as the as of date for the closing.
Which business units to close.
You can undo a close, if necessary, by using the procedures described later in this chapter.
See Also
Running the Close Application Engine Process (GLPCLOSE)
Defining and Using ChartField Value Sets
Interpreting the Results of Interim Closing
Interim closing sums all transactions that affect the selected P/L accounts and closes them to retained earnings. The system creates journal entries to update ledgers.
The system also creates offsetting entries. You can create offsets with alternative ChartFields. If you offset to an account other than the source transaction, the audit trail remains intact. If the offset account is the same as the source account, you close the account and no audit trail exists for the closed accounts.
Create Offset Transaction
This table illustrates creating offsets with alternative chart keys:
|
P/L Balance 410000 |
Retained Earnings Offset 360101 |
Retained Earnings 360100 |
|
100 CREDIT |
100 DEBIT |
100 CREDIT |
Note. When you use an offset for interim close, it must be the target for the subsequent year end close.
Close Account
This table illustrates creating offsets with the same account as the source document by selecting the Retain all CF Value for Offset (retain all ChartField value for offset ) option on the Net Income/Retained Earnings page:
|
P/L Balance 410000 |
Retained Earnings Offset 360101 |
Retained Earnings 360100 |
|
100 CREDIT 100 DEBIT |
100 CREDIT |
Performing Year End ClosingThis section provides an overview of year end closing and discusses how to:
Complete a year end procedures checklist.
Perform year end closing procedures.
Interpret results of year end closing.
Define the relationship of interim close to year end close.
Understanding Year End Closings
Before year end close begins, the process uncloses the periods in the fiscal year that is processed. It then closes the P/L accounts to retained earnings (storing them in period 999) and generates the balance forward amounts (storing these balances in period 0). It directly updates the ledger and creates offsets to the retained earnings amounts.
Completing a Year End Procedures Checklist
Because final adjustments may not be known for weeks after year end, closing a year and opening a new one is often an iterative process. General Ledger enables you to carry on normal accounting and reporting activities during year end, while maintaining control over the closing process. The following procedures are typical of most year end activities.
To complete the year end process:
Run revaluation (if you manage financial information in multiple currencies).
Stop processing accounting transactions for the old year.
As you would at the end of any accounting period, use the Open Period Update page or Open Periods Mass Update page to change the range of open fiscal years and accounting periods to prohibit the entry and posting of additional transactions to the old year.
Produce preliminary year end reports.
Produce the usual period-end reports and any other special year end reports.
Begin to process the new year.
As you do at other times of the year, you can use the Open Period Update page or Open Periods Mass Update page to open the first accounting period in the new year for entry and posting.
Record adjustments to the old year.
When you are ready to post adjusting entries to the old year:
Enter them as adjusting journals.
Alternatively, reopen the appropriate accounting period, enter and post the entries, and close the period again.
Close the old year.
To close revenue and expense accounts to retained earnings and roll forward beginning balances to the new year, use the Close Request page to initiate the background request. General Ledger performs closing according to the options selected in the closing rules.
Produce reports for the new year.
Until you run year end closing, reports for the next year do not include any results from prior years. Once you run the close process, balance sheet accounts and inception-to-date revenue and expense accounts are available for reporting.
Make additional adjustments to the old year.
When you must make additional adjustments for the old year, follow the same process that you use to record adjustments to the old year.
Reclose the old year.
Whenever you make adjustments to a closed year, you must run year end closing again to ensure that the opening balances for the new year reflect all activity for prior years.
Performing Year End Closing Procedures
Year end closing involves three major tasks.
To perform a year end close:
Define ChartField value sets.
If you plan to close to multiple retained earnings accounts, you must define the sets of values for the ChartFields that the system uses as the source for the year end closing. These can be the same sets of ChartFields that you use for interim closing or different value sets.
Specifically, you must create ChartField value sets for the ChartFields to be closed to retained earnings. (You define ChartField value sets on the ChartField Value Set page.)
Define closing rules.
Define the rules for the year end close. Specifically, you must identify:
Which P/L accounts are closed to the various retained earnings accounts.
Whether to store P/L reversal entries.
Whether to have beginning balances reflect separate debits or credits, or whether to reflect the net of the debits and credits.
Whether to close the general ledger periods.
Whether to create journal entries for the year end entries.
Which ChartField value sets to use for the roll-forward amounts.
Run the closing request.
When you request that the year end close be processed, you identify:
Which ledger to close.
Which closing rule to use.
Which date to use as the closing date.
Which business units to close.
In addition, note the following points:
If you perform interim closes using an offset to retained earnings, you must perform all interim closes for all the interim periods and use the offset account defined for the interim closes as the target retained earnings for the year end close.
You run year end close using the Close Request page.
You can undo a close, if necessary, using the undo procedure.
Note. Whereas you can select a year-end close option to close the GL open periods upon successful completion, if you run the undo process, it does not reopen the closed year. If you should need to post additional journals after initially closing the year, use the Open Period Update page (or Open Period Mass Update page) to open the closed year for additional entries.
See Also
Defining and Using ChartField Value Sets
Selecting Closing Rules Closing Options
Interpreting Year End Closing Results
The process of year end closing closes the profit and loss (P/L) accounts to retained earnings and generates the balance forward amounts. To maintain the integrity of financial reporting, the entries generated by year end closing are stored in special system-defined periods. The year end closing entry to book the current year net income to retained earnings is stored in period 999, and the balance forward amounts are stored in period 0.
The following example illustrates how General Ledger stores amounts in a ledger after closing has been performed for the old year (998 is an adjustment period). This ledger uses a simplified calendar containing only four accounting periods:
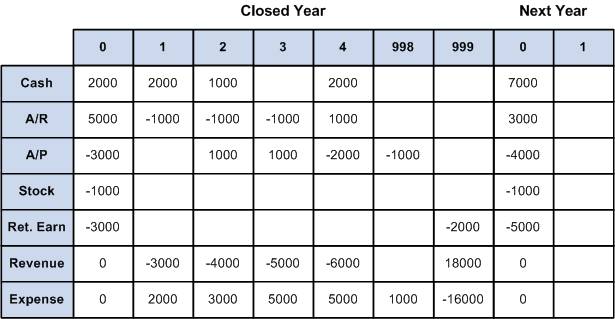
Storing amounts in a ledger after closing
Note. The General Ledger financial statement reports do not include beginning balances for profit and loss accounts.
See Also
Adjustments and Other Special Periods
Defining the Relationship of Interim Close to Year End CloseOnce you have determined to use interim close, you should run it consistently for the daily, monthly, or quarterly period chosen. If at any time you do an ad hoc interim close, you should subsequently perform an undo of that close.
If you do not use an offset to the retained earnings account when performing interim closes, the P/L accounts are closed and the balance is transferred to the retained earnings account as shown in the following example:
|
P/L Balance 410000 |
Retained Earnings Offset 360101 |
Retained Earnings 360100 |
|
100 CREDIT 100 DEBIT |
100 CREDIT |
When the interim closes are performed consistently, the P/L accounts is correctly closed at year end and the correct amount is recorded in the applicable retained earnings account. Completing the year end close then involves closing any remaining unclosed P/L accounts to retained earnings.
If you use an offset to the retained earnings account when performing interim closes, the offset must be defined as the target for the year end close. All P/L accounts must be closed to the offset account rather than to the retained earnings.
This is because when using an offset account for interim close, the P/L accounts retain their balances—they are not zeroed out during interim close. The following example shows the results of an interim close in which account 360101 offsets the amount in the revenue account 410000 and the revenue is correctly reflected in the retained earnings account 360100:
|
P/L Balance 410000 |
Retained Earnings Offset 360101 |
Retained Earnings 360100 |
|
100 CREDIT |
100 DEBIT |
100 CREDIT |
When the final interim close is performed, the year end closed must be performed with the P/L accounts closed to the offset account 360101.
Defining Closing Rules
To define closing rules, you use the Closing Rules component.
This section provides an overview of closing rules and discusses how to:
Select closing rules closing options.
Specify net income and retained earnings ChartField values.
Specify journal options.
Specify roll-forward options.
Understanding Closing RulesClosing rules define how General Ledger calculates retained earnings and carries forward balances to the new year. The PeopleSoft system provides flexibility in the determination of how retained earnings are calculated. Depending on your needs, you can:
Close all profit and loss accounts to a single retained earnings account in total for a business unit.
Close all profit and loss accounts to a single retained earnings account, but break down this amount by the Department ChartField, the Project ChartField, or any other ChartField that you select to track profit and loss.
Close selected profit and loss accounts and ChartFields to multiple retained earnings accounts.
Close by selected book code using accounts with a particular book code, or close to overridable accounts and retain the book code.
You can define any number of closing rules for different contingencies.
Pages Used to Define Closing Rules|
Page Name |
Definition Name |
Navigation |
Usage |
|
CLOSE_DEFN1 |
General Ledger, Close Ledgers, Closing Rules, Closing Options |
Identify the type of closing (interim or year end), closing scope, and other closing options. |
|
|
CLOSE_DEFN2 |
General Ledger, Close Ledgers, Closing Rules, Net Income/Retained Earnings |
Identify the P/L ChartField value sets and the retained earnings ChartFields for the closing. |
|
|
CLOSE_JOURNAL |
General Ledger, Close Ledgers, Closing Rules, Journal Options |
Define journal options for system-generated journals created during the close. Also, specify whether to create journal entries for year end close. |
|
|
CLOSE_DEFN3 |
General Ledger, Close Ledgers, Closing Rules, Roll Forward Options |
For year end close only, identify whether to roll forward accounts with zero balances. Also, indicate whether to roll forward none, some, or all of the profit and loss accounts. (Normally only balance sheet accounts are rolled forward.) |
Selecting Closing Rules Closing Options
Access the Closing Options page (General Ledger, Close Ledgers, Closing Rules, Closing Options).
|
Create Closing Group |
Click to access the Closing Process Group page to create or modify closing process groups, which include one or more closing rules for processing. |
|
Description |
Enter a brief description of the closing rule to appear on pages and reports. |
|
Ledger Template |
Select the ledger template associated with the ledger to be closed. The system uses this template to determine which ChartFields to list in the selection fields for the closing rule. Only the ChartFields defined for the selected ledger template can be included in the closing rules. When you select a ledger group on the Close Request page, the ledger group must be associated with the ledger template entered here. |
|
Scope |
For interim closings only, enter the scope of the interim close. Values are: Incremental Current Period: Includes current period balance (from period start date to the end of period date). Incremental Year to Date: Used for daily close, includes transactions that you have posted since the last closing process, up to the as of date entered on the Close Request page. The closing process marks the journals that it processes as Closed, and the journals are not processed in future runs. Incremental Year to Curr Period (incremental year to current period): Includes transactions starting with period 1 (that is, period 1 through the end of the current period). |
|
Target Currency Option |
For interim closings, identify which base currency is used for the closing journal entries and offsets. Values are: Base currency of Prim Ledger (base currency of primary ledger): Uses the base currency of the primary ledger in the ledger group (as entered on the Detail Ledger Group page). The ledger group is automatically entered on the Close Request page. Business Unit Base Currency: Uses the base currency of the business unit. Retain currency: Uses the source transactions' currency. Specify Target Currency: Uses the currency that you specify in the Target Currency field. To retain the offset entry in the original currency, select the Currency Code ChartField on the Journal Options page, and select Retain Value. |
|
Target Currency |
If you select Specify Target Currency in the Target Currency Option field, enter the currency for the system-generated closing journals. Be sure that it is a base currency for one of the ledgers in the ledger group that you select on the Close Request page. Be careful when you enter a target currency. Because you have not yet identified the ledger group that is processed for the closing, the system cannot validate that the currency is valid for the ledger group. |
|
Adj Periods Included (adjustment periods included) |
Select the adjustment period that the system closes in the interim closing. Click the Add button to close additional adjustment periods. (Adjustment periods are defined on the Defining Detail Calendars page.) |
|
Year End Closing Options |
Click to access the year end close options. The link is available only for year end closings. |
Click the Year End Closing Options link.

Year End Close Options page
|
Close by |
You can perform year end close on either the Account ChartField or the Alternate Account ChartField. In addition, you can define a year end closing rule on the Alternate Account) only. In this case, no Account ChartField is required for retained earnings, P/L ChartField value sets, or roll-forward ChartField value sets. Closing populates the Account ChartField with the default values for the particular Alternate Account ChartField. However, you can enter an Account ChartField to accompany the Alternate Account ChartField if you want. To perform a year end close by Alternate Account ChartField only, select ALTACCT in the Close by field. In the close sequence, you typically perform a currency translation from the local ledger to a reporting ledger. You then close and report the local ledger by Alternate Account ChartField. You can then close and report the translated reporting ledger by the Account ChartField. |
|
Set Default Retained Earnings |
Select to use the default retained earnings that you also define on the Closing Options page. If not selected, you must use the Net Income/Retained Earnings page to define all accounts to be closed. If you do not select this check box, no default retained earnings account exists for P/L accounts that may have inadvertently been omitted on the Net Income/Retained Earnings page. When you use the balance sheet indicator option at the installation level, this option is set to Off, and it is display-only. |
|
Create Jrnl by RE Group (create journal by retained earnings group) |
Select to have year end close create separate journals for each P/L ChartField value set group and retained earnings pair; that is, one journal for one ChartField value group number. For example, to have a separate journal for each department, you might enter DEPTID in the ChartField value set criteria, as well as in the retained earnings ChartFields on the Net Income/Retained Earnings page and then select this option. |
|
Close the G/L Open Periods (close the general ledger open periods) |
Select to close all open general ledger periods for the business-unit-and-ledger-group combination for the year being closed. This prevents any additional journals from being entered for the year that is being closed. Note. Keep in mind that if you undo the close process, that process does not reopen the closed year. If you want to post additional journals after you undo the close process, you must access the Open Period Update page (or Open Period Mass Update page) to reopen the closed year for posting. |
|
Close Adjustment Periods |
Select to close all open adjustment periods for the business-unit-and-ledger-group combination and year being closed. |
|
Store P/L Reversal Entries (store profit and loss reversal entries) |
Select to store P/L offsets in period 999 (where the closing entries for all accounts are stored). If you select this option, the system inserts ledger rows for the entries made to period 999 to close revenue and expense accounts. You can access these amounts using the General Ledger inquiry pages. If this option is not selected, offsets are not stored in period 999. If you select period 999 for reports, the ledger will be out of balance. |
|
Initialize DR/CR with Net Bal (initialize debit/credit with net balance) |
Select to begin the year with net balances of debits and credits, instead of carrying forward separate balances for debits and credits. This option is available only if you have enabled separate debits/credits (DR/CR) on the database. When separate DR/CR is enabled, the period 999 entries for profit and loss accounts offset not only the net ending balances, but also the debit and credit ending balances. This option enables you to begin the year with net balances of debits/credits, instead of carrying forward separate balances for debits and credits If selected, the debit or credit balances are initialized with the net period zero balance. If the net balance is positive, this amount is placed in the DR column for period 0; if the net balance is negative, this amount is placed in the CR column for period 0. If not selected, the system moves the ending debit balance and ending credit balance forward to become the beginning balances of the following year. The DR column in period 0 is the sum of DR through the previous year. The CR column in period 0 is the sum of CR through the previous year. |
|
Close DR/CR with Net Balance |
Select this option if you are using the separate debit credit modification and want to net the separated debit and credit amounts during year end closing for the equity—profit and loss accounts before posting a single net amount to period 999. |
See Separate Debit and Credit Options for Opening and Closing Periods.
Specifying Net Income and Retained Earnings ChartField Values
Access the Net Income/Retained Earnings page (General Ledger, Close Ledgers, Closing Rules, Net Income/Retained Earnings).
|
Close To Multiple Ret Earnings (close to multiple retained earnings) |
Select to close to multiple retained earnings accounts. If deselected (year end closings only), the system uses the default account for retained earnings defined on the Closing Options page. All P/L accounts will close to the default retained earnings account. This option is required when the Book Code option, the Balance Sheet option, or the Off-Balance Sheet option is selected at installation. |
|
Closing Offset Options |
Use for interim close only. Options are:
|
|
Retain Earnings |
Define the mapping of P/L accounts to retained earnings accounts. |
|
ChartField Value Group Number |
Each ChartField Value Group comprises a group of P/L ChartField value sets to close to a single retained earnings account. To close to multiple retained earnings, click the Add button to create additional ChartField value groups. |
|
Profit/Loss |
Identify the P/L accounts (source accounts) to be closed. |
|
ChartField Value Set |
Select the ChartField value set for the P/L accounts to be closed. If there are other P/L ChartField value sets that close to the same retained earnings account, click the Add button and select the appropriate ChartField value set. The system uses the values in these ChartField value sets to identify the P/L accounts that close to the retained earnings account that you enter in the Retained Earnings group box. For best system performance, select ChartField value sets that have the same ChartField combinations. For example, if you select ChartField value sets 1, 2, and 3, and ChartField value set 1 includes the Department ChartField and the Project ChartField, then the other ChartField value sets should also include Department and Project. If they included different ChartFields (for example Product and Project), then processing the close may take longer and be less efficient. |
|
Update/New |
Click to access the Setup ChartField Value Sets page, where you can create or update a ChartField value set to use as P/L ChartField value set. |
|
Retained Earnings |
Identify the retained earnings account (target account) to which the P/L accounts are closed. |
|
ChartField |
Select a ChartField. The default is the Account ChartField, which is the required ChartField, unless you have changed the name of the Account ChartField. (If you have modified your ChartFields, be sure to change the Account field on the Ledger Template – Field Definitions page.) You can select additional ChartFields, such as Department or Product. Click the Add button to add ChartFields. |
|
Retain Value |
Select to retain the ChartField value from the original journal entry. If the check box is deselected, you must specify a value in ChartField Value field. This option in not available for the Account ChartField. |
|
ChartField Value |
Select the specific retained earnings account. This option is required for the Account ChartField. If you perform interim closes using an offset to retained earnings, you must use the offset account as the target retained earnings for the year end close. For other ChartFields, if you have not selected Retain Value check box, enter a specific ChartField value here. |
|
Offset ChartFields |
For interim closings only, identify the ChartField and ChartField value for the offset to the retained earnings entries. If the Retain all CF Value for Offset check box is selected, the following fields should be left blank. |
|
ChartField |
For interim closings only, this can be only the Account ChartField, or it can be a combination of ChartFields (for example, Department and Account.) If the Retain all CF Value for Offset check box is deselected, Account is required and must be the first ChartField entered. Select a ChartField for a contra-equity offset. To offset to a combination of ChartFields, click the Add button to select additional ChartFields. |
|
Retain Value |
Select to retain the ChartField value from the original journal entry. If the check box is deselected, specify a value in the ChartField Value field. |
|
ChartField Value |
If you do not select the Retain Value check box, enter a specific ChartField value here. |
See Also
Defining and Using Account Types and Attributes
Using the Balance Sheet Indicator and Book Code
Single Versus Multiple Retained Earnings Account Closings
Managing Multiple GAAPs and Prior Period Adjustments
Specifying Journal Options
Access the Journal Options page (General Ledger, Close Ledgers, Closing Rules, Journal Options).
|
Journal ID Mask |
Enter a prefix for naming closing journals. Journals are identified by a 10-character alphanumeric ID. The system automatically appends the prefix that you specify here to the journal IDs. For example, if you specify the journal ID mask as YEC, the year end closing journal IDs might be YEC0001, YEC0002, and so on. Alternatively, the value NEXT causes the system to assign the next available journal ID number automatically, without including the mask. (This option makes it more difficult to identify the closing journals.) Reserve a unique mask value for closing to ensure that no other process creates identical journal IDs. |
|
Source |
Enter a code to identify the origin of the journal entries that are created. |
|
Closing Doc Type (closing document type) |
If you use the Document Sequencing feature, select a predefined closing document type for the closing journals. The Document Sequencing feature requires that you identify a document type for all created journal entries. |
|
Description |
Enter a description of the journals that are created (for example, Daily Close Journals). |
|
Closing Journal Date Option |
Values are: Retain Transaction Date: Sets the output journal date to equal the original transaction date. Use Process Date: Sets the output journal date to equal the process date of the closing process run. |
|
Create Journal Entries |
Select to create journal entries for year end close transactions only. Interim close always creates journal entries. |
The following three fields are for interim close only (because year end close directly updates the ledgers and interim close does not). If you select these fields, the system processes the journals without any intervention by you. If you want to edit and post the journals through journal processing, do not select the fields.
|
Edit Journal(s) |
For interim close only, select to have the journals automatically undergo the edit process. If you do not select this option, the closing process designates the journals as No Status - Needs to be Edited. |
|
Budget Check Journal(s) |
For interim closings only, select to have the journals automatically checked against the Commitment Control budget for the business unit and account. To select this option, you must have the Commitment Control feature enabled for the ledger group, and you must have selected the Edit Journal(s) option. |
|
Post Journal(s) |
For interim closing only, select to have the journals automatically posted to the ledger. To select this option, you must have selected the Edit Journal(s) option and the Budget Check Journal(s) option if the Commitment Control feature is enabled for the ledger. |
See Also
Interpreting the Results of Interim Closing
Setting Up Basic Commitment Control Options
Specifying Roll-Forward Options
Access the Roll Forward Options page (General Ledger, Close Ledgers, Closing Rules, Roll Forward Options).
Note. These fields appear for year end closings only. They are not available for interim closings.
|
Do Not Roll Forward Zero Bal (do not roll forward zero balances) |
Prevents the system from creating balance-forward amounts (period 0) for accounts with a zero ending balance. |
|
P/L to Roll Forward to Next Yr (profit and loss to roll forward to next year) |
Normally, only balance sheet accounts are rolled forward, and their balance forward amounts stored in period 0. Options are:
|
|
Roll Forward Profit/Loss |
If you elect to roll forward in the P/L to Roll Forward to Next Yr field, select the ChartField value set for the P/L accounts that you want to roll forward. To roll forward more than one ChartField value set, click the Add button and select additional ChartField value sets. |
|
Update/New |
Click to access the Setup ChartField Value Sets page, where you can create or update a ChartField value set to use as the roll-forward P/L ChartField value set. |
Defining Closing Process Groups
This section lists the standard closing reports. Running a report entails selecting it from a menu and entering any necessary parameters. Once you enter the report parameters, use PeopleSoft Process Scheduler to run the report.
This section discusses how to create the Closing Process Group.
Page Used to Define Closing Process Groups|
Page Name |
Definition Name |
Navigation |
Usage |
|
CLOSE_GRP |
General Ledger, Close Ledgers, Request Ledger Close, Closing Process Group, Closing Process Group |
Specify the closing rule or rules to be included within a process group when running the ledger close process. |
Defining the Closing Process GroupDefine a closing process group to be used for a given ledger close request. A closing process group includes one or more closing rules that you define. Whereas in accordance with GAAP, typically the profit and loss accounts are closed to earnings account directly, some countries require additional steps and entries for closing. The closing process group facilitates setup of rules to generate additional accounting entries for a given close request besides those made to retained earnings accounts.
Access the Closing Process Group page (General Ledger, Close Ledgers, Closing Process Group, Closing Process Group).
|
Closing Type |
Select a closing type of either Year End Closing or Interim Closing for the closing process group. The closing type of the closing rules that you include within the group must match the closing type for the closing process group. Note. The Interim Closing closing type should only include one step. |
|
Closing Step |
Displays the sequence for which the closing rules are to be processed. The first step in the sequence is the only step that allows a closing rule with the Set Default Retained Earnings and the Create Journal Entries selections. The last step in the sequence is the only step that allows a closing rule with the Roll Forward of P&L accounts selections and a closing rule with Close Period selections. All closing rules within a closing process group must have the same Close by option (Account or Alternate Account). |
|
Closing Rule |
Select the closing rule (or rules) that are to be grouped together for processing a given ledger close request. |
Running the Close Application Engine Process (GLPCLOSE)
You use similar procedures to run the Close process for an interim closings and a year end closings. Both procedures use the Close Request page.
This section discusses how to:
Create the close request.
Monitor validation checking.
Pages Used to Run the Close Application Engine Process|
Page Name |
Definition Name |
Navigation |
Usage |
|
CLOSE_REQUEST |
General Ledger, Close Ledgers, Request Ledger Close, Ledger Close Request |
Specify the process request parameters to perform an interim or year end close for one or more business units. |
|
|
CLOSE_REQ_STEP_SEC |
General Ledger, Close Ledgers, Request Ledger Close, Ledger Close Request. Click the Rules to Execute link. |
Select or deselect individual closing rules within the closing process group (in sequence only) to include or exclude when running the closing process. |
Creating the Close Request
Access the Ledger Close Request page (General Ledger, Close Ledgers, Request Ledger Close, Ledger Close Request).
|
Request Number |
Displays the system-generated number used to order a series of requests. |
|
Close Request Type |
Specify the type of close that the system runs. Options are Close and Undo. In case of an error, to reverse the retained earnings (interim or year end closings) and balance-forward calculations (year end closings), select Undo. For year end close, it is not necessary to undo a close before rerunning the close because existing amounts are deleted first. Note. Keep in mind that if you undo the close process, that process does not reopen the closed year. If you want to post additional journals after you undo the close process, you must access the Open Period Update page (or Open Period Mass Update page) to reopen the closed year for posting. |
|
Closing Type |
If you select Undo in the Close Request Type field, the Closing Type field becomes available. Select the type of closing to undo. Options are Year End and Interim. |
|
Previous Close to Undo |
To display the Previous Close to Undo group box, select Undo for the close request type and select Interim for the closing type. Select the process instance and business unit for the close that you want to undo. If you want to undo more than one close, click the Add button to enter another process instance and business unit. Note. Obtain the process instance from the process log. |
|
Fiscal Year |
Enter the year to be closed or the year of the closing that you want to undo if you selected Year End as the closing type. |
|
Business Unit for Prompting |
Select a business unit to determine which ledger groups and closing rules can be selected. Only ledger groups and closing rules associated with the business unit are available for selection in the Ledger Grp and Closing Rule fields. |
|
Check only, Do not process |
Select to have the Close process perform validation checking but not calculate retained earnings or balance-forward amounts. |
|
Closing Group |
Select the closing group to use for this request. The closing group includes the closing rule or rules that you specified for the group. |
|
Ledger Group |
Select the ledger group for the ledger being closed. |
|
Ledger |
Leave blank if the Keep Ledgers in Sync option is enabled for the selected ledger group selected. If the Keep Ledgers in Sync option is not enabled for the ledger group, you can either enter a specific ledger to process or leave this field blank to process all ledgers in the ledger group. |
|
Rules to Execute |
Click to access the Closing Rules to Execute page where you can select or deselect certain rules within the group to execute. |
|
BU Process Date (business unit process date) |
Select this option to use the process date of the business unit as the as of date for the closing process. This is recommended if you are submitting a group of interrelated requests for processing (for example, journal posting, revaluation, and interim close). |
|
As of Date |
Enter a specific date for the closing process. |
|
Selections |
Select the business units to close or use trees to identify which business units to close. |
|
Selected Detail Values |
Select to enter one or more business unit values in the Business Unit to Close field. |
|
Detail - Selected Parents |
Specify a tree containing the business units that you want to close. All business units for the tree setID, tree, and level (if applicable) are included in the close. |
|
Tree SetID, Level, and Tree |
If the Detail - Selected Parents option is enabled, select a tree setID, tree, and level (if applicable) for the group of business units that you want to close. |
|
Business Unit to Close |
If the Selected Detail Values option is enabled, select a business unit in the Select Value field. To close or undo a close for more than one business unit, click the Add button and select another business unit. The business unit must be associated with the ledger group that you entered previously. |
Selecting Rules to Execute
Access the Closing Rules to Execute page (click the Rules to Execute link from the Ledger Close Request page).
|
Execute |
Select to execute a given closing rule for the ledger close request process. The closing rules cannot be selected out of sequence. In other words, do not select closing step 1 and closing step 3 while deselecting closing step 2. |
See Also
PeopleTools PeopleBook: PeopleSoft Process Scheduler, "Understanding PeopleSoft Process Scheduler"
Monitoring Validation Checking
During closing, General Ledger performs validation checking for the business unit and closing rule. Specifically, the system determines whether the following conditions exist:
All ChartFields in the closing rule are valid for the business unit and ledger.
All ChartField values are valid.
All retained earnings accounts are valid for the business unit.
Any duplication or overlapping in the P/L selection criteria occurred.
(This condition could cause double entries to retained earnings accounts.)
The system displays an error message if any of these validations fail.
Processing an Undo Close
If you must reverse the retained earnings (interim and year end closing) and balance-forward calculations (year end closing), you can run an undo process.
Note. For year end close, it is not necessary to run an undo close before rerunning a year end close because existing amounts are always deleted first.
The undo process differs depending on whether you undo an interim close or a year end close.
This section discusses how to:
Undo an interim close.
Undo a year end close.
Undoing an Interim Close
When you run the interim close process, the system creates an entry in the process log that includes:
User ID.
Closing rule.
As of date.
Date-time stamp.
Source instance (which comprises process instance and request number).
To undo an interim close:
Obtain the process instance and business unit from the process log.
Enter the process instance and business unit on the Close Request process page.
The system calls the Journal Posting process to unpost or delete the journals, whichever is necessary.
Undoing a Year End Close
To undo a year end close, enter the ledger group, ledger (if necessary), fiscal year, and business units that you want to unclose.
When you run an undo for a year end close and you elect not to create journal entries, the system clears the period 999 (results of year end close) and period 0 (balance forward) rows from the ledger. To create journal entries, the system deletes the journal entries and clears the period 999 and period 0 rows.
Producing Interim and Year End Closing Reports
This section lists the standard closing reports. Running a report entails selecting it from a menu and entering any necessary parameters. Once you enter the report parameters, use PeopleSoft Process Scheduler to run the report.
This section discusses how to generate the Journal Closing Status report.
Pages Used to Produce Interim and Year End Closing ReportsGenerating the Journal Closing Status ReportAccess the Journal Closing Status Report page (General Ledger, Close Ledgers, Journal Closing Status Report).
Note. This page is discussed in detail because it involves more parameters than the system usually requires for generating reports.
|
Display Full Numeric Field |
Select to display the full numeric value if it is larger than the report column size. The number wraps to a second line. |
|
Select From Closing Log Table |
Select to have the scope of the report defined by the process instance stored in the closing log table. The Process Instance field becomes available. |
|
Process Instance |
Enter the process instance number of the Close process run. |
|
Report Closing Status |
Select one of the following to: All Closing Status Types: Include all journals, regardless of their closing status. All Except Not Processed: Include only journals that the close process has processed. Closed Journals: Include only journals that the close process has closed. Not Processed: Include only journals that the close process did not process. Unclosed Journals: Include only journals that the close process processed but did not close. |
|
ChartField Selection |
Enter a sequence number and ChartField field long name. Use the Select option to include only selected values, and enter a value. |
Note. To modify standard reports, create your own reports, or reformat report output, you can use a variety of reporting tools that the PeopleSoft system provides.