 Understanding Oracle's PeopleSoft Allocations Process (FS_ALLC)
This chapter provides an overview of Oracle's PeopleSoft Allocations process (FS_ALLC) and discusses how to:
Define allocation process steps.
Define the allocation group.
Copy, rename, or delete allocation steps.
Create adjusting entry journals.
Set up interunit and intraunit allocations.
Use allocations with PeopleSoft Project Costing.
Run an allocation request.
Produce allocation reports.
View process messages.
Restart and recover the allocations process.
Understanding Oracle's PeopleSoft Allocations Process (FS_ALLC)
Most businesses have some expenses or assets that are held or accumulated in one entity but must be shared by more than one business unit, department, or other entity. Typically, you allocate these balances and statistical quantities across the entities within the organization so that they recognize an appropriate share of the amounts.
Using the PeopleSoft Allocations process, you can define multiple allocation steps or step-down allocations when amounts must be applied according to a hierarchy and in a precise order, which might include allocations to multinational, national, and regional levels for the organization. Step-down allocations are used to determine not only how much general and administrative expense to charge to each business unit and department, but also what portion of that expense to attribute to individual projects or products.
Allocations offers the following advantages:
Save allocation specifications for such recurring items as rent, utilities, and administrative expenses each time that they are allocated.
Use time spans (rolling time frames) to automate the determination of accounting periods for the allocations.
Generate journal entries, edit, and post them to update ledgers from the allocations process or choose to post them later in a separate process.
Create calculation logs for a complete audit trail.
When you are defining an allocation, first determine the desired end result. For example, the cost of renting an office building might be shared among the departments that are housed in that building. If rent is paid as a single amount and is initially charged to one department, you can allocate the expense to each department in proportion to its share of office space, personnel head count, or any other fixed, percentage, or statistical criteria.
After you determine the purposes of the allocations, gain a working knowledge of the records or tables that are involved and identify which ChartFields are affected.
Note. Carefully consider the types of accounts you propose to use with allocations. Allocation does not support open item accounting. In particular, do not select open item accounts on the Target Tab of the Allocation Step Definition Process.
These are important consideration as you establish the following basic elements of the allocation:
Allocation type: This is the calculation method for the pool and basis and describes how the basis is used to distribute the pool amounts to the target.
Pool: The amount or amounts to be allocated.
This amount can originate from a ledger or table, or you can specify a fixed amount. If it comes from a ledger, allocations uses the ledger definition to determine its table name and other characteristics (such as calendar, multibook, and base currency). If the pool record is a table, specify the table name.
Basis: Determines how and in what proportion the pool amounts are distributed to the various targets.
Target: This is the destination where the amounts are allocated.
Offset: Entries that balance the targets.
These entries reflect the clearing of pool amounts as they are transferred to the targets or amounts that offset the target.
Amount fields: Determine the mapping of the amount fields between the pool, basis, and target records.
For example, assume that you want to allocate rent expense that is originally debited against the rent account 640000 to administrative department 14000. The pool is the sum of the amounts that are in the ledger rows for that ChartField combination. The pool is divided among the ChartField values that are specified as the target (the other departments in the company) according to the basis, which in this case is the amount of floor space that each department uses as specified by a statistical account. As the target accounts are debited, the system generates an offset to balance them.
The PeopleSoft Allocations process uses background processing. It is also flexible in that you can update the target and offset tables directly, create and post allocation journals, or create journals that are to be posted later.
Ultimately, an allocation results in updated target and offset ledgers, but the output of the allocation can be to journal entries that you choose to post in allocations or later in a separate process to update the ledgers.
In PeopleSoft applications, you can also allocate among business units (interunit) or within business units (intraunit), such as between funds or departments.
See Also
Setting Up Interunit and Intraunit Allocations
Understanding General Ledger Background Processes
Defining Allocation Process Steps
To define steps in the PeopleSoft Allocations process, use the Define Allocation Step component (ALLOCATIONS).
The following section provides an overview of allocation steps and process group and discusses how to:
Select the allocation type.
Define the allocation pool.
Define the allocation basis.
Define the allocation target.
Define the allocation offset.
Select output options.
Select rounding and distribution of odd cents options.
Specify batch records.
Define amount fields.
 Understanding Allocations Steps and Process Group
Depending on its complexity, you can define an allocation by one or more process steps. Multiple steps represent a step-down allocation. These steps together form a process group, with each allocation identified by a unique group ID.
Each allocation step represents a discrete stage in the PeopleSoft Allocations process, which means that the process updates the ledger balances or creates journals at the end of the step. For example, you can perform a rent expense allocation in one step because you update the ledger only once to accomplish this allocation. But for more complex allocations, such as the distribution of administrative expenses across sales departments followed by the allocation of sales expense across products, you need two steps.
This diagram illustrates the use of multiple steps in an allocation processing:
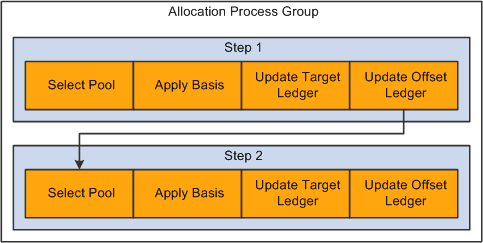
Multiple steps in allocation processing
In this example, the first allocation step distributes administrative expense across the sales departments and then updates the ledger. If the ledger is not updated, the second step draws erroneous data from the ledger because the second step must allocate the newly updated sales expense across products.
Pages Used for Allocation Steps
|
Page Name |
Definition Name |
Navigation |
Usage |
|
ALLOC_CALC_OPTN |
Allocations, Define and Perform Allocations, Define Allocation Step, Type Select the Type tab on the Define Allocation Step page. |
Define one of five allocation types, as well as any special arithmetic operations that you want to perform by using the pool and basis. Select a transaction code for use in interunit and intraunit allocations. |
|
|
ALLOC_POOL |
Allocations, Define and Perform Allocations, Define Allocation Step, Pool |
Define the allocation pool: pool record, selection criteria, and selection method. You can define the pool from ledger balances, any table, or a fixed amount. |
|
|
ALLOC_POOLX |
Select the Exceptions link on the Define Allocations Step - Pool page. |
Enter pool exceptions for ranges of values. |
|
|
ALLOC_BASIS |
Select the Basis tab on the Define Allocation Step page. |
Determine the basis of the allocation or how the pool amount is to be allocated to the target. |
|
|
ALLOC_BASISX |
Select the Exceptions link on the Define Allocations Step - Basis page. |
Enter basis exceptions for ranges of values. |
|
|
ALLOC_BASISX |
Select the Exceptions link on the Define Allocations Step Basis page. |
Enter basis exception ranges. |
|
|
ALLOC_TARGET |
Select the Target tab on the Define Allocation Step page. |
Define the destination for the allocation or the target record (journal or any table) and target field values. |
|
|
ALLOC_OFFSET |
Select the Offset tab on the Define Allocation Step page. |
Define the offset entry that balances the target. Offset usually reflects the clearing of pool amounts as they are transferred to the targets. However, if the target record is not a balanced ledger, such as a budget ledger, there is usually no offset. |
|
|
ALLOC_OUT_JRL_OPTN |
Select the Output Options tab on the Define Allocation Step page. |
Define journal options if the target or offset record is journals, or define the Table Output Option if the target or offset record is table. |
|
|
Round Options |
ALLOC_ROUND_OPTN |
Select the Round Options tab on the Define Allocation Step page. |
Define the method for rounding the allocation amount and distributing odd cents. This option is valid for only these allocation types: Spread Evenly, Allocate of Fixed Basis, and Prorata with Record Basis. |
|
ALLOC_RECNAME |
Select the Batch Records tab on the Define Allocation Step page. |
Specify the batch temporary tables that are used in the PeopleSoft Allocations process. |
|
|
ALLOC_AMOUNT |
Select the Amount Fields tab on the Define Allocation Step page. |
Define the amount field mapping between the pool, basis, target, and offset records. |
Selecting the Allocation Type
Access the Type page (Allocations, Define and Perform Allocations, Define Allocation Step, Type).
These tables illustrate the results of a simple rent allocation using the same pool of 400 GBP but different allocation types.
The following example illustrates the allocation type of spread evenly:
|
Basis and Target For a Pool of 400 GBP |
Account |
Department |
Amount |
|
Basis |
|
11001 |
One of 4 departments |
|
|
|
12000 |
One of 4 departments |
|
|
|
13000 |
One of 4 departments |
|
|
|
22001 |
One of 4 departments |
|
Target |
RENT |
11001 |
100 GBP |
|
|
RENT |
12000 |
100 GBP |
|
|
RENT |
13000 |
100 GBP |
|
|
RENT |
22001 |
100 GBP |
The following example illustrates the allocation type of fixed basis:
|
Basis and Target For a Pool of 400 GBP |
Account |
Department |
Amount |
|
Basis |
|
11001 |
10 percent |
|
|
|
12000 |
20 percent |
|
|
|
13000 |
20 percent |
|
|
|
22001 |
50 percent |
|
Target |
RENT |
11001 |
40 GBP |
|
|
RENT |
12000 |
80 GBP |
|
|
RENT |
13000 |
80 GBP |
|
|
RENT |
22001 |
200 GBP |
The following example illustrates the allocation type of prorata:
|
Basis and Target For a Pool of 400 GBP |
Account |
Department |
Amount |
|
Basis |
FLOORSPACE |
11001 |
10 SQF |
|
|
FLOORSPACE |
12000 |
20 SQF |
|
|
FLOORSPACE |
13000 |
20 SQF |
|
|
FLOORSPACE |
22001 |
50 SQF |
|
Target |
RENT |
11001 |
40 GBP |
|
|
RENT |
12000 |
80 GBP |
|
|
RENT |
13000 |
80 GBP |
|
|
RENT |
22001 |
200 GBP |
The following example illustrates the allocation type of arithmetic operations of multiplication:
|
Basis and Target For a Pool of 400 GBP |
Account |
Department |
Amount |
|
Basis |
FLOORSPACE |
11001 |
10 SQF |
|
|
FLOORSPACE |
12000 |
20 SQF |
|
|
FLOORSPACE |
13000 |
20 SQF |
|
|
FLOORSPACE |
22001 |
50 SQF |
|
Target |
RENT |
11001 |
4000 GBP |
|
|
RENT |
12000 |
8000 GBP |
|
|
RENT |
13000 |
8000 GBP |
|
|
RENT |
22001 |
20000 GBP |
See Also
Setting Up Interunit and Intraunit Allocations
Defining the Allocation Pool
Access the Pool page (Allocations, Define and Perform Allocations, Define Allocation Step, Pool).
Defining Pool Exceptions to Ranges of Values
The ability to define exceptions to included or excluded ranges of values provides the ability to refine selection criteria while reducing the need for multiple rows or steps.
Access the Pool Exceptions page. (Select the Range of Values option, provide the range values and click the link in the Exceptions column on the Define Allocation Step - Pool page).
|
Range From and Range To |
Enter the range of values that are exceptions to the associated range of either included values or excluded values. If you selected the Include Specified Values field for the Include/Exclude option on the Pool page, the exceptions that you define on this page are exceptions to the included range that you entered. If you selected the Exclude Specified Values field for the Include/Exclude option on the Pool page, the exceptions that you define on this page are exceptions to the excluded range that you entered. |
Defining the Allocation Basis
Access the Basis page (Allocations, Define and Perform Allocations, Define Allocation Step, Basis).
The allocation type that you select on the Type page determines much of the Basis page. The following describes what occurs for each allocation type:
Copy: No basis is required and all fields on the Basis page are unavailable.
Spread Evenly: The pool amount is divided evenly across the basis field values that are specified in the basis. No basis rows are required to exist in the basis record that is specified. You must still specify a value in the Basis Record Type field so that the system can provide a prompt table listing for the Field Name field in the Basis Fields group box.
In the How Specified group box, you can use Selected Detail Values, Selected Tree Nodes, or Range of Values fields to specify field values.
You can specify more than one field name; the system divides the pool amount evenly across all basis field value combinations.
Suppose that you spread evenly across department IDs 0100 and 0200 and products A, B, and C. In this case, each department ID and product combination (that is, DeptID 0100 and Product A, DeptID 0100 and Product B, and so on) receives 1/6 of the pool amount.
Note. This is a simplified example of spread evenly allocation type to illustrate how the amounts are distributed across the target. However, depending on the distribute odd cents option, one of the departments might contain the odd cents that are required to offset the allocated amount against the pool. The distribution of the odd cents is covered in the values in the Selecting Rounding Options section.
See Selecting Rounding and Distribution of Odd Cents Options.
Allocate on Fixed Basis: This is a variation of prorata allocation, where the percentage of the prorate is fixed. As withSpread Evenly, no basis rows are required to exist in the basis record that is specified. You must still specify the basis record type so that the system can provide a prompt table listing on the basis field name.
You can use only the Selected Detail Values field to specify basis field values, and you can specify more than one value in the Field Name field.
You must also specify the fixed % (percent) for each field value in the Specify Value/Range of Values/Tree Nodes edit box. The total of the percentage for one field does not have to add up to 100 percent, but the system uses the percentages to calculate the actual percent-to-total for each value.
For example, if you specify 10 percent for DeptID 0100 and 40 percent for DeptID 0200, the system allocates 20 percent of the pool amount to DeptID 0100 and 80 percent to DeptID 0200.
Prorata with Record Basis: Specify basis fields in the same way that you do the pool. Basis rows are selected from the basis record, and their amounts are used to calculate a percent-to-total to distribute the pool amount to each target.
Arithmetic Operation: Like Prorata with Record Basis, basis rows are selected from the basis record, and you specify basis in the same way that you do the pool. Target amounts are calculated by performing the mathematical operation between each pool and basis amount.
For example, suppose that the total November rent expense for US004 is 110,000.00 USD, paid through the administrative division. This expense must be divided among six divisions. The basis for the rent expense allocation is the amount of floor space that is occupied each month by each division. Floor space is maintained in statistical account 999903. Department ID is defined using the MFG_DEPARTMENTS tree, the DIVISION tree level, and the USA tree node. The following table indicates how much floor space each division uses:
|
Division |
Floor Space |
Preallocation Expense |
|
Administration |
4000 |
110000 USD |
|
Sales/Marketing |
4000 |
|
|
Customer Service |
2000 |
|
|
Engineering |
4000 |
|
|
Manufacturing |
6000 |
|
|
Other (No Department Value) |
2000 |
|
|
Total |
22,000 square feet |
110000 USD |
When the amounts are allocated, each division is debited for its share of the rent expense:
|
Division |
Floor Space |
Allocated Expense |
|
Administration |
4000 |
20000 USD |
|
Sales/Marketing |
4000 |
20000 USD |
|
Customer Service |
2000 |
10000 USD |
|
Engineering |
4000 |
20000 USD |
|
Manufacturing |
6000 |
30000 USD |
|
Other (No Department Value) |
2000 |
10000 USD |
|
Total |
22000 square feet |
110000 USD |
Refer to the Pool page for a description of the remaining fields on the Basis page.
Note. Allocations does not support using summary ledgers in the basis.
Defining Basis Exceptions to Ranges of Values
The ability to define exceptions to included or excluded ranges of values provides the ability to refine selection criteria while reducing the need for multiple rows or steps.
Access the Basis Exceptions page. (Select the Range of Values option, provide the range values and click the link in the Exceptions column on the Define Allocation Step - Basis page).
|
Range From and Range To |
Enter the range of values that are exceptions to the associated range of either included values or excluded values. If you selected the Include Specified Values field for the Include/Exclude option on the Basis page, the exceptions that you define on this page are exceptions to the included range that you entered. If you selected the Exclude Specified Values field for the Include/Exclude option on the Basis page, the exceptions that you define on this page are exceptions to the excluded range that you entered. |
Defining the Allocation Target
Access the Target page (Allocations, Define and Perform Allocations, Define Allocation Step, Target).
|
Target Record Type |
Select one of the following:
|
|
Time Span |
Use to specify the output for a single or multiple accounting periods for the target. Relative time spans, such as PER (current period activity), create the target relative to the as of date that is specified on the Allocation Request page. If the Target Record Type value is Journals Records, you must specify the time span value. If the target record is a table that has both FISCAL_YEAR and ACCOUNTING_PERIOD fields, you have the option to specify the time span value. If the target record is a table that does not have both FISCAL_YEAR and ACCOUNTING_PERIOD fields, you cannot specify the time span value. If you do not specify the time span value, the system populates both FISCAL_YEAR and ACCOUNTING_PERIOD with a zero value in the target record. |
|
Basis Span Opt (basis span option) |
If you use a multiperiod time span for the basis and target, select one of the following in the Basis Span Optfield:
|
|
Target Span Opt (target span option) |
If you select a multiple period time span for the target, you must specify the Target Span Opt field when the basis time span is either a single period or multiple periods (the Basis Span Opt field is Combine Periods for Basis):
|
|
Field Name |
If the target record is journals, the target record name is actually the journal line record name that is defined on the ledger template for the ledger group. The Field Name prompt table lists all fields that are in the target record. The system validates the Field Name field value that is entered against the record when you save this allocation step definition. Typically, you include any fields that are required by the target record including all the keys and any fields that affect functionality and those that you might decide are mandatory. |
|
Source |
Provides a convenient way to populate the target field values, particularly if the values are from the pool or basis records. You need not reenter them here, just prompt for the appropriate option and choose from the following:
|
|
Field Mapping |
If the source is from Pool, Basis, or Group by, you can specify field mapping for those occasions when the field name for the pool or basis record differs from the field name that is in the target record. For example, this could occur if the Product field value for the target record must come from the Project field value of the pool record. |
|
Value/Mask |
If you specify a fixed value in the Source field, use this Value/Mask field for character or date-type fields. You can enter a fixed date in one of the following formats: mmddyy, mm/dd/yy, or mm/dd/yyyy. |
Defining the Allocation Offset
Access the Offset page (Allocations, Define and Perform Allocations, Define Allocation Step, Offset).
|
Offset Record Type |
Select Journal Records or Any Table. For journals, specify theOffset Ledger name. The system uses this definition to determine the journal line record name and other characteristics (such as calendar, multibook, and base currency). If the value in the Offset Record Type field is a table, specify the record name in theTable edit box that becomes available. Note. If the allocation step does not require an offset, leave this field blank. |
|
Specify Field Values |
Specify the offset field values. The offset fields can be directed to the pool record or a particular target table, but the purpose of the offset is always to prevent double counting. |
See Also
Defining the Allocation Target
Selecting Output Options
Access the Output Options page (Allocations, Define and Perform Allocations, Define Allocation Step, Output Options).
Journal Options
|
Journal ID Mask |
If the target or offset is a journal that is on the Allocations Target or Allocations Offset pages, you must define the journal options. The Journal ID Mask field enables you to specify a prefix for naming allocation journals. A 10-character alphanumeric ID identifies journals. The system automatically appends the prefix that you specify to the journal IDs. For example, if you specify the Journal ID Mask to be ALLOC, the allocation journal IDs might be ALLOC00001, ALLOC00002, and so on. Alternatively, the value NEXT causes the system to assign the next available journal ID number automatically. Reserve a unique mask value for allocations to ensure that no other process creates the same journal ID. |
|
Journal Date Code |
You can assign a value based on the following options, all of which are adjusted to the prior working day if the next day is in the next period:
Note. You must use either the Beginning of the Period or End of the Period journal date options if you use multiple-period time spans for the target. |
|
Source |
Enter the journal source. Unless you specify otherwise, the journal source moves by default to ALO (allocations). |
|
Reversal |
Click to access the Journal Entry Reversal page. You can set up a reversing entry for the current allocation by selecting the applicable option, which then appears in the link. Options are:
|
|
Reference Number |
Enables you to refer each journal back to a document, person, invoice, date, or any other piece of information that is helpful to you when you track the source of the transaction. |
|
Document Type |
If you run the PeopleSoft Allocations process for a business unit for which you enable document sequencing, you must select a document type. If you do not select a document type, you receive an error. If some of the business units require document sequencing, you assign a document type to the allocation rules regardless of whether you enable document sequencing for that business unit. If you do not enable document sequencing for any of the business units, the Document Type field is unavailable. |
|
Bypass VAT Processing (bypass value added tax processing) |
Click if you want the allocations process to skip VAT processing. Even if Bypass VAT Processing is not selected, the journals that are created through allocations and edited do not create VAT rows for VAT applicable accounts. The VAT process processes VAT accounts that are created by the allocation process. However, to prevent double counting, the VAT process does not create VAT lines for VAT applicable accounts that are created from allocations. |
|
Post Journal (s) |
Click to post the journals. If you select this option, the system automatically selects the Edit Journal(s) and Budget Check Journal(s) check boxes. You can deselect the Budget Check Journal(s) check box if you want to run the Budget Processor later to update the commitment control ledgers. |
|
Edit Journal (s) |
Select to edit the journals that the PeopleSoft Allocations process creates so that you do not have to edit them later in a separate process. You select this option when you want to edit journals without posting them. Typically, you select this option in a multiple-step allocation process where the pool amount for the next step comes from the target of the previous step. If journals are not posted, the ledger is not updated. The next multiple step then draws erroneous data from the ledger. If you select this option, the PeopleSoft Allocations process calls the Journal Edit process (GL_JEDIT) first to edit the journals. If the journals fail in the Journal Edit process, the system does not post them to the ledger and the PeopleSoft Allocations process issues this error message: "Allocation step … is complete with journal created but not posted." Journals can fail the Journal Edit process for many reasons, including invalid ChartFields, balancing by ChartField, or ChartField combination edit. After you determine the cause of the problem, you might have to change the allocation step definition to avoid it. |
|
Budget Check Journal (s) |
Select this check box to run the Budget Processor to budget check journals for the commitment control ledgers. This option is available only if you enable the commitment control option. If you select this option, the system automatically selects Edit Journal. You must edit journals before you budget check them. |
|
When No Journals are Created |
Specify what you want the PeopleSoft Allocations process to do:
|
Commitment Control
Click the Commitment Control link to access the Commitment Control page.
In the Commitment Control Amount Type field, select from the following options:
|
Actuals and Recognized |
Select for the actual amount of the expenditure or the recognized revenue transaction. |
|
Encumbrance |
Select if the journal is not an actuals transaction. Instead, it records the amount that you authorize to be spent. This usually occurs when you create a contract or a purchase order. |
|
Pre-Encumbrance |
Select if the journal is not an actual transaction. Instead, it records the amount that you expect to expend. This usually occurs when you create a requisition. |
|
Collected Revenue |
Select if the journal records the collected amount from a prior revenue transaction. |
|
Actuals, Recognize and Collect |
Select if the journal records both recognize and collect amounts on the revenue estimate budget ledger. |
|
Planned |
Select if the journal records the amount that you plan to spend. This amount is only an estimate; it is not yet an actual transaction. |
Bypassing or Overriding Budget Checking
Click the Commitment Control link to access the Commitment Control page.
|
Bypass Budget Checking |
You can select this option to temporarily allow the journal to bypass budget checking. This field is active only if you enabled Commitment Control. |
|
Override |
If selected, journal entries are allowed to pass budget checking if they exceed their budgeted amount. This field displays the override user ID and override date. |
Budget Entry Type
The following options apply to commitment control budget journals:
|
Original |
Select to indicate an original budget journal entry. Used to record adopted or approved budgets. |
|
Adjustment |
Select to indicate an adjustment to an original budget. |
Parent Budget Options
Automatic generation of parent budget impacts revolves around the originating journal. The originating journal is a child level budget, budget adjustment, or transfer budget journal, entered manually or by journal import or allocations, on which parent or multiple parent budget level impacts are generated.
The automatic generation of parent budgets is discussed in the Commitment Control PeopleBook in the chapter dealing with posting of budgets.
See Generating Parent Budgets, Budget Adjustments and Budget Transfers Automatically.
Table Output Option
|
Table Output Option |
If the target or offset record that you select is Any Table on the Allocation Target or Allocation Offset pages, the Table Output Option field becomes available and you can select Replace Existing Amountor Update Existing Amount. |
Currency Conversion
The currency conversion fields are used by the PeopleSoft Allocations process to convert the base currency amount of the target and offset. The process converts the base currency if the base currency of the target and offset is different from the base currency of the pool. When allocating to a table, the business unit of the target and offset must be a General Ledger business unit; otherwise, the process does not convert the base currency amount.
|
Rate Type |
Specify the currency conversion exchange rate type. When allocating to a journal, if the rate type is blank, the process uses the rate type from the primary ledger of the target and offset ledger group. When allocating to a table, if the rate type is blank, the process does not convert the base currency amount. |
|
Currency Effective Date Code |
Select one of the following for the allocation:
|
See Also
Selecting Rounding and Distribution of Odd Cents Options
Access the Round Options page (Allocations, Define and Perform Allocations, Define Allocation Step, Round Options).
|
Round Options |
Specify the method to use to round the allocation amount from the following options:
|
|
Distribute Odd Cents |
For allocation types of prorata, spread even, and fixed basis, the process balances the target and offset amounts to the pool amount that is allocated. In other words, the process attempts to allocate 100 percent of the pool amount to the target and offset amount, sometimes resulting in odd cents. The Distribute Odd Cents option gives you the flexibility to determine where to distribute odd cents. Because allocation processing is set based rather than row-by-row to improve performance, this option is required for allocation types of prorata, spread even, and fixed basis.
If you are allocating within ChartFields or grouping by ChartFields in the definition, the process distributes odd cents with each group, ChartField value. Note. PeopleSoft recommends that you select the first two options for optimum performance. |
|
Field Name and Field Value |
If you select Specify ChartFields as the Distribute Odd Cents option, enter the ChartField combination to which you want to distribute the odd cents. Enter the ChartField in the Field Name field and the ChartField value in the Field Value field. For example, enter ACCOUNT for the field name and 100000 for the field value. |
The following examples show how the process rounds the allocation amounts if you select one of the options on this page:
|
Allocation Type |
Spread evenly. |
|
Pool Amount |
1000.00 with a currency precision of two for USD. |
|
Pool Factor |
100.00. |
|
Basis |
Dept ID: 11001, 12000, 13000, 14000, 15000, 16000. |
|
Target |
Account: 100000. Dept ID: values from basis. |
Example 1
The first example shows how the process rounds the allocation amounts if you specify the following options:
|
Distribute Odd Cents |
Specify ChartField. Account: 100004. Dept ID: 41000. |
|
Round Options |
Normal. |
The process uses the following formula to calculate the amounts:
Allocated Amount = (Pool Amount (Pool Factor/100)) (Basis Amount/Total Basis).
(1000 (1/6)) = 166.67 rounded:
|
Account |
Dept ID |
Allocated Amount |
|
100000 |
11001 |
166.67 |
|
100000 |
12000 |
166.67 |
|
100000 |
13000 |
166.67 |
|
100000 |
14000 |
166.67 |
|
100000 |
15000 |
166.67 |
|
100000 |
16000 |
166.67 |
|
100004 |
41000 |
-0.02 |
Example 2
The second example shows how the process rounds the allocation amounts if you specify the following options:
|
Distribute Odd Cents |
Last target line. |
|
Round Options |
Round up. |
The process uses the following formula to calculate the amounts:
Allocated Amount = (Pool Amount (Pool Factor/100)) (Basis Amount/Total Basis) + .005.
(1000 (1/6)) = 166.67 rounded:
|
Account |
Dept ID |
Allocated Amount |
|
100000 |
11001 |
166.67 |
|
100000 |
12000 |
166.67 |
|
100000 |
13000 |
166.67 |
|
100000 |
14000 |
166.67 |
|
100000 |
15000 |
166.67 |
|
100000 |
16000 |
166.65 |
Example 3
The third example shows how the process rounds the allocation amounts if you specify the following options:
|
Distribute Odd Cents |
Largest target. |
|
Round Options |
Round down. |
The process uses the following formula to calculate the amounts:
Allocated Amount = (Pool Amount (Pool Factor/100)) (Basis Amount/Total Basis) - .005.
(1000 (1/6)) = 166.67 rounded:
|
Account |
Dept ID |
Allocated Amount |
|
100000 |
11001 |
166.70 |
|
100000 |
12000 |
166.66 |
|
100000 |
13000 |
166.66 |
|
100000 |
14000 |
166.66 |
|
100000 |
15000 |
166.66 |
|
100000 |
16000 |
166.66 |
See Also
Selecting Rounding and Distribution of Odd Cents Options
Specifying Batch Records
Access the Batch Records page (Allocations, Define and Perform Allocations, Define Allocation Step, Batch Records).
|
Calculation Log Record |
Specify to create a calculation log for a complete audit trail for debugging. Select the Create Calculation Log option on the Allocation Request page. You can use the delivered calculation log record, ALLOC_CALC_LOG, for all allocation steps that are processed against the actuals ledger (but not the budgets ledger, which might have ChartFields that are different from the actuals ledger). If the allocation is not processed against the actuals ledger, modify the Calculation Log Record field or create a unique record. |
|
Pool |
Specify the temporary table for the pool data. The PeopleSoft Allocations process uses this table to store the temporary data for the pool. |
|
Basis |
Specify the temporary table for the basis data. The PeopleSoft Allocations process uses this table to store the temporary data for the basis. |
|
Target Detail |
Specify the temporary table for the target detail data. The PeopleSoft Allocations process uses this table to store the temporary data for the target. |
|
Target Summary |
Specify the temporary table for the target summary data. The PeopleSoft Allocations process uses this table to store the summarized data for the target and offset. |
|
Offset Detail |
Specify the temporary table for the offset detail data. When allocating to a journal, sometimes the process uses a separate temporary table to store the offset data. |
|
Offset Summary |
Specify the temporary table for the Offset Summary data. Data is summarized from the target record or journals. When allocating to a journal, sometimes the process uses a separate temporary table to store the offset summary data. |
|
Target Balance |
Specify the temporary table for the target balance data. The PeopleSoft Allocations process uses this table to store the target balance lines, which are necessary to balance the target and offset against the pool amount. |
|
Calculation Log |
Specify the temporary table (ALC_CLOG_TAO) to the calculation log. |
|
Default |
Click the Default button to assign the default temporary tables. The process assigns the temporary tables based on the setup of the pool, basis, target, and offset. |
PeopleSoft delivers these standard temporary (TAO) tables:
|
Temporary Table |
General Ledger |
Projects |
|
Calculation log |
ALC_CLOG_TAO |
ALC_CLOG_TAO |
|
Pool |
ALC_GL_P_TAO |
ALC_PC_P_TAO |
|
Basis |
ALC_GL_B_TAO |
ALC_PC_B_TAO |
|
Basis Summary |
ALC_GL_BS_TAO |
ALC_PC_BS_TAO |
|
Target Detail |
ALC_GL_T_TAO |
ALC_PC_T_TAO |
|
Target Summary |
ALC_GL_TS_TAO |
ALC_PC_TS_TAO |
|
Offset Detail |
ALC_GL_O_TAO |
ALC_PC_T_TAO |
|
Offset Summary |
ALC_GL_OS_TAO |
ALC_PC_TS_TAO |
|
Target Balance |
ALC_GL_TB_TAO |
ALC_PC_TB_TAO |
Use the standard General Ledger TAO tables to allocate ledger (including all ledger, commitment control, projects, and budgets) and journal data.
Use the standard Project Costing TAO tables to allocate projects resource data.
Note. When allocating to a journal, the PeopleSoft Allocations process sometimes uses a separate temporary table for the offset detail and offset summary data in order to optimize the processing performance. The process determines if it must use a separate temporary table at runtime. Even if you specify a different table for the offset detail and summary, the process might not use a separate temporary table to process the offset data. There are no delivered offset detail and summary TAO tables for projects because these tables are not used to allocate to a journal.
PeopleSoft recommends that you use the standard delivered TAO tables.
Note. If you specify the value Any Table in the Pool Record Type field, add any additional fields that might be required to the delivered ALC_GL_P_TAO table.
If you are using your own customized TAO tables, use the delivered TAO tables as a model. Open the delivered TAO table and do a save as to create a TAO table. The following fields are required:
PROCESS_INSTANCE, LOGICAL_RECORDS, BUSINESS_UNIT, BUSINESS_UNIT_IU.
ChartField that are applicable to the process, such as Account, DEPTID, and so on.
Amount Fields and the currency control fields that are applicable to the amounts that are allocated.
This should also include the calculation log pool and basis amount fields, namely, ALLOC_POOL_AMT, ALLOC_POOL_PBA, ALLOC_POOL_PTR, ALLOC_BASIS_AMT, ALLOC_BASIS_TOT.
Fields required for interunit processing, IU_TRAN_GRP_NBR, IU_ANCHOR_FLG.
Fields required for intraunit processing, CF_VALUE1 to CF_VALUE10.
Field required for base currency conversion, BASE_CURRENCY_POOL, RATE_MULT, RATE_DIV.
Fields required for time span, ACCOUNTING_PERIOD, FISCAL_YEAR.
Other fields that are applicable to the setup.
For example, if you are allocating to a specific ledger, add field LEDGER to the TAO tables.
Note. To increase performance, the PeopleSoft Allocations process attempts to use a dedicated temporary table for all TAO tables. If you are using your own TAO tables, use dedicated temporary tables that are created in PeopleSoft Application Designer and define the record type as a temporary table. Define the temporary tables in the definition of the PeopleSoft Allocations process (FS_ALLC).
See Also
Understanding General Ledger Background Processes
Defining Amount Fields
Access the Amount Fields page (Allocations, Define and Perform Allocations, Define Allocation Step, Amount Fields).
Use this page to define the fields in the chosen pool record that store the pool amounts, the fields in the chosen basis record that store the basis amounts, and where the system is to put the calculated amounts in the chosen target and offset records.
You can specify many sets of amount fields to perform allocations. For example, Project Costing can allocate on both resource amount and resource quantity fields in the same allocations. You can allocate pool resource amounts by using the basis resource amount percentage-to-total ratio and the pool resource quantity by using the basis resource quantity percentage-to-total ratio. You can also allocate both the pool resource amount and resource quantity using the basis resource amount percentage-to-total ratio. This page gives you the flexibility to define how the amounts are distributed from the fields in the pool record to the fields in the target and offset record.
General Ledger provides information about the total balances in the base currency and in individual transaction currency balances. Use the posted total amount field to get the total balance in the base currency. You can use the Posted Transaction Amount field to get the individual transaction currency balances. The Posted Transaction Amount (POSTED_TRAN_AMT) and Posted Total Amount (POSTED_TOTAL_AMT) fields exist in the ledger table to store different currency information.
The following simplified example illustrates the totals as recorded in the ledger for three transactions in three currencies: 1000 EUR, 100 USD, and 1000 GBP. Assume that the base currency is USD. Also, assume that 1 EUR is equal to 1.10 USD and that 1 GBP is equal to 1.58 USD. After the three transactions are recorded, the balances in the ledger are as follows:
|
Currency |
Posted Total Amount |
Posted Base Currency Amount |
Posted Transaction Amount |
|
EUR |
1000 |
1100 |
1000 |
|
USD |
2780 |
100 |
100 |
|
GBP |
1000 |
1580 |
1000 |
Note. The Foreign Amount (FOREIGN_AMOUNT) field on the journal line is the transaction currency amount and is ultimately recorded in the posted transaction amount. The Monetary Amount (MONETARY_AMOUNT) field on the journal line is the equivalent of the base currency amount and is recorded in the posted base amount. It is important to keep this relationship between ledger and journal line fields in mind when the target and offset are journal lines.
|
Fixed Pool Amount |
Enter an amount if the pool is not a record but a fixed amount. This field is not available if you do not specify Fixed Amount in the Pool Record Type field on the Pool page. |
|
Amount |
Select amount fields for the Pool, Basis, Target, and Offset. Depending on the records and fields that you specify on the Pool, Basis, Target and Offset pages, the system displays possible fields for the amount in the drop-down menus. Following are values for a RENTEXP allocation example that uses the ledger group record and the Account field for pool and basis and is allocating the pool amount to the journal record for target and offset. The values that are available in the drop-down menus differ depending on the records and fields that are specified for the basis, pool, target and offset, and thus for the product for which the allocation is intended. For example, the values are different for Project Costing and General Ledger allocations because the records and fields are different. You must thoroughly understand the relationship between records and fields in the product and between pool, basis, target, and offset before you can successfully complete the allocations.
|
|
Base Amount |
Select from the values for the Pool, Target, and Offset fields.
|
|
Transaction Amount |
Specify the Posted Transaction Amount to allocate the individual transaction currencies when the target record is specified as Any Table on the Target page. The allocation must be allocating to a record for this field to be available. It does not appear on the Amount page otherwise. |
|
Log Amount |
Select the appropriate fields from the Calculation Log record used to store the pool, basis, and target amounts to provide an audit trail. |
|
Log Base Amount |
Select the appropriate fields from the Calculation Log record:
|
|
Log Basis Total Amount |
The amount field in the Calculation Log record that is used to store the total basis amount for the audit trail. Dividing the value stored in the Log Basis field by the value stored in the Log Basis Total field gives you the percentage of pool amount distributed to the target. |
The following are examples of the setup for the amount fields for various allocation scenarios.
For example, if you are allocating on monetary amounts for General Ledger, the pool record might be Ledger Group ACTUALS and the Target record journals ACTUALS. The allocation fields are:
|
Allocation Amount Fields |
Field Value |
|
Pool Amount |
POSTED_TRAN_AMT |
|
Pool Base Amount |
POSTED_BASE_AMT |
|
Target Amount |
FOREIGN_AMOUNT |
|
Target Base Amount |
MONETARY_AMOUNT |
The actual pool and target records are LEDGER and JRNL_LN, respectively. The currency control fields that are defined in PeopleSoft Application Designer for the POSTED_TOTAL_AMT, POSTED_TRAN_AMT, and POSTED_BASE_AMT fields are the CURRENCY_CD and BASE_CURRENCY fields for the LEDGER record. The currency control fields that are defined in PeopleSoft Application Designer for the FOREIGN_AMOUNT and MONETARY_AMOUNT fields are the FOREIGN_CURRENCY and CURRENCY_CD fields for the JRNL_LN record.
Using these currency control field definitions, allocations automatically determine that the target record's FOREIGN_CURRENCY field value source is from the pool record's CURRENCY_CD field value, and the target record's CURRENCY_CD field value source is from the pool record's BASE_CURRENCY field value. You need not define the currency field values explicitly for the Target and Offset fields.
These currency control field values also determine the currency precision and rounding feature in the PeopleSoft Allocations process. For example, if the target record FOREIGN_CURRENCY field value is USD, the system rounds the FOREIGN_AMOUNT to the second decimal. If the target record FOREIGN_CURRENCY field value is JPY (Japanese yen), the system rounds the FOREIGN_AMOUNT to the integer.
The PeopleSoft Allocations process uses the target record's currency control field values to determine the currencies that are for the target and offset records. If you are allocating on fixed pool amounts, there is no pool record; you must specify the target and offset records' currency field values in the Target and Offset fields. For example, if you are allocating 100.00 USD, you enter 100 in the Fixed Pool Amount field on the Amount page. On the Target and Offset pages, specify the FOREIGN_CURRENCY and CURRENCY_CD fields in the Specify Field Values group box. Set the Source field value on the Target and Offset page to Value.
The following table is an example of the fields that are used when allocating on monetary amounts in PeopleSoft applications:
|
Allocation Amount Field |
Field Value |
|
Pool Amount |
POSTED_TRAN_AMT |
|
Pool Base Amount |
POSTED_BASE_AMT |
|
Basis Amount |
POSTED_TOTAL_AMT |
|
Target Amount |
FOREIGN_AMOUNT |
|
Target Base Amount |
MONETARY_AMOUNT |
|
Offset Amount |
FOREIGN_AMOUNT |
|
Offset Base Amount |
MONETARY_AMOUNT |
|
Pool Log Amt |
ALLOC_POOL_AMT |
|
Pool Log Base Amt |
ALLOC_POOL_PBA |
|
Basis Log Amt |
ALLOC_BASIS_AMT |
|
Basis Log Total |
ALLOC_BASIS_TOT |
|
Target Log Amt |
ALLOC_TARG_OFF_AMT |
|
Target Log Base Amt |
ALLOC_TARG_OFF_PBA |
The following example shows fields used when allocating to statistics amounts in PeopleSoft applications:
|
Allocation Amount Field |
Field Value |
|
Pool Amount |
POSTED_TOTAL_AMT |
|
Pool Base Amount |
optional |
|
Basis Amount |
POSTED_TOTAL_AMT |
|
Target Amount |
STATISTIC_AMOUNT |
|
Target Base Amount |
optional |
|
Offset Amount |
STATISTIC_AMOUNT |
|
Offset Base Amount |
optional |
|
Pool Log Amt |
ALLOC_POOL_AMT |
|
Pool Log Base Amt |
optional |
|
Basis Log Amt |
ALLOC_BASIS_AMT |
|
Basis Log Total |
ALLOC_BASIS_TOT |
|
Target Log Amt |
ALLOC_TARG_OFF_AMT |
|
Target Log Base Amt |
optional |
If you are multiplying a statistics pool amount (such as, hours) by a basis amount (such as , hourly rate) in PeopleSoft applications to create a monetary amount target, explicitly specify the FOREIGN_CURRENCY and CURRENCY_CD field values for the target and offset record. The amount fields are defined as follows:
|
Allocation Amount Field |
Field Value |
|
Pool Amount |
POSTED_TOTAL_AMT |
|
Pool Base Amount |
optional |
|
Basis Amount |
POSTED_TOTAL_AMT |
|
Target Amount |
FOREIGN_AMOUNT |
|
Target Base Amount |
MONETARY_AMOUNT |
|
Offset Amount |
FOREIGN_AMOUNT |
|
Offset Base Amount |
MONETARY_AMOUNT |
|
Pool Log Amt |
ALLOC_POOL_AMT |
|
Pool Log Base Amt |
optional |
|
Basis Log Amt |
ALLOC_BASIS_AMT |
|
Basis Log Total |
ALLOC_BASIS_TOT |
|
Target Log Amt |
ALLOC_TARG_OFF_AMT |
|
Target Log Base Amt |
ALLOC_TARG_OFF_PBA |
If you are creating budgets for next year in PeopleSoft applications and you do not want to carry all foreign currencies in the budget ledger but instead you want to use the consolidated total amounts for all currencies, you can specify the currency code equal to the base currency for your pool. Define the amount fields as follows:
|
Allocation Amount Field |
Field Value |
|
Pool Amount |
POSTED_TRAN_AMT |
|
Pool Base Amount |
POSTED_BASE_AMT |
|
Basis Amount |
POSTED_TOTAL_AMT |
|
Target Amount |
FOREIGN_AMOUNT |
|
Target Base Amount |
MONETARY AMOUNT |
|
Offset Amount |
FOREIGN_AMOUNT |
|
Offset Base Amount |
MONETARY_AMOUNT |
|
Pool Log Amt |
ALLOC_POOL_AMT |
|
Pool Log Base Amt |
ALLOC_POOL_PBA |
|
Basis Log Amt |
ALLOC_BASIS_AMT |
|
Basis Log Total |
ALLOC_BASIS_TOT |
|
Target Log Amt |
ALLOC_TARG_OFF_AMT |
|
Target Log Base Amt |
ALLOC_TARG_OFF_PBA |
Defining the Allocation Group
To define the allocation group, use the Define Allocation Group component (ALLOC_GROUP).
This section provides an overview of the allocation group and discusses how to put process steps in allocation groups.
Understanding the Allocation GroupYou can define multiple allocation steps for step-down allocations across ChartFields. The target for each step can become the next step's pool or basis. You define an allocation group for these steps and then process the allocation on the group. If a step in the sequence fails, the Continue option determines if processing continues for the next step.
The allocation group is effective-dated, allowing you to track the historical basis of the financial data that results from allocation processing.
Note. Even if there is only one step in an allocation, you must define an allocation group.
Page Used to Define Allocation Group
|
Page Name |
Definition Name |
Navigation |
Usage |
|
ALLOC_GROUP |
Allocations, Define and Perform Allocations, Define Allocation Group |
Define multiple allocations across ChartFields. |
Putting Process Steps in Allocation GroupsAccess the Allocation Group page (Allocations, Define and Perform Allocations, Define Allocation Group, Allocation Group).
Use the icons in the upper right corner of the page to copy, rename, or delete the allocation group.
|
|
Click the Copy Allocation Group button to make a copy of the group. |
|
|
Click the Rename Allocation Group button to rename the copy group. |
|
|
Click the Delete Allocation Group button to delete the copy group. |
|
Effective Date |
Enter the date that the Allocation Group is to be effective. This provides the ability to change the Allocation Group as time progresses and retain the audit trail of those changes. |
|
Status |
Select a status of Active or Inactive for the Allocation Group. |
|
Description |
Enter a short description to appear in prompt lists and reports. |
|
Comments |
Add a detailed explanation for the Allocation Group and document the purpose of each step within a complex allocation. |
|
Step |
Enter the name of the process step that determines the various allocations processing options in addition to the pool, basis, target, and offset ChartFields. Define each allocation step in a series of pages. You must define a step before you can select it in the allocation process group sequence. After it's defined, you can use a step in any number of allocations. The sequence determines the order in which the PeopleSoft Allocations process performs the steps. It is important to enter them in the correct sequence because the target of each step becomes the pool for the next step (or basis if the journals are posted). |
|
Continue |
Select for a specific step to indicate that you want the system to continue processing even if that allocation step fails. |
See Also
Defining Allocation Process Steps
Copying, Renaming, or Deleting Allocation Steps
This section provides an overview of copying, renaming, or deleting allocation steps and discusses how to copy, rename, or delete allocation steps.
Understanding Copying, Renaming, or Deleting Allocation StepsThe PeopleSoft Allocations process requires several steps. Chances are that some of the steps in a single allocation—or even steps for a different allocation altogether—can be quite similar. It's possible to use identical steps in several allocations simply by specifying the step name; there is no limit to the number of times or places that you can use a given step.
Page Used to Copy, Rename, or Delete Steps|
Page Name |
Definition Name |
Navigation |
Usage |
|
GL_ALC_COPY |
Allocations, Define and Perform Allocations, Copy / Rename / Delete Allocation Step |
Create new steps that are identical or similar to the ones that you already defined. Also rename or delete an allocation step. |
Specifying the Parameters for a Copy, Rename, or DeleteAccess the Copy / Rename / Delete Allocation Step page (Allocations, Define and Perform Allocations, Copy / Rename / Delete Step, Copy / Rename / Delete Allocation Step).
|
Action |
Select one of the action options: For Copy or Rename, the New Step field is available. Use this field to identify the new step or rename the original one. If you select Delete, the process purges the step definition from the system. If you rename to delete a process step, the process automatically updates the allocation process groups. |
|
Allocation Step |
Select the step that you want to manipulate. |
|
Add Step to Allocation Groups |
When you copy a step, you can choose one of the following options to add the step to the process group where the process step, used to copy the new step, exists:
|
Creating Adjusting Entry Journals
To create adjusting entry journals, use the TimeSpans component (TIME_SPAN).
This section provides an overview of allocations and adjusting entry journals and discusses how to:
Set up time span definitions specifying absolute period.
Set up time span definitions specifying relative period.
Allocate to multiple adjustment periods.
Specify the Adjusting Entry option.
Understanding Allocations and Adjusting Entry JournalsThe PeopleSoft Allocations process supports creating adjusting entry journals, where the accounting period is an adjustment period. Adjustment periods can be defined as absolute period or relative to current period.
Page Used to Create Adjusting Entry Journals|
Page Name |
Definition Name |
Navigation |
Usage |
|
TIME_SPAN |
Set Up Financials/Supply Chain, Common Definitions, Calendars/Schedules, TimeSpans |
Specify the adjusting period's type for the output. |
Setting Up TimeSpan Definitions Specifying Absolute Period
Access the TimeSpans page (Set Up Financials/Supply Chain, Common Definitions, Calendars/Schedules, TimeSpans).
In this example, the adjustment period is set up for the absolute period of 905.
Setting Up TimeSpan Definitions Specifying Relative Period
In the following example, the adjustment periods are defined relative to the current regular period:
The adjustment period is the Start Adjustment Period/End Adjustment Period value that is specified, plus the current regular period. For example, suppose that you are processing allocations in March, then the current period is 03 (monthly calendar) and the adjustment period is 903.
The advantage of defining the adjustment period as relative to the current period is that you need not maintain the adjustment period value in the time span.
Allocating to Multiple Adjustment Periods
Use relative adjustment periods to allocate to multiple adjustment periods. In this example, the TimeSpans page is defined for allocations to create adjusting journal entries for adjustment periods 901 through 912:
Specifying the Adjusting Entry Option
Select a time span that uses adjustment period on the allocations Target page.
Notice in the following example that if the TimeSpan that you select on the Target page is set up to use adjustment periods, the Adjusting Entry options on the allocation Output Option page are visible.
The PeopleSoft Allocations process uses this option to determine which accounting periods are used with the journals. If the Adjusting Entry option is selected, the PeopleSoft Allocations process creates the journal or journals with the adjustment period or periods that are defined in the target time span. If the option is not selected, allocations creates the journal or journals with the regular accounting period or periods.
Setting Up Interunit and Intraunit Allocations
The PeopleSoft Allocations process creates what are initially unbalanced allocation journal entries between legal entities (interentity), between business units (interunit), and among balancing ChartFields within a particular business unit (intraunit).
The PeopleSoft Allocations process does not create the interunit and intraunit balancing journal lines as a part of the process. The interunit and intraunit balancing transaction lines are created by the Inter/IntraUnit Processor, which is run from journal edit.
In the following example, business unit JP001 is allocating rent expense that is accumulated in its account 640000 in the amount of 1000000 JPY to JP001, JP002, and JP003 on a fixed basis of 50 percent, 20 percent, and 30 percent, respectively.
The following illustrates a simple allocation of this expense across multiple business units:
|
BU Pool |
Fixed Basis |
Target by Basis |
Offset to BU Pool |
|
JP001 |
50 percent to JP001 |
JP001 |
JP001 |
|
|
20 percent to JP002 |
JP002 |
|
|
|
30 percent to JP003 |
JP003 |
|
You create an interunit and intraunit allocation much as you would any other, except that you must select an appropriate transaction code on the Allocation Type page. The PeopleSoft Allocations process populates this value on each journal entry line.
The transaction code is a means to categorize interunit and intraunit transactions. In this instance, we have used the delivered System Transaction for General Ledger journals (GLJ) and the Transaction Code JOURNALS.
If you want to distinguish the allocated interunit and intraunit rent receivables and payables from all others, you can create a transaction code (such as AllocJrnl) and map it to the GLJ System Transaction. You must also create interunit templates and intraunit templates that associate the new transaction code with accounting entry types for which you provide ChartField values that are used by the system to complete the partial interunit and intraunit entries.
The PeopleSoft Allocations process supplies the following information for the journal header:
|
Business Unit |
Business Unit IU |
System Transaction |
Transaction Code |
|
JP001 |
JP001 |
GLJ |
JOURNALS |
|
JP002 |
JP001 |
GLJ |
JOURNALS |
|
JP003 |
JP001 |
GLJ |
JOURNALS |
The PeopleSoft Allocations process creates the following journal line information:
|
IU Group |
Anchor |
Line # |
BU |
Acct |
Amount |
|
1 |
JP001 |
1 |
JP001 |
640000 |
-1000000 |
|
1 |
|
2 |
JP001 |
640001 |
500000 |
|
1 |
|
3 |
JP002 |
640001 |
200000 |
|
1 |
|
4 |
JP003 |
640001 |
300000 |
The anchor is the business unit or ChartField value around which the system completes the entry and determines such things as the balancing method and organizes the related journal lines in the same IU group (interunit group).
For intraunit allocation steps, the process always defines a unique IU group for each balancing ChartField value that is defined in the pool. For interunit, the process always uses an IU group number of 1.
The PeopleSoft Allocations process derives the anchor business unit based on the definition setup.
The process first checks to determine if the business unit is defined in the offset as a fixed value. If this condition is the case, the process uses the offset fixed value as the anchor.
If not, the business unit is not in the offset as a fixed value, the process checks if the business unit is defined in the target as a fixed value. If this condition is true, the process uses the target fixed value as the anchor.
If the business unit is not defined in the target or offset as a fixed value, then the process uses the business unit from the pool as the anchor.
Note. If there are multiple pool values, each is processed against the basis in turn. The result is a separate IU group for each pool value and its journal entry lines. Use any of the interunit business units that are defined in the pool when requesting interunit allocations.
At this point, the rent expense is allocated but the journal is not in balance because you have not yet created the due to and due from interunit or intraunit payables and receivables lines. When you run the Inter/IntraUnit Central Processor, it provides the following information or additional lines to balance the journal entry (lines 5 through 8):
|
IU Group |
Anchor |
Line# |
BU |
Acct |
Affiliate |
Amount |
|
1 |
5 |
JP001 |
100000 |
JP002 |
200000 |
|
|
1 |
6 |
JP001 |
100000 |
JP003 |
300000 |
|
|
1 |
7 |
JP002 |
100000 |
JP001 |
-200000 |
|
|
1 |
8 |
JP003 |
100000 |
JP001 |
-300000 |
See Also
Using Interunit and Intraunit Accounting and ChartField Inheritance
Using Allocations with PeopleSoft Project CostingThere are two basic types of allocations that you can perform in PeopleSoft Project Costing by using the PeopleSoft Allocations process:
Project-to-project allocations.
General Ledger to Project Costing allocations.
The PeopleSoft Project Costing 9.1 PeopleBook discusses using the PeopleSoft Allocations process in Project Costing and provides an example of a project-to-project allocation step.
See Also
Using Allocations with PeopleSoft Project Costing
Processing Allocations in PeopleSoft Project Costing
Running an Allocation Request
This section discusses how to run the allocation request.
Page Used to Run the Allocation Request|
Page Name |
Definition Name |
Navigation |
Usage |
|
ALLOC_REQUEST |
Allocations, Define and Perform Allocations, Request Allocation, Allocation Request |
Specify parameters for running the PeopleSoft Allocations process. |
Specifying the Allocation Process Request ParametersAccess the Allocation Request page (Allocations, Define and Perform Allocations, Request Allocation, Allocation Request).
Run the request after you define the allocation steps and allocation group.
|
Unit |
Specify the business unit for the PeopleSoft Allocations process. For non-interunit steps, this business unit also determines the business unit value for the pool and basis rows that are selected. For interunit steps, use any one of the business units that are defined in the pool when requesting interunit allocations. |
|
Allocation Group |
Identify the allocation group to be processed in this request. |
|
Request Date Option |
Select the As of Date value in the Request Date Option field, and two additional As of Date fields become available. The as of date moves by default to the current system date; however, you can change the date for individual lines by using the As of Date field on each line or for all lines using the As of Date field for the request. You can define individual steps in an allocation group using relative time spans, such as PER (Current Period Activity). A relative time span retrieves ledger amounts relative to the Request Date Option that you specify. The request date options are:
|
|
|
Click the Update As of Date button to change the as of date for all lines in the run requests to the current date or the date that you specify. |
|
Output Options |
Select one of the following options:
|
Note. Calculation logs are cleared using SQL scripts.
|
Start Step |
When errors occur and processing aborts, you can restart processing at the step that failed by selecting Start Step. This option appears only if an error occurred during processing. |
See Also
Restarting and Recovering the Allocations Process
Producing Allocations Reports
The allocation reports provide information about the allocation setup and the results of a PeopleSoft Allocations process run.
Pages Used to Produce Allocation ReportsViewing Process Messages
The run status in the process monitor appears as a warning if allocations generates any error messages for the request. Use the Message Log to view any system-generated messages when you process allocations. The Message Log can also help you to troubleshoot allocations and to audit allocation information.
Restarting and Recovering the Allocations Process
If the system encounters an error while it is processing a request, it sets the request status to error The program then continues with the next request. To rerun the canceled request, you must return to the online request page and initiate the request.
You can use the Message Log page to identify any request marked in error. When you correct the condition that caused the error, mark the request for processing and run the job again.
For allocations, the request specifies the allocation group to be processed and a commit is performed after each allocation step in that group. If the system encounters an error while it is processing a step, two factors determine whether the system continues with subsequent steps:
The type of error.
The Continue option on the Allocation Group page.
If the error is a system error, the allocation process aborts. If the error is a data error, the system checks the Step Continue option on the Allocation group definition.
If you select Continue for the step that failed, the system continues processing despite the failure. If you do not select Continue for that step, allocations proceeds with the next group on the request. After you correct the problem that caused the error, you can rerun the process for the same group.
The Start Step check box on the Allocation Request page enables you to specify whether the PeopleSoft Allocations process should restart processing at the step that failed. If you do not select this check box, allocations starts with the first step in the group. The Start Step option is available only if an error occurred during processing.