 Understanding Demantra Integration
This chapter provides an overview of Demantra integration and discusses how to:
Set up calendars and weight profiles.
Build demand history.
Map fields for exporting to Demantra.
Export demand history.
Review demand history.
Import forecast data.
Review and update imported forecast.
Understanding Demantra IntegrationThis section discusses:
PeopleSoft Advanced Planning - Demantra processes.
Information flow between PeopleSoft and Demantra Demand Management.
Oracle's Demantra Demand Management Integration, enables you to use the Demantra Demand Management system in conjunction with PeopleSoft's demand history data, Inventory, Supply Planning, and Inventory Policy Planning. Demantra Demand Management is a configurable, web-based product that helps an organization perform demand planning and forecasting. The product provides access to historical and other reference data.
Using the Advanced Planning, Demantra component, you can manage the integration of data between PeopleSoft and Demantra Demand Management. You can establish and maintain demand history data and export this data to the Demantra planning system using an Oracle Process Integration Package (PIP). The system can then generate forecasts using the Demantra Demand Management application and its forecasting calculations. After forecasts have been generated in Demantra, you can:
Export the forecast from Demantra to a flat file using the Process Integration Package.
Import the forecast flat file back into PeopleSoft using the Import Forecast component.
After the forecasts have been imported into PeopleSoft they are then available for use by other PeopleSoft applications.
This chapter only provides details about the PeopleSoft Supply Chain Management Integrations component. For more information about using integration processes and programs, review these documents.
Oracle Application Integration Architecture Release 1.0, Oracle Value Chain Planning Integration to JD Edwards EnterpriseOne Implementation Guide.
Oracle Application Integration Architecture Release 1.0, Oracle Value Chain Planning Integration to JD Edwards EnterpriseOne Installation Guide.
Oracle Application Integration Architecture Release 1.0, Oracle Value Chain Planning Integration to JD Edwards EnterpriseOne Release Notes.
PeopleSoft Advanced Planning - Demantra Processes
The setup and processing of data to be exported to and imported from Demantra Demand Management is accomplished using the Advanced Planning - Demantra component. Using the component you:
Create calendars and weight profiles.
You use calendars and weight profiles to define different period buckets and weights for each day and are passed to Demantra using the Process Integration Package.
Create a map ID that maps PeopleSoft fields to Demantra integration file fields.
This map is used to define which data is passed from PeopleSoft to Demantra Demand Management for use in forecast generation.
Build demand history from PeopleSoft application internal data.
Internal data is transactional data that consists of demand quantities, dates, costing information, and attributes that are related to the product, item, location, and customers and so on.
Create specifications and run controls to export PeopleSoft data to Demantra Demand Management.
Create specifications and run controls to import forecast data from Demantra Demand Management.
This data is used to publish forecast information and populate existing publish tables for PeopleSoft applications.
Review imported forecast information.
Information Flow Between PeopleSoft and Demantra
To support the use of the Demantra Demand Management application, system administrators need to install the application and users must be familiar with the application's setup and use.
The Oracle Process Integration Package also needs to be installed, setup, and configured and users must be familiar with this as details are not provided by PeopleSoft.
The next example illustrates the processing steps required to integrate PeopleSoft with Demantra Demand Management:
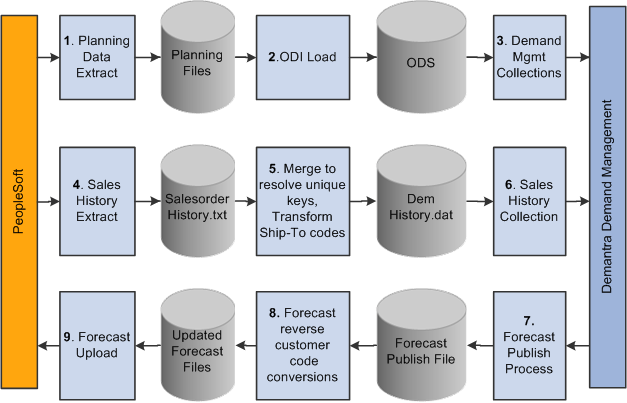
Exporting demand and importing forecast data processing steps
The process for exchanging files between PeopleSoft and Demantra Demand Management includes:
Extracting planning data.
This is performed in PeopleSoft using the Base, Customer, and Calender Export options. The system uses data in the demand history to populate the base.xml, customer.xml and calendar.txt files that are required by the Process Integration Package.
Loading data into the Oracle Data Integrator (ODI).
The system processes base, customer, and calendar files and loads data into ODI using the Process Integration Package.
Collecting demand management item, organization, and customer data
The data is loaded from the Operational Data Store (ODS) into Demantra using the Process Integration Package.
Extracting sales history.
Using the Sales Export option in PeopleSoft, the system extracts sales history data from the demand history to populate the SalesOrderHistory.txt file.
Merging and resolving unique keys and transforming ship-to codes.
The Process Integration Package processes the SalesOrderHistory file together with data already loaded into the ODS, and uses it to generate a file of demand history called DemHistory.dat.
Collecting sales history.
The PIP processes the DemHistory file and loads the data into Demantra Demand Management.
Exporting forecast publish process data is from Demantra Demand Management using the PIP.
Converting the forecast and reverse the customer code.
The PIP processes the exported forecast data to generate a file of forecast details called forecast.txt.
Uploading the forecast.
The forecast.txt file is imported into PeopleSoft and used to populate the publish tables that will be ready for use by PeopleSoft Supply Planning, Inventory Policy Planning and Inventory applications.
Common Elements Used in This Chapter|
Item/Product Forecasts |
Select a value that determines the nature of the forecast. If you select Item, the system sets the Item Code field to INV_ITEM_ID and the Organization field to BUSINESS_UNIT_IN. If you select Product the system sets the Item Code field to PRODUCT_ID and the Organization field to BUSINESS_UNIT_OM. |
|
Publish Name |
Enter or select a label that other applications use to identify the publish activity. The name is a logical name that you can use to publish a forecast again and again. When you import forecasts, you can select which name you want to use to populate publish forecast tables. The system uses this field, along with a forecast publish date, to create a unique publish instance that other applications use to retrieve the published data. |
|
Map ID |
Select or enter a map ID. You use map IDs to map data fields from PeopleSoft to Demantra Demand Management flat files. During the demand export and forecast import processes, the system uses the map ID to identify what data to export and to validate the data that is being imported. |
Setting Up Calendar and Weight ProfilesThis section provides an overview of calendars and discusses how to:
Define calendar patterns.
Create and maintain calendars.
Define calendar periods.
 Understanding Calendars
A calendar in PeopleSoft controls forecast and inventory policy parameters for each day of the year by using weights. The system stores weights for each day and distributes raw data into different period buckets based on the weights.
Note. Some calendar attributes are used by PeopleSoft Inventory Policy Planning and not in conjunction with Demantra Demand Management integration.
See Creating Calendars.
Here are some key factors for working with calendars:
Establish an overall time frame that might extend over several years.
A calendar should start at a date that is equal to or prior to the earliest date of the demand history that you want the application to populate and recognize. The calendar should extend beyond the end of the forecast horizon.
Set up a standard calendar which includes the generally observed corporate holidays or vacations. You can then copy this calendar to other calendars as a starting point when setting up calendars to reflect local operating conditions.
Define multiple calendars that cover the same date ranges.
Change days within a specific calendar to contain various elements of data.
Calendar patterns are week-long templates that you use to maintain calendar weights for each day in a weight profile. The week is from Monday through Sunday. Use patterns to set up daily weights attributes quickly for calendar weight profiles and apply them to a range of dates within the weight profile.
Weight profiles are templates that you use to create and maintain daily weights. The default weight profile typically has a normal weight distribution across a given date range.
Here are some examples of weight profiles that can be set up for customer ordering patterns:
Orders are placed on the 1st and the 15th of the month.
Orders are placed toward the end of the month.
Orders are placed toward the end of the quarter.
Periods define time buckets for a calendar. Each calendar period is numbered within a year, either based on a calendar or fiscal year, and has a start date and an end date.
The definitions also allow the system to associate fiscal years and periods with underlying calendars, based on calendar years. For example, suppose that an organization's fiscal year runs from July to June on a monthly basis and you associate month one with July. The calendar period definition runs from July 1 of the starting year to June 30 of the ending year. In turn, the definition associates period one in each fiscal year with the month of July.
You cannot overlap start and end dates within a single period definition. However, the same day can belong to a different period in another period definition. The period definitions are independent of the daily weight attributes and therefore, the same day within the same calendar has identical attributes even if it is contained in multiple period definitions.
Note. When deciding whether to base period definitions on calendar or fiscal years, consider which period that forecasters and collaborators consider as period one. When the forecast is published for use by PeopleSoft Inventory Policy Planning, Supply Planning or Inventory, the system uses dates to determine the period to which the forecast is assigned.
The system copies the data setup for a pattern code to the appropriate day in the weight profile. You can apply different pattern codes for different date ranges to change daily attributes or weightings for days that are in a selected date range. The pattern code is not stored in the weight profile; rather, the system copies attributes from the pattern code to each day in the weight profile. Therefore, you can reapply the pattern-code data to parts of the weight profile at any time.
You can also:
Create new pattern codes and apply them to weight profiles that are already in use.
Assign pattern codes to weight profiles by using the Weight Profiles page. To access the page, select Define Calendars, Weight Profiles.
Change details for an existing pattern code at any time.
This does not change the details on a weight profile where the pattern code has been used. To change the weight profile details, you must maintain the individual weight profile by reapplying the new pattern code to it or by changing the weight details manually on the weight profile.
Pages Used to Set Up Calendar and Weight Profiles|
Page Name |
Definition Name |
Navigation |
Usage |
|
DP_CALENDARPATTERN |
SCM Integrations, Advanced Planning, Demantra, Calendar Patterns |
Define calendar patterns. |
|
|
DP_CALENDARS |
SCM Integrations, Advanced Planning, Demantra, Calendars |
Create and maintain calendars. |
|
|
DP_CALENDARS_2 |
SCM Integrations, Advanced Planning, Demantra, Calendars Select the Periods tab. |
Define calendar periods. |
|
|
DP_WEIGHTPROFILES |
SCM Integrations, Advanced Planning, Demantra, Weight Profiles |
Define calendar weight profiles that include assigning a pattern code and start and end dates to a calendar. |
|
|
DP_CALENDARWGTS |
SCM Integrations, Advanced Planning, Demantra, Change Calendar Weights |
Change daily calendar weights for a specific calendar. |
|
|
DP_COPYWTPROFILE |
SCM Integrations, Advanced Planning, Demantra, Copy Weight Profiles |
Create weight profiles for a new or existing calendar by using profiles from an existing calendar. |
Defining Calendar Patterns
Access the Define Calendar Patterns page (SCM Integrations, Advanced Planning, Demantra, Calendar Patterns)
|
Enter a code for use when you apply the pattern to a period of data. You assign pattern codes to weight profiles by using the Weight Profiles page. You can add a new calendar pattern at any time, and you must define at least one calendar pattern before you add a new weight profile. |
|
|
Enter the relative weight for each day. For Demantra integration, the demand weight is used to determine whether a day is a working or a nonworking day when the system creates the calendar flat file. |
Creating and Maintaining CalendarsAccess the Define Calender Structure page (SCM Integrations, Advanced Planning, Demantra, Calendars).
|
Calendar ID |
Enter a code for identifying the calendar. This field is required. |
|
Start Date |
Enter a date that is early enough to cover the entire period of historical data that you plan to use in the system. The date is required and cannot be changed after you save the calendar. |
|
End Date |
Enter a date that is far enough in the future to cover all future planning periods. PeopleSoft recommends that you start and end the overall calendar on the first and last day of a year even if the organization's fiscal year is different. The system requires the date and can extend it during the life of the calendar. |
Defining Calendar PeriodsAccess the Periods page (SCM Integrations, Advanced Planning, Demantra, Calendars and select the Periods tab).
You can define multiple period codes for a calendar along with varying date ranges that increase the flexibility of the calendar. To create calendar periods:
If you are creating additional periods, click the Add Row button.
If this is the first time that calendar periods are added for the calendar, you do not need to perform this step.
Enter the period code that you want to use for the calendar, and a description.
Select a period type that determines which periods per year the calendar uses.
The system inserts the default value for the selected period type in the Periods Per Year field. You can override that value; however, if you want to customize the periods per year, select the Periodic period type.
If you previously added a period code, the system enters default values in the Start Date, End Date, and Forecast Period/Year start and end fields. You can override these values as needed.
Enter a start date and end date to set up the date range for the period code.
The system provides a default start and end date from the calendar. Values are required for both fields.
Enter values in the Forecast Period/Year fields for the start and end date to define a starting period other than the system default.
Use this feature to distinguish between a yearly calendar and a fiscal calendar. Yearly calendars match the start date, but you offset the date by entering the period that matches the start of the fiscal year. Values are required for both fields. If you are setting up weekly periods codes, you must indicate what week is the first week of the year.
Click the Recreate button.
If this is the first time that periods are defined for the calendar, click the Create button.
The system populates the lower portion of the page with more detailed period information.
You can change the details for an existing period definition at any time; however, you cannot change all of the fields. To change the period type or the starting date or starting period year, you must delete the period definition and recreate it. You can change the end date, end period, and year, as well as any of the individual period start and end dates.
The system can re-create period date ranges automatically. This process deletes existing period data and creates new periods and ranges that are based on the date and period details that you provide. If you need to extend the period definition end date, select a new end date, period and year; then click the Extend button to create new periods at the end of the existing periods, extending the periods through to the new end date.
|
Enter a unique code that the system uses to retrieve data that you define for this period definition. Periods cannot overlap or have gaps between them. Within a single definition, you must include each day in a period, and a day cannot belong to more than one period. |
|
|
Select a value that determines the type of periods that make up the calendar. The formats for all period types are recurring through the end date for the calendar. The field is required. Values include:
|
|
|
Periods Per Year |
Enter the number of periods that occur in one year for the period type that you selected. The system provides a default value that is based on the period type that you select. |
|
Total Periods |
Displays the total number of periods in the calendar horizon when periods are created. |
|
Enter a start and end date to define a subset of periods within the calendar, or change the start date to match the period one start date. The start and end dates must be within or equal to the start and end dates that you define on the Calendars page.
Note. When adding weekly periods based on a calendar year,
make sure that the start date is at the beginning of the week that you want
to have as week one. |
This table lists actions if the monthly period type is based on a calendar year or a fiscal year:
|
Calendar Type |
Start Date |
Period Action |
Year Action |
|
Calendar Year |
1/1/2003 |
The system uses the default value of 1 as the start period. |
The system uses the default value of 2003 as the year. |
|
Calendar Year |
7/1/2003 |
The system uses the default value of 7 as the start period. |
The system uses the default value of 2003 as the year. |
|
Fiscal Year: July 1-June 30 |
1/1/2003 |
You must enter 7 (January) as the forecast period to show the middle of the fiscal year. |
You must enter 2003 as the fiscal year for the forecast. |
|
Fiscal Year: July 1-June 30 |
7/1/2003 |
You must enter 1 as the forecast period to show the start of the fiscal year. |
You must enter 2004 as the fiscal year for the forecast. |
After you are enter data and re-create it, review the record of periods to enter any changes that you want to make to the start and end dates. If you change an end date, the system automatically updates the next start date. If you change a start date, the system automatically adjusts the previous end date. If there are insufficient days between the start and end date or too many days to split into periods, an error message appears.
|
The system populates these start and end values based on the information that you enter in the Start Date and End Date fields. Enter either a forecast period, a year, or both to create or maintain the start and end date of the calendar manually. |
|
|
Recreate |
Click to rebuild period definitions if you change the forecast date, period, or year. |
|
Click if you want the system to calculate the start and end period dates automatically for the period of time that you add. This increases the time over which the period code is valid by extending the end date. Note. If you click the Extend button, you must recalculate the trading days to populate the trading days value for those extended periods. |
Defining Calendar Weight Profiles
Access the Calendar Weight Profiles page (SCM Integrations, Advanced Planning, Demantra, Weight Profiles).
The Calendar ID and Year fields are display-only. You can change the month field and enter data in each of the daily boxes. You must create a weight profile for each calendar. The system requires that you have a weight profile for the calendar that is associated with a forecast that is designated as the default weight profile.
|
Select this option to indicate that the system should use this weight profile to calculate trading days. If you select to calculate trading days, then when you maintain calendar period information, you can also view the total number of trading days for each period. Use the Periods page to view the number of trading days. Note. This feature is not used with the Demantra integration. |
|
|
Pattern Code |
Select a pattern code. When you set up a new weight profile, you can add the daily weights automatically by using one or more pattern codes. This is the easiest way to create the basic daily data for the weight profile for the first time. After this, you can change some or all of the daily weights by using another pattern code or by changing the weights for a single day. Note. It is not necessary to apply the pattern code to the entire weight profile before saving it. Provided the weight profile has a start and end date, you can save it without applying a pattern and then subsequently apply the pattern code for ranges of dates within the weight profile start and end dates as required. |
|
Start Date |
Select a date from which you want to apply the pattern along with an end date. You can repeat this to apply different patterns to different date ranges within the calendar. |
|
End Date |
Select a date on which you want to finish applying the pattern. |
Changing Daily Calendar Weights
Access the Change Calendar Weights page (SCM Integrations, Advanced Planning, Demantra, Change Calendar Weights).
A daily calendar displays each day along with any weights for the day. Use the calendar to adjust the daily weight attribute by entering the relative demand weight for the day.
See Setting Up Calendar and Weight Profiles.
Mapping PeopleSoft Fields To Demantra FieldsYou can map PeopleSoft fields for use with Demantra Demand Management processing. The system provides a field where you can indicate whether the map is at the product or item level. This section discusses how to:
Map base fields.
Map customer fields.
Map sales fields.
Pages Used to Map and Maintain Forecasting Fields|
Page Name |
Definition Name |
Navigation |
Usage |
|
FINT_ITMFLDMAP |
SCM Integrations, Advanced Planning, Demantra, Define Field Mappings |
Define base field mappings. |
|
|
FINT_LOCFLDMAP |
Click the Customers tab on the Define Field Mapping - Base page. |
Define customer field mappings. |
|
|
FINT_SALEFLDMAP |
Click the Sales tab on the Define Field Mappings - Base page. |
Define sales field mappings. |
|
|
FINT_COPY_FLD_MAP |
SCM Integrations, Advanced Planning, Demantra, Copy Field Mappings |
Copy a map ID to create a new map. |
|
|
FINT_DEL_FIELDMAPS |
SCM Integrations, Advanced Planning, Demantra, Delete Field Mappings |
Delete a map ID. |
Defining Base Field MapsAccess the Define Field Mappings - Base page (SCM Integrations, Advanced Planning, Demantra, Define Field Mappings).
Use this page to define which PeopleSoft fields are mapped to Demantra fields contained in the integration Base.xml file. You must select a value in the Item/Product Forecasts field. The page consists of a number of mapping fields along with a single Item Group Mappings grid used for mapping additional fields to Demantra using the Custom Hook functionality provided by the integration. For a new mapping, the system provides default values for field mappings.
Note. When you are using the Item Group Mappings grid, the group name that you enter cannot match the category name. Group names must be unique and cannot be duplicated, but you can map the same planning field mapped to more than one group.
|
Map Name |
Enter a name that you want to use to describe the map ID. |
|
Item Code |
If the Item/Product Forecasts field value is Item, then the system sets the Item Code field to INV_ITEM_ID. The field cannot be changed. If the Item/Product Forecasts field value is Product, the Item Code field is set to PRODUCT_ID and cannot be changed. You cannot leave the Item/Product Forecasts field blank. |
|
DM_ITEM_DESC |
Displays a value based on the Item/Product Forecasts field setting. When the setting is Item, this field displays MITBL_DESCR.. When the setting is Product, this field displays PRDITM_DESCR. |
|
Organization |
The field is set to BUSINESS_UNIT_IN if the Item/Product Forecast field is set to Item. TheOrganization field is set to BUSINESS_UNIT_IN when the Item/Product Forecast field value is Product. |
|
DM_ORG_DESC |
Displays the description – DESC and is used to pass the description for the business unit to the integration. |
|
Master Branch |
Select a master branch. The master branch is required by the integration for validation purposes but the value is not used by Demantra. The master branch populates the base.xml file so that the branch will have an entry for each item or product, whether that branch and item combination exists in reality. |
|
Product Family |
Select a product family for the map ID. The system uses the data in this field to populate the product family in Demantra. |
|
Planning UOM (planning unit of measure) |
Displays the unit of measure to be mapped to the planning unit of measure in the integration. You cannot change the value. |
|
Shipping UOM (shipping unit of measure) |
Select the shipping unit of measure for this map ID. The shipping unit can be the shipping, standard, volume, or weight unit of measure. |
|
Primary UOM (primary unit of measure) |
Select a primary unit of measure to be used with this map ID. The primary unit can be the shipping, standard, volume, or weight unit of measure. |
|
Volume UOM (volume unit of measure) |
Displays a volume unit of measure to be used with this map ID. You cannot change the value. |
|
Weight UOM(weight unit of measure) |
Displays a weight unit of measure to be used with this map ID. You cannot change the value. |
Branch Category Parameters
Branch categories are populated as default values and cannot be changed.
|
Operating Unit |
Displays the PeopleSoft field used to populate the operating unit in Demantra. The GL_BUS_UNIT is obtained from the BUS_UNIT_TBL_GL table for the business unit that is being processed. |
|
Business Group |
Displays the PeopleSoft field – GL_BUS_UNIT– used to populate the business unit in Demantra. |
|
Legal Entity |
Displays the PeopleSoft field – LEGAL_ENTITY– that is used to populate the legal entity in Demantra. |
Item Default Category
The item default category in Demantra is populated with the PeopleSoft field that you select in the Planning Field field.
|
Category Name |
Displays the item default category name. |
|
Planning Field |
Select a planning field to be used to populate the item default category. |
Item Group Mappings
The system uses item group mappings to populate additional fields in Demantra using the Customer Hooks functionality provided through the integration.
|
Group Name |
Enter a name for the item group mapping that you will create using this grid. The group name is required by the integration. The name cannot match the item default category name. The group name cannot be duplicated; however, you can duplicate the PeopleSoft planning field to which the name is mapped. |
|
Planning Field |
Select a PeopleSoft planning field with which you want to populate the group name that you entered. |
Defining Customer Field MapsAccess the Define Field Mappings - Customer page (click the Customers tab on the Define Field Mappings - Base page).
Use this page to define which PeopleSoft fields are mapped to Demantra fields contained in the integration Customer.xml file. You must select a value in the Item/Product Forecasts field. The page consists of a number of mapping fields along with a single Customer Group Mappings grid used for mapping additional fields to Demantra using the Custom Hook functionality provided by the integration. For a new mapping, the system provides default values.
The Site Code field is set to the Ship to Cust ID and you cannot change the value.
Note. When you are using the Customer Group Mappings grid, the group name that you enter cannot match either the channel name or the demand class name. Group names must be unique and cannot be duplicated but you can map can use the same planning field mapped to more than one group.
The channel and demand class in Demantra are populated with the PeopleSoft values that you select for the Channel Planning Field and Class Planning Field fields.
The channel name and demand class name are required by the integration.
Customer Category Parameters
|
Channel Name |
Enter a name for the channel. This is required by the integration. |
|
Channel Planning Field |
Select a planning field that you want to map to the Channel field in Demantra. |
|
Demand Class Name |
Enter a name for the demand class. This is required by the integration. |
|
Class Planning Field |
Select a planning field that you want to map to the Demand Class field in Demantra. |
Customer Group Mappings
Use this grid to map a customer group name. The system uses customer group mappings to populate additional fields in Demantra using the Customer Hooks functionality provided through the integration.
|
Group Name |
Enter a group name. The group name cannot match either the channel name or demand class name. The group name cannot be duplicated; however, you can duplicate the PeopleSoft planning field to which the name is mapped. |
|
Planning Field |
Select a PeopleSoft planning field to which you want to link the customer group mapping name that you entered. |
See Also
Defining Sales Field MapsAccess the Define Field Mappings - Sales page (click the Sales tab on the Define Field Mappings - Base page).
Use this page to view sales field mappings for the map ID. Field mappings on this page are display only and cannot be changed,
|
Item/Product Forecasts |
Select whether you want to display values for either the item or product forecast. When you make a selection, the system updates values in the Field Mappings grid. |
|
Interface Field and Planning Field |
Displays the fields that the system will use to populate the SalesOrderHistory.txt file that is passed to Demantra through the integration. The Planning Field is the PeopleSoft field that you use to populate the Interface Field. |
Building and Reviewing Demand HistoryThis section provides an overview of building demand history and discusses how to:
Build demand history.
Review demand data history.
Understanding How to Build Demand HistoryDemand history is extracted from transactions in PeopleSoft Order Management, Billing, and Inventory. Internal data is transactional data that consists of demand quantities, dates, costing information, and attributes that are related to the product, item or customer.
The internal builder process creates a staging record by pulling the demand data and all of its related attributes (item/product/customer), costs, prices, and secondary information into a single record for each transaction. This data is read directly from sales orders, shipments, transfers, and invoices based on user-specified criteria. Demand data includes new demand for a selected date range and adjustments to demand for past periods.
When the system builds internal demand, you cannot make changes to demand data that's extracted from the transaction system. If the data is not correct, you should go back to the transactional system and correct it there.
Pages Used to Build and Review Demand History|
Page Name |
Definition Name |
Navigation |
Usage |
|
FINT_DDH_XTRACT |
SCM Integrations, Advanced Planning, Demantra, Build Demand History |
Build demand history by defining a process run ID, extracting details, and reviewing extractions for the previous times that the process was run. |
|
|
Review Demand History |
FINT_DMDHIST_FILT |
SCM Integrations, Advanced Planning, Demantra, Review Demand History |
Define selection criteria for which to review demand data history. |
|
FINT_DMDHIST_TBL |
SCM Integrations, Advanced Planning, Demantra, Review Demand History |
Review demand history built from PeopleSoft SCM data. |
Building Demand HistoryAccess the Build Demand History page (SCM Integrations, Advanced Planning, Demantra, Build Demand History).
Use this page to run the Build Demand History (FINT_DHBUILD) process.
Use the Demand Source group box to select which internal PeopleSoft transaction data that you want to extract from PeopleSoft SCM records, such as sales orders and transfers.
|
Demand From |
(Extract Parameters group box) Enter a starting date from which the build process should pull data. The system extracts demand history from records only for the selected transactions from this period. The default value for this field is the latest extract demand to date for the previous extraction. |
|
Demand To |
(Extract Parameters group box) Enter an ending date from which the build process should pull data. The default value for the field is the current date. |
|
Custom Fields From |
(Extract Parameters group box) Select the record from which you want to extract custom fields. You can use custom fields from PeopleSoft Inventory to update specific user-defined fields. Using this field, you determine whether the system uses custom fields from the item level or from the item/business unit level. Values include: BU Items Inventory (business unit items inventory): These custom fields are related to the item ID specifically as it relates to a specific business unit. Master Item Table:These custom fields are related to the item ID specifically across all business units. |
|
Select whether you want to run the Demand Data History Builder process using product kits. A product kit consists of a fixed set of components that are forecasted as a unit. Forecast kit options include: Both: Select to include components and product kits in the build process. The process creates a demand record for each product kit and for each component in the product kit. Components:Select to include only the components in the build process. The process creates a demand record for each component in the product kit. Product Kits:Select to include only product kits in the build process. The process creates a demand record for each product kit. During inventory policy generation, PeopleSoft Inventory Policy Planning can react to the kits and explode product kit items into its components. The Policy Generation (DP_CALCPOLCY) process matches inventory policy items and attributes for use in the PeopleSoft Inventory system. |
Demand Source Tab
Select the Demand Source tab.
Displays the PeopleSoft transaction data types that are selected for the run control ID that you choose on the General tab. The check boxes that you select indicate that the system will include data from that source when it runs the build process. Sources include:
Billing
Sales Orders
Order Shipments
Material Stock Requests
Transfers
Status Tab
Select the Status tab.
|
Status |
Displays the state of the corresponding run control ID. Values include: Processed: Indicates that the process is complete and extracts the number of rows of data that are displayed in the corresponding column. Not Processed: Indicates that this extract run control has not been processed before. Errored: Indicates that this process was started but not complete because of an error. The system locks the build process for one of these reasons:
|
|
Rows Extracted |
Displays the number of rows of data extracted from records when this process ran. The system writes this data to the DP_DMDHISTORY record. |
|
Notes |
Displays system-generated messages that indicate the number of rows that were updated from each demand source. |
Reviewing Demand Data HistoryAccess the Review Demand History page (SCM Integrations, Advanced Planning, Demantra, Review Demand History)
Demand
Select the Demand tab to view information about the demand. As part of the information the page displays the source and date of the demand, the quantity and value of the demand, and any errors that occurred during the build for each row of data. The demand source is where the demand originated such as a billing or a customer.
Codes
Select the Codes tab to view information about any codes associated with the demand, for example, the UOM, source code, or forecaster code.
Currency
Select the Currency tab to view information about the currency, conversion rate, cost per unit and list price for the demand.
Orders
Select the Orders tab to view information about the orders associate with the demand. This information describes, for example, the Order Management business unit, salesperson, order line and schedule line number.
Shipments
Select the Shipments tab to view information about how the demand will be shipped. This includes the ship to customer and the item's shipping date.
Billing
Select the Billing tab to view billing information for the demand. Billing information includes the customer, invoice number and date, and the Billing business unit.
Items
Select the Items tab to view a variety of demand item information. Item information ranges from component, group, family and category information to attribute information such as item type and utilization group.
Products
Select the Products tab to view product demand information including the product ID, group, brand, category and product description.
Customers
Select the Customers tab to view customer demand information. Customer demand information includes the sold to customer and corporate customer and customer group and subgroup information.
Customer and Product Custom Items
Select any custom item tab for customers and product to view tailored demand information that has been defined by the organization.
Promotional Channel
Select the Promotional Channel tab to display PeopleSoft Order Management information that is related to events. Fields include Customer Channel, Classification, Division, Region, and Territory.
Exporting Data to DemantraThis section provides an overview of exporting data and discusses how to:
Define export specifications.
Maintain export controls.
Export demand.
Understanding Data ExportDemand data is the actual sales requirement for a product, item, or component. When defining an import specification for demand data, select the data fields that you want the system to use for importing demand data. When you load records, the system processes demand data that matches the selection criteria that you define on this page. You can also define additional parameters or update these parameters when you run the import process.
When you use this specification to load data, the system processes items only in the forecast that you select.
Pages Used to Export Data to Demantra|
Page Name |
Definition Name |
Navigation |
Usage |
|
FINT_EXP_SPEC |
SCM Integrations, Advanced Planning, Demantra, Define Export Specifications |
Define export specifications by setting up parameters for extracting demand data into files for integration to Demantra Demand Management. |
|
|
FINT_DDH_CONTROL |
SCM Integrations, Advanced Planning, Demantra, Maintain Export Controls |
Maintain export controls that define how the system should process demand data history. |
|
|
FINT_EXPORTDMD |
SCM Integrations, Advanced Planning, Demantra, Export Demand |
Export demand to Demantra Demand Management. |
|
|
DP_COPYDPINT_SPECS |
SCM Integrations, Advanced Planning, Demantra, Copy Export Specifications |
Create an export specification by copying the attributes of an existing specification. The system copies the specification parameters and the selection criteria from the specification. |
|
|
DP_COPYDPINT_SPECS |
SCM Integrations, Advanced Planning, Demantra, Copy Export Specifications |
Delete export specifications. |
Defining Export SpecificationsAccess the Define Export Specification page (SCM Integrations, Advanced Planning, Demantra, Define Export Specifications).
Use this page to define basic information about an export specification, select demand sources, and define selection criteria. Export specifications enable you define a set of data that you can export for use with the Oracle Value Chain Planning Process Integration Package (PIP).
|
Date Updated |
Displays the last date the export specification was updated. |
|
Updated By |
Displays who updated the export specification. |
|
Posting UOM(posting unit of measure) |
Displays Standard Inventory UOM which indicates that the system uses the unit of measure defined for the item at the business unit level. Values are only retrieved for weight and volume. |
|
Delimiter |
Select the delimiter that the system uses during the integration Values include:
|
|
Select whether you want to run the process using product kits. A product kit consists of a fixed set of components that are forecasted as a unit. The default value for the field is blank and will include components and product kits in the build process. The process creates a demand record for each product kit and for each component in the product kit. Forecast kit options include: Components:Select to include only the components in the build process. The process creates a demand record for each component in the product kit. Product Kits:Select to include only product kits in the build process. The process creates a demand record for each product kit. During inventory policy generation, PeopleSoft Inventory Policy Planning can react to the kits and explode product kit items into its components. The Policy Generation (DP_CALCPOLCY) process matches inventory policy items and attributes for use in the PeopleSoft Inventory system. |
|
|
Calendar ID |
Select a calendar to be exported and used by the integration. |
|
Weight Profile |
Select the weight profile that you want to use for the export. The profile determines which dates are working and nonworking days. The system also associates weight profiles with a calendar, so the values that are available for this field depend on the calendar ID that you selected. |
Demand Source
The check boxes that you select indicate that the system will include data from that source when it runs the export process.
Shift Definition
Enter shift information. This data is used to populate the Shift information text files required by the Process Integration Pack used for integrating to Demantra.
Selection Criteria
Use the grid to provide filter elements for the data subset. The feature makes it possible for you to control and filter ranges of data or types of data to be selected for export. You create the subset by establishing selection criteria for the field. For example, if you want to limit the number of items or only select data for a specific location, you can select a range of records to limit the Item Code or Location field.
|
Open ( (open parenthesis) |
Select the open parenthesis character to signify the start of a group of criteria that you want to enclose. For example, if you have three criteria, you can create a selection criteria of (A or B) and C by placing an open parenthesis on the line for A. |
|
Field Name |
Select a field on which to filter. The system uses the field you define as the basis for further limiting data when you use the Criteria field. Fields that are available for selection are dependent on the function that you use. |
|
Operator |
Determines the action that the system applies to the criteria that you enter in the Criteria field. For example, suppose you want only item IDs that start with AA to be placed in the data file, use the = (like) operator. You should enter the correct form of the criteria to match the operation that you want the system to perform. Available operators depend on the page that you use. Values include:
|
|
Criteria |
Enter the value that you want the system to use when applying the operators. For example, if you select >= for an Item Code field and enter AA100 as the criteria, then the system includes only values that are equal to or greater than the criteria. |
|
Close ) (close parenthesis) |
Select the close parenthesis character to signify the end of a group of criteria that you want to enclose. For example, if you have three criteria, you can create a selection criteria of (A or B) and C by placing an close parenthesis on the line for B. |
|
Next |
Provides a means of creating And or Or statements for the operators and criteria that you enter. Use the AND option to create additional criteria for the field. Use the OR option to create contrasting criteria. |
Maintaining Export ControlsAccess the Maintain Export Controls page (SCM Integrations, Advanced Planning, Demantra, Maintain Export Controls).
Use this page to define how the system should process demand history data when exporting data to Demantra.
|
Unlock |
Select to unlock the demand data history record in the event of a failure or other problem. Do not use this option when the build or load processes are running. |
|
Reset |
Select to reset the status of all demand data history records to the status of not processed. You normally only use this option during system start up. Warning! This resets the status of all demand data history records to Not Processed. |
|
Rebuild |
Select to delete all demand data history records. You normally only use this option during system start up. Warning! Selecting this option deletes all demand history. |
Exporting DemandAccess the Export Demand page (SCM Integrations, Advanced Planning, Demantra, Export Demand).
Use this page to define run controls and initiate the Export Demand History (FINT_DMD_EXP) process.
|
Specification ID |
Select an export specification. An export specification defines the demand history data set that you want to export for use with the integration to Demantra Demand Management. |
|
Edit Export Specification |
Click to access the export specification that you selected to use with this run control. Using the page, you can make updates to specifications to refine the demand history data to use with the export process. |
|
From and To Date |
Select the date range from which to include demand history data for this export process. |
|
Sales, Base, Customer,Calendars, and User Data |
Select which data to export from PeopleSoft. Selecting any check box also creates a number of empty xml files required by the integration.
|
|
File Path |
Enter the location where you want the export Integration files to be created. |
Importing Data from DemantraThis section discusses how to:
Define import specifications.
Import forecasts.
Pages Used to Import Data From Demantra|
Page Name |
Definition Name |
Navigation |
Usage |
|
FINT_IMP_SPEC |
SCM Integrations, Advanced Planning, Demantra, Define Import Specifications |
Define import specifications by setting up parameters for loading forecast data sent from the Demantra Demand Management system into PeopleSoft publish tables. |
|
|
FINT_IMPORT_FCST |
SCM Integrations, Advanced Planning, Demantra, Import Forecast |
Import forecasts from Demantra Demand Management. |
|
|
FINT_COPYIMP_SPEC |
SCM Integrations, Advanced Planning, Demantra, Copy Import Specifications |
Create an import specification by copying the attributes of an existing specification. The system copies the specification parameters and the selection criteria from the specification. |
|
|
FINT_DEL_IMP_SPEC |
SCM Integrations, Advanced Planning, Demantra, Delete Import Specifications |
Delete import specifications. |
Defining Import SpecificationsAccess the Define Import Specification page (SCM Integrations, Advanced Planning, Demantra, Define Import Specifications).
Importing data is the process of retrieving forecast information sent from Demantra Demand Management by the Process Integration Package and loading that into PeopleSoft publish tables. You use an import specification to define the forecast information that you want to include and where the forecast data file resides.
|
Calendar ID |
Select a calendar for use by the import specification. Calendars provide the time horizon over which the forecast operates. |
|
Time Period Code |
Select a code for the selected calendar for the specification. A period definition is comprised of the number of periods per year and the total number of periods within the calendars date range. The period code defines the date range for each period and thus the size of the time buckets into which forecasts will be grouped. |
|
Weight Profile |
Select the weight profile that you want to use for this import specification. The profile determines the weights that are associated with each time period and is used when the Publish Daily Weights check box is selected. The system associates weight profiles with a calendar. |
|
Publish Daily Weights |
Select to have the system automatically publish the daily weights associated with the calendar for this import specification. Other applications use these weights to convert the published forecast into daily time periods for aggregation or reporting purposes. The default value is to include daily weights. You can publish daily weights regardless of what time period code you select for the specification. |
|
File Path |
Enter the file name and path to the location of the external file that you want to import. The system imports the file only when you select to import the forecasts. |
Selection Criteria
Use the grid to provide filter elements for the data subset. The feature makes it possible for you to control and filter ranges of data to be selected. You create the subset by establishing selection criteria for either items or locations.
See Selection Criteria.
Importing ForecastsAccess the Import Forecast page (SCM Integrations, Advanced Planning, Demantra, Import Forecast).
Use this page to define run controls and initiate the Import External Forecast (FINT_FSTIMP) process.
|
Import Specification |
Select an import specification. An import specification defines how data will be imported into the PeopleSoft publish tables from the file of forecasts supplied from Demantra Demand Management. |
|
Edit Import Specification |
Click to access the Define Import Specification page where you can make changes to an import specification before running the Import External Forecast process. Make sure that you save the data that you entered for this run control ID before editing the specification. Note. This field is not available until you select an import specification. |
|
Publish Name |
Enter the name used to identify the forecast data set. The name is a label that applications use to identify the publish activity. The name is a logical name that you can use to access and use the forecast data set again and again. |
|
Description |
Enter a description that to further describes the specification. |
|
Publish Date |
Select the date that you want to use as the publish date for this Import External Forecasts process run. |
Reviewing and Updating Imported ForecastsThis section discusses how to:
Review imported forecasts.
Update forecasts.
Pages Used to Review and Update Imported Forecasts|
Page Name |
Definition Name |
Navigation |
Usage |
|
Review Imported Forecasts |
FINT_IMPORTFCSTINQ |
SCM Integrations, Advanced Planning, Demantra, Review Imported Forecasts |
Access imported forecast data using a forecast publish name or publish date. |
|
FINT_IMPFCST_FILT |
Click the Search button on the Review Imported Forecasts page. |
Define search criteria for reviewing forecasts. |
|
|
FINT_IMPFCST_TABLE |
Click the Search button on the Review Imported Forecasts search criteria page. |
Review imported forecast details. |
|
|
Forecast Period Data |
FINT_IMPFCST_DET |
Click a Forecast Item link on the Forecast Item Details page. |
Review forecast period data. |
|
Forecast Update |
FINT_RDOUPD_RUN |
SCM Integrations, Advanced Planning, Demantra, Forecast Data Update |
Update imported forecasts. |
Defining Search Criteria for Reviewing ForecastsAccess the Review Imported Forecasts search page (click the Search button on the Review Imported Forecasts page after defining a publish name and date).
Use this page to define the search criteria for the imported forecast information that you want to review. The page header information displays the publish name, date, and map ID that you selected. After defining selection criteria, click the Search button to retrieve the search results. Click the Clear Filter button to remove selection criteria entries.
Note. If you do not define search criteria, the system retrieves all the forecast details for the imported forecast.
See Selection Criteria.
Reviewing Forecast Item DetailsAccess the Forecast Item Details page (click the Search button on the Review Imported Forecasts page).
Using the Forecast Item Details feature, you can review forecast item information and access forecast period data and weight profiles.
|
Forecast Item |
Displays the logical item/location combination for the imported forecast data. Click the link to access the Forecast Period Data page where you can review additional forecast information. |
|
Item Code |
Displays the item code used to define an item across the organization. |
|
Location |
Displays the location or business unit for the forecast data. |
|
Weight Profile |
Displays the weight profiles defined for this imported forecast data set. Weight profiles are templates that you use to create and maintain daily weights for calendars. One weight profile must be defined on each imported forecast data set. |
|
Base Unit |
Displays the unit of measure (UOM) in which the system stores demand and forecast quantities for the selected forecast item. This is also the UOM that is associated with all standard prices and costs. |
|
Publish Unit |
Displays the unit of measure in which the forecast was published. |
Reviewing Forecast Period DataAccess the Forecast Period Data page (click a Forecast Item link on the Forecast Item Details page).
This page provides basic details about the imported or published forecast period data. The data includes period-by-period values for the imported (published) forecast. Select the Return to Item Details link to return to the Forecast Item Details page
|
Periodand |
Displays the period to which this row of data pertains. |
|
Year |
Displays the year in which the period belongs. |
|
Start Dateand End Date |
Displays the beginning and ending dates for the forecast period. |
|
Forecast Value |
Displays the total value of the forecast for the forecast period. The value appears in the published unit of measure. |
Updating Imported ForecastsAccess the Forecast Update page (SCM Integrations, Advanced Planning, Demantra, Forecast Data Update).
Use this page to run the FINT_FSTUPD process to update the imported forecasts.
|
Publish Name |
Select the name used to identify the imported forecast data. The name is a label that applications use to identify the publish activity. The name is a logical name that you can use to access and use the forecast data set again and again. |
|
Forecast Set |
Select the forecast set. The set contains the latest imported forecast set. |
|
Item/Product Forecasts |
Select whether to update the forecast based on the item forecast or the product forecast. |
|
Forecast Update Method |
Select the method that you want to use to update the forecast. Values include: Complete: Select to update the complete forecast set. Replace: Select to replace only those forecast items or products records that have been updated. |