 Common Elements Used in This Chapter
This chapter provides a list of common elements and discusses how to:
Create and maintain basic rule characteristics.
Define common rules.
Define page generation and validation rules.
Define distribution rules.
Define production rules.
Common Elements Used in This Chapter
Creating and Maintaining Basic Rule Characteristics
To maintain basic rule characteristics, use the Rule component (RULE_MAINT_GBL). This section discusses how to:
Define basic rule information.
Copy rules.
Delete rules.
 Pages Used to Define Basic Rule Characteristics
|
Page Name |
Definition Name |
Navigation |
Usage |
|
CP_RULE_HEADER_PNL |
|
Define basic rule characteristics, including processing action and modes, effective dates, comments, and search keywords. |
|
|
CP_RULCPY_SECPNL |
|
Copy an existing rule definition to the one that you are creating. |
|
|
CP_RULE_SELECT_INQ |
Configuration Modeler, Maintain Rules, Review Rules, Review Rules - Search |
Search for specific rules by functional area, action, effective date, model, or the search keywords that you define. |
|
|
CP_RULE_SELECT_IN2 |
Click the Search button on the Review Rules - Search page. |
The system returns rules based on selection criteria on the Review Rules - Search page. Select a linked rule ID to view or modify its definition. |
Defining Basic Rule InformationAccess the Rule page (Configuration Modeler, Maintain Rules, Rule).
Set the status and enter a rule description that appears on reports and in rule inquiries.
|
Condition (Syntax) |
Select, modify, or add an expression ID in this field. This expression is tested to determine whether to process the rule. The condition must evaluate to a Boolean value ("0" for false or "1" for true). |
|
Effective Date |
The rule is not processed until the specified date. |
|
Obsolete Date |
The rule is not processed after the specified date. |
Select the modes in which to use this rule:
|
Use in Order Management |
Rule is active during sales order and quote entry in Order Management. |
|
Use in Direct Production |
Rule is active when generating configuration direct production orders in Product Configurator. |
|
Use in Direct Requisition |
Rule is active when generating configuration direct requisition orders in Product Configurator. |
|
Use in CRM External (use in customer relationship management external) |
Only used in Customer Relationship Management (CRM). |
|
Use in CRM Internal (use in customer relationship management external) |
Only used in CRM. |
|
Use in Model Tester |
Rule is active for the model tester. |
Enter up to five search keywords to identify rules or their properties. For example, you might use the name of the rule's author, the date that the rule is created, or the table that the rule references for a variable value.
Rule Comments
Enter descriptive text for the rule.
Copying Rules
Access the Rule page in Add mode (click the Add button on the Rule page).
To copy rules:
Click the Rule Copy link.
Select a rule to copy from the available options list.
Note. Only rules with the same functional area and action type are available.
Click the OK button to copy the rule details and return to the Rule page.
After you copy the rule, you can modify it to create a new rule.
Deleting Rules
Access the Rule page in Update/Display mode (click the Update/Display button on the Rule page).
Note. To be eligible for deletion, the rule must not exist in any model.
To delete rules:
Change the status of the rule to Inactive.
Save the page.
Click the Rule Delete link.
Defining Common Rules
To define common rules, use the Rule component (RULE_MAINT_GBL). This section discusses how to:
Define condition rules.
Define configuration detail rules.
Define create external parameter rules.
Define internal variable override rules.
Define secondary, global, and option variable rules.
Define start and end trace rules.
Pages Used to Define Common Rules
|
Page Name |
Definition Name |
Navigation |
Usage |
|
CP_RULE_HEADER_PNL |
Configuration Modeler, Maintain Rules, Rule |
Define basic rule characteristics, including processing action and modes, effective dates, comments, and search keywords. |
|
|
CP_RULE_DTL_CD |
When accessing the Rules component, select Configuration Detail as the action type. |
Produces and stores one line of detail information on the Configuration Detail table, from which you can pull information to include on printed reports. |
|
|
CP_RULE_DTL_CP |
When accessing the Rules component, select Create External Parameter as the action type. |
Create parameters to pass to external applications during configuration rules processing. |
|
|
CP_RULE_DTL_GV |
When accessing the Rules component, select Global Variable as the action type. |
Populate variables that apply to all component levels with a configuration. |
|
|
CP_RULE_DTL_IV |
When accessing the Rules component, select Internal Variable Override as the action type. |
Point to different product or item keys than those associated with original internal variables. |
|
|
CP_RULE_DTL_OV |
When accessing the Rules component, select Option Variable as the action type. |
Create a new value for an existing option variable or to populate a new option variable. |
|
|
CP_RULE_DTL_SV |
When accessing the Rules component, select Secondary Variable as the action type. |
Populate temporary storage variables that are used in configuration processing. |
|
|
CP_RULE_TRACE_INQ |
Product Configurations, Review Configuration Info, Production Trace |
View rules that are traced for a configuration during the production configuration process. When the trace is active, the Production Trace page displays all of the configuration rules that are used, and the corresponding results. |
|
|
CP_TRACE_SEC |
A distribution trace appears when the configuration is complete. |
View rules that are used during the distribution configuration process. You can view trace rules for configured products that are entered on sales orders, configured direct production orders, and configured direct configuration orders. |
Defining Condition Rules
Each rule has a condition statement to determine whether or not the rule processes. The condition rule does not contain any action other than this condition statement; its main purpose is to provide branching logic in a configuration model. This branching removes the need to test the same condition over and over again; instead of using the same condition statement on multiple rules in a configuration model, you can create a parent condition rule and leave the Condition (Syntax) field blank for subsequent rules. Inactivating this parent condition rule means that all of its children rules are not executed in the configuration.
For example, in a custom bike production scenario (LT5010_PRDN_TREE in the provided sample data), condition rules are used to branch the processing logic in the model to initiate the component list rules that accumulate the bike's required parts, and trigger the operation sequence rules that govern its assembly.
To create a condition rule:
Select Condition as the action type and access the Rule page in Add mode.
Complete the information on the Rule page.
Complete the status and rule description information.
In the Condition (Syntax) field, select, modify, or add a syntax statement that expresses the condition for processing the subsequent rules.
Defining Configuration Detail Rules
The advantages of make-to-order manufacturing depend partly on both you and the customer seeing what goes into the final order. Configuration Detail rules enable you to save the results to the Configuration Detail table, from which you can pull information to include on printed reports. Each rule produces one line of detail information.
To create a configuration detail rule:
Select Configuration Detail as the action type and access the Rule page in Add mode.
Complete the information on the Rule page.
In the Condition (Syntax) field, select, modify, or add a syntax expression to specify the conditions under which the detail line is created.
Access the Configuration Detail page and complete the required fields.
Defining Create External Parameter Rules
This rule passes configuration information out to external programs to perform specific user-defined functions during configuration processing. Each of these rules sends one parameter to the external program. The create external parameter rules must process before invoking an external program variable (any "P-" variable within configuration syntax), which calls the external program and calculates a result.
See Configuration Variable Types.
To a create an external parameter rule:
Select Create External Parameter as the action type and access the Rule page in Add mode.
Complete the information on the Rule page.
In the Condition (Syntax) field, select, modify, or add a syntax expression to specify the conditions under which the parameter is created.
Access the Create Parameter page.
Select the field type for the parameter value (Character or Numeric).
In the Value of Parameter (Syntax) field, select, modify, or add a syntax expression to calculate the parameter.
Defining Internal Variable Override Rules
This rule retrieves data for configuration processing by allowing you to override specific information on an existing internal variable. Unlike internal variables themselves, the internal variable override rule allows you to change the key values on the internal variable without creating an entirely new variable. Internal variable override rules use the internal variable definitional structure, but enable you to override the business unit and item or product ID keys in order to retrieve data.
Values that are retrieved by this rule are stored for processing as secondary variables. Like all secondary variables, these values apply only to the rules that are for a single configured product.
See Defining Secondary, Global, and Option Variable Rules.
To create an internal variable override rule:
Select Internal Variable Override as the action type and access the Rule page in Add mode.
Complete the information on the Rule page.
In the Condition (Syntax) field, select, modify, or add a syntax expression to specify the conditions under which the rule processes.
Access the Internal Variable page.
Select, modify, or add an expression in the Variable field to store the resultant value. You can use this new secondary variable (the internal variable override) in the syntax of subsequent rules.
Select, modify, or add a name in the Internal Variable field to point the configuration engine to the correct data.
The business unit that you select overrides any BUSINESS_UNIT field that is on the associated internal variable.
Select, modify, or add an expression in the Product ID/Item Name (Syntax) field to override any PRODUCT_ID or INV_ITEM_ID fields on the associated internal variable.
Defining Secondary, Global, and Option Variable
Rules
Secondary, global and option variable rules are defined as:
Secondary variable rules populate variables for a single level of configuration for the values that are used in configuration processing. For example, if you want to accumulate a running total for the price, you can define that total as a secondary variable and use it in rule syntax. Secondary variables are available only within the configuration processing for the current component (a single level of the configuration).
Global variable rules apply to all component levels within a configuration. Using global variables enables you to share variable information between a parent product and its configured components, or between a child node and other child nodes that follow in configuration processing. Global variables in a distribution configuration are also passed to the production configuration process.
Option variable rules substitute a new value for an option variable. The system then uses this new value in the configuration processing exactly as it uses an option variable that is entered on a page generation rule.
Note. Option, secondary, and global variables are populated by the configuration engine during syntax evaluation with default values—a zero value (0) for numerics and a zero-length string value ("") for characters—if the variable does not contain a value.
To create a secondary variable, global variable, or option variable rule:
Select Secondary Variable, Global Variable, or Option Variable as the action type and access the Rule page in Add mode.
Complete the information on the Rule page.
In the Condition (Syntax) field, select, modify, or add a syntax expression to specify the conditions under which the variable is created.
Access the associated action detail page.
Select, modify, or add an expression in the Variable field.
Select, modify, or add a value expression in the Value (Syntax) field.
Defining Start and End Trace Rules
You can trace distribution and production model processing by using the start trace and end trace rules within a configuration model. These rules trace the configuration models as the process runs so that you can see:
The rules that are processed.
The order in which the rules are processed.
The rule interpretation (true or false).
The value of the result fields.
The effective date that is used to select the rule.
To trace the entire process, put a start trace rule at the beginning of the model and an end trace rule at the end of the model. To trace a specific section of the model, put the start trace and end trace rules before and after the part of the model to test.
The system displays distribution configuration trace results online on the Rule Trace page when you finish configuring a product using a sales order, a direct production order, or a direct requisition order.
Results of a Production model trace are stored in the database. Use the Production Trace inquiry page to view the results of the production process.
After you test the configuration model processing and everything is running correctly, be sure to inactivate the start trace and end trace rules by changing the status or the effective date on the Rule page. This helps in maximizing performance.
To create a start or end trace rule:
Select Start Trace or End Trace as the action type and access the Rule page in Add mode.
Complete the information on the Rule page.
In the Condition (Syntax) field, select, modify, or add a syntax expression to specify the conditions under which the trace starts or ends as specified.
To view a distribution trace:
Make sure that the appropriate start trace rule is active.
Enter an order for a configured product in one of the following:
The Order Management order entry pages.
The Product Configurator direct configuration orders page.
Configure the product and click the OK button. The system displays the Rule Trace inquiry page.
To view a production trace:
View the production trace.
When the trace is active, this page shows all of the rules on the model, which are used, and the corresponding results.
|
Area |
The functional area values are: Distribution or Production. |
|
Condition |
The evaluation of the rule syntax. Values are: True or False. |
Defining Page Generation and Validation
Rules
To define page generation and validation rules, use the Rule component (RULE_MAINT_GBL). The page generation rule controls when an order entry page appears for a configured product, and how the product information appears and is validated on the page. You can also validate product information by using page validation rules.
Note. You can use the PeopleSoft globalization features to display configured order-entry page information in nonbase languages.
This section discusses how to:
Define page generation rule characteristics.
Establish page layouts.
Define page validation rules.
See Also
Language Sensitivity in PeopleSoft Product Configurator
Pages Used to Define Page Generation and
Validation Rules
|
Page Name |
Definition Name |
Navigation |
Usage |
|
CP_RULE_HEADER_PNL |
Configuration Modeler, Maintain Rules, Rule |
Define the basic characteristics of the rule, including the specific action and the condition for processing. |
|
|
CP_RULE_DTL_PG |
When accessing the Rules component, select Page Generation as the action type. |
Associates user input for each page with option variables to use in configuration processing. You can set up the option value lists and constraints for validation, and specify defaults. |
|
|
CP_RULE_DTL_PG2 |
When accessing the Rules component, select Page Generation as the action type. The Page Layout Options page also appears. |
Determines how the product options appear on order entry pages. |
|
|
CP_RULE_INFO_SEC |
|
Includes additional information for configuration options. When the customer selects an option, a secondary window appears containing the information that you define on this page. |
|
|
CP_USER_CD_SX_SEC |
|
Creates the syntax for the Dynamic Value List field that determines which value list to use for this option. If the syntax does not evaluate to a value list, then the value list that is defined in the Value List field is used. If the Value List field is blank, and the syntax does not evaluate to a value list, then an error results. |
|
|
CP_DYNAMIC_PANEL |
|
Displays a working version of the page that is to be created by the Page Generation rule. |
|
|
CP_RULE_DTL_PV |
When accessing the Rules component, select Page Validation as the action type. |
Detects a condition that should yield an error, a warning, or an informational message. |
Defining Page Generation Rule Characteristics
Access the Page Generation page (select Page Generation as the action type in the Rule page).
To define a page generation rule's general characteristics:
Select Page Generation as the action type and access the Rule page in Add mode.
Complete the information on the Rule page.
In the Condition (Syntax) field, select, add, or enter a syntax statement to specify the condition for processing the page generation rule.
Access the Page Generation page.
Enter the general page characteristics; in particular:
|
Page Title |
Enter a title for the order entry Configuration page.
Note. HTML tags and configuration binds are supported on
this field. In addition, the %Image(<<Database Image Name>>) meta-HTML
tag is also supported. This meta-HTML tag allows you to use database images
within HTML. See Configuration Binds. |
|
Page Constraint |
Select, modify, or add a page-level constraint that the system uses to validate this page. |
|
Price (Syntax) |
This syntax field appears only when the page processing mode is set to Real-Time Mode or On Display Mode. In Real-Time mode, the price is recalculated when you change an option value during order entry. The system stores the Real Time Pricing value in the DYNAMIC_PRICE constant. Define default values for all of the options if you intend to use the real-time dynamic pricing feature. |
Set up option validation on the Option Information tab.
Enter the required values; in particular:
|
Variable |
Select, modify, or add the option variables you want to have appear on the order entry page that this rule generates. The Variable field appears under each tab—Option Attributes, Page Attributes, Prompt, and Default—for this page. In addition, during the configuration process numeric option variables will automatically be converted from fractions to decimals. For example, if 5 1/2 (five and a half) is entered then 5.5 will be stored. |
|
Seq (sequence) |
The order that the option appears on the page. |
|
|
Click the Option Description button to access the Page Generation - More Option Information page. When you enter an option description, the page label appears as a link on the Order Entry page. Clicking the link displays the additional option information. You might add detailed product specifications, or HTML for graphics or other media-rich content. Note. HTML tags and configuration binds are supported on this field. In addition, the %Image(<<Database Image Name>>) meta-HTML tag is also supported. This meta-HTML tag allows you to use database images within HTML. See Configuration Binds. |
|
Description |
The visible option description that appears on the page.
Note. HTML tags and configuration binds are supported on
this field. In addition, the %Image(<<Database Image Name>>) meta-HTML
tag is also supported. This meta-HTML tag allows you to use database images
within HTML. See Configuration Binds. |
Access the Option Attributes tab.
View the attributes for the Option variables.
|
Date |
Select this check box to indicate that this option variable is a date. When you select this check box the system will perform date validations on this option when processing the model configuration. This option variable must be entered as an eight digit number with no decimals in YYYYMMDD format. For example, 20030623 would be a valid date, but 20033131 would not. |
Access the Page Attributes tab.
Enter the required values, in particular:
|
Control Type |
Select Edit Box or one of the other variable display options: Check Box: Only options that have a length of 1 and a type of Character are valid. Dropdown List: You must associate a value list for all options of this type. Radio Button: You must associate a value list for all options of this type. Text Box: A multi-line version of an edit box. |
|
Status |
Select to control whether the variable option's appearance on the order entry page is: Required: The option must contain a value in order to continue the configuration process. Optional: The option may contain a value, but can be left empty (a value of None appears for radio button and the available options list controls). Included: The option is visible, but unavailable for selection since the option's value is already included in the configuration. Conditional: The option functions with a status of optional, and the option's display is controlled by the expression that you add in the Condition (Syntax) field that appears. |
|
Condition (Syntax) |
Select, add, or update a syntax expression to determine the conditional control type option's appearance on the order entry page. |
|
Print Code |
Select, add, or update to designate which reports include the option information. |
Access the Prompt tab to view the attributes for the Option variables.
Access the Default tab.
|
Default Value (Syntax) |
If no syntax or value is entered, or if the syntax is not valid, then the default for a radio button or the available options list is the last value in the value list. For a check box, the default is deselected. |
Save the settings in preparation for establishing page layout options.
Establishing Page Layouts
Once you define general Page Generation rule characteristics, access the Page Layout Options page (select Page Generation as the action type in the Rule page).
You can select one of the three standard page layouts, or create a new unique layout. If you create your own page layout, the system generates an HTML template that you can modify to meet your requirements. The HTML that the system generates contains all of the option information and attributes that you enter for the page generation details.
See Configuration Binds.
In addition, the following fields accept HTML tags, enabling modifications to each of the standard layout styles:
Page Title
Option Description
Additional Information
Note. In addition to standard HTML tags, you can use the %IMAGE(<<Database Image Name>>) meta-HTML tag within the standard HTML image tag to leverage images within the database in HTML (for example: <img src='%IMAGE(<<Database Image Name>>)'>).
To establish the page layout:
Complete the steps in the previous section to define page generation rule characteristics.
Define all of the options and the associated option information.
Access the Page Layout Options page and select a page processing option:
Deferred Mode: The page is validated only when the continue action is selected during order entry.
This is the default mode.
On Display Mode: The page is validated upon initial page display and when the continue action is selected during order entry.
Additionally, you can click the Refresh button during order entry to update price or option validation.
Real-Time Mode: The page is validated upon initial page display, when the continue action is selected during order entry, or when an option value is changed during order entry.
Select a layout option:
Standard: To use one of the three standard page layout templates that appear in the Page Layout group box. Options are:
A short page, single column style.
A short page, double-column style layout.
A long page, single-column style layout for lengthy labels.
Custom: To create a unique page layout. This option is available only when page processing is in Deferred mode.
Important! You must save the page before selecting this option, which uses what is stored in the database to generate the HTML. If changes are made and the Custom layout option is selected without first saving the page, the HTML will not contain the changed information. After you select the Custom layout option, all fields on the Page Generation page are unavailable for entry. Changing an option or attribute after generating the HTML template corrupts the accuracy of the option and attribute information contained within the template.
The system generates and displays a custom layout HTML template based upon the defined layout option.
Using an HTML or text editor, cut and paste the Custom Layout HTML template into the body of an HTML document.
The following is an example of an acceptable HTML structure:
<html><head><title>Page Generation Rule Custom Layout Template</title></head><body>
<!-- Start of Cut & Paste HTML --><!-- Insert HTML from Product Configurator's
Page Generation Rule Here --><!-- End of Cut & Paste HTML --></body></html>
Modify the HTML to fit the business needs.
Adhere to the following guidelines when modifying the HTML:
SELECT and INPUT tags cannot be deleted.
Additionally, the NAME property on SELECT and INPUT tags cannot be modified and must match the option variable names that are defined on the page generation rule.
The VALUE property that is on OPTION tags cannot be modified and must match the value list definition for the corresponding option variable on the page generation rule.
The system captures as option variables only those options that you define on the page generation rule.
The system does not capture any additional options with SELECT or INPUT tags unless you add these option variables to the page generation rule and regenerate the HTML.
Paste the modified HTML back into the Custom Layout HTML text box.
Optionally, select the Display Summary Tab check box.
This controls the appearance of the configured order entry Summary page, which displays configuration details for the product during a configuration. Configuration Detail rules and any print code that is associated with the page generation rules determine which options are displayed on this page.
Select the page layout.
Click the Test Page link to view a working model of the page that you just created.
Defining Page Validation Rules
Page validation rules check for invalid conditions, and display appropriate error, warning, or informational messages. If the combination of options that is selected on an order entry page is not valid, the system stops the order entry configuration and prompts the user to correct any mistakes.
To ensure that the correct page appears for modification when an error does occur, a page validation rule must be a child of a page generation rule in the model if the message type is an error or a warning.
To define a page validation rule:
Select Page Validation as the action type and access the Rule page in Add mode.
Complete the information on the Rule page.
In the Condition (Syntax) field, select, add, or enter a syntax statement to specify the condition for processing the page validation rule.
Access the Page Validation page.
Enter the general page characteristics; in particular:
See Also
Maintaining Configuration Messages
Defining Distribution Rules
To define distribution rules, use the Rule component (RULE_MAINT_GBL). This section discusses how to:
Define availability date rules.
Define configured component rules.
Define finalized cost rules.
Define finalized date rules.
Define finalized price rules.
Define finalized volume and weight rules.
Define kit component rules.
Define kit generation rules.
Define product selector rules.
Set up product selector as product advisor.
Define purchase item rules.
Define workflow rules.
See Also
Defining Page Generation and Validation Rules
Pages Used to Define Distribution Rules
|
Page Name |
Definition Name |
Navigation |
Usage |
|
CP_RULE_HEADER_PNL |
Configuration Modeler, Maintain Rules, Rule |
Identifies basic information for a rule before going to the rule details page. |
|
|
CP_RULE_DTL_AD |
When accessing the Rules component, select Availability Date as the action type. |
Checks the availability of the components during a configuration. |
|
|
CP_RULE_DTL_CC |
When accessing the Rules component, select Configured Component as the action type. |
Creates configured components that launch nested configuration models. |
|
|
CP_RULE_DTL_FIN |
When accessing the Rules component, select Finalized Cost as the action type. |
The Finalized Cost rule action returns the estimated cost for the configured product. |
|
|
CP_RULE_DTL_FIN |
When accessing the Rules component, select Finalized Date as the action type. |
The Finalized Date rule action returns the scheduled shipment date for the configured product. |
|
|
CP_RULE_DTL_FIN |
When accessing the Rules component, select Finalized Volume as the action type. |
The Finalized Volume rule action returns the total volume for the configured product. |
|
|
CP_RULE_DTL_FIN |
When accessing the Rules component, select Finalized Weight as the action type. |
The Finalized Weight rule action returns the total weight for the configured product. |
|
|
CP_RULE_DTL_FP |
When accessing the Rules component, select Finalized Price as the action type. |
Returns the price for the configured product. |
|
|
CP_RULE_DTL_KC |
When accessing the Rules component, select Kit Component as the action type. |
Creates a kit component for a configured kit. |
|
|
CP_RULE_DTL_KG |
When accessing the Rules component, select Kit Generation as the action type. |
Combines the functionality of the page generation rule with the kit component rule for a configured kit. |
|
|
CP_RULE_DTL_PS |
When accessing the Rules component, select Product Selector as the action type. |
Returns a standard product ID as output from the configuration. |
|
|
CP_RULE_DTL_PI |
When accessing the Rules component, select Purchase Item as the action type. |
Create a purchase requisition for components that you purchase (instead of producing) for the configured product. |
|
|
CP_RULE_DTL_WF |
When accessing the Rules component, select Workflow as the action type. |
Creates a Workflow based on the business process, the activity, and the event to trigger. |
Defining Availability Date Rules
This rule calculates the scheduled availability date during a configuration. The availability date rule uses a business unit, an item, and a quantity to calculate an availability date. This result can then be used in the configuration model to calculate a schedule shipment date (using the finalized date rule) or in other configuration modeling scenarios.
The system uses time-phased availability (ATP) information in order to determine the available date. This ATP information is retrieved using Inventory and takes into account supply and demand in order to calculate the date that an item is available. This functionality mimics the availability inquiry within the Maintain Sales Order menu of Order Management.
Checking the availability of components can be time-consuming. Therefore, use this rule only with components that have a high impact on the configurations.
To define an availability date rule:
Select Availability Date as the action type and access the Rule page in Add mode.
Complete the information on the Rule page. In particular:
In the Condition (Syntax) field, select, modify, or add a syntax expression to specify the conditions under which the availability is checked.
Access the Availability Date page.
Select, modify, or add a secondary variable in the Variable field to store the resultant value. You can use this new secondary variable in the syntax of subsequent rules.
The system displays ATP Check (available to promise check) in the Availability Check Type field.
Enter the Inventory business unit in which to check item availability.
Select, modify, or add an expression in the Component ID (Syntax) field to determine the item for which you are checking availability.
Select, modify, or add an expression in the Quantity (Syntax) field to determine the number of items or components (in the standard unit of measure) for which you are checking availability. The syntax must evaluate to a numeric value.
See Also
Defining General Item Information
Defining Configured Component Rules
This rule initiates multilevel configuration processing (models). Each configured component within a configured product uses its own model.
To define a configured component rule:
Select Configured Component as the action type and access the Rule page in Add mode.
Complete the information on the Rule page. In particular:
In the Condition (Syntax) field, select, modify, or add a syntax expression to specify the conditions under which the rule processes.
Access the Configured Component page.
Complete the required fields. In particular:
See Also
Defining Finalized Cost Rules
This rule is used to return the estimated cost of the configured product. You must be able to track the cost for the products based on the options that are included. Use finalized cost rules only for the main product, not for the separate configured components.
The system uses the cost that returns during order entry to perform gross margin calculations in Order Management. It is not applied to item costing in Inventory. A configured item cost generation calculates the exact costs of the configured item based on the production orders that the system produces offline in production configuration.
To define a finalized cost rule:
Select Finalized Cost as the action type and access the Rule page in Add mode.
Complete the information on the Rule page.
In the Condition (Syntax) field, select, modify, or add a syntax expression to specify the conditions under which the rule processes.
Access the Finalized Cost page.
Complete the required fields.
|
Value of Cost (Syntax) |
Select, modify, or add a syntax expression to calculate the cost value of the configured product. The result must be a numeric value with a maximum precision 10.4. |
Defining Finalized Date Rules
This rule is used to return the scheduled shipment date for the configured product. You can use internal variables and availability date information to assist in calculating the date.
To define a finalized date rule:
Select Finalized Date as the action type and access the Rule page in Add mode.
Complete the information on the Rule page.
In the Condition (Syntax) field, select, modify, or add a syntax expression to specify the conditions under which the rule processes.
Access the Finalized Date page.
Complete the required fields.
|
Date in 'YMD' Format (Syntax) [date in YYYYMMDD (year/month/date) format] |
Select, modify, or add a syntax expression to calculate the date in YYYYMMDD (year/month/date) format to return as the schedule shipment date for the configured product. |
Defining Finalized Price Rules
This rule returns the sales price of a configured product. After the configured price is finalized, it overrides any other pricing method that is applied to the product, including contract pricing. If the system encounters multiple finalized price rules for the main product during the configuration, the value that is calculated by the last one is returned.
Finalized price rules are valid only for the main product, not for configured components. You can generate price details by using configuration detail rules. If a finalized price rule is found on a component, the resulting price is ignored, but the condition is checked to see whether it releases any child rules.
If no finalized price rule is found during a configuration, the system prices the configured product according to standard pricing rules for non-configured products.
See Defining Configuration Detail Rules.
To define a finalized price rule:
Select Finalized Price as the action type and access the Rule page in Add mode.
Complete the information on the Rule page.
In the Condition (Syntax) field, select, modify, or add a syntax expression to specify the conditions under which the rule processes.
Access the Finalized Price page.
Complete the required fields.
|
Price Setting |
Options are: Return List Price: Uses the finalized price value as the list price for the product that is being configured. All of the standard Order Management pricing logic is applied to this list price. Return Net Unit Price: Uses the finalized price value as the net unit price for the product that is being configured. None of standard Order Management pricing logic is applied to this price, and price protection is in effect. |
|
Value of Price (Syntax) |
Select, modify, or add a syntax expression to calculate the final price. The result must be a numeric value with a maximum precision 10.4. |
Defining Finalized Volume and Weight Rules
These rules return the finalized volume and weight for the configured product. You must be able to track the weight or volume for the configured main product based on the options that are included. Use finalized weight and volume rules only for the main product, not for the separate configured components on a configuration.
The system can use the weight or volume that is returned during order entry to perform weight and volume freight calculations in Order Management.
To define a finalized volume rule:
Select Finalized Volume as the action type and access the Rule page in Add mode.
Complete the information on the Rule page.
In the Condition (Syntax) field, select, modify, or add a syntax expression to specify the conditions under which the rule processes.
Access the Finalized Volume page.
Complete the required fields.
|
Value of Volume (Syntax) |
Select, modify, or add a syntax expression to calculate the value of volume for the configured product. The result must be a numeric value with a maximum precision 11.4. |
To define a finalized weight rule:
Select Finalized Weight as the action type and access the Rule page in Add mode.
Complete the information on the Rule page.
In the Condition (Syntax) field, select, modify, or add a syntax expression to specify the conditions under which the rule processes.
Access the Finalized Weight page.
Complete the required fields.
|
Value of Weight (Syntax) |
Select, modify, or add a syntax expression to calculate the value of weight for the configured product. The result must be a numeric value with a maximum precision 11.4. |
Defining Kit Component Rules
Using Order Management product kit concepts, the configured kit dynamically groups or bundles products with complex interproduct compatibility and validation. The kit component rule implements this concept by dynamically adding components to a configured kit.
Multilevel Kit Configuration
You can include configuration components within configured kits; however, configured components within a configured kit can only be single-level configurations. In other words, a configured product that is a component within a configured kit cannot contain an additional configured component within it.
In addition:
Only one production-configured component is allowed as a component within a configured kit.
Standard configured products do not have a limit to the number of production-configured components that they can have.
Note. You cannot use configured kits within a configured kit.
You must have a configured component rule and a kit component rule (in that order) for each configured product that is a component within a configured kit.
The configured component rule processes the component's model as a nested configuration.
The kit component rule provides the information (quantity per, quantity code, unit of measure) that is needed to add the product as a kit component.
When a kit component rule is encountered for a configured product during the configuration, the system looks for a configured component rule for that product and identifies the corresponding configuration code. The configured component must have its own configuration model.
To define a kit component rule:
Select Kit Component as the action type and access the Rule page in Add mode.
Complete the information on the Rule page. In particular:
In the Condition (Syntax) field, select, modify, or add a syntax expression to specify the conditions under which the rule processes.
Access the Kit Component page.
Complete the required fields.
|
Component Product ID (Syntax) |
Select, modify, or add the product that you want to add to the kit when the rule is triggered. |
|
Quantity (Syntax) |
Select, modify, or add the quantity, or the syntax expression ID to use in calculating the quantity. |
|
Per |
Identifies whether the number of units selected in the Quantity field is per Assembly or per Order. |
|
OK to Ship Without |
Select if the product kit can ship without this component. |
See Also
Defining Configured Component Rules
Defining Kit Generation Rules
Configured kits enable you to dynamically bundle products or packages with complex interproduct compatibility and validation. The kit generation rule provides a way to leverage existing product definitional hierarchies within configured kits. The functionality in this rule action combines the functionality of the page generation rule with the kit component rule for a configured kit.
Use the kit generation rule to:
Explode a product kit into a display of its components, including an editable quantity field, the default unit of measure, and discounted price of each component.
Add the components of a product kit with dynamically entered quantities to a configured kit.
The following figure shows a sample configuration page where a kit generation rule is defined.
To define a kit generation rule:
Select Kit Generation as the action type and access the Rule page in Add mode.
Complete the information on the Rule page. In particular:
In the Condition (Syntax) field, select, modify, or add a syntax expression to specify the conditions under which the rule processes.
Access the Kit Generation page.
Complete the required fields.
|
Page Title |
The title that is displayed on the order entry configuration page that is generated with a kit generation rule.
Note. HTML tags and configuration binds are supported on
this field. In addition, the %Image(<<Database Image Name>>) meta-HTML
tag is also supported. This meta-HTML tag allows you to use database images
within HTML. See Configuration Binds. |
|
Product Kit ID (Syntax) |
Select, modify, or add an expression ID for the product kit to explode. Must be a valid product kit ID. |
|
Page Constraint |
Optionally select, modify, or add a page-level constraint ID to control and validate what can be entered on the order entry configuration page that is generated with a kit generation rule. |
The order entry configuration page automatically displays the component description, an editable quantity field, and unit of measure.
Select additional page display options by using the Show Product ID(s), Show Product Price(s), and Show Product Image(s) check boxes.
Click the Test Page link to view a working model of the page that you just created.
Defining Product Selector Rules
This rule returns a standard product ID as the result of a configuration. This rule can be used to return a standard product ID:
That is equivalent to a complete configuration.
As part of a product advisor assessment.
To define a product selector rule:
Select Product Selector as the action type and access the Rule page in Add mode.
Complete the information on the Rule page. In particular:
In the Condition (Syntax) field, select, modify, or add a syntax expression to specify the conditions under which the rule processes.
Access the Product Selector page.
Complete the required fields. In particular:
|
Product ID (Syntax) |
Select, modify, or add a syntax expression to return a valid product ID. |
Setting Up Product Selector as a Product
Advisor
You can use Product Configurator's product selector feature to enable the customers or sales representatives to search for products based on specific (configured) attributes. For example, you can create a generic configured product that functions as a shopper's helper, or product advisor.
When the customer or sales representative selects a product advisor product, the system can display a list of scriptable questions for the customer or sales representative to answer. Unlike a regular configured product or kit, a product selector uses the product configuration engine to select a product instead of creating a custom-configured product or kit.
The following figure shows an example where a customer or sales representative selects the desired combination of product or recipient attributes (accessories for a female, costing no more than 100 USD) and initiates the product selection search. The system will process the combination and return all products; configured and standard, that match the criteria.
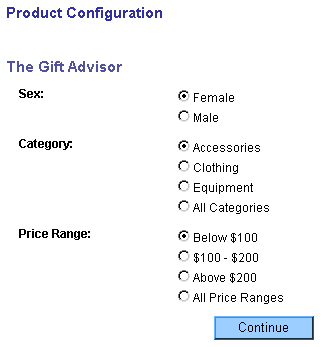
Example for product selector in Product Configurator page
Note. Product Configurator's product selector feature can be designed in many ways; this example presents only one possible scenario.
Defining Purchase Item Rules
This rule generates purchase requisitions for configured and nonconfigured components that are used in configured products, such as raw materials or subassemblies that are used as components in the configuration.
A single configured product can generate multiple components, configured or not configured, that can be purchased. Then, Product Configurator generates the requisitions to cover component requirements so that all of the components that are used in producing the configured product are associated with the configuration.
For example, a bicycle manufacturer might use this rule if the manufacturer makes the frame and assembles the bicycle but doesn't produce the other components that make up the bicycle. The manufacturer uses the Purchase Item rule to create a configured purchase requisition for the wheels and other parts of the bicycle.
If the system finds a purchase item rule after a configured component rule, the configured item is purchased, rather than produced.
Note. If you are using the purchase item rule and Purchasing is not installed, the rule is processed, but the corresponding requisition is not created.
To define a purchase item rule:
Select Purchase Item as the action type and access the Rule page in Add mode.
Complete the information on the Rule page. In particular:
In the Condition (Syntax) field, select, modify, or add a syntax expression to specify the conditions under which the rule processes.
Access the Purchase Item page.
Complete the required fields. In particular:
|
Item ID (Syntax) |
Select, modify, or add a syntax expression to return the item ID. |
|
Quantity (Syntax) |
Select, modify, or add a syntax expression to return the quantity. If the parent is not a manufactured configured item, Purchasing uses this value when creating the requisition. If the parent is a manufactured configured item, this value is ignored. When the purchased item is being used as a component on the production order (that is, the component list rule references it), the quantity is overwritten with the value that is calculated in the Production Configuration engine. If it is not used as a component, then this value is used by the Purchase Requisition Loader to create the requisition. |
|
Date |
Select a variable type, and enter a configuration variable value that returns a value in the valid date format of YYYYMMDD.
|
|
Price |
Select a variable type, and enter a configuration variable value that returns the price. If the purchased item is configured, the system uses this as the purchase price because Purchasing does not store configured prices. Note. A cost for purchased configured items will automatically be inserted into the cost tables based on the configuration code, price, and default cost element for the item if a production cost does not already exist. If the purchased item is a standard item, the system uses Purchasing pricing and this field value is ignored. |
Defining Workflow Rules
This rule helps to integrate product configuration in business processes. You can dynamically trigger a Workflow business process, activity, or event from within a product configuration. The business process, activity, and event names are defined in the Application Designer.
Note. The sample database includes an email workflow and a worklist workflow as examples. See the CP Workflow Mail and CP Workflow Worklist activities for details.
To define a Workflow rule:
Select Workflow as the action type and access the Rule page in Add mode.
Complete the information on the Rule page.
In the Condition (Syntax) field, select, modify, or add a syntax expression to specify the conditions under which the rule processes.
See Also
PeopleTools PeopleBook: Workflow Technology
Defining Production Rules
To define production rules, use the Rule component (RULE_MAINT_GBL). Some Product Configurator rule action types are specific to production (manufacturing) functions. After you configure a product through the distribution configuration engine, the system is ready to begin the background process of production configuration if the item is set up as production configured. Production rules enable you to specify the routing operations and components that are required for manufacturing configured items. They also determine the production cost for items that have costs that are based on the configuration.
To set up a production model, use any of the rule action types that are discussed here, along with any common rule action types.
This section discusses how to:
Define component list rules.
Define operation sequence rules.
See Also
Pages Used to Define Production Rules
|
Page Name |
Definition Name |
Navigation |
Usage |
|
CP_RULE_HEADER_PNL |
Configuration Modeler, Maintain Rules, Rule |
Define the basic characteristics of the rule, including the specific rule action and the condition for it to process. |
|
|
CP_RULE_DTL_CL |
When accessing the Rules component, select Component List as the action type. |
Create or add to a dynamic component list for each item that you configure. You can include multiple components on a component list. |
|
|
CP_RULE_DTL_OS |
When accessing the Rules component, select Operation Sequence as the action type. |
Specify an operation to use from the standard routing associated with the item. Also, custom times and resources can be entered to override the standard operation times and resources. |
Defining Component List Rules
This rule dynamically generates a component list (a bill of material) for each configured item in a configuration.
To define a component list rule:
Select Component List as the action type and access the Rule page in Add mode.
Complete the information on the Rule page. In particular:
In the Condition (Syntax) field, select, modify, or add a syntax expression to specify the conditions under which the system adds an item to the component list.
Access the Component List page.
Complete the required fields. In particular:
|
Op Seq (operation sequence) |
Determines where in the manufacturing process you need the component. Enter the number of the operation sequence from your routing that requires this component. To avoid having items assigned to the default operation sequence, be sure to structure the model so that you define valid operation sequences with each component list item. |
|
Quantity (Syntax) |
Calculates the required quantity for each item or each assembly in the base unit of measure for the manufacturing business unit. This syntax value must resolve to a numeric value. |
See Also
Defining Operation Sequence Rules
Using production configuration, it is no longer necessary to maintain individual routings for each possible configuration of an item; this rule creates or adds to operation sequences and takes the place of routings for individual items.
You can specify the necessary operations from a predefined routing that is associated with the configured item. This enables you to generate configured routings for each unique configuration of an item. Routing times and routing resources for the operation sequence are included in the operation details, which allow custom times and resources to be entered to override the standard operation times and resources.
The system arranges the operation sequence list in order of sequence number. If the operation sequence is not found on the corresponding routing, the process is stopped and marked as an error.
See Maintaining Operation Lists.
See Structuring Routings.
To define an operation sequence rule:
Select Operation Sequence as the action type and access the Rule page in Add mode.
Complete the information on the Rule page. In particular:
In the Condition (Syntax) field, select, modify, or add a syntax expression to specify the conditions under which the system adds an operation sequence number to the operation list.
Access the Operation Sequence page.
Complete the required fields.
|
Operation Sequence (Syntax) |
The syntax expression returns the appropriate operation sequence number. This operation sequence number must exist on the routing that is associated with the item that is being configured. |
|
Use Standard Operation Times |
Select this option to use the standard operation times for the routing definition in Manufacturing, and to make the Operation Times Attributes group box fields unavailable for entry. |
|
Use Rule Based Operation Times |
Select this option to enable the definition of custom operation times for this operation sequence. If you define custom operation times, all of the standard operation times on your routing for this operation will be replaced by your defined custom times. When you select this option the Operation Times Attributes grid appears. |
|
Time/Resource Type |
Select the time or resource type for this operation. |
|
Operation Time/Rate (Syntax) |
A syntax field that takes into account the combination of selected times and rates that it takes to complete the operation. |
|
Time Rate Unit |
Select the unit for the operation time or the operation rate. |
|
Include Setup |
Select this check box to include setup in your operation lead time calculation. |
See Maintaining Tasks.
See Also
Maintaining Operation Resources
Defining Routing Operation Times and Rates