 Understanding Unified Navigation
This chapter provides an overview of unified navigation and discusses how to:
Complete initial system configuration.
Configure the integration gateway.
Set up single signon.
Set up unified navigation.
Set up related content.
Consume pagelets from content provider systems.
Understanding Unified NavigationThis section provides an overview of:
Unified navigation in PeopleSoft Applications Portal.
The Unified Navigation WorkCenter.
Remote content references and templates.
Remote dashboards.
Limitations in PeopleTools 8.52.
Support information for customers who have not purchased a PeopleSoft Applications Portal license.
 Unified Navigation in PeopleSoft Applications Portal
Unified navigation provides a framework to federate PeopleSoft applications under a single portal system, the PeopleSoft Applications Portal. Using the delivered Unified Navigation WorkCenter page, you can configure and federate portal registries from content provider systems into a unified system. Your administrators and users will log into the portal system to access local resources on the portal system as well as remote resources made available through unified navigation. Once unified navigation is configured, your users and administrators will be able to:
Access remote content references and resources, which includes:
Accessing remote DFAN pages through the main drop-down menu of the portal system.
Adding remote content references as My Links (or Favorites) on the portal system.
Accessing remote dashboards through the main drop-down menu of the portal system.
Accessing remote WorkCenter pages with remote pagelets through the main drop-down menu of the portal system.
Creating related content services in the portal system using the either local or remote content references.
Creating related content services in the content provider system using content references local to that system.
Assigning local (to the portal system) or remote content references (from a content provider system) as related content services (or related actions) to content references on the portal system.
Assigning local (to the content provider system) or remote content references (from a different content provider system) as related content services (or related actions) to content references on the content provider system.
Tracking usage of remote content references with iTracker.
Synchronize user system profiles, or user personalization data, or both from the portal system to the content provider systems.
The following diagram illustrates how content from the content provider system is rendered in the portal system and identifies which pieces of the page are rendered from which system:
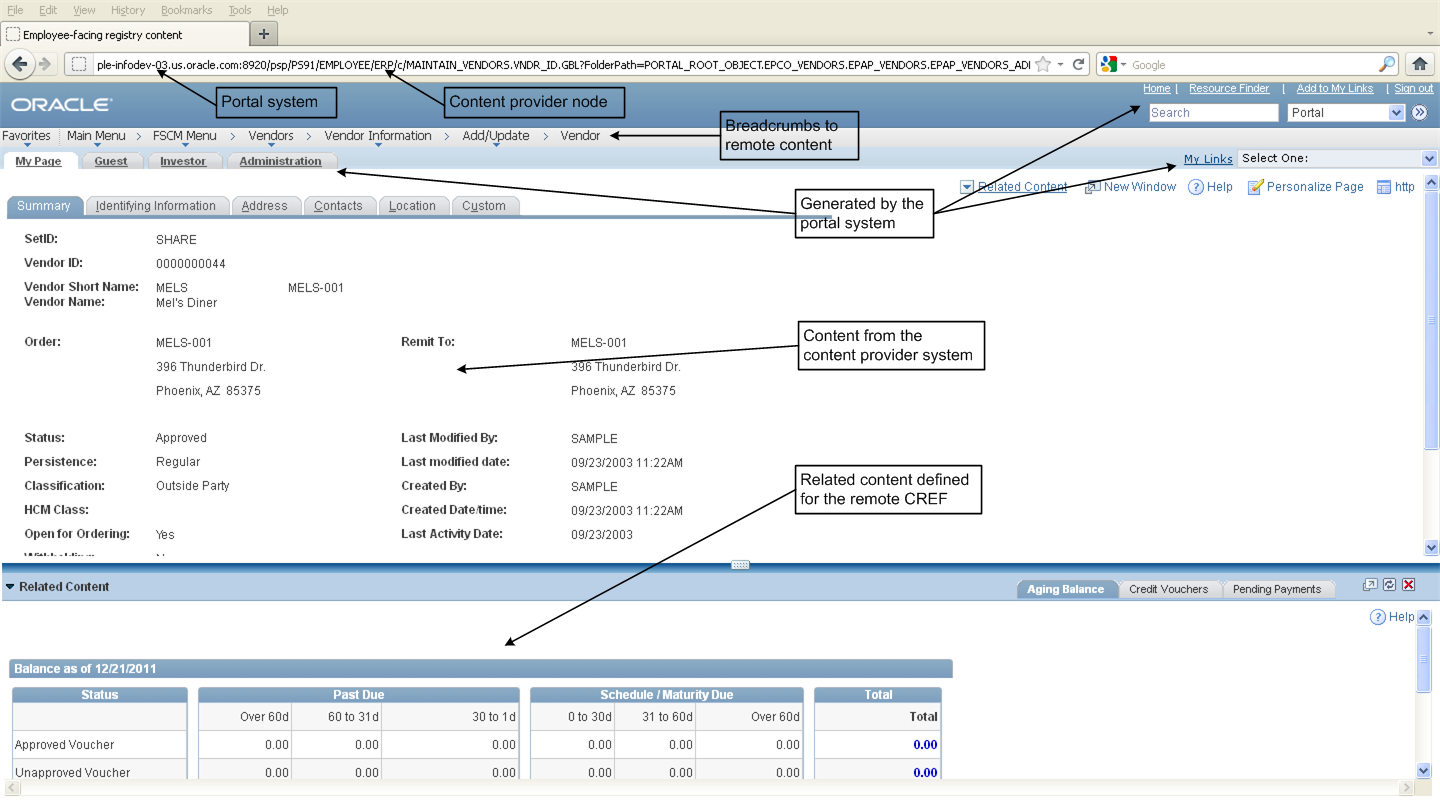
Content from a content provider system displayed through unified navigation
The URL in the address field indicates that the portal system is the current system and that the content resides on a content provider node (ERP).
The page header (Home and Sign out links, search, and so on), the drop-down menu, and homepage tabs are generated from the portal system. This ensures that portal functions and navigation remain local to the portal system.
The content in the target area of the page comes from the content provider system. If the content reference in the content provider system is defined with a specific template, then the content is also rendered using that template.
Related content services defined for the remote content reference are displayed.
See Also
Remote Content References and Templates
The Unified Navigation WorkCenter
The Unified Navigation WorkCenter provides a guide to the steps that need to be completed to configure your portal system for unified navigation.
To access the Unified Navigation WorkCenter, select Portal Administration, Unified Navigation WorkCenter:
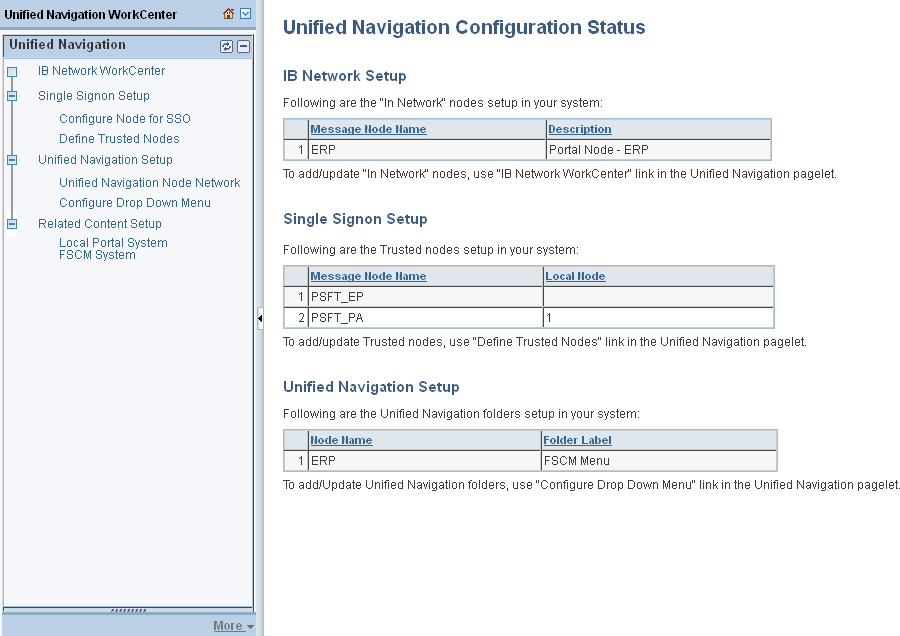
Unified Navigation WorkCenter with configuration of the portal system completed
When you click links in the Unified Navigation pagelet, pages are displayed within the portal system on which you need to enter information to configure unified navigation.
Note. In addition, some configuration is required on the content provider systems.
Configuration of unified navigation consists of seven procedures, which are documented in this chapter:
Complete initial system configuration.
Configure the integration gateway (click the IB Network WorkCenter link in the pagelet).
Define remote nodes (click the Configure Node for SSO link in the pagelet).
Identify trusted nodes (click the Define Trusted Nodes link in the pagelet).
Add remote nodes to the integration network (once again, click the IB Network WorkCenter link in the pagelet).
Set up the unified navigation node network and test the single signon configuration (click the Unified Navigation Node Network link in the pagelet).
Add remote folders to the drop-down menu (click the Configure Drop Down Menu link in the pagelet).
After configuration of unified navigation has been completed, you can configure related content to take advantage of remote content and remote services. Related content can be configured from the Unified Navigation WorkCenter page:
You can create a service to manage related content for a content provider system.
See Creating a Service to Manage Related Content for a Content Provider System.
You can create and assign related content for the portal system and for content provider systems.
See Creating and Assigning Related Content Within the Unified Navigation Framework.
Remote Content References and Templates
When a menu item (content reference) from a content provider system is selected from the drop-down menu, the information that is displayed comes from multiple sources as follows:
The page header (Home, Sign out, and other links) plus the drop-down menu come from the portal system.
The target area content is fetched from the content provider system.
The template for the target area content is also fetched from the remote system and is used to render the target content. However, if the remote content reference is defined without a template, then the default template for the local Application Portal system is used to render the remote content reference.
When remote content is displayed, the New Window, Help, Customize Page, and other links invoke actions that are relative to the content provider system or the portal system, depending on which link is clicked:
The New Window link opens a new window redisplaying the current content—that is, the header and drop-down menu come from the portal system and the content comes from the content provider system.
The Help link displays the help topic from the help system that is configured for the content provider system.
The Personalize Page link replaces the target area with the page personalization information from the content provider system.
The Copy URL icon button copies the URL of the current page—that is, a URL on the portal system that includes the content provider node and content reference.
Note. Templates from both the portal system and from the content provider system are not cached.
Oracle delivers unified navigation with support for PeopleTools-delivered, iFrame-based templates (for example, DEFAULT_TEMPLATE and PT_IFRAME_TEMPLATE) and WorkCenter templates. If your remote content references use custom templates or other PeopleSoft-delivered non-iFrame templates, then those templates must conform with the following standards:
The template HTML must include the PeopleSoft header and drop-down menu pagelets:
For example, to include the PeopleSoft header, use HTML code similar to the following:
<div>
    <pagelet name="UniversalNavigation">
      <source node="LOCAL_NODE" href="s/WEBLIB_PT_NAV.ISCRIPT1.FieldFormula.⇒
IScript_UniHeader_Frame?c=%Bind(:5)" /> </pagelet>
  </div>
In addition, to include the PeopleSoft drop-down menu, use HTML code similar to the following:
 <div>
    <pagelet name="Nav">
      <source node="LOCAL_NODE" href="s/WEBLIB_PT_NAV.ISCRIPT1.FieldFormula.⇒
IScript_PT_NAV_INFRAME?navtype=dropdown&c=%Bind(:5)" />
    </pagelet>
  </div>
Important! In both examples, the source element’s node attribute must be set to LOCAL_NODE. Otherwise, unified navigation will fail to operate on the remote content reference.
The following HTML code represents a template that has been modified to adhere to the preceding standards. In this example, the relevant portions of the code are highlighted in bold:
<!DOCTYPE HTML PUBLIC "-//W3C//DTD HTML 4.01//EN" "http://www.w3.org/TR/html4/⇒ strict.dtd"> <html dir="%Direction" lang="%LanguageISO"> <head> <meta http-equiv="X-UA-Compatible" content="IE=8"> <meta http-equiv="content-type" content="text/html; charset=UTF-8"> </head> <body class="PSPAGE" id="ptifrmtemplate"> <div> <pagelet name="UniversalNavigation"> <source node="LOCAL_NODE" href="s/WEBLIB_PT_NAV.ISCRIPT1.FieldFormula.⇒ IScript_UniHeader_Frame?c=var" /> </pagelet> </div> <div> <pagelet name="Nav"> <source node="LOCAL_NODE" href="s/WEBLIB_PT_NAV.ISCRIPT1.FieldFormula.⇒ IScript_PT_NAV_INFRAME?navtype=dropdown&c=var" /> </pagelet> </div> <div id="ptifrmcontent"> <div id="ptifrmtarget"> <iframe id="ptifrmtgtframe" name="TargetContent" title="Target_Title" ⇒ frameborder="0" scrolling="auto" onload="ptrc.onLoadTC()" src=""> <target Name="target" params="var"/> </iframe> </div> </div> </body> </html>
Errors When Accessing Remote Content Through DFAN Pages
When a remote content reference is accessed through a remote DFAN page, a “not authorized” error can occur even though the user is authorized to access to the content reference on the content provider system. This error occurs because the portal registry definition for the remote content reference uses LOCAL_NODE, instead of a specific node. Under unified navigation, LOCAL_NODE will resolve to the portal host node on the portal system, and not a node on the content provider system. Because the content reference (component and page) does not exist on the portal system, the “not authorized” error results.
To resolve this issue, you must identify and update content references on the content provider system to use either the default local node or the portal host node of the content provider system. In the following example for a PeopleSoft HCM application, a SQL statement updates the node value to HRMS, the portal host node:
update PSPRSMDEFN set PORTAL_CNTPRV_NAM='LOCAL_NODE' where PORTAL_REFTYPE='C' and ⇒
PORTAL_CNTPRV_NAM='HRMS' and PORTAL_NAME='EMPLOYEE';
Remote Dashboards
Since dashboards are accessed through content references, remote dashboards defined in a content provider system can be accessed through a remote folder that is configured for unified navigation.
Note. However, because homepages (unlike dashboards) are displayed only when a user directly signs into a system, homepages from content provider systems are not accessible through unified navigation.
Remote dashboards are subject to the following limitations:
A pagelet on a remote dashboard will not function properly if the pagelet performs a JavaScript document.write or document.writeln operation.
When the portal system's drop-down menu is used to navigate to the remote dashboard, then the menu breadcrumbs are updated properly. However, if the PeopleCode RedirectURL method is used to load the remote dashboard, then the menu breadcrumbs are not updated.
See Also
PeopleTools 8.52: PeopleTools Portal Technologies PeopleBook, “Administering Homepages, Dashboard Pages and Pagelets,” Understanding Homepages and Dashboard Pages
PeopleTools 8.52: PeopleTools Portal Technologies PeopleBook, “Administering Homepages, Dashboard Pages and Pagelets,” Managing Dashboard Pages
Limitations and Additional Considerations in PeopleTools 8.52
Unified navigation can be used with these limitations and additional considerations in PeopleTools 8.52:
Unified navigation requires a PeopleSoft Applications Portal license. Configuration of unified navigation must be completed on the portal system with associated configuration steps performed on the content provider system. Use of unified navigation features (for example, navigation to remote content references) must also occur on the portal system.
The Unified Navigation pagelet is delivered in PeopleTools as a homepage pagelet. On the Personalize Content page, it is listed under PeopleSoft Applications. However, adding the Unified Navigation pagelet to the homepage and using it in this manner is not supported. The only supported use of the Unified Navigation pagelet is on a portal system in the delivered Unified Navigation WorkCenter.
Navigation to menu items on content provider systems is supported through the portal system's drop-down menu only. You cannot use homepage menu pagelets such as the Enterprise Menu pagelet or the Main Menu pagelet to navigate to remote menu items. While the label for remote folders will appear in these pagelets, no subfolders or menu items will be displayed.
Pagelet icon images used in remote pagelets must be copied from the content provider system to the portal system. In addition, if both systems do not use the same style (for example, one uses SWAN, and the other does not), the cascading style sheets (CSS) must copied from the content provider system to the portal system.
Templates for remote content references must conform to the standards outlined in this document.
Adding subfolders under a remote folder (a unified navigation folder) is not supported. While the Structure and Content page on the portal system will show an Add Folder link for a remote folder, adding a folder in this manner is not supported. You must maintain the menu structure for a remote folder while directly logged into the content provider system.
Do not use the following special characters in the labels for a remote folder: { } #.
Unified navigation supports same portal integration only—for example, EMPLOYEE portal to EMPLOYEE portal, CUSTOMER portal to CUSTOMER portal, or PARTNER portal to PARTNER portal, and so on. Therefore, when selecting the portal host node on the portal system and on the content provider system, select the portal host node for the same portal.
Remote dashboards must conform to the standards outlined in this document.
See Remote Dashboards.
Support Information for Customers Who Have Not Purchased a PeopleSoft
Applications Portal License
As stated previously, unified navigation requires a PeopleSoft Applications Portal license. Configuration and use of unified navigation features (for example, navigation to remote content references) must occur on the portal system. However, in certain situations, some peer-to-peer configurations can achieve limited functionality that resembles what is available with unified navigation.
Specifically, you can create a local related content service on a content provider system using a content reference from a different content provider system without federating the content provider systems under unified navigation. To achieve this, you must manually copy the content references from the remote content provider system to the local content provider system and then manually synchronize security between the two systems.
See Also
PeopleTools 8.52: PeopleTools Portal Technologies PeopleBook, “Developing and Configuring Related Content Services”
Completing Initial System Configuration
You should complete the following steps prior to using the Unified Navigation WorkCenter to configure unified navigation on your systems:
On both the portal system and the content provider system, set the authentication domain to the lowest level domain shared by all sytems—for example, if all systems share the same subdomain, then .us.mycompany.com would be appropriate; otherwise, use .mycompany.com instead.
See PeopleTools 8.52: PeopleTools Portal Technologies PeopleBook, “Configuring the Portal Environment,” Configuring Web Profiles, Configuring General Portal Properties.
On both the portal system and the content provider system, turn off the generate relative URLs option on the Virtual Addressing page of the web profile.
See PeopleTools 8.52: PeopleTools Portal Technologies PeopleBook, “Configuring the Portal Environment,” Configuring Virtual Addressing.
Stop and restart each web server after making these changes.
On both the portal system and the content provider system, enable the drop-down menu.
See PeopleTools 8.52: PeopleTools Portal Technologies PeopleBook, “Administering Portals,” Managing General Settings for Portals.
Set the default user ID for the ANONYMOUS node.
On the content provider system only, set the default user ID for the ANONYMOUS node to be a user ID that is defined in both the content provider system and the portal system. If necessary, add a user profile for this user to the portal system.
Important! Select a user ID with limited privileges. Specifically, neither select a user with super user privileges nor an administrative ID that will be performing configuration and testing of unified navigation on the portal system.
See PeopleTools 8.52: PeopleSoft Integration Broker Administration PeopleBook, “Adding and Configuring Nodes,” Defining Node Parameters.
Set permissions to allow this user to invoke the PTUN_SSOTESTER service operation.
On the content provider system only, the default user ID on the ANONYMOUS node must have permissions to invoke the PTUN_SSOTESTER service operation. Modify a permission list used by that default user to enable permissions for the PTUN_SSOTESTER service operation (PTUN_USRPERS_SYNC service).
See PeopleTools 8.52: Security Administration PeopleBook, “Setting Up Permission Lists,” Setting Web Services Permissions.
On the portal system only, create a new node for the PTUN_SSOTESTER service operation:
Copy the node definition for a node that is used internally by the Integration Broker system—for example, copy the ANONYMOUS node definition.
Save the node definition with a different name—for example, SSOTEST.
On the Node Definitions page, ensure that it is an active node, that the node is segment aware, and that the authentication option is set to none.
On the WS Security page, ensure that the authentication token type is none.
On the Routings page, ensure that no other service operation is defined for this node.
See PeopleTools 8.52: PeopleSoft Integration Broker Administration PeopleBook, “Adding and Configuring Nodes,” Defining Node Parameters.
On the portal system only, create a new outbound routing for the PTUN_SSOTESTER service operation:
Important! The PTUN_SSOTESTER service operation is delivered with an outbound routing using WSDL_NODE as the receiver node. Because WSDL_NODE requires WS-Security for other service operations, it cannot be used for the PTUN_SSOTESTER service operation.
Edit the PTUN_SSOTESTER service operation.
On the Routings page, inactivate the current PTUN_SSOTESTER_ROUT outbound routing that uses the WSDL_NODE node.
On the Routings page, create and activate a new outbound routing (for example, PTUN_SSOTESTER_ROUT1) that uses the new node created in step 7.
See PeopleTools 8.52: PeopleSoft Integration Broker PeopleBook, “Managing Service Operation Routing Definitions,” Adding Routing Definitions From Service Operation Definitions.
Configuring the Integration Gateway
To configure the Integration Broker integration gateway and start the setup of the integration network on your portal system:
Select Portal Administration, Unified Navigation WorkCenter to open the Unified Navigation WorkCenter page.
In the WorkCenter pagelet, select the IB Network WorkCenter link to open the integration network's Configuration Status page in a separate window.
Alternatively, select PeopleTools, Integration Broker, Integration Network, Configuration Status.
See PeopleTools 8.52: PeopleSoft Integration Broker Administration PeopleBook, “Using the Integration Network,” Using the Configuration Status Page.
Click the Gateway Not Configured link.
The Gateways page appears.
See PeopleTools 8.52: PeopleSoft Integration Broker Administration PeopleBook, “Using the Integration Network,” Verifying and Managing Integration Gateway Configuration.
Configure the integration gateway:
Enter the machine name and complete URL to the PeopleSoftListeningConnector in the Gateway URL field:
Click the Ping Gateway button.
The status should return as active.
Click the Load Gateway Connectors button to load the gateway connectors.
Click the Save button to save your changes.
Click the Gateway Setup Properties link.
Log in on the Gateway Properties page.
The PeopleSoft Node Configuration page appears.
See PeopleTools 8.52: PeopleSoft Integration Broker Administration PeopleBook, “Managing Integration Gateways,” Setting Oracle Jolt Connection Properties.
Enter the URL to the gateway and other values in the Gateway Default App. Server group box.
At a minimum, enter the values for the default local node in the PeopleSoft Nodes group box.
Click the Save button.
Click the Ping Node button.
The status should return as success.
On the Ping Node Results page, click the Return button.
If you have the information now, you can define other participating nodes in the PeopleSoft Nodes group box at this time. Create an entry for the portal system's portal host node. In addition, for each content provider system, create entries for the default local node and portal host node.
Note. Alternatively, you can return to this PeopleSoft Node Configuration page once you have identified and defined these nodes.
Save your changes.
Then, for each default local node defined, click the Ping Node button.
The status might not return success if the node is not yet defined with the same parameters in both systems.
Note. If you click the Ping Node button for a any node that is a portal
host node, the following error will result:
Integration Broker Service: Destination node does not match the local
node. (158,506)
On the PeopleSoft Node Configuration page, click the Advanced Properties Page link.
The Gateway Properties page appears.
See PeopleTools 8.52: PeopleSoft Integration Broker Administration PeopleBook, “Managing Integration Gateways,” Using the integrationGateway.properties File.
Enter the full path to the keystore file and enter the encrypted keystore password:
See PeopleTools 8.52: PeopleSoft Integration Broker Administration PeopleBook, “Managing Integration Gateways,” Configuring Security and General Properties and PeopleTools 8.52: PeopleSoft Integration Broker Administration PeopleBook, “Managing Integration Gateways,” Encrypting Passwords.
Click the OK button.
On the PeopleSoft Node Configuration page, click the Save button again.
Click the OK button.
On the Gateways page, click the Return to Configuration Status link.
Click the Node Network Not Configured link (or the Node Network Configured link if that is displayed instead).
Ensure that the portal system's default local node is selected as in network (it is selected by default).
If you added the portal host node for content provider systems to the PeopleSoft Node Configuration page in step 6f previously, then select the portal host node from each content provider system as in network.
Click Save, then click the Return to Configuration Status link.
Click the No Domain Active link.
The Domain Status page appears.
In the Domains group box, set the status for this machine to Active.
Click the Update button to update the domain status.
Return to the Configuration Status page (click the Return to Configuration Status link).
The status should show that all three steps have been completed and that your integration gateway and integration network are configured.
Important! While this integration network is active, its configuration might not yet be complete if you have not added all remote nodes to the integration gateway.
Close the IB Network WorkCenter window.
Setting Up Single SignonThis section provides an overview of single signon and remote nodes, and discusses how to:
Define remote nodes.
Identify all trusted nodes.
Adding remote nodes to the integration network.
Testing single signon.
Understanding Single Signon for Unified Navigation
In a PeopleSoft environment, single signon is deployed for a number of reasons. For users, single signon provides the ability for them to navigate freely within a environment of multiple applications after being authenticated only once. For integration of PeopleSoft applications and systems, single signon identifies those systems that are trusted participants in the integration. With unified navigation, single signon is deployed for both purposes: to identify those trusted systems and to allow users to navigate freely to resources on those trusted systems.
Understanding Remote Nodes
The first step to configuring single signon is to define the participating nodes from each content provider system in the portal system, and conversely, to define the default local node and portal host node from the portal system in each content provider system. As an example, the following diagram illustrates four systems participating in unified navigation: AP (the portal system), FSCM, HCM1, and HCM2:
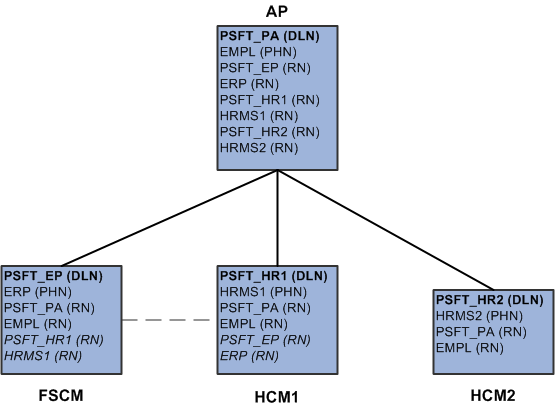
Remote nodes in a unified navigation configuration
Under each system, the default local node is highlighted in bold and identified with the notation (DLN). For example, on the AP system, the default local node is PSFT_PA. On the HCM1 system and the HCM2 system, the default local nodes have been renamed to PSFT_HR1 and PSFT_HR2 respectively because each node participating in a single signon configuration must be uniquely named. The portal host nodes are identified with the notation (PHN). On the FSCM system, the portal host node is named ERP. On the HCM1 system and the HCM2 system, the portal host nodes have been similarly renamed to HRMS1 and HRMS2 respectively.
Important! Unified navigation supports same portal integration only—for example, EMPLOYEE portal to EMPLOYEE portal, CUSTOMER portal to CUSTOMER portal, or PARTNER portal to PARTNER portal, and so on. Therefore, when selecting the portal host node on the portal system and on the content provider systems, select the portal host node for the same portal.
Finally, under each system, the remote nodes that need to be defined are identified with the notation (RN. For example, on the AP system, six remote nodes would need to be defined: PSFT_EP, ERP, PSFT_HR1, PSFT_HR2, HRMS1, and HRMS2. On each of the content provider systems, two remote nodes would need to be defined at a minimum: PSFT_PA and EMPL.
In addition, if content from one content provider is to be configured as related content on any other content provider, then the applicable nodes from each system need to be defined in the other system. For example, if salary information from FSCM is to be added as related content on the HCM1 system, then PSFT_EP and ERP need to be added to HCM1 as remote nodes; similarly, PSFT_HR1 and HRMS1 need to be added to the FSCM system as remote nodes. These optional remote nodes are also designated with (RN are highlighted in italics.
Defining Remote Nodes
This section discusses how to:
Define remote nodes on the portal system.
Define remote nodes on a content provider system.
Defining Remote Nodes on the PeopleSoft Applications Portal System
To define remote nodes on the portal system:
Select Portal Administration, Unified Navigation WorkCenter to open the Unified Navigation WorkCenter page.
In the WorkCenter pagelet, expand the Single Signon Setup section and select the Configure Node for SSO link to open the Nodes page in the target area.
Alternatively, select PeopleTools, Integration Broker, Integration Setup, Nodes.
If the remote node is already defined in the PeopleSoft Applications Portal database, then select that node definition. Otherwise, add a new value for the remote node.
Select the Node Definitions page:
Enter a description for the remote node.
Verify that the node type is PIA.
For default local nodes only, set the authentication option to Password or Certificate. If the authentication type is password, enter the password defined for the remote node.
Enter the default user ID as defined on the remote node.
Important! If necessary, add a user profile for this default user ID.
See PeopleTools 8.52: PeopleSoft Integration Broker Administration PeopleBook, “Setting Up Secure Integration Environments,” Implementing Node Authentication and PeopleTools 8.52: PeopleSoft Integration Broker Administration PeopleBook, “Adding and Configuring Nodes,” Defining Node Parameters.
Select the Connectors page:
Enter the integration gateway in the Gateway ID field. If the remote node will use the locally defined integration gateway, enter LOCAL as the gateway ID.
Enter PSFTTARGET as the connector ID.
See PeopleTools 8.52: PeopleSoft Integration Broker Administration PeopleBook, “Adding and Configuring Nodes,” Specifying Gateways and Connectors.
If the remote node will use the locally defined integration gateway and you did not add this node to the gateway configuration previously, do so now.
Click the Gateway Setup Properties link to add the remote node to the integration gateway.
See Configuring the Integration Gateway.
After the remote node has been added to the integration gateway, click the OK button to return to the Connectors page.
Select the Portal page:
Enter values for the Content URI Text field and the Portal URI Text field as defined for the remote node:
See PeopleTools 8.52: PeopleTools Portal Technologies PeopleBook, “Configuring the Portal Environment,” Setting Portal Nodes.
Save the definition of the remote node.
Repeat steps 2 through 6 for each default local node and portal host node that needs to be defined as a remote node in the portal system.
Important! Unified navigation supports same portal integration only—for example, EMPLOYEE portal to EMPLOYEE portal, CUSTOMER portal to CUSTOMER portal, or PARTNER portal to PARTNER portal, and so on. Therefore, when selecting the portal host node on the portal system and on the content provider system, select the portal host node for the same portal.
Defining Remote Nodes on a Content Provider System
To define remote nodes on a content provider system:
Select PeopleTools, Integration Broker, Integration Setup, Nodes.
If the default local node for the portal system (PSFT_PA) is already defined in the content provider database, then select that node definition. Otherwise, add a new value for PSFT_PA.
Select the Node Definitions page:
Enter a description for the remote node.
Verify that the node type is PIA and that the Authentication Option field value is Password or Certificate. If the authentication type is password, enter the password defined for the remote node.
Enter the default user ID as defined on the remote node.
Important! If necessary, add a user profile for this default user ID.
See PeopleTools 8.52: PeopleSoft Integration Broker Administration PeopleBook, “Setting Up Secure Integration Environments,” Implementing Node Authentication and PeopleTools 8.52: PeopleSoft Integration Broker Administration PeopleBook, “Adding and Configuring Nodes,” Defining Node Parameters.
Select the Connectors page:
Enter the integration gateway in the Gateway ID field. If the remote node will use the locally defined integration gateway, enter LOCAL as the gateway ID.
Enter PSFTTARGET as the connector ID.
See PeopleTools 8.52: PeopleSoft Integration Broker Administration PeopleBook, “Adding and Configuring Nodes,” Specifying Gateways and Connectors.
If the remote node will use the locally defined integration gateway, click the Gateway Setup Properties link.
Log in on the Gateway Properties page.
Enter the remote node in the PeopleSoft Nodes group box:
Click the Save button.
Click the Ping Node button for the remote node that is the default local node.
The status should return as success.
Note. If you click the Ping Node button for a remote node that is a
portal host node, the following error will result:
Integration Broker Service: Destination node does not match the local
node. (158,506)
On the Ping Node Results page, click the Return button.
Click the OK button to return to the Connectors page.
Select the Portal page:
Enter values for the Content URI Text field and the Portal URI Text field as defined for the remote node:
See PeopleTools 8.52: PeopleTools Portal Technologies PeopleBook, “Configuring the Portal Environment,” Setting Portal Nodes.
Save the definition of the remote node.
Repeat steps 1 through 5 for the portal host node (EMPL) from the portal system.
Repeat steps 1 through 5 for each default local node and portal host node from the other content provider systems that needs to be defined as a remote node in this content provider database.
Repeat steps 1 through 7 on each content provider system.
Identifying All Trusted Nodes
After the remote nodes have been defined on each system, all the nodes participating in the single signon configuration need to be identified on each system.
Identifying Trusted Nodes on the PeopleSoft Applications Portal System
To identify the trusted nodes on the portal system:
Select Portal Administration, Unified Navigation WorkCenter to open the Unified Navigation WorkCenter page.
In the WorkCenter pagelet, expand the Single Signon Setup section and select the Define Trusted Nodes link to open the Single Signon page in the target area.
Alternatively, select PeopleTools, Security, Security Objects, Single Signon.
See PeopleTools 8.52: Security Administration PeopleBook, “Implementing Single Signon,” Implementing PeopleSoft-Only Single Signon, Working with the Single Signon Page.
Add the default local node from each content provider system as a trusted node.
Save the list of trusted nodes.
Identifying Trusted Nodes on a Content Provider System
To identify the trusted nodes on a content provider system:
Select PeopleTools, Security, Security Objects, Single Signon.
See PeopleTools 8.52: Security Administration PeopleBook, “Implementing Single Signon,” Implementing PeopleSoft-Only Single Signon, Working with the Single Signon Page.
Add the default local node (PSFT_PA) from the portal system as a trusted node.
If single signon is also to be implemented between content provider systems, then add the default local node from each content provider system as a trusted node.
Save the list of trusted nodes.
Repeat steps 1 through 4 on each content provider system.
Adding Remote Nodes to the Integration Network
Once content provider nodes have been defined in the portal system, the portal host nodes need to be added to the integration network to complete the network configuration.
Note. If added portal host nodes from the content provider systems to the integration network previously, then you might not need to complete this procedure.
See Configuring the Integration Gateway.
To add portal host nodes from the content provider systems to the integration network:
Select Portal Administration, Unified Navigation WorkCenter to open the Unified Navigation WorkCenter page.
In the WorkCenter pagelet, select the IB Network WorkCenter link to open the integration network's Configuration Status page in a separate window.
Click the Node Network Configured link.
Alternatively, select PeopleTools, Integration Broker, Integration Network, Network Setup.
See PeopleTools 8.52: PeopleSoft Integration Broker Administration PeopleBook, “Using the Integration Network,” Viewing Node Network Status.
For each remote node that is a portal host node, select the option to make the node in network.
Save the changes to the integration network.
Close the IB Network WorkCenter window.
Testing Single Signon
You can test your single signon configuration from the portal system after the remote nodes have been defined and added to the integration network. The Unified Navigation Node Network page includes a button that allows you to test single signon for each remote node that has been defined as part of the integration network.
In addition, successfully testing single signon requires that you complete the initial configuration steps.
See Also
Setting Up the Unified Navigation Node Network
Completing Initial System Configuration
Setting Up Unified NavigationThis section discusses how to:
Set up the unified navigation node network.
Add remote folders to the drop-down menu.
Pages Used to Setup Unified Navigation|
Page Name |
Definition Name |
Navigation |
Usage |
|
Unified Navigation Node Network |
PTUN_REMOTENODECFG |
Portal Administration, Unified Navigation WorkCenter Expand the Unified Navigation Setup section. Click the Unified Navigation Node Network link. |
Test single signon for each remote node. Optionally, specify whether to synchronize user system profiles and user personalization data. |
|
Configure Drop Down Menu |
PTUN_DDMENUCFG |
Portal Administration, Unified Navigation WorkCenter Expand the Unified Navigation Setup section. Click the Configure Drop Down Menu link. |
Add a remote menu folder and configure its location in the Application Portal system's drop-down menu. |
|
(untitlted) |
PTUNDATA |
|
Displays the name of the selected node and portal. |
|
(untitlted) |
PTUN_TREE |
|
Displays the menu tree for the selected node and portal. |
Setting Up the Unified Navigation Node Network
To set up the unified navigation node network on the portal system:
Select Portal Administration, Unified Navigation WorkCenter to open the Unified Navigation WorkCenter page.
In the WorkCenter pagelet, expand the Unified Navigation Setup section and click the Unified Navigation Node Network link to open the Unified Navigation Node Network page in the target area.
|
Test Single Signon |
Click the Test Single Signon button to validate the single signon configuration for that remote node. Note. If all other aspects of the single signon integration work correctly, but you are unable to successfully test single signon, the configuration of the ANONYMOUS node, the WSDL_NODE node, or the required service operation might not be correct. |
|
Sync User Personalization |
Select this option to synchronize user personalization settings (My Personalizations settings such as time zone) from the portal system to all other remote systems defined in this node network. |
|
Sync User System Profile |
Select this option to synchronize user profile settings (My System Profile settings such as email addresses) from the portal system to all other remote systems defined in this node network. |
Adding Remote Folders to the Drop-Down Menu
Configuring the drop-down menu provides access to the menu structure of the remote system within the main drop-down menu of the portal system.
To add remote folders to the drop-down menu:
Select Portal Administration, Unified Navigation WorkCenter to open the Unified Navigation WorkCenter page.
In the WorkCenter pagelet, expand the Unified Navigation Setup section and click the Configure Drop Down Menu link to open the Configure Drop Down Menu page in the target area.
|
Node Name |
Select a portal host node from the list of defined content provider nodes. |
|
Portal Name |
The current portal name is automatically filled in after you select the remote folder. |
|
Folder Label |
Enter the label for the folder as it will appear in the portal system's drop-down menu. Important! Do not use the following special characters in the labels for a remote folder: { } #. |
|
Folder Name |
Click the lookup button, navigate the tree of folders, and select the folder from the folders defined on the node of the selected content provider system. The selected folder and all menu items and subfolders contained within it will be available in the drop-down menu on the portal system. |
|
Local Parent Folder Name |
Click the lookup button, navigate the tree of folders, and select the folder from the folders defined on the portal system. This folder becomes the parent of the selected remote folder. |
Setting Up Related ContentThis section provides an overview of setting up related content and discusses how to:
Create a service to manage related content for a content provider system.
Create and assign related content within the unified navigation framework.
Understanding the Setup of Related Content Within Unified Navigation
Related content on a PeopleSoft Applications Portal system relies on the PeopleTools Related Content Framework. You use the same PeopleTools pages and methodologies as on any other PeopleSoft application system. However, with unified navigation, you have additional options for defining remote resources as related content as well as configuring related content for content references on content provider systems.
Once unified navigation has been configured to incorporate one or more content provider systems, you have expanded options for configuring related content including:
Create related content services in the portal system using the either local or remote content references.
Creating a service that allows you to manage related content for a content provider system is an example of a service that is local to the portal system but is built on a remote content reference.
See Creating a Service to Manage Related Content for a Content Provider System.
Create related content services in the content provider system using content references local to that system.
Assign local (to the portal system) or remote content references (from a content provider system) as related content services (or related actions) to content references on the portal system.
Assign local (to the content provider system) or remote content references (from a different content provider system) as related content services (or related actions) to content references on the content provider system.
For example, this would allow you to assign the content reference for employee expenses from PeopleSoft FSCM to the content reference for employee information from PeopleSoft HCM.
Creating a Service to Manage
Related Content for a Content Provider System
The Unified Navigation pagelet of the Unified Navigation WorkCenter is delivered with a link that allows you to manage related content on the (local) portal system. Once unified navigation is configured, you can create a service on the portal system that will allow you to manage related content for a content provider system. Once created, this service will appear as a link in the Unified Navigation pagelet.
The following example illustrates how such a service appears as the FSCM System link in the Unified Navigation pagelet:
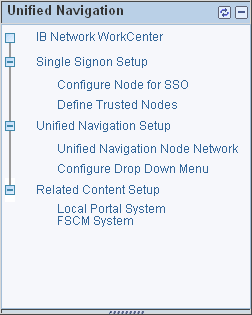
Unified Navigation pagelet
To create a service that allows you to manage related content for a content provider system:
Select Portal Administration, Unified Navigation WorkCenter to open the Unified Navigation WorkCenter page.
In the WorkCenter pagelet, expand the Related Content Setup section and click the Local Portal System link to open the Manage Related Content Configuration page in the target area.
Alternatively, select PeopleTools, Portal. Related Content Service, Manage Related Content Service.
Click the Create a New Related Content Service link to create a new service.
Specify a new service ID, for example, RCSETUPFSCM, and click Add.
Note. This new service will be similar to the delivered RCSETUPLOCAL service.
In the Service Name field, enter a value that identifies the content provider system—for example, FSCM System.
Ensure that PeopleSoft Component is the selected URL type.
In the Node Name field, select the portal host node from the content provider system.
Select the following component parameters:
Menu Name: PTCSSERVICES
Component Name: PTCS_SRVCFGSRCHGBL
Market: GBL
Page Name: PTCS_SRVCFG_SRCH
In the Service URL Parameters group box, enter the following parameter and value:
Parameter Name: UniNavRcPglt
Description: true
Retain the other default values for this service.
Save the new service definition. The following shows a completed service definition, which will result in the FSCM System link appearing in the Unified Navigation pagelet:
See Also
PeopleTools 8.52: PeopleTools Portal Technologies PeopleBook, “Developing and Configuring Related Content Services,” Defining Related Content Services, Creating and Maintaining PeopleSoft Component Related Content Service Definitions
Creating and Assigning Related Content Within the Unified Navigation
Framework
This section provides high-level procedures for how to:
Create related content services.
Assign related content to application pages on the portal system.
Assign related content to application pages on a content provider system.
Creating Related Content Services
Creating a related content service within PeopleSoft Applications Portal uses standard Related Content Framework pages delivered in PeopleTools. However, you can begin from the Unified Navigation WorkCenter as documented here:
Select Portal Administration, Unified Navigation WorkCenter to open the Unified Navigation WorkCenter page.
In the WorkCenter pagelet, expand the Related Content Setup section and select one of the following links:
To create a service on the portal system, click the Local Portal System link.
To create a service on a content provider system, click the link for that system—for example, FSCM System—if one has been created.
See Creating a Service to Manage Related Content for a Content Provider System.
Click the Create a New Related Content Service link.
Add a new value.
The Define Related Content Service page is displayed.
Define the related content service:
For a service on the portal system, you can base the service on a local resource or on a content reference from a content provider system.
For a service on a content provider system, you can base the service on a resource local to that content provider system.
The PeopleTools PeopleBooks contain detailed information on creating various types of related content services.
See PeopleTools 8.52: PeopleTools Portal Technologies PeopleBook, “Developing and Configuring Related Content Services,” Defining Related Content Services.
Assigning Related Content to Application Pages on the Portal System
Assigning related content within PeopleSoft Applications Portal uses standard Related Content Framework pages delivered in PeopleTools. However, you can begin from the Unified Navigation WorkCenter as documented here:
Select Portal Administration, Unified Navigation WorkCenter to open the Unified Navigation WorkCenter page.
In the WorkCenter pagelet, expand the Related Content Setup section.
To assign related content on the portal system, click the Local Portal System link.
Click the Assign Related Content to Application Pages link.
The Select a Content Reference page is displayed.
Browse the menu structure and select a content reference on the portal system.
The Assign Related Content page is displayed.
Assign one of the following service types from the following sources:
Content reference – From the portal system or from a content provider system.
Pagelet – From the portal system.
Service – From the portal system.
The PeopleTools PeopleBooks contain detailed information on assigning related content to a content reference.
See PeopleTools 8.52: PeopleTools Portal Technologies PeopleBook, “Developing and Configuring Related Content Services,” Assigning and Managing Related Content Services.
Assigning Related Content to Application Pages on the Portal System
Assigning related content within PeopleSoft Applications Portal uses standard Related Content Framework pages delivered in PeopleTools. However, you can begin from the Unified Navigation WorkCenter as documented here:
Select Portal Administration, Unified Navigation WorkCenter to open the Unified Navigation WorkCenter page.
In the WorkCenter pagelet, expand the Related Content Setup section.
To assign related content on a content provider system, click the link for that system—for example, FSCM System—if one has been created.
See Creating a Service to Manage Related Content for a Content Provider System.
Click the Assign Related Content to Application Pages link.
The Select a Content Reference page is displayed.
Browse the menu structure and select a content reference on the content provider system.
The Assign Related Content page is displayed.
Assign one of the following service types from the following sources:
Content reference – From the content provider system or from a different content provider system.
Pagelet – From the content provider system.
Service – From the content provider system.
The PeopleTools PeopleBooks contain detailed information on assigning related content to a content reference.
See PeopleTools 8.52: PeopleTools Portal Technologies PeopleBook, “Developing and Configuring Related Content Services,” Assigning and Managing Related Content Services.
Consuming Pagelets from Content Provider SystemsOnce single signon has been established between the portal system and a content provider system and once the portal host node from that content provider as been configured as in network, you can consume pagelets from the content provider system to be available has homepage or workspace pagelets.
This section discusses how to:
Define a content provider as a source application.
Add a content provider pagelet as a homepage pagelet.
Add a content provider pagelet as a workspace pagelet.
Pages Used to Consume Pagelets from Content Provider Systems|
Page Name |
Definition Name |
Navigation |
Usage |
|
Define Source Applications |
EPPPB_SOURCE_APPS |
Portal Administration, Pagelets, Consume Pagelet |
Define a content provider as a source application. |
|
Add Pagelet |
EPPPB_CP_ADD |
|
Select a pagelet definition from a source portal and add it to a template. |
Defining a Content Provider as a Source Application
Access the Define Source Applications page (Portal Administration, Pagelets, Consume Pagelet).
Use the Define Source Applications page to define a content provider system as a source application.
|
ID |
Specify an ID for the content provider system. |
|
Description |
Specify a description of the content provider system. |
|
Content Provider |
Select the portal host node from the content provider system. Important! The default local node of the content provider system must be defined as a trusted system in the single signon configuration plus the portal host node from that content provider must be configured as in network |
|
Site Name |
Specify the corresponding portal for the portal host node. Note. The default value is the EMPLOYEE portal. |
|
Save |
Click the Save button to save your changes. |
|
Add Pagelet |
Click the Add Pagelet button to add a content provider pagelet as a homepage pagelet on the portal system. |
Adding a Content Provider Pagelet as a Homepage Pagelet
Access the Add Pagelet page (click the Add Pagelet button on the Define Source Applications page).
Use the Add Pagelet page to add an already defined pagelet to be available as a homepage pagelet.
|
Source Application |
Select the portal registry that is the source of the pagelet definition. To select the portal registry from the node of a content provider system, that node must already be defined as a source application. |
|
Pagelet Folder |
Select the portal folder that is the source of the pagelet definition. |
|
Pagelet Name |
Select the pagelet definition. |
|
Pagelet Name |
Displays the ID of the pagelet. |
|
Pagelet Title |
Displays the title of the pagelet, which you can modify. |
|
Description |
(Optional) Enter a description for the pagelet. |
|
Pagelet Folder |
Select the folder in which the pagelet definition will be stored. PeopleSoft Applications is the default folder for homepage pagelets. |
|
Pagelet Security |
Select a pagelet security option:
|
|
Author Access |
Select to provide the pagelet author with access to the pagelet regardless of any security restrictions assigned to the pagelet. This access is granted based on the author’s user ID. |
|
Select |
Select one or more homepage tabs for this pagelet:
|
|
Pagelet Behavior |
Select the default behavior for the pagelet:
|
Note. Once a pagelet definition has been added, the definition is modifiable on the Content Ref Administration page through Structure and Content, similar to other pagelet definitions.
See Also
PeopleTools 8.52: PeopleTools Portal Technologies PeopleBook, “Administering Portals,” Administering Content References, Defining Content References
Adding a Content Provider Pagelet as a Workspace PageletWhen a content provider has been defined as a source application, pagelets from that content provider can be added to workspaces and workspace templates.
See Administering Workspace Modules.
See Adding or Editing Related Pagelets in a Template.