11 Managing Cartridges
Moving Cartridges (Recovery Moves)
Moving a cartridge using SLC only updates the cartridge's location in the library controller database. You must perform an audit from the host software to update the host database to prevent mount failures.
To view a table of all cartridges in the library, see "Viewing Cartridge Information".
Caution:
To avoid data loss, use caution when moving cartridges in partitioned libraries. Accidentally moving a cartridge from one partition to another will orphan the cartridge and the new partition may treat it as a scratch cartridge.-
Select Tools > Diagnostics. Click the Library in the device tree.
-
Click the RcvrMove tab.
-
Select the Source Location Mode:
-
For VOLID, enter the vol-id of the cartridge to move.
-
For Location, select the cartridge's current location (CAP, Slot, Drive, Reserved Slots).
-
-
Select the Destination Location type (CAP, Storage Slots, Drive, and Reserved Slots) and select the destination address.
Note:
Only select Drive if the source is a CAP or reserved slot.Do not move data cartridges into reserved slots. Reserved slots should only contain diagnostic or cleaning cartridges.
-
Click Start.
-
Initiate a library audit from the host software to update the host database (see the tape management software documentation).
Locating a Cartridge
You can search for cartridges by volume ID, internal library address, or host address.
To view a table of all cartridges in the library, see "Viewing Cartridge Information".
Locating a Cartridge by Volume ID
-
Select Tools > Diagnostics, and then click the Library in the device tree.
-
Click the Search tab.
-
Select VOLID.
-
Enter the volume ID (use * as a wildcard).
-
From the Requester drop-down list, select the format for the search results:
-
default to display in library internal address format.
-
hli0 or hli1 to display in HLI-PRC address format.
-
-
Select the Cartridge Type.
-
Click Search.
Locating a Cartridge by Address
-
Select Tools > Diagnostics, and then click the Library in the device tree.
-
Click the Search tab.
-
Select Location.
-
Select the search criteria from the drop-down list, and enter the address (wildcards are invalid).
-
From the Requester drop-down list, select the type of address you entered in the Location field.
-
Click Search.
-
Click . . . to see details about the cartridge.
Importing/Exporting Diagnostic and Cleaning Cartridges
The library can perform only one diagnostic or cleaning cartridge import or export operation at a time. The library controller reserves the CAP for the entire operation.
Before importing, verify the cartridge has the proper label. Diagnostic cartridges must have DG as the first two characters of the eight character volume ID. Cleaning cartridges must have CLN as the first three characters.
Importing Diagnostic and Cleaning Cartridges
Caution:
The library will consider a used cleaning cartridge to be new, and set the usage counter to zero.Note:
Only import cleaning cartridges using SLC if Auto Clean is enabled (see "Enabling Drive Auto Cleaning"). For host managed drive cleaning, import the cleaning cartridges using the host software.-
Verify that the library has enough empty reserved system slots. There must be at least one empty system slot in the base and DEM for robot recovery or library initialization (see "Using Reserved System Slots").
-
Verify the CAP is empty, not reserved by a host, closed, and locked (see "Viewing Device Status and Properties").
-
In SLC, select Tools > Diagnostics.
-
Expand the CAP folder in the device tree, and then click a CAP to use.
-
Click the Import/Export tab.
-
In the Operation section, select Import Cleaning/Diagnostic cartridges.
-
Click Start.
-
Load the cartridges into the CAP (follow "Entering Cartridges Using a CAP" starting with step 2).
Exporting Diagnostic and Cleaning Cartridges
-
Verify the CAP is empty, not reserved by a host, closed, and locked (see "Viewing Device Status and Properties").
-
In SLC, select Tools > Diagnostics.
-
Expand the CAP folder in the device tree, and then click a CAP to use.
-
Click the Import/Export tab.
-
Select a type of export operation. If exporting specific cartridges, select the cartridges to export in the "Select Cartridges(s) to export" list.
-
Click Start.
-
When the unload notification appears, unload the CAP (follow "Ejecting Cartridges Using a CAP" starting with step 2).
Defining Cleaning Cartridge Usage Count Warning Thresholds
The warning threshold should be lower than the cartridge's recommended maximum usage to allow time to replace the cartridge (see the drive manufacturers' documentation for recommended usage).
When you import a cleaning cartridge into the library, the library controller sets the usage count to zero. To display the current usage count, see "Viewing Cleaning Cartridge Status".
-
In SLC, select Tools > System Detail. Select the Library in the device tree.
-
Select Auto Clean, and then the Warning Threshold tab.
-
Select the index number of the cleaning cartridge type to configure.
-
Enter the new warning threshold for the cartridge type. To disable the warning, set the threshold to 0.
Note:
The warning threshold for all cleaning cartridges of that type will be modified. -
Click Apply.
Configuring the Barcode Format for FC-SCSI Hosts
The barcode format specifies which part of a cartridge barcode the library passes to FC-SCSI hosts.
-
In SLC, select Tools > Configuration.
-
From the drop-down list, select the presentation format to use for each partition:
-
all — passes all eight barcode characters to the host.
-
left6 (default) — passes only the six VOLID characters to the host. It does not pass the domain and type characters, which are the two characters on the right of the barcode.
-
-
Click Apply.
Viewing Cartridge Information
-
In SLC, select Tools > Reports.
-
Expand the Status Summary folder in the navigation tree.
-
Select the Cartridge Table.
Viewing Cleaning Cartridge Status
Important:
If a drive cannot use a cleaning cartridge, it notifies the library that the cartridge has expired. Replace expired cleaning cartridges as soon as possible (see "Importing/Exporting Diagnostic and Cleaning Cartridges").-
In SLC, select Tools > System Details.
-
Select the Library in the device tree
-
Click the Auto Clean tab, and then the Cleaning Cartridges tab.
Note:
A cleaning cartridge may not appear in the list if it is in use, in transit, or was entered into the library with host software.
-
OK — cartridge is usable for cleaning.
-
warning — usage count has reached or exceeded the warning threshold defined for this cartridge type.
-
expired — cartridge has expired based on information from the drives.
Using Reserved System Slots
Both the base module and the DEM have reserved system slots on the lower rear wall. Reserved slots store diagnostic and cleaning cartridges imported using SLC and the module configuration block. Do not store data cartridges in the reserved system slots.
Viewing Cartridges Currently in the System Slots
-
In SLC, select Tools > Reports.
-
Expand Status Summary in the navigation tree.
-
Select the Cartridge Table report.
-
Click the Location Type column heading to sort the table. All system slots have a Location Type of "sysCell".
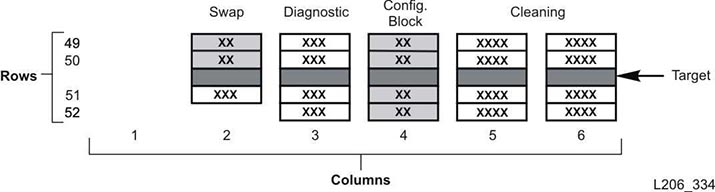
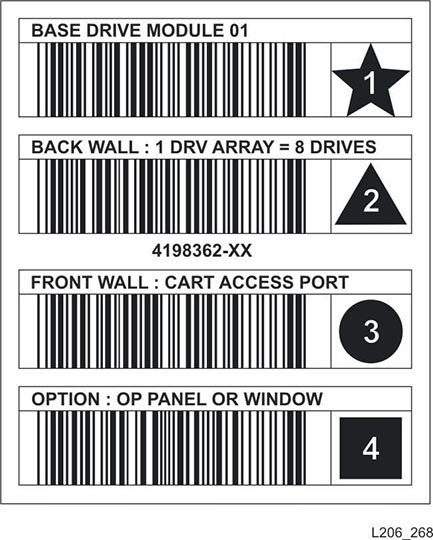
Module Configuration Block
Each module has an identification block with labels that identify the module configuration. This block is on the lower rear wall in the fourth column from the left, rows 49, 50, 51, and 52. During an initialization or after an upgrade, the robotic assembly visits the module identification block to determine the module configuration.
The block identifies the:
-
Type of module — Base Module, Drive Expansion Module, Cartridge Expansion Module, Parking Expansion Module, or Access Expansion Module.
-
Back wall configuration — 1 drive array, 2 drive arrays, 3 drive arrays, 4 drive arrays, arrays, bulk load magazines, or empty.
-
Front wall configuration — Arrays, cartridge access port, CAP window, empty, or bulk load magazines.
-
Options — Arrays, op panel or window, empty, or service bay.
Special Labels
The CAPID/ label and NOMAG/ label are special labels that do not include an icon.
-
CAPID/ is mounted only at the top of all CAPs as a generic identifier for the library if the CAP does not have any magazines installed on which to target.
-
NOMAG/ is mounted behind the removable magazines in the bulk load AEM.
Cartridge Types
-
Data cartridges — used to store customer data
-
Diagnostic cartridges — used by service representatives to run read/write tests on drives (see "Importing/Exporting Diagnostic and Cleaning Cartridges")
-
Cleaning cartridges — used to clean the tape path and read/write heads of the tape drives (see "Importing/Exporting Diagnostic and Cleaning Cartridges")
Cartridge Labels
For information about cartridge label standards, see the Barcode Label Technical Brief on OTN. All library cartridges must have a readable external label. The robot reports an error when it encounters an unreadable label.
Non-labeled cartridges are not supported. The library exports any non-labeled cartridges it finds through the CAP. A non-labeled or unknown type cartridge will not mount to a drive.
Cartridge Handling
Caution:
When cartridges are improperly handled, loss of data or damage to a library component can occur.-
Keep cartridges clean and inspect for damage before each use.
-
Never open a cartridge.
-
Do not handle tape that is outside the cartridge; the tape edge might be damaged.
-
Do not expose the tape or cartridge to direct sunlight, moisture, or magnetic fields.
Inspecting a Cartridge
Always inspect a cartridge before you insert it into a tape drive or a library. A defective or dirty cartridge can damage a tape drive. Never use a damaged cartridge. Look for:
-
Dirt or debris
-
Cracked or broken housing
-
Damaged write-protect switch
-
Liquid in the cartridge
-
Labels not firmly attached, or that extend over the cartridge edge
Cleaning the Cartridge Exterior
Wipe all dust, dirt, and moisture from the cartridge with a lint-free cloth. Use Oracle StorageTek Tape Cleaner Wipes to clean the cartridges. These wipes are saturated with isopropyl alcohol. Do not let any solution touch the tape or get inside the cartridge.
Storing Cartridges
Store cartridges in a clean environment. Do not take a cartridge out of its protective wrapping until you are ready to use it. Use the tear string, not a sharp instrument, to remove the wrapping. Before using a cartridge, ensure that it has been in its operating environment for at least 24 hours.