| Skip Navigation Links | |
| Exit Print View | |

|
Oracle Solaris Cluster Concepts Guide Oracle Solaris Cluster 4.1 |
| Skip Navigation Links | |
| Exit Print View | |

|
Oracle Solaris Cluster Concepts Guide Oracle Solaris Cluster 4.1 |
2. Key Concepts for Hardware Service Providers
3. Key Concepts for System Administrators and Application Developers
Device IDs and DID Pseudo Driver
Cluster Configuration Repository (CCR)
Local and Global Namespaces Example
Using the cldevice Command to Monitor and Administer Disk Paths
Using the clnode set Command to Manage Disk Path Failure
Adhering to Quorum Device Requirements
Adhering to Quorum Device Best Practices
Recommended Quorum Configurations
Quorum in Two-Node Configurations
Quorum in Greater Than Two-Node Configurations
Characteristics of Scalable Services
Data Service API and Data Service Development Library API
Using the Cluster Interconnect for Data Service Traffic
Resources, Resource Groups, and Resource Types
Resource and Resource Group States and Settings
Resource and Resource Group Properties
Support for Oracle Solaris Zones
Support for Zones on Cluster Nodes Through Oracle Solaris Cluster HA for Solaris Zones
Criteria for Using Oracle Solaris Cluster HA for Solaris Zones
Requirements for Using Oracle Solaris Cluster HA for Solaris Zones
Additional Information About Oracle Solaris Cluster HA for Solaris Zones
Data Service Project Configuration
Determining Requirements for Project Configuration
Setting Per-Process Virtual Memory Limits
Two-Node Cluster With Two Applications
Public Network Adapters and IP Network Multipathing
SPARC: Dynamic Reconfiguration Support
SPARC: Dynamic Reconfiguration General Description
SPARC: DR Clustering Considerations for CPU Devices
SPARC: DR Clustering Considerations for Memory
SPARC: DR Clustering Considerations for Disk and Tape Drives
SPARC: DR Clustering Considerations for Quorum Devices
SPARC: DR Clustering Considerations for Cluster Interconnect Interfaces
SPARC: DR Clustering Considerations for Public Network Interfaces
This section provides a conceptual description of configuring data services to launch processes on a specified Oracle Solaris OS UNIX project. This section also describes several failover scenarios and suggestions for using the management functionality provided by the Oracle Solaris Operating System. See the project(4) man page for more information.
Data services can be configured to launch under an Oracle Solaris project name when brought online using the RGM. The configuration associates a resource or resource group managed by the RGM with an Oracle Solaris project ID. The mapping from your resource or resource group to a project ID gives you the ability to use sophisticated controls that are available in the Oracle Solaris OS to manage workloads and consumption within your cluster.
Using the Oracle Solaris management functionality in an Oracle Solaris Cluster environment enables you to ensure that your most important applications are given priority when sharing a node with other applications. Applications might share a node if you have consolidated services or because applications have failed over. Use of the management functionality described herein might improve availability of a critical application by preventing lower-priority applications from overconsuming system supplies such as CPU time.
Note - The Oracle Solaris documentation for this feature describes CPU time, processes, tasks and similar components as “resources”. Meanwhile, Oracle Solaris Cluster documentation uses the term “resources” to describe entities that are under the control of the RGM. The following section uses the term “resource” to refer to Oracle Solaris Cluster entities that are under the control of the RGM. The section uses the term “supplies” to refer to CPU time, processes, and tasks.
For detailed conceptual and procedural documentation about the management feature, refer to Chapter 1, Network Service (Overview), in Introduction to Oracle Solaris 11 Network Services.
When configuring resources and resource groups to use Oracle Solaris management functionality in a cluster, use the following high-level process:
Configuring applications as part of the resource.
Configuring resources as part of a resource group.
Enabling resources in the resource group.
Making the resource group managed.
Creating an Oracle Solaris project for your resource group.
Configuring standard properties to associate the resource group name with the project you created in step 5.
Bringing the resource group online.
To configure the standard Resource_project_name or RG_project_name properties to associate the Oracle Solaris project ID with the resource or resource group, use the -p option with the clresource set and the clresourcegroup set command. Set the property values to the resource or to the resource group. See the r_properties(5) and rg_properties(5) man pages for descriptions of properties.
The specified project name must exist in the projects database (/etc/project) and the root user must be configured as a member of the named project. Refer to Chapter 2, Projects and Tasks (Overview), in Oracle Solaris Administration: Oracle Solaris Zones, Oracle Solaris 10 Zones, and Resource Management for conceptual information about the project name database. Refer to project(4) for a description of project file syntax.
When the RGM brings resources or resource groups online, it launches the related processes under the project name.
Note - Users can associate the resource or resource group with a project at any time. However, the new project name is not effective until the resource or resource group is taken offline and brought back online by using the RGM.
Launching resources and resource groups under the project name enables you to configure the following features to manage system supplies across your cluster.
Extended Accounting – Provides a flexible way to record consumption on a task or process basis. Extended accounting enables you to examine historical usage and make assessments of capacity requirements for future workloads.
Controls – Provide a mechanism for constraint on system supplies. Processes, tasks, and projects can be prevented from consuming large amounts of specified system supplies.
Fair Share Scheduling (FSS) – Provides the ability to control the allocation of available CPU time among workloads, based on their importance. Workload importance is expressed by the number of shares of CPU time that you assign to each workload. Refer to the following man pages for more information.
Pools – Provide the ability to use partitions for interactive applications according to the application's requirements. Pools can be used to partition a host that supports a number of different software applications. The use of pools results in a more predictable response for each application.
Before you configure data services to use the controls provided by Oracle Solaris in an Oracle Solaris Cluster environment, you must decide how to control and track resources across switchovers or failovers. Identify dependencies within your cluster before configuring a new project. For example, resources and resource groups depend on device groups.
Use the nodelist, failback, maximum_primaries and desired_primaries resource group properties that you configure with the clresourcegroup set command to identify node list priorities for your resource group.
For a brief discussion of the node list dependencies between resource groups and device groups, refer to Relationship Between Resource Groups and Device Groups in Oracle Solaris Cluster Data Services Planning and Administration Guide.
For detailed property descriptions, refer to rg_properties(5).
Use the preferenced property and failback property that you configure with the cldevicegroup and clsetup commands to determine device group node list priorities. See the clresourcegroup(1CL), cldevicegroup(1CL), and clsetup(1CL) man pages.
For conceptual information about the preferenced property, see Device Group Ownership.
For procedural information, see “How To Change Disk Device Properties” in Administering Device Groups in Oracle Solaris Cluster System Administration Guide.
For conceptual information about node configuration and the behavior of failover and scalable data services, see Oracle Solaris Cluster System Hardware and Software Components.
If you configure all cluster nodes identically, usage limits are enforced identically on primary and secondary nodes. The configuration parameters of projects do not need to be identical for all applications in the configuration files on all nodes. All projects that are associated with the application must at least be accessible by the project database on all potential masters of that application. Suppose that Application 1 is mastered by phys-schost-1 but could potentially be switched over or failed over to phys-schost-2 or phys-schost-3. The project that is associated with Application 1 must be accessible on all three nodes (phys-schost-1, phys-schost-2, and phys-schost-3).
Note - Project database information can be a local /etc/project database file or can be stored in the NIS map or the LDAP directory service.
The Oracle Solaris Operating System enables for flexible configuration of usage parameters, and few restrictions are imposed by Oracle Solaris Cluster. Configuration choices depend on the needs of the site. Consider the general guidelines in the following sections before configuring your systems.
Set the process.max-address-space control to limit virtual memory on a per-process basis. See the rctladm(1M) man page for information about setting the process.max-address-space value.
When you use management controls with Oracle Solaris Cluster software, configure memory limits appropriately to prevent unnecessary failover of applications and a “ping-pong” effect of applications. In general, observe the following guidelines.
Do not set memory limits too low.
When an application reaches its memory limit, it might fail over. This guideline is especially important for database applications, when reaching a virtual memory limit can have unexpected consequences.
Do not set memory limits identically on primary and secondary nodes.
Identical limits can cause a ping-pong effect when an application reaches its memory limit and fails over to a secondary node with an identical memory limit. Set the memory limit slightly higher on the secondary node. The difference in memory limits helps prevent the ping-pong scenario and gives the system administrator a period of time in which to adjust the parameters as necessary.
Do use the resource management memory limits for load balancing.
For example, you can use memory limits to prevent an errant application from consuming excessive swap space.
You can configure management parameters so that the allocation in the project configuration (/etc/project) works in normal cluster operation and in switchover or failover situations.
The following sections are example scenarios.
The first two sections, Two-Node Cluster With Two Applications and Two-Node Cluster With Three Applications, show failover scenarios for entire nodes.
The section Failover of Resource Group Only illustrates failover operation for an application only.
In an Oracle Solaris Cluster environment, you configure an application as part of a resource. You then configure a resource as part of a resource group (RG). When a failure occurs, the resource group, along with its associated applications, fails over to another node. In the following examples the resources are not shown explicitly. Assume that each resource has only one application.
Note - Failover occurs in the order in which nodes are specified in the node list and set in the RGM.
The following examples have these constraints:
Application 1 (App-1) is configured in resource group RG-1.
Application 2 (App-2) is configured in resource group RG-2.
Application 3 (App-3) is configured in resource group RG-3.
Although the numbers of assigned shares remain the same, the percentage of CPU time that is allocated to each application changes after failover. This percentage depends on the number of applications that are running on the node and the number of shares that are assigned to each active application.
In these scenarios, assume the following configurations.
All applications are configured under a common project.
Each resource has only one application.
The applications are the only active processes on the nodes.
The projects databases are configured the same on each node of the cluster.
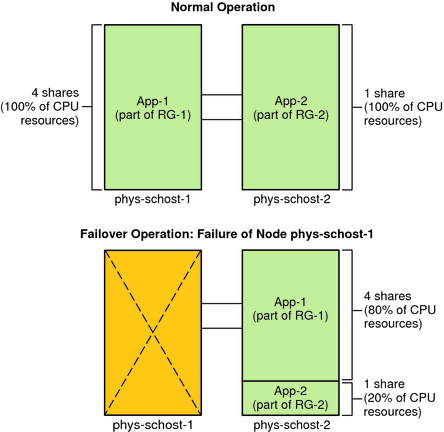
You can configure two applications on a two-node cluster to ensure that each physical node (phys-schost-1, phys-schost-2) acts as the default master for one application. Each physical node acts as the secondary node for the other physical node. All projects that are associated with Application 1 and Application 2 must be represented in the projects database files on both nodes. When the cluster is running normally, each application is running on its default master, where it is allocated all CPU time by the management facility.
After a failover or switchover occurs, both applications run on a single node where they are allocated shares as specified in the configuration file. For example, this entry in the/etc/project file specifies that Application 1 is allocated 4 shares and Application 2 is allocated 1 share.
Prj_1:100:project for App-1:root::project.cpu-shares=(privileged,4,none)
Prj_2:101:project for App-2:root::project.cpu-shares=(privileged,1,none)
The following diagram illustrates the normal and failover operations of this configuration. The number of shares that are assigned does not change. However, the percentage of CPU time available to each application can change. The percentage depends on the number of shares that are assigned to each process that demands CPU time.

On a two-node cluster with three applications, you can configure one node (phys-schost-1) as the default master of one application. You can configure the second physical node (phys-schost-2) as the default master for the remaining two applications. Assume the following example projects database file is located on every node. The projects database file does not change when a failover or switchover occurs.
Prj_1:103:project for App-1:root::project.cpu-shares=(privileged,5,none)
Prj_2:104:project for App_2:root::project.cpu-shares=(privileged,3,none)
Prj_3:105:project for App_3:root::project.cpu-shares=(privileged,2,none)
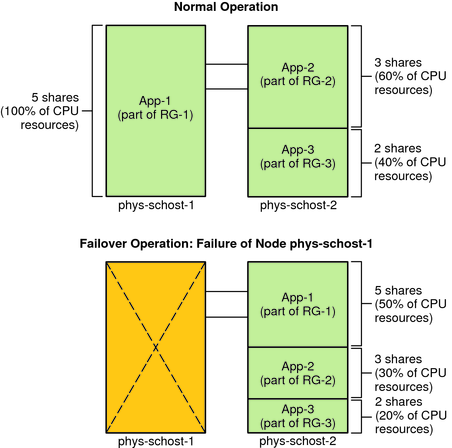
When the cluster is running normally, Application 1 is allocated 5 shares on its default master, phys-schost-1. This number is equivalent to 100 percent of CPU time because it is the only application that demands CPU time on that node. Applications 2 and 3 are allocated 3 and 2 shares, respectively, on their default master, phys-schost-2. Application 2 would receive 60 percent of CPU time and Application 3 would receive 40 percent of CPU time during normal operation.
If a failover or switchover occurs and Application 1 is switched over to phys-schost-2, the shares for all three applications remain the same. However, the percentages of CPU resources are reallocated according to the projects database file.
Application 1, with 5 shares, receives 50 percent of CPU.
Application 2, with 3 shares, receives 30 percent of CPU.
Application 3, with 2 shares, receives 20 percent of CPU.
The following diagram illustrates the normal operations and failover operations of this configuration.

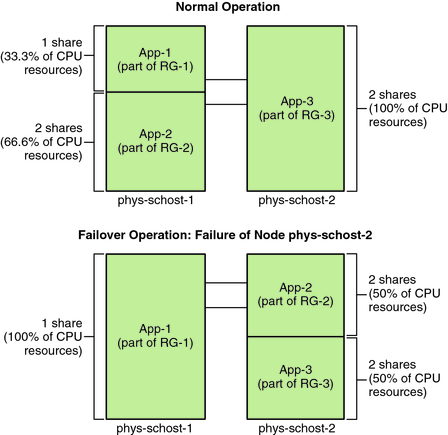
In a configuration in which multiple resource groups have the same default master, a resource group (and its associated applications) can fail over or be switched over to a secondary node. Meanwhile, the default master is running in the cluster.
Note - During failover, the application that fails over is allocated resources as specified in the configuration file on the secondary node. In this example, the project database files on the primary and secondary nodes have the same configurations.
For example, this sample configuration file specifies that Application 1 is allocated 1 share, Application 2 is allocated 2 shares, and Application 3 is allocated 2 shares.
Prj_1:106:project for App_1:root::project.cpu-shares=(privileged,1,none)
Prj_2:107:project for App_2:root::project.cpu-shares=(privileged,2,none)
Prj_3:108:project for App_3:root::project.cpu-shares=(privileged,2,none)
The following diagram illustrates the normal and failover operations of this configuration, where RG-2, containing Application 2, fails over to phys-schost-2. Note that the number of shares assigned does not change. However, the percentage of CPU time available to each application can change, depending on the number of shares that are assigned to each application that demands CPU time.
