 Understanding Involvement
This chapter provides overviews of the Involvement application and the self-service online giving and pledge life cycles, and discusses how to:
Give online to the institution.
Make a pledge online.
Monitor self-service commitment summary.
Monitor self-service giving club progress.
Monitor self-service membership history.
Generate self-service gift and pledge sessions.
Balance, queue, and post self-service gift and pledge sessions.
Process self-service credit card transactions.
Work with denied self-service transactions.
Adjust self-service gift credit card payments.
Investigate self-service gift and pledge transactions.
Understanding Involvement
PeopleSoft Campus Solutions offer self-service applications that are licensed separately. If you have licensed the Involvement application, you can use the self-service pages described here. Contributor Relations also offers Outreach, another self-service application that enables traveling development officers to access accumulated prospect action and strategy information. Outreach is part of PeopleSoft Campus Self Service.
See Using Self-Service Outreach.
Virtually all fund-raising organizations have established, or are in the process of establishing, a web presence that provides self-service facilities to their contributors. These organizations need the ability to accept and process credit card payments online when receiving a donation. Using Involvement's online giving functionality, both new and existing contributors can give to the organization in a secure, online environment. In addition, Involvement offers online visitors the option to create a scheduled pledge.
Understanding the Self-Service Online Giving Life Cycle
The life cycle of self-service online giving has three stages: set up, enter, and process. The steps within these stages may vary, depending on a contributor's choices, but this diagram shows a high-level overview of the stages:
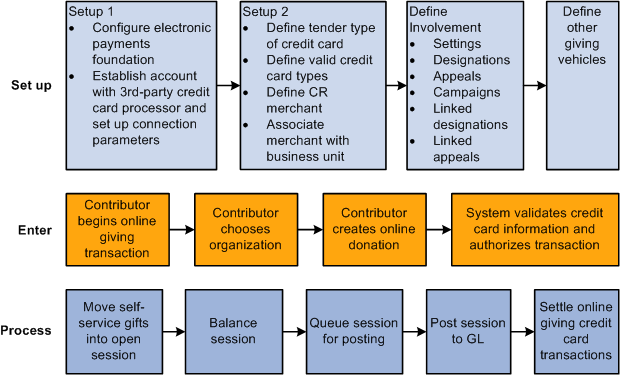
Overview of the life cycle of online giving
See Also
Understanding Credit Card Processing
"Campus Solutions 9.0 Electronic Payment Integration Developer's Reference Guide" on My Oracle Support
Understanding Self-Service Online Pledges
After your institution sets up online giving functionality, the process for entering and processing online pledges is similar to that for online gifts. The online pledge life cycle has two stages, as shown in this diagram:
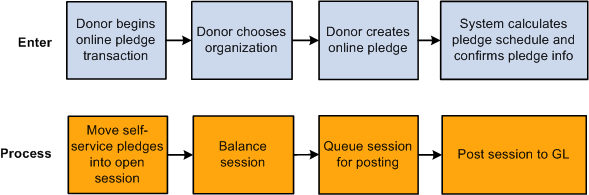
Overview of the life cycle of online pledging, including details for enter and process steps
Giving Online to the Institution
If you have set up online giving so that the default option presents a single organization to receive the donation, contributors begin the online giving process by proceeding directly to the Ways to Give page. However, if the system finds multiple active organizations defined, contributors must first select an organization to receive their donation.
Depending on which way contributors decide to give, the system presents them with a series of pages to enter donation specifics and credit card information. If contributors decide not to give over the internet, they also have the option of printing a mail-in donation form.
This section provides overviews of secure online giving and Involvement navigations, lists prerequisites, and discusses how to:
Select an organization.
Select a way to give.
Start the online giving process.
Enter gift information.
Enter payment information.
Confirm and submit payment information.
View fund information.
View payment results.
Select an existing campaign.
Donate to an existing campaign.
Give by mail.
 Understanding Secure Online Giving
To donate online, contributors complete these steps as they navigate through the process:
Designate a gift amount and gift distribution.
Enter credit card, billing address, and other contact information.
Review the information already entered and complete the transaction.
Understanding Self-Service Involvement NavigationsThese navigation guidelines apply to all of the Involvement online giving pages:
Click the Next button to proceed to the next page in the process.
Click the Previous button to return to the previous page.
Click the Return to Involvement button to go to the Involvement home page.
Click the Mail In Donation Form button to access the Mail In Donation page.
See Also
Monitoring Self-Service Commitment Summary
Monitoring Self-Service Giving Club Progress
Monitoring Self-Service Membership History
Prerequisites
You must define specific information on these pages before self-service contributors can use the pages for online giving:
On the Donations - Choose Organization page, define multiple institutions so that donors can select an organization to receive their gift.
On the Ways to Give page, you must define these options:
Web campaigns on the Web Campaigns page.
Giving vehicles on the Defining Giving Vehicles page.
Settings and contact information on the Involvement Setup page.
Define credit card merchant information on the CR Merchants page.
On the Web Campaigns page, define campaigns from which donors can select.
See Also
Setting Up Self-Service Online Giving and Pledges
Pages Used to Give Online to the Institution|
Page Name |
Definition Name |
Navigation |
Usage |
|
AV_INVLV_G_INST |
Self Service, Involvement, Ways to Give Click an organization name link. |
Donors select an organization to receive their donation. |
|
|
AV_INVLV_G_WAYS |
|
Donors review donation options for the organization they selected on the Donations - Choose Organization page. |
|
|
AV_INVLV_G_INTRO |
Click the Make your gift securely on-line link on the Ways to Give page. |
Donors see this page first when they begin the online donation process. |
|
|
AV_INVLV_G_GFT |
Click the Next button on the Make a Donation - Welcome page. |
Donors designate their gift amount, gift terms, and gift distribution. |
|
|
AV_INVLV_G_CC |
Click the Next button on the Make a Donation - Gift Information page. |
Donors enter credit card, billing address, and other contact information. |
|
|
AV_INVLV_G_CNF |
Click the Next button on the Make a Donation - Payment Information page. |
Donors review the credit card, billing address, and other contact information entered on the previous page, and then to finalize the transaction. |
|
|
AV_INVLV_G_DES |
Click the View Fund Information link on the Make a Donation - Confirm and Submit page. |
Donors view details about the funds designated on the Make a Donation - Gift Information page. |
|
|
AV_INVLV_G_END |
Click the Submit button on the Make a Donation - Confirm and Submit page. |
Donors confirm that their online giving session is complete. |
|
|
AV_INVLV_G_CMPGN |
Click the Invest in existing campaigns link on the Ways to Give page. |
Donors select a campaign to receive their donation. |
|
|
AV_INVLV_G_FORM |
Click the Mail-in donation form link on the Ways to Give page. |
Donors can print the form, complete it manually, and mail it to the institution. |
Selecting an Organization
Access the Donations - Choose Organization page.
Select an organization name to access the Ways to Give page. For this page to appear, you must have previously defined more than one active institution on the Involvement Setup page.
Selecting a Way to Give
Access the Ways to Give page.
Select one of three predefined options:
Make your gift securely online. Click this link to directly access the online donation process. On the pages that appear, contributors can apply their donation to specific campaigns, fund designations, and appeals.
Invest in existing campaigns. Click this link to see a list of campaigns predefined by the organization. On these subsequent pages, contributors select a campaign to which the organization has already associated specific designations and appeals. These campaign-specific designations and appeals appear as available values for the selected campaign.
Mail-in donation form. Click this link to access a printable form that contributors can complete and mail. This option also lists the address to which to send the donation form. You define the mailing address on the Involvement Setup page.
Organizations can define other ways to give using the Giving Vehicles setup page. If giving vehicles were set up previously, then they appear under the Other Ways to Give heading.
To donate to a different organization, contributors can click the View Information for Other Organization link and return to the Choose Organization page.
See Also
Starting the Online Giving Process
Access the Make a Donation - Welcome page.
This page welcomes the visitor and explains how to navigate through the online giving process. This page also provides information about the mail-in donation form and contact information for the organization.
Entering Gift Information
Access the Make a Donation - Gift Information page.
Gift Detail Information
In the fields in this section, contributors enter the amount of their donation and decide whether or not to give anonymously. If they are donating to a specific fund-raising campaign, they select it here. The organization also collects information about how the contributor heard about the fund-raising effort.
Finally, contributors decide whether to apply their gifts to the organization's greatest need or to particular funds. If a contributor selects the Apply my gift to the greatest need option, then the system applies the gift based on the contributor's selection on the Ways to Give page. If the contributor enters through the Give securely online link, then the system applies the gift to the default designation defined on the Web Designations page. If the contributor enters through the Invest in existing campaigns link, the system applies the gift to the default linked designation defined on the Campaign Linked Designations page. If a contributor selects the Send my gift to the following funds option, the Fund Information section appears.
Fund Information
Contributors can select a specific designation and enter a specific portion of their donation to go to that fund. They can click the Add Fund button to designate additional funds and portions of their donation, or they can click the Evenly Distribute Gift button to divide their total donation evenly among the selected designations.
The fund values that appear in this section are defined on the Web Designations page. When a contributor sends a gift to specific funds, rather than contributing to the organization's greatest need, the designation value and amount fields are required to process a gift session. Contributors can use the Comments area to enter special requests, tribute information related to the donation, and so on.
When contributors navigates to the next page, the system verifies whether the total amounts designated equal the Total Gift Amount; if they do not, the system returns an error message. Contributors can manually adjust their fund designation amounts until the total matches their Total Gift Amount, or they can click the Evenly Distribute Gift button.
Entering Payment Information
Access the Make a Donation - Payment Information page.
Enter credit card information. CyberSource requires an email address but does not validate it; if the user leaves this field blank, the system uses the email address from the associated Merchant table. The system populates as much personal information as is available (based on the address and other type settings from the Campus Community Installation Setup page), but a contributor can modify any field.
Note. If you have selected the Security Code - Self Service check box for a Payment Merchant on the CR Merchants page, the system requires users to enter their credit card's security code as well as their credit card type, number, and expiration date. The explanatory "What is a security code?" link also appears.
When a contributor navigates to the next page, the system performs an internal system check to ensure that all required information is entered properly. The system prompts for corrections if it finds any errors or missing information.
Confirming and Submitting Payment Information
Access the Make a Donation - Confirm and Submit page.
This page displays online gift details for the contributor's review. Contributors can access the View Fund Information page to review details about the funds they designated on the Make a Donation - Gift Information page.
Viewing Fund Information
Access the Fund Information page.
When you determine that the information on the Fund Information page is correct, click Submit to submit the online gift transaction. The system sends the credit card information to a third-party credit card payment processor to authorize the gift amount. If the transaction fails, for example, because of invalid card or billing information, then the Payment Result page displays an error message.
See Also
Processing Credit Card Transactions
Viewing Payment Results
After a transaction is successfully authorized, the Payment Result page appears.
This page displays a message thanking the contributor by name for the donation. This page also provides a receipt number and transaction summary, which the contributor can print and keep as a record. The system generates a hard copy receipt that will be mailed later, using the current Contributor Relations Acknowledgement process.
If the payment is not successful, the Payment Result page displays an error message.
See Also
Generating Acknowledgement Letters
Selecting an Existing Campaign
Access the Involvement Setup page.
This page enables organizations to define campaigns and to link related designations and appeals to a specific campaign. When you click the Invest online in existing campaigns link, you see only the designations and appeals related to the selected campaign as you proceed through the online giving pages.
Donating to an Existing Campaign
Access the Donations - Campaigns page.
This page lists each campaign your organization has defined on the Web Campaigns page. When a contributor clicks a campaign link on this page, the system proceeds to the Make a Donation - Welcome page. From there, the online giving process continues in much the same way as it does when contributors give securely online.
However, when investing in existing campaigns, the Make a Donation - Welcome page displays the name and description of the selected web campaign in addition to the standard welcome and navigational information.
In addition, on the Make a Donation - Gift Information page, if the contributor applies the donation to specific funds, the Fund Information area displays the default fund designation and appeal options linked to the campaign. However, the contributor can use the Lookup feature to select other appeals and designations associated with that specific campaign.
Giving by Mail
Access the Mail In Donation Form page.
Online visitors who do not want to transmit personal information using the internet can use this page to contribute. Print this page using your web browser's Print functionality, complete the form, and mail it to the organization.
Note. The Mail To name and address information at the top of the page is defined on the Involvement Setup page.
Making a Pledge Online
This section provides an overview of the online pledge process and discusses how to:
Select a way to give.
Invest in an existing campaign.
Make a pledge online.
Enter pledge information.
Enter payment information.
Confirm and submit a pledge.
Understanding Online PledgesTo make a pledge online, donors complete these steps:
Make a pledge and learn to navigate through the online pledge process.
Designate a pledge amount and fund distribution.
Enter a pledge schedule and other contact information.
Review all of their information and complete the pledge.
Pages Used to Make a Pledge Online|
Page Name |
Definition Name |
Navigation |
Usage |
|
AV_INVLV_G_WAYS |
Self Service, Involvement, Ways to Give |
Donors review donation options set up by the institution. |
|
|
AV_INVLV_G_CMPGN |
Click the Invest in existing campaigns link on the Donations - Ways to Give page. |
Donors view existing campaigns and select a campaign to receive the gift or pledge. |
|
|
AV_INVLV_G_INTRO |
|
Donors see the Welcome page when they begin the online gift or pledge process. |
|
|
AV_INVLV_P_PL |
Click the Next button on the Make a Donation - Welcome page. |
Donors enter pledge detail and fund distribution information. |
|
|
AV_INVLV_P_CNT |
Click the Next button on the Make a Donation - Pledge Information page. |
Donors set up a pledge payment schedule and enter or verify their contact information. |
|
|
AV_INVLV_P_CNF |
Click the Next button on the Make a Donation - Payment Information page. |
Donors review their pledge information and payment schedule, and then submit the pledge. |
|
|
AV_INVLV_G_DES |
Click the View Fund Information link on the Make a Donation - Confirm and Submit page. |
Donors view details about the funds designated on the Make a Donation - Pledge Information page. |
|
|
AV_INVLV_P_END |
Click the Submit button on the Make a Donation - Confirm and Submit page. |
Donors see the Payment Result page when their online pledge is created. |
|
|
AV_INVLV_G_FORM |
Click the Mail-in Donation Form link on the Donations - Ways to Give, Make a Donation - Payment Information, or Make a Donation - Confirm and Submit pages. |
Online visitors who do not want to transmit personal information using the internet can use this form to submit pledge information. |
Selecting a Way to Give
Two links on the Donations - Ways to Give page enable donors to begin the pledge process:
Click the Invest in existing campaigns link to access the Donations - Campaigns page, where you can select a campaign to receive your pledge.
Click the Make a pledge on-line link to access the Make a Donation - Welcome page; where you can select a campaign to receive your pledge later in the process.
Investing in an Existing Campaign
If donors click the Invest in existing campaigns link, the Donations - Campaigns page appears. It describes all existing campaigns activated by the institution for online giving on the Web Campaigns setup page. Each campaign has an indicator next to it for donors to select to either give to this campaign or pledge to this campaign.
When donors click the Pledge to this campaign link, the system takes them to the Make a Donation - Welcome page for pledges. The welcome text on the page includes the campaign name selected on the Donations - Campaigns page.
Making a Pledge Online
If donors click the Make a pledge on-line link, the Make a Donation - Welcome page appears. It welcomes the visitor by name and explains how to navigate through the online pledge process. This page also provides contact information for the institution and a link to the mail-in donation form.
Entering Pledge Information
Access the Make a Donation - Pledge Information page. This page changes, depending on which link donors use on the Donations - Ways to Give page:
If donors access this page through the Make a pledge on-line link, they can select a specific campaign to receive the pledge.
If they enter this page through the Invest in existing campaigns link, they have already selected a campaign, therefore, no campaign choices appear.
Regardless of how donors access this page, they can select an appeal code and designation fund options for their pledge. Donors enter the amount of their pledge on this page.
Making a Pledge to an Existing Campaign
The page displays only designations and appeals related to the campaign selected on the Donations - Campaigns page. The Fund Information section displays the default fund designation and appeal options linked to the campaign.
Entering Payment Information
Access the Make a Donation - Payment Information page.
Donors use this page to create a pledge payment schedule and to enter or verify their contact information.
Available options for a donor's pledge payment schedule include the start and end dates of the pledge period, the frequency of the pledge payments, and the number of payment installments.
Note. For the system to generate a pledge schedule, donors must enter either a number of installments or a last payment date.
Confirming and Submitting a Pledge
Access the Make a Donation - Confirm and Submit page.
Donors use this page to review their pledge information and finalize the transaction.
Donors can review the information they entered on the Make a Donation - Payment Information page. The system also displays the generated expected pledge schedule. To generate the pledge schedule, the system divides the total pledge amount into equal installments, based on information entered on the Make a Donation - Payment Information page. Then, it calculates the expected payment dates and amounts to fulfill the pledge.
When the donor confirms and submits the pledge information, the system:
Saves the pledge information.
Generates a receipt number for the pledge.
Displays the Payment Result page, which includes a personalized thank you message, the receipt number, and a final summary of the pledge information, designation information, and pledge schedule information.
Note. The system does not charge the donor's credit card or process any transactions at this time.
Monitoring Self-Service Commitment Summary
This section discusses how to view a commitment summary.
Pages Used to Monitor Self-Service Commitment Summary|
Page Name |
Definition Name |
Navigation |
Usage |
|
AV_SS_P_CS_ORG AV_SS_P_CMTMT_SMRY |
Self Service, Involvement, My Involvement, Commitment Summary |
Donors view information about their history of giving to the institution. |
|
|
AV_SS_CS_SP |
Click the Fiscal Year link on the Commitment Summary page. |
View details about their giving during a particular year. |
Viewing a Commitment Summary
Donors can view information about lifetime giving and a summary of giving by fiscal year. If the donor has given to more than one institution, he or she can view information for each institution on separate versions of the page.
For each fiscal year summary, the donor can access details of his or her giving during that particular year.
Monitoring Self-Service Giving Club Progress
This section lists the pages used to monitor progression through giving clubs during a self-service session.
Page Used to Monitor Self-Service Giving Club Progress|
Page Name |
Definition Name |
Navigation |
Usage |
|
AV_SS_P_GC_ORG AV_SS_P_GCLUB |
Self Service, Involvement, My Involvement, Giving Club Progress |
Donors view information about their progression through giving clubs and various club levels. If the donor has given to more than one institution, he or she can view information for each institution on separate versions of this page. |
Monitoring Self-Service Membership History
This section lists the pages used to view information about participation in member organizations at the institution during a self-service session.
If a member belongs to member organizations for more than one institution, he or she can view information for each institution on separate versions of this page.
Members click the Membership Organization link in any row to view detailed information about a particular membership in the Membership Detail group box.
Page Used to Monitor Self-Service Membership History|
Page Name |
Definition Name |
Navigation |
Usage |
|
AV_SS_P_MB_ORG AV_SS_P_MBR_INQ |
Self Service, Involvement, My Involvement, My Memberships |
View information about a member's participation in member organizations at the institution. |
Generating Self-Service Gift and Pledge Sessions
This section lists prerequisites and discusses how to create self-service gift and pledge sessions.
PrerequisitesTo create self-service gift and pledge sessions, unprocessed, authorized self-service credit card gift or pledge transactions must exist in the system.
Page Used to Generate Self-Service Gift and Pledge Sessions|
Page Name |
Definition Name |
Navigation |
Usage |
|
AV_RUNCTL_INVLV |
Contributor Relations, Session Management, Process Sessions, Process Self Service Giving |
Run the process that moves self-service gifts and pledges into open self-service sessions. |
Creating Self-Service Gift and Pledge Sessions (AV_INV_SESS)
Access the Self Service Giving page.
When you run the AV_INV_SESS process, the system:
Looks at all institutions set up for online giving.
Moves self-service gifts and pledges into open self-service sessions.
You can configure Process Scheduler to run the Self Service Gifts Application Engine process at user-defined intervals. When the process completes, the data is saved and the session remains open.
Note. Due to the nature of credit card transactions, you should set the specified time frame between running the AV_INV_SESS process to no more than 24 hours.
You can also configure the AV_INV_SESS process to notify a particular user (or all users in a particular role) using email of process completion. By transferring the process log on notification, users can know which self-service sessions are open for processing.
Balancing, Queuing, and Posting Self-Service Gift Sessions
After you have a complete credit card session, as with any other type of session, you must balance it, queue it for posting, and post it to the general ledger. When you use the Maintain Sessions page to balance a session, you can see whether the session was created as a result of online giving or online pledging; the check box is selected for self-service sessions.
When you use the Queue Sessions page to queue a session for posting, you can filter the page to show only self-service sessions. To do so, select the Self Service Session check box.
See Also
Creating and Working with Sessions
Processing and Posting Sessions
Processing Self-Service Credit Card Transactions
This section provides an overview of self-service transaction types, lists prerequisites, and discusses how to:
Select self-service gift transactions for processing.
Capture self-service gift transactions.
Understanding Self-Service Transaction Types
After you post a credit card gift to the general ledger, you can then process it through a third-party payment processor such as CyberSource. Contributor Relations supports the following transaction processes:
Authorization authenticates the credit card number and places a temporary hold on the specified amount against the cardholder's credit card.
It also generates an authorization number and reduces the cardholder's available credit by the authorized amount. If the credit card information is not correct or if the cardholder does not have available credit, the system generates a message declining the transaction. Note that CyberSource does not bill the credit card at this time; it only verifies that the card is valid for the charge.
Note. All credit card payments for gifts made through self-service pages are authorized during online giving. Therefore, self-service gift sessions are ready to proceed directly to the capture process.
Capture confirms the temporary hold placed on credit card funds after a transaction is authorized and bills the credit card.
Credit issues a refund to a customer's credit card account after an adjusted gift.
See Also
Understanding Credit Card Processing
Prerequisites
To process self-service credit card transactions, the following conditions must exist:
Before you can select transactions for processing, using the EP Transaction Processing - Filter Options page, posted gift sessions must exist with the tender type of Credit Card.
Before you can capture transactions, using the EP Transaction Processing - Transaction List page, valid, posted gift credit card transactions must exist in the system.
Before you can select denied transactions for processing, using the EP Denied Transactions - Filter Options page, denied posted gift credit card transactions must exist in the system.
Before you can capture denied transactions, using the EP Denied Transactions - Transaction List page, denied posted gift credit card transactions must exist in the system.
Pages Used to Process Self-Service Credit Card Transactions|
Page Name |
Definition Name |
Navigation |
Usage |
|
AV_EP_FLTR |
Contributor Relations, Session Management, Process Electronic Payments, EP Transaction Processing |
Enter your selection criteria for the gifts to process. |
|
|
AV_EP_G_PROC |
Click the Search button on the EP Transaction Processing - Filter Options page. |
Select and capture gift transactions that meet the criteria you entered on the EP Transaction Processing - Filter Options page. |
Selecting Self-Service Gift Transactions for Processing
Access the EP Transaction Processing - Filter Options page (Contributor Relations, Session Management, Process Electronic Payments, EP Transaction Processing).
|
Institution |
Enter an institution code. |
|
Business Unit |
Enter a business unit for the gift transactions to process. If you leave the business unit blank, you view all gifts for the organization. Note. You must specify a business unit here to use the rest of the filter choices on this page. |
|
Tender Type |
Enter the electronic processing tender type for the gift transactions to be processed (the system populates this field to the electronic payment type Credit Card by default). Note. The PeopleSoft system uses CC to designate this electronic payment tender type. However, you can define it in another way on the Tender Types page. |
|
Transaction Requested |
Select Capture to capture the self-service gift transactions. Other delivered values for transaction processes currently supported by CyberSource are: Authorize, Authorize and Capture, and Credit. Note. Authorize and Capture is not a valid process for self-service gifts. |
|
Self Service Session |
Select Only Self Service to select gifts made through the self-service Make a Donation pages only. Other delivered values include All Sessions and Non Self Service. |
|
Post Date |
Enter dates to select gifts posted within the range of From and To date values. |
|
Session Number |
Enter a session number to select gifts made in this specific session only. To display a session, you must enter a business unit. |
|
Gift |
Enter a gift number to select gifts made with this gift number only. To display a specific gift, you must enter a business unit. |
Capturing Self-Service Gift Transactions
Access the EP Transaction Processing - Transaction List page (Click the Search button on the EP Transaction Processing - Filter Options page).
Note. On the EP Transaction Processing - Filter Options page, set Transaction Requested to Capture.
These fields on this page are defined on the EP Transaction Processing - Filter Options page: Business Unit, Tender, Session Nbr, Gift Nbr, and Post Dt.
|
Select |
Select the check box for each row to process. |
|
Select All |
Click this button to select check boxes for all rows. |
|
Payment Status |
Displays the current transaction status. If you click a link under this heading, a page appears that displays all existing transaction processing information. All transactions ready to be captured have a Payment Status value of Authorized. |
|
Auth Dt (authorization date) |
After the transaction is authorized, the system populates this field. |
|
Reference Nbr (reference number) |
After the transaction is sent, the system populates this field with a system-generated reference number used to communicate with the third-party credit card payment processor. |
|
ID |
Displays the ID of the contributor. |
|
Gift Amt (gift amount) |
Displays the amount of the gift credit card transaction. |
|
Process |
Click to run the capture process. The system gathers the transactions you select and sends them to the third-party credit card payment processor. Important! After you click the Process button, give the process at least 30 seconds to run. |
|
Process Monitor |
Click to review the status of the capture process. |
|
Set Filter Options |
Click to return to the EP Transaction Processing - Filter Options page. |
If any transactions are not captured successfully, you must complete them using the denied transactions process or using a gift adjustment session.
Working with Denied Self-Service Transactions
When you attempt to authorize or capture self-service credit card gift transactions, you occasionally receive denial messages from the third-party credit card payment processor. Denials occur for many reasons, including invalid card number, account over limit, internet communication problems with the third-party credit card payment processor, and so on.
To resolve denied transactions, use the EP Denied Transactions - Filter Options and EP Denied Transactions - Transaction List pages to perform the following functions: retry the capture or credit processes, decide to handle the transaction manually, or cancel the payment of the transaction.
This section discusses how to:
Select denied self-service gift transactions for processing.
Capture denied self-service gift transactions.
Pages Used to Work with Denied Self-Service Transactions|
Page Name |
Definition Name |
Navigation |
Usage |
|
AV_EP_FLTR |
Contributor Relations, Session Management, Process Electronic Payments, EP Denied Transactions |
Enter your selection criteria for the gift transactions to process. |
|
|
AV_EP_G_PROC |
Click the Search button on the EP Transaction Processing - Filter Options page. |
Select and capture denied gift transactions that meet the criteria you entered on the EP Denied Transactions - Filter Options page. |
Selecting Denied Self-Service Gift Transactions for Processing
Access the EP Denied Transactions - Filter Options page (Contributor Relations, Session Management, Process Electronic Payments, EP Denied Transactions).
Use this page in the same way that you select gifts for capture. The difference is that the EP Denied Transactions - Filter Options page only searches those transactions that the third-party credit card payment processor denied.
The fields on this page are the same as those on the EP Transaction Processing - Filter Options page. For denied gift transactions, however, the Transaction Requested value you select is the stage at which the gift transaction is denied, such as during capture.
See Also
Selecting Gift and Membership Transactions for Processing
Capturing Denied Self-Service Gift Transactions
Access the EP Denied Transactions - Transaction List page (Click the Search button on the EP Transaction Processing - Filter Options page).
Note. To capture, on the EP Denied Transactions - Filter Options page, set Transaction Requested to Capture.
After you select the appropriate rows, click the Process button to retry the transaction.
Click the Manual button to handle a denied transaction manually. For example, you may want to call the contributor, adjust the gift, or contact the third-party credit card payment processor directly to resolve the transaction.
Click the Cancel Pmt button to cancel the transaction. The transaction remains in the system, but—after you cancel a transaction—you can no longer filter on it using the EP Denied Transactions - Filter Options page.
Important! After you click the Process, Manual, or Cancel Pmt buttons, give each process at least 30 seconds to run.
See Also
Capturing Gift and Membership Transactions
Adjusting Self-Service Gift Credit Card Payments
To adjust gift credit card payments, you must open a gift adjustment session and make the necessary changes. However, any time you change credit card information, you must revalidate, reauthorize, and recapture the transaction. You must also credit the original gift amount.
To reauthorize and credit adjusted transactions:
Authorize the new gift amount using the EP Transaction Processing - Filter Options and EP Transaction Processing - Transaction List pages.
Filter transactions for a Transaction Requested value of Credit on the EP Transaction Processing - Filter Options page.
Credit the original gift amount on the EP Transaction Processing - Transaction List page.
See Also
Adjusting Gifts and Matching Gifts
Selecting Gift and Membership Transactions for Processing
Capturing Gift and Membership Transactions
Investigating Self-Service Gift and Pledge Transactions
You may need to research the details of a self-service gift or pledge if, for example, an online contributor contacts your organization with questions about their transaction or if your organization needs to review valid transactions that have not yet processed. You have can investigate transactions using either the Self Service Giving Inquiry pages or the EP Transaction Log Inquiry pages.
This section lists prerequisites and discusses how to:
Filter self-service gifts.
View self-service gift or pledge information.
View self-service gift or pledge details.
View self-service gift log details.
Select self-service gift transactions for review.
Review self-service gift transactions.
PrerequisitesBefore you can search for and view self-service gift transactions, you must make sure that self-service transactions exist in the system.
Pages Used to Investigate Self-Service Gift and Pledge Transactions|
Page Name |
Definition Name |
Navigation |
Usage |
|
AV_INV_G_INQ_FLTR |
Contributor Relations, Session Management, Supervise Sessions, Self Service Giving Summary |
Enter search criteria for self-service gifts or pledges. |
|
|
AV_INVLV_G_INQ |
Click the Search button on the Self Service Giving Inquiry - Filter Options page. |
View the results of your search. |
|
|
AV_INV_G_INQ_DTL |
Click a Receipt Number link on the Self Service Giving Inquiry - Self Service Giving List page. |
View details of a self-service gift or pledge. |
|
|
AV_INV_G_INQ_LOG |
Click a link under the Reference Nbr heading on the Self-Service Gift Inquiry - Self Service Gift List page. |
View a summary of each step in the electronic payment process. |
|
|
AV_EP_LOG_FLTR |
Contributor Relations, Session Management, Process Electronic Payments, EP Transaction Log Inquiry |
Enter your selection criteria for the self-service gift transactions to review. |
|
|
AV_EP_TRANS_LOG |
Click the Search button on the EP Transaction Log Inquiry - Filter Options page. |
View the transactions that meet the criteria you selected on the EP Transaction Log Inquiry - Filter Options page. |
Filtering Self-Service Gifts
Access the Self Service Giving Inquiry - Filter Options page (Contributor Relations, Session Management, Supervise Sessions, Self Service Giving Summary).
The system populates this page by default to the user's Institution, a Payment Status of Processed, the current date, and a Commitment Type of All. You can modify these default values and enter any combination of search criteria to research self-service gifts or pledges. Other delivered values for Payment Status are Authorized, Declined, and Valid. Other delivered values for Commitment Type are Gift and Pledge.
Note. A self-service pledge has a status of Valid when submitted by the self-service donor, and a status of Processed when the system moves it into a self-service session. The Payment Status values Authorized and Declined apply only to self-service gifts.
Enter the system-generated Receipt Number to search for a specific gift or pledge. This field is also useful if a donor contacts your institution with a Receipt Number from an online gift or pledge session. To search for multiple gifts or pledges, enter From and To values for Date Range and Amount Range. Click Search to retrieve the results.
This table describes each payment status on this page in detail:
|
Payment Status |
Description |
|
Valid |
Contributor has entered gift online and system has submitted gift to a third-party credit card processor for authorization. (System saves the record when contributor clicks the Submit button.) However, for some internal reason, system receives no response from the third-party processor (for example, because of poor internet connectivity, expired license, business interlink improperly configured, third-party processor system is down). |
|
Authorized |
System has authenticated the credit card number and third-party processor has placed a temporary hold on the specified amount against the cardholder's credit card. |
|
Processed |
Gifts has been entered online, authorized, and processed by the self-service gift process that creates gift sessions. |
|
Declined |
System has generated a decline message after transaction is sent to the third-party payment processor. Note that declined self-service gifts cannot be reprocessed since they are not actually written to the gift table and assigned a gift number and session number. |
Viewing Self-Service Gift or Pledge Information
Access the Self Service Giving Inquiry - Self Service Giving List page, which lists all online giving that meets your search criteria. Click the Set Filter Options link to return to the Self Service Giving Inquiry - Filter Options page and change your search criteria. To change your view of the search results on this page, you can Sort By Amount, Date, or Type, in either ascending or descending order.
Click a Receipt Number access the Self-Service Giving Detail page. Click a link under the Reference Nbr (reference number) heading to launch the Self-Service Gift Log Detail page.
Viewing Self-Service Gift or Pledge Details
Access the Self Service Gift Inquiry - Self-Service Giving Detail page to view summary details about an online gift or pledge.
The details include the Receipt Number the system generated for the gift or pledge and the Institution that received it. In addition, this page displays the ID of the donor and the total Gift Amount. Other details include the name of the Campaign, Appeal, Business Unit, and associated Designation that the donor selected, as well as the Session Nbr and Gift Nbr that the system assigned. If the donation is a pledge, the page displays pledge schedule information generated by the system.
Click the Return button to go back to the Self Service Giving Inquiry - Self Service Gift List page.
Viewing Self-Service Gift Log Details
On the Self-Service Gift Inquiry - Self-Service Gift Log Detail page, click a link under the Payment Status heading to view all data sent between your organization and the third-party credit card payment processor.
This page lists the gift transaction information sent to and from the third-party credit card payment processor. It displays the credit card and personal information the contributor entered, such as Credit Card Type, encrypted Credit Card Number, Expiration Date, cardholder Name and Address information, and Gift Amount. Other system details that appear include the Gift Nbr (number), Reference Number, Business Unit, Session Number, Tender Type, ID, and Payment Status.
The remaining information on this page relates to the information the system sent to, and received from, the third-party credit card payment processor. The Service Provide is the name of the third-party processor. The Credit Card Request ID is a code used during billing, to indicate the request number of the prior authorization of the transaction. Auth DTTM lists the authorization date and time code in vendor format. Return Status lists a three-character result code: 0 means success, 100-199 means declined by the vendor but OK to display to online users, 200-299 means declined by vendor and not OK to display to online users, 300-399 means transmission error. CyberSource generates the Auth Code when the transaction is successfully authorized, and the authorization Date appears to the right. The AVS Code designates that the third-party processor verified the cardholder address. The Credit Card Message fields display response messages from the third-party credit card payment processor.
Click the Return button to go back to the Self Service Giving Inquiry - Self Service Gift Log Detail page.
Selecting Self-Service Gift Transactions for Review
Access the EP Transaction Log Inquiry - Filter Options page (Contributor Relations, Session Management, Process Electronic Payments, EP Transaction Log Inquiry) to track self-service credit card activity by day, session, business unit, and so on. You may also need to track transactions that are waiting to be sent for third-party processing. Contributor Relations retains a historical record of all credit card activity that you can filter and review.
This page is primarily used by Contributor Relations to research gift transactions entered at your organization. However, you can retrieve self-service transaction details from this page by entering the Receipt Number for a gift.
See Also
Understanding Credit Card Processing
Reviewing Self-Service Gift Transactions
Access the EP Transaction Log Inquiry - Transaction List page.
List tab
|
Reference Nbr (reference number) |
The system populates this field by default with a system-generated reference number used to communicate with the third-party credit card payment processor. |
|
SeqNum (sequence number) |
Indicates how many actions the system has taken on a particular reference number. |
|
Payment Status |
Indicates the results of each system action. |
|
Credit Card Message 1 |
Displays the resulting response message from the third-party credit card payment processor. |
Detail tab
The Detail tab provides more clarity about each gift credit card payment. For each transaction on the List tab, you view the corresponding Business Unit, Tender type (which for self-service gifts is the organization's assigned tender type value for credit card transactions), Session and Gift Nbr (numbers). The Trans Dt (transaction date) lists the date the transaction was initiated, and the Auth Dt (authorization date) lists the date the transaction was authorized (if applicable). Other fields on this page display the ID of the contributor, the Gift Amt (amount), and the Auth Reply (authorization reply) that the system received from the third-party credit card payment processor.
|
|
Displays a single page that contains the combined information from both the List and Detail tabs. |
|
|
Returns to the EP Transaction Log Inquiry - Transaction List page. |