23 Creating Template, CSElement, and SiteEntry Assets
The CSElement, Template, and SiteEntry asset types provide the pagelets and elements that build your online sites. They are asset representations of page names and elements, the components that WebCenter Sites uses to generate pages.
When you create a CSElement asset, you code an element. When you create a SiteEntry asset, you name a page. When you create a template, you do both: you code an element and you name a page.
This chapter describes these three asset types and provides information about how to create them. Additional information about coding templates and CSElements is included in Chapter 28, "Coding Elements for Templates and CSElements."
This chapter contains the following sections:
-
Section 23.1, "Understanding Template, CSElement, and SiteEntry Assets"
-
Section 23.7, "Managing Template, CSElement, and SiteEntry Assets"
-
Section 23.8, "Using Oracle WebCenter Sites Explorer to Create and Edit Element Logic"
23.1 Understanding Template, CSElement, and SiteEntry Assets
This chapter contains procedures for creating Template, CSElement, and SiteEntry assets.
-
Template assets are classified as typed or typeless depending on whether they apply to a single asset type or no asset type.
-
If you are using SiteLauncher (to replicate sites or share Template and CSElement assets), WebCenter Sites requires element logic to indirectly refer to assets, asset types, attribute names, and template names. To this end, the WebCenter Sites interface introduces the Map screen (for example, Section 23.4.2.5, "Step 5: Configure the Map"); the API introduces the
render:lookuptag.Using the Map screen, you assign an alias to each value. You can then hardcode the aliases in the element logic and use the
render:lookuptag to retrieve the actual values from the aliases at runtime. -
The Cache Rules field has been simplified to reduce errors. Template developers can choose cached, uncached, or advanced. Selecting Advanced allows developers to set caching rules individually for WebCenter Sites and Satellite Server.
-
A new tag,
calltemplate, was introduced to invoke templates in a way that simplifies the template writing process. -
The PageCriteria field has been renamed to Cache Criteria. It accepts the following reserved parameters: c, cid, context, p, rendermode, site, sitepfx, ft_ss, and custom-defined parameters.
Cache criteria values are stored in the pagecriteria column of the SiteCatalog table (in previous versions they were stored in the resargs columns of the SiteCatalog table).
The Cache Criteria field is also used to hold variables that enable the Extra Parameters section in the CKEditor and make them available to users, in the Include asset link and Add asset link dialog boxes. The Extra Parameters section provides a way of passing custom parameters (such as image dimensions) to the template. See substep 3 of step 2 in Section 23.4.2.4, "Step 4: Configure SiteEntry" about extra parameters. For more information, see the Oracle Fusion Middleware WebCenter Sites User's Guide.
-
Forms for creating Template and CSElement assets have been subdivided by tabs; fields are organized by function on the tabs.
23.2 Pages, Pagelets, and Elements
In the WebCenter Sites context, an online page is the composition of several components into a viewable, final output. Creating that output is called rendering. (Making either that output or the content that is to be rendered available to the visitors on your public site is called publishing.)
WebCenter Sites renders pages by executing the code associated with page names. The name of a page is passed to WebCenter Sites from a browser and WebCenter Sites invokes the code associated with that page name. The code is actually a named file, a separate chunk of code called an element.
The code in your elements identifies and then loads assets to display in those pages or pagelets, and passes other page names and element names to WebCenter Sites. When WebCenter Sites invokes an element, all of the code in the element is executed. If there are calls to other elements, those elements are invoked in turn. Then the results, the images, articles, linksets, and so on, including any HTML tags, are rendered into HTML code (or some other output format if your system is configured to do so).
Template, CSElement, and SiteEntry assets represent elements and pagelets as follows:
-
A CSElement asset is an element.
-
A SiteEntry asset is the name of a page or a pagelet.
-
A Template asset is both an element and a page or pagelet that renders an asset.
This section contains the following topics:
23.2.1 Elements, Pagelets, and Caching
Pages and pagelets are cacheable. They have cache criteria set for them that determines whether they are cached and, if so, for how long.
Elements do not have cache criteria. When your code calls an element directly by name, without going through a page name, the output is displayed in the page that called the element's name and that output is cached as a part of that page.
If you want to cache the output from an element separately from the output of the page that called it, you must provide a page name for it and call it by its page name. The code in a Template asset has a page name by default. To provide a page name for a CSElement asset, you create a SiteEntry asset and select the CSElement asset for it.
23.2.2 Calling Pages and Elements
To see a WebCenter Sites page, you provide a URL that includes the name of the page. A WebCenter Sites URL looks like this:
For WebLogic and WebSphere:
http://host:port/servlet_context_path/ContentServer?pagename=name_of_page
where:
-
hostis the name of the server that is hosting the WebCenter Sites system, -
portis the port number of the web server, -
servlet_context_pathis the path that the application server gives to the WebCenter Sites web application, and -
name_of_pageis the page name.
This syntax passes the name of a page to the ContentServer servlet, which then renders the page.
For example, to see the home page of the Burlington Financial sample site, you enter:
http://127.0.0.1:7001/servlet/ContentServer?pagename=
BurlingtonFinancial/Page/Home
When you code your elements, you use tags that programmatically call the pagelets and elements that you want to display in your site. These tags pass the names of pages and elements to the ContentServer servlet just as a URL entered in a browser passes a page name to the ContentServer servlet.
To call a page name, use the render:satellitepage (RENDER.SATELLITEPAGE) tag. For example:
<render:satellitepage pagename="BurlingtonFinancial/Page/Home" />
To call an element directly by name, use the render:callelement (RENDER.CALLELEMENT) tag. For example:
<render:callelement elementname="BurlingtonFinancial/Common/TextOnlyLink" />
To call a template by name, use the render:calltemplate tag. For example:
<render:calltemplate
        site='<%=ics.GetVar("site")%>'
        slotname="Head"
        tid='<%=ics.GetVar("tid")%>'
        c='<%=ics.GetVar("c")%>'
        cid='<%=ics.GetVar("cid")%>'
        tname='<%=ics.GetVar("HeadVar")%>'>
    <render:argument name="p" value='<%=ics.GetVar("p")%>' />
</render:calltemplate>
When you use Sites Explorer to examine SiteCatalog and ElementCatalog entries, they are presented as folders and subfolders that visually organize the pages and pagelets.
However, these entries are simply rows in a database table (there is no actual hierarchy). Therefore your code must always call a page entry or an element entry by its entire name. You cannot use a relative path.
How does your code call template, CSElement, and SiteEntry assets? As follows:
-
Because a SiteEntry is a pagelet, you use the
render:satellitepagetag to call SiteEntry assets from within your element code. -
Because a CSElement is an element, you use the
render:callelementtag to call CSElement assets from within your element code. -
Because a template is both an element and a page name, you can use either of the above, although typically the render:calltemplate tag is designed to be used for templates. It encapsulates the functionality of
render:satellitepageandrender:calleelementas well as other features, such as parameter validation.
23.2.3 Page vs. Pagelet
For the sake of clarity, the following table lists the various terms that include the word page and defines them in the context of their usage in the documentation for WebCenter Sites, the WebCenter Sites modules, and the products:
| Term | Definition |
|---|---|
|
pagelet |
The results of an HTTP request displayed in a browser as one piece of a rendered page. It has an associated element file. A pagelet can be cached in the WebCenter Sites and Satellite Server page caches. |
|
page |
The results of an HTTP request displayed in a browser window. A page is created by compiling several parts of pages (pagelets) into one final, displayed or rendered page. It has an associated element file. A page can be cached in the WebCenter Sites and Satellite Server page caches. |
|
page name |
The complete name of a page or pagelet. For example: BurlingtonFinancial/Article/Full. |
|
page asset |
Page assets do not represent page names. They represent logical containers for content. These containers can be arranged into a tree structure for navigation of site content. You create page assets and then place them in position in the Site Plan tree which is visible on the Site tab in the tree in the left pane of the WebCenter Sites interface. You associate other content and site design assets with them and then you publish them. |
23.3 CSElement, Template, and SiteEntry Assets
As mentioned, CSElement assets are elements, SiteEntry assets are page names, and Template assets include both.
Because page names and elements are assets, you can manage your code and page names in the same way you manage your content: you can use workflow, revision tracking, approval, and preview, as well as the Mirror to Server publishing method to move your code and page names to the management and delivery systems.
Revision tracking. Never use the revision tracking feature in the Sites Explorer tool to enable revision tracking directly on the SiteCatalog or ElementCatalog tables.
Mirror to Server. If templates or CSElements refer to elements that are not associated with a template or CSElement asset, these elements are not automatically mirrored to the publishing destination. You must move them manually with the CatalogMover utility. For this reason, we do not recommend using elements that are not wrapped by CSElements.
When you create a CSElement or Template asset, you create an element. You can code the element by using the asset form (Template or CSElement, depending on which type of asset you are creating).
Note:
Elements for Template assets and CSElements can be coded in Sites Explorer. However, the procedure is not recommended for reasons dealing mostly with compositional dependencies and updates to the cache. Developers who prefer to use Sites Explorer must follow the steps in Section 23.8, "Using Oracle WebCenter Sites Explorer to Create and Edit Element Logic" in order to ensure the validity of the Template or CSElement assets.
This section contains the following topics:
23.3.1 Template Assets
Templates render other assets into pages and pagelets. This in turn creates the look and feel of your online site. You create a standard set of templates for each asset type, except CSElement and SiteEntry assets, so that all assets of the same type are formatted in the same way.
This process allows content providers to preview their content by selecting formatting code for the content, but not requiring them to code themselves or allowing them to change your standard, approved code.
When you save a Template asset, WebCenter Sites does the following:
-
Creates a row in the
Templatetable for the asset. -
Creates an element entry in the
ElementCatalogtable. The name of the entry uses the following convention:AssetTypeName/TemplateName
where:
-
AssetTypeNameis the asset type formatted by the Template asset and element. -
TemplateNameis the name of the template.
-
-
Creates a page entry in the SiteCatalog table. The name of the page entry uses the following convention:
SiteName/AssetTypeName/TemplateName
where:
-
SiteNameis the name of the site that the template belongs to, which is the site that you were working in when you created the template. WebCenter Sites obtains this name from the Publication table. (In previous versions of the product, sites were called publications.) -
AssetTypeNameis the asset type formatted by the Template asset and element -
TemplateNameis the name of the template.
Note:
Do not change the name of the page entry that WebCenter Sites creates.
-
-
Creates new rows in other tables that support the operation of the Template asset. The tables start with the name:
Template_ -
Creates a new row in the AssetPublication table to associate your template with your site.
23.3.2 CSElement Assets
You use CSElement assets for the following kinds of things:
-
Code that is not for rendering an asset and that you want to reuse in more than one place and/or call from more than one type of template. For example, you have six templates that use the same top banner so you create a CSElement asset for the code in the banner and call that element from each template. This way, if you decide to change the way the banner works, you only have to change it in one place.
-
Recommendations for Engage. If you create a dynamic list recommendation, you must create a CSElement asset to build the dynamic list. For more information, see Chapter 39, "Recommendation Assets" These assets do not render content, but exist for logic processing.
When you save a CSElement, WebCenter Sites does the following:
-
Creates a row in the
CSElementtable for the asset. -
If you have coded the element in the CSElement form, creates an element entry in the ElementCatalog table. The name of the entry is the name that you entered into the ElementCatalog Entry Name field in the form.
-
Creates a new row in the
AssetPublicationtable to associate your template with your site.
23.3.3 SiteEntry Assets
You use SiteEntry assets for the following kinds of things:
-
If you are using the CS-Designer tool, you use SiteEntry assets to represent code snippets. In that interface, when you drag and drop a code snippet into a page, you are dropping in a WebCenter Sites call to a page entry through a render:satellitepage tag.
-
When the code in a CSElement asset is rendered, the code is displayed in the page that called it, and is cached as part of that page (if that page is cached, that is). If you want the output from a CSElement to be cached as a separate pagelet and have its own cache criteria set for it (timeout value, page criteria values, and so on), your code must invoke that element through a page name. In such a case, you create a SiteEntry asset to accompany your CSElement asset.
When you create and save a SiteEntry asset, you associate a CSElement asset with it. The element in that CSElement asset becomes the root element for the SiteEntry's page entry.
When you save a SiteEntry asset, WebCenter Sites does the following:
-
Creates a row in the
SiteEntrytable for the asset. -
Creates a page entry in the
SiteCatalogtable. The root element of the page entry is the element from the CSElement asset that you specified. -
Tracks an approval dependency between the SiteEntry asset and the CSElement asset. Both the SiteEntry asset and its CSElement asset must be approved before the SiteEntry asset can be published.
Note:
Compositional dependencies are also tracked. The SiteEntry defines the page criteria and the default arguments that contain the dependency information. The CSElement records the id of the SiteEntry and CSElement assets into the rendering engine using
render:logdeptags that are added to the CSElement code stub.
23.3.4 What About Non-Asset Elements?
If you code customizations for the WebCenter Sites interface on the management system, you create elements that are not assets because you do not want them to be published to your delivery system.
For example, when you create workflow elements that implement actions or conditions, you do not create them as CSElement assets. Rather, you use the Sites Explorer tool to manually create an entry in the ElementCatalog table.
Remember that if you create workflow or other custom elements on your delivery system, you must use the CatalogMover utility to copy those elements to the ElementCatalog on your management system.
23.4 Creating Template Assets
Templates render assets. When you create a Template asset, you create it as either
-
a typed template, for rendering assets of a specific type, or
-
a typeless template, which applies to assets of any type. A typeless template is generally used to specify the layout of a page in which assets can then be rendered by the typed templates.
Note:
The only field that makes a template typed or typeless is the For Asset Type field. The purpose of distinguishing templates as typed or typeless is to help developers manage the construction of pages and easily keep track of which templates are responsible for page layout and which for asset rendering.
Before creating a Template asset, complete Section 23.4.1, "Prerequisites" to determine how you will set template properties (such as the template name) and how you will code the template's element logic. You will then complete the following steps, using the WebCenter Sites interface:
-
Step 3: Configure the Template's Element (To specify its usage, file type, and logic.)
-
Step 4: Configure SiteEntry (To specify page and pagelet caching parameters.)
-
Step 5: Configure the Map (If you wish to support template sharing and site replication.)
-
Step 6: (Optional) Create a Thumbnail (To graphically represent the template in its Inspect form.)
Information that you enter into the Template form will be written to database tables when the template is saved.
Note:
Do not create Template assets directly in the database tables. Doing so will require you to write to several tables and can result in incorrect tracking of dependencies. Instead, use the Template form and the procedures in this section to create Template assets. For help with coding the template's element logic (in typed templates), see Chapter 28, "Coding Elements for Templates and CSElements."
This section contains the following topics:
23.4.1 Prerequisites
Before you begin creating a Template asset, determine the following:
-
TemplateName(a name for your Template asset; the value of the Name field in the Name screen, To name and describe the Template asset). -
Whether the Template asset is to be typed or typeless.
-
Whether the Template asset will be shared and whether the site you are working in will be replicated. These considerations determine how you will code the template's element logic.
-
Whether to code the Template's element logic in Sites Explorer instead of the Template form. Coding in Sites Explorer, although practiced, is not recommended for the reasons outlined in Section 23.8, "Using Oracle WebCenter Sites Explorer to Create and Edit Element Logic."
23.4.1.1 Naming a Template Asset
-
Once a Template asset is saved, its name cannot be changed.
-
WebCenter Sites appends the template name to SiteName (also to AssetTypeName for typed templates). The template name should make sense in relation to SiteName and AssetTypeName. WebCenter Sites's naming conventions must not be overridden; names created by WebCenter Sites must not be changed. Table 23-1 lists the conventions that use TemplateName.
AssetTypeNameis used only for typed templates and represents the value of the template's For Asset Type field in the Name screen (see To name and describe the Template asset).SiteNameis the name of the site to which the template belongs (the site that you are working in as you are creating the template). WebCenter Sites obtains theSiteNamefrom the Publication table. (In previous versions of the product, sites were called publications.)Table 23-1 Naming Conventions Using
TemplateNameTemplate Naming Conventions Description Typed
AssetTypeName/TemplateNameName of the root element for a typed template.
This value is written to the Rootelement field in step 4. This value must not be changed. If the default value is changed, some tags that expect the default value, such as the
render:calltemplatetag with thestyleattribute set toelement, will fail.Note: The naming convention requires root element names to be unique. You must not have multiple Template assets pointing to the same root element. You can, however, have two SiteEntry assets point to the same element (for example, if you wish to specify different default arguments, or different cache criteria depending on the calling scenario).
n/a
AssetTypeName/TemplateName.xml_or_jsp_or_htmlPath to the element file of a typed template.
This value is written to the ElementStorage Path/Filename when the file type is selected in step 3.
n/a
SiteName/AssetTypeName/TemplateNameName of the page that will be rendered if the template is typed.
This value is written to the SiteCatalog Pagename field, in Section 23.4.2.4, "Step 4: Configure SiteEntry."
Typeless
/TemplateNameName of the root element for a typeless template.
This value is written to the Rootelement field in step 4. This value must not be changed. If the default value is changed, some tags that expect the default value, such as the
render:calltemplatetag with thestyleattribute set toelement, will fail.Note: The AssetTypeName is omitted, as the template applies to any asset type. The forward slash is kept to identify the template as typeless. See also the note in the first row of this table.
n/a
Typeless/TemplateName.xml_
or_jsp_or_htmlPath to the element file of a typeless template.
This value is written to the ElementStorage Path/Filename when the file type is selected in step 3.
n/a
SiteName/TemplateNameName of the page that will be rendered if the template is typeless.
This value is written to the SiteCatalog Pagename field, in Section 23.4.2.4, "Step 4: Configure SiteEntry."
Note: The
AssetTypeName/is omitted, as the template applies to any asset type.Typed
AssetTypeName/TemplateNameName of the root element for a typed template.
This value is written to the Rootelement field in step 4. This value must not be changed. If the default value is changed, some tags that expect the default value, such as the
render:calltemplatetag with thestyleattribute set toelement, will fail.Note: The naming convention requires root element names to be unique. You must not have multiple Template assets pointing to the same root element. You can, however, have two SiteEntry assets point to the same element (for example, if you wish to specify different default arguments, or different cache criteria depending on the calling scenario).
n/a
AssetTypeName/TemplateName.xml_or_jsp_or_htmlPath to the element file of a typed template.
This value is written to the ElementStorage Path/Filename when the file type is selected in step 3.
23.4.1.2 Designating a Template as Typed or Typeless
Before creating a Template asset, determine whether it is to be typed or typeless. Once the template is saved, its status as typed or typeless cannot be changed.
23.4.1.3 Template Sharing and Site Replication
Before creating a template, decide how the template and the site you are working in will be used. Your decision determines how you will code the template's element logic (in Section 23.4.2.3, "Step 3: Configure the Template's Element").
If you wish to share your Template asset or make the current site replicable, ensure that the template's element logic does not directly refer to assets, asset types, attribute names, or template names. Instead, you must refer to them indirectly. Use the Map screen (Section 23.4.2.5, "Step 5: Configure the Map") to assign an alias (key) to each value, then hard code the aliases in your template. Use the render:lookup tag to retrieve the actual values from the aliases at runtime.
During its execution, the render:lookup tag refers to the map to look up the keys and returns the asset-specific information for use in the element logic. This dynamic lookup allows the Template asset (but not the element logic alone) to refer directly to asset data while enabling safe replication and template sharing.
For example, assume a template is named FSIILayout, and the site containing this template has a site prefix of FSII. If the site is replicated such that the new site's prefix is New, and the FSIILayout template is copied, then the copy of the template is named NewLayout. Referring to the NewLayout template by its hard-coded name (FSIILayout) would result in a failure when the template is executed. Instead, the template name is looked up:
<%-- Look up the name of the layout template --%>
<render:lookup
        site='<%=ics.GetVar("site")%>'
        varname="LayoutVar"
        key="Layout"
        tid='<%=ics.GetVar("tid")%>'/>

<%-- Look up the name of the wrapper page's site entry.
     Note we want the asset name only, so we must specify
     the match filter. --%>
<render:lookup
        site='<%=ics.GetVar("site")%>'
        varname="WrapperVar"
        key="Wrapper"
        tid='<%=ics.GetVar("tid")%>'
        match=":x"/>
To code the element logic, you must have a clear understanding of its design and the map it will refer to. You will need to determine:
-
Which keys to create and which name to assign to each key.
-
The type of asset information to be looked up:
-
Template Name
-
Asset Type
-
Asset (Type:Name)
-
Asset (Type:ID)
-
-
A value for each key.
-
The site to which the map applies.
Additional information about usage of the render:lookup tag is given in the Oracle Fusion Middleware WebCenter Sites Tag Reference.
23.4.2 Procedures for Creating Template Assets
This section shows you how to create a Template asset, using the WebCenter Sites interface.
Note:
Before starting the procedures in this section, read Section 23.4.1, "Prerequisites" for information about creating Template assets.
23.4.2.1 Step 1: Open the 'Template' Form
-
Open the Admin interface.
-
In the button bar, click New.
-
In the list of asset types, select New Template.
Note:
For the New Template option to be displayed, the Template asset type must be enabled for your site and a start menu item must be created for it.
-
The Template form displays. Continue with Section 23.4.2.2, "Step 2: Name and Describe the Template Asset."
Note:
If you see a Choose Assignees screen instead of the Template form, it means that the Template asset you will be creating is associated with a workflow. Select a name (or names) from the Users column and click Set Assignees. Continue with Section 23.4.2.2, "Step 2: Name and Describe the Template Asset."
23.4.2.2 Step 2: Name and Describe the Template Asset
The Name screen is used to identify the template as typed or typeless, assign the template to a category, specify arguments that may be passed to the template, and name keywords by which the template can be located in search routines.
When the Template asset is saved, field values that you specify in the Name screen (with the exception of legal arguments), are written to the Template table, as indicated in the procedures below.
Note:
At any time in the process of creating a template, you can save the template. WebCenter Sites will display the template's Inspect form. To return to the Template form, click the Edit link.
To name and describe the Template asset
In the Name screen, fill in the fields as explained in the steps below:
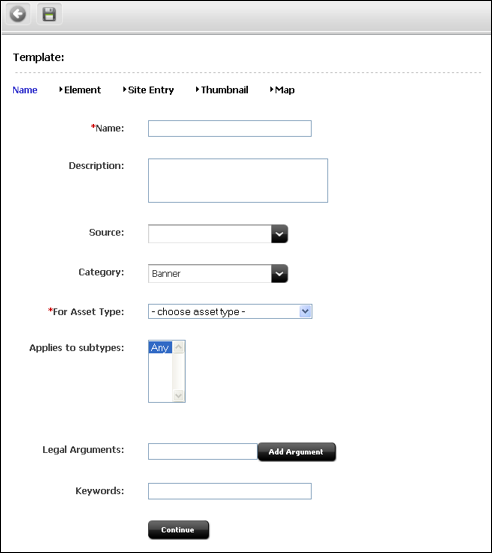
Description of the illustration n_temp_name_small.png
-
(Required). In the Name field, type a descriptive template name that is unique for the template and for the type of asset(s) that the template renders. It is best to choose a name that reflects the function or purpose of the template.
Valid entries:
-
Up to 64 alphanumeric characters (the first character must be a letter)
-
Underscores (_)
-
Hyphens (-)
-
Spaces (these will be converted to underscores when used in the SiteCatalog pagename for the template)
Note:
Make sure you have chosen a name for your Template asset using the guidelines in the section Section 23.4.1, "Prerequisites."
-
-
In the Description field, type a brief description of the template. You can use up to 128 characters.
-
In the Source field, select an option from the drop-down list if your template is derived from a source that you wish to note.
-
In the Category field, select an option from the drop-down list if you wish to place the Template asset into a category.
-
(Required). In the For Asset Type field, identify your template as typed or typeless:
-
If you are creating a typeless template (for example to dispatch to typed templates), select Can apply to various asset types and skip to step 7.
-
If you are creating a typed template (which renders assets of a certain type), select an asset type. For example, if you are creating a template to render article assets, select Article from the drop-down list.
-
-
(Required for typed templates). In the Applies to Subtypes field, select the appropriate subtypes from the menu.
Note:
A typed template should be used only for specific subtypes of the asset type that you selected in the preceding field (For Asset Type).
-
-
Enter an argument that may be passed to the template and click Add Argument.
-
In the fields that are displayed:
-
Specify whether the argument is optional or required.
-
Provide a description of the argument (to help you know the purpose of the argument you are creating).
-
Specify legal values (including descriptions) for the argument.
-
(You can specify as many arguments and legal values as you require by clicking the Add Arguments and Add Legal Value buttons.)
-
-
In the Keywords field, enter keywords that you and others can use as search criteria in the Advanced Search form when you search for this template in the future. For information about searching for assets, see the Oracle Fusion Middleware WebCenter Sites Administrator's Guide.
-
Click Continue to open the next screen, Element.
Note:
If you chose to save the Template asset, you will notice that WebCenter Sites adds two fields:
-
The Status field, which is pre-populated with the editorial status of the Template asset (created, edited, and so on). This field identifies the latest operation that was performed on the Template asset, regardless of whether the Template asset is associated with a workflow.
-
The ID field, which is pre-populated with a unique number that WebCenter Sites generates and assigns to the Template asset as its ID. (The ID field corresponds to the tid variable.)
-
23.4.2.3 Step 3: Configure the Template's Element
The Element screen is used to create the template's element, define the element file type (XML, JSP, or HTML), provide the element logic, and name the element. For example:
-
The Create Template Element field offers a choice of XML, JSP, or HTML file types for the element logic, and is used to seed the Element Logic field with standard stub code (which you need to include in any element that you create).
When you use the Create Template Element field to create, for example, a .jsp file, WebCenter Sites adds JSP
taglibstatements and theRENDER.LOGDEPtag to the Element Logic field by default so that WebCenter Sites can log the compositional dependency between this Template asset and pages that are rendered from this element. For other file types, WebCenter Sites adds code specific to the file type. You will add your own code to the Element Logic field.For information about dependencies, see Section 28.1, "About Dependencies." For help with coding the element logic, see Chapter 28, "Coding Elements for Templates and CSElements."
-
The Element Storage Path/Filename field names the file that holds the element logic and specifies the path to the file.
When the Template asset is saved, field values in the Element screen are written to a row (representing the element) in the ElementCatalog table, as indicated in the procedures below.
Note:
Selecting an Existing Element
In the steps that follow, we assume you are creating a new element for the Template asset. If, however, you are migrating assets from an earlier WebCenter Sites release and wish to reuse an existing element, you need to identify the element correctly so that WebCenter Sites can find it and associate it with this Template asset.
To select an existing element
-
(Optional). In the ElementCatalog Description field, type a description of the element.
-
In the Element Storage Path/Filename field, enter a value according to the naming convention in Table 23-1.
-
In the Element parameters field, specify the variables or arguments that can be passed to the element. For more information, see step 7 in the "To configure a new element" section.
-
Save and re-open the Template asset.
WebCenter Sites checks for the existence of the named element:
If the element has been correctly named, WebCenter Sites recognizes the element and displays its code in the Element Logic field.
If the named element does not exist (or is incorrectly named), WebCenter Sites does nothing. When you inspect or edit the Template asset, WebCenter Sites displays a message stating that there is no root element in the form. As soon as you code the element and give it the correct name, WebCenter Sites detects it and associates it with the template.
In the Element screen, fill in the fields as explained in this section.
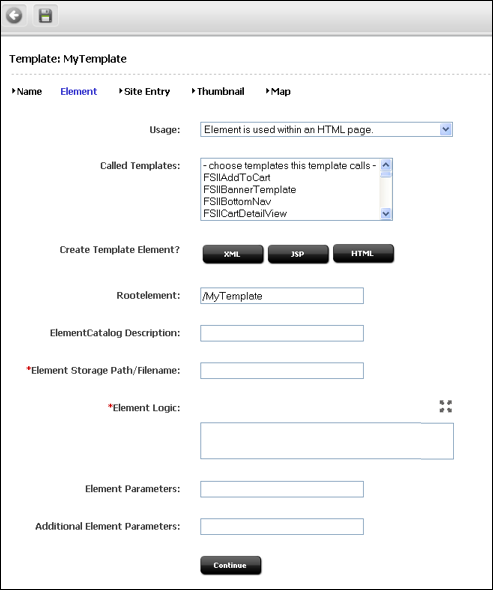
Description of the illustration n_elementscreen_small.png
-
In the Usage field, specify the intended usage of this template, using the table below as a guideline.
Usage Option Description Usage unspecified
Specifies a template that generates HTML. It is unknown whether the template is a Body template (see row 2 of this table) or a url template (see row 3 of this table).
Element is used within an HTML page
Specifies a template that is used inside the
<BODY>...</BODY>tag of an HTML page. This option characterizes the template as a Body template.Element is used as a layout
Specifies a layout template that generates a complete HTML page, and is used to render assets in Web Mode.
Element defines a whole HTML page and can be called externally
Specifies a template that generates a complete HTML page and can be used in a url. This option characterizes the template as a url template.
Element is streamed as raw data
Specifies a template that generates raw binary data of an unknown type that is not HTML.
-
In the Called Templates field, select the template(s) that this template will call (if they exist).
-
In the Create Template Element field, do one of the following:
-
To create an .xml file, click XML. The code that is pasted in comes from the
OpenMarket\Xcelerate\AssetType\Template\modelXML.xmlelement and can be modified to use custom default logic. -
To create a .jsp file, click JSP. The code that is pasted in comes from the
OpenMarket\Xcelerate\AssetType\Template\modelJSP.xmlelement and can be modified to use custom default logic. -
To create an .html file, click HTML. The code that is pasted in comes from the
OpenMarket\Xcelerate\AssetType\Template\modelHTML.xmlelement and can be modified to use custom default logic.
WebCenter Sites populates the following fields:
-
Element Logic field with a header and other auto-generated code.
For example, if you clicked the JSP button, WebCenter Sites enters a tag library directive for each of the WebCenter Sites JSP tag libraries. WebCenter Sites also sets a RENDER.LOGDEP (render:logdep) tag to mark a compositional dependency between the Template asset and any page or pagelet rendered with the template.
-
Element Storage Path/Filename field. Do not change the value of this field.
This field displays the element file name, preceded by the path to the element file. The naming convention is given in Table 23-1.
When you save the Template asset, the value in the Element Storage Path/Filename field is written to the url column of the
ElementCatalogtable, for the row that represents the element.
-
-
The Rootelement field is pre-populated with the value given in Table 23-1. Do not change the value of this field. If the default value is changed, some tags that expect the default value, such as the
render:calltemplatetag with thestyleattribute set toelement, will fail. -
(Optional). In the ElementCatalog Description field, type a description of the element. When you save the Template asset, information in this field is written to the description column for the element entry in the ElementCatalog table.
-
(Required). In the Element Logic field, code your element. Be sure to enter all of your code between the two
cs:ftcstags.If you are using JSP, remove the comments from the
taglibdirectives that describe the tag libraries you are using.For help with this step, see Chapter 28, "Coding Elements for Templates and CSElements."
Note:
Ensuring Template Sharing or a Replicable Site
If you wish to share your Template asset or make the current site replicable, make sure that the template's element logic does not directly refer to assets, asset types, attribute names, or template names. Instead, use the render:lookup tag and prescribed keys as explained in Section 23.4.1.3, "Template Sharing and Site Replication." In Section 23.4.2.5, "Step 5: Configure the Map," you will map the same keys to the asset information that must be accessed for use in the element logic.Calling a Template
Templates should always be called by therender:calltemplatetag, and never therender:callelementtag orrender:satellitepagetag. -
(Optional). The Element Parameters field and Additional Element Parameters field are used to enter variables or arguments that can be passed to the element, if the site design requires them.
-
The Element Parameters field corresponds to the resdetails1 column in the ElementCatalog. When you save the template, WebCenter Sites writes the template ID (
tid)to this field (i.e., to theresdetails1column). -
The Additional Element Parameters field corresponds to the resdetails2 column in the
ElementCatalog. WebCenter Sites leaves this field blank.
If your site design requires you to use variables in addition to tid in your template element, enter the variables into one of the fields above. Enter them as name=value pairs with multiple arguments separated by the ampersand (&) character. For example:
MyArgument=value1&YourArgument=value2
Each field supports up to 255 characters.
For more information about using variables, see Chapter 4, "Programming with Oracle WebCenter Sites."
-
-
Click Continue to open the next screen, SiteEntry.
23.4.2.4 Step 4: Configure SiteEntry
The SiteEntry screen is used to specify caching and pagelet parameters for the page to be rendered by this Template asset.
When the Template asset is saved, field values that you specify in the SiteEntry screen are written to the SiteCatalog table, as indicated in the procedures below.
-
In the SiteEntry screen, fill in the fields as explained in this section.
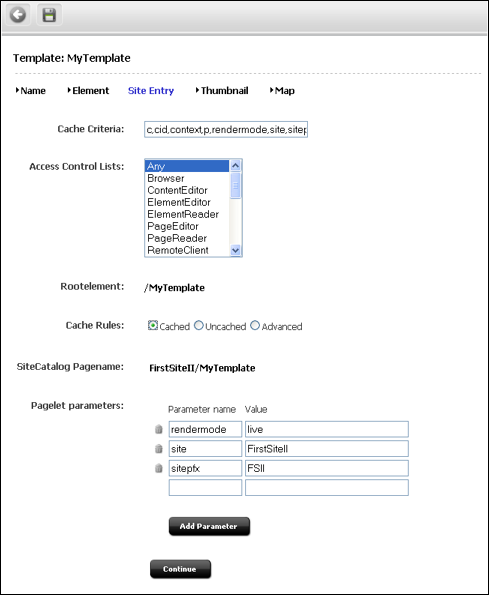
Description of the illustration l_siteentry_small.png
-
-
WebCenter Sites names the following reserved variables as Cache Criteria:
c,cid,context,p,rendermode,site,sitepfx,ft_ss
Note:
The reserved Cache Criteria variables should not be removed. For information about the reserved variables, see Chapter 4, "Programming with Oracle WebCenter Sites."
-
If you need to include your own variables as Cache Criteria (for example,
foo), add them to the existing list. For example:c,cid,context,foo,p,rendermode,site,sitepfx,ft_ssNote:
The Cache Criteria field names the variables which, in conjunction with SiteCatalog Pagename, define a pagelet as being unique. The variables are used to identify cached pages, which means that the variables are used in the page's cache key.
Only those variables that are specified as Cache Criteria are used by the caching system to create the cache key for cached pages. Therefore, if your site design requires you to use page-level variables in addition to the reserved variables, be sure to designate them as Cache Criteria variables, as shown in this step.
-
-
If you need to enable the Extra Parameters section in CKEditor, complete these steps:
-
Move the "Extra Parameters" that were added to the Cache Criteria of the Template to the "Legal Arguments" section of the Template.
-
When moving the parameters to the Legal Arguments section, it is no longer necessary to prefix the parameters with
fp:, just use the parameter name.For example, instead of using
fp:imageHeight, just useimageHeight. -
These parameters are then available in the included template, and can be retrieved in standard ways, such as using
<ics:getvar name="imageHeight"/>.
The Extra Parameters section provides a way of passing custom parameters, such as image dimensions, to the template. These extra parameters will be available in the Include asset link and Add asset link dialog boxes. The parameter names (
imageHeightandimageWidthin our example) will be displayed in CKEditor's Extra Parameters section, as options in the Name menu. The Value field enables the user to specify a value for the chosen parameter. For more information about extra parameters, see the Oracle Fusion Middleware WebCenter Sites User's Guide.When the Template asset is saved, the Cache Criteria variables are written to the
pagecriteriacolumn in theSiteCatalogtable. -
-
(Optional). The Access Control Lists field corresponds to the acl column in the
SiteCatalogtable. If you want to allow only certain visitors to request this page, select the ACLs that the visitors must have in order to see the page. For more information about ACLs, see Chapter 31, "User Management on the Delivery System." -
The Rootelement field is pre-populated with a value that is shown in Table 23-1.
-
The Cache Rules field corresponds to the cscacheinfo and sscacheinfo columns in the
SiteCatalogtable. Do one of the following:-
Select Cached if the pagelet to be rendered by this template's element must be cached. The pagelet is set to be cached forever. The cache will be flushed by CacheManager's active cache management logic. This option sets both WebCenter Sites and Satellite Server caching conditions.
-
Select Uncached if you wish to turn off caching for the pagelet to be rendered by this template's element. This option sets both WebCenter Sites and Satellite Server caching conditions.
-
Select Advanced if you wish to set caching rules individually for WebCenter Sites and Satellite Server. Selecting Advanced displays two additional fields: one for WebCenter Sites caching and one for Satellite Server caching.
Note:
CacheManager is designed to manage the lifecycle for cached pages on both WebCenter Sites and Satellite Server. It is designed to operate with pages that are set to be cached forever. If the cache expires on WebCenter Sites before it expires on Satellite Server, CacheManager will fail to flush the cache properly and invalid pages may be served from cache. Only advanced users should configure these settings manually.
For more information about page caching settings, see Chapter 5, "Page Design and Caching."
-
For more information about page caching settings, see Chapter 5, "Page Design and Caching."
-
SiteCatalog Pagename field. Do not change the value of this field. This field is pre-populated with the name of the page entry. The page naming convention is given in Table 23-1.
-
In the Pagelet parameters section, you can enter pagelet parameters (name-value pairs), which will be passed into the template each time it is executed. (The Pagelet parameters section supports a total of 510 characters.)
Note:
The Pagelet parameters section is pre-populated with the following default pagelet parameters (reserved variables that were named in step 2, including their values:
site, sitepfx, rendermode
The default parameter values will be overwritten if they are explicitly specified when the template is called.
-
If you are specifying a pagelet parameter in this step, make sure to list its name as a Cache Criteria variable (see step 2).
-
If you named your own Cache Criteria variables (in step 2), the variables are listed in the Page parameters section. If you do not specify values for these parameters, WebCenter Sites ignores the parameters.
When the Template asset is saved, the name-value pairs that are specified as Pagelet parameters are written to either the resargs1 or resargs2 column of the SiteCatalog table. The column to which they are written is not important and is managed automatically. (Each column supports up to 255 characters.)
-
-
Click Continue to open the next screen, Thumbnails.
-
Click Continue to open the next screen, Map.
Note:
You will return to the Thumbnail screen after you have completed creating the Template asset and saved the Template asset.
23.4.2.5 Step 5: Configure the Map
The purpose of mapping is to enable site replication and the sharing of Template assets, as explained in Section 23.4.1.3, "Template Sharing and Site Replication."
Note:
Skip this section if you are designing a non-replicable site.
Using the Map form, you will:
-
Map each key in the
render:lookuptags of the template's element logic to a value that will be used by the element logic. -
Map each key's value to the asset information that must be used in the element logic: asset, asset type, attribute name, or template name.
When the Template asset is saved, the map is written to the Template_Map table.
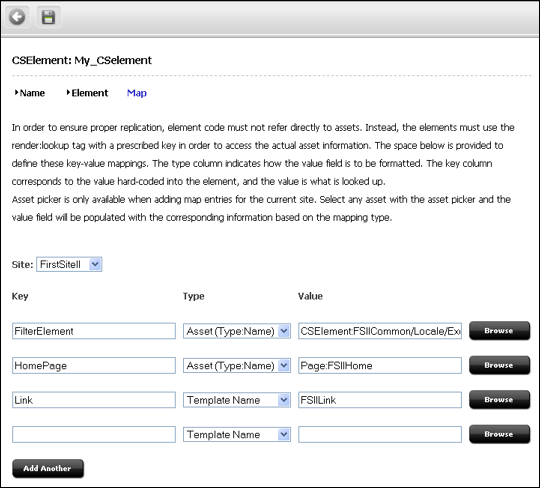
In the Map form, fill in the fields as explained in this section.
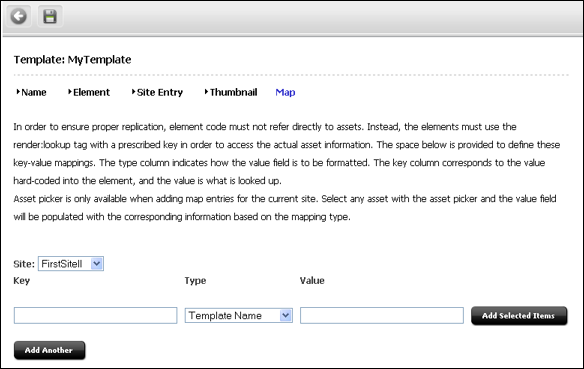
Description of the illustration e_template_map_small.png
-
The Key field represents a value that the element logic will look up. Enter the key that is named in a
render:lookuptag of the element logic. -
The Type field identifies the type of asset information to be accessed. Select one of the following options:
-
Template Name: Maps a template name to the key value (which you will specify in the Value field, in the next step). The information that will be accessed is a template name that matches the value that you will specify in the next step. For an example, see Figure 23-1.
-
Asset Type: Maps an asset type to the key value. The information that will be accessed is an asset type, equal to the value that you will specify in the next step.
-
Asset (Type:Name): Maps an attribute type:name to the key value. The information that will be accessed is an asset whose type and name match the value that you will specify in the next step.
-
Asset (Type:ID): Maps an attribute type:ID to the key value. The information that will be accessed is an asset whose type and name match the value that you will specify in the next step.
-
-
In the Value field, enter a value for the key. This value will be looked up by the element logic when the Template is executed.
-
In the siteid field, select the name of the site to which the mapping applies.
-
To add a key, click Add Another and repeat the steps in this section.
-
When you have completed creating your template, save the template (click Save Changes).
WebCenter Sites displays the template's Inspect form.
-
If you wish to create a thumbnail for your template, continue with Section 23.4.2.6, "Step 6: (Optional) Create a Thumbnail." Otherwise, skip to Section 23.4.2.7, "Step 7: Inspect the Template."
23.4.2.6 Step 6: (Optional) Create a Thumbnail
A thumbnail graphically assists template users in determining how your Template asset lays out pages or renders content. The thumbnail that you create will be displayed in the Template's Inspect form.
When the Template asset is saved, the name of the thumbnail file is written to the urlthumbnail column of the Template_Thumb table.
-
Preview your Template asset. For instructions, see Section 23.7.5.2, "CSElement and SiteEntry Assets and Preview."
-
Capture the preview as an image file and save it to a file system.
-
Open the Template form and click Thumbnail at the top of the screen.
-
In the Thumbnail Image field, enter (or browse for) the path to the image file that you created in step 2.
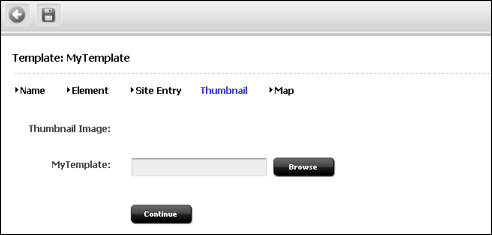
Description of the illustration n_temp_thumb_small.png
-
To display the thumbnail in the Inspect form:
-
Save the template (click the Save icon).
WebCenter Sites uploads the image file to the WebCenter Sites database and displays template's Inspect form.
-
In the Inspect form, scroll down to the Thumbnail Image section. If the displayed image is too large or too small, resize the image in its source file and repeat steps 4 and 5.
-
-
To operate in the image in the Thumbnail screen:
-
Scroll to the top of the Inspect form, and click the Edit link.
-
At the top of the Template form, click Thumbnail.
-
-
To copy, send, and perform other operations on the thumbnail, right-click on the thumbnail and select an option.
-
If you wish to delete the thumbnail, select Delete thumbnail image? and click Save Changes.
WebCenter Sites displays the template's Inspect form.
23.4.2.7 Step 7: Inspect the Template
When you have finished creating the Template asset and clicked Save, WebCenter Sites does the following:
-
Writes to the database tables:
-
Creates a template entry in the Template table.
-
Creates an element entry in the
ElementCatalogtable, using the
AssetTypeName/TemplateNamenaming convention. If the element was coded in the template form (rather than Sites Explorer), WebCenter Sites also creates the element file. -
Determines the name of the site that the template belongs to and creates a page entry in the
SiteCatalogtable using theSiteName/AssetTypeName/TemplateNamenaming convention. -
Sets the name of the root element of the new
SiteCatalogpage entry to the name of theElementCatalogentry. -
Creates a thumbnail entry in the
Template_Thumbtable. -
Creates a map entry in the
Template_Maptable.
-
-
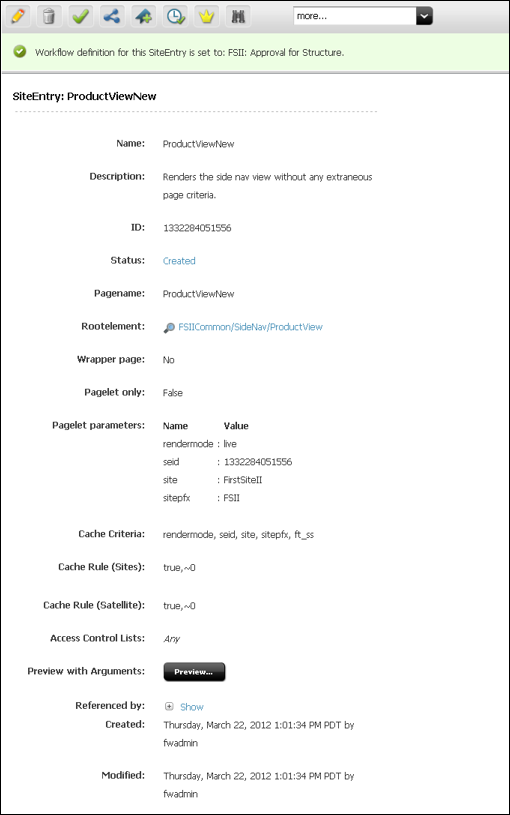
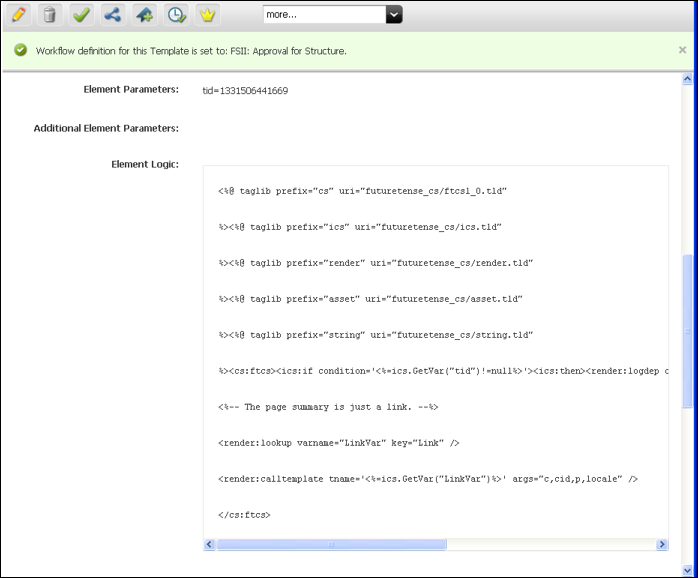
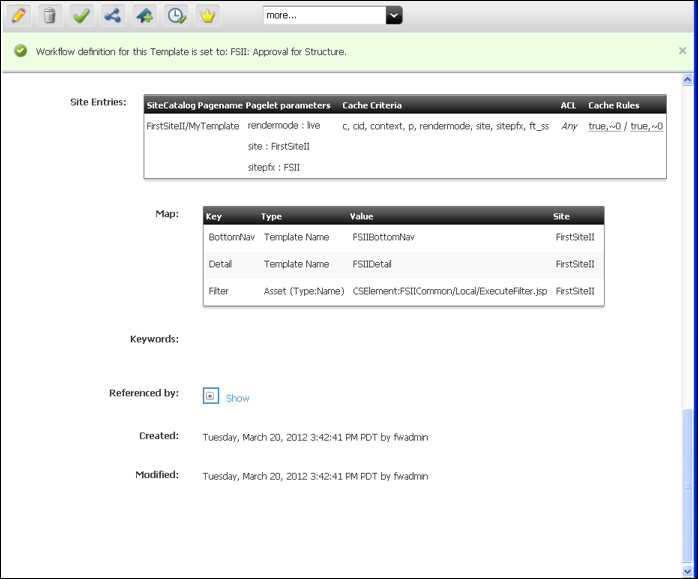
Displays the Inspect form (Figure 23-5), which provides the following kinds of information:
-
Information in the Name screen (standard summary information, such as asset name, description, status, source, and ID, for assets of all types).
-
Information in the Element screen (root element, element logic, path to the element file, and
tid). -
Information in the SiteEntry screen (SiteCatalog pagename, pagelet parameters, cache criteria, and the ACLs of users who are authorized to view the page).
-
Information in the Thumbnail screen (a thumbnail image, if one was chosen).
-
Information in the Map screen (a map of key-value-asset information, if the site was designed to be replicable, or the template is sharable).
-
If you have shared the Template asset, the Inspect form also lists all of the additional page entries in the
SiteCatalogfor this Template asset (there is a page entry for each site that the template is shared with).
-
Figure 23-2 Template Asset: Sample Inspect Form
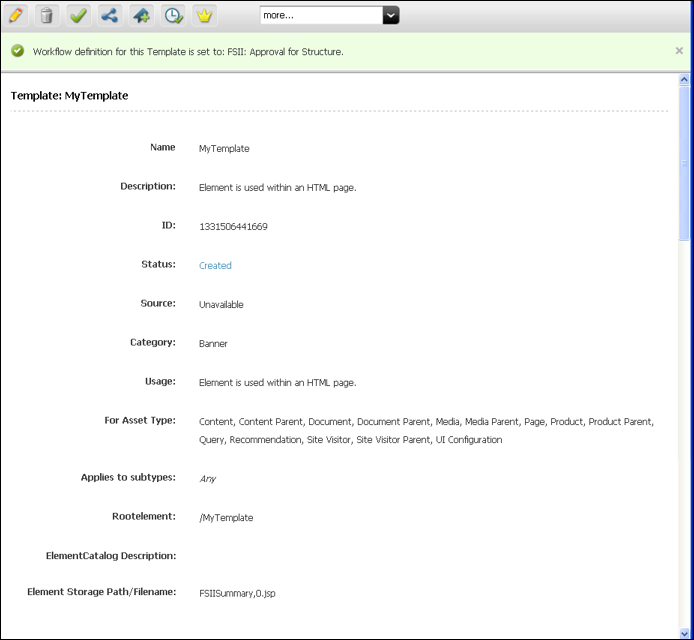
Description of "Figure 23-2 Template Asset: Sample Inspect Form"
Description of the illustration n_inspect02_small.png
Description of the illustration n_inspect03_small.png
23.5 Creating CSElement Assets
When you create a CSElement asset, you do three things: you create an asset, you code an element for the asset, and you configure a key-value-asset information map (similar to the map for a Template asset).
To create a CSElement asset, you must first complete Section 23.5.1, "Prerequisites" to determine how you will set CSElement properties that cannot (or must not) be changed once the CSElement is saved, and how you will code the CSElement's element logic. You will then complete the following steps, using the WebCenter Sites interface:
-
Step 3: Configure the Element (To specify its file type and logic.)
-
Step 4: Configure the Map (If you wish to support CSElement sharing and site replication.)
-
Step 6: Add the CSElement to Bookmarks (If you plan to use the CSElement as a root element for a Site Entry asset. See Section 23.6, "Creating SiteEntry Assets.")
Information that you enter into the CSElement form will be written to database tables when the CSElement asset is saved, as indicated in the procedures below.
Note:
Do not create CSElement assets directly in the database tables. Doing so will require you to write to several tables and can result in incorrect tracking of dependencies. Instead, use the CSElement form and the procedures in this section to create CSElement assets. For help with coding the CSElement logic, see Chapter 28, "Coding Elements for Templates and CSElements."
This section contains the following topics:
23.5.1 Prerequisites
Before you begin creating a CSElement asset, you must determine several things:
-
A name for your CSElement asset.
-
Whether your CSElement will be sharable and the site replicable. These considerations determine how you will code the CSElement's element logic.
-
Whether you plan to code the CSElement's element logic in Sites Explorer instead of the CSElement form. This approach is not recommended for the reasons outlined in Section 23.8, "Using Oracle WebCenter Sites Explorer to Create and Edit Element Logic."
23.5.1.1 Naming the CSElement
-
Once the CSElement asset is saved, its name cannot be changed.
-
The CSElement logic file takes the name of the CSElement (followed by the file extension:
CSElementName.xml_or_jsp_or_htmlThe name of the CSElement logic file must not be changed.
23.5.1.2 CSElement Sharing and Site Replication
Before creating a CSElement, decide whether the CSElement must be shared or the site you are working in must be replicable. If so, the CSElement logic will be coded in the same way. If sharing and replication are not required, you will skip key-value mapping (see Section 23.5.2.4, "Step 4: Configure the Map").
For information about coding element logic to support CSElement sharing and site replication, see Section 23.4.1.3, "Template Sharing and Site Replication." The information applies without exception to CSElement assets.
23.5.2 Procedures for Creating CSElement Assets
This section shows you how to create a CSElement asset, using the WebCenter Sites interface.
Note:
Before starting the procedures in this section, read Section 23.5.1, "Prerequisites" for information about creating CSElement assets.
23.5.2.1 Step 1: Open the 'CSElement' Form
-
Log in to WebCenter Sites as an administrator.
-
Select the site in which you want to work.
-
Select the Admin interface.
-
In the button bar, click New.
-
In the list of asset types, select New CSElement.
Note:
For the New CSElement option to be displayed, the CSElement asset type must be enabled for your site and a start menu item must be created for it.
-
The CSElement form displays. Continue with Section 23.5.2.2, "Step 2: Name and Describe the CSElement Asset."
Note:
If you see a Choose Assignees screen instead of the CSElement form, it means that the CSElement you will be creating is associated with a workflow. Select a name (or names) from the Users column and click Set Assignees. Continue with Section 23.5.2.2, "Step 2: Name and Describe the CSElement Asset."
23.5.2.2 Step 2: Name and Describe the CSElement Asset
The Name screen is used to define metadata about the CSElement. From this metadata, a developer will be able to identify what the CSElement does and the arguments it uses to perform its function.
Note:
At any time in the process of creating a CSElement, you can save the CSElement. WebCenter Sites will display the CSElement's Inspect form. To return to the CSElement form, click the Edit link.
To name and describe the CSElement
-
In the Name screen, fill in the fields as explained in this section.
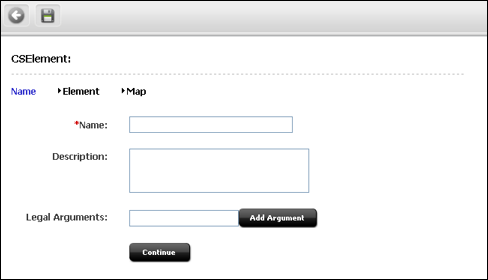
Description of the illustration l_cse_name_small.png
-
(Required). In the Name field, type a unique, descriptive name for the CSElement asset. It's best to use a name that describes what the CSElement does.
Valid entries:
-
Up to 64 alphanumeric characters (the first character must be a letter)
-
Underscores (_)
-
Hyphens (-)
-
Spaces (these will be converted to underscores when used in the SiteCatalog pagename for the template)
-
Note:
Make sure you have chosen a name for your CSElement asset using the guidelines in the section Section 23.6.1, "Prerequisites."
-
In the Description field, type a brief description of the CSElement asset. You can enter up to 128 characters.
-
In the Legal Arguments field:
-
Enter an argument that may be passed to the CSElement and click Add Argument.
-
In the fields that are displayed:
-
Specify whether the argument is optional or required.
-
Provide a description of the argument (to help you know the purpose of the argument you are creating).
-
Specify legal values (including descriptions) for the argument.
-
(You can specify as many arguments and legal values as you require by clicking the Add Arguments and Add Legal Value buttons.)
-
-
Click Continue to open the next screen, Element.
23.5.2.3 Step 3: Configure the Element
The Element screen (step 1) is used to create the CSElement's element, define the element file type (XML, JSP, or HTML), provide the element logic, and name the element. For example:
-
The Create Element field offers a choice of XML, JSP, or HTML file types for the element logic, and is used to seed the Element Logic field with standard stub code (which you need to include in any element that you create).
-
When you use the Create Element field to create, for example, a .jsp file, WebCenter Sites adds JSP taglib statements and the render.logdep tag to the Element Logic field by default so that the compositional dependency between this CSElement asset and pages that are rendered from this element is logged. For other file types, WebCenter Sites adds code specific to the file type. You will add your own code to the Element Logic field.
For information about dependencies, see Section 28.1, "About Dependencies." For help with coding the element logic, see Chapter 28, "Coding Elements for Templates and CSElements."
-
The Element Storage Path/Filename field names the file that holds the element logic and specifies the path to the file.
When the CSElement is saved, field values in the Element screen are written to a row (representing the element) in the ElementCatalog table, as indicated in the procedures below.
Note:
Selecting an Existing Element
In the steps that follow, we assume you are creating a new element for the CSElement asset. If, however, you are migrating assets from an earlier WebCenter Sites release and wish to reuse an existing element, you need to identify the element correctly so that WebCenter Sites can find it and associate it with the CSElement asset.
To select an existing element
-
(Optional). In the ElementCatalog Description field, type a description of the element.
-
In the Element Storage Path/Filename field, enter a value according to the convention in Section 23.5.1.1, "Naming the CSElement."
-
If your site design requires it, enter the appropriate arguments in the element parameter fields. For instructions, see step 1.
-
Save and re-open the CSElement asset.
WebCenter Sites checks for the presence of an element with the correct name:
If the element has been correctly named, WebCenter Sites recognizes the element and displays its code in the Element Logic field.
If the named element does not exist (or is incorrectly named), WebCenter Sites does nothing. When you inspect or edit the CSElement asset, WebCenter Sites displays a message stating that there is no root element in the form. As soon as you code the element and give it the correct name, WebCenter Sites detects it and associates it with the CSElement asset.
-
In the Element screen, fill in the fields as explained in this section.
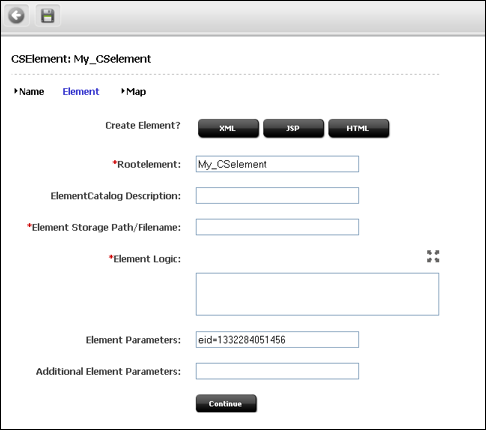
Description of the illustration l_cse_element_small.png
-
In the Create Element field, do one of the following:
-
To create an .xml file, click XML. The code that is pasted in comes from the
OpenMarket\Xcelerate\AssetType\CSElement\modelXML.xmlelement and can be modified to use custom default logic. -
To create a .jsp file, click JSP. The code that is pasted in comes from the
OpenMarket\Xcelerate\AssetType\CSElement\modelJSP.xmlelement and can be modified to use custom default logic. -
To create an .html file, click HTML. The code that is pasted in comes from the
OpenMarket\Xcelerate\AssetType\CSElement\modelHTML.xmlelement and can be modified to use custom default logic.
WebCenter Sites populates the following fields:
-
Element Storage Path/Filename field. Do not change the value of this field.
This field displays the element file name preceded by the path to the element file. By default, the file takes the name of the CSElement asset (entered in step 2) followed by the file extension:
CSElementName.xml_or_jsp_or_htmlWhen you save the CSElement asset, the value in this field is written to the url column of the ElementCatalog table, for the row that represents the element.
-
Element Logic field with a header and other information.
For example, if you clicked the JSP button, WebCenter Sites sets a tag library directive for some common WebCenter Sites JSP tag libraries (
asset, siteplan, render). WebCenter Sites also sets the beginning and endingcs:ftcstags, and aRENDER.LOGDEP (render:logdep)tag to mark a compositional dependency between the CSElement asset and any page or pagelet rendered by the element.
-
-
The Rootelement field is pre-populated with the name of the element file
(CSElementName.xml_or_jsp_or_html). Do not change the value of this field.The root element is listed by this name in the
ElementCatalogtable. When you create code that calls this element(RENDER.CALLELEMENT), this is the name you should use. It uses the name of the CSElement asset by default. -
(Optional). In the ElementCatalogDescription field, type a description of the element.
When you save the CSElement asset, information in this field is written to the
descriptioncolumn for the element entry in the ElementCatalog table. -
(Required). In the Element Logic field, code your element. Be sure to enter all of your code before the ending
cs:ftcstag.If you are using JSP, remove the comments from the taglib directives that describe the tag families you are using.
For help with this step, see Chapter 28, "Coding Elements for Templates and CSElements."
Note:
Ensuring Template Sharing or a Replicable Site
If you wish to share your CSElement or make the current site replicable, make sure that the CSElement's element logic does not directly refer to assets, asset types, attribute names, or template names. Instead, use therender:lookuptag and prescribed keys as explained in Section 23.4.1.3, "Template Sharing and Site Replication." In Section 23.5.2.4, "Step 4: Configure the Map," you will map the keys to the asset information that must be accessed for use in the element logic.Calling a Template
Templates should always be called by therender:calltemplatetag, and never therender:callelementtag orrender:satellitepagetag. -
(Optional). The Element Parameters field and Additional Element Parameters field are used to enter variables or arguments that can be passed to the element, if the site design requires them.
-
Element parameters field. WebCenter Sites populates this field with the CSElement ID (
eid), generated by WebCenter Sites as a unique identifier of the CSElement asset. Do not change or delete this value.This field corresponds to the resdetails1 column of the ElementCatalog table. When you save the CSElement, WebCenter Sites writes the CSElement ID to the
resdetails1column, in the row that represents the CSElement. -
Additional element parameters field. WebCenter Sites leaves this field blank.
This field corresponds to the
resdetails2column of theElementCatalog.
If your site design requires you to use variables in addition to eid, enter the variables into one of the fields above. Enter them as
name=valuepairs with multiple arguments separated by the ampersand (&) character. For example:MyArgument=value1&YourArgument=value2
Each field supports up to 255 characters.
For more information about WebCenter Sites variables, including scope and precedence, see Chapter 4, "Programming with Oracle WebCenter Sites."
-
-
Click Continue to open the next screen, Map.
23.5.2.4 Step 4: Configure the Map
The purpose of mapping is to enable site replication and sharing of CSElement assets. The concepts behind mapping are identical to those for Template assets. They are explained in Section 23.4.1.3, "Template Sharing and Site Replication."
Note:
Skip this section if you are designing a non-replicable site or a CSElement asset that will not be shared.
Using the Map screen, you will:
-
Map each key in the
render:lookuptag of the element logic to the value that must be used in the element logic. -
Map each key's value to the asset information that must be used in the element logic: asset, asset type, attribute name, or template name.
When the CSElement asset is saved, the map is written to the CSElement_Map table.
-
In the Map form, fill in the fields as explained in this section.
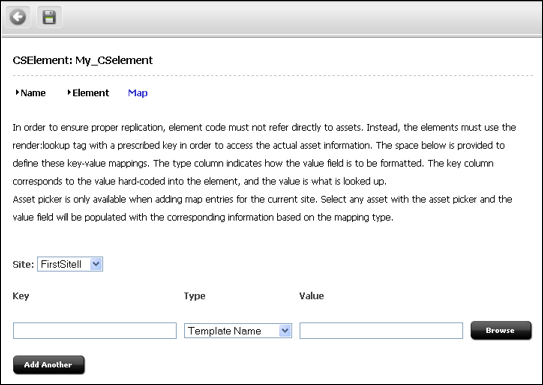
Description of the illustration l_cse_map_small.png
-
The Key field represents the value that the element logic will look up. In this field, enter the key that is named in a
render:lookuptag of the element logic. -
The Type field identifies the type of asset information to be accessed. Select one of the following options:
-
Template Name: Maps a template name to the key value (which you will specify in the Value field, in the next step). The information that will be accessed is a template name that matches the value you will specify in the next step. (For an example, see Figure 23-1.)
-
Asset Type: Maps an asset type to the key value. The information that will be accessed is an asset type, equal to the value that you will specify in the next step.
-
Asset (Type:Name): Maps an attribute type:name to the key value. The information that will be accessed is an asset whose type and name match the value that you will specify in the next step.
-
Asset (Type:ID): Maps an attribute type:ID to the key value. The information that will be accessed is an asset whose type and name match the value that you will specify in the next step.
-
-
In the Value field, enter a value for the key. This value will be looked up by the element logic when the CSElement asset is invoked.
-
In the siteid field, select the name of the site to which the mapping applies.
-
To add a key, click Add Another and repeat the steps in this section.
23.5.2.5 Step 5: Save and Inspect the CSElement
When you have finished creating the CSElement asset, click Save.
WebCenter Sites does the following:
-
Writes to the database tables:
-
Creates a row in the CSElement table for the CSElement asset, where it enters the CSElement name and description that you specified in the previous steps.
-
Creates an element entry in the ElementCatalog table using values specified in the Element screen:
-
The value of the Rootelement field is used to position the element file in the appropriate folder.
-
The value of the Element Storage Path/Filename field is written to the url column.
-
The value of the eid variable is set to the ID of the CSElement asset in the resdetails1 column.
-
-
-
Flushes the pagecache of any pagelets that call this element.
-
Displays the Inspect form (Figure 23-5), which provides the following kinds of information:
-
Information in the Name screen (standard summary information, such as asset name, description, status, and ID, for assets of all types).
-
Information in the Element screen (root element, element logic, path to the element file, and the element's eid).
-
Information in the Map screen (a map of key-value-asset information, if the site was designed to be replicable, or the template is sharable).
-
Preview with Arguments button, enabling you to preview the page(s) rendered by the SiteEntry asset.
-
23.5.2.6 Step 6: Add the CSElement to Bookmarks
Note:
Complete the steps in this section if you are planning to use your CSElement to create a SiteEntry asset. This step makes the CSElement available for selection in WebCenter Sites's tree by adding it to your Bookmarks.
If you are not planning to create the SiteEntry asset in this session, you might want to add the CSElement to your Bookmarks so that you can easily find it later.
To add the CSElement to Bookmarks
-
Run a search on the CSElement asset you created.
-
In the results list, select the check box in the right-hand column to add the CSElement to Bookmarks.
This CSElement is listed in WebCenter Sites's tree, in Bookmarks tab, where it is a selectable option for SiteEntry assets.
-
Create the SiteEntry asset. For instructions, see Section 23.6, "Creating SiteEntry Assets."
Figure 23-4 CSElement Asset: Sample Inspect Form
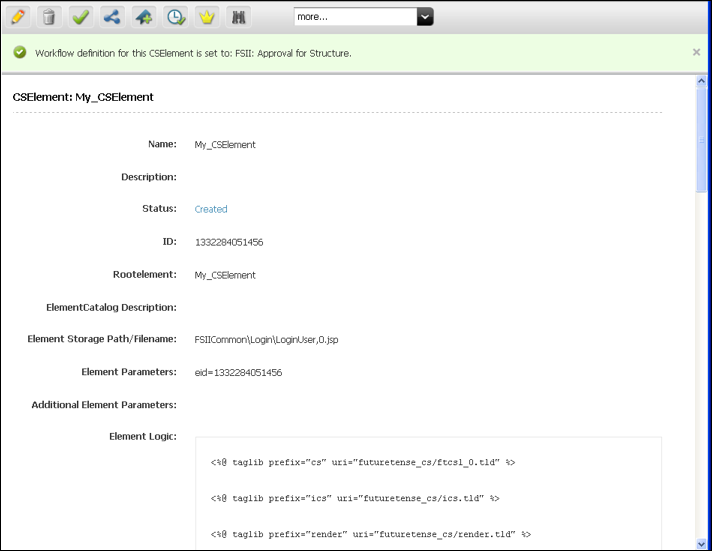
Description of "Figure 23-4 CSElement Asset: Sample Inspect Form "
23.6 Creating SiteEntry Assets
When you create a SiteEntry asset, you are creating both an asset and a page entry in the SiteCatalog table. The fields in the first part of the SiteEntry form define the page entry as an asset. The rest of the fields provide information about the page entry as a WebCenter Sites page, information that is written to the SiteCatalog table.
To create a SiteEntry asset, you must first complete Section 23.5.1, "Prerequisites" to create its root element and determine how you will set SiteEntry properties (such as SiteEntry name). You will then complete the following steps, using the WebCenter Sites interface:
Information that you enter into the SiteEntry form will be written to database tables when the CSElement asset is saved, as indicated in the procedures below.
Note:
Do not create SiteEntry assets directly in the database tables. Doing so will require you to write to several tables and can result in incorrect tracking of dependencies. Instead, use the SiteEntry form and the procedures in this section to create SiteEntry assets.
This section contains the following topics:
23.6.1 Prerequisites
Before you begin creating a SiteEntry asset, complete the following steps:
-
Create a root element for the page entry:
-
Create a CSElement asset. For instructions, see Section 23.5, "Creating CSElement Assets."
(A root element is required for any page entry. The root element is the element of the CSElement, which you will select for the SiteEntry asset.)
-
Make the CSElement available. For instructions, see Section 23.5.2.6, "Step 6: Add the CSElement to Bookmarks."
(To specify a CSElement for your SiteEntry asset, you will select the CSElement from the Bookmarks tab in WebCenter Sites's tree, or the History tab if you created the CSElement in the current session).
-
-
Determine a name for your SiteEntry asset. The same name will be assigned to the page. Neither the SiteEntry name nor the page name can be changed once the SiteEntry asset is saved.
23.6.2 Procedures for Creating SiteEntry Assets
This section shows you how to create a SiteEntry asset, using the WebCenter Sites interface.
Note:
Before starting the procedures in this section, read Section 23.6.1, "Prerequisites" for information about creating SiteEntry assets.
23.6.2.1 Step 1: Open the 'SiteEntry' Form
-
Log in to WebCenter Sites as an administrator.
-
Select the site in which you want to work.
-
Select the Admin interface.
-
In the button bar, click New.
-
In the list of asset types, select New SiteEntry.
Note:
For the New SiteEntry option to be displayed, the SiteEntry asset type must be enabled for your site and there must be a start menu item created for it.
-
The SiteEntry form displays. Continue with Section 23.5.2.2, "Step 2: Name and Describe the CSElement Asset."
Note:
If you see a Choose Assignees screen instead of the SiteEntry form, it means that the SiteEntry you will be creating is associated with a workflow. Select a name (or names) from the Users column and click Set Assignees. Continue with Section 23.5.2.2, "Step 2: Name and Describe the CSElement Asset."
23.6.2.2 Step 2: Create the SiteEntry Asset
-
In the SiteEntry form, fill in the fields as explained in this section.
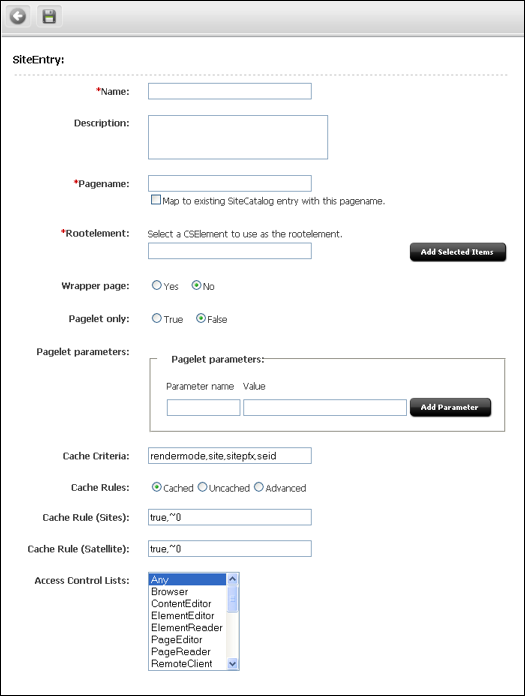
Description of the illustration e_siteentry_small.png
-
(Required). In the Name field, type a descriptive name for the SiteEntry asset. It's best to use a name that describes the purpose of the page.
Valid entries:
-
Up to 64 alphanumeric characters (the first character must be a letter)
-
Underscores (_)
-
Hyphens (-)
-
Spaces (these will be converted to underscores when used in the SiteCatalog pagename for the template).
-
-
In the Description field, type a brief description of the SiteEntry asset. You can enter up to 128 characters.
-
(Required). Click in the Pagename field to automatically populate it with the name of the page entry and the path to the page entry (for example:
FSIICommon/SideNav/ProductView). Do not change the value of this field.Note:
The value in this field is the name of the page entry (which will be stored in the
SiteCatalogtable when the SiteEntry is saved). When you create code that calls this SiteEntry asset(RENDER.SATELLITEPAGE), this is the name you should use. -
If you wish to use the row of a pre-existing page entry in the SiteCatalog table, select the Map to existing SiteCatalog entry check box.
-
(Required). In the Rootelement field, select the appropriate CSElement asset from the tree and click Add Selected Items.
Note:
Only one CSElement can be added.
-
In the Wrapper page field, select one of the options to specify whether the asset you are creating is a wrapper page. Selecting the NO option displays the Pagelet only field.
-
If the Pagelet only field is displayed, select one of the options to specify whether the asset you are creating is a pagelet.
-
In the Pagelet parameters section, you can enter pagelet parameters (name-value pairs), which will be passed into the page or pagelet each time it is executed. (The Pagelet parameters section supports a total of 510 characters).
Note:
The Pagelet parameters section is pre-populated with the following default parameters (reserved variables that are named by default in the Cache Criteria field (next step), including their values:
site, seid, sitepfx, rendermodeThe default values will be overwritten if they are explicitly specified when the page or pagelet is called.
-
If you are specifying a pagelet parameter in this step, make sure to list its name as a Cache Criteria variable in the next step.
When the SiteEntry asset is saved, the name-value pairs that are specified as Pagelet parameters are written to either the resargs1 or resargs2 column of the
SiteCatalogtable. The column to which they are written is not important and is managed automatically. (Each column supports up to 255 characters.) -
-
In the Cache Criteria field:
-
WebCenter Sites names the following reserved variables as Cache Criteria:
rendermode,seid,site,sitepfx,ft_ss
Note:
The reserved Cache Criteria variables should not be removed. For information about the reserved variables, see Chapter 4, "Programming with Oracle WebCenter Sites."
-
-
If you need to include your own variables as Cache Criteria (for example, foo), add them to the existing list. For example
foo,rendermode,seid,site,sitepfx,ft_ssNote:
The Cache Criteria field names the variables which, in conjunction with Pagename, define a pagelet as being unique. The variables are used to identify cached pages, which means that the variables are used in the page's cache key.
Only those variables that are specified as Cache Criteria are used by the caching system to create the cache key for cached pages. Therefore, if your site design requires you to use page-level variables in addition to the reserved variables, be sure to designate them as Cache Criteria variables, as shown in this step.
When the SiteEntry asset is saved, Cache Criteria variables and their values are written to the
pagecriteriacolumn in the SiteCatalog table. -
The Cache Rules field corresponds to the
cscacheinfoandsscacheinfocolumns in theSiteCatalogtable. Do one of the following:-
Select Cached if the pagelet to be rendered by this SiteEntry's CSElement must be cached. The pagelet is set to be cached forever. The cache will be flushed by CacheManager's active cache management logic. This option sets both WebCenter Sites and Satellite Server caching conditions.
-
Select Uncached if you wish to turn off caching for the pagelet to be rendered by this SiteEntry's CSElement. This option sets both WebCenter Sites and Satellite Server caching conditions.
-
Select Advanced if you wish to set caching rules individually for WebCenter Sites and Satellite Server. Selecting Advanced displays two additional fields: one for WebCenter Sites caching and one for Satellite Server caching.
Note:
CacheManager is designed to manage the lifecycle for cached pages on both WebCenter Sites and Satellite Server. It is designed to operate with pages that are set to be cached forever. If the cache expires on WebCenter Sites before it expires on Satellite Server, CacheManager will fail to flush the cache properly and invalid pages may be served from cache. Only advanced users should configure these settings manually.
For more information about page caching settings, see Chapter 5, "Page Design and Caching."
-
-
The Access Control Lists field corresponds to the
aclcolumn in theSiteCatalogtable. If you want to allow only certain visitors to request this page, enter the ACLs that visitors must have in order to see the page. For more information about ACLs, see Chapter 31, "User Management on the Delivery System."
23.6.2.3 Step 3. Save and Inspect the SiteEntry Asset
When you have finished creating the SiteEntry asset, click Save. WebCenter Sites does the following:
-
Writes to the database tables:
-
Creates a row in the
SiteCatalogtable for the SiteEntry asset, where it enters the values that you specified in the previous steps.
-
-
Displays the Inspect form, which provides the following information:
-
Standard summary information (asset name, description, status, ID) and the page entry criteria you specified in the previous steps.
-
Preview with Arguments button, enabling you to preview the page(s) rendered by the SiteEntry asset.
-
23.7 Managing Template, CSElement, and SiteEntry Assets
This section presents additional procedures for working with template, CSElement, and SiteEntry assets and contains the following topics:
-
Section 23.7.1, "Designating Default Approval Templates (Static Publishing Only)"
-
Section 23.7.2, "Editing Template, CSElement, and SiteEntry Assets"
-
Section 23.7.3, "Sharing Template, CSElement, and SiteEntry Assets"
-
Section 23.7.4, "Deleting Template, CSElement, and SiteEntry Assets"
-
Section 23.7.5, "Previewing Template, CSElement, and SiteEntry Assets"
23.7.1 Designating Default Approval Templates (Static Publishing Only)
When assets are approved for a publishing destination that uses the Export to Disk publishing method, the approval system examines the template assigned to the asset to determine its dependencies.
If you design your online site to render assets with more than one template (a text-only version and a summary version and a full version for the same type of asset, for example), you should create a template that contains a representative set of approval dependencies for all of the templates, and then specify that template as the Default Approval Template for the asset type.
For more information about approval templates, see Section 28.1.1.3, "Approval Templates for Export to Disk." For an example of a template that could be used as a default approval template, see the Burlington Financial template for article assets named Full.
To designate that a template is the default approval template
-
On the Admin tab, select Publishing, then Destinations and then Static.
-
Under the name of a static destination, select Set Default Templates.
-
In the Default Templates form, click Edit.
-
In the edit form, select a default template for each asset type. If you are using the Subtype feature for any of your asset types, you can designate a default approval template for each subtype of that asset type. For information about subtypes, see Section 15.2.10, "Step 8: (Optional) Configure Subtypes."
-
When you have finished, click Save.
23.7.2 Editing Template, CSElement, and SiteEntry Assets
Creating a template, CSElement, and SiteEntry assets also creates entries in the SiteCatalog and/or ElementCatalog tables. The names of those entries are based on the asset's name, and for Template assets, the asset type, and the site the template belongs to. Because these naming dependencies exist, the following restrictions apply when you edit templates, CSElements, or SiteEntry assets:
-
You cannot rename a template, CSElement, or SiteEntry asset after it has been saved.
-
For templates, you cannot change the asset type selected in the Asset Type field after the Template asset has been saved.
-
For templates and CSElements, you cannot change the name of the root element.
-
For SiteEntries, you cannot change the name of the page entry.
Caution:
If you have manually created (using Sites Explorer) one or more site entries that point to a template, and then edit the template through the Admin interface, the manually created site entries are automatically deleted.
For the basic procedure on editing assets, see the Oracle Fusion Middleware WebCenter Sites Administrator's Guide.
23.7.3 Sharing Template, CSElement, and SiteEntry Assets
When you share a CSElement, template, or SiteEntry asset, WebCenter Sites creates a row in the AssetPublication table for each site that you share the asset with.
Additionally, for Template assets only, WebCenter Sites does the following:
-
Creates a new SiteCatalog page entry for each site that you share the asset with. It uses the name of the site in the name of the page entry. All of the new page entries point to the same root element, the template element.
Note:
Do not change the root elements of these page entries. All page entries for a shared template must point to the same root element.
-
Lists all the other page entries for the shared template that share this root element in the Inspect form.
For the basic procedure on sharing assets, see the Oracle Fusion Middleware WebCenter Sites Administrator's Guide.
Note:
For templates and CSElements to be sharable, their element logic must not be hard-coded with asset type names, attribute names, template names, or IDs. Instead, use the render:lookup tag and hard-code the keys for which you have created a map that the render:lookup tag can refer to in order to look up asset information for use in the element logic.
23.7.4 Deleting Template, CSElement, and SiteEntry Assets
WebCenter Sites does not allow you to delete an asset if there is another asset using it. However, it does not check to see whether a template or CSElement is referenced by the code in other template or CSElement elements.
Before you delete a template or SiteEntry asset, be sure to remove any page calls to that asset's page entry from your elements. Before you delete a CSElement asset, be sure to remove any element calls to that asset's root element from your other elements.
When you delete an asset, WebCenter Sites does the following:
-
Changes the value of the asset's name column in the Template, CSElement, or SiteEntry table (depending on the asset type) to its object ID.
-
Changes the value of the asset's
statuscolumn in the Template table to VO, for void. -
For templates, deletes all the SiteCatalog table entries (if the template is shared, there are as many page entries as there are sites that the template is shared with) and the ElementCatalog table entry for the template.
-
For CSElements, deletes the
ElementCatalogtable entry for the asset.
For the basic procedure on deleting assets, see the Oracle Fusion Middleware WebCenter Sites Administrator's Guide.
23.7.5 Previewing Template, CSElement, and SiteEntry Assets
Because template, CSElement, and SiteEntry assets provide logic and code for formatting other assets, you preview assets of these types differently from the way you preview your content assets.
23.7.5.1 Templates and Preview
You preview a template by previewing an asset and selecting the template that you want to use to render the asset. WebCenter Sites invokes the code in the template and renders a page with the asset as the content.
23.7.5.2 CSElement and SiteEntry Assets and Preview
You preview CSElement and SiteEntry assets directly. If the element that will be called has self-contained context, a banner that does not expect variables or arguments. For example, you can simply click the Preview icon. But when the results of the rendered element depend on values that are passed to it, you must manually set those values in the CSElement or SiteEntry form in order to preview that asset.
For example, the Burlington Financial CSElement asset named BurlingtonFinancial/Query/ShowHotTopics expects a value for the p variable. If it doesn't receive one, the value of p defaults to the object ID of the Home page asset. If you want to preview this CSElement for a page asset other than the Home page, you must pass in the ID of that page asset as the value of the p variable with the argument fields in the New or Edit form for that CSElement asset.
To specify argument values for previewing CSElement or SiteEntry assets
-
Find the asset and inspect it (click the icon with the letter i).
-
Scroll to the bottom of the Inspect form. Next to Preview with Arguments, click Preview. The following form appears for a CSElement asset:
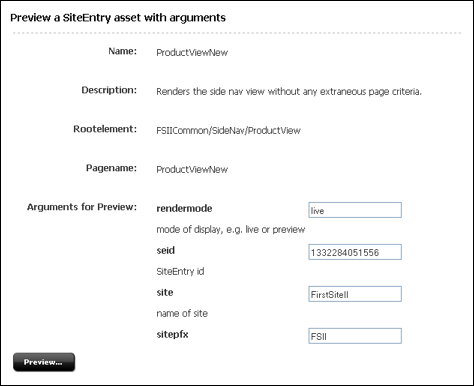
Description of the illustration l_preview_small.png
-
Enter values for the arguments. You can also select values by double-clicking in the fields and selecting from the drop-down list.
-
Click Preview.
-
Click the links that are displayed to preview the pages that are rendered by this SiteEntry asset.
23.8 Using Oracle WebCenter Sites Explorer to Create and Edit Element Logic
Note:
It is not recommended that you create or edit element logic directly from Sites Explorer. However, should you prefer to do so, you will need to ensure the validity of your Template and CSElement assets. Take note of the information in this section and follow the instructions that are included.
When a Template (CSElement) asset is created and saved in the WebCenter Sites interface (Template or CSElement form), several important steps are taken that are not taken when you use Sites Explorer:
-
The interface seeds your element with stub code that sets compositional dependencies and, if you are using JSP, drops in the appropriate tag library directives for you. Compositional dependencies are described in the section Section 28.1, "About Dependencies."
-
When you save the Template (CSElement) in the WebCenter Sites interface:
-
The approval system receives information that the asset was changed and can therefore change its approval status.
-
Most importantly, the CacheManager servlet can update the cache (that is, flush pages and pagelets from the WebCenter Sites and Satellite Server caches).
-
If you choose to work with the CSElement asset in Sites Explorer, be sure that you do not alter the value of the eid variable or accidentally delete it.
A practical reason for using the WebCenter Sites interface is to avoid switching between WebCenter Sites and Sites Explorer, especially if you are mapping asset information (to support template sharing and site replication). Mapping is supported only in the WebCenter Sites interface (in the Map screen of the Template form and in the Map screen of the CSElement form).
This section contains the following topics:
23.8.1 Creating Templates and CSElements
If you prefer to use Sites Explorer to code your element logic, follow the steps below:
-
Start creating your Template (or CSElement) asset using the Template form (or CSElement form). Start with Section 23.4.2.1, "Step 1: Open the 'Template' Form" (or Section 23.5.2.1, "Step 1: Open the 'CSElement' Form") and continue sequentially.
-
In Section 23.4.2.3, "Step 3: Configure the Template's Element" (or Section 23.5.2.3, "Step 3: Configure the Element"), select your element type (JSP, XML, or HTML). Do not change the element logic that is auto-generated for you. Also, be sure that you do not alter the value of the tid variable or accidentally delete it.
-
Continue through the form you have chosen until you finish. If you know which keys and asset values you must map, add them to the Map form (in Section 23.4.2.5, "Step 5: Configure the Map"). The same step applies to the CSElement asset).
-
Save the asset.
-
Open Sites Explorer and edit your element. Save your changes.
-
The final step is to re-save your asset in the Template form (or CSElement form). You do not have to change any data in the form, but you must re-save it. This will ensure that no functionality is bypassed.
23.8.2 Editing Templates and CSElements
Any time that you edit an element's logic in the Sites Explorer tool, open and save the template (or CSElement) in the WebCenter Sites interface so that (1) the approval system knows the asset was changed and can change its approval status, and (2) the CacheManager servlet can update the cache.
