9 Managing Access to Content Management Site Components
This chapter shows you how to manage access to site components. It is assumed that users have already been given the permission to access the site containing those components.
This chapter contains the following sections:
-
Section 9.2, "Managing Access to Asset Types via Start Menus"
-
Section 9.5, "Managing Access to the Tree (Administrator's interface only)"
Note:
The following features are deprecated in WebCenter Sites 11g Release 1 (11.1.1.8.0): Sites Desktop, Sites DocLink.9.1 Overview
Once users are granted permission to access a site (as shown in Chapter 8, "Assembling Content Management Sites") their ability to work with the site's content is managed through:
-
Start menus, which determine whether the users can create, search for, and edit assets of certain types on the site to which the users are assigned.
-
Permissions to assets (that are not part of a workflow process). For such assets, you can create policies that define which roles have permissions to perform which functions on assets.
-
Permissions to WebCenter Sites' tree. You can control users' permissions to the tree, tabs in the tree, nodes in the tabs, and items in the nodes.
Roles are the components that you invoke in order to associate users with interface functions and the content that the users must manage.
9.2 Managing Access to Asset Types via Start Menus
A start menu is a list of hyperlinked asset types, as Figure 9-1, "New" shows:
Figure 9-1 New and Search Start Menus in the Admin Interface
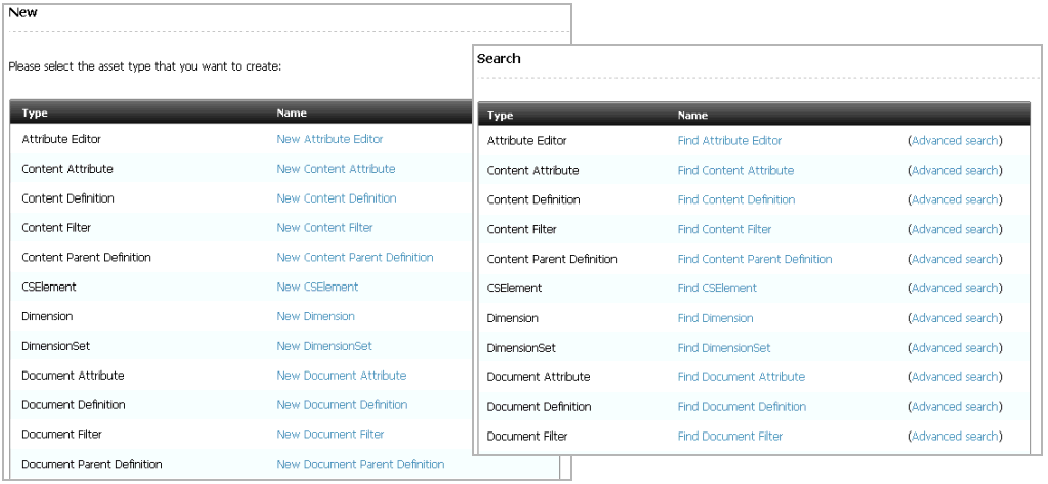
Description of ''Figure 9-1 New and Search Start Menus in the Admin Interface''
Clicking an asset type name opens a form for either creating an asset of the selected type, or searching for assets of the selected type. For example, clicking an asset type in a New start menu opens a form for creating an asset of the selected type. Clicking an asset type in the Search start menu opens a form that is used to search for and edit assets of the selected type.
The start menus shown in Figure 9-1, "New" are accessible from the Admin Interface by the user clicking the New and Search buttons, at the top left of the interface. You, as the administrator, grant a user permission to a start menu item by assigning the same role to the user and the start menu item.
This section contains the following topics:
9.2.1 Start Menu Items
A start menu item is an option in a start menu. A start menu item names the type of asset a user can create, copy, or search for. For example, the New start menu shown below belongs to the Admin Interface and displays 16 start menus items to the user who is authorized to work with the items. The user can create assets of the types that are listed in the menu.
Figure 9-2 New Form, Showing Start Menu Items
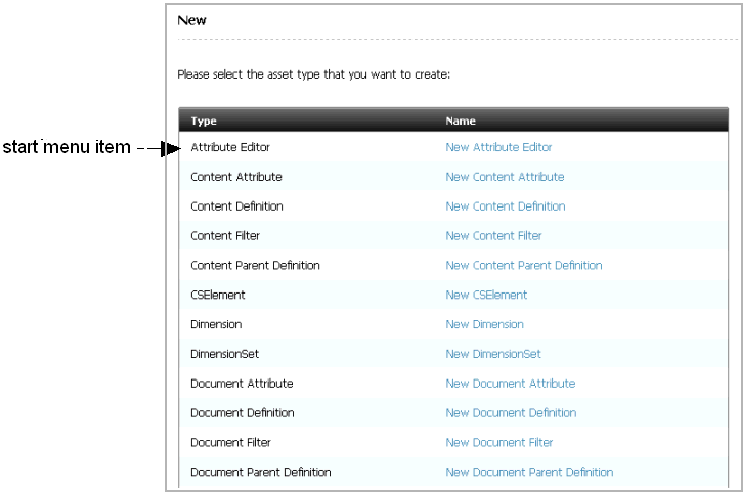
Description of ''Figure 9-2 New Form, Showing Start Menu Items''
In the Admin Interface, start menu items are displayed in a list when users click New or Search in the button bar.
You configure the start menu items to determine the following about the new assets that are created with them:
-
Which roles on which sites have access to the start menu item. Specifying roles controls which content providers can create or search for assets of this type on the specified sites.
-
Field/value pairs. You can supply values for certain fields so that those fields are automatically filled in whenever a content provider creates a new asset with the shortcut.
For example, for basic assets, it might be useful to have the start menu item set a pre-determined value for the Dimension, Description, End Date, Start Date, Subtype, Template or User fields (or some combination). If your basic assets have associations that can be different based on the subtype of the asset, be sure to create start menu items that set a subtype for new assets so that the only the appropriate associations appear in the New form.
For flex assets, it is useful to have start menu items that set the flex definition for new flex assets so the content providers have fewer steps.
-
Which workflow process to assign by default to new assets created with the start menu item and the users who participate in that workflow process.
Start menu items also determine whether certain operations can be performed on an asset type that is listed in a tree tab (in the Admin interface). If an asset type is displayed on a tree tab, but there is no start menu item created for it, the only options listed in the right-mouse menu for the asset type are Refresh, Edit, and Inspect. To have the New option included in the right-mouse menu, a New start menu item must be created for the asset type.
Start Menu Items for Different Kinds of Users
If you have different groups of content providers who create different types of content, you could create start menu items for each type.
For example, suppose that you have a group of writers who create business articles. You could create a start menu item that creates a new article, sets the Category to Business, sets the template to the correct template for articles on the business page, and places it in a workflow for business articles. Additionally, if you create a role for business writers, you can configure the start menu item so that only users with the business writer role can use this start menu item.
Start menu Items for Flex Assets
For flex assets, you can set the definition of a flex asset with the start menu item.
For example, suppose that your public site were a catalog of household goods and that your flex assets were products. You could create a start menu item named "Toaster" that sets the product definition to "toaster" for new toaster products, a start menu item named "glassware" that sets the appropriate product definition for new glassware products, and so on. A start menu item that sets the flex definition in this way eliminates a step for your content providers, thereby reducing the chance that they will select the wrong flex definition by mistake.
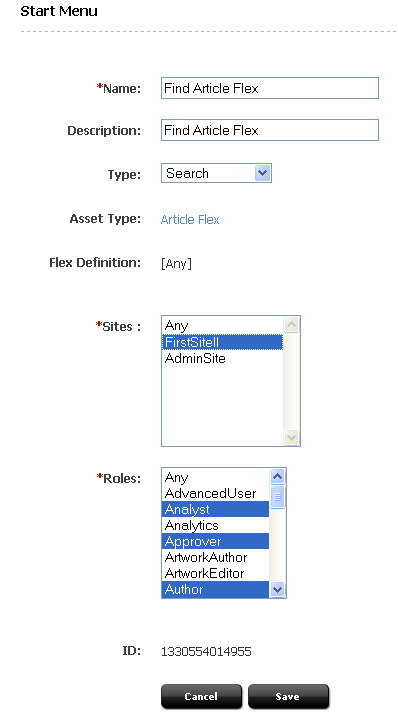
9.2.2 Creating Start Menu Items
Managing user's access to asset types on a site entails creating start menu items for the asset types. Start menu items determine which users can create and search for assets of specific types on a specific site. WebCenter Sites supports four kinds of start menu items:
-
New – creates a link for the asset type on the list that is displayed when you click New in the button bar. If you do not create New items for the asset types that are enabled for a site, no one can create assets of those types. For information about creating New start menu items, see Section 9.2.2.1, "Creating New Start Menu Items."
-
Search – creates a link for the asset type on the list that is displayed when you click Search in the button bar. If you do not create Search items for the assets that are enabled for a site, no one can search for and edit assets of those types in any of the WebCenter Sites interfaces. For information about creating Search start menu items, see Section 9.2.2.2, "Creating Search Start Menu Items."
-
Sites Desktop – makes the asset type available to content providers who use the Sites Desktop interface instead of one of the browser-based interfaces. For information about creating Sites Desktop start menu items, see Section 23.2.2, "Configuring the Word Asset Types for Sites Desktop."
-
Sites DocLink – makes the asset type available to content providers who use the Sites DocLink interface instead of one of the browser-based interfaces. For information about creating Sites DocLink start menu items, see Section 23.3.2, "Configuring the Sites DocLink Asset Types."
This section contains the following topics:
-
Section 9.2.2.4, "Creating Start Menu Items for Sites Desktop"
-
Section 9.2.2.5, "Creating Start Menu Items for Sites DocLink"
-
Section 9.2.2.6, "Displaying a List of All Start Menu Items"
9.2.2.1 Creating New Start Menu Items
Before you begin creating start menu items, note the following:
-
Create start menu items for only the asset types that are enabled for that site. If the assets are not enabled, go back to Chapter 8, "Assembling Content Management Sites," and complete the steps in Section 8.3.1, "Enabling Asset Types for a Site."
-
If you want to specify a default workflow process, create the workflow process first. For information about workflow, see Chapter 10, "Creating and Managing Workflow Processes".
-
Talk with your developers to ascertain which fields are used by queries, collections, or other design elements for the online site. That way, you can specify useful default values for those fields.
Note:
Content Query assets are not supported within the Admin UI. -
Talk with your developers about specific dates when the site will change so that you can create start menu items with appropriate default start and end dates for Site Preview. Also note that for published assets, the end date determines when the assets automatically expire from the web site. Speak with developers about their needs when formulating end date defaults.
-
Talk with your developers to find out which templates are appropriate for the various subtypes of asset types that you are creating start menu items for.
-
You cannot set values for the following kinds of fields:
-
An upload field or any field that writes data to a URL column.
-
Fields that accept more than one value.
-
Association fields.
-
Flex attribute fields for flex and flex parent assets.
To illustrate, the following asset types cannot have set values in the Start Menu:
-
Visitor Attribute
-
CS Element
-
Dimension
-
Dimension Set
-
Flex Attribute
-
Flex Child Definition
-
Flex Filter
-
Flex Parent Definition
-
History Attribute
-
History Definition
-
Page Attribute
-
Page Definition
-
Page Filter
-
SiteEntry
-
Template
-
Attribute Editor
-
To create a New start menu item
-
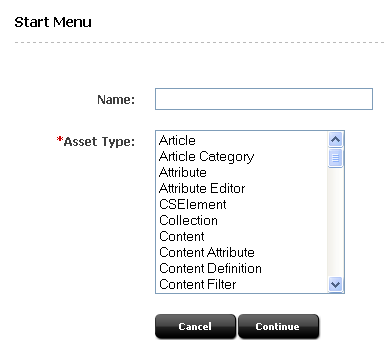
In the Admin tab, expand Start Menu, then double-click Add New.
-
In the Start Menu form, do the following:
-
In the Name field, enter the name of the item, using up to 64 characters. Although it is not required, it is a good idea to start the name with the word "New" (for example, "New Article" or "New Template"). This is to help the user later realize that the start menu item is for a new asset.
The name used in the New field will be displayed on the New and Search forms if the Description field (described in step 4) is left blank.
-
In the Asset Type field, select the type of asset for which you are creating the Start Menu item.
-
Click Continue.
-
-
If you have chosen a flex asset type, the Flex Definition field will appear. If you did not select a flex asset type, skip to step 4.
-
In the Flex Definition field, select the asset subtype.
-
If the form does not automatically reload, click Continue.
-
-
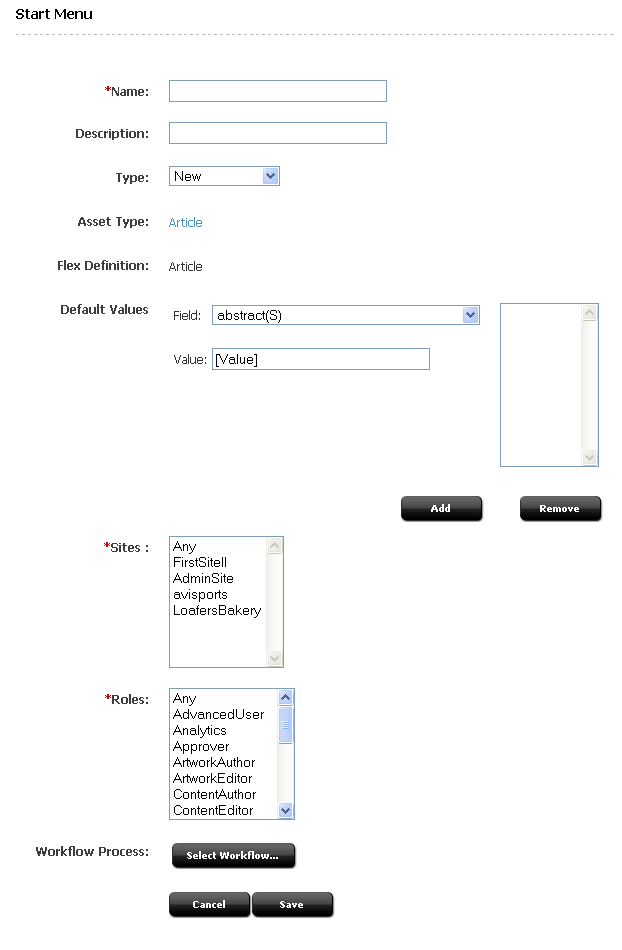
In the next Start Menu form, fill in the fields as explained below:
-
In the Description field, enter a short description, using up to 255 characters. The name entered in the Description field will be displayed on the New and Search forms.
-
In the Type field, select New.
-
Note that the Asset Type field is an information-only field that displays your choice of asset type from the previous form.
-
(Optional) In the Default Values section, complete the following steps if you want field values to be set automatically when a content provider creates an asset with this start menu item.
-
Select a field from the Field drop-down list. This list displays all the fields for assets of this type; for example, category, source, and template.
-
In the Value field, enter or select a value.
Note:
All values are case-sensitive.WebCenter Sites does not validate the value against the field that you are setting it for. Therefore, you must be sure that you have entered an appropriate value.
-
Click the Add arrow to add the value to the field.
-
Repeat the previous three steps, as necessary.
Note:
When you set a field value through a start menu item, the field does not become a read-only field. That is, no matter what value you set in the Start Menu form, that value can be overridden by the content provider who creates an asset through the start menu item. The values that you specify are for convenience only.
-
-
In the Sites field, select which sites can use this start menu item. Use Ctrl-Click to select more than one site.
-
In the Roles field, select the roles that can have access to the start menu item. Use Ctrl-Click to select more than one role.
Note:
If you are assigning a default workflow with this start menu item, the roles that you select in this step must match the roles that are (or will be) authorized for the start step in the workflow process. -
(Optional) To configure workflow process details for assets created with this start menu item, complete the following steps:
-
Click Select Workflow.
-
In the Select Workflow form, select the appropriate workflow process from the drop-down list and then click Select Workflow.
-
In the Set Participants form, select at least one user for each role that appears, and click Set Participants.
-
Click Continue.
The system saves the workflow information and re-displays the Start Menu form.
-
-
-
Click Save.
9.2.2.2 Creating Search Start Menu Items
To create a Search start menu item
-
In the Admin tab, expand Start Menu, then double-click Add New.
-
In the Start Menu form, do the following:
-
In the Name field, enter the name of the item, using up to 64 characters. Although it is not required, it is a good idea to start the name with the word "Find" (for example, "Find Article" or "Find Template"). This is the name that is displayed on the Search list.
-
In the Asset Type field, select the type of asset for which you are creating the Start Menu item.
-
Click Continue.
-
-
If you have chosen a flex asset type, the Flex Definition field will appear. If you did not select a flex asset type, skip to step 4.
-
In the Flex Definition field, select the asset subtype.
-
If the form does not automatically reload, click Continue.
-
-
In the next Start Menu form, fill in the fields as explained below:
-
In the Description field, enter a short description, using up to 255 characters.
-
In the Type field, select Search.
-
Note that the Asset Type field is an information-only field that displays your choice of asset type.
-
(Optional) In the Default Values section, complete the following steps if you want field values to be set automatically when a content provider creates an asset with this start menu item.
-
Select a field from the Field drop-down list. This list displays all the fields for assets of this type; for example, category, source, and template.
-
In the Value field, enter or select a value.
Note:
- All values are case-sensitive.
WebCenter Sites does not validate the value against the field that you are setting it for. Therefore, you must be sure that you have entered an appropriate value.
-
Click the Add arrow to add the value to the field.
-
Repeat the previous three steps, as necessary.
Note:
When you set a field value through a start menu item, the field does not become a read-only field. That is, no matter what value you set in the Start Menu form, that value can be overridden by the content provider who creates an asset through the start menu item. The values that you specify are for convenience only.
-
-
In the Sites field, select which sites can use this start menu item. Use Ctrl-Click to select more than one site.
-
In the Roles field, select the roles that can have access to the start menu item. Use Ctrl-Click to select more than one role.
Note:
If you are assigning a default workflow with this start menu item, the roles that you select in this step must match the roles that are (or will be) authorized for the start step in the workflow process. -
(Optional) To configure workflow process details for assets created with this start menu item, complete the following steps:
-
Click Select Workflow.
-
In the Select Workflow form, select the appropriate workflow process from the drop-down list and then click Select Workflow.
-
In the Set Participants form, select at least one user for each role that appears, and click Set Participants.
-
Click Continue.
The system saves the workflow information and re-displays the Start Menu form.
-
-
Click Save.
9.2.2.3 Editing Start Menu Items
-
In the Admin tab, expand Start Menu, then expand the node the desired Start Menu item is located under. Double-click the desired Start Menu item.
The Start Menu Item form appears.
-
Click Edit.
The Start Menu form with the stored information for the item displays.
-
Make the changes to the item.
-
Click Save.
9.2.2.4 Creating Start Menu Items for Sites Desktop
For information about creating Sites Desktop start menu items, see Section 23.2.2, "Configuring the Word Asset Types for Sites Desktop".
9.2.2.5 Creating Start Menu Items for Sites DocLink
For information about creating Sites DocLink start menu items, see Section 23.3.2, "Configuring the Sites DocLink Asset Types".
9.2.2.6 Displaying a List of All Start Menu Items
In addition to the individual start menu nodes that appear for each of the asset types that exist on your WebCenter Sites system, there is a top-level Start Menu node in the Admin tab. Use this node when you want to see a list of all the start menu items in the system.
Additionally, there is a link to the list of all the start menu items from the Inspect form for any individual start menu item.
9.3 Setting Access Permissions to Assets
WebCenter Sites provides a system by which you can set access permissions to assets that are not part of a workflow process. For such assets, you can create policies and, within them, define which roles have permissions to perform which functions on assets. For example, a policy for the Copy function might specify which roles are allowed to copy an asset. A different policy for the Copy function might specify which roles are denied the ability to copy an asset. For flex assets, inheritable policies can be set on parents, meaning that the policies will be inherited by the children.
Functions that can be performed on assets, by default, are the following: checkout, copy, edit, delete, rollback, share, approve, and build. (For definitions of the functions, see Section 10.2.6, "Determine the Function Privileges").
All of the above-listed functions are defined in the futuretense_xcel.ini file, as values of the property xcelerate.authorizefunction (located in the Authorization tab, if you are using the Property Editor). You can specify additional functions (which are listed in the Authorization tab).
Access permissions serve a three-fold purpose:
-
Extend the workflow function privileges system, making it possible to set permissions for assets when they are not in workflow
-
Introduce new functions (authorize, inspect, and preview) for viewing the contents of assets that are not in workflow
-
Introduce a hierarchical permission inheritance model for assets that are not in workflow
Note:
The access permissions feature does not apply to other entities, such as pagelets.
This section contains the following topics:
9.3.1 Permission Structure
Permission structure determines which functions (for example, edit and view) a role can perform. A user's permissions are managed by assigning him the roles that can perform the functions. WebCenter Sites implements a three-level permission structure: Grant, Deny, and Inherited. Grant and Deny denote the explicit permissions, that is, they grant or deny the permission to perform a function. Inherited means that permissions are neither granted nor denied. Instead, the permissions are inherited from the parent asset's policy, if one exists. If the parent's policy does not exist, then the asset's permissions are inherited from the policy of the parent's parent, and so on.
If permissions are ambiguous, the following considerations may help resolve the ambiguity:
-
A permission is granted if at least one of the user's roles grants the permission.
-
Grant overrides Deny. If one role grants a permission, but another role denies the same permission, the permission is granted.
-
A permission is denied if at least one of the user's roles denies the permission, and none of the user's roles grant the permission.
The above scenarios are summarized in the following table:
-
Assets can inherit permissions from parent assets.
For example, if a parent asset named "Money Market Funds" grants the delete permission to a role named
Editor, and user Bob has that role, then Bob can delete the "Money Market Funds" asset and all of its child assets. -
Asset permissions can override the parent assets' permissions.
A "Prime Money Market semi-annual report" asset denies the delete permission to a certain role. That same role is granted the delete permission in the "Prime Money Market" parent asset. This means that Bob cannot delete the report, even though the parent asset grants the delete permission.
-
If there are no applicable permissions found on a particular asset, then the administrator needs to examine the
futuretense_xcel.inifile for this permission. In thefuturetense_xcel.inifile, permissions for a particular function are set for all assets, rather than for a single asset.For more information about setting permissions in the
futuretense_xcel.ini, see "To set access permissions from futuretense_xcel.ini". -
Asset permissions overrides
futuretense_xcel.inisettings.For example, if there is a permission
xcelerate.copy.grantin thefuturetense_xcel.inifile and the permission to delete asset A is revoked, then the permission to delete asset A is denied.
9.3.2 Types of Authorization
Three types of authorization can be defined on a particular function and a particular asset: workflow function privileges, access permissions, and authorization properties in futuretense_xcel.ini, all independent of each other. (For information about workflow function privileges, see Chapter 10, "Creating and Managing Workflow Processes."
When a user attempts to perform a function on an asset, the system performs a series of authorization checks in the following order, for that function:
For assets in workflow:
The system checks the workflow function privileges for the function in the workflow process in which the asset is entered.
-
If no function privilege is defined for the function, the system checks the access permission policy for that function, as defined in the asset's access permissions interface.
-
If no access permission is set for the function (including inheritance of the parent's policy), then the system checks the authorization properties in
futuretense_xcel.ini. -
If none of the above types of authorization are defined, permission to perform the function on the asset is granted, by default.
Note:
The above types of authorization are checked in the order shown. If two or more types of authorization are defined, the authorization that is found first overrides all other types of authorization. For example, for a specific function such as Edit, if both workflow function privileges and access permissions are defined on an asset, then function privileges on Edit override access permissions on Edit.For assets that are not in workflow:
-
The system checks the access permissions policy for the function, as defined in the asset's access permissions interface.
-
If no access permission is set for the function (including inheritance of the parent's policy), then the system checks the authorization properties in
futuretense_xcel.ini. -
If none of the above levels of authorization are defined, permission to perform the function on the asset is granted, by default.
-
9.3.3 Summary
The different types of authorization described above are independent of each other, which means that only one type of authorization can apply to an asset at any given time for any given function. The following guidelines can help you decide which type of authorization to use:
-
If a function does not require authorization, do not use any of the authorization types. All roles will have permission to perform that function.
-
If you need a simple authorization policy across multiple assets, set authorization properties in
futuretense_xcel.ini. -
If you need a simple authorization policy on a particular asset, set access permissions.
-
If you need a more complex type of authorization that allows workflow to control the permissions on an asset, set workflow function privileges.
9.3.4 Setting Access Permissions
Setting access permissions means creating a policy for an asset by specifying which roles can perform which function(s) on the asset.
There are several ways to set access permissions on assets:
-
Using the administrator's interface, to set permissions on individual assets
-
Using the
futuretense_xcel.inifile, to set permissions on all assets at onceNote:
If your asset is entered in to a workflow for which function privileges are defined, the function privileges override the asset's access permissions. For information about function privileges, Chapter 10, "Creating and Managing Workflow Processes."
This section contains the following topics:
-
Section 9.3.4.2, "Setting Access Permissions from the Administrator's Interface"
-
Section 9.3.4.3, "Setting Access Permissions from Property Files"
9.3.4.1 Asset Toolbar
When an asset is viewed, a toolbar appears at the top to aid in working with the asset. This is where you can perform certain function with each asset.
The icons in the toolbar perform the following actions, described from left to right:
-
Edit: to open the Edit form for the asset.
-
Delete: Click to delete the asset.
-
Approve for Publish: Click to approve the asset for publication the next time publication for this asset occurs.
-
Share Content: Click to share the content with other sites as enabled by the system administrator.
-
Add to My Bookmarks: Click to add a bookmark to this asset in the Bookmarks tab. If the asset is already added to the Bookmarks tab, it will be unavailable.
-
Status: Click to open a form detailing the workflow approval state of the asset.
-
Access Permissions: Click to open the Access Permissions form for the asset. See Section 9.3.4.2, "Setting Access Permissions from the Administrator's Interface" for more information.
-
Drop-down menu: this menu allows you additional ways to work with the asset, including using the asset to copy and create a new asset, as well as create a wholly new asset and search for other assets.
9.3.4.2 Setting Access Permissions from the Administrator's Interface
To set access permissions from the Administrator's interface
-
Locate the asset for which you will set access permissions.
-
In the asset's Inspect form, select Access Permissions from the icon menu bar.
-
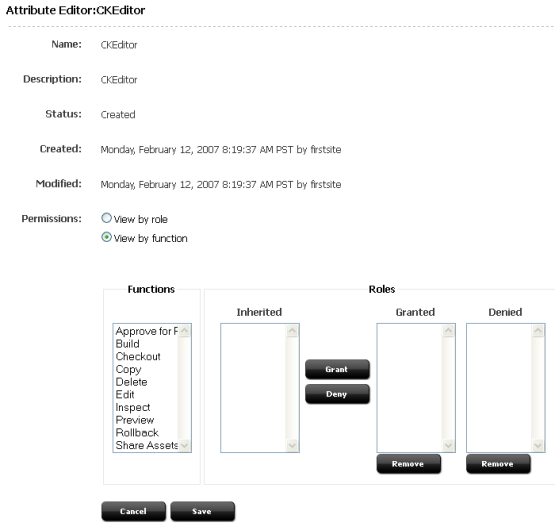
Select one of the radio boxes, click View by role or View by function. In this example, View by Function is used.
Note:
In this procedure, we are using View by function, which allows you to select a function and then specify the roles that are granted or denied permission to perform it. If you select View by role, the order will be reversed: you will have to select the role first, then specify the functions it is granted or denied. -
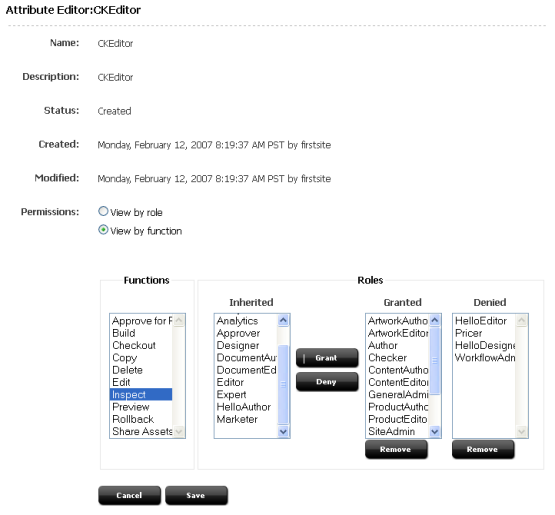
Select a function.
Roles that can perform the function are now displayed in the Inherited list box, by default. Inherited refers to the permissions policy that the asset inherits from its parent, or its parent's parent, and so on, depending on which asset in the hierarchy has a policy.
-
Select a role (or roles) to which you will deny or grant the permission to perform the function. (To select a block of roles, Shift-Click the extremes of the block. To select non-adjacent roles, Ctrl-Click each role).
-
Select either Grant or Deny to allow or forbid the role(s) to perform the function:
-
Grant explicitly allows the selected role(s) to perform the selected functions on the specific asset. All other roles are denied permission to perform the selected function on that asset unless explicitly granted permission.
-
Deny explicitly forbids the selected role(s) to perform the selected function on the specific asset. All other roles are denied permission to perform the selected function on that asset unless explicitly granted permission
-
Selecting neither Grant nor Deny leaves the roles in the Inherited list box to indicate that access permissions are inherited.
-
-
Repeat steps 4–6 for each function and role that must be granted or denied or which you want to grant or deny permission.
When you have completed selecting functions and roles, your access permissions form will look similar to the one below:
-
Click Save when finished.
Users who now access this asset will be able to perform the functions that their roles allow.
9.3.4.3 Setting Access Permissions from Property Files
To set access permissions from futuretense_xcel.ini
In futuretense_xcel.ini, either grant or deny permissions by setting the following properties:
-
xcelerate.grant.functionname= rolelist -
xcelerate.deny.functionname= rolelistwhere
functionnameis the name of the function, as shown in thefuturetense_xcel.inifile, on the Authorization tab if you are using the Property Editor.rolelistis a comma-separated list of roles for which the permission is either denied or granted.
If the permission is granted or denied in the futuretense_xcel.ini, it is granted or denied for all assets. These permissions can be overridden by specifically setting access permissions on an asset-by-asset basis, using WebCenter Sites' access permissions feature.
9.4 Configuring Other Options for Asset Types
In the Admin tab, there are several other items that configure asset types. These items contribute to the design and implementation of the asset types, which means that they are typically used by the developers. Administrators typically do not manage the items.
However, after an asset type is designed and installed, you might be asked to maintain the following items:
-
sources
-
categories
-
subtypes
-
associations
-
mimetypes
For information about these items and procedures for creating and editing them, see the Oracle Fusion Middleware WebCenter Sites Developer's Guide.
9.5 Managing Access to the Tree (Administrator's interface only)
You have several ways to configure the tree that is displayed in the left-hand panel of the administrator's interface:
-
You can configure the tree to be either displayed by default in the main window or hidden by default.
-
You can control whether users who toggle a tree off are allowed to toggle the tree back on.
-
You can configure tabs within the tree, adding items or functionality to them, and determining which users have access to them based on their roles.
-
You can configure the tabs' nodes to specify the number of items that are displayed under any given node.
WebCenter Sites supports two general categories of tree tabs:
-
System default tabs, which provide administrative functionality (Admin, Site Admin, Workflow) and access to individual assets (History, Bookmarks, Site Plan).
Assets and asset types intended for developers (for example, Template) are either available only for inspection or inaccessible in the Contributor interface. Conversely, the following assets are available only through the Contributor interface: All flex assets and their parent assets, all basic assets, Engage assets (such as recommendations, segments and promotions), Query, Collection, and Page assets.
-
Custom tabs
-
Tabs that you create to make it more convenient for users in different roles to create the most commonly used asset types.
-
Tabs that developers create to offer customized behavior or new functionality.
Note:
The Workflow Groups tab is a hybrid between a system default and a custom tab. Although the Workflow Groups tab is not installed by default and you must create it to use it, the element that provides its logic is installed. That is, while you must manually create this tab, your developers do not have to code a new element for you.
-
This section describes how to add roles to the system default tabs, how to create basic tree tabs that provide access to asset types, and how to configure whether the tree is displayed by default.
For information about creating custom tree tabs that implement new functionality, see the Oracle Fusion Middleware WebCenter Sites Developer's Guide.
This section contains the following topics:
9.5.1 Displaying and Hiding the Tree
Any user can toggle the tree on and off whenever he needs less or more space in the main window to display the assets that he is working on.
If you want, you can configure your WebCenter Sites system so that the tree is toggled off by default when users first log in to the system. You can also control whether users are allowed to toggle the tree back on.
The WebCenter Sites features for working with assets are available in right-mouse menus on the tabs as well as through the icons at the top of the window and the action bars displayed in the New, Edit, and Inspect forms for individual assets managed solely in the Admin interface. Therefore, it is not necessary to display the tree for content providers. However, because the administrative functions are available only through the Admin, Site Plan, and Workflow tabs, administrative users must always have access to the tree.
To configure display of the tree and toggling rights
-
Start the Property Editor and open the
futuretense_xcel.inifile. -
Select the Preference tab.
-
To specify that the tree should be toggled off by default when users first log in to the administrator's interface, set the value of the
xcelerate.showSiteTreevalue tofalse. -
(Optional) To configure the system so that only administrative users (that is, users who have the xceladmin ACL assigned to their user accounts) are allowed to toggle the tree back on, set the
xcelerate.restrictSiteTreeproperty totrue. -
Save the property file and close the Property Editor.
-
Restart the application server.
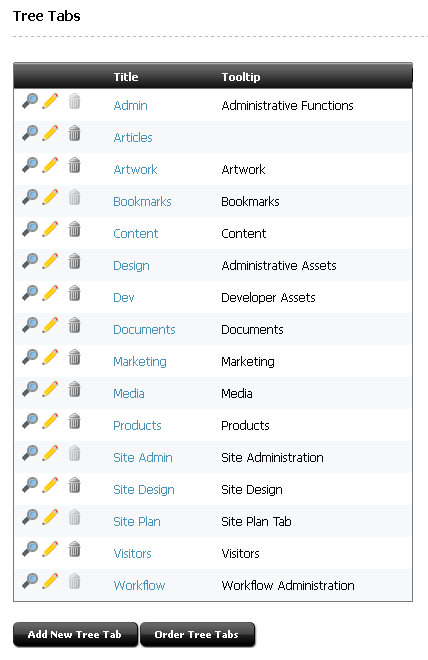
9.5.2 Creating Tree Tabs
A tree tab is a tab (such as Admin) that appears in the left-hand panel of the administrator's interface. Access to tree tabs is controlled through roles.
Several default tree tabs are core to WebCenter Sites. Before creating a new tree tab, review the default tabs to gain an understanding of WebCenter Sites' existing capabilities. The default tree tabs are:
-
Bookmarks – displays the assets that you selected and placed in your bookmarks. All users see this tab as soon as they use the Add to My Bookmarks button to place an asset in their bookmarks.
-
Admin – displays the administrative functions that affect all of the sites in the system. By default, only users with the default system role named GeneralAdmin have access to this tab.
-
Design — serves as the source for creating pages on your site. Some of these sources are: Templates, Product Definition, Content Definition, and other sources for the creating pages.
-
History – displays the assets that you worked with during the current session. All users see this tab as soon as they create, inspect, edit, or copy their first asset. This tab is not configurable.
-
Site Admin – holds a subset of the administrative functions that apply only to the site that you are currently logged in to. By default, only users with the default system role named SiteAdmin have access to this tab. This tab is useful if you have individuals who manage which existing users have access to individual sites, but who do not need to create new users or new sites.
-
Site Plan – displays a graphical and hierarchical representation of the pages, collections, queries, and content assets that make up the online site that you are making available on the delivery system. By default, all of the FirstSiteII sample site roles and system default roles grant access to this tab.
-
Workflow – has the workflow configuration functions. By default, only users with the Workflow Admin role have access to this tab.
This section contains the following topics:
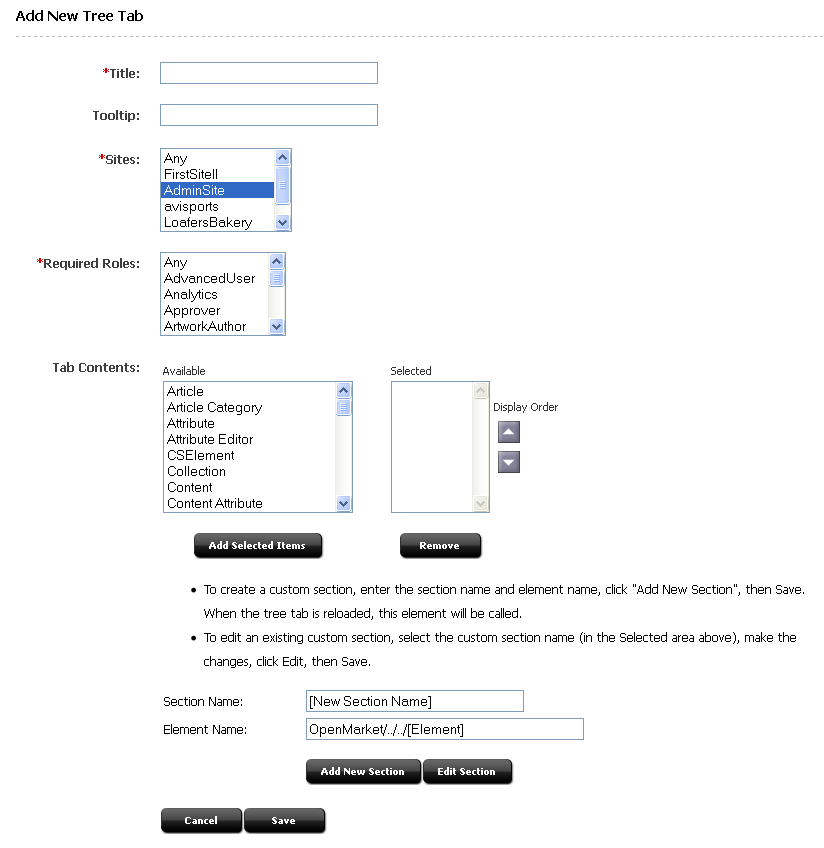
9.5.2.1 Creating a New Tree Tab
Note:
Before creating a tree tab, familiarize yourself with the default tree tabs to avoid duplicating their functions. The default tree tabs are described earlier.-
In the Admin tab, double-click Tree.
-
In the Tree Tabs form, click Add New Tree Tab.
-
Fill in the Add New Tree Tab form:
-
In the Title field, enter a short, descriptive name of up to 64 characters.
-
In the Tooltip field, enter a short, informative description of the tab, up to 255 characters. This description is displayed when the mouse hovers over the tab.
-
In the Site field, select the sites that will display the tab.
-
In the Required Roles field, select which roles can access the tab.
-
In the Tab Contents field, select the asset types that will be displayed on the tab and then click Add Selected Items.
-
(Optional) If you want to add custom functionality to this tab, use the Section Name and Element Name fields at the bottom of the form. You will need help from your developers for this step. See also the Oracle Fusion Middleware WebCenter Sites Developer's Guide for more information.
-
-
Click Save.
The new tab is displayed in the tree (refresh the display, if necessary).
9.5.2.2 Creating the 'Workflow Groups' Tab
The Workflow Groups tab displays the workflow groups that exist for a site and the assets that are included in those groups. For information about workflow groups, see Section 10.1.6, "Workflow Groups." This tab does not appear by default. If you want to use it, you must create it.
To create the Workflow Groups tab
-
In the Admin tab, double-click Tree.
WebCenter Sites displays the Tree Tabs form.
-
In the form, click Add New Tree Tab.
-
In the Title field, enter a short, descriptive name of up to 64 characters.
For example: Workflow Groups.
-
In the Tooltip field, enter a short, informative description of the tab, up to 255 characters.
For example: Workflow Groups.
-
In the Site field, select the sites that will display the tab.
-
In the Required Roles field, select which roles can access the tab.
-
In the Tab Contents area, scroll down to the section area. In the Section Name field, enter the following name exactly as it appears here:
Groups. -
In the Element Name field, enter the following name exactly as it appears here:
OpenMarket/Gator/UIFramework/LoadWorkflowGroups -
Click Add New Section.
The word Groups appears in the Selected column.
-
Click Save.
9.5.3 Editing Tree Tabs
Editing a tree tab means that you can:
-
Rename the tree tab
-
Edit its tooltip
-
Enable the tree tab for a different set of sites
-
Display the tree tab to a different set of roles
-
Select a different set of content for the tree tab, and/or rearrange the content's display order
Note:
- A tree tab is displayed in the user's interface when two conditions are met:
The tree tab is enabled on the user's site, and Both the tree tab and the user have at least one role in common.
-
When you create site users with new roles, you must select the new roles in the default tree tabs so that the users have access. (Default tree tabs are not automatically enabled for new roles.) The list of default tabs can be found in Section 9.5.2, "Creating Tree Tabs".
-
In the Admin tab, double-click Tree.
-
In the Tree Tabs form, navigate to the desired tab and click its Edit icon.
-
In the Edit Tree Tab form, make the necessary changes.
For example:
-
If you wish to enable the tree tab for a new site, select the site from the Sites list.
-
If your new site has users with new roles, and you wish to enable the tree tab for those users, select the users' roles from the Roles list.
-
-
Click Save.
9.5.4 Deleting Tree Tabs
-
In the Admin tab, double-click Tree.
-
In the Tree Tabs form, navigate to the desired tree tab and click its Delete icon.
WebCenter Sites displays a warning message.
-
Click Delete Tree Tab.
The tree tab has been deleted.
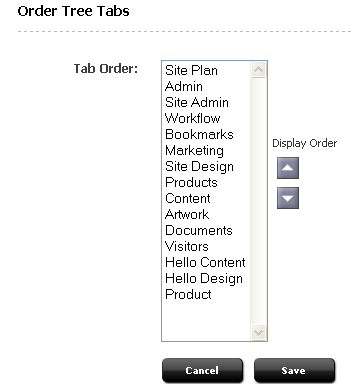
9.5.5 Changing Tree Tab Order
You can change the order in which the tree tabs are displayed.
To change the order of tree tabs
-
In the Admin tab, double-click Tree.
-
At the bottom of the Tree Tabs form, click Order Tree Tabs.
WebCenter Sites displays the Order Tree Tabs form:
The form lists the tabs in the order in which they will appear in the tree.
The tree arranges its tabs into rows. When there are more tabs than a single row can accommodate, an additional row is formed behind it. The tabs in each row are ordered from left to right. Rows are ordered front-to-back.
-
To move a tab in the tree, select the tab from the list and then use the arrow buttons to move the tab to the correct position. Repeat this step for each tab that you want to reposition.
-
Click Save.
The new tab order is displayed in the tree (refresh the display, if necessary).
9.5.6 Configuring the Number of Items Displayed Under Nodes on Tabs
To optimize WebCenter Sites' response time, you may want to limit the number of assets that are listed under their respective node in a tree tab. Specifically, when the WebCenter Sites database holds many assets of any one type, WebCenter Sites can take a long time to load all the assets and then list them under their node in the tab. To minimize the loading time, you can limit the number of items to be listed under the node by setting a threshold. Then, when the number of assets (or other items) for a node exceeds the threshold, and a user attempts to access the assets, the administrator's interface prompts the user to enter a search criterion that restricts the number of items to be returned.
For example, suppose that a node contains more than 300 articles, and the display threshold is set to 100. When a user expands the node icon that represents the articles, WebCenter Sites displays a small search criteria form that prompts the user to enter values which WebCenter Sites uses to limit the number of articles that it returns.
To configure the number of items under a node in a tree tab
-
Start the Property Editor and open the
futuretense_xcel.inifile. -
Select the Preference tab.
-
Select the
xcelerate.treeMaxNodesproperty and specify a value for it. By default, this property is set to 100, which means that up to 100 items can be displayed under a node. -
Save and close the property file.
-
Restart the application server.