8 Assembling Content Management Sites
Content Management sites can be assembled once their basic components are created. The basic components are the users (including their ACLs and roles) and the data model. Optionally, you can enable auxiliary user interfaces such as Sites Doclink and Sites Desktop. This chapter shows you how to work with sites (create, edit, and delete sites); how to manage site users (add, edit, and delete users); and how to manage asset types for the sites (enable and remove asset types).
This chapter contains the following sections:
Note:
The following features are deprecated in WebCenter Sites 11g Release 1 (11.1.1.8.0): Sites Desktop, Sites DocLink.8.1 Working with Sites
Assembling a site requires you to assign users to the site, assign content (asset types) to the site, and optionally enable the Sites Desktop and Sites DocLink interfaces. In this chapter, you will create sites, associate users to the sites, and assign asset types to the sites. In later chapters, you will develop each site by tuning site users' permissions to content on the site.
This section contains the following topics:
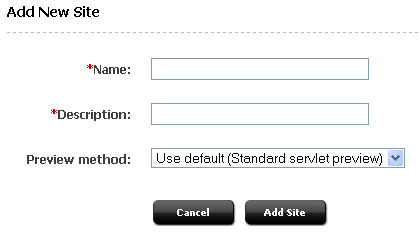
8.1.1 Creating a Site
Creating a site means specifying a site name, description, and a method for previewing the content that the site will display.
-
In the Admin tab, expand Sites and double-click Add New.
The Add New Site form is displayed.
-
In the Name field, enter a unique name of up to 255 characters.
Note:
Be certain that you have entered a correct name for the site. Although you can edit the description of a site, you cannot change the name of a site after you have created it. -
In the Description field, enter the name of the site as you want it to appear in the WebCenter Sites interfaces (up to 64 characters). This display name will be used in site lists throughout the user interface.
-
In the Preview method field, select the method how you will preview the site content.
-
Click Add Site.
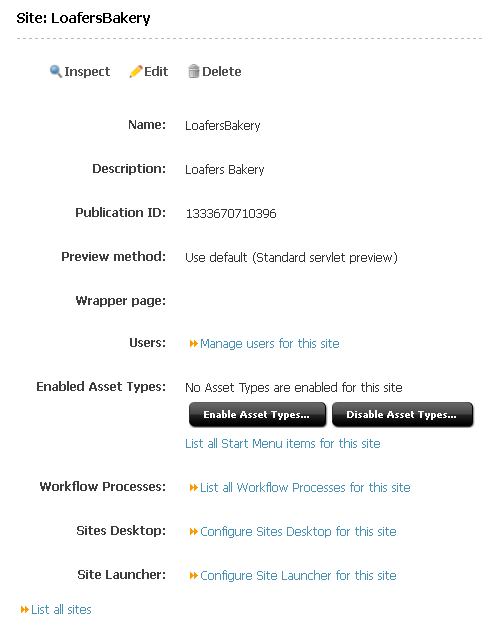
The Site form appears, where you can execute a number of operations. For example, inspect, edit, or delete the site, manage users, or configure Site Launcher to replicate the site.
When the new site is added to the Sites node, WebCenter Sites creates, below the site name, a set of sub-nodes that prompt you for site components:
-
Click Manage users for this site for this site to manage site users.
-
Click Enable Asset Types... to select asset types for the website; click Disable Asset Types... to remove asset types. Asset types are created by developers.
-
Click List all Start Menu items for this site to display the Start Menu items which have been created for the site.
-
Click List all Workflow Processes for this site to manage the workflows for the site.
-
Click Configure Sites Desktop for this site to configure and enable Sites Desktop.
-
Click Configure Site Launcher for this site to configure and enable Site Launcher.
Each sub-node is equipped with a linking mechanism that allows you to associate the sub-node, and therefore the site, with data in the configuration pool. Because of this linking mechanism, the sub-nodes cannot be deleted or supplemented with custom sub-nodes. Selecting a sub-node allows you to create All data required by the sub-nodes must be entered in to the configuration pool, described next.
-
Note that the procedure above only adds new sites.
-
To make a site usable, you must associate users and asset types (created by developers) with the site. If you plan to use workflow processes, you should create those processes as well.
-
To copy or migrate the site to another WebCenter Sites system, use the RealTime publishing method. See the chapters on real-time publishing.
8.1.2 Obtaining Site Configuration Information
In certain situations, you will need to know how a site has been configured—for example, which asset types and workflow processes are enabled, and who are the site users.
To obtain site configuration information
-
In the Admin tab, expand Sites and double-click the desired site.
-
In the Site form, select the option that provides the information you are looking for.
8.1.3 Editing a Site
Editing a site means changing its description and/or preview method. If you need to change the name of a site, you must delete the site and create a new one with the correct name.
-
In the Admin tab, expand Sites and double-click the desired site.
-
In the Site form, click Edit.
-
In the Edit form, do the following:
-
In the Description field, make the appropriate changes.
-
In the Preview Method field, select a different preview method, if necessary.
-
-
Click Save.
8.1.4 Deleting a Site
When you delete a site, all configuration information for that site is either removed or unshared (if the site shared data with other sites). The following configuration information is affected by the deletion of a site:
-
Start Menu items that were enabled for the site are deleted or unshared
-
Smartlists are deleted or unshared
-
Publishing destinations are unshared
-
Users are removed from the site
-
Workflows that were shared are unshared or deleted
-
Template assets that were shared have their SiteEntry removed
-
Asset subtypes that were enabled for that site as well as tree tabs are removed or unshared
Therefore, before deleting a site, be sure that you have shared the assets that you need to keep.
-
In the Admin tab, double-click Sites.
-
In the list of sites, navigate to the site you want to delete and click its Delete icon.
A warning is displayed to inform you that site components will be deleted. The warning identifies the components and prompts you to confirm your intention to delete the site.
Figure 8-3 Delete Site Form, Showing Warning
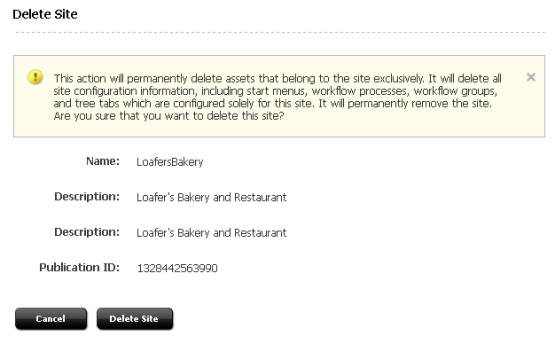
Description of ''Figure 8-3 Delete Site Form, Showing Warning''
-
Click Delete Site.
8.2 Assigning and Managing Site Users
This section shows you how to grant WebCenter Sites users access to a site, view site users, change users' role assignments on a site, and remove users from a site.
This section contains the following topics:
8.2.1 Granting Users Access to a Site (Assigning Roles to Users)
For a user to gain access to a site, the user must be assigned at least one role on the site. Assigned roles associate the user with the site and allow the user to log in to the site. When one of the user's assigned roles is also specified for an interface function on the site, the user gains access to the interface function.
Note:
In this section, we assume that you have created at least one user, a role, and a site. If you need to create one or another, follow the steps in Section 5.4.1, "Creating a New User," Section 4.5.1, "Creating a Role," and Section 8.1.1, "Creating a Site."To give a user access to a site
-
In the Admin tab, expand Sites, then expand the desired site.
-
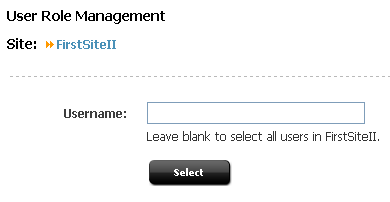
Double-click Users.
The User Role Management form appears.
-
Enter the desired user name and click Select.
The User Role Management form displays the user name. No roles are listed next to the user name.
Note:
If you need a list of system-wide users, open the list as follows:Expand User Access Management and double-click User. Leave the Enter User Name field blank, select Modify User, and click OK.
-
Click the Edit icon next to the user name.
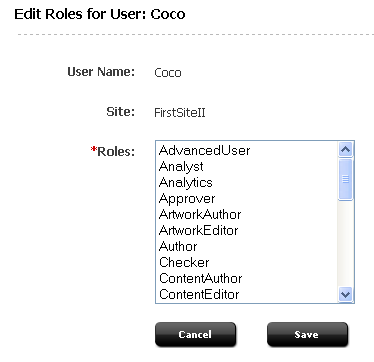
WebCenter Sites displays the Edit Roles form:
-
Select one or more roles from the list. To select multiple roles, Ctrl-Click each desired role. To select a range of roles Shift-Click the first and last role in the range.
Note:
Consider the user's type. A general administrator, site administrator, and regular user require different sets of system-defined roles. For example, a regular user requires access to the content contributor's interface. In this instance, select the SitesUser role. For additional help with selecting system-defined roles, see Section 31.5, "System Roles."Selecting a role (or roles) makes the user a member of the site that you chose to work with in step 1. It does not necessarily enable the user to manage the site's content. To manage content, the user must have access to interface functions (such as Search) on the site.
If you know which roles are allowed to invoke which interface functions on the user's site, select the roles in this step. Otherwise, the roles that you select here you will also specify (in later chapters) for interface functions that the user needs. The functions may be start menu items, tree tabs, workflow processes, and asset approval and publishing functions.
For more information about assigning user roles, see Section 4.5, "Working with Roles."
-
Click Save.
-
Give the user access to site components by following procedures in Chapter 9, "Managing Access to Content Management Site Components"
Note:
Remember that the user cannot perform the functions available to her roles unless the user also has adequate ACL permissions to operate on the database tables. (While roles allow access to interface functions, ACLs activate those functions by allowing access to the database tables.) For more information about roles and their relationship to ACLs, see Section 1.4.4, "Roles."8.2.2 Viewing Site Users and Reassigning Roles
To view the list of users and their roles on a given site, and to reassign roles
-
In the Admin tab, expand Sites, then expand the desired site.
-
Under the desired site, double-click Users.
-
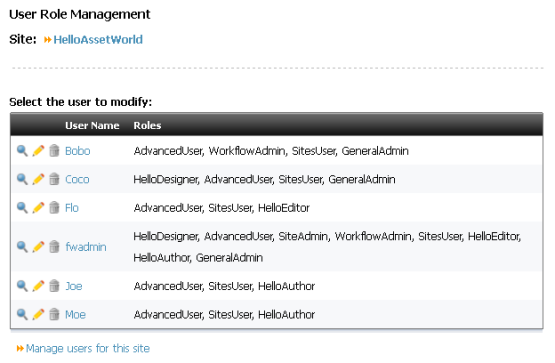
In the User Role Management form, leave the user name field blank and click Select.
WebCenter Sites displays a list of all the users currently assigned roles in the selected site:
-
(Optional) If you want to reassign the user's roles, do the following:
-
Navigate to the desired user name and click its Edit icon.
-
In the Edit Roles form, select (and/or deselect) one or more roles from the list, then click Save.
-
Repeat steps a and b for each additional user, as necessary.
-
8.2.3 Deleting Users from a Site
You can delete a user from a site without deleting that user from the system.
-
In the Admin tab, expand Sites, then the desired site.
-
Under the desired site, double-click Users.
-
In the User Role Management form, enter the desired user name and click Select.
-
In the form that appears, click the Delete icon next to the user.
WebCenter Sites displays a warning message.
-
Click Delete User from Site.
8.3 Enabling and Managing Asset Types
This section shows you how add asset types to a site (enable the asset types), and delete them from a site.
This section contains the following topics:
8.3.1 Enabling Asset Types for a Site
Enabling an asset type means associating the asset type with a chosen site or sites. Once the assignment is made, the asset type itself must be made available to users through an interface function such as a start menu item or a tree tab, as shown in Chapter 9, "Managing Access to Content Management Site Components."
Note:
The following procedure describes how to enable an asset type for use. Enabling an asset type for use with Sites Desktop is described in Section 23.2.2, "Configuring the Word Asset Types for Sites Desktop."To enable asset types for a site
-
In the Admin tab, expand Sites, then expand the desired site.
Note:
If you have the SiteAdmin role, but not the GeneralAdmin role, select the Site Admin tab. -
Under the desired site, expand Asset Types and double-click Enable.
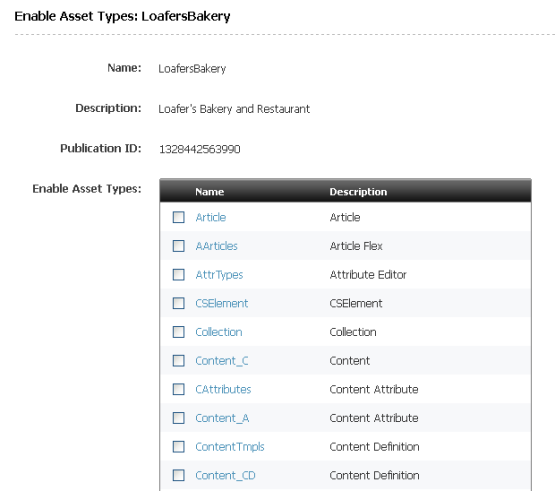
WebCenter Sites displays the Enable Asset Types form, listing asset types that have not yet been enabled in this site:
-
Select the asset types which you want to enable for this site.
Note:
Content Query assets are not supported within the Admin UI. -
Click Enable Asset Types.
-
(Optional) In the form that follows, check the box next to each start menu item that you would like WebCenter Sites to create. (For more information on start menu items, see Section 9.2, "Managing Access to Asset Types via Start Menus."
Figure 8-8 Enable Type Assets Form - Start Menu Selection
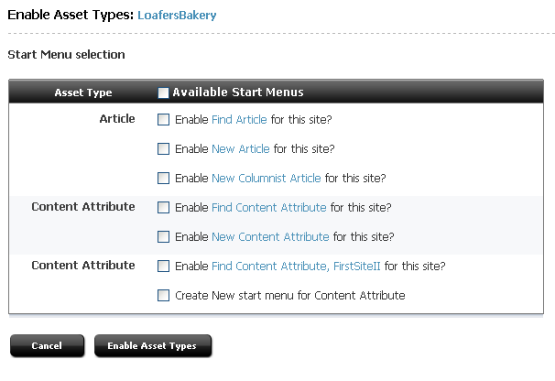
Description of ''Figure 8-8 Enable Type Assets Form - Start Menu Selection''
If you choose not to generate start menu items at this time, you must manually create them later. No one can create assets of the asset types you just enabled until the corresponding start menu items are created.
-
Click Enable Asset Types.
-
The asset types are now enabled for the site. If you need to create start menu items for them, continue to Section 9.2, "Managing Access to Asset Types via Start Menus."
Note:
To view the assets in the Contributor interface's trees (Site Tree, Content Tree, and My Work tree) you also need to manually create the tree tabs for the assets.
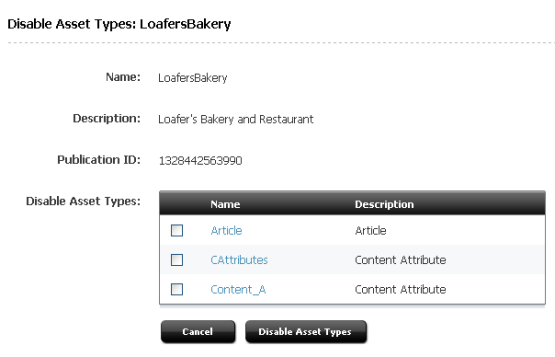
8.3.2 Removing Asset Types from a Site
To remove asset types from a site
-
In the Admin tab, expand Sites, then the desired site.
Note:
If you have the SiteAdmin role, but not the GeneralAdmin role, select the Site Admin tab. -
Under the desired site, expand Asset Types and double-click Disable.
WebCenter Sites displays the Disable Asset Types form, showing asset types that have been enabled for the selected site:
-
Select the asset types that you want to remove from the site.
-
Click Disable Asset Types.
Note:
If start menu items or workflow processes exist for the asset type that you disabled on a site, edit the start menu items or workflow processes so that they reflect the change.
8.4 Enabling and Managing User Interfaces
If you plan to enable the Sites Desktop and Sites DocLink interfaces for users on certain sites, follow instructions in Chapter 23, "Configuring the User Interfaces."