5 Configuring Users, Profiles, and Attributes
Users can be created through one of the following options: WebCenter Sites' native user manager (in the administrator's interface), or via LDAP. However, to configure user profiles and attributes, you must use the administrator's interface.
This chapter outlines your options for creating users. This chapter also shows you how to create users in WebCenter Sites, and configure their profiles and user attributes. For information about creating users in external sources, refer to the product documentation.
This chapter contains the following sections:
5.1 Overview
WebCenter Sites users can be created through WebCenter Sites' native user manager, through WEM Admin, or through external user managers such as LDAP.
Every WebCenter Sites user is defined by the following set of data:
-
User account, which gives the user access to the WebCenter Sites system and its database tables
-
User profile, which is required for users who will be working with:
-
WebCenter Sites applications
-
Language packs and setting a default language
-
Workflow processes, in which email messages will be sent to notify workflow participants of their assignments. The user profile supports workflow actions by mapping a user name to an email address.
-
-
User attributes (in addition to the email and locale attributes in the user profile), if actions and events in addition to workflow must be supported.
Once users are created and configured, they must be associated, by means of roles, with the sites they are to work in. This chapter shows you how to create and configure users. Procedures for associating users with sites are given in Chapter 8, "Assembling Content Management Sites."
5.2 User Management Options
WebCenter Sites' Directory Services API enables your WebCenter Sites system to connect to external directory servers or user managers that contain authentication information, user information, and so on. The following connection options are available:
-
Native system—The WebCenter Sites native user manager, which uses the native WebCenter Sites user management tables
SystemUsersandSystemUserAttrs. -
The LDAP plug-in—With this option, user names and attributes are stored in the directory server rather than in the WebCenter Sites database.
Because WebCenter Sites security is based on ACLs, any external user management system (such as LDAP) must be configured to match the WebCenter Sites ACLs.
Information about configuring the plug-ins is given in the Oracle Fusion Middleware WebCenter Sites: Installing and Configuring Supporting Software. Properties that configure the plug-ins are located in the files futuretense.ini (the Authentication tab), ldap.ini, and dir.ini files. The files are described in the Oracle Fusion Middleware WebCenter Sites Property Files Reference.
Note:
This guide uses the native WebCenter Sites user manager throughout.This section contains the following topics:
5.2.1 Native WebCenter Sites User Manager
If you are using the native WebCenter Sites user manager, follow the guidelines in Chapter 3, "Site Configuration Guidelines" to create and configure users, and then grant them access to the management system.
5.2.2 LDAP Plug-In
If you are using LDAP to manage your users on either the management or the delivery system, you create user accounts with LDAP rather than with the WebCenter Sites administrator's interface. However, you must still use the administrator's interface to create ACLs and roles in the WebCenter Sites database (It is also possible to use WEM Admin to create roles). Instructions for granting users access to a Sites management system integrated with LDAP are given in our guide, the Oracle Fusion Middleware WebCenter Sites: Installing and Configuring Supporting Software.
5.3 Configuring Users in WebCenter Sites
Each WebCenter Sites user is completely defined by a user account, user profile, and, if necessary, user attributes.
-
A user account is required for anyone who is to work with WebCenter Sites.
-
A user profile is required for users who will be working with WebCenter Sites modules and products, setting a default language, and participating in workflow processes in which email messages will be sent.
-
User attributes, in addition to the locale and email attributes in the user profile, may also be required for your operation. If so, the additional attributes can be created.
Once you have created the user, you must enable that user for the appropriate sites by assigning roles to the user name for each site the user will work in. For information about enabling users after you have created them, see Section 8.2.1, "Granting Users Access to a Site (Assigning Roles to Users)."
After you have created and enabled a new user, be sure to give that user the following information:
-
The user name/password combination of the user account.
-
The URL to the WebCenter Sites:
http://<server>:<port>/<context>/loginwhere
<server>is the host name or IP address of the machine running WebCenter Sites. Depending on how the system was set up, you might also need to include the port number—server:8080for example; and<context>is the name of the web application on the same server.
The rest of this chapter shows you how to create user accounts, profiles, and attributes, as well as modify and delete them.
5.4 Working with User Accounts
This section shows you how to create, edit, and delete user accounts in WebCenter Sites.
Note:
This section provides procedures for creating, editing, and deleting users in the WebCenter Sites administrator's interface. If you are using LDAP, refer to the LDAP product documentation. If you are using WEM Admin, refer to Chapter 34, "Web Experience Management Framework."Also, be sure to substitute the word "group" for the word "ACL" when reading that guide, and create users who belong to the groups with these names.
This section contains the following topics:
5.4.1 Creating a New User
This section shows you how to create users in the WebCenter Sites administrator's interface.
Note:
If you are using LDAP, refer to the LDAP product documentation, if you are using WEM Admin, refer to Chapter 34, "Web Experience Management Framework."Before creating a user, determine the user's:
-
Log in name
-
Password
-
ACLs, which regulate the user's access to WebCenter Sites' database tables.
-
To determine the user's required ACLs, see Section 31.4, "Required ACLs for Custom Users."
-
To determine the user's additional system ACLs, see Section 31.2, "System ACLs."
-
To determine which ACLs are assigned to the database tables the user must access, follow the steps in Section 4.3.4, "Assigning ACLs to Custom Tables."
-
-
In the Admin tab, expand User Access Management, then double-click User.
-
In the form that appears, select Add User and click OK.
You can add a user name before clicking OK; it will appear auto-filled in the Login Name field on the next form.
-
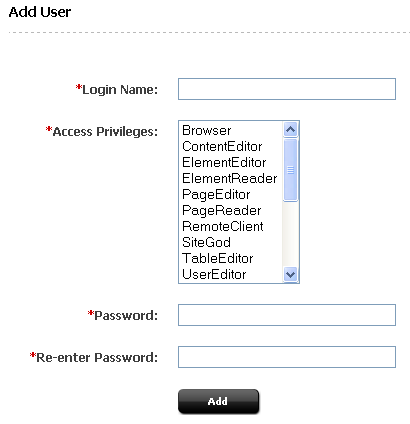
Fill in the fields in the Add User form:
-
In the Login Name field, enter a unique name. Do not include spaces or special characters, such as punctuation. The underscore character (_) is allowed.
-
In the Access Privileges list, select ACLs for the user. To select multiple ACLs, Ctrl-Click each desired ACL; you can also select a range of ACLs by selecting the first and last ACL in the range with Shift-Click.
-
Enter the same password into the Password and Re-Enter Password fields.
-
Click Add.
The user has been created.
-
You can create a general administrator, For more information about making the user an administrator or a content contributor, see Section 5.4.2, "Creating Common User Types."
-
To follow up with post-creation procedures
-
If the user will be implementing any of the following options:
-
Oracle WebCenter Sites products such as Oracle WebCenter Sites: Engage
-
Language packs and different languages
-
Workflow processes that send email messages
create a profile for the user. For instructions, see Section 5.5.1, "Creating and Editing a User Profile."
-
-
If the user requires attributes in addition to or in place of locale and email (specified in the user profile), create the attributes. For instructions, see Section 5.5.3, "Modifying, Adding, and Deleting User Attributes."
-
Once the user has been completely defined, you must associate the user with a site by means of roles.
-
If you have not already done so, create roles for the user, following instructions in Section 4.5.1, "Creating a Role."
-
To associate the user to the site, create the site and add the user to the site. For instructions, see Section 8.1.1, "Creating a Site" and Section 8.2.1, "Granting Users Access to a Site (Assigning Roles to Users)."
-
5.4.2 Creating Common User Types
When creating a user, it is important to consider the roles that the user will have on separate web sites. In many cases, a user may be an administrator on one site and a content contributor on another. This section details how to make each user a specific type of user.
This section describes the following topics:
5.4.2.1 Making the User a General Administrator
The general administrator for a site controls all aspects of the site. You should be aware that when a user is a general administrator, their administrative actions can only be controlled when they are logged in to the one site, however, they can administrate all sites when logged in.
-
For the newly created user, double-check that it has the correct ACLs assigned to it.
To determine the ACLs for a user, see Section 31.4, "Required ACLs for Custom Users." Looking at the table there, you can see that the ACLs for a general administrator are Browser, Element Reader, PageReader, UserReader, xceleditor, xceladmin, TableEditor, UserEditor, and VisitorAdmin.
-
On the Admin tab expand security, expand Assign Users to Groups, and double-click Add New. The Assign Groups to User form appears.
-
Select the user to make a general administrator, and then select RestAdmin in the Groups field.
You can use Ctrl-Click to select more than one user or group, but as you will likely make few general administrators, it is suggested you add them one at a time to ensure you do not accidentally add a user to the RestAdmin group.
-
Open the WebCenter Sites tree, and select the site to add the user to.
-
Click Users to open the User Role Management form.
This form is also available under Site Admin tab by double clicking Users if you are logged in to the specific site.
-
Enter the log in information for the user, and click the Edit icon to open the Edit Roles for User form. Select GeneralAdmin as well as any other roles you wish the user to have on this web site.
Note:
The names of roles used in this documentation are the names of the roles used in the FirstSiteII example web site that comes installed. You might choose to use different roles or role names with your published web site.When adding a general administrator to a site, you may want to consider if you will want the same person to have different roles on a different site. You will need to assign these roles to the user when logged in to the site or sites you want to assign these different roles for the user on.
When a user has general administrator rights, the Admin tab will only appear when they are logged into the web site (or web sites) where they have the general administrator role.
5.4.2.2 Making the User a Site Administrator
-
For the newly created user, double-check that it has the correct ACLs assigned to it.
To determine the ACLs for a user, see Section 31.4, "Required ACLs for Custom Users." Looking at the table there, you can see that the ACLs for a site administrator are Browser, Element Reader, PageReader, UserReader, xceleditor, and xceladmin.
-
Open the WebCenter Sites tree, and select the site to add the user to.
-
Click Users to open the User Role Management form.
This form is also available under the Site Admin tab by double-clicking Users if you are logged in to the specific site.
-
Enter the log in information for the user, and click the Edit icon to open the Edit Roles for User form.
-
Select the user to make a site administrator, and then select SiteAdmin_AdminSite in the Groups field.
You can use Ctrl-Click to select more than one user or group, but as you will likely make few site administrators, it is suggested you add them one at a time to ensure you do not accidentally add a user to the SiteAdmin_AdminSite group.
-
Select SiteAdmin and Advanced User as well as any other roles you wish the user to have on this web site. The SiteAdmin role grants the user access to the Site Admin tab, the AdvancedUser role grants access to the Admin interface.
Note:
The names of roles used in this documentation are the names of the roles used in the FirstSiteII example web site that comes installed. You might choose to use different roles or role names with your published web site.When adding a site administrator to a site, you may want to consider if you will want the same person to have different roles on a different site. You will need to assign these roles to the user when logged in to the site or sites you want to assign these different roles for the user on.
When a user has site administrator rights, the Site Admin tab will only appear when they are logged into the web site (or web sites) where they have the site administrator role.
5.4.2.3 Making the User a Workflow Administrator
-
For the newly created user, double-check that it has the correct ACLs assigned to it.
To determine the ACLs for a user, see Section 31.4, "Required ACLs for Custom Users." Looking at the table there, you can see that the ACLs for a workflow administrator are Browser, Element Reader, PageReader, UserReader, xceleditor, and xceladmin.
-
Open the WebCenter Sites tree, and select the site to add the user to.
-
Click Users to open the User Role Management form.
This form is also available under Site Admin tab by double-clicking Users if you are logged in to the specific site.
-
Enter the log in information for the user, and click the Edit icon to open the Edit Roles for User form.
-
Select WorkflowAdmin and AdvancedUser, as well as any other roles you wish the user to have on this web site. The WorkflowAdmin role grants the user access to the Workflow tab, the AdvancedUser role grants access to the Admin interface.
Note:
The names of roles used in this documentation are the names of the roles used in the FirstSiteII example web site that comes installed. You might choose to use different roles or role names with your published web site.When adding a workflow administrator to a site, you may want to consider if you will want the same person to have different roles on a different site. You will need to assign these roles to the user when logged in to the site or sites you want to assign these different roles for the user on.
When a user has workflow administrator rights, the Workflow tab will only appear when they are logged into the web site (or web sites) where they have the workflow role.
5.4.2.4 Making the User a Content Contributor
For the newly created user, double-check that it has the correct ACLs assigned to it.
To determine the ACLs for a user, see Section 31.4, "Required ACLs for Custom Users". Looking at the table there, you can see that the ACLs for all users are Browser, ElementReader, PageReader, UserReader, and xceleditor. You may want to add additional ACLs needed for a content contributor, depending on the type of content you want the user to contribute.
For example, the PageEditor ACL would allow the user to add pages to the site, and modify the content based on the defined elements. The ElementEditor ACL would allow the contributor to create templates. For more information on the specific ACLs and how they impact the contributor's editing access, see Chapter 31, "System Defaults."
The user does not need additional ACLs if you only want them to modify existing content on a page. Simple editing is contained in the assigned role.
-
Open the WebCenter Sites tree, and select the site to add the user to.
-
Click Users to open the User Role Management form.
This form is also available under Site Admin tab by double clicking Users if you are logged in to the specific site.
-
Enter the log in information for the user, and click the Edit icon to open the Edit Roles for User form. Select SitesUser for the role.
It may be necessary to add different roles depending on how the roles are connected to the assets. When assets are created, they are connected to roles. These roles are the only roles that have access to the asset.
Note:
Typically you would not assign a user the SitesUser role as well as the AdvancedUser role for the same web site. The SitesUser role grants access to the Contributor interface; the AdvancedUser role grants access to the Admin interface.The names of roles used in this documentation are the names of the roles used in the FirstSiteII example web site that comes installed. You might choose to use different roles or role names with your published web site.
For most content contributors, you will not want to assign them roles on the web site beyond SitesUser, depending on how you have set up the different assets. Content contributors will make changes to the content only through the Contributor interface, and not through the Admin interface that administrators use.
5.4.3 Editing a User
This section shows you how to edit users in the WebCenter Sites administrator's interface. If you are using LDAP, refer to the LDAP product documentation.
Caution:
Do not change the names or ACLs of WebCenter Sites system users (DefaultReader, ContentServer, xceladmin).-
In the Admin tab, expand User Access Management, then double-click User.
-
In the form that appears, enter the name of the user you want to work with. If you do not know the user name, leave the field blank; WebCenter Sites will return a list of all users in the system.
-
Select Modify User and click OK.
-
In the list of users, select the user you want to work with.
-
In the Modify User form, make the desired changes, then click Modify.
5.4.4 Deleting a User from the System
This section shows you how to delete WebCenter Sites users using the WebCenter Sites administrator's interface. If you are using LDAP, refer to the LDAP product documentation.
To delete a user from the system
Caution:
Do not delete any of the WebCenter Sites system users (fwadmin - or the user used as admin, ContentServer, or DefaultReader).-
Delete the user profile, as shown in Section 5.5.2, "Deleting a User Profile."
-
In the Admin tab, expand User Access Management, then double-click User.
-
In the form that appears, enter the name of the user you want to delete. If you do not know the user name, leave the field blank; WebCenter Sites will return a list of all users in the system.
-
Select Delete User and click OK.
-
In the list of users, select the Delete radio button next to the user you want to delete.
-
Click Delete.
WebCenter Sites displays a warning message.
-
Click OK.
The user has been deleted.
5.5 Working with User Profiles and User Attributes
A user profile is required for any user who will be working with the following:
-
Sites modules and products
-
Language packs
-
Workflow processes in which email messages will be sent to notify workflow participants of their assignments. The user profile supports workflow actions by mapping a user name to an email address.
A user profile holds a set of user attributes. By default, the only user attributes a user profile holds are:
-
The email attribute, which is used to support workflow actions and takes the user's email address as a value. (You can create workflow actions that send workflow participants email about the assets that are assigned to them.)
-
The locale attribute, which is used to determine which language to use for a given user. This attribute takes the user's preferred location as a value.
-
The timezone attribute, which is used to determine which time zone to use for a given user. This attribute takes the user's preferred time zone as a value.
If the user was created in the WEM Admin interface, the avatar is also an attribute. You can add more user attributes and store values for them in the WebCenter Sites user management tables if you want to. However, to use these values in the WebCenter Sites interfaces requires you to customize the elements that display the user profile forms. For information about customizing elements for the WebCenter Sites interfaces, see the Oracle Fusion Middleware WebCenter Sites Developer's Guide.
This section contains the following topics:
5.5.1 Creating and Editing a User Profile
If you are using LDAP, be aware of system responses to user and site management operations. For information about system responses, see Chapter 33, "Managing Users, Sites, and Roles in LDAP-Integrated Sites Systems."
To create or edit a user profile
-
In the Admin tab, expand User Access Management, then double-click User Profiles.
WebCenter Sites displays the User Profile Management form.
-
In the form, enter the desired user name and click Select.
WebCenter Sites displays the profile of the selected user.
-
Click the Edit icon.
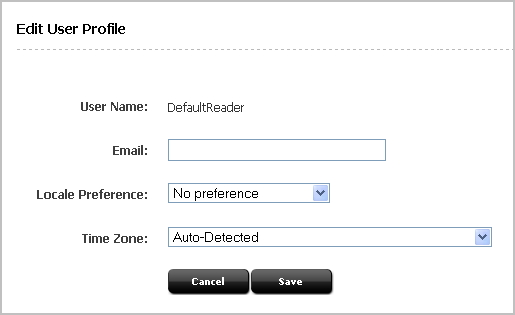
WebCenter Sites displays the Edit User Profile form:
-
In the Email field, enter the user's email address.
-
(Optional) Select a locale preference for this user from the Locale Preference drop-down list. The user's local preference overrides the language preference for the WebCenter Sites system (which is set from the Locale Manager).
Note:
If you do not set a locale preference for the user (No preference is selected in the Locale Preference drop-down list), the WebCenter Sites interfaces will be displayed in the language set for the WebCenter Sites system. For information about setting the locale preference for the WebCenter Sites system, see -
(Optional) In the Time Zone drop-down list, select the user's time zone preference. If you do not specify a time zone preference (Auto-Detected is selected in the drop-down menu), the system will automatically detect the time zone of the user from the user's browser.
-
Click Save.
-
Enable this user for the sites the user needs to work with. For instructions, see Chapter 8, "Granting Users Access to a Site (Assigning Roles to Users)."
5.5.2 Deleting a User Profile
-
In the Admin tab, expand User Access Management, then double-click User Profiles.
-
In the User Profile Management form, click Delete.
WebCenter Sites displays a warning message.
-
Click Delete User Profile.
WebCenter Sites displays a message confirming the deletion.
5.5.3 Modifying, Adding, and Deleting User Attributes
By default, the only user attributes that the WebCenter Sites content applications need are an email address and locale preference. Users created in WEM will additionally have an avatar attribute. You use the user profile feature to assign these attributes to a user, as shown in Section 5.5.1, "Creating and Editing a User Profile." If you need to, you can store and use additional user attributes for your users in this table, even if you are using LDAP.
The Modify User Attributes option allows you to modify the attributes that are used in the user profile. It also allows you to add and delete attributes.
-
In the Admin tab, expand User Access Management, then double-click User.
In the form that appears, enter the name of the user you want to work with. If you do not know the user name, leave the field blank; WebCenter Sites will return a list of all users in the system.
-
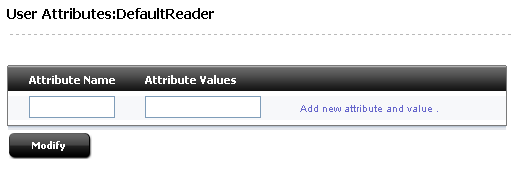
Click the user name in the list that whose attributes you want to modify. The User Attributes form will display.
-
Fill in the fields of the User Attributes form:
Do one of the following, as required:
-
Change the current value (or values) assigned to an attribute by editing the contents of the Attribute Values field.
-
Add a new attribute by entering its name and at least one value in the fields at the bottom of the form.
-
Delete any unwanted attributes by deleting the associated value (in the Attribute Values field).
-
-
Click Modify.
Your changes are committed to the database.