3 Site Configuration Guidelines
Site configuration in WebCenter Sites is based on a relational system, where components in a system-wide configuration pool must be associated with each other and with a site name in order to function as a site. Making the correct associations creates a functional site—one that hosts the correct users, provides them with the correct asset types for authoring and managing content, supports workflow as necessary, publishes correctly, and delivers approved content to the intended audiences.
This chapter contains procedures that show first-time administrators how to configure sites. It also contains recommendations for the more experienced administrators to help them manage and maintain established sites.
This chapter contains the following sections:
3.1 Overview
When creating and configuring sites, you will be using the Admin tab, shown in Figure 3-1. The tab is logically separated into two sections. The first section is the Sites node, where sites are first established; the second is the system-wide configuration pool, where site components are created, associated to each other, and managed. The configuration pool begins with the AssetMaker node and ends with User Access Management.
Initially, when a new site is defined and added to the Sites node, it is empty and non-functional, because it is not associated in any way with the configuration pool. You make the site functional by associating with it the various components in the configuration pool. The components are sharable among sites. Any component that you associate with one site, you can associate with as many other sites as necessary. More information about the Sites node and the configuration pool is given on the next page.
Figure 3-1 Nodes in Admin Tab, Described
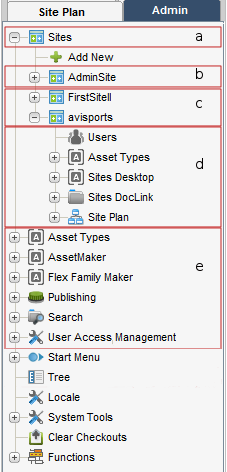
Description of ''Figure 3-1 Nodes in Admin Tab, Described''
In Figure 3-1, the marked areas are described in this way:
-
Section a highlights the Sites node.
-
Section b highlights the default site.
-
Section c highlights the custom sites. These sites are created by the administrator. In this illustration, there are only two custom sites, which are samples provides with WebCenter Sites.
-
Section d highlights the default nodes. There is one set per site. Each default node must be configured by the administrator.
-
Section e highlights the system-wide configuration pool. Components in the configuration pool must be selectively associated with each other and with the sites (as listed in section b) in order to make the sites functional.
Sites are configured in four basic steps from the Admin tab, as shown below. We emphasize basic to indicate that the steps are intended to provide only an overview of the site configuration process. Detailed procedures are given in the rest of this guide.
Note:
In the procedure below, steps 1 and 2 are interchangeable.| Step | Description |
|---|---|
|
Add sites to WebCenter Sites:
|
The Sites node (rather than the configuration pool) can be the starting point for creating sites. When you execute step 1, WebCenter Sites adds the site to the Sites node. The Contributor and Admin interfaces are automatically assigned to each newly added site. Under the newly added site, WebCenter Sites creates a set of sub-nodes that prompt you for site components: The Users sub-node prompts you for users. The Asset Types sub-node prompts you for asset types (created by developers). The Sites Desktop sub-node prompts you to enable Sites Desktop. The Sites DocLink sub-node prompts you to enable Sites DocLink. Each sub-node is equipped with a linking mechanism that allows you to associate the sub-node, and therefore the site, with data in the configuration pool. Because of this linking mechanism, the sub-nodes cannot be deleted or supplemented with custom sub-nodes. All data required by the sub-nodes must be entered in to the configuration pool, described next. |
|
Populate the configuration pool with components, such as users, asset types, and roles. |
The configuration pool begins with the AssetMaker node and ends with User Access Management, as Figure 3-1 shows. The configuration pool enables you to select and create components for the site and to associate the components with each other. Data that you establish in the configuration pool remains independent of any sites (and therefore inaccessible to users) until you associate the data with the sites. |
|
Associate and enable components in the configuration pool with the site:
|
The Sites node is the endpoint of the site building process. In this step, you once again use the Sites node, this time to associate components in the configuration pool to the site that you added in step 1. Note that components in the configuration pool are reusable; they can be associated with as many sites as necessary. |
3.2 Site Replication Option
If you plan to create many sites that are similar in content and structure, you can shorten the site creation process. You can configure the appropriate source sites, then replicate the sites as often as necessary, and finally modify the replicates as necessary. The source sites must conform to certain replication requirements. For more information, see Chapter 11, "Replicating Content Management Sites."
3.3 Site Configuration Steps
In the site configuration process, certain components in the configuration pool are required by other components and must be created first if re-tracing of steps is to be minimized. For example, before users can be created, their ACLs must first exist.
In general, the order of steps in the site configuration process is flexible. One possible order is given in the procedure below (starting with Section 3.3.1, "Assumptions"), where the critical site components are created first, then assembled into a site, and finally enabled for use; the optional components (with the exception of workflows) are considered last, after the publishing process is configured.
If you are a first-time administrator, we suggest that you familiarize yourself with the procedure below in order to obtain a basic understanding of the configuration process and gather all the information that you will need. Once you understand how sites are configured, you can modify the procedure to suit your needs.
We also suggest that you make a copy of the procedure below and keep it handy when configuring sites. Each step refers you to sections of this guide (or the Oracle Fusion Middleware WebCenter Sites Developer's Guide) where you can find detailed information about the particular step.
This section contains the following topics:
-
Section 3.3.3, "Configuration Steps at the Development System"
-
Section 3.3.4, "Configuration Steps at the Management System"
3.3.1 Assumptions
We assume that you and developers will code the data model at the development system, and after successful testing, migrate the data model to the management system. At the management system, you will complete the site configuration tasks, test the management system, and finally deploy the system. Before beginning the configuration tasks, read Chapter 1, "Overview" for a general understanding of WebCenter Sites concepts, components, and content management models.
3.3.2 Pre-Configuration Decisions
The decisions to make before you start configuring are best handled in a certain order.
Determine the user management method
Your options are WebCenter Sites' native user manager, an LDAP plug-in, or an external manager.
While this guide is based on the native WebCenter Sites user manager, it does describe system behavior for LDAP-integrated systems. For information, see Chapter 33, "Managing Users, Sites, and Roles in LDAP-Integrated Sites Systems." For information about configuring users in LDAP, refer to the LDAP product documentation.
Determine users' table-level permissions (ACLs)
Regardless of which user management method you will be implementing, you must have ACLs defined in WebCenter Sites. Examine the list of system ACLs (and custom ACLs, if any have been created) to determine which ACLs to assign to users, and whether you need to create additional ACLs. Typically, the system ACLs are sufficient. For general information about ACLs, see Chapter 4, "Working with ACLs and Roles." For specifications, see Chapter 31, "System Defaults."
WebCenter Sites defines several system roles and additional roles for the sample sites. You can reuse the roles for your sites, or create your own. Typically, you will need to create roles to cover the full range of users' responsibilities on any given site.
For information about roles, see Chapter 1, "Overview" and the section Section 4.5, "Working with Roles" for general information, and see Chapter 31, "System Defaults," for the list of system roles and their specifications.
Determine whether you will be replicating the sites you are configuring
If you plan to replicate the sites you are configuring, make sure that template-coding and other requirements are satisfied for the source sites (the sites you are currently configuring). For an overview of site replication as well as replication options and requirements, see Chapter 11, "Replicating Content Management Sites."
Before developers begin designing the online site, or contemplating changes to the user interface on the management system, you must determine and implement your security protocols. Decisions that you make about security affect the way that developers code and implement the online site. For information about security, see Chapter 6, "Setting Up External Security."
3.3.3 Configuration Steps at the Development System
Configuration steps at the development system are also given in detail in the Oracle Fusion Middleware WebCenter Sites Developer's Guide. When coding at the development system is complete, the data model is migrated to the management system, where site configuration is completed.
Complete configuration steps in this order:
Create the sites that will be used on the management system
In this step, you will create sites with the names that will be used on the management system. For information and procedures on creating sites, see Chapter 8, "Assembling Content Management Sites."
Create the data model (asset types and their definitions)
For developers to create a data model or any site used on the management system, the developers must be created and configured, preferably as an administrative user, at the development system. For more information on this, see Section 3.3.4, "Configuration Steps at the Management System," and create administrators on the developers' system.
Start by creating the assets with the broadest use to maximize reusability:
-
Create design asset types (templates), bearing in mind site-replication requirements, if any.
-
Create management asset types.
-
Create sample assets of each type.
For information about creating asset types, see the Oracle Fusion Middleware WebCenter Sites Developer's Guide.
Test the data model in accordance with your company's QA requirements.
Migrate the data model to the management system
To migrate the data model, publish it to the management system. For instructions, see the chapters on real-time publishing.
3.3.4 Configuration Steps at the Management System
Once the development system has been put into place, you can then configure the management system.
Complete configuration steps in this order:
For procedures on creating ACLs, see Chapter 4, "Working with ACLs and Roles."
Note:
Under no circumstances should you modify or delete a system ACL.Database tables. When the data model is migrated to the management system, assign ACLs to the custom database tables (asset types), as necessary. For procedures on assigning ACLs to database tables, see Chapter 4, "Working with ACLs and Roles."
WebCenter Sites page entries. Typically there is no need to assign ACLs to WebCenter Sites page entries on the management system because you use roles to control access to assets and interface functions. However, if you need instructions for assigning ACLs to WebCenter Sites page entries, see Section 4.3.5, "Assigning ACLs to WebCenter Sites Pages (SiteCatalog Page Entries)."
Configure the external user manager, if you are using one
For procedures on configuring an LDAP server, see the Oracle Fusion Middleware WebCenter Sites: Installing and Configuring Supporting Software.
For procedures on creating roles, see Chapter 4, "Working with ACLs and Roles."
Create the users (content providers)
For instructions on creating user accounts in WebCenter Sites, see Section 5.4.1, "Creating a New User." If you are creating user accounts in external managers, refer to the product documentation.
Create user profiles, if necessary
User profiles are required for users who will be working with:
-
Sites content applications (Engage, Analytics)
-
Language packs and setting a default language
-
Workflow processes, in which email messages will be sent to notify workflow participants of their assignments. The user profile supports workflow actions by mapping a user name to an email address.
User profiles must be created in WebCenter Sites. For instructions, see Section 5.5, "Working with User Profiles and User Attributes."
Set user attributes, if necessary
If users require attributes beyond the locale and email attributes that are specified in the user profile, you can create the attributes. For instructions, see Section 5.5.3, "Modifying, Adding, and Deleting User Attributes."
Create workflow processes for asset types, as necessary
Implementing workflow processes is a business decision, and not a WebCenter Sites requirement. If you need to create workflow processes, do the following:
-
Create the Workflow tab for the site, if one does not already exist. For instructions, see Section 9.5.2.1, "Creating a New Tree Tab."
-
Plan your workflow process by sketching it. See Chapter 10, "Creating and Managing Workflow Processes" for help with this step. Then refer to your sketch and notes throughout this section.
-
If you have not already done so, create the roles that are needed for the workflow processes. in you need instructions, see Section 4.5.1, "Creating a Role."
-
Ensure that users are set up to participate effectively in the workflow:
-
Ensure that users who will participate in workflow have user profiles created for them. Otherwise, they will not receive email messages from the workflow process.
-
For shared assets, if you want the pool of workflow candidates to include people from all the sites that an asset is shared to, enable the cross-site assignments feature. See Section 10.2.2.3, "Cross-Site Assignments and Participants" for details.
-
-
Create the email objects that you need for your actions and enable the
xcelerate.emailnotificationproperty in thefuturetense_xcel.inifile. For instructions, see Chapter 1, "Overview." -
Create the step actions, timed actions, deadlock actions, group deadlock actions, and delegate actions that you need. For instructions, see Section 10.3.3, "Setting Up the Actions and Conditions."
-
If your states have deadlines, be sure to configure the Timed Action Event so that the deadlines of assets are calculated regularly and the appropriate timed actions (if any) are invoked in a timely way. For instructions, see Section 10.3.4, "Setting Up the Timed Action Event."
-
Create your states. For instructions, see Section 10.3.5, "Setting Up the States."
-
Create your process. While creating your workflow process, you create the steps for that process. The steps link together the states so they occur in the proper order. Additionally, while creating your process, you configure any function privileges that you need. For instructions, see Section 10.3.6, "Setting Up the Workflow Processes."
-
Test your workflow processes. For instructions, see Section 10.3.7, "Testing Your Workflow Process."
Set up your start menu shortcuts so that workflow processes are assigned automatically to assets when they are created. For help with start menu items, see Section 9.2.2, "Creating Start Menu Items."
Re-create the sites that were created on the development system
For information and procedures on creating sites, see Chapter 8, "Assembling Content Management Sites."
Migrate the data model, if you have not already done so
At this point, you will need the data model in order to complete most of the remaining steps. Real-time publish the data model from the development system to the management system by using procedures in the chapters on real-time publishing.
Assign custom ACLs (if any) to the custom tables, if you have not already done so
For procedures on assigning ACLs to database tables, see Chapter 4, "Working with ACLs and Roles."
-
Grant users access to the sites. For instructions, see Section 8.2.1, "Granting Users Access to a Site (Assigning Roles to Users)."
-
Enable asset types for the sites by associating the asset types with the sites. For instructions, see Section 8.3.1, "Enabling Asset Types for a Site."
Note:
This step provides you with the option of allowing WebCenter Sites to automatically create Start Menu items for the asset types you are enabling. The Start Menu items New and Search items allow site users to create and search for assets of those types. You can also create your own Start Menu items.Make the site components available to users
-
If you have chosen to create your own Start Menu items for various asset types, go to Section 9.2, "Managing Access to Asset Types via Start Menus" for additional instructions.
-
Set access permissions on assets. For instructions, see Section 9.3, "Setting Access Permissions to Assets."
-
Give users access to the tabs in WebCenter Sites' tree. For instructions, see Section 9.5, "Managing Access to the Tree (Administrator's interface only)."
Configure the Sites publishing process
-
Determine which type of publishing your management system is to execute:
-
RealTime
-
Export to Disk
-
Mirror to Server
-
Export Assets to XML
-
-
Configure the publishing process so the information that content providers create can be made available to the delivery system.
For general information and instructions on configuring the publishing process, see the chapters on export and mirror publishing. For information on the RealTime publishing process, see the chapters on real-time publishing.
Configure user interfaces, as necessary
The user interface options are Contributor, Admin, WEM Admin, Sites Desktop, and Sites DocLink. For instructions on making these interfaces available to content providers, see Chapter 23, "Configuring the User Interfaces."
Enable asset types for search engines, as necessary
In some cases, such as upgrades, it may be necessary to configure the asset types to be searched so that they can be indexed correctly and found by your search engine. For instructions on configuring the asset types, see Chapter 25, "Configuring the Lucene Search Engine."
Set up revision tracking, as necessary
Revision tracking prevents assets from being edited by more than one user at a time. When you enable revision tracking for a database table, WebCenter Sites maintains multiple versions of the assets in that table. For instructions on setting up revision tracking, see Chapter 26, "Revision Tracking."
For more information, see the Oracle Fusion Middleware WebCenter Sites Developer's Guide.
Test all systems in accordance with your company's QA policies.
Give users the URL and their log in information to the to the WebCenter Sites installation
Once users log in, they can then control and manage the content as you've configured.