2 Administrator's Interface
Oracle WebCenter Sites defines three kinds of administrators, each with a different range of administrative rights. This chapter summarizes the administrators and shows you how to log in to Oracle WebCenter Sites as the general administrator. It describes the administrator's interface, its tabs, the nodes within the tabs that allow you to manage sites, and important system defaults that are accessible either from the interface or the back end.
This chapter contains the following sections:
2.1 Types of WebCenter Sites Administrators
Oracle WebCenter Sites defines three types of administrators:
-
The general administrator, for whom this guide is written.
The general administrator typically manages all systems in the WebCenter Sites environment and therefore has unrestricted access to each system's interfaces. The jobs of the general administrator at each system are outlined in Chapter 1, "Overview."
-
Site administrators, who administrate only certain sites on the management system.
-
Workflow administrators, who create workflow processes on the management system
Each administrator is given permissions to relevant parts of the WebCenter Sites interface.
Procedures in this guide are specific to the general administrator. Whenever steps can be executed by the site or workflow administrators, this guide indicates which steps.
Finally, this guide is not restricted to any particular system in the WebCenter Sites environment. The concepts and procedures it contains are valid at all systems in the WebCenter Sites environment.
Note:
As this guide is written for the general administrator, the word "you," whenever it is used, refers strictly to the general administrator.2.2 Logging in to the Administrator's Interface
This section shows you how to log in to Oracle WebCenter Sites as the general administrator.
Note:
If you are not the general administrator and need to log in as a site administrator or workflow administrator, obtain your user name and password from the general administrator before following the steps below. Also bear in mind that because your permissions to the Oracle WebCenter Sites interfaces are limited by your role, only certain parts of this guide are relevant to you.To log in to Oracle WebCenter Sites as the general administrator
-
Open your browser.
-
Set your browser so that it checks for newer versions of stored pages with every visit to the page.
-
Navigate to the following URL:
http://<server>:<port>/<context>/loginwhere
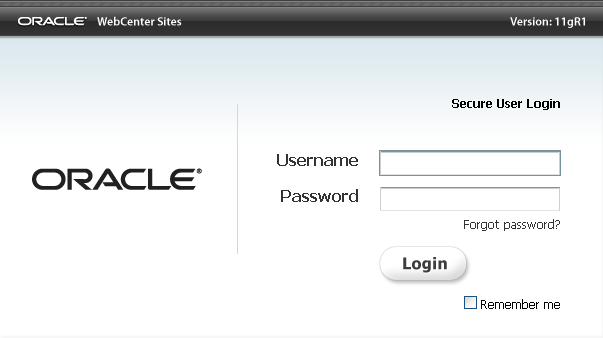
<server>is the host name or IP address of the machine running Oracle WebCenter Sites,<port>is the port number for the server, and<context>is the context path of the Oracle WebCenter Sites web application. Depending on how the system was set up, you might also need to include the port number. The system can be development, management, delivery, testing, or another system in your WebCenter Sites environment.Oracle WebCenter Sites displays the following login dialog:
-
Enter your user name and password
Note:
If you are the general administrator of a new installation that had no previous administrator, log in as the default system user, with user name fwadmin and password xceladmin and then immediately change the password. For instructions on changing your password, follow the procedure in Section 5.4.1, "Creating a New User."Because you have logged on as the default administrator, your user name has the xceladmin ACL (Access Control List) assigned to it, in addition to being a part of the REST_Admin security group. See Chapter 5, "Configuring Users, Profiles, and Attributes" for information about user accounts and their ACLs.
If you create any other general administrators, they must have the xceladmin ACL assigned to them, and they must be part of the REST_Admin security group.
-
Click Login.
-
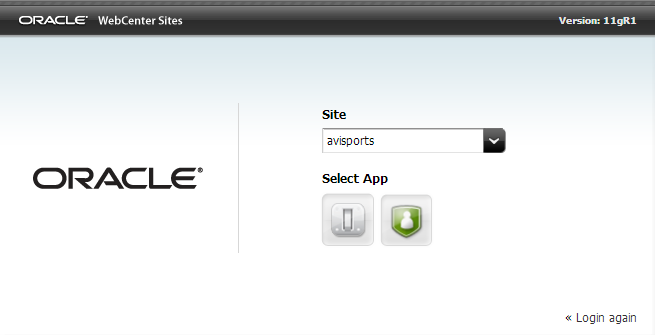
WebCenter Sites responds according to the number of sites that have been created in its interface. To continue, complete one of the following steps:
-
If no sites have been created, you must log in to the AdminSite, which will be listed in the drop-down list. (Note that the situation of no sites is rare. Most new installations run the sample sites that are provided with Oracle WebCenter Sites.) Continue with step 7.
-
If one site has been created, you still need to select the site from the list to log in to that site. Continue with step 7.
-
If two or more sites have been created, they are listed in your WebCenter Sites interface, along with the sample sites that your installation engineer has elected to install. Select the site that you want to work on. Continue with step 7.
-
-
Once a site is selected, you will see two icons appear. The left icon is to log in to the Admin interface, and the right icon is to log in to the Contributor interface.
Click to enter the Admin interface.
If you select AdminSite, the icons will be slightly different.
-
At this point, you are logged in to the site of your choice. All the tasks that you complete pertain to the site, until you switch to a different site. The one exception is the set of administrative tasks that you execute from the Admin tab, which is not site specific. The Admin tab contains data for all sites in the system.
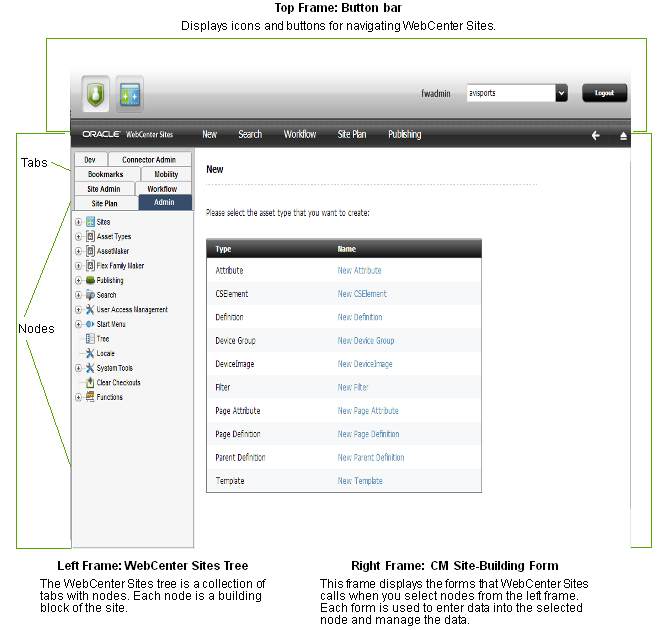
Within your selected site, Oracle WebCenter Sites displays the administrator's interface, consisting of the three frames shown in Figure 2-3:
Note:
At this point, the first time you log in after selecting a site, you will be prompted to create a new asset type, with the New form displaying.If you are a first time WebCenter Sites user, we recommend that you familiarize yourself with the following features:
-
The administrator's interface—the Admin tab in particular. You will be using the Admin tab almost exclusively throughout this guide to create, configure, and manage sites. For more information, see Section 2.3, "Administrator Tabs.".
-
System defaults, such as ACLs, which you will need in order to configure users, their access rights, and so on. For more information about system defaults, see Chapter 31, "System Defaults."
-
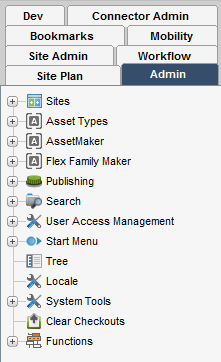
2.3 Administrator Tabs
Up to three administrator-specific tabs can be displayed in Oracle WebCenter Sites' tree:
-
Admin
-
Site Admin
-
Workflow
The tabs are permissions-based. To be exposed to the user, they require the user to have the ACLs and roles shown below:
Table 2-1 Tab Permissions and Roles
| Tab | ACL | Role |
|---|---|---|
|
Admin |
xceladmin |
GeneralAdmin |
|
Site Admin |
xceladmin |
SiteAdmin |
|
Workflow |
xceladmin |
WorkflowAdmin |
The ACLs and Roles are covered in further depth in Chapter 5, "Configuring Users, Profiles, and Attributes," and Chapter 31, "System Defaults."
The tabs are also conditional on the type of site in which you are working:
-
If you log in to a Oracle WebCenter Sites installation where no sites have been created, you are required to log in to the AdminSite site. Here, you see only the Admin, Site Admin, and Workflow tabs.
-
If you are logged in to a custom site, both the Admin and the Site Admin tabs are displayed in your interface. The Admin tab remains system-wide. The SiteAdmin tab is specific to the site you are logged in to. It is therefore a sub-set of the Admin tab.
-
If workflow processes have been created for any site (except the default site), the Workflow tab is also displayed in your interface. The Workflow tab lists all workflow processes that have been configured for all sites in the system.
Whether administrator tabs are exposed to other users depends on whether you assign the users the associated ACLs and roles. For more information about ACLs and roles, see Chapter 4, "Working with ACLs and Roles." For more information about administering Mobility (for mobile devices), see the Oracle Fusion Middleware WebCenter Sites Developer's Guide
This section contains the following topics:
2.3.1 Admin Tab
The Admin tab is the main administrative tab, used to create, configure, and manage sites. The Admin tab accounts for all content management components in the Oracle WebCenter Sites installation.
The Admin tab displays the following nodes:
-
Sites, that is, CM sites (described in Chapter 1, "Overview").
The Sites node has the following functions:
-
Lists sites that have been created in the system.
-
Enables you to define sites and associate to them the components from the system-wide configuration pool, below the Sites node. Oracle WebCenter Sites provides several sample sites as learning tools.
The configuration pool consists of the following nodes:
-
-
Asset Types, for configuring asset types:
-
To add subtypes or asset associations for basic asset types.
-
To create start menu items for asset types that appear on the New and Search menus.
-
To enable or disable revision tracking for specific asset types. See Chapter 26, "Revision Tracking" for information.
-
To enable assets for Sites Desktop. For information, see Chapter 23, "Configuring the User Interfaces".
-
To enable assets for Sites DocLink. For information, see Chapter 23, "Configuring the User Interfaces".
-
-
AssetMaker, for site developers to create asset types using the basic asset data model. See the Oracle Fusion Middleware WebCenter Sites Developer's Guide for information.
-
Flex Family Maker, for site developers to create new flex families and flex asset types. See the Oracle Fusion Middleware WebCenter Sites Developer's Guide for information.
-
Publishing, for setting up the publishing system on the development and management systems. See Chapter 12, "Publishing with Oracle WebCenter Sites" for more information on publishing in general. See Chapter 15, "The Export to Disk Publishing Process" and Chapter 16, "The Mirror to Server Publishing Process" for more information on static and dynamic publishing. See Chapter 19, "RealTime Publishing Overview" for information about interactive dynamic publishing.
-
Search, for configuring asset types so that they are indexed correctly when you are using one of the supported third-party search engine modules. See Chapter 25, "Configuring the Lucene Search Engine" for information.
-
User Access Management, which you use to create ACLs and users, to enable or disable revision tracking for non-asset tables, and to perform various other operations on WebCenter Sites' database. This node includes the following:
-
Users, which you use to manage WebCenter Sites users and the roles associated with each user ID. See Chapter 5, "Configuring Users, Profiles, and Attributes" for more information.
-
Roles, which you use both for determining the recipients of workflow assignments and to control users' access to functions in the Oracle WebCenter Sites interfaces. For more information, see Chapter 4, "Working with ACLs and Roles."
-
ACLs, which are used for allowing access to individual tables and sites. For more information, see Chapter 4, "Working with ACLs and Roles."
-
User Profiles, which you use to specify email addresses for your users. See Chapter 5, "Configuring Users, Profiles, and Attributes" for more information.
-
REST Security, for configuring the security groups and assigning users to those groups. Adding someone to the security groups is tied to the WebCenter Sites interface. See Chapter 6, "Setting Up External Security" and the Oracle Fusion Middleware WebCenter Sites Developer's Guide for information.
-
-
Start Menu, which you use to create links in the form that is displayed when users click the New button or Search button in the Oracle WebCenter Sites interface. You use the links to create new assets or search for existing assets. Start Menu items can also be created for managing access to the Sites Desktop and Sites DocLink interfaces. See Chapter 9, "Managing Access to Content Management Site Components" for information.
Note:
This release of WebCenter Sites supports automatic creation of the New and Search Start Menu items. -
Tree, which you use to control access to the existing tree tabs, create new ones, or view assets in the tree in the Contributor interface. See Chapter 9, "Managing Access to Content Management Site Components" for information.
-
Locale, which you use to set the default locale for the WebCenter Sites system. See Chapter 23, "Configuring the User Interfaces" for information.
-
System Tools, which you use to troubleshoot problems directly from the administrator's interface. Features include configuring log4j logging, accessing various types of system information, managing caches, searching logs, and testing the performance of the shared file system. See Chapter 30, "System Tools" for information.
-
Clear Checkouts, which you use to unlock and check back in to the database the assets that are checked out by specific users. See Chapter 26, "Revision Tracking" for information.
-
Functions, which administrators can enable or disable in the Oracle WebCenter Sites interfaces of all users or selected users.
2.3.2 Site Admin Tab
The Site Admin tab is site-specific. It is used to manage the site that you are logged in to.
The Site Admin tab holds a subset of the administrative functions in the Admin tab. It allows you to manage existing users of the site, as well as enable or disable asset types. It does not allow you to create users, asset types, or sites.
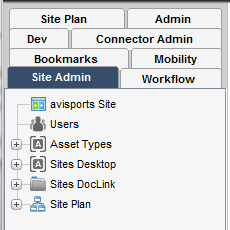
For any other user to access this tab, the user must be assigned the xceladmin ACL and the SiteAdmin role for the site(s) that the user logs in to.
2.3.3 Workflow Tab
The Workflow tab is used to configure workflow processes from the workflow building blocks that were created using the Admin tab.
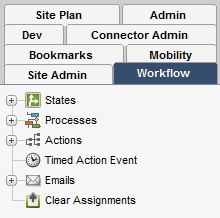
Note:
While the Workflow tab itself is site-specific, its content is not.The tab. When a user selects a site, the Workflow tab is displayed if the user is assigned the xceladmin ACL and WorkflowAdmin role for that site. In this respect, the Workflow tab is site-specific.
The tab's content. The Workflow tab displays system-wide information, that is, all workflow processes for all sites in the installation. Therefore, the content under the nodes in the Workflow tab is not site-specific.
-
States, which you use to create points in the workflow process that represent asset status within the workflow. See
-
Actions, which you use to create the workflow building blocks called actions and conditions. These items can be used by any workflow process.
-
Timed Action Event, which you use to configure the frequency with which due dates are calculated for assets that are in workflow.
-
Email, which you use to create the workflow email messages that can be used by any workflow process.
-
Clear Assignments, which you use to clear workflow assignments.
For more information on workflow, see Chapter 10, "Creating and Managing Workflow Processes."
2.4 Non-Administrative Tabs
Your interface displays default non-administrative tabs, and custom tabs if they have been configured by another administrator. You can create additional tabs as necessary.
For information about the default tabs, see Section 31.7, "Default Tree Tabs." For information about creating and configuring tabs, see Section 9.5, "Managing Access to the Tree (Administrator's interface only)."
2.5 System Defaults
WebCenter Sites has a number of system defaults:
-
Non-administrative tabs, described in the previous section
-
ACLs
-
Roles
-
Users
-
Asset types
-
System Tables
You must be familiar with the defaults in order to configure users and sites. Information about system defaults is given in Chapter 31, "System Defaults" and Chapter 32, "System Data: WebCenter Sites Database."
2.6 Sample Sites
To help you better understand WebCenter Sites, we have packaged it with sample sites named avisports and FirstSiteII. You can use the sites to learn about and experiment with WebCenter Sites without affecting your own sites. The sample sites vary in complexity and purpose. In addition to providing code samples for developers, they exemplify how sites are configured.
If your installation engineer has elected to install the sample sites, they will be displayed in your interface.
To work on the sample sites, follow the steps in Section 2.2, "Logging in to the Administrator's Interface." You can access the corresponding online sites by pointing your browser to each site's URL, available from your installation engineer.