16 The Mirror to Server Publishing Process
This chapter explains how Mirror to Server publishing works and how it is configured.
This chapter contains the following sections:
-
Section 16.2, "Before Configuring Mirror to Server Publishing"
-
Section 16.3, "Configuring Your System for Mirror to Server Publishing"
-
Section 16.5, "Retrieving Logs From Delivery WebCenter Sites Systems"
Note:
The following features are deprecated in WebCenter Sites 11g Release 1 (11.1.1.8.0): Mirror publishing, static publishing. Mirror publishing is replaced by RealTime publishing.16.1 How Mirror to Server Publishing Works
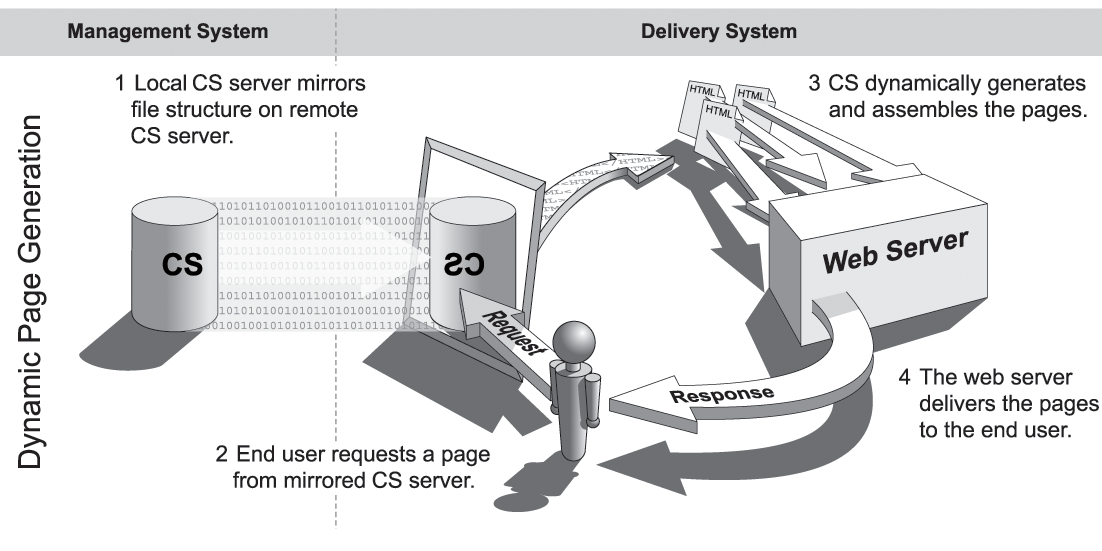
The Mirror to Server publishing method gathers information from the approval system, the publishing schedule, and the destination configurations, copies data to the destination, unpacks that data on the destination system, and then invokes the CacheManager servlet to refresh any pages that should be regenerated to take advantage of the new content.
Whether or not your Sites delivery system delivers content dynamically, you probably use the Mirror to Server publishing method to move data from your development systems to your management system. For information about that process, see Section 18.16, "Troubleshooting".
When a Mirror to Server publishing session runs, this is what occurs:
Figure 16-2 Mirror to Publishing Process
Description of ''Figure 16-2 Mirror to Publishing Process''
-
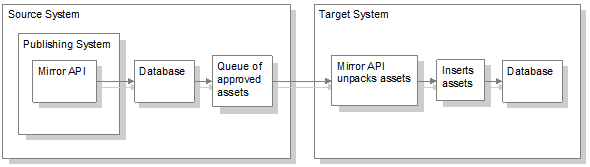
On the source system, Mirror to Server publishing uses the list of approved assets that the publishing system passed to it to create a mirror queue for the destination.
Mirror Queue for Basic Assets
For basic assets, the following information is added to the queue:
-
The asset's main table row. For example, for page assets, the asset's row in the
Pagetable. -
The appropriate rows in the
AssetPublicationtable. These rows list sites and which assets belong to them. -
Rows in the
AssetRelationTreetable that refer to any assets that are associated with the asset being published. -
The associated assets referenced by those rows in the
AssetRelationTreetable. The asset table rows,AssetPublicationrows, and associated assets of any dependent assets are also mirrored, if they are approved and have not yet been published.
Mirror Queue for Flex and Complex Assets
For flex asset types and the other multi-table asset types like template and CSElement, the information from the appropriate rows from all of their tables are serialized into an object and stored in the
_Publishtable for that asset type.For example, when a template is to be published, the appropriate rows from the
Template,SiteCatalog, andElementCatalogtables are serialized into an object and stored in theTemplate_Publishtable.Each item in a
_Publishtable is added to the mirror queue. -
-
WebCenter Sites uses the
AssetPublishListtable to create a list of all the assets that are in the mirror queue. -
The mirror operation starts.
First, the
AssetPublishListis mirrored from the source to the destination. -
The mirror queue is delivered and the publishing system unpacks the assets in the queue.
For flex assets, Mirror to Server publishing de-serializes the objects in the
_Publishtables, and inserts the results in the appropriate tables.For basic assets, each row in the queue is copied.
-
When the items in the mirror queue are unpacked, the publishing system sends messages that the mirror publish concluded successfully. The destination system responds as follows:
-
The newly-published assets are marked as changed on the destination system, which means that before they can be published from that system to another destination, they must be approved. Note that this feature is enabled by default. You can turn it off if you need to. See Section 16.3.12, "Turn Off Asset Invalidation on the Delivery System" for details.
-
The CacheManager servlet on the destination regenerates the appropriate pages in the cache so that all pages that refer to the assets that were just published are updated. It also rebuilds any pages that have unknown compositional dependencies.
-
CacheManager then communicates a message about which pages must be refreshed to each Satellite Server identified by the
satellite.inifile on the destination system. It communicates with the co-resident version and any remote instances that are identified as belonging to this Sites system. The Satellite Server applications then use that information to refresh the Satellite Server page caches. -
The
AssetPublishListtable is cleared, making it ready for the next publishing session.
-
-
On the source system, the publishing system updates the publish log file. Unlike the Export to Disk publishing method, which writes to the publish log after each asset is exported, Mirror to Server publishing waits until the entire mirror queue has been successfully mirrored before writing the results to the publish log.
-
When the publishing session is successful, WebCenter Sites concludes the session by writing information about the published references to the
PubKeyandPublishedAssetstables and by clearing theAssetPublishListtable on the source system. -
WebCenter Sites also writes information about the assets that were published to the
ApprovedAssetsandApprovedAssetDepstables so the approval system can calculate dependencies correctly the next time an asset is approved.
16.2 Before Configuring Mirror to Server Publishing
Before you configure the Mirror to Server publishing process, take into the consideration the topics that are presented in this section. Prior knowledge of the information you will be providing will help to ensure a smooth configuration process:
16.2.1 Users and Mirror to Server Publishing
In addition to the batch user account on the source system that a publish event uses to process a publishing session, the Mirror to Server publishing method requires another user account: the mirror user account, which is located on the destination server. This is the user account that the publishing system uses to unpack the mirror queue on the destination system.
When you set up a Mirror to Server publishing destination, you must create the mirror user account on the destination system that the destination represents.
16.2.2 CacheManager
The CacheManager is a WebCenter Sites servlet that maintains the page cache on any dynamic Sites system, including the management system.
CacheManager is important to the publishing system because it locks the appropriate assets on the destination during a mirror publish and ensures the integrity of the page cache both before and after a mirror publishing session.
For more information about the CacheManager, see the Oracle Fusion Middleware WebCenter Sites Developer's Guide.
16.2.3 Configuring a Mirror Destination
The Mirror to Server publishing method copies information for approved assets from one Sites database to another. This information must be configured for the mirror destination. Configuring a mirror destination involves two steps: initializing the destination, and configuring the data for the destination.
Whenever you create a new mirror destination, you must initialize it before you can publish to it. To initialize a mirror destination, you specify the following information:
-
The sites. Based on the sites that you select, the appropriate rows from the
Publication,SitePlanTree, andPublicationTreetables are mirrored to the destination. -
Any custom table that supports or is directly related to your asset types. In other words, a table for assets that was not created by either AssetMaker or Flex Family Maker. Examples of these are
SourceandMimetype. These tables are called auxiliary tables.
Mirror destination configuration is the process of indicating which data (for example, assets types, associations, and start menu items) will be mirrored to the target destination. Mirror destination configuration moves configuration data and rows from auxiliary tables—which are non-asset database tables that are used for the dynamic display of the assets—from one Sites database to another.
16.2.4 When to Use Mirror Destination Configuration
You use the Mirror Destination Configuration feature in several situations:
-
To set up any new mirror destination.
-
To move configuration items that support asset types (start menu items, associations, and so on) from a development system to a management system or to a delivery system.
-
To move workflow configuration data from a development system to a management system.
-
If you or your developers add any additional sites, asset types, or auxiliary tables to your system.
-
If you or your developers add any additional categories or subtypes for existing asset types.
-
When you need to troubleshoot your configuration. If you can successfully initialize a mirror destination, that means that the source and the destination systems are communicating.
16.3 Configuring Your System for Mirror to Server Publishing
The main steps when configuring a system for Mirror to Server publishing are as follows:
-
Section 16.3.1, "Create the Batch User Account (If One Does Not Exist)"
-
Section 16.3.3, "Identify the Mirror User to the Source System"
-
Section 16.3.4, "Identify the Local Proxy Server to the Source System (If One Exists)"
-
Section 16.3.12, "Turn Off Asset Invalidation on the Delivery System"
Note:
Configuring a system for Mirror to Server publishing requires you to provide information that is specific to your WebCenter Sites installation and your business practices. Before starting the procedures in this section, it is best to read them in order to gather and confirm the information they prompt you to provide.
16.3.1 Create the Batch User Account (If One Does Not Exist)
Note:
This procedure needs to be performed only once on each source system, regardless of the number and types of publishing destinations you are configuring.If a batch user account already exists on your source system, skip to Section 16.3.2, "Set Up the Destination System."
-
If you have not already done so, create the batch user account. For instructions, see Section 15.4.1, "Create the Batch User Account (If One Does Not Exist)."
-
If a batch user account already exists for your installation, skip to Section 16.3.2, "Set Up the Destination System."
16.3.2 Set Up the Destination System
To mirror publish assets from one Sites system to another, you must ensure that the sites and asset types are the same on both the source and the destination system. You must also create an additional user on the destination system, called the mirror user (as opposed to the batch user, which exists on the source). This user completes the mirror publish database transactions on the destination system.
Note:
Database properties on the source and destination systems, if not an exact match, must be compatible, particularly database schema options (set infuturetense.ini). Be sure to restart the application server if you make changes to futuretense.ini.To set up your destination system
-
If you have any custom support tables—a lookup table for a field in an asset type, for example — create those tables on the destination system.
-
On the destination system, create the mirror user and note the following:
Note:
The mirror user has the same privileges as the RealTime user configured for RealTime publishing. If a RealTime user is configured for RealTime publishing, the same user may serve as the mirror user.-
This user must have the following ACLs:
-
Browser
-
ElementEditor
-
PageEditor
-
TableEditor
-
Visitor
-
VisitorAdmin
-
xceladmin
-
xceleditor
-
-
Because the mirror user account is used by the CacheManager to regenerate the page cache after a publishing session, the mirror user must have sufficient privileges to regenerate all the pages in the cache. Therefore, the mirror user account must be given to all ACLs which are assigned to page entries in the
SiteCatalogtable or database tables that are holding data to be rendered.Note:
If any of the sample sites are installed on the destination system, a user named "mirroruser" already exists. For security, if you decide to keep this user as your mirror user, be sure to change the password for this user; or if you decide to create a different mirror user, be sure to delete the sample site "mirroruser." -
If you need help with creating the mirror user, see Section 5.4.1, "Creating a New User."
-
16.3.3 Identify the Mirror User to the Source System
Next, you identify the name and password of the mirror user on the destination system to the source system by setting property values in the futuretense.ini file on the source system.
Note:
Because the proxy server is used by both Mirror to Server and RealTime publishing, it may have been set up for RealTime publishing. In such a case, review the properties in the steps below to ensure they are set correctly.To identify the mirror user to the source system
-
Start the Property Editor and open the
futuretense.inifile on the source WebCenter Sites system. If you need help with this step, see the Oracle Fusion Middleware WebCenter Sites Property Files Reference. -
In the Export/Mirror tab specify values for the following properties:
-
cs.mirroruserSet this property to the name of the user that you created on the destination system in the preceding procedure.
-
cs.mirrorpasswordSet this property to the password of the user that you created on the destination system in the preceding procedure.
-
-
Save the property file.
-
Do one of the following:
-
If there is a firewall separating your source system from the destination system, go to Section 16.3.4, "Identify the Local Proxy Server to the Source System (If One Exists)."
-
If there is no firewall separating your source and destination systems, close the Property Editor. Stop and restart the application server. Then go to Section 16.3.5, "Create a Mirror Destination."
-
16.3.4 Identify the Local Proxy Server to the Source System (If One Exists)
Note:
This procedure needs to be performed only once on each source system, regardless of the number and types of publishing destinations you are configuring. Skip to Section 16.3.5, "Create a Mirror Destination" if the local proxy has already been identified to your source system, or a proxy server is not used.To identify the local proxy to the source system:
-
Open
futuretense.iniin the Property Editor on the source system, select the Export/Mirror tab, and specify values for the following properties:-
cs.mirrorproxyserverSet this property to either the name or the IP address of the local proxy server.
-
cs.mirrorproxyserverportSet this property to the port number of the local proxy server.
-
-
Save the property file and close the Property Editor.
-
Restart the application server.
16.3.5 Create a Mirror Destination
To create a mirror destination
-
Log in to the administrator's interface on the source WebCenter Sites system.
-
In the Admin tab, expand Publishing, then Destinations.
-
Under Destinations, double-click Add New.
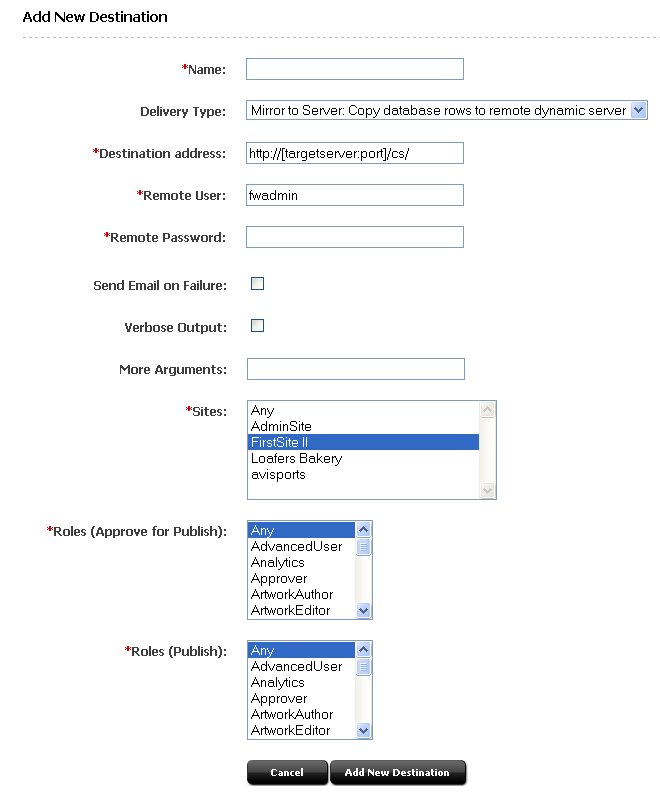
The Add New Destination form appears.
-
Configure the fields on this form as follows:
-
Name: Enter a unique name for the destination.
-
Delivery Type: Select Mirror to Server: Copy database rows to remote server.
-
Destination Address: Enter the URL of the remote server in the format shown. For
<targetserver:port>, enter the hostname or IP address of the target system and the port to be used by the destination. A slash is required at the end of the URL because this URL is appended dynamically. -
Remote User: Enter the name of the mirror user created in Section 16.3.2, "Set Up the Destination System." This user will be invoked by the publishing system to unpack the mirror queue on the target system.
-
Remote Password: Enter the password of the mirror user.
-
Send Email on Failure: If publishing fails and email notices to that effect are required, select the checkbox.
-
Email Addresses: Enter the recipient's email address. (This field is available only when Send Email on Failure is selected).
-
-
Verbose Output: Select this option to activate detailed error logging during the publishing process. When selected, messages in addition to error messages are written to the PubMessage table. Because additional information lengthens the publishing process, select this parameter only for troubleshooting.
-
More Arguments: This parameter is reserved for future use; no additional arguments may be specified at this time.
-
Sites: Select the sites whose assets can be approved for and published to this destination.
-
Roles (Approve for Publish): Select the roles to which you are assigning approval privileges. All users who are assigned these roles will be allowed to approve assets.
-
Roles (Publish): Select the roles to which you are assigning publish privileges. All users assigned these roles can publish.
-
-
Click Add New Destination.
WebCenter Sites displays the Publish Destination form.
-
If you are ready to initialize this destination system (you must initialize the destination system before you can publish to it), click the Initialize Mirror Destination button in the Publish Destination form, then proceed to Section 16.3.6, "Initialize the Destination" for detailed instructions (begin at step 4 of that procedure).
If you need to create more mirror destinations, repeat steps 1 through 5 for each additional mirror destination that you need to create for your source system.
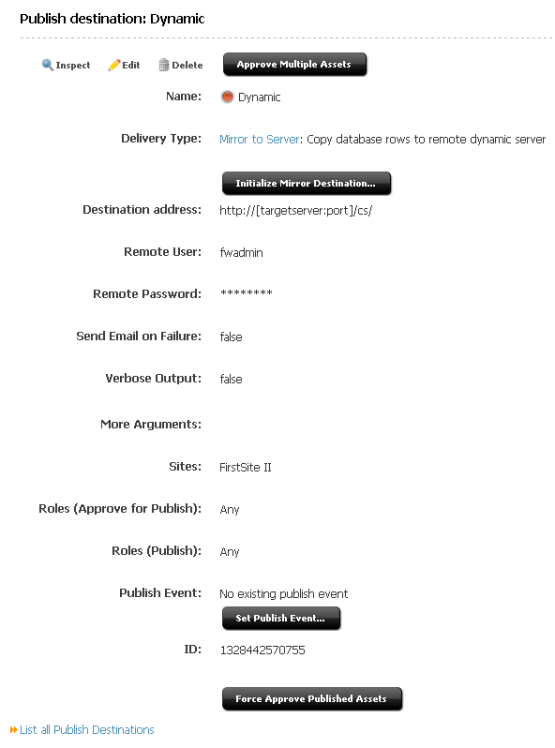
16.3.6 Initialize the Destination
You must initialize the destination system before you can publish to it. This creates the basic site information on the destination system. Specifically, the Publication and PublicationTree tables are updated with the site names and asset types published to the target.
To initialize the destination system
-
In the Admin tab, expand Publishing, then Destinations.
-
Under Destinations, double-click the destination you want to initialize.
-
In the Publish Destination form, click Initialize Mirror Destination.
The Initialize Mirror Destination form appears
Figure 16-5 Initialize Mirror Destination Form
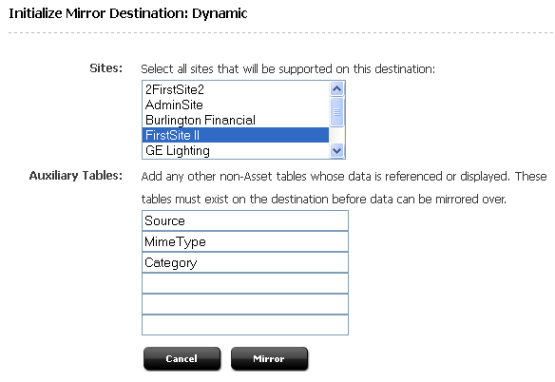
Description of ''Figure 16-5 Initialize Mirror Destination Form''
-
Select the sites whose assets you want to publish to this destination.
-
In the Auxiliary tables fields, enter the names of the following tables:
-
Source, if you are using the source feature for any of your asset types -
Mimetype, if you are using Sites DocLink, flex filter assets, the ImageFile asset type, or if you are using this table for any of your custom asset types. -
Filters, if you are using flex filters on your site. (TheFilterstable lists the classes that are used by the flex filters. You will need to copyjarfiles and classes manually.) -
Any other auxiliary tables (such as lookup tables) for your asset types.
-
-
Click Mirror.
If the initialization is successful, WebCenter Sites displays a confirmation message; otherwise, an error message is displayed.
Based on the sites that you selected in step 4, the corresponding rows from the
Publication,SitePlanTree, andAssetTypetables are copied to the destination.Additionally, all the rows in the tables that you specified as auxiliary tables are copied to the destination.
Note:
You can also initialize the target destination from the Publish Console: In the button bar, click Publishing.-
In the Publish Console, select your mirror destination from the drop-down list and then click Select Destination.
-
Click the Create Site on Target button. When the confirmation form appears, click Yes. This creates the basic site information on the destination system.
-
16.3.7 Configure the Mirror Destination
Now you need to configure the data that will be on your target destination. This configuration will vary depending on the purpose of the target destination. For example, if the target destination is strictly a delivery machine, it makes sense to only include asset types when mirroring. Before proceeding with configuring the destination, you may find it helpful to refer to Section 18.1, "Migrating a Site from One System to Another."
Note:
If Revision Tracking is turned on at the publishing target destination for either ElementCatalog or SiteCatalog, then the publishing of template will fail and the template may become corrupted.It is not recommended to enable Revision Tracking on the target destination.
-
In the Admin tab on the source system, expand Sites and double-click the site whose data you want to publish on the target destination.
-
In Publish Destinations (near the bottom of the form), click Mirror site configuration for destination (dynamic), where destination is the target destination.
WebCenter Sites displays the Mirror Site Configuration form:
Figure 16-6 Mirror Site Configuration Form
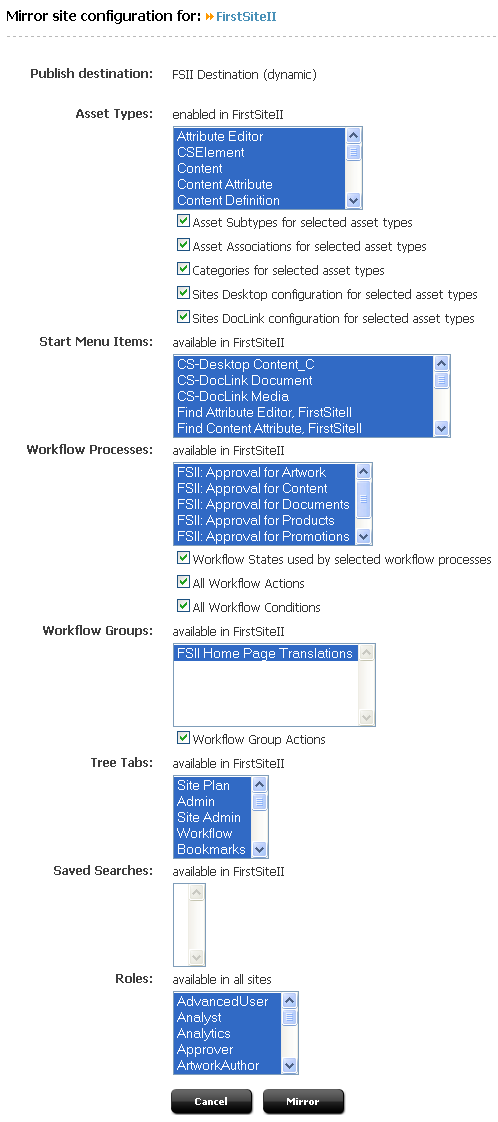
Description of ''Figure 16-6 Mirror Site Configuration Form''
Select the data you wish to make available on the target destination:
-
Asset Types: Select the asset types that you want to make available on the target destination.
If your asset types have subtypes and categories, choose the appropriate options from the list in the Asset Types section and select the corresponding check boxes. For example, the
AssocNamedtable contains information about associations for asset types. The table will be mirrored only if you select Asset associations for selected asset types and then the relevant asset types.Select the Sites Desktop / Sites DocLink configuration check boxes to configure the selected asset types for Sites Desktop and Sites DocLink.
-
Start Menu Items: Select any start menu items that you or the developers designed for your content providers to use.
-
Workflow Processes: If there are workflow processes for your asset types, select these processes and the appropriate workflow items.
-
Workflow Groups: Select any workflow groups that you or the developers designed for your content providers to use.
-
Tree Tabs: Select the tree tabs that you want to make available on the target destination.
Note:
If any of the following tree tabs already exist on the target destination, mirroring the tree tabs will fail and potentially corrupt the tree tabs on the destination: Site Plan, Admin, Site Admin, Workflow, Bookmarks.It is not recommended to mirror tree tabs that already exist on the target destination.
-
Saved Searches: Select any saved searches that you or the developers designed for your content providers to use.
-
Roles: Select the roles you want to exist on the target destination.
-
-
Click Mirror.
Based on which asset type configuration options you selected in step 1, appropriate rows from the
AssocNamed,AssocNamed_Subtypes, andCategorytables are copied to the destination.If you selected Start Menu Items or Saved Searches, appropriate rows from the tables that implement those features are copied to the destination.
Based on which workflow configuration options you selected in step 1, appropriate rows from the workflow tables are copied to the destination.
-
Repeat steps 1–3 for each site whose assets you want to publish on the target destination.
16.3.8 Approve Your Assets
To truly test your published site, you must approve and publish all the assets for the site. See Section 18.2, "Approving Multiple Assets" for help with approving many assets at once.
If you want to perform a simple test of your configuration, temporarily create a home page asset with only a few dependents.
16.3.9 Publish the Assets
After you have approved assets that can be published to your destination, you can run a test publishing session:
-
On the source system, click Publishing in the button bar.
-
In the Publish Console, select your mirror destination from the drop-down list and click Select Destination.
WebCenter Sites displays information about the assets that are ready to be published to this destination.
-
If for some reason the target destination has not yet been initialized, it must be initialized now or the publishing session will fail. To initialize the destination, click Create Site on Target in the Publish Console. This creates the basic site information on the destination system.
-
Click Publish.
A confirmation message appears. Click Yes to proceed with the publish.
The publishing system mirrors all the approved assets for this destination to the WebCenter Sites database on the destination system.
-
In the Publish Console Active tab you can observe that the session is running.
-
When the session completes, click the History tab to view the session summary for this session.
Mouse over the session information to view summary information; click View Log to view the session log files. For information on configuring the logs to view destination information, see Section 16.5, "Retrieving Logs From Delivery WebCenter Sites Systems."
16.3.10 Test the Results
To test the results, point your browser to the home page asset on the destination system and examine the site.
If you have not already done so, you must determine the asset's URL. A WebCenter Sites URL is constructed by concatenating the following values:
-
The hostname or IP address (and sometimes the port number) of the destination system.
-
The CGI path, which the system obtains from the
ft.cgipathproperty in thefuturetense.inifile. For example, for WebLogic and other application servers with servlet architectures, this default path is/servlet/. -
The string
ContentServer?pagename= -
A page name from a
SiteCatalogentry. -
Additional information that is passed in with the WebCenter Sites page criteria variables,
c,cid,tid, andp(see the Oracle Fusion Middleware WebCenter Sites Developer's Guide for information about these variables).
Complete the following steps to determine the URL of your home page and test the site:
-
Start the Property Editor and open the
futuretense.inifile for the destination system. (If you need help with this step, see the Oracle Fusion Middleware WebCenter Sites Property Files Reference.) -
In the App Server tab, locate the
ft.cgipathproperty and write down its value. -
In the Compatibility tab, locate the
ft.approotproperty and write down its value. -
Save the property file and close the Property Editor.
-
Open a text editor. Enter the server name, a slash (/), and then the cgipath. Precede the server name with the proper protocol—
http://orhttps://—as in the following example:WebLogic and WebSphere:
http://bigfatsun.example.com:8080/servlet/ -
At the end of the string, type a slash, and then add the following text:
ContentServer?pagename=your_home_pageNow the URL should look similar to the following examples:
Example for WebLogic and WebSphere:
http://bigfatsun.example.com:8080/servlet/
   ContentServer?pagename=ExampleSite/Page/Home
-
Point your browser to the URL you assembled.
-
Scan the page for errors and test all links to ensure they work.
Note:
It is recommended that you conduct a complete test of the system under peak load conditions after you have mirrored the entire site for the first time, and at regular points thereafter.
16.3.11 Set Up the Schedule
After you have ensured that your destination is configured correctly, you can finish configuring your publishing system by completing the following steps on the source system:
-
Create scheduled publish events for the destination. For help with this step, see Section 18.7, "Scheduling Publish Events."
-
If you are using images that are not assets in the design of your site — that is, your site designers want to store all images on the web server rather than manage them as assets — plan how you will move the image files from the web server for the management system to the web server for the delivery system. For example, you can set up a regular FTP transfer.
-
If you are using elements and SiteCatalog page entries that are not CSElement and SiteEntry assets, you must use the CatalogMover tool to mirror them to the destination system. For help with CatalogMover, see the Oracle Fusion Middleware WebCenter Sites Developer's Guide.
16.3.12 Turn Off Asset Invalidation on the Delivery System
By default, the publishing system is configured to mark an asset as changed on the destination system when you publish an asset from one system to another (source to destination). Then, the newly-published asset must be approved on the destination system before it can be published to another destination.
The default configuration is appropriate for development and management systems. However, when you are publishing to the delivery system, there is no need for the publishing system to take the time to mark the change—assets are published to the delivery system but not from it.
Therefore, on the delivery system, turn off this publishing feature by completing the following steps:
-
Start the Property Editor and open the
futuretense_xcel.inifile. If you need help with this step, see the Oracle Fusion Middleware WebCenter Sites Property Files Reference. -
In the Publishing tab, locate the
xcelerate.publishinvalidateproperty and set its value tofalse. -
Save the file and close the Property Editor.
16.4 Approval Query for Performance Enhancement
Dynamically publishing thousands of assets takes a long time because of the time required to compute which assets are publishable for the given destination. The query is executed twice: When the user selects the publishing destination and when the user clicks the Publish button to publish the assets. The current query is also complex, given that it is written to work for both mirror and static publishing. To improve publishing performance, we simplified the query by considering only mirror publishing. The same query is used to improve the performance of RealTime publishing. The simplified query, with comments, looks as follows:
select pkt.localkey, pkt.urlkey from PubKeyTable pkt JOIN
   ApprovedAssets aa ON pkt.assetid=aa.assetid -- match asset id's
   WHERE aa.targetid=<targetid>
   AND pkt.targetid=<targetid> -- match target id's
   AND aa.tstate='A' -- asset must be approved
   AND (aa.lastassetdate IS NULL OR aa.assetdate >   aa.lastassetdate) -- compare assetdate to lastassetdate
To implement the approval query
-
On the source WebCenter Sites system, create the file
Shared/Storage/pubquery.txtand paste in the following query (same as above, but without comments):select pkt.localkey, pkt.urlkey from PubKeyTable pkt JOIN ApprovedAssets aa ON pkt.assetid=aa.assetid WHERE aa.targetid=__TARGETID__ AND pkt.targetid=__TARGETID__ AND aa.tstate='A' AND (aa.lastassetdate IS NULL OR aa.assetdate > aa.lastassetdate)
-
Restart your source system and enable database debugging to verify that the query runs during mirror and RealTime publishing sessions. (To enable database debugging, go to the Admin tab, expand System Tools, and double-click Configure log4j. After making changes there, system restart is not necessary.)
-
Inspect the logs to verify that the query ran during publishing and that all publishable assets were published correctly.
-
Resume normal operations (disable database debugging by setting
com.fatwire.logging.cs.dbto its normal value and then restart the system).
16.5 Retrieving Logs From Delivery WebCenter Sites Systems
WebCenter Sites provides a way to retrieve publishing-related logging information from the delivery system and display it in the Publishing console. To achieve this, WebCenter Sites inserts the publishing session ID into each relevant log entry. The management interface has the ability to retrieve the relevant entries for a publishing session and display them in the Log form for that session.
To enable remote publishing logging
-
Activate the logger by setting the following property in
commons-logging.propertieson both source and target:org.apache.commons.logging.LogFactory=com.fatwire.cs.core.logging.ContextAwareLogFactory
-
Add the following lines to your
web.xmlon the target system:<filter> <filter-name>ContextHeaderFilter</filter-name> <filter-class> com.fatwire.cs.core.logging.context.filter.ContextHeaderFilter </filter-class> </filter> <filter-mapping> <filter-name>ContextHeaderFilter</filter-name> <servlet-name>ContentServer</servlet-name> </filter-mapping> -
On the target system, set the following
futuretense.ini property:log.file.location=<path to Sites log file>