15 The Export to Disk Publishing Process
This chapter explains how Export to Disk publishing works and how it is configured.
This chapter contains the following sections:
15.1 Rendering Export to Disk Pages
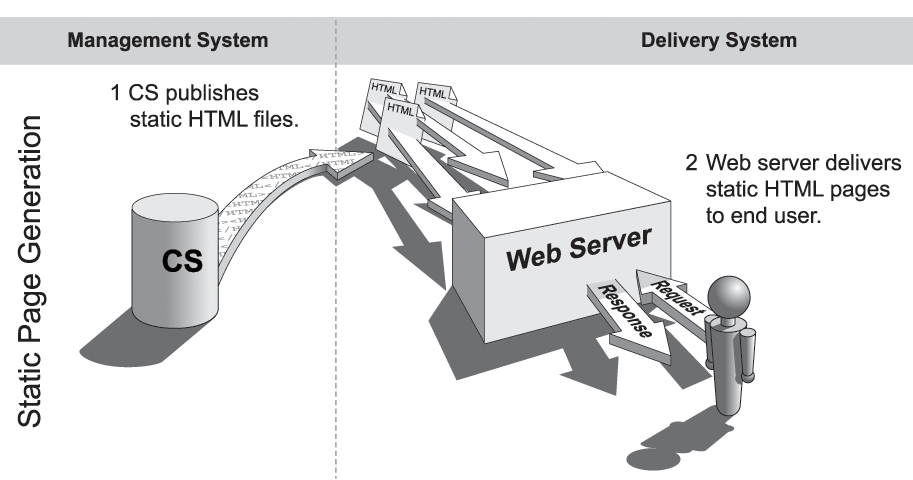
In extremely simple terms, WebCenter Sites renders a Export to Disk page as follows:
-
A page name is submitted by the client browser to WebCenter Sites (through HTTP or another protocol).
-
WebCenter Sites locates the page in the
SiteCatalogtable, invokes the root element, and renders the page to anhtmlfile. -
You publish the file (either through FTP or another file transfer protocol) to the web server that is hosting your online site.
Typically, administrative users of the Export to Disk publishing method set up a quality assurance process to test the rendered files before moving them to the web server of the delivery system.
15.2 How Export to Disk Publishing Works
When content is published using Export to Disk, the approval system, the publishing schedule, and your destination configurations all contribute to the process of exporting your approved assets into static HTML files.
When a Export to Disk publishing session runs, this is what happens:
-
The publishing system notifies the CacheManager servlet that a session is about to begin for a specific destination. CacheManager clears all the pages that were previously exported to this destination from the page cache on the source system.
During an export publishing session, exported files are cached to the page cache. If publishing sessions occur more frequently than the cache is configured to be cleared (expiration time), there could be exported pages in the cache that have the same names as the newly exported pages. To ensure that old files are not used, the CacheManager servlet clears the page cache of any pages that were exported to during previous publishing sessions before a new publishing session starts.
-
WebCenter Sites creates an export queue and adds all references that can be published to it. A reference that can be published is one of the following:
-
A pubkey that has been designated as an export starting point. See Section 15.3.5, "Export Starting Points."
There must be a starting point for the site and its asset must be approved, or the export session cannot begin. Every site that is exported must have at least one export starting point designated for it.
-
Any previously exported page or pagelet (reference) whose assets have changed and been approved again since the last publishing session to this destination. (After a site has been published, the publishing system knows which references have been published. It reads the data in the
PublishedAssetstable and then adds any references whose assets have been changed and approved again for this destination to the export queue.) -
Any asset whose template uses
RENDER.UNKNOWNDEPStag.This tag alerts the approval system that the dependencies for the asset being rendered by the template cannot be calculated because they are unknown. It is typically used for queries. When the dependencies are unknown, the system cannot determine whether changed dependents would require the asset to be published. Therefore, the presence of this tag means that the asset must be published during every publishing session.
-
Any page or pagelet (reference) that has not yet been published and is connected to another page or pagelet through a
RENDER.GETPAGEURLtag. (That is, it is referenced from another page and has not yet been published.) -
Any page or pagelet (reference) identified by a
RENDER.SATELLITEPAGEorsatellite.pagetag.
-
-
For the first export starting point, WebCenter Sites determines whether its asset has been approved:
-
If the asset has not been approved, the publishing session ends.
-
If the asset is approved, WebCenter Sites determines the page name of the template assigned to the asset.
-
-
WebCenter Sites renders the export starting point by passing the following information to WebCenter Sites:
-
The page name of the template for the starting point.
-
The
rendermodevariable set toexport[destinationID]. -
The name and location of the export directory where the rendered files should be saved.
-
-
WebCenter Sites invokes the root element of the page name, and begins rendering every approved asset that is connected to that export starting point as a reference. WebCenter Sites writes the resulting rendered pages to files rather than posting them to the browser.
-
After each file is rendered, WebCenter Sites writes a message about that reference to the publish log for the session.
-
If there is more than one export starting point, the process cycles back to step 3 in this description.
-
When the publishing session is successful, WebCenter Sites concludes the session by writing information about the published references to the
PubKeyandPublishedAssetstables. -
WebCenter Sites also writes information about the assets that were published to the
ApprovedAssetsandApprovedAssetDepstables. It logs the date from the assets' updated field at the time that the assets were published so the approval system can calculate dependencies correctly the next time an asset is approved.
15.3 Path Naming Convention
How WebCenter Sites names paths to exported files depends on the type of asset that is published and path information that might have been set for the asset. The export path can be as simple as a single directory or it can be a path of several directories, limited only by the number of characters that are supported by the operating system.
The export path naming convention is:
<cs.pgexportfolder>/<DIR>/<file_dir>
where <cs.pgexportfolder> is a required directory. The subdirectories are conditional. Whether <file_dir> is used depends on a publishing argument named SIMPLEDIR.
Before summarizing the possible export paths, we define the export path variables and the SIMPLEDIR publishing argument.
This section contains the following topics:
15.3.1 Export Path Variables and SIMPLEDIR
Export path variables are defined as follows:
-
<cs.pgexportfolder>defines the root directory for all exported files.<cs.pgexportfolder>is the value of thecs.pgexportfolderproperty in thefuturetense.inifile. It is a required value and applies to all Export to Disk publishing destinations.Typically,
<cs.pgexportfolder>names a testing location (a file system where the exported files are verified) rather than a location directly on the delivery system. -
<DIR>is the value of the publishing argumentDIR, which is used to create subdirectories of the root directory (specified bycs.pageportfolder). When<DIR>is specified, WebCenter Sites creates<cs.pgexportfolder>/<DIR>.Note:
The DIR publishing argument is available to administrators as the Base Directory field in the Add New Destination form (step 3). Throughout this section, we use<DIR>to mean Base Directory.This argument is typically used to organize the contents of the root export directory when multiple export destinations exist for your sites.
Note:
The directory specified by<cs.pgexportfolder>or<cs.pgexportfolder>/<DIR>is called the destination directory. -
<file_dir>takes one of the values listed below, depending on whether the exported asset is a page asset and whether path information is available.<file_dir>is determined hierarchically, as WebCenter Sites looks for the values listed below, in the order shown. It is assumed thatSIMPLEDIR=false.Table 15-1 Possible File_Dir values
Possible <file_dir> Values Description <ForDestination:Path>Value of the For Destination: Path field, shown on step 8 (the field is displayed in the Specify Path/Filename for destination form for a specific destination).
Setting a value in the ForDestination: Path field forces the asset to take the specified path when the asset is exported to the specified destination.
If
<ForDestination:Path>is not set, WebCenter Sites uses<parent_page's_path><parent_page's_path>Value of the Path field for the exported asset's parent page.
Note for Page Assets: When exported, a page asset takes the path that is set for its parent page, not the one set for itself. (As a rule, a page asset's Path is applied only to child assets.)
If
<parent_page's_path>is not set, WebCenter Sites uses<ID_of_parent_page>.<asset's_path>Value of the exported asset's Path field.
Note:
<asset's_path>is used only for assets that are not page assets. If<asset's_path>is not set, WebCenter Sites uses <ID_of_parent_page> as the value of<file_dir>. If both<parent_page's_path>and<asset's_path>are not set, WebCenter Sites uses<ID_of_parent_page>.<ID_of_parent_page>ID of the asset's parent page. This value is used if
<parent_page's_path>and<asset's_path>are unknown. -
SIMPLEDIR. Although this publishing argument is not explicitly part of the export path, it determines whether
<file_dir>is used when path information is unavailable. That is:-
If
SIMPLEDIRis set totrueand path information is unavailable,<file_dir>is omitted from the export path. Setting a path overridesSIMPLEDIR. -
If
SIMPLEDIRis set tofalseand path information is unavailable,<file_dir>takes<ID_of_parent_page>as its valueNote:
The SIMPLEDIR publishing argument is available to administrators as the Use simple directory naming checkbox in the Add New Destination form (see step 3).
-
15.3.2 Export Path Construction
This section summarizes the export paths that WebCenter Sites can construct using the convention:
<cs.pgexportfolder>/<DIR>/<file_dir>
as explained in Section 15.3, "Path Naming Convention." Note that only <file_dir> varies in all the examples below
This section contains the following topics:.
15.3.2.1 Forced Export Path
When <ForDestination:Path> (defined in Section 15.3.1, "Export Path Variables and SIMPLEDIR") is specified, the asset being published to the named destination is forced to take the specified path, even if other path information is set. The asset's full export path is:
<cs.pgexportfolder>/<DIR>/<ForDestination:Path>
15.3.2.2 Export Path for Page Assets
If <ForDestination:Path> is not set, WebCenter Sites constructs the export path as shown below (for examples, see Table 15-2, "Sample Export Paths for Page Assets when SIMPLEDIR=false").
-
When
<parent_page's_path>is specified, the page asset's export path is:<cs.pgexportfolder>/<DIR>/<parent_page's_path>
(even if
<asset's_path>is specified).Note:
When exported, a page asset takes the path that is set for its parent page, not the one set for itself (that is,<file_dir>takes the value<parent_page's_path>).As a rule, a page asset's Path information is applied only to child assets.
-
When
<parent_page's_path>is not specified:-
If
SIMPLEDIR=false, WebCenter Sites uses<ID_of_parent_page>:
<cs.pgexportfolder>/<DIR>/<ID_of_parent_page>
-
If
SIMPLEDIR=true, WebCenter Sites omits<file_dir>:
<cs.pgexportfolder>/<DIR>
-
15.3.2.3 Export Path for Assets Other than Page
For an asset that is not a page, WebCenter Sites constructs one of the following export paths depending on which information is available (For examples, see Table 15-3, "Sample Export Paths for Assets Other Than Page when SIMPLEDIR=false").
-
When
<asset's_path>is specified, the export path is:<cs.pgexportfolder>/<DIR>/<asset's_path>
-
When
<asset's_path>is not specified, WebCenter Sites uses<parent_page's_path>:<cs.pgexportfolder>/<DIR>/<parent_page's_path>
-
When both
<asset's_path>and<parent_page's_path>are unspecified:-
If
SIMPLEDIR=false, WebCenter Sites uses<ID_of_parent_page>:
<cs.pgexportfolder>/<DIR>/<ID_of_parent_page>
-
If
SIMPLEDIR=true, WebCenter Sites omits<file_dir>:
<cs.pgexportfolder>/<DIR>
-
15.3.2.4 Sample Export Paths
The following tables describe the sample export paths for assets.
Table 15-2 Sample Export Paths for Page Assets when SIMPLEDIR=false
| Page Asset | cs.pgexportfolder | DIR | file_dir | Export path | ||
|---|---|---|---|---|---|---|
|
N/A |
N/A |
N/A |
asset's_path |
parent_page's_path |
ID_of_parent_page |
N/A |
|
Home |
|
N/A |
|
N/A |
N/A |
|
|
Home |
|
|
|
N/A |
N/A |
|
|
World News |
|
|
|
|
998877665 |
|
|
World News |
|
N/A |
|
|
998877665 |
|
|
World News |
|
|
|
N/A |
998877665 |
|
|
World News |
|
N/A |
|
N/A |
998877665 |
|
Table 15-3 Sample Export Paths for Assets Other Than Page when SIMPLEDIR=false
| Not Page Asset | cs.pgexportfolder | DIR | file_dir | Export path | ||
|---|---|---|---|---|---|---|
|
N/A |
N/A |
N/A |
asset's_path |
parent_page's_path |
ID_of_parent_page |
N/A |
|
Oil Price |
|
|
|
N/A |
997766554 |
|
|
Oil Price |
|
|
|
|
997766554 |
|
|
Oil Price |
|
N/A |
|
|
997766554 |
|
|
Oil Price |
|
|
N/A |
|
997766554 |
|
|
Oil Price |
|
|
N/A |
N/A |
997766554 |
|
|
Oil Price |
|
N/A |
N/A |
N/A |
997766554 |
|
15.3.3 Paths for Links Within Exported Files
URLs in links for HREFs within the exported files do not include the values that specify the destination directory (<cs.pgexportfolder>/<DIR>). Instead, they begin within the destination directory and are relative to that directory.
The URL Prefix field on the Destination Configuration form is used to resolve URLs by specifying the location of those files on the delivery system. That is, URLs for links within the exported files are created like this:
<URLPREFIX>/<path_of_parent_page>
This means that the value for URL Prefix must match the value of the web alias that identifies the directory where the files are found. If you are using only cs.pgexportfolder to create the destination directory, the web alias that the URL Prefix represents must point to that location. And if you have set the Base Directory field on the destination configuration form to add a subdirectory to the root directory specified by cs.pgexportfolder, be sure that the web root or the web alias represented by URL Prefix points to this directory.
15.3.4 File Naming Conventions
How WebCenter Sites names an exported file depends on whether a file name is provided by the asset (in the Inspect form) and whether Use Simple File Naming is selected (on the Destination Configuration form; for more information on this setting see Section 15.4, "Configuring Your System for Export to Disk Publishing"). Possible file names are shown in Table 15-4, "File Naming Conventions". The naming convention is explained below the table.
Table 15-4 File Naming Conventions
| File Name | Description |
|---|---|
|
|
Used for assets with a populated Filename field and Use Simple File Naming is not selected. |
|
|
Used for assets with a populated Filename field and Use Simple File Naming is selected. |
|
|
Used for assets with an empty Filename field and Use Simple File Naming is not selected. |
|
|
Used for assets with an empty Filename field and Use Simple File Naming is selected. |
Note:
When export files are named, the following syntax changes are made:-
Slash characters (
/) in page names are converted to hyphens (-) in file names. -
Equal signs (
=) in packed arguments are converted to hyphens (-) in file names. -
Ampersand characters (
&) in packed arguments are converted to underscores (_) in file names.
-
<pagename>is the name of the SiteCatalog page entry of the template that is used to render the asset. (All template assets have SiteCatalog page entries.)Note:
<pagename>is dropped when the Use Simple File Naming parameter is selected in the Destination Configuration form. Use the Use Simple File Naming option selectively. If your assets are rendered by more than one template, do not select Use Simple File Naming. For more information about Use Simple File Naming, see Section 15.4, "Configuring Your System for Export to Disk Publishing." -
<packedargs(if any)>are passed in from the page entry's root element. If any packed arguments are passed in from the root element of the asset's rendering template, the values of those arguments are also included in the name of the file generated for the asset.For information about packed arguments and how they relate to URLs, see the Oracle Fusion Middleware WebCenter Sites Developer's Guide.
-
<filename>is the value of the asset's Filename field. If the Filename field is empty, WebCenter Sites uses the asset_ID specified in the asset.Note:
A file name set for an asset for a specific destination in the Specify Path/Filename for Destination form supersedes the file name provided in the Filename field on the asset's New or Edit form when the asset is exported to that destination. -
<asset_ID>is the ID that is specified in the asset.<asset_ID>is used if the asset's Filename field is empty or if the following note applies.Note:
WebCenter Sites needs both the asset's ID and type to determine whether a file name is provided for the asset. If the identity of the asset's type is not provided, the file name cannot be used. In such a case, WebCenter Sites uses the asset's object ID in place of its file name. -
<SUFFIX>is a destination configuration option that specifies the extension of the file name. For more information about thesuffixparameter, see Section 15.4, "Configuring Your System for Export to Disk Publishing."
Table 15-5, "Export File Naming Conventions" provides examples of how file names are created during Export to Disk publishing. In the examples given, Use Simple File Names is not selected in the destination configuration.
Table 15-5 Export File Naming Conventions
| Asset Name | SiteCatalogPagename | packedargs | filename | asset_ID | SUFFIX | Exported File Name |
|---|---|---|---|---|---|---|
|
Home |
BF/Page/Home |
cid=123 c=Page |
123 |
BF-Page-Home_123.html |
||
|
Home |
BF/Page/Home |
cid=123 c=Page |
123 |
.htm |
BF-Page-Home_123.htm |
|
|
Home |
BF/Page/Home |
cid=123 c=Page |
home.html |
123 |
BF-Page-Home_home.html |
|
|
Home |
BF/Page/Home |
cid=123 c=Page |
home.html |
123 |
.htm |
BF-Page-Home_home.html |
|
Home |
BF/Page/Home |
cid=123 c=Page PACKEDARGS="topicword=oil" |
home.html |
123 |
BF-Page-Home_topicword_ oil_home.htm |
15.3.5 Export Starting Points
The Export to Disk publishing method cannot begin rendering files unless it knows where to start. You tell it where to start by designating at least one starting point: that is, a page asset and the template that should be used to render it. WebCenter Sites invokes the root element of the template's page name, and begins rendering every approved asset that is connected to that export starting point — assets connected through an association, a hyperlink, a navigation bar, a query, and so on.
Note:
There must be at least one export starting point for an exported site. Typically it is your home page. However, depending on how your online site is designed, you may need to designate more than one export starting point. Why? Because if there is a section on your site that isn't connected to the rest of the site, it will not be rendered. For example:-
If your online site has more than one top-level page asset, you need an export starting point for each one.
-
If your site uses a combination of static pages and dynamic pages and there is a hard-coded static URL in an HREF on a dynamically-generated page, the asset that the URL points to should be designated as an export starting point.
15.4 Configuring Your System for Export to Disk Publishing
The main steps when configuring a system for Export to Disk publishing are these:
-
Section 15.4.1, "Create the Batch User Account (If One Does Not Exist)"
-
Section 15.4.8, "Set Up the Schedule"
Note:
Configuring a system for Export to Disk publishing requires you to provide information that is specific to your WebCenter Sites installation and your business practices. Before starting the procedures in this section, it is best to read them in order to gather and confirm the information they prompt you to provide.
15.4.1 Create the Batch User Account (If One Does Not Exist)
Note:
The steps in this section must be completed only once regardless of the number and types of publishing methods you are setting up. If an account already exists for your installation, skip to Section 15.4.2, "Specify the Root Export Directory."The purpose of creating a batch user account is two-fold:
-
Configure a batch user account for the publishing system on the source to use.
-
Specify where the publish logs should be stored.
The procedures in this section require you to set several properties in the futuretense.ini, batch.ini, and futuretense_xcel.ini files. Additional properties are also available to you for fine-tuning your system configuration. For a complete list of properties, see the Oracle Fusion Middleware WebCenter Sites Property Files Reference.
To create the batch user account
-
Log in to the administrator's interface on your source system.
-
In the Admin tab, expand User Access Management and double-click User.
-
Create a user account for the publishing system on the source system to use (that is, the batch user) and assign it the following ACLs:
-
Browser
-
ElementEditor
-
PageEditor
-
TableEditor
-
UserReader
-
Visitor
-
VisitorAdmin
-
xceladmin
-
xceleditor
If you need help with this step, see Section 5.4.1, "Creating a New User".
-
-
Start the Property Editor:
In Windows:
propeditor.bat, typically located in<sites_install_dir>/In UNIX:
propeditor.sh, typically located in$HOME/<sites_install_dir>-
Open the
futuretense_xcel.inifile for the source system. -
In the Publishing tab, set values for the following properties:
xcelerate.batchhostSet this property to the host name of the application server that is hosting the source system. The source system is the batch host. If the port number of the web server is anything other than 80, you must also include the port number. For example,
myserver:7001. In a clustered WebCenter Sites environment, only one batch host is supported. Thexcelerate.batchhostproperty must be set on each cluster member to point to the dedicated host.xcelerate.batchuserSet this property to the name of the user that you created in step 3 of this procedure.
xcelerate.batchpassSet this property to the password of the user that you created in step 3 of this procedure.
-
Save and close the property file.
-
Open the
batch.inifile for the source system.In the Results tab, set the
request.folderproperty to point to the directory that you want to hold your publish log files. By default, this property is set to thedispatchersubdirectory in the application server installation directory.Note:
Be sure to set this property to a directory that can be written to. Otherwise, no session information will be displayed in the Publish History tab of the Publish Console. -
Save the property file and close the Property Editor.
-
-
Restart the application server.
-
Continue with the configuration procedure for Export to Disk publishing. Go to Section 15.4, "Configuring Your System for Export to Disk Publishing" the next procedure in this section.
15.4.2 Specify the Root Export Directory
As mentioned previously in this chapter, the directory that WebCenter Sites exports files to is determined by the cs.pgexportfolder property in the futuretense.ini file. (If you wish to add subdirectories to this directory, you enter a value in the Base Directory field in the Destination Configuration form.)
To set the root directory for the exported files
-
Start the Property Editor on the source system. If you need help with this step, see the Oracle Fusion Middleware WebCenter Sites Property Files Reference.
-
Open the
futuretense.inifile. -
In the Export/Mirror tab, select the
cs.pgexportfolderproperty and set the value to the file directory (location) to which all files should be exported.This is a global setting for the system. If you have multiple destinations and want the files published to those destinations to be stored in separate subdirectories within this directory, enter a value in the Base Directory field when you configure those destinations (in Section 15.4.3, "Configure an Export Destination").
For more information about export directories, see Section 15.3, "Path Naming Convention".
-
Save the property file and close the Property Editor.
-
Restart the application server.
Note:
Before you run an export publishing session, make sure that this root export directory exists and that it has enough space for the HTML pages that will be created there.
15.4.3 Configure an Export Destination
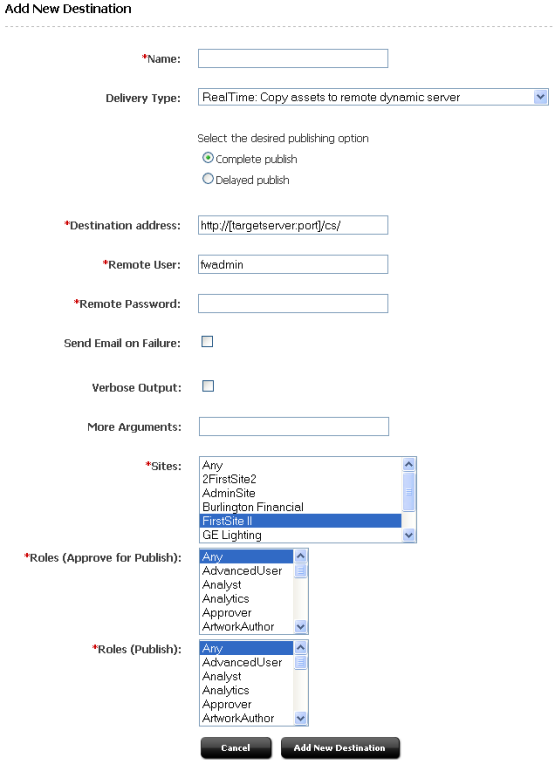
To create an export destination
-
Log in to the administrator's interface on the source Sites system.
-
In the Admin tab, expand Publishing, then Destinations, and double-click Add New.
WebCenter Sites displays the Add New Destination form:
-
Fill in the fields on the Add New Destination form as follows:
-
In the Name field, enter a unique name for the destination.
-
In the Delivery Type drop-down list, select Export to Disk: Export Web Files to Disk. The available fields on the form will change slightly.
-
Base Directory: Enter a subdirectory name for the files published to this export destination. The base directory is created as a child directory of the root directory that is specified by the
cs.pgexportfolderproperty.When you enter a value in this field, the export path for the publishing destination is as follows:
<cs.pgexportfolder>/<DIR>
where
<DIR>is the base directory.Note:
URLs that are contained in exported files do not include this destination directory path in the URL. Exported files have URLs that begin below this level, inside the destination directory. Therefore, if you enter a value in this field and you enter a value in the URL Prefix field as well, be sure that the web root or the web alias represented by the URL Prefix field points to this directory.This parameter is typically used to organize the contents of the root export directory when there are multiple export destinations for your sites.
-
URL Prefix: Enter the prefix that the export process will add to the beginning of the URLs that are used as links (HREFs) within the exported files.
Specify the web server alias of your delivery system in the URLs so that the links in the HTML files can be resolved when the files are moved to that system. If you leave this field blank, URLs will be relative.
The names of the generated files do not include this prefix — only the links within the files use it.
Because you should always test the HTML files before you move them to the delivery system, be sure that the name of the web alias on the testing system is the same as the name of the web alias on the delivery system.
-
Suffix: In this text box, specify the file suffix to use for the generated files when the Filename field for the asset is not used or it does not specify a suffix. The default is html.
-
Use simple file naming: If this parameter is selected, WebCenter Sites overrides the normal file-naming conventions by ignoring the
SiteCatalogpage entry of the template that is used to render the asset and uses only the value entered in the asset's Filename field as the file name. If the asset does not have a filename, WebCenter Sites uses the asset's ID, instead. (For a description of the file-naming conventions, see Section 15.3.4, "File Naming Conventions".)Note:
There is one exception to this rule: assets with upload fields (assets that are blobs) will always receive a standard (long) file name, even when this value is set to true.Caution:
The Use simple file naming parameter must be used with caution. If your site is designed such that individual assets are rendered by multiple templates, you must not use this parameter. Without the SiteCatalog page entries used in the file name, file names cannot be guaranteed to be unique when an asset is rendered by more than one template. -
Use simple directory naming: When selected, this parameter overrides the normal directory-naming convention. For a description of the file-naming conventions, see Section 15.3, "Path Naming Convention."
When Use simple directory naming is selected, WebCenter Sites puts the rendered HTML file directly into the default export directory when there is no path information available from the parent asset. (Normally, WebCenter Sites uses the page asset's ID when there is no path information.) Note that if there is a value in the Path parameter of the asset's parent page asset, this selection is ignored.
-
Old Template: Select this parameter to use the rendering methodology that was standard in 3.5 and earlier versions of the product.
Note:
If the online site that you present on your delivery system was designed for the rendering model used in Sites versions prior to 3.6 and it has not yet been redesigned for the 3.6 rendering model, you must select this parameter.If you select this parameter, do not set an export starting point for your site. The export starting point is determined by the templates themselves.
-
Send Email on Failure: If publishing fails and email notices to that effect are required, select this option. Additional fields appear.
-
Email Addresses: Enter the recipient's email address, and click Add. (This field is displayed only when Send Email on Failure is selected). All email addresses that will receive an email on failure are displayed.
-
-
Verbose Output: Activates detailed error logging during the publishing process. When selected, messages in addition to error messages are written to the PubMessage table. Because additional information lengthens the publishing process, be sure to select this option only for troubleshooting.
-
More Arguments: No additional arguments may be specified at this time.
-
Sites: Select the sites whose assets can be approved for and published to this destination.
-
Roles (Approve for Publish): Select the roles to which you are assigning approval privileges. All users assigned these roles can approve assets.
-
Roles (Publish): Select the roles that have publish privileges. All users assigned these roles can publish.
-
-
Click Add New Destination.
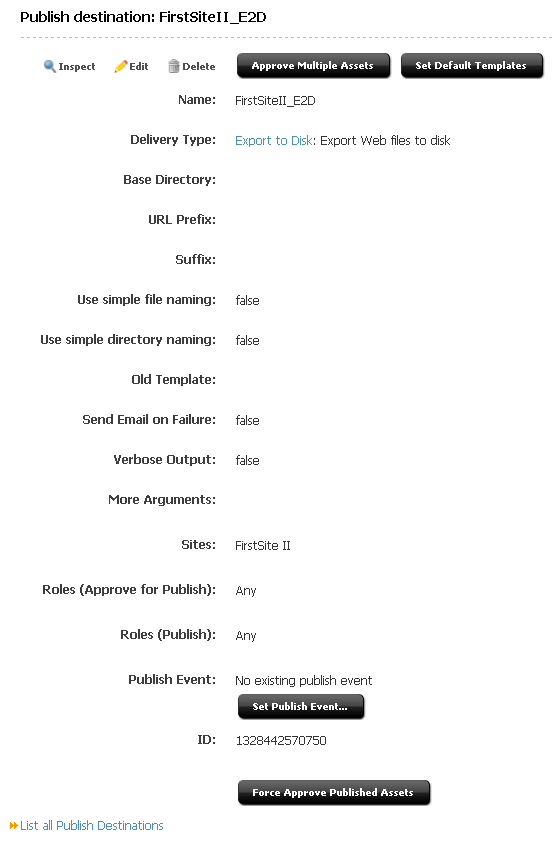
The Publish Destination form appears showing the new destination.
-
Repeat steps 2–4 for each additional export destination you need to configure.
15.4.4 Map a URL Prefix for Your Web Server
To make your exported content available to the public at its final destination (your delivery system), you must configure your web server to map a URL path prefix to the place where the files will reside so that URLs can be resolved.
Refer to the vendor documentation for your web server for information about the appropriate procedure for mapping URL prefixes on your web server. Remember that the name you specify for this prefix must match the name that you specified with the URL Prefix destination configuration parameter for the destination. If you enter a URL Prefix, be sure that the web root or alias includes the directory you entered.
15.4.5 Create the Export Starting Points
To create an export starting point
-
Using the administrator's interface on the source system, find the asset that you want to specify as an export starting point.
-
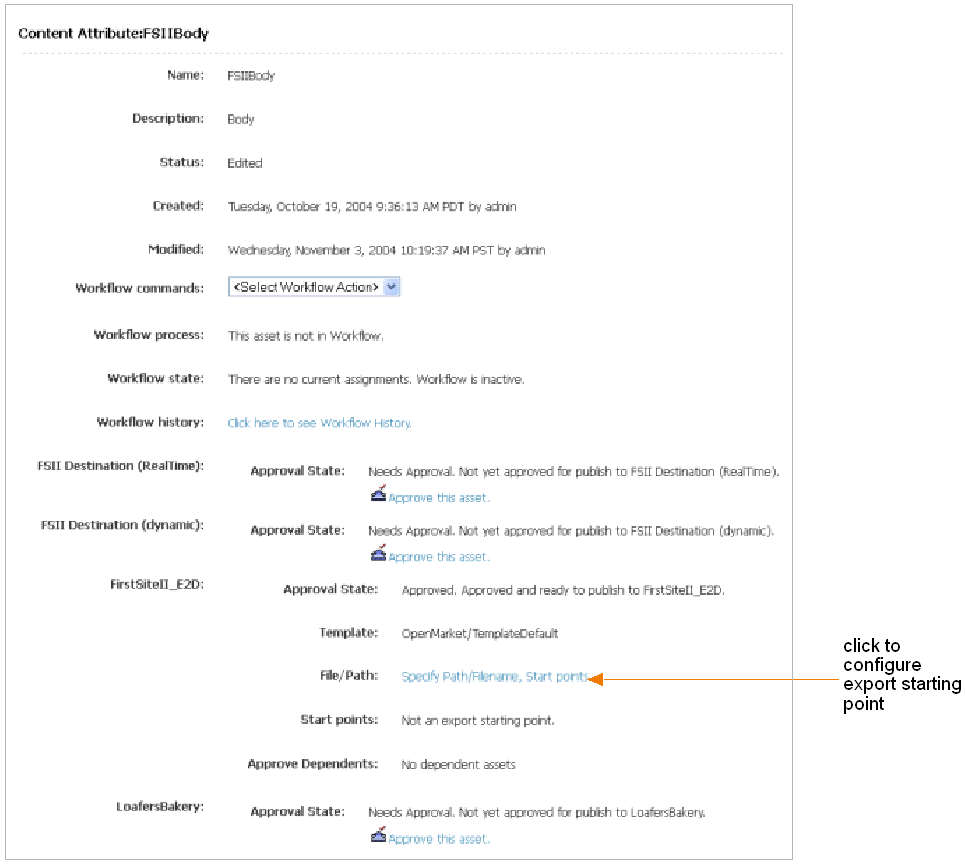
Open the asset in its Status form and scroll to the Publishing Destination section.
-
Do one of the following:
-
In the publishing approval form, select the destination for which you are approving the asset and click Approve.
WebCenter Sites calculates dependencies for all the assets linked to this asset and displays the results.
-
When WebCenter Sites displays the approval results, click the Status icon (a clock face with a green check mark) from the toolbar.
-
Scroll down to the section of the Status form that displays the selected destination.
-
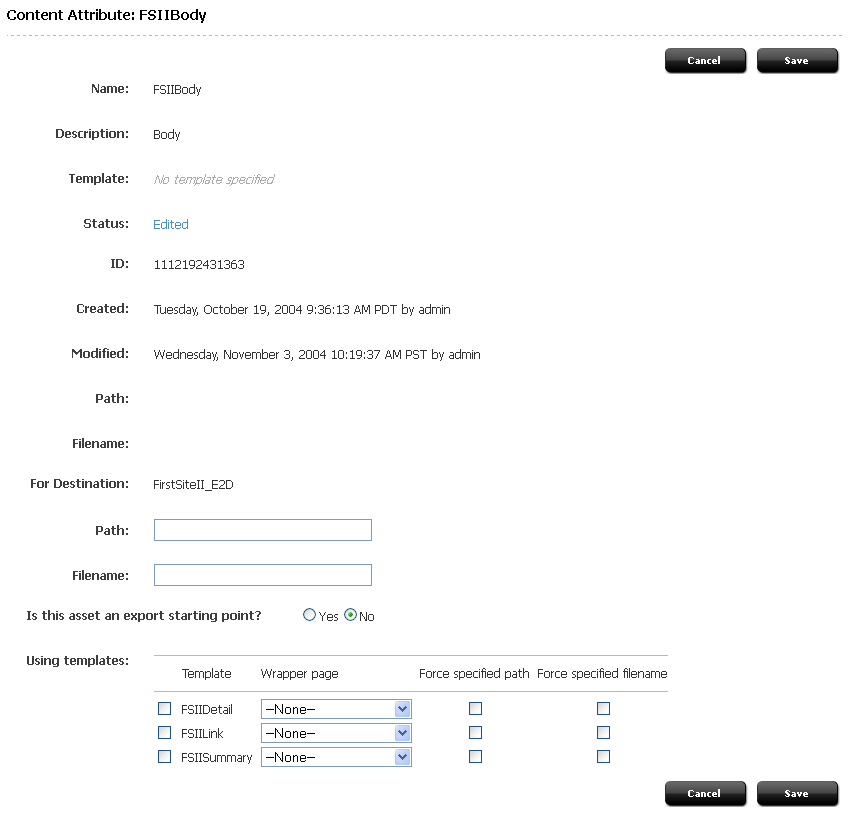
In the File/Path field, click Specify Path/Filename, Start points to configure the export starting point:
-
In the next form, fill in the fields as instructed below:
-
(Optional) For Destination section:
-
Path: If you want to specify unique path information for the asset being published to this destination (the path information is not provided elsewhere for this asset), enter the path in the Path field.
-
Filename: If you want to specify file name information that is different for this destination, enter it in the Filename field. A file name entered in this form for this destination overrides any file name information provided elsewhere for the asset.
-
-
Select Yes for Is this asset an export starting point?
-
(Optional) Using Templates section:
-
Select a template.
-
Select a wrapper page.
-
Select Force specified path if you would like to force this asset to be exported to the path that is named in the For Destination section.
-
Select Force specified filename if you would like to force the use of the file name that is specified in the For Destination section.
-
-
-
Click Save.
15.4.6 Approve Your Assets
If you want to perform a simple test of your configuration, select the export starting point with the fewest number of dependent assets and approve each of those assets.
If you want to complete a test publish of your entire site, approve all the assets for the site. See Section 18.2, "Approving Multiple Assets" for help with approving many assets at once.
15.4.7 Publish and Test the Results
Once the assets you want to publish to the selected destination are approved, run a test publishing session:
-
In the administrator's interface on the source system, click Publishing in the button bar.
-
In the Publish Console, select your destination from the drop-down list and click Select Destination.
WebCenter Sites displays information about the assets that are ready to be published to this destination. (If you have not yet created an export starting point for this destination, the form states this fact. You must create at least one export starting point before the publishing session can begin.)
-
Click Publish.
A confirmation message appears. Click Yes to proceed with the publish.
The publishing system exports all the approved assets for this destination into files.
-
In the Publish Console Active tab you can observe that the session is running.
-
When the session completes, click the History tab to view the session summary for this session.
Mouse over the session information to view summary information;
-
In the Publish Console History tab, select the link to the publishing destination.
A session summary displays a list of all the files that were created during the export process.
-
Click the Preview (binoculars) icon next to the file representing the top-level page in your site.
WebCenter Sites opens the page in a new browser window.
-
Scan the page for errors and test all the links. Make sure to test links to all of the other files that were generated.
-
Test the results by directly entering the URL of the rendered home page into your browser and navigating the entire site. To do this, you must first set up a web server root on the Sites management system that points to the export directory.
-
If you decide that the files are ready for delivery, copy them to your delivery system.
15.4.8 Set Up the Schedule
After you have ensured that:
-
Your destination is configured correctly,
-
The file names and directory names are created according to your needs, and
-
Your web server is delivering the files correctly,
you can finish configuring your publishing system by completing the following steps on the source system:
-
Create scheduled publish events for the destination. For help with this step, see Section 18.7, "Scheduling Publish Events."
-
Plan how you will copy the generated files to your web servers, for both the testing area and the delivery system. For example, you can set up a script that automatically copies the files via FTP to a testing area after a publishing session completes.